STRAGGLER FISH AND QUESTIONS
Some folk have written to me privately with questions about the Fish Hats:
What yarn did you use, and at what gauge?
We used oddballs and leftovers for the set of four – all acrylic mostly given to me by a dear family friend (Hi, Jean!). She is a big fan of yard sales and flea markets, and accumulates yarns of all sorts over the course of a year, to use as packing material when she sends gifts to the kids at holiday time. Some of her yarn I knit up myself, and some I donate to charity or to schools. Not all of the yarn I used for my fish hat retained its original label, but the skeins that did included Red Heart Classic, Lion Jamie (which I used doubled), Sears Best Worsted, Caron Sayelle, Woolworth Worsted and Phentex – a regular salad of mass market acrylics.
With the exception of Jamie they’re all marked as worsted, but they’re really not. Except for Jamie they all work up (normally) at 4 stitches per inch, which makes them sort of in between bulky and light Aran weight. (Textbook worsteds knit up at 5 stitches per inch.) I did the fishes on US #7s, at the specified 4.5 stitches per inch, knitting these acrylics down in gauge somewhat. In this case the tighter gauge is acceptable, yielding a denser and stiffer and slightly more windproof hat. Also in this case – for kids’ sledding/snowboarding hats – washable acrylic is a good choice. I’ve seen how muddy play mittens and coats can get when the snow gets melty and worn down to grass. These hats can be thrown in the washer and dryer.
Did you make any mods to the Fish Hat pattern?
No. I knit it up as written, with only a couple of minor elaborations:
1. After finishing the stockinette stitch mouth, I worked one row of the head color before leaping into the Shape Mouth section. I did this so that any wraps I did would be embracing stitches of the same color. (You can see red wraps on white stitches in the pattern’s close-up of the pink-headed fish).
2. On one of the hats I did the knit the wraps trick. It made little difference in the overall appearance EXCEPT in one spot. I strongly suggest knitting the wrap along with its carrying stitch on the last two stitches wrapped – the leftmost and rightmost ones. Otherwise you get a slight gap in the row behind the fish’s grin. It’s not necessary to do the others, but working the wraps formed on rows 15 and 16 does avoid holes.
3. When picking up the fins I identified the point on the body specified in the pattern for the first stitch to be picked up, then counted down the requisite number of stitches towards the tail. I held a length of yarn the same color as the fin on the inside of the body, and using a crochet hook, picked up my stitches. Once I had enough on my needle, I joined my working yarn on the outside of the fish and finished the fin. This left four ends per fin to finish: two of the scrap yarn on the inside of the body; and two of the working yarn on the fin itself. I found that picking up towards the head rather than towards the tail was much easier.
4. When working the fins, I did them entirely in twisted ribbing (k1b, p1b) to give them a bit more body and stiffness.
5. To sew up the fins, I used mattress stitch for the vertical seam and whip stitch for the cast-off row.
Are you fished out?
Not yet. It’s a fun form, easy to play with, and faster than a sock. I’ve got a request from an adult pal for a hat. This one I’ll make out of some other all-wool leftovers. I’m pretty sure this set of remnants is Jamieson Aran weight 100% wool, bought as an experiment for a pullover that I ended up deciding not to make. I’ve only got four skeins of the stuff – these and a deep plum, but the recipient asked for no purple. Lovely stuff with great stitch definition. If these colors are not to her liking, I think I’ll keep this hat for myself.

I’ve decided to rip back the small teal and gold scales shown, and restart the head section using a larger scale pattern. I’ll use a smaller scale variant closer to the tail (click on thumbnail below for full size). And yes, I use my wire Strickfingerhut for stranding at this weight, too.

Contemplating any other mods?
Possibly. It would be easy to knit on a segment of sawtooth edging instead of the picked-up and knit-out-from-the body fins. I see a shark in the future. Or if I use a lacy edging for all of the fins, end of the body blunt and add a tail of the same lacy edging, perhaps an angelfish variant. But why stop there? I’ve got a body shape now thanks to this pattern. Fantastic fins, tentacles, catfish style whiskers – all manner of body mods are possible. Perhaps I’ll end up working some sort of sea monster. But to do that, I’ll have to find someone willing to wear a (woolly) aquatic nightmare through the winter.
FINAL FISH FINISHED
Here are all four, finished and ready to swim. Elder Daughter did the one at the upper left, with the lighter orange fins and tail.

The two new ones are the dark green fish that looks something like a cross between an athletic sock and a trout, and the pastel fish, with its pattern of stranded scales. Dark green and pastel will be wriggling their way to my nephew and niece in Buffalo by Monday.
If you’re working your own fish hat and want to do stranded scales, here’s my six-stitch repeat. It fits nicely into the 90 stitches around segment of the body, and the clever can probably work it into the decreased sections as the body slims down towards the tail, which are also multiples of six. Click on the thumbnail below for the full size version.

BLINTZ BLITZ
When I posted the latke recipe I didn’t have pix of the in-process or finished product. I made more the other night and (this time) remembered to have the camera handy:

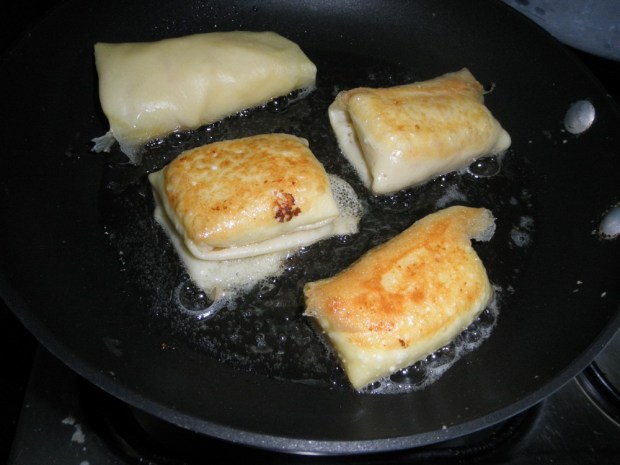
Two pans going. You can see how thin they are, and the crunchy, lacy edges formed when the very runny batter spreads in the hot oil. Yum.
I did promise the family blintz recipe. This time no pix are in the offing. I don’t have any plans to cook these up soon, but a promise is a promise. This recipe like the latke one was originally shared with the KnitList mailing list back in 1995, and was also collected into a knitters-on-line recipe omnibus in 2002.
MINNIE LEIBOWITZ’S CHEESE BLINTZES
(For Grandma this makes about 50 blintzes – for me, about 35-40, my crepes are heavier than hers)
First a discussion of cheeses:
It’s tough to find the right kinds outside of New York City , I imagine that it might be even more difficult for people in other countries.
Farmer Cheese – A white soft cheese that is sort of like large curd cottage cheese that’s been pressed until it’s solid. Not particularly sweet, but a tad salty. It is sold in large soft chunks custom “cut” from a big block at the deli/cheese counter, or in small individually wrapped blocks in the prepackaged cheese/butter section of the supermarket. There is no substitute for this – if you can’t get it, skip the recipe. Common brand names on farmer cheese in the Northeast U.S. are “Friendship” and “Breakstone”.
Pot Cheese – To get the authentic texture I like to add pot cheese like my Grandmother did. This is a big problem because no one outside of NYC has ever heard of it. Pot cheese is sort of in between Ricotta and small curd cottage cheese in feel, but dryer and with firmer curds, and sharper than either of them. It’s not as dry or as salty as the farmer cheese. It’s sold scooped into containers at the deli/cheese counter, or in cottage cheese style tubs in the regular dairy section of the supermarket. I’ve tried substituting cottage cheese and Ricotta (even pressing or hanging them in cheesecloth to dry them out). All substitutions have produced disasters. The filling becomes way too soft and wet and breaks the crepes. If you can’t get pot cheese, substitute it’s volume equivalent in farmer cheese. The blintzes will be a bit firmer than my Grandmother’s, but they won’t fall apart. The brand name I remember as I child was “Breakstone”.
Cream cheese – Good old Kraft Philadelphia (the bagel’s friend) works fine. In a pinch I’ve substituted low fat cream cheese, but the filling ended up flabby and bland. Don’t use whipped or flavored cream cheese, only the old fashioned plain kind sold in the silver foil bricks or in bulk.
On traditions:
In our family, blintzes are slightly salty and served with sour cream. Other families make sweeter blintzes and serve them with applesauce or cherry sauce. My Grandmother said that fancy sweet sauces like cherry were “townsfolk” things – rural people like her family couldn’t afford the sugar. Decrease the salt and add a pinch of sugar to the filling if you plan on serving these with a sweet condiment.
Instructions:
For the crepes (blechlach in Yiddish):
16 enormous heaping table tablespoons (as opposed to measuring spoons) of all-purpose flour (pile these so high that more can’t balance on the spoon)
1 1/2 quarts water
7 large eggs (6 if blintzes will be eaten immediately instead of being frozen or refrigerated)
Vegetable oil for frying
Grandma beat the flour and water by hand. It took forever to achieve a lump-free batter. Spare yourself, use an electric mixer. Combine water and flour until completely smooth with no lumps. Adding the flour in by batches makes this easier. Blend in the eggs. This should give you a very runny vaguely yellowish batter.
Heat at least two small saut or frying pans over medium-high heat. (Using one pan at a time takes too long – Grandma and my Great-aunt Itke did a ballet that featured four pans and two cooks). I use the same pans I use for latkes, the non-stick small omelet pans pictured above. Pour a small quantity of oil into a saucer. When the pans are hot, brush them lightly with the oil and drain the excess back into the saucer. Ladle about 3/4 cup of batter into each hot pan and swirl the pan to coat the bottom evenly. Cook until the edges have begun to curl and the center is set. They should be lightly marked with brown spots, but not crispy or stiff. Do not cook the second side. Invert the finished crepe onto a clean dishtowel or old tablecloth to cool. Crepes can be stacked when cool.
I’ve improvised using this basic crepe recipe, flipping them over and cooking them on both sides, folding them around a dollop of sour cream and sprinkling them with cheap lumpfish caviar and slivers of chive or scallions. Very impressive looking when bosses or Important People come to dinner, but don’t tell them that Grandma was the inspiration. 🙂
For the filling:
1 1/4 lb. farmer cheese
1 1/4 lb. pot cheese
1 large cream cheese (8 oz. block) at room temperature
2 eggs
1 tsp salt
Mix the ingredients with a spoon by hand until thoroughly combined- do not use a mixer or blender. It’s easier to get the filling uniform in texture if the cream cheese is at room temperature.
To assemble and cook:
Place a crepe in front of you, cooked side down. Spoon one or two tablespoons of filling onto the bottom third of one side. Fold the bottom edge up over the filling. Fold in the left and right sides. Roll the crepe away from you to make a cylinder roughly the size of a Chinese eggroll. The filling should be entirely encased. These may be frozen or refrigerated at this point – both of these processes work best if the blintzes are not touching each other. Otherwise they might stick and the outsides might tear.
Saut lightly in vegetable oil using a heavy pan starting with the “flap” side down. Blinzes are done when the skin is golden and the filling is firm. Serve with sour cream, or with applesauce or another sweet condiment.
UPDATE:
This recipe was collected by the Jewish Food Society, and appears in their on line recipe index here. They romanticized the story a bit, but the basics are true. And they better quantified the ingredients, which is what really counts.
A MESS OF FISH
Well, not a mess, actually. Some pretty good but goofy fish.


These are two fish of my manufacture and one of Elder Daughter’s. Elder Daughter made the gold face, ultra stripy hat for herself (and in the process learned a lot about darning in ends). I made the slightly less stripe one for her younger sibling (dark orange mouth and fins). We worked on them while we were visiting our Buffalo family, and in the process my niece and nephew were likewise fish-smitten. Being a soft touch, I agreed to make two more.
The half finished green/gold/white fish is for nephew Justin, he of the blanket pattern, now a middle school kid. I’ll be starting younger niece Veronica’s fish hat later today. She’s requested softer blues, greens and pastels. I’ll do my best out of my stash; but be they pastel, screaming oranges and golds, or in-your-face green, these hats are a supremely silly must-haves. At least in this family. Kudos to Thelma Egberts and her muse Jonas, Master of Fish!
HALIBUT FOR TWO, AND RED LACY SCARF
Back to knitting.
Here you see the Estonian Lace Scarf by Nancy Bush I started back over Thanksgiving. I ripped it out began again, using a US #6 for the Malabrigio Baby Merino Laceweight instead of the #4 recommended for the laceweight named in the pattern. The look and drape are both MUCH better. Although red photographs poorly, and my own lousy camera skills don’t help, in real life you can see the small nupp style bobbles, which now look like soft cranberries dotting the surface. I don’t know if I’ll be able to make this the recommended length and still have enough left over to do the specified edging. If not, it can live unedged, or with something less yarn-voracious of my own devising. Stay tuned to see how this challenge will be met.

But in the mean time I made the mistake of showing my kids the Fish Hat from the latest edition of Knitty. They’re totally smitten. Especially because they know I’ve got a pile of lurid orange and yellow acrylic sitting around, just waiting to become a pair of randomly striped ultra silly goldfish.

I may have to do up a couple of these over the holiday, just to keep the peace. Oh. And to enable a local rendition of the classic Fish Slapping Dance.
Finally, happy holidays to all from us here a slightly snowy Casa Magnifica, somewhere in Eastern Massachusetts.

HOLIDAYS APPROACH BEARING FUDGE AND LATKES
A small holiday this year. Long time readers may remember that I usually bake at least 10 kinds of cookies for the Hanukkah/Christmas season. This year work expanded to eat most of my prime baking weeks, so my cookie plans were diminished. This year’s set is all tried and true family favorites, with no experiments or departures into the unknown. I’ve managed to make only these:
- Chocolate chip
- Rum Balls
- Mexican Wedding Cakes
- Peanut Butter
- Chocolate crinkles (aka Earthquakes)
Plus panforte (two cakes as gifts); and the usual super easy condensed milk/bittersweet chocolate/butter fudge. I will say that I did something new on the fudge. I roasted some whole almonds leftover from the panforte then mixed up the fudge as usual. But instead of ladling it all into a square baking pan to harden, instead I hauled out some bendy silicon oval baking forms:

and tossed some nuts in each cuplet, then filled each with the fudge mixture. When all had hardened in the fridge, I popped out these:

All in all, a much nicer presentation than the squashed looking, inexpertly cut squares that usually result when I try to slice the cake- pan-produced fudge block.
In other news, the camo valence curtains have been finished. Pix await the teenager’s room being tidy enough to photograph. Another pair of gift socks has been completed, and the rest of the holiday preparations have been made.
Since tonight is Latke Night, in the spirit of the holidays I share (again) my family’s latke recipe. I first posted this 1995 as a gift to the old pre-Yahoo KnitList. It’s been collected in a knitters’ recipe collection since.
MINNIE LEIBOWITZ’S LATKES

Latke rules:
1. Every family does it differently.
2. Every family’s latkes are the best.
Latkes (sans sour cream) were a common accompaniment for meat leftovers that might not otherwise be enough to go around. Latkes (with sour cream) were the center of a traditional dairy meal.
Latkes work best when the potatoes are old because old spuds are more watery and brown better than new ones, probably because their sugar has begun converting to starch. Grandma’s general rule of thumb was
eaters-1 = number of potatoes, and
potatoes-1=number of eggs.
You can’t make this for one eater.
Ingredients for five eaters as a major side dish:
- 4 well-washed large raw baking potatoes (about man-fist size), ones that are starting to show their age are better. I’ve also used Yukon Golds. They work nicely, but have to be watched carefully during frying because they brown more quickly. No need to peel them
- 3 extra large eggs
- 2 heaping tablespoons of all purpose flour
- 1 tsp salt
- Water
- Lots of plain old vegetable oil for frying. (Olive oil and corn oil won’t work.)
- Additional salt for sprinkling on the just-fried, hot latkes
Equipment:
- Pyramid-style grater – the tin or stainless kind with the different size holes on each side.
- Frying or saute pan(s)
- Band-Aids
Serve with:
- Sour cream or applesauce
Directions:
Grate the potatoes on the side of the grater that produces mush. You don’t want potato shreds, you want potato slurry. I’ve not found any modern kitchen appliance (including the Cuisinart) that can produce the correct consistency. Also, I’ve never made these without skinning at least one knuckle. This is where the Band-Aids come in. 🙂
My grandmother peeled the potatoes first. I don’t. She was horrified by my oversight, but I notice no difference in the finished product between the with- and without-peels versions. The potato mush will turn ugly gray-brown- even if you’ve bothered to peel. Don’t worry, this also has no effect on the finished product.
Mix in the eggs and salt thoroughly. Add some of the flour and about a third of a cup of water. Wait about 10 minutes for the sludge to absorb the water and flour.
Now comes the hard part. The mush should be very thin and watery – far more watery than pancake batter. Since potatoes aren’t uniform in starch/moisture content, the exact amounts of water and flour to add to get to this consistency can’t be predetermined.
Heat oil (about 1/4 inch deep of oil) in the frying pan or pans – I use two small saute pans on separate burners because my stove won’t heat a big pan evenly.
Spoon a dollop (about 2 measuring Tbs worth) of the potato mush into the hot oil. If the batter is thin enough and the oil hot enough, the latke should spread out and have thin, lacy edges. Adjust the mush, adding more water or flour to achieve these results. If the latkes are too watery and the oil too hot, you’ll just get potato splatters, not things you can pick up and eat. If the batter is too thick or the oil is too cool, the latke will keep the shape you spooned and be heavy, greasy, and patty-like.
Fry latkes in batches of two or three until they are golden brown on the first side, then flip them over. I use a fork to stab and flip rather than a spatula because if the latke is too soft to spear, it isn’t ready to turn.
Replenish the oil as needed. The ideal Leibowitz latke is very thin with a wide crispy edge. When hot, it should be too crunchy to fold in half.
Grandma drained the finished latkes on paper towels or brown paper. I find they get less soggy if they are drained on a wire rack. Salt them if desired when they are hot and right out of the oil.
Serve immediately with cold sour cream or applesauce. When my grandmother made these we kids would sit around the kitchen table like baby birds with mouths open wide, waiting for each pan full to be done.
Variations:
In accordance with Latke Rule #1, some families grate a small bit of raw onion into the mix. Others serve the latkes and sour cream with a very generous sprinkle of chives on top. Other families go for the sweet and spike the applesauce with a healthy amount of cinnamon. A friend’s family serves latkes with an apples stewed in honey-water dish I’ve never seen anywhere else. Other families belong to the “potato shreds held together with potato starch or flour and egg” school. These are good too, but they are not *the best* (see Latke Rule #2).
If you’re very good, I’ll post the family blintz recipe, too.
SYMMETRICAL SNAKE
Working through some quick holiday presents, over the past week (and in spite of deadlines) I managed to do up a Kureopatora’s Snake scarf. I used some Southwest Trading Company Karaoke, a 50% soy silk. 50% wool thin/thick single, with equivocal results.
To start with, I bought the Karaoke with this scarf in mind. I picked up just two skeins of it on a lark, in a now defunct yarn shop I visited during a business trip to Savannah, Georgia. I was rushed and didn’t have much time to play. My magpie self was attracted to the jewel like colors and the promise of exceptionally long repeats. I selected two skeins of the same color number and dyelot that looked to have the same colors on the outside, with the hope that they would be more or less symmetrical in their color progression. By the label, two skeins together were about 220 yards – short yardage for this project as written, but I decided that if I made a narrow Snake over 22 instead of 30 stitches, I’d have enough.
The yarn in the first skein was quite thick, with very few thin sections. The twist was uneven, with some heavily twisted thick bits, and some parts that were almost like untwisted roving. There were clot like “fluffs” of extraneous fiber stuck to the main strand that I picked off as I was working. Skein #1 began and ended with dark blue. I knit away, starting from the center of the skein. Repeats were exceptionally long. The entire skein seemed to encompass only one (the two yellow areas are markedly different). Starting at the photo’s left, I got to the scarf’s dark blue center section before I ran out of yarn.

Because I had two highly similar skeins and the repeat was so long I decided to try to play with color placement. I began using the second skein – also showing blue on its exterior – starting from the outside in. This yarn being 50% wool spit splices nicely, so I melded my trailing blue end onto the same color blue from the outside of the second skein and kept going.
Now is when the equivocal part kicks in. While the color matched nicely, the second skein was unlike the first in thickness, with extremely overtwisted thin sections making up the bulk of the thing, studded with lots of those fluffy fiber clots. The difference between the two balls is noticeable when knit, although I didn’t notice it in the skein. If you compare the left leg in the photo (knit with the thicker yarn) and the right leg (knit with the thinner second skein) you can see the difference in achieved width. The drape is quite different, too, with the left side being thick and plush, and the right side being skimpy by comparison.
Finally, while it didn’t matter much for this project, the total yardage for the two skeins was wildly different. I knit every inch of skein #1. I had about a quarter of skein #2 left over when I reached the comparable color point on my second leg and decided to end off.
So I now have a pretty and color-balanced rainbow Snake Scarf, that looks much better than it drapes. Plus a caution for anyone buying this yarn who expects to make something larger than a hat or pair of mitts from it. Printed yardage and gauge are both VERY unreliable. Buy one extra skein for every three you estimate that you need, just in case you end up with short yardage (though full weight) fat-yarn skeins. And if you want to use this for small projects, be advised that depending on the thickness in your skeins, you could be working this at anything from DK to bulky weight gauge. Also be advised that although soft, this yarn catches easily on everything, even dry skin, and on the highly saturated #298 colors will run when washed (based on the blue shedding when handled with damp hands). Final verdict – I wouldn’t use it again without specific reason, and if I had reason, would only buy this in person, and only after close inspection for uniformity.
Oh. How to make a wider or narrower Snake? Easy. Start the project as written. Continue the initial increase section until you have achieved an even number of stitches and your piece is the width you want. Work the trumpet like sections in the same method as written. Work the final section like the others until you have HALF of the stitches on each needle. On the next right side row (the one that commences at the left edge where you increased on previous rows) begin with a SSK instead of the increase. Continue until you have three stitches remaining on your needle. On the last row, SSSk all three of those stitches together.
READY TO PILLAGE
In counterpoint to the last post – here’s Smaller Daughter, armed with round shield, spear, sword and helm of her own manufacture.

In fact, yesterday her class, armed with similar tin-foil weapons, pillaged the fourth grade and selected offices in her elementary school. She got extra credit for trying to capture the principal.
To explain – her fifth grade class is finishing up a world history unit on the viking era of exploration and conquest. They’ve done famous leaders, history, migrations and settlement, culture, literature, technology and crafts. They played with spinning, sprang, kennings, navigation, sagas, and allthings; and finished up by staging their own raid on the rest of the school. They didn’t really burn or steal anything, instead they mostly ran around shaking their weapons and shouting, held some stuffed animals hostage, seized some pre-arranged “treasure”, tossed some papers around and had general kid-amok fun. No actual fourth-graders were harmed.
I was impressed that the unit mentioned sprang, but it turns out that Smaller Daughter’s teacher is a knitter. I should have known.
PLUCKED BUT NOT YET READY TO PILLAGE
The proud new dad to whom I gave the Chicken Viking Hat has rewarded me with this mug shot of the recipient modeling it:

It’s on backward, and none the less silly for wearing it that way. Here’s to the little guy! May he grow gracefully into the thing.
MORE SOCKS – LIKE POTATO CHIPS, BUT FUZZY
I’m back from a horrific spate of deadlines prior to a trip to see family in Florida for the holiday, and about to launch into another round of equally horrific deadlines. (I need to embroider a sampler that says “Another Day, Another Deadline.”)
But in the mean time, I can present the mindless knitting I did on the plane. I finished the pair of Noro Kureyon Sock slouch socks, and have almost finished another totally boring and featureless sock, this one of Regia 4-Ply, in their Design Line color grouping endorsed by Kaffee Fassett (Color 04455). Interesting play of colors, but like all stripers with no texture, miles of plain old stockinette.

Why knit these boring socks? Because I’m not a good traveler. The motion of the plane coupled with the gentle aroma of blended jet fuel exhaust and unwashed traveler, compounded by the coffin like minimalist seating squash makes me green. I can only work on things I don’t have to watch closely. Knitting from written or charted directions is a special challenge to both my personal equilibrium, and ability to contort to hold all in view without elbowing my seatmates. So for the trip, it’s plain old socks or some similar non-challenging bit of work.
On the ground in Florida I started a lace scarf. Again, separated from my reference library I relied on a simple printed pattern. In this case, the Estonian Lace Scarf by Nancy Bush, offered up on Knitting Daily for a limited time (it’s a reprint from Interweave Knits back in the Fall of 2001, if you still have access to that issue).
I’m using some Malabrigio Baby Merino Laceweight in a garnet-strawberry blend. It is not an optimal yarn for this project. First of all, it’s heavier than what I would consider to be a true laceweight, and would look better on a larger size needle than recommended in the pattern (the only one I packed for the trip). It’s a highly twisted single, more similar to a 3-ply in bulk. Second, the color variegation is fighting with the lace patterning. In particular the highly-annoying-to-work p7tog nupps (aka mini-bobbles) totally disappear. If I put in that finger twisting effort, I want the result to be seen. And finally, the pattern specifies 504 yards of yarn to complete. One skein of the Malabrigio is 470 or so yards. To save yarn, I planned on shortening the scarf by one repeat and improvising an edging instead of working the one shown. Even so, I am not pleased with the result:

I’m now thinking of carefully ripping it all out and starting over, either working this same pattern on a larger needle, or (now that I’m home) drafting out a different lace pattern that would be better suited to the color combo and available yardage. So it goes.
