POST-HOLIDAY QUIET
No knitting today. It was a happy but hectic holiday weekend here at String, full of family and food. Needless to say nothing beyond the targeted activities was accomplished. Still all are fed and happy, with grandparents spoiled beyond their expectations and back on their grand tour road trip.
Just as all of this was getting underway, I received a package from Long Term Needlework Pal Kathryn. She sent me glossy print catalogs from Bradbury and Bradbury, an outfit that offers reproductions of historical design wallpapers. She’s right in that some of their offerings are spot on for our 1912 house. I’ve not trembled to a halt on any of the offered designs yet (although several are very tempting), but I can say that after leafing through the catalogs I am in the early stages of project lust for something else.
Curtains for our library.
The bulk of the pictures from the catalog are available on line. You can see the type of curtains there that hit me. Plain linen rectangles of simple line, hung from narrow brass rods threaded through the top (or through small brass rings rings). But I don’t want unadorned curtains. I want to embroider mine. I happen to have on hand a huge set of counted thread border patterns of various widths at my disposal. Plus a pretty good idea of how to go about it all.
I want to put a pair of curtains on each of my two windows, each stitched with a border parallel to the center and bottom edges. Kind of like this:

If you happen to have a copy of The New Carolingian Modelbook to hand, I’m thinking of doing the full giant repeat of Plate 33 – the daSera grape leaves and flowers meander. Possibly in deep hunter green on natural linen. At four curtain panels to cover two windows that are about 5 feet tall by 3.5 feet wide, yes I’m nuts. So nuts in fact that I have to do more serious contemplation as to whether or not I will have the fortitude to take something like this to completion. But I’ve already started looking into linens…
Once more Kathryn leads me astray!
INSPIRATION FROM ANOTHER TIME
[Repost of material originally appearing on 25 August 2006]
Like socks? Ever hear of the socks shown at the Great Exhibition of 1851? No? You’re in luck. The Victoria and Albert Museum never forgets. Their collections are now searchable on-line. A bit of poking around brings up this set of images, socks from that very exhibition, when all things Scots and the latest advances in machine knitting were the rage.
Now don’t poo-poo machine knitting. Sock machines of that time required quite a bit of hand manipulation. How about these socks – stockinette, with some openwork, finished off with hand embroidery, from the early 1840s?
Socks too mundane? Contemplate Sara Ann Cunliffe’s exquisite cotton lace baby gown, knit sometime in the late 1800s.
White cotton lace knitting too late for you? How about a brilliant 17th century silk and silver brocade jacket, with a thumbnail opinion that it was probably knit on needles and not a frame. What do you think. Cut and steeked? I think so. Even at 17 stitches per inch, I’d love to make one…
Looking for wool? How about an early 1800s baby ensemble that looks like it inspired Debbie Bliss.
There’s 19th century bead knitting, too. And (amazing to me) 18th century beaded knitting! Not to mention hand-knitted lace doilies from the Azores (1875-1900); 16th century liturgical gloves, a Shetland shawl to die for (19th century), and lots of other stuff from every era since knitting impinged on Western consciousness.
Of course, if you prefer stitching over knitting, especially Blackwork or monochrome embroidery, there’s some well-known examples of that there, too. Also samplers showing motifs straight from early modelbooks. Even an Egyptian piece from the 14th-16th century I’ve never seen before. I’m in heaven.
DIGRESSION – BLACKWORK EMBROIDERY
[Repost of material originally appearing 10 August 2006]
My old friend Marian pointed me at a fascinating Web-based resource. The Web Gallery of Art. It’s an on-line (sort of) searchable collection of art images from pre-1800. I’m in the middle of thumbing my way through Renaissance-era portraiture, in part to plain old enjoy it, but also with an eye to the embroidery used on clothing.
Now the few folk who visit here may know that in addition to knitting, I’m a sucker for embroidery. Especially counted embroidery from before 1600. My favorite family of styles is often lumped under the term “blackwork,” and had a popularity run spanning about 100 years or so, until it morphed into other things and/or fell out of fashion for upper-class clothing, sometime between 1600 and 1630. It did however live on through its descendants (most familiarly some of the bandwork common on early samplers) and peasant embroideries of several regions Through these descendants some of blackwork’s substyles have enjoyed little renaissances in the centuries since.
So. What is blackwork?
Not to be facetious, it’s monochrome embroidery worked in black thread on white ground. Most but not all of the time. Non-black or multiple colors were occasionally used. Most people think of it as counted work – embroidery that uses the threads of the ground fabric as a foundation “graph”.. Again, most but not all of the time. Some sub styles are clearly worked on the count. Others may have been, and still others are clearly freehand drawn. Some people are under the impression that there are clearly defined national or regional substyles, with English work being distinct from say German or Italian. Again, that’s partly but not entirely true. If you’re unfamiliar with the basics, The Skinner Sisters website has an excellent survey of Blackwork styles available on line.
Here’s one of the most famous examples of band style blackwork, worked on the count. It’s seen on the sleeves of Jane Seymour, as painted by Holbein in 1536 (you can click on the images in the linked pages to display them in greater detail). Very linear, clearly done both two-sided and on the count in a stitch that today goes by several names – Holbein Stitch, Spanish Stitch, Double Running Stitch. Harder to see (peeking out just above the gold and red units at the edge of the bodice – is a tiny line of blackwork on Catherine of Aragon, painted circa 1525-7 by Lucas Horenbout. Catherine is often said to have introduced the fashion for blackwork to the English court.
Here are heavier outlines, but still very geometric, suggesting a counted ground to me: Pierfrancesco di Jacopo’s Portrait of a Lady, dated to 1530-1535. This one, too – Gentleman in Adoratio nby Giovanni Battista Moroni, dated 1560. Moroni’s Gentleman wears a style that I associate more with English strapwork than embroidery of Northern Italy. To some extent, these styles traveled via printed pattern books and were international.
These suggest work on the count, but possibly in satin stitch rather than double running or another linear stitch. Bernadino Luini’s Portrait of a Lady, 1525. (See. Not all early blackwork is double running!). Also this one – Romanino’s Portrait of a Man, 1516-1519. This is the picture that Marian alerted me to, starting this whole rumination. The regularity of the piece leads me to think “counted.” The angles of the ends of the leaves makes me think “satin stitch” rather than a solid filling done in another method.
This one – Portrait of a Venetian Man by Jan van Scorel (1520) looks very much like cross stitch is used to form the stitched repeat. It’s also done in red. There is no zoomable detail page for it on the website.
Of the most famous types is the inhabited style, in which outlines were infilled with all-over patterns, done on the count. My own forever project is an example of this type, although it’s my own composition and not a repro of a historical piece:

Bettes’ 1585-90 portrait of Elizabeth shows sleeves that are (at least in part) done in the inhabited style (Link via the Tudor Portraits site)
Yet another sub-style, again outlines done freehand (or drawn) rather than on the count, and accented with metal thread work. The most famous again is in a portrait by Holbein – Catherine Howard‘s cuffs, 1541. Here’s another example of freehand outlines but without the infilling geometrics: the shoulder area of Hillard’s portrait of Elizabeth I, 1575-6. Some examples of this subgroup use stippling (tiny scattered stitches) almost like pen-done line shading to provide textural or shadowed interest, or include embellishments like seed beads, pearls, or spangles.
More blackwork using colored threads? Here’s Caterina van Hemessen’s self portrait, 1548. Although tough to see, I’m pretty sure there are red cuffs and collar bands there. Red was the most popular color used after black. (I wish I could see her coif better)
There were other styles, too. All confusingly lumped together under the modern term “blackwork.”
Finally, there are portraits that show things that look vaguely familiar, but not in enough detail to be sure they are related.
- Band stitching, done in gold, with details too small to determine whether it was worked on the count – Jan Sanders van Hemessen’s Woman Wearing Gold, (undated, but the artist lived 1500-1556).
- A small collar worn by a man. Looks vaguely blackwork like, but detail isn’t very clear. Foschi’s Portrait of a Man (1530s)
- Matching(?) bands on chemises of both husband and wife. Lorenzo Lotto, 1523. Possibly freehand.
- More red blackwork? This time possibly on the collar of Charles V’s undershirt, in a piece by Bernaert van Orley, 1519-1520.
- Blackwork on edge of chemise? It’s so light as to be doubtful. Portrait of Jacquemyne Buuck, by Pieter Pourbus, dated 1551
- An all-over design produced by counted black stitching, or some sort of brocade? Hard to tell. Ambrogio de Predis Portrait of a man, dated 1500
OLD EMBROIDERY – DENIM JACKET
To recover from the charting series, I present tiny mental vacation in
the past. 1972 to be exact. That was the year I embroidered
this jacket.

It was well before The Warner Brothers Store and WB characters being
available on licensed merchandise. I drew my Roadrunner freehand
from cartoons on TV. As you can see by the variant color (the
official Roadrunner is blue), my Looney Tunes years were spent in front
of a black and white TV.
I had a lot of embroidered clothing back then – a pair of jeans with
large phoenix that wound up one leg, starting in flames at the
cuff and finishing with a peacock-frilled head on the hip pocket; a
blue workshirt covered with wildflowers copied from herbals; and a
denim vest done in Shisha mirrorwork.
Except for the denim jacket all are long gone, sold while I was in
college to pay for books. You might have seen the other pieces if
you wandered past the window of the Red Dog second hand clothing
boutique in Harvard Square,
Cambridge, MA, sometime between ’75 and
’78 (back when the Square was more edgy and gritty than it is in
its current Urban Redevelopment/Mall of America glory). I’ve always
wondered who bought my pieces.

My Roadrunner is done in plain old 6-strand cotton floss, mostly in
chain stitch. The two-tone tail happened when the store that sold
Coats & Clarks embroidery thread dropped it in favor of the DMC
line. I
ran out of my original stock and had to do the closest color match I
could. You can barely make out the blue sig block below the front foot.
When I stitched this, the denim ground was the same color blue as that
block.
Elder Daughter wears this now (fraying and all), and would
kill for the other pieces. They may be long gone, probably
discarded from the homes of others, but I still have some of the Medieval history
textbooks they funded.
SOMETHING DIFFERENT
The Kureopatora snake scarf continues. It’s longer, but otherwise
looks the same. I will probably finish it up tonight and post my
how-to thereafter.
In the mean time, here’s another of the embroideries that litter my
house. This one is another doodle – a sampler in the true sense,
done to try out patterns that ended up in my book. It’s done in a
single strand red linen on a linen ground, at about 15 stitches per
inch on linen that’s about 30 threads per inch. The long dark
band at the bottom was done in long-armed cross stitch. The lion,
the knot at upper left, the narrow diagonal band next to it, and the
dark band at the left edge were in more standard regular cross
stitch. THINK was stitched on the count using chain. The
rest of the patterns were worked in double running (aka Spanish Stitch,
Holbein Stitch).

The dense rose corner surrounding the lion is original, the rest
(except for THINK) all have historical precedent, and are all graphed
out in The New Carolingian Modelbook. In general I’m not that
fond of this one. Done as a true sampler as it was, placement of
the motifs was very haphazard. I stitched whatever I felt like
trying out, and if the pattern didn’t fit – I didn’t care (the leggy
grapes are truncated at the bottom edge). I didn’t plan anything,
and the imbalance of the whole thing reflects that.
THINK ended up hanging in my husband’s office for a time. That
company he was working for in ’89 used the heraldic lion as a logo element, which is why
THINK and the lion both ended up on the thing. He’s no longer there and has another,
better embroidery at work now. THINK along with its obsolete logo
has been exiled to the upstairs hallway.
ON THE STUMP
Here’s a curious piece that came to me from the same grandparents as my fly bowl (I’ve been told that it’s actually a bee dish, not a fly bowl).

This
is an original pen and ink line drawing that appears to depict a piece
of stumpwork embroidery. It bears a sigil of the letters HCs (possibly
CCS) but has no other signature on it. It hung in my grandmother’s
library for years, and always held a certain fascination for me when I
was a kid. At that time I didn’t realize the embroidery connection. At
seven I liked the whimsical little animals in the corners, and the fact
the central figure was a queen. Anecdotal family tales say the title of
this piece is "Queen Esther."
Years later when I began
embroidering in earnest (started on that path by the same grandmother),
I stumbled across the stumpwork style and recognized the drawing for
what it was. I’m torn. I’m not exactly sure if this is a copy of a
piece displayed in a museum, or if it’s a freehand drawing inspired by
that style. I rather suspect the former. There is supposed to be a
stumpwork piece depicting Queen Esther n the
collection of the Massachusetts Historical Society, but I haven’t seen
a picture of it, so I can’t say if my pen and ink drawing shows that
particular artifact.
Stumpwork
(raised or embossed embroidery) was popular in the 1600s, tailing off
into the early 1700s. It has enjoyed a couple of minor revivals since.
It’s characterized by three dimensional effects, and is gaining
interest right now, in part fueled by the popularity of ribbon
embroidery and Brazilian embroidery, two other more modern styles that
also employ three dimensional effects. There are also traditional
forms of padded stitching practiced in Thailand and Cambodia that also
use heavy stitching on separately embroidered motifs that are affixed
to a ground over stuffing.
In stumpwork, much of the
stitching is done over raised grounds, separately stitched and sewn
onto a backing fabric. These motifs and slips are stuffed
underneath with batting or even little wooden forms. Additional raised
effect is provided by the inclusion of detached stitching, much of it
based on detached buttonhole, hollie point, or other "free" lace
stitches. On some pieces, further embellishment is provided by the
liberal use of gold and silver threads, sequins, spangles and even
beads. Some say that the little wooden forms used for stuffing
are the "stumps" that gave the work its ungraceful name, others say
that the name is a corruption of the word stamp, as many of the faces
of the figures were printed by stamping rather than being stitched.
It’s heavy and encrusted looking except in its very lightest
manifestations, not well suited for wearing. Instead it was employed
mostly for decor – panels, mirror surrounds, book covers, cushions, and
most especially small chests (cabinets) that were covered inside and out with the stitching.
Creating
a cabinet was a crowning glory for the amateur needleworker of the late
1600s. They were expensive to do, required better than average skill,
and represented a sort of needlework "graduation" for teens just about
done with the course of informal study that passed for most girls’
educations at that time.
There are several articles on stumpwork available elsewhere on the web, but precious few pictures of historical examples: This one has a useful bibliography, Janet Davies has some photos of artifacts that show the dimensionality of the stitching on her stumpwork and raised Elizabethan embroidery pages, CameoRoze also offers up an article on the modern revival of the style. In a Minute Ago also offers up a nice round-up of stumpwork and related styles as they are practiced today.
In the mean time my Not Embroidery hangs in my bedroom, where it complements a larger blackwork panel.
BLACKWORK MERMAIDS
In the absence of any knitting progress, I offer up another embroidered tidbit.
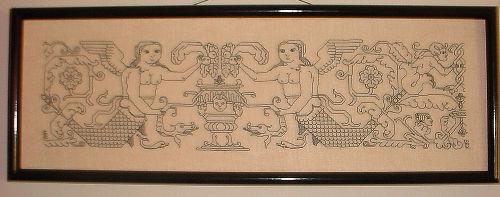
This is the last pattern in my New Carolingian Modelbook. It’s the same one that the SCA Lady Lakshmi used to make a hat for her friend Mistress Morwenna.
As you can see (in spite of my lousy camera work), my panel isn’t centered on the middle of the repeat. Instead I’ve skewed it a bit to focus on one mermaid, and to show the second bounce center – the twist at the panel’s extreme right. This is in part because I wanted to work one full cycle, but was limited by the size of the piece of linen I had available. For the record, this is done on 30 count linen (about 15 spi) using one strand of standard DMC embroidery floss.
This is one of the pieces I entered in the Woodlawn Plantation embroidery exhibition over the years. It won an honorable mention prize (feedback was that the judges didn’t like the skewing of the repeat). Amusingly enough, my brazen, bare-breasted mermaids must have offended some sensibilities. The piece was displayed at the very top of the wall in a room with 15-foot ceilings. The prize ribbon was clipped athwart the bosom of one mermaid, and a yellow sticky note was affixed to her sister’s.
QUESTION GRAB-BAG
A few knitting and non-knitting related questions from the inbox:
How did Killer Bunnies go?
Tons of fun. We played as a mixed-age group, with the youngest
being 7. We had hoped to get the Red Expansion Pack at Puzzle Me This
in Provincetown, but they were out. We settled for Violet, the
next one in sequence. The game plays more smoothly if you add
them in order because each pack builds on the last, but we were able to
use most of the Violet cards anyway.
What size needles did you use for the two versions of your counterpane?
The old version in the heavier cotton was knit on one of my odd size
needles, it’s a set of old long steel DPNs, they’re probably antique 9s
– and just a bit larger than standard US #4s (3.5mm), but closer to #4s
than #5s (3.75mm). The new piece is knit on 3mm needles, which in
some makers’ lines is a US #2, and in some is somewhere between a US#2
and a US #3.
Did you finish that embroidery doodle while you were away?

Are you planning on assembling the counterpane in the same way as the last try?
No. These units can be joined in many ways. Last time I
butted the triangles together. This time I plan to join
squares. My goal is to do the layout shown at the upper
right. Last time I used the one at the lower right. Both
use some plain solid triangles in addition to the pattern bearing units.
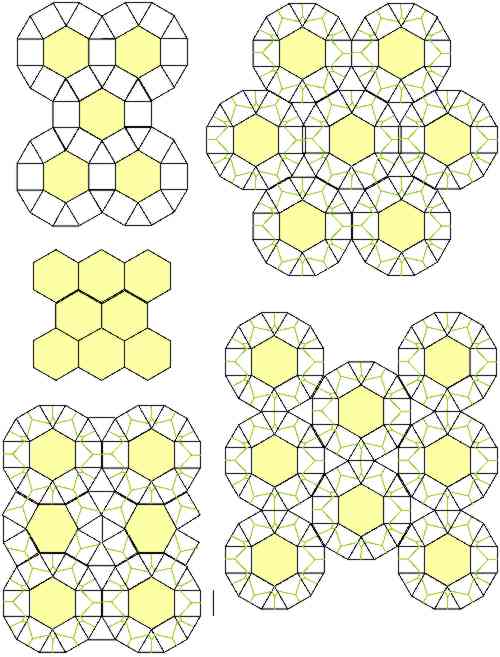
Where did you buy the counterpane pattern?
I didn’t. I made it up, starting with a standard spiraled
star. I added the outline-like bars to emphasize the motif, and
played with several treatments for the ground behind the star.
This one like my Mountain Laurel counterpane plays with a textured
ground and smooth star, but unlike that piece, plays a bit more with
the ground. I also wanted to do a counterpane that was an
tessellation of more interest than a flat tiled hex or a plain octagon
and hex. That’s why there are four units – the center hex, a
patterned square, a patterned triangle, and a plain triangle. The
layout above is actually an early draft showing how I played with the
concept, looking at ways in which I could use the patterned units to
extend the lines of the center hexes.
Can you send me the pattern?
Be patient. I plan on posting it to wiseNeedle this year –
probably after I’ve gotten considerably more done on the thing and have
a decent representation of the piece’s final look. I’d also like
to noodle up a complementing half hex and border.
EMBROIDERY QUESTIONS
From the inbox:
How did you draw the pattern on the cloth?
I
didn’t. I have the design drawn out on a piece of graph paper. I’m
copying that design onto the fabric, using the weave of the linen as
the equivalent of graph paper. Each unit on my ground cloth is a two
thread by two thread square. I worked from the graph to establish the
outlines in the center motif, then "colored in" the long armed cross
stitch background. I worked the first repeat of the lettuce around the
edges from the graph, but subsequent iterations of it from the piece I
embroidered (much less cumbersome than toting around a book).
Was this stuff actually done on the count in the 1600s?
A
vast amount was. There are a couple of caveats though. Some people
assert that a minority of counted thread pieces worked on very fine
linens used some other method to establish the evenly spaced graph-like
appearance. In particular, they suggest that some sort of evenly woven
but easily unraveled fabric was placed over the ground cloth, and used
as a stitching guide. The stitching was done over the placement aid,
and its threads were later removed from the work. Other people suggest
that pouncing, either over paper or another fabric was used to produce
evenly spaced dots, which were then employed as the spacing mechanism
for the ground. I’m kind of skeptical on the pounced dots thing. That’s
a ton of very smearable dots in a very small space.
Another
exception is theorized for other forms of voided foreground stitching.
(Yesterday’s piece is voided foreground). Some of the panels look more
like someone drew the foreground motifs freehand, then filled in the
background with the covering stitch. Again I can’t confirm or deny
this. Some panels (especially those with repeats) look quite precise to
me – too stitch-precise and weave-aligned to have been freehand
sketches. To my eye, the few pieces that might have been done this way
are pictorial panels that have almost a folk-art type naivety of line
and motif placement. One of these panels is pictured in Bath’s Embroidery Masterworks. While it’s not a probability that all voided foreground works were done this way, it’s not a impossibility that some were.
I’m
sure the total state of research into the origins of voided foreground
styles and Assisi embroidery has gnawed into this problem. I haven’t
kept up my reading in it of late. My long time pal and needlework buddy
Kathryn Goodwyn has an excellent article
on voided foreground stitching on line (this group of styles is her
specialty). She mentions the hand drawn outline variant as a curious
offshoot.
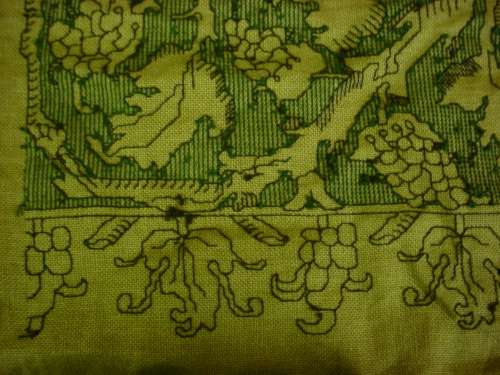
Are the colors accurate?
Green
wasn’t the most popular but it was used. However the natural color, brownish unbleached linen I had on hand wouldn’t have been used. A historical stitcher would have preferred a much lighter ground. The accompanying black
outlines in this piece are also open for debate. Few pre-1700 pieces
employ contrasting color outlining, although most later examples of the
style do. The original of this design clearly employs two different colors in the work. Even in the black and white photo of the original (dated
1560-1625), the background is clearly a different color from the
outlines. The original also shoed background area behind the lettuce
north and south of the main panel as being worked in long-armed cross stitch – something I don’t intend to do.
(Lettuce isn’t a technical term for the extra borders framing the main
panel, it’s just my own term of reference).
Linen thread?
It
is out there. DMC has some. There are linen threads made by other
makers, too. But sometimes expedience wins. I’m not doing this piece as
a totally accurate historical study. It really is a doodle. I’m
playing. I happened to have the Flower Thread on hand, and it worked
nicely with the weave size of my ground cloth.
I’m offended. My 11-spi stitching isn’t "coarse!"
For
me, 11 stitches per inch on 22 count linen is much less fine than the
gauges I usually pursue. I prefer the look of stitching on a really
buttery thick 50-count linen (that’s 25 stitches per inch). Compared to
that work, 11 stitches per inch is as large as logs. My doodle is a
quick study, again not intended for any purpose other than to let me do
some stitching at events, and for the fun of it.
What does the back look like?/Do you use knots?
My
backs are relatively neat, not because I’m a fanatic about making them
so and not because I believe that that’s the way they should be. My
backs are neat because that’s the way I stitch (historical pieces often
have absolutely chaotic backs that would make most modern needlework
judges recoil in horror). And yes – heresy of heresy – unless I’m
working something that’s intended to be totally two-sided, I do use
knots. No – if done carefully they don’t pull out or show through to
the front. Savage me if you must, but I reserve the right to ignore you.
What stitches did you use?
Double running (aka Spanish Stitch, Holbein Stitch, Vorstitch) for the outlines. Here’s a double running stitch mini-lesson
from the Skinner Sisters website. I could also have used back stitch, a
less represented but also historically accurate way to do them on
voided foreground works. Long armed cross stitch is less well known
than it’s X-like cousin with equal length arms, but it’s a very useful
thing. There’s a research article about it here
by Christian de Holcombe (another needlework pen pal), but a short
example of how to (along with quite a few related stitches) at this site.
Doodle?/What’s it going to be?
I
haven’t thought that far ahead. I’ll probably end up mounting this
piece for wall display. I called it a doodle because it’s an offhand
and trivial effort, a time-filler, and bit of life’s marginalia. It’s
not a Big Project, nor a planned project. It’s just… a doodle.
Your book is out of print, it’s o.k. for me to copy it, right?
No.
Absolutely not. Copyright doesn’t last until the publisher decides to
skip town, or drop the item from current inventory. US copyright lasts
75 years. Even if I get hit by a truck, that copyright is part of my
estate and would be owned by my heirs until 2070. Anyone who respects
authors, living or dead, should respect copyright.
I’m not an
ogre, hoarding rights and royalties (lord knows I’ve seen almost none
of the latter). I AM trying to get the thing back into print. One
publisher has turned me down flat in part because his research
indicated that illegal copies were being made.
So don’t do it,
as tempting as it might be. There’s more about copyright – in specific
your rights as a purchaser, as well as the author’s intellectual
property rights at Girl From Auntie and Yarnaholic Confessions.
DOODLES IN STRING
This weekend past we went to a local SCA event. We’re not very active
in the organization any more, but every now and again it’s fun to show
up and partake of the day. This particular day was quite warm, and we
arrived late – missing the most strenuous part of the planned
activities. We mostly sat in the shade and enjoyed various song and
story performances. In the evening a very ambitious dinner was served,
consisting of dozens of dishes from a recently translated 16th century
Italian cookbook.
I
keep a small sampler I work on when I go to events like this. Now that
I’m up to the easily replicated borders, I rarely stitch on it in
between events.
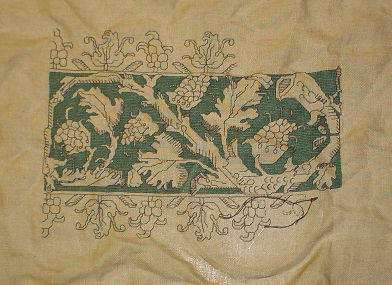
My doodle is worked on even weave unbleached linen, using DMC’s Danish Flower Thread. The
Flower Thread is a matte finish cotton. In construction this thread is a single
strand, as opposed to the more commonly seen multstrand
embroidery floss. Having used both, I find that for small pieces, this
thread mimics the look (but not the stiffness) of linen thread. I’m
working at at the extremely coarse gauge of 11 stitches per inch, on 22
thread count ground. It’s quick and easy to see.
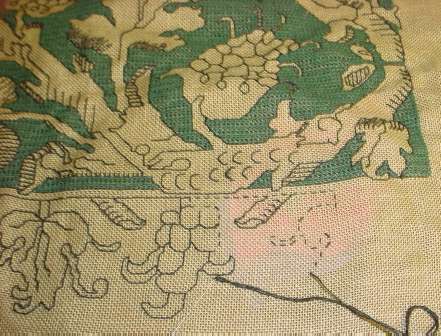
All
of the black lines in the piece are done in double running stitch (aka
Holbein Stitch, Spanish Stitch). You can see the bit in process, where
I’ve established a baseline. All of the "growths" from that baseline
are traced out and filled in again as I go along. The background is
done in long-armed cross stitch, worked back and forth across the piece
to heighten the illusion of a plaited ground. Since I’ve already done a
full repeat of the border, I no longer need to refer to my original
printed pattern. Also, because the whole goal of this piece is "quick
and portable," I’m not working it in a large rectangular frame. Instead
I’m using a plain old 7-inch diameter round tambour-style embroidery
frame. My matte finish single construction thread stands up to the
hoop’s abuse much better than does silk or even cotton floss.
The design is another one from my New Carolingian Modelbook. It’s on Plate 74:1. I graphed it from a photo of a late 16th or early 17th century artifact, appearing in Adolph Cavallo’s Needlework.
(New York: Cooper Hewitt Museum, 1974). What I like about this design
in particular is the way the edges of the work pop past the internal
border. The meaty branches have an almost palpable vitality, as if they
can’t be contained by the formal constraints of the stitching. Working
a solid background (as was done in the original) heightens the effect.
I’ve
only tried out one repeat of the central design. The historical piece
repeated the S-shaped flourish, mirroring it at either end. Since this
is a self-contained unit, it can be either mirrored or it can be
repeated in the same orientation to make a longer length of patterning.
Period embroiders used both methods of composition to construct longer
decorative bands.
