WHERE ARE THE SOCKS OF YESTERYEAR?
UPDATE: THE STITCH PATTERN BELOW IS NOW AVAILABLE IN AN EASY TO DOWNLOAD PDF FORMAT AT THE KNITTING PATTERNS LINK, ABOVE.
As you can tell from my absence from these pages, life again overtakes my leisure pursuits. Still, even though I haven’t had much time to write, I have been able to fit little scraps of knitting into my not-so-copious free time.
First, I knit a pair of replacement socks for Friend Alexx. They’re replacements because I had made a pair for him over the holidays that failed to fit. Since my socks come with an unlimited warranty, I was honor bound to replace them. Friend Alexx requested a pair of heavy hiking/slipper socks – preferably purple variegated. It took a bit of searching to find a purple mix in DK weight washable wool that didn’t trail off into prissy pink or boudoir lilac. But I did. Cleckheaton Tapestry 8 Ply, in Color #4. The pair is now done and waiting for me to darn in the ends and send them to the recipient. No pix – they’re pretty standard stockinette in screaming purple, but they’re dense and cushy.
In a coincidence, I stumbled across a briefcase I had been using three years ago. In it I found a pair of socks I had started for Alexx’s wife, Friend Kestrell. At that point, Kes was learning to knit and wanted to make socks. So I decided to make a pattern just for her. This presented a couple of challeges because Kes is blind. I wanted to use a simple knit/purl brocade that made a deeply embossed texture, and that would be relatively easy for a new sock knitter to memorize. Having worked with Friend Rosie (another non-sighted knitter) I also wanted to make a pattern in which one could use feel to determine one’s location.
My best intentions at that time led me to finish out one sock, and make my way through the heel of the second. Then for whatever reason something happened and I stopped working on the project. Around that time my job world changed, and the briefcase holding the socks was “retired.” The socks were forgotten in the ensuing turmoil.
In any case when the pair resurfaced, I had a finished sock but no pattern written down. I know I had drafted out the textured brocade, but I couldn’t find it on my archives. Another friend came to the rescue. My stitchpal Kathryn saves everyhing. I had shared the original chart with her way back when, and she was kind enough to send me a copy.
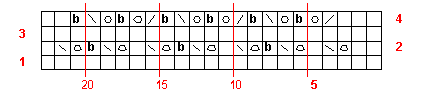
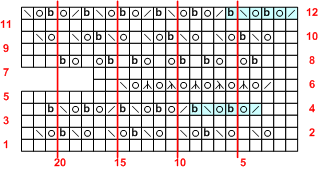
But there was a complication. The chart I sent Kathryn was for a 14-stitch repeat. My done-sock was worked on 72 stitches – an 18-stitch repeat. Yes, I had the finished sock, but it can be surprisingly difficult to graph up a piece from as-knitted, especially when the knitted object is done at tiny gauges with a variegated yarn. But between the sock and the logic of the pattern I was able to noodle it out and continue. I present both the 14 stitch and 18 stitch repeat. The 14 fits neatly on any sock worked on 56 stitches. If you are partial to working with a set of five rather than four needles, you will find that one full repeat will fit on each needle, and each needle will be worked in the same way. Also, being top-down symmetrical, this pattern wil look pretty much the same for toe up and cuff down socks.
Here’s a set of quick and dirty charts. Yes, I know that Kes and Rosie would have problems reading a *.jpg chart. See below for full prose instructions.

Kes’ Brocade – 14 stitch version, transcribed for knitting in the round only
Row 1: (Right Side) P2, K3, (P1, K1)3 times, K2, P1
Row 2: (Wrong Side) P3, K3, P1, K1, P1, K3, P2
Row 3: K1, P3, K3, P1, K3, P3
Row 4: K2, P3, K5, P3, K1
Row 5: K3, P3, K3, P3, K2
Row 6: P1, K3, P3, K1, P3, K3
Row 7: K1, P1, K3, P5, K3, P1
Row 8: (P1, K1)2 times, K2, P3, K3, P1, K1
Row 9: K1, P1, K3, P5, K3, P1
Row 10: P1, K3, P3, K1, P3, K3
Row 11: K3, P3, K3, P3, K2
Row 12: K2, P3, K5, P3, K1
Row 13: K1, P3, K3, P1, K3, P3
Row 14: P3, K3, P1, K1, P1, K3, P2
Kes’ Brocade – 18 stitch version, transcribed for knitting in the round only
Row 1: (Right Side) K3, P4, (K1, P1)2x, K3, P3, K1
Row 2: (Wrong Side) K1, P3, K4, P1, K4, P3, K2
Row 3: K2, P3, K7, P3, K3
Row 4: K3, P3, K5, P3, K4
Row 5: K4, P3, K3, P3, K4, P1
Row 6: P1, K4, P3, K1, P3, K4, P1, K1
Row 7: K1, P1, K4, P5, K4, P1, K1, P1
Row 8: P1, K4, P3, K1, P3, K4, P1, K1
Row 9: K4, P3, K3, P3, K4, P1
Row 10: K3, P3, K5, P3, K4
Row 11: K2, P3, K7, P3, K3
Row 12: K1, P3, K4, P1, K4, P3, K2
Row 13: P3, K4, P1, K1, P1, K4, P3, K1
Row 14: P2, K4, (P1, K1) 3 times, K3, P3
The astute will notice that the thing is symmetrical on two axes. The 14 stitch repeat mirrors around central stitch #8, and row #7. The 18 stitch repeat mirrors around stitch #9 and row #7.
And for good measure here’s a close-up showing the final texture. Or as good a photo as I could manage given my limited photography skills, the dark color and speckled nature of the yarn I used. Which yarn is it? I believe it’s Ancient Fortissima from the pre-merger days. The 100g ball (now long since separated from the ball band) is sort of ragg-style tweedy, with haphazard stripes being produced when one or more of the constituent plies shades off to a new tone. In real life it’s more deep burgundy/blood red than it is magenta/blue. The striping effect though isn’t uniform. Sock #1 has a far more demonstrative striping pattern than does on-the-needles sock #2.

I’m about half-way through the brocaded cuff of sock #2 right now (not shown). As soon as I’m done, I’ll pack up both pairs along with the finished pattern and send them to my friends.
KOMBU SCARF PATTERN IN GERMAN
Apparently there are lots of German-speaking knitters out there who would love to have my Kombu scarf pattern in German. Or so the very gracious Kerstin Michler tells me. So many in fact that she translated the thing, and asked my permission to post it. I said I’d put it up on wiseNeedle, but some major overhauls on that site have made the appearance of Kerstin’s hard work woefully late.
I apologize, and for the time being, post the thing here
CHARTING 106 – SECOND EXAMPLE
Here’s the last item in the chart series. Thank you for all the kind
words. I’m delighted that people are finding this useful.
I
have gotten some questions about why I am not using the standard
Japanese symbol set. That set is quite broad compared to most of the
sets in Western books. My answer is that it’s relatively unknown in the
US and Europe. Perhaps I’ll add a symbol glossary that equates its
symbols to notations used by other more commonly available sources.
That’s a big project though, and might be better suited for wiseNeedle
than for this blog.
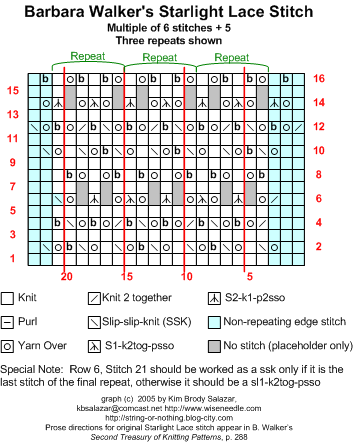
Barbara Walker’s Starlight Lace, Second Treasury of Knitting Patterns, p.288
I
will use this last Walker pattern to show some more complications to
charting life. This time, the pattern’s stitch count varies in a couple
of rows, plus there is a large number of edge stitches. My method is to
graph out everything verbatim row to row, then (if needed) introduce
no-stitch boxes for clarity. Again, all quotations from Walker are in
bold. Here goes…
Multiple of 6 st plus 5
Row 1 (wrong side): and all other wrong-side rows – Purl.
Row 2: K2 *yo, ssk, k1, yo, ssk, k1-b; rep from *; end yo, ssk, k1.
The
repeat is only 6 stitches, but I think I’ll chart out three repeats plus
edge stitches. That should give me enough room to see the play of the
edge stitches, and the staggered effect of the offset design itself.
Row 1 is plain old purl, but it’s a wrong side row, so it graphs out as
shown below, with the “1” on the left hand edge rather than the right
hand edge. Remember, I’m just graphing verbatim at this point. I’m
making no effort to read ahead. I just want to get the stitches down on
my chart.

We’ve
got 23 stitches [(6×3) + 5]. Note that the k1-b (knit one stitch
through the back of the loop to twist it) has its own symbol. All wrong
side rows in this pattern are plain – worked as purls if the thing is
knit flat, and as knits if it’s worked in the round.
Digression:
Most modern texture patterns alternate rows with something happening on
them (cable crossings, decreases, increases, etc.) with plain rows, and
many pattern authors don’t bother graphing the alternate rows if
they’re all plain. This can cause a bit of confusion. I got tripped up
recently by Hazel Carter’s Spider Queen shawl. It’s a masterful bit of
charting, but the first chart is stripped of those plain wrong-side
rows. The later charts include them. I wasn’t paying attention, and
didn’t notice that the numbering on that first chart labeled every row,
but counted by twos. I ended up having to rip back a bit when I noticed
that my piece didn’t looklike the project photo. So be warned. Look
at the numbering. If it begins with “1” on the left, and you’re
knitting flat you start off with a wrong-side row. If the “1” is on the
right and you’re knitting flat, you start off with a right-side row. If
every other number is missing, you’ve got a pattern with the plain rows
left out. Look elsewhere in the write-up to find out if those plain
rows are to be knit or purled.
I’ll skip writing up the plain rows, but I will include them in my growing graph:
Row 4: K3, *k2tog, yo, k1-b, yo, ssk, k1-b, rep from *; end k2
Again,
no problems here. Everything graphs out nicely and stitch count is
constant. There are equal numbers of stitches increased (the yos) and
stitches decreased (the ssks and k2togs).
Sometimes if I’m
having problems with a repeat, even if it’s charted, I’ll grab a piece
of graph paper and draw out my stitches. Sometimes I catch an error in
my knitting using my pencil that went totally unnoticed on my needles.
Row 6: k2, k2tog * yo, sl2-k1-p2sso, yo, sl1-k2tog-psso; rep from * end yo, sl2-k1-p2sso, yo ssk, k2.
This
is where that “off to hell in a handbasket” feeling begins to creep in.
We’ve got double decreases, both with the rightmost leg on top
(sl1-k2tog-psso), and with the centermost stitch on top (sl2-k1-p2sso).
We’ve also got a number of yarn overs, and just for fun – a couple of
plain old decreases, and an unknown number of times to do the ** repeat
between the k2, k2tog opening unit, and the end yo, sl2-k1-p2sso, yo,
ssk, k2 closing unit.
To figure this out, we need to remember
that we’ve got 23 base stitches on the previous row. That’s 23 stitches
to play with. All of the plain knits plus the stitches in the decreases
on Row 6 must add up to 23. Let’s look at the math:
- One ** repeat on this row adds up to six stitches (the two double decreases).
- The pre-** opening row unit is four stitches (k2 plus one k2tog)
- The after-** closing row unit is seven stitches (one double decrease plus one ssk and k2)
If
you add up our fixed numbers (the pre- and post-** stitches) you get 11
stitches. The previous row contained 23, and we subtract those 11 from
the total. We get 12, which (serendipity) is a multiple of our ** unit.
We graph out the pre-* stitches (shown in blue) plus two repeats of the
** unit, followed by the post-** unit (also shown in blue.

We’re out of that handbasket, even though our graph is showing a very
short row. Not to worry. Going through and counting stitches confirms
that we’ve got the correct number here. We’ll worry about neatening
everything up and inserting those no-stitch boxes after we get all the
rows charted. So let’s move on.
Row 8: K3, *k1-b, yo, k1, yo, k1-b, k1; rep from*, end k2.
This
row is also problematic. How many times to repeat the stuff between the
**s? Again , stitch count comes to our rescue. Evil Row 6 brought the
stitch count down to 17. Row 7 (worked plain) preserved that count. Now
on Row 8, there are increases, and “as-is” stitches but no decreases.
There should be 17 stitches on this row EXCLUSIVE of the YOs. Again we
do the math. We start with 17 stitches, then account for the three
before the *, and the 2 after – that’s 12 stitches left. NOT counting
YOs, each between the ** repeat contains 4 stitches. We need to graph
out three iterations of the stuff between the **s. Happily once we
graph in these instructions (including the 6 YOs) that restores us to
the original stitch count of 23.

Remember,
we’re not worrying about lining stitches up right now, our only concern
is getting the correct number of them on the chart. We’ll think about
how to represent those low-count rows 6 and 7 later.
Row 10: K2, *yo, ssk, k1-b, yo, ssk,k1; rep from * end yo, ssk, k1
We’re
back to a stable stitch count, with the same number of increases and
decreases per row. Graphing it up is easy. I notice something here
though:

See
those two blue units? They’re identical. It looks like this pattern is
formed by an exact duplicate of rows 1-6, offset by three stitches (one
half of the repeat). While you can see it (sort of) in the prose
directions, the duplication leaps out in the charted ones. I find this
sort of half-drop duplication and charting makes the pattern really
easy to memorize. More on this later, after we’ve charted some more
rows.
Row 12: *K2tog, yo, k1-b, yo, ssk, k1-b; rep from *, end k2 tog, yo, k1-b, yo, ssk.
Again this looks veeerrrryyyy familiar! I’ve highlighted the repeat (in fact I just cut and pasted those boxes).
Row 14: K1, *yo, sl2-k1-p2sso, yo, sl1-k2tog-psso; rep from *, end yo, sl2-k1-p2sso, yo, k1.
Remember
Evil Row 6, with all those double decreases? It’s back! Offset three
stitches, but otherwise the same. We start with 23 stitches on the
previous row, then subtract the 1 before the **, and the 4 after the
**, leaving 18 stitches – so we do the 6-stitch bit between the **s
three times.

Row 16: K1, k1-b, *k1, yo, k1-b, k1, k1-b, yo; rep from * end k1, k1-b, k1.
Just
like row 8, offset again by three stitches. Again we’ve got 17 stitches
on the previous row to account for. Not counting the YOs, we’ve got 2
stitches before and 3 stitches after the ** accounted for, leaving 12 –
so we do the 4-stitch ** unit three times. One you add in the YOs,
we’re back up to to the 23 stitches of our original count.

Now
to add the finishing touches. It looks like each of the decrease units
on Rows 6 and 14 visually caps off the clusters of decreases on the
rows below. So I’ll spread them out across the row, adding in my
no-stitch boxes as best I can to maximize the read of the pattern
compared to the photo of the worked swatch.
I’ll also add in
my stitch key, header and footer info at this point. Remember that
there are NO increases or decreases on alternate rows. Therefore I
don’t need to include that second column of “if it’s a
right-side/wrong-side row” instructions that I had to include in
yesterday’s write-up.
One final note, there is one small bit of
strangeness here. Because of the way that the repeat works out, and the
way that edge stitches are handled, the last decrease on Row 6 is
handled differently if it is the final stitch of an “inside repeat” or
if it is the final stitch of the last repeat on the row. Since this
isn’t easy to graph, I’ve added a special note about it, and made it
blue on the chart.
The memorization thing?? This pattern looks complicated at first glance. Especially if you just look at the prose directions. However it’s not that tough. There are only four substantive rows – 2, 4, 6, and 8. The entire pattern repeat is only six stitches wide. Everything else is a repeat, either straight on the same row, or (in the case of rows 10-16) offset by three stitches (one half the width of the repeat). ? I can’t remember the prose directions verbatim, but I can and do memorize the pattern in its visual representation. Not everyone can memorize a nonverbal visual representation (and it’s no shame not to have that bit of wiring) but many people can, and have surprised themselves by being able to do so after becoming comfortable with charts.
This
concludes my mini-series on graphing – how to read them, how to build
them, and how to solve common problems translating prose directions to
charts. Please feel free to post additional questions about graphing
and reinterpreting prose instructions as charts, but please know I will
not be offering a graphing service here. My goal is to show others how
to do it for themselves, not do it for them.
One last tech note
– the visual presentation of the charts changes mid-way through this
note because I experienced a massive computer failure. I ended up
finishing this post on a different machine using a different version of
MS Visio. The later version has a slightly different GIF translator
than the earlier version I normally use. So it’s not your monitor –
it’s me. Apologies for the visual confusion.
CHARTING 105 – EXERCISES
So far the nominations for stitches to use as object lessons have been rather sparse. I’ve gotten suggestions to do:
- Porcupine Stitch from B. Walker’s Second Treasury of Knitting Patterns, p. 282
- Drooping Elm Leaves from B. Walker’s A Treasury of Knitting Patterns, p. 217
I’ve also gotten notes from people who said that given the hints posted over the past week they’ve been able to graph up
- Mermaid Mesh from Walker’s Second Treasury, p. 267
- Madeira Cascade from Walker’s A Treasury, p. 222
As the big boss at work would say, “Good on ‘ya!”
These two patterns are not quite straightforward. Cascade has five stitches above and beyond the repeat that need to be apportioned into edge stitches. It does however have a very strong central spine – a double decrease that lines up on all right-side rows. Mesh is a bit harder in that it has both lots of edge stitches, plus a massive number of decreases and increases that use natural slant of the decreases to
visually wander left and right. Certainly not a pattern for the
faint-hearted to graph!
For the object lesson I’ll do Porcupine and Walker’s Starlight Lace (Second Treasury, p 288). Drooping Elm is interesting, but doesn’t pose some of the conundrums that these two do. I’ll start today with Porcupine. Starlight will appear later in the week.
Porcupine Stitch from B. Walker’s Second Treasury of Knitting Patterns, p. 282
Porcupine has some interesting features. It’s a 9 row repeat, in which only three rows are substantive. BUT those three rows are each repeated at least twice, and the same instructions are repeated on both the right and wrong side rows of the piece. There are also four stitches requested over the 12 stitch repeat count that will have to be accounted for in edge stitches, but they seem to always stay outside the ** repeat marks, so keeping track of them shouldn’t be a problem.
Walker notes that this texture design is of Victorian origin. It does have a major feature that was much more common in early instructions than in later ones. Porcupine includes patterning on both right side and wrong side rows. You don’t see this often as most modern? patterns confine increases, decreases or other shaping elements to right-side rows only. Flipping the instructions for decreases is far more confusing than just translating knits to purls and vice versa.
My write-up will intersperse the as Walker gives them with how that row ends up being graphed. The Walker quotations will be in bold.
Multiple of 12 stitches plus 4
Row 1: K2, *Yo, K2tog; rep from * to last 2 sts, end k2
Looking at the pattern, I suspect it will be a good idea to graph out two repeats of the pattern, that’s 24+4 = 28 stitches across my chart. We start with a right-side row:

Row 2 and 4: K2, purl to last 2 st, end k2
Very easy. Remember this is a wrong side row, and that mental inversion thing should be invoked to “flip” knits to purls and vice versa.
Row 3: Knit
Because Row 4 is the same as Row 2, I’ll graph up both 3 and 4 here. 
Row 5 and 8: K2, *sl1-k2tog-psso, k4, yo, k1, yo, k4, re from *, end k2
Now it begins to get interesting. Still, stitch counts are maintained. How can I tell this? By looking at the part between the **s. It includes a double decrease that finishes with the rightmost stitch on top, plus
two yos to compensate for the two stitches eaten by the double decrease. Warning though. It’s not all that hard to visualize row 5, it’s a right-side (odd numbered) row, but I can sense some hyperventilation among those who have noticed that this same sequence is repeated on a wrong-side (even numbered) row. We’ll deal with that bit of chaos when we get there.
Row 6, 7 and 9: K2* p3tog, p4, yo, p1, yo, p4, rep from * end k2
We have now hit the twilight zone row – the one that will cause many people to give up graphing. But it’s not impossible. Remember that mental flip thing? Flex your brain because we’re now going to do some gymnastics.
On Row 6, we’ve been told to do a p3tog on a wrong side row. Now, a p3tog on a wrong side row, if viewed from the right side of the work is a dead ringer for a k3tog. How do I know this? The Sainted Barbara tells me so in the glossary of chart symbols in her Charted Knitting Designs (aka Walker III), and A Fourth Treasury of Knitting Patterns (aka Walker IV). Also I experimented. I’ll use my symbol for k3tog, BUT
I’ll remember to build a double column glossary to accompany this pattern that describes what should be done when this symbol is encountered on both right-side and wrong-side rows.

Now on Row 7, we’re told to do the same thing as on Row 6. But we’re on a right-side row. A p3tog on a right side row is a p3tog on a right side row. I don’t have a symbol in my set for a p3tog, so I’ll have to make one up. Visually, in a P3tog done on an odd numbered row, the right hand most stitch of the three worked together ends up on top. I’ll make a hybrid symbol that sort of reminds me that three stitches are being worked together, the right hand most one will end up on top, and that it’s a purl. If it turns out that I like this symbol, I’ll add it to my permanent stencil collection in Visio:

Row 5 and 8: K2, *sl1-k2tog-psso, k4, yo, k1, yo, k4, re from *, end k2
Row 8 is a repeat of Row 5, but it’s done on a wrong-side as opposed to right-side row. Again referring to the Sainted Barbara, we see that a s1-k2tog-psso done on the right side has as its wrong-side counterpart
the delightfully awkward p3tog through the back of the loop. Again – remember we don’t actually have to DO a p3tog through the back of the loop here unless we are doing this pattern in the round, but the symbol we use on the chart is the same one that would be used for one of those awkward puppies worked on the right side. I don’t happen to have a standard symbol for p3tog through the back of the loop, so I’ll invent one.
Row 6, 7 and 9: K2* p3tog, p4, yo, p1, yo, p4, rep from * end k2
Row 9 is a duplicate of Row 7. We’ve already graphed that. So we now have the nine rows of our repeat. It’s also become clear that stitch counts are rock-stable row to row, and that the four extra stitches here are just garter stitch selvedges there for convenience, and aren’t required to eke out partial repeats of the pattern. I’ll mark the four extras off in blue.
But we’re not quite done even though all nine rows are graphed out. We’ve got a repeat made up of an odd number of rows. That means that Row 1 repeats on Row 10. In fact, although rows 10-18 are the same as Rows 1-9, each one graphs up as its opposite-side sibling. (I can sense I’ve lost quite a few of you, so I’ll show rows 10-13: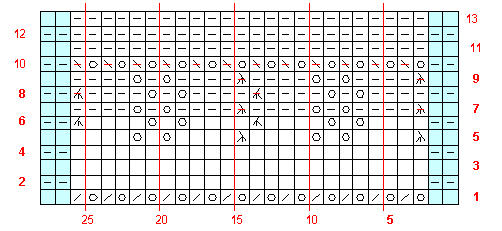
Row 10 duplicates the action of Row 1, but does it on a wrong-side row. Therefore, the stitches that graph up as K2togs in Row 1 use a different symbol in Row 11. Likewise the knits/purls of rows 11-13 show as their opposite.
Row 14 duplicates Row 5, but as a wrong-side row. We’ve already graphed that bit of twisted thinking on Row 8, so adding it isn’t a problem. Row 15 replicates Row 6, again we already did that flip on Row 9, so a simple cut and paste takes care if it, too.
Row 16 duplicates Row 7, which has its wrong-side counterpart originally on Row 6. Row 17 is another Row 8 in its right-side expression (Row 5). Row 18 is another Row 9 flipped for the wrong side (Row 6). If you place all of them on the chart, add the stitch key, grids, titles, and attributions you end up with this:

Now this may seem a long way to go for a short drink of water compared to Walker’s original write-up. In this case, the prose description is only five lines long, but the chart takes up half a page. There’s no bonus
for brevity awarded for the charted format. But there is one major advantage to having this described in a graph. This chart is equally useful to people knitting in the flat and people knitting in the round, because all the right/wrong side transformations have been done.
People knitting in the round experience every row as a right-side row. To knit this reversible pattern entirely in the round, they’d cast on an even number of the stitch multiple (without the four blue extra stitches) then they’d follow every row starting at the right hand edge of the graph, and using the key symbols as interpreted in the “On Right-Side Rows” column. People knitting in the flat would follow the chart in the manner I described before, starting the odd numbered rows at the right edge, and the even numbered rows at the left, alternately using the appropriate columns from the accompanying symbol key.
Have fun with this one. Try out Porcupine Stitch in a swatch. You’ll find the lacy effect is magnified if a larger needle than one would usually use for a given yarn is used. Lacy or dense, the result will be rather puffy. Given the appropriate yarn it would make nice two-sided scarves, shawls, or blankets. Stay tuned for more adventures in charting!
KUREOPATORA’S SNAKE PATTERN
UPDATE: THE KUREOPATORA SCARF PATTERN IS NOW AVAILABLE AS AN EASY TO DOWNLOAD AND PRINT PDF FILE AT THE KNITTING PATTERNS BUTTON LINK ABOVE.
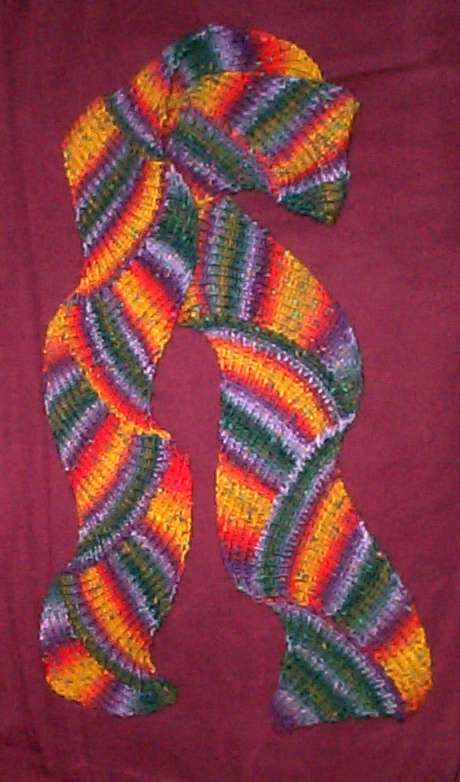
I’ve finished my Snake Scarf. It’s about 58″ long, which works. I’ve used all but about four yards of my fancy yarn. The jury is still out on the edging thing. Perhaps something very narrow in black just to give it a contained, outlined look. Perhaps not. Lots depends on whether I have time to hit my LYS, as there’s nothing suitable in stash. Or I may just leave it as it is.
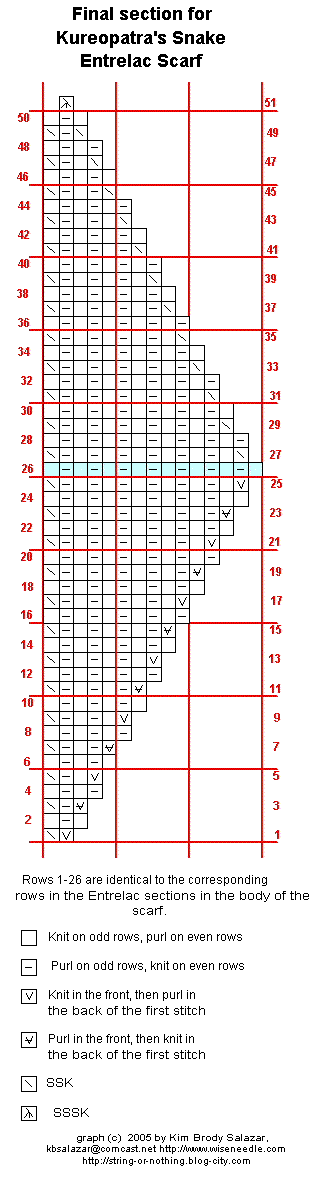
I played a long time with the final section, trying out several ways to do it that preserve the look of the ribbed sections that went before, because the usual way of ending off an Entrelac section lost the directionality of the ribbing. My corners don’t exactly match, but that’s because the entire piece has a definite beginning and end. If you were to work this idea like a seaman’s scarf, with a center third of plain ribbing, and both ends worked out from that ribbing, they would match exactly. Perhaps that’s the next step, provided I find a suitable yarn in a color set I like.
I make no claim as to inventing this concept. Entrelac is pretty standard. I’ve seen recipes for it going back to instructions for sock tops printed in the 1890s or so. Nor is doing it in a narrow strip unique. Quick searches on the Web will surface lots of other people’s experiments with directional knitting and narrow scarves. And I certainly can’t lay any claims to ribbing, or to using long repeat multicolor yarns in a narrow scarf. However, I can claim the serendipty that happened when I played with all of these concepts together. The trumpet like manner in which the ribbing spreads and curves is (to me at least) both amusing and graceful, and presents a different effect than working this idea in garter or stockinette stitch. I did work out the ribbed treatment for the final end, and have provided my own graph for it.
As far as using this with other yarns since the Kureopatora is now long gone – I suspect that Noro Silk Garden or Kureyon would work nicely, as would some of the Daikeito yarns that are
beginning to show up here in the US. (I haven’t seen the latter in person, but I’ve read reports of them on the Web.) What you want is a yarn in which each individual color lasts for about a yard (or more) before shading into the next one. The glorious hand-painted yarns that are hank-dyed in skeins that are about a yard around would NOT produce this wide stripe effect. They’d be lovely, but the color sections would not be long enough to make dramatic stripes like Kureopatora’s.
Just to annoy the natural-fiber-only crowd, I do observe that the yarn for this project needn’t be a top-drawer luxury product. There are some very inexpensive acrylics that have exceptionally long color repeats. I’m not fond of working with them in general, but if you’re thinking of knitting a rugged scarf for a little kid, those yarns might be worth considering.
Enjoy!
KUREOPATORA’S SNAKE – A KNITTING PATTERN
Materials
- US #6 needles
- Gauge
for this project, taken over 1×1 ribbing, at the midpoint of a section
where it isn’t particularly stretched out: approximately 6 stitches (3
ribs) per inch - 30 stitches at widest point
- Width of scarf: about 4.25 inches. Length of scarf: about 58 inches.
- Anticipated
yarn consumption for this size: About 250 yards of a multicolor worsted
weight yarn that normally knits in stockinette at 5 stitches per inch.
As
for working method, this scarf is done in a pretty standard Entrelac
edge column technique – think Entrelac project reduced to just the right
and left most columns, without the basket weave effect sections
between.
Row 1: Cast on 1 stitch, knit in the front, then purl in the back of this stitch [2 stitches on needle]
Row 2: Knit in the front, then purl in the back of the first stitch, K1 [3 st on needle]
Row 3: Purl in the front, then knit in the back of the first stitch, P1, K1 [4 stitches on needle]
Row 4: Purl in the front, then knit in the back of the first stitch, P1, K1, P1 [5 stitches on needle]
Row 5: Knit in the front, then purl in the back of the first stitch, finish row in established K1, P1 ribbing [6 st on needle]
Row 6: Knit in the front, then purl in the back of the first stitch, finish row in established K1, P1 ribbing [7 st on needle]
Row 7: Purl in the front, then knit in the back of the first stitch, finish row in established P1, K1 ribbing [8 st on needle]
Row 8: Purl in the front, then knit in the back of the first stitch, finish row in established P1, K1 ribbing [9 st on needle]
Continue
rows 5-8, adding one stitch in each row but doing it to maintain the
K1, P1 rib pattern. Keep doing this until you have 30 stitches on your
needle.
Entrelac body section:
Row 1: Knit in the front, then
purl in the back of the first stitch, SSK. Turn work over so the next
row heads back in the other direction. Note that this first row is only
3 stitches long.
Row 2 and all subsequent even numbered rows: Work P1, K1 ribbing as established.
Row
3: Purl in the front, then knit in the back of the first stitch, P1,
SSK. Note that from now on this row-ending SSK will be composed of one
stitch worked on the previous row, plus one stitch from the dormant
stitches on the left hand needle. Turn work over so the next row heads
back in the other direction. You now have 4 stitches in the row.
Row
5: Knit in the front, then purl in the back of the first stitch, K1,
P1, SSK. Turn work. You now have 5 stitches in the row.
Row 7: Purl
in the front, then knit in the back of the first stitch, P1, K1, P1,
SSK. Turn work. You will now have 6 stitches in the row.
Continue
to work in the manner of rows 5-8, adding one stitch at the edge of
each right-side row in the established rib pattern until you have
incorporated all of the dormant stitches on the left hand needle. You
will again have 30 stitches on the needle. At this point your segment
is done. To do the next one, flip the work over (the and begin again
from Row 1 of the Entrelac section). Continue adding entire trumpet
shaped sections until your scarf is of sufficient length. (Mine maxed
out at about 58″).
Final section:
Rows 1-25 – work as for
a standard Entrelac section. At the completion of Row 25 you should
have fifteen active stitches on your right hand needle. The left hand
needle should hold the other fifteen stitches. Work Row 26 as usual
(marked in blue on accompanying chart).
Row 27 and all
subsequent odd numbered rows: SSK, work in established ribbing, ending
row with SSK and turn in the same manner as in the Entrelac section.
Rows 28 and all subsequent even numbered rows: Work P1, K1 ribbing as established.
Continue in this manner until you have completed Row 50, and three stitches remain on your needle.
Row
51: Slip, slip, slip, knit all three stitches together through the back
of the loop (this is a three-stitch variant of the standard two stitch
SSK decrease).
Darn in all ends.
INSTANT GRATIFICATION
After the overland slog on the Mystery Project, I felt the need for some instant gratification. I did a couple of pairs of booties (already distributed to the deserving, and not available for photographs). Then I took that beautiful hand-dyed sock yarn I mentioned the other day and started in on another pair of halfie mittens. I started (more or less) with the Fingerless Whatever pattern written up here earlier, but went free-form pretty early on.
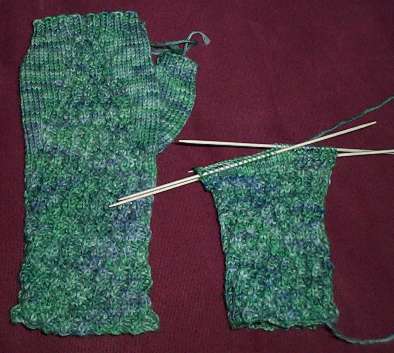
To
start, I’m using a traveling twisted stitch instead of ribbing. It
goes all the way around the cuff portion, but when the thing gets to
the heel of the hand, the palm side switches to plain stockinette.
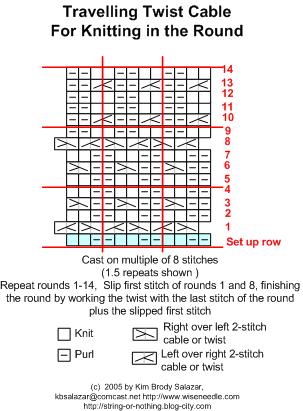
After the heel of the hand transition, the twisted traveling stitch
pattern drops a half-repeat at each cable crossing, and ends up forming
a slave bracelet sort of triangle on the back of the hand. The thumb
gusset is worked in the plain stockinette part, and is exactly the same
as the one on Fingerless Whatevers. The hand and thumb bit end off with
a bit of plain old K2, P2 rib.
Yes, the patterning would be
shown to greater advantage were I not using hand-dyed yarn. But I like
the seaweed-like effect of the mottled greens and blues, and the way
the colors play with the highly embossed texture vs. the flat
stockinette part. I’m pleased with my minor diversion, and as
this yarn was a gift, thank yous are in order. (Plus I’m sure the
giver would be curious to see what her offspring ended up becoming.)
Another postscript
Strange intersections of my professional employment and personal avocation keep cropping up elsewhere. I will soon be forced to knit my own robot.
EDGING UP
Here’s the final graph and directions for my edging to complement the Paisley Shawl from Interweave Knits, Spring 2005 edition. I haven’t worked out how to do the corners yet, but I suspect I’ll fudge them, working the equivalent of an extra repeat of the chart in each corner. I’ll start several stitches before each corner, working more than one attachment point into one stitch of the shawl body.
Simple Edging for Paisley Shawl
Work Paisley Shawl as directed until after the final row of the paisley lace border, just before the directions for the picot edging begin . You will have 156 stitches per quarter, as described. DO NOT BREAK OFF THE YARN.
The edging will be worked back and forth flat, using a DPN of the same size as your circular needle and the left hand needle tip of that circular. Place a needle stopper or rubber band on the right hand tip of your circular needle to avoid inopportune “stitch leakage” off the bottom of your circ as you work the edging.
Using the DPN, the active yarn strand and the half-hitch cast on, cast on 8 stitches. Avoid leaving a large skip between the circ and the DPN by taking care to make the first stitch immediately adjacent to the last stitch knit normally on your circular needle.
Flip the work over and knit the 8 stitches you just cast on. Flip the work over again and begin following the chart below at Row #1.
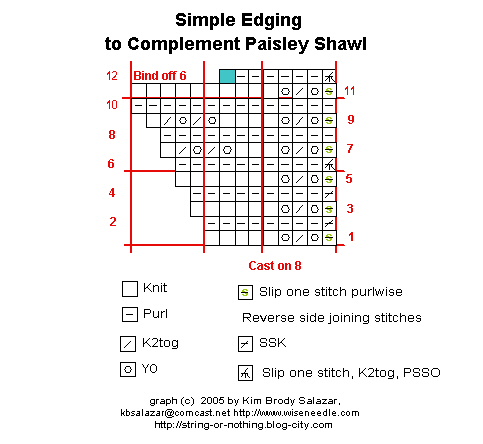
Note that at the end of every wrong-side row you will be working an attachment point. The attachments on Rows 2, 4, 8, and 10 are done as SSKs, with the first stitch of the SSK being the last stitch of the edging, and the second being a single active stitch of the shawl’s body. The attachments on Rows 6 and 12 are done by slipping the last stitch of the edging, knitting two stitches of the shawl body together, and passing the slipped stitch over the K2tog.
The result:
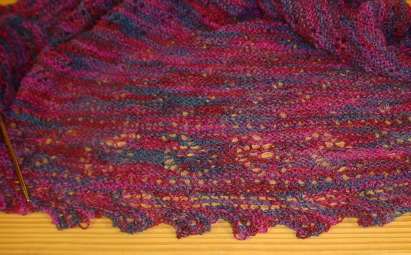
Each sawtooth has a quad flower on it, and the double row of eyelets at the base of the trim echoes the four double column of eyelets that follow the diagonal lines from the shawl’s center to the four corners. Plus the edging is about half the width of the paisley lace band that’s just inside it, so the proportions work well. This edging also knits up quite quickly. Last night I was able to do most (but not all) of Side #1. Based on yarn consumption, I should have enough to finish. Perhaps even have a little bit left over.
Enjoy!
PAISLEY EDGING
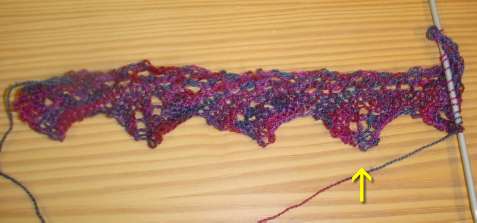
After much noodling, doodling, and swatching, here’s the result. I didn’t bother taking photos of every generation of interim swatches. All that rejection is just too depressing. I’m using the tail end off the outside of my yarn ball to work my experiments. Since I need to be frugal, I’ve been ripping back the rejects as I go.
One important thing to note is the difference in the quad eyelet motif. I thought about it some more as I sat in traffic during yesterday morning’s commute. In the shawl body, that motif is presented in plain old north-south orientation, with the rows running horizontally. The motif spans six rows and begins with a single eyelet on the first. In the edging, the repeat is presented on the bias. The motif wouldn’t show in the same orientation. Plus the extra stitches added to form the repeat skew the stitch count. Therefore working the repeat as shown yesterday would not make a quad-eyelet design comparable to the one in the body. If stitch placement were adjusted, it would make a square of eyelets instead of a diamond. Unadjusted as is, it would make a snaky looking blob of eyelets.
Sure enough, by the time I was finally able to swatch tonight that all became painfully obvious. So I began playing. If you look at the body at a 45-degree angle, the eyelets appear as two stacked groups of two. If I were to work them that way perhaps when the edging was viewed in its natural orientation, the eyelets would resemble the ones in the body.
Again, sure enough it worked exactly that way. Working two right side rows with (YO, K2tog)2x produced the proper appearance. But then I had the problem of where to place that repeating unit. How close could I put it to the right hand YO columns before it lost its integrity? On which two right side rows should the unit be worked?
You guessed it. More swatching. You can see some of my spurious results here, with the last complete dag (marked with the arrow) being the one with the most optimal placement:
And here’s the final graph.

Now to go back to the shawl and begin to work the thing onto the live stitches around the edge. More on that tomorrow, guaranteed!
PERSEVERE!
My older daughter is new to knitting. She just began at the Boston Knit Out this past fall. So far she’s done several foofy garter scarves for herself and her friends (first lesson in casting on and the knit stitch); a 42-stitch hat (using DPNs to knit in the round, decreases); and a felted bag (more reinforcement of knitting in the round, plus making a larger project, and I-cord, and picking up along an edge).
You’ll notice that all of her finished items were all-knit/big yarn projects. She wanted to “graduate” from all-knit and learn purling. She also wanted to use smaller needles. So we talked it over, and she suggested doing a pair of ribbed fingerless mitts. In fingering weight yarn. On US #0s. Without a pattern.
Now, did I tell her that many adults break out in prickly heat at the thought of using DPNs, let alone size #0s? Or that a 56-stitch around wristlet can contain as many stitches as an entire big-needle sweater? Or that I’ve seen grown women cry when someone suggests they knit (gasp) without a pattern?
Naah. What she didn’t know couldn’t daunt her.
So she cast on and began knitting. And knitting. And knitting. She plugged away at her mitts every evening after homework, while we (as a family) played video games. At first, being new to purling, her stitches were loose and wobbly, with ladders in the corners between the DPNs. But practice soon took care of that:
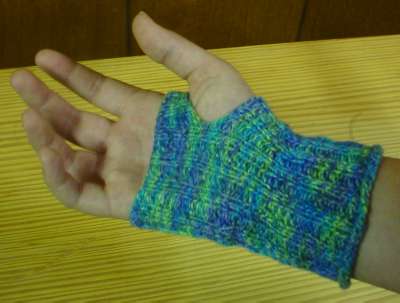
For everyone who has ever said to me, “I tried DPNs but I couldn’t manage them,” or “It takes too long to learn something new,” I present her learning progression. She worked the bottom one first, then the top one, both using the same yaran, stitch count and needles. You can see how her gauge, stitch accuracy and general neatness improved steadily throughout the project.
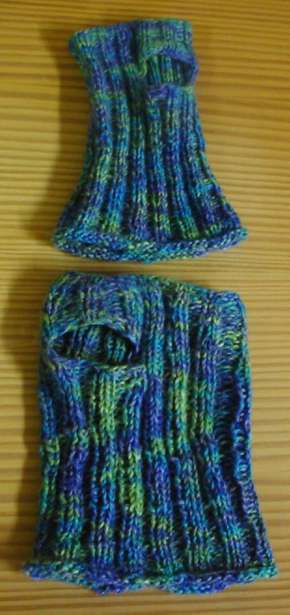
Sure, one’s bigger than the other, but both are wearable, and she does wear them proudly.
Knitting takes time to learn – there’s no getting out of that fact. Some people DO learn faster than others, but everyone who wants to learn IS capable of doing so. The key is practice. Unfortunately practice is a dirty word in today’s instant-dissolve, short attention span world.
Not satisfied with how something is turning out? Keep at it. Do something small and inconsequential that uses the same skills. Work out the kinks and bugs on the practice piece rather than the luxe yarn you chose for your “real” project. But keep going. You CAN do it. As the Target Child says “No stinking piece of string was going to defeat me!”
Here’s her pattern. (She?thinks her fingerless mitts look like the disc-shooting zapper gauntlets worn by a character in one of her favorite PS2 games).
Zapper Gauntlets
About 150 yards or so of a smooth non-itchy fingering weight sock yarn. This pair was knit in some remnants of On Line Linie 6 Supersocke 100 Cotton, but any sock yarn will do.
5 DPNs, Size US #0 (2mm)
Gauge: Approximately 9 stitches = 1 inch (2.5cm), measured over K2, P2 ribbing.
Cast on 56 stitches (14 stitches per needle). Join to continue working in the round. Knit six rows. Change to K2, P2 rib and work until piece measures approximately 4 inches long (10cm).
At the beginning of the next round, bind off 10 stitches. Continue working around wristlet. You should have one needle with 4 stitches on it, then three needles each with 14 stitches. When you get to the hole created by the bind-off, flip the work over and head back in the other direction. Work five more rows of K2, P2 rib this way – flat, ending at the right side of the growing thumb hole.
On the next row we return to knitting in the round. Start Needle #1 by casting on 10 stitches (all needles should have 14 stitches again). Continue in established K2, P2 ribbing pattern, working in the round until piece measures approximately 1 inch (2.5cm) measured from cast-on row above thumb opening. Bind off loosely in pattern, and darn in all ends.
That’s it!
(More in the cast-on series next week, I promise. Looking up all those links is more work than I have time for right now mid-deadline.)
ROGUES WITH DRAGON SKIN
Having finally gotten my act together what with swatching, recalculating, and general pointless noodling, I’m embarking on the highly modified Rogue. As ten thousand others have noted, it’s a very completely written out pattern for a pocket front hoodie, by Girl from Auntie’s Jenna. I really like the organic way she has used closed form cables to highlight the piece, and how those shaped cables narrow and widen. Killer!
In spite of the beauty of the native version, I am trying to satisfy specifications issued by a child in The Picky Years, so modifications are necessary:
- Gauge. Target child has picked out a yarn that knits at 5 spi instead of the pattern’s 4.5. Math will be needed.
- Fiber. Nice springy wool works best and is easiest to use for cables, but the chosen yarn is 100% cotton. I’ve done complex cabling in cotton before. I’ll cope.
- Zip front. I won’t be the first to modify this and make a cardigan. The pattern’s own home page provides hints on cardigan-ization. I’ll be leaning on them.
- Texture for body. Kiddo is in love with the Dragon Skin all-over pattern (Walker II, p. 136). While I prefer the contrast between the smooth body and dense cables of the original, she’s set on my using the design. Unfortunately, the design as presented by Walker needs 26 stitches to manifest nicely. A bit wider than is convenient for this pattern.
So to start. How to start?
First I bought the pattern. (Always a good thing, as “sharing copies” is a pernicious, evil, illegal but all too often seen antisocial behavior).
Knowing that the Dragon Skin pattern in the original was too wide. I began to play with it, and eventually trimmed it down somewhat. Here’s the result:
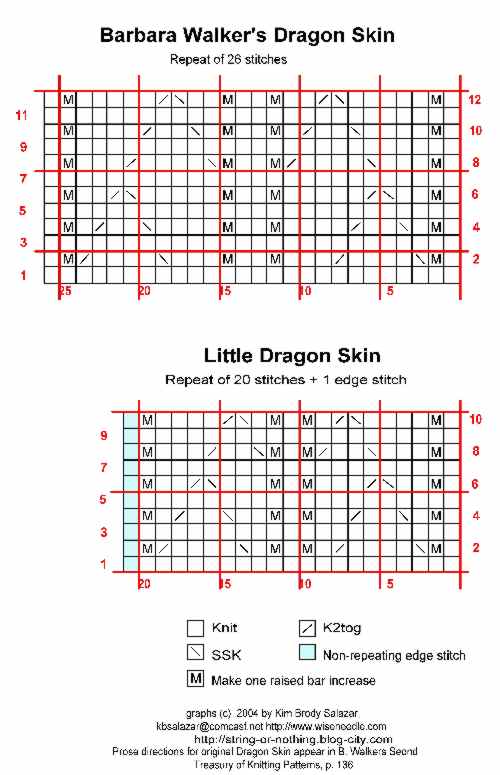
The original is definitely nicer, with wider vertical elements, but the slimmed down version is quite usable and recognizable as the other’s little brother. I’m still dithering whether or not to do the single stitch knit column between the make-ones as a normal or twisted knit stitch.
I swatched my yarn and established an unambiguous gauge for the stuff in my dragon skin patterns. I got a firm 5 stitches per inch total. Not the 4.5 spi the pattern specifies.
What to do?
First I looked at the size appropriate for Target Daughter in the original. Then I looked at the stitch counts of the next two larger sizes. I did the math to see if at 5 stitches per inch, they came anywhere near the circumference of the optimal original size. Serendipity! One did. I am using that size as the basis for all my stitch count estimations. I’ll use that size’s stitch count directions for anything relating to width, but will use the original size’s directions for length. Yes, I’m sure there will be fudging along the way, especially to eke out vertical repeats so that the cables up the side finish nicely, but I don’t think that those tweaks will be too difficult.
Can you take any pattern and do this? Yes and no. It’s relatively easy to translate between Worsted and DK (5 and 5.5spi) and Aran and Worsted (4.5 and 5spi), but harder to make this translation for larger gauge differences. Plus patterns that rely on row gauge like colorwork, or raglan shaping present additional challenges. It’s also easier to do this if you are not at either end of the range of sizes presented. If you already take the largest size in a pattern written for Aran weight yarn, and you wish to use Worsted, there aren’t any sizes left with higher stitch counts for you to play with. (If you were going the other way – you were faced with a Worsted weight 5 spi pattern that was just a tad too small – you might be able to eke out an additional size or two by using Aran weight yarn at 4.5 spi instead.)
I’ve got my basic stitch count now, adjusted for my finer gauge. The next mod is the cardigan one. The advice worked out by others suggests adding an extra stitch to the front and back so that the total stitch count can be divided by two, creating the center front break. I’m going to add three to the front, but two to the back. My width is just a bit skimpy, and I have a feeling that I’d like an extra selvedge stitch in the center front when zipper sewing and I-cord trim time comes. I’m adding one fewer stitches to the back because my new texture design has a center stitch, and I want it run down the center of the back.
The next step is to cast on. I’ll be working my Rogue back and forth rather than in the round (a loss there, I’d much prefer to work it in the round, but steeking would kill the elegance of the cables at the neckline). I note that the thing is written with a hem instead of ribbing. I like that for this cotton. Working it on smaller needles as directed should tame edge flare. Since I prefer a smooth finish inside when using a hem facing, I am using a provisional cast on – the same crocheted onto the needle one I used for Crazy Raglan. Using needles three sizes smaller than my body needles, I cast on the specified number of stitches for my chosen (larger) size, plus five more (three front, two back), and began knitting the facing.
On my first row of the facing, I decided to spot the left and right side areas in which the cable detail will happen. I did the count, figuring out which stitch will be the center sidemost stitch left and right, then counted out the required number for the first row of the cable detail chart, centered on those two stitches. I put markers in my work and left them there. While I’m not up to the post-facing bit yet, I can use the facing rows to re-count and confirm my marker placement. By the time I’m up to the first row of the main body, I should be 100% confident that those markers are in the correct places.
Next headache? Centering the Dragon Skin texture pattern repeat. On the back, I’ll identify the centermost stitch. That will be stitch #11 on my chart above. I’ll count back from that point, and begin my pattern panel on the appropriate stitch. On the fronts, I’ll also plan out from the center, working one plain stitch, then walking backwards from Stitch #21 to figure out where I have to begin my left front; and doing one plain knit then walking forward from Stitch #1 to place the pattern on the right front. One thing to take into consideration – to maintain a stable stitch count there must be an equal number of increases and decreases per row. Because the width of the back and front panels will require that I truncate the repeats, I’ll have to make sure to maintain that stitch count by fudging if that truncation cuts into an increase/decrease pair. I’m hoping that by happy coincidence, I’ll be able to work the pocket openings into the verticals naturally created in the Dragon Skin texture pattern. THAT would be nifty!
Now all that remains is to plug away at the knitting part. Like with all pattern manipulations, there’s no guarantee that my doing this will work out. I’m willing to wing it. By the time I get half-way up the body I’ll have a good idea whether or not finishing IS a good idea. If not – I’ll rip back and design something from scratch. (If you’ve read this far and noticed that I’ve screwed up my logic, please feel free to leave a comment and let me know.)
One final note – for those of you who are wondering how I can slap a copyright notice on a texture design from Walker – I am not copyrighting the pattern. She owns her prose write-up of the thing. I am asserting ownership of only my graphed representation. Have fun. Use it and other patterns shared here for your own knitting; but please do not repost or republish them without my permission.
