Having finally gotten my act together what with swatching, recalculating, and general pointless noodling, I’m embarking on the highly modified Rogue. As ten thousand others have noted, it’s a very completely written out pattern for a pocket front hoodie, by Girl from Auntie’s Jenna. I really like the organic way she has used closed form cables to highlight the piece, and how those shaped cables narrow and widen. Killer!
In spite of the beauty of the native version, I am trying to satisfy specifications issued by a child in The Picky Years, so modifications are necessary:
- Gauge. Target child has picked out a yarn that knits at 5 spi instead of the pattern’s 4.5. Math will be needed.
- Fiber. Nice springy wool works best and is easiest to use for cables, but the chosen yarn is 100% cotton. I’ve done complex cabling in cotton before. I’ll cope.
- Zip front. I won’t be the first to modify this and make a cardigan. The pattern’s own home page provides hints on cardigan-ization. I’ll be leaning on them.
- Texture for body. Kiddo is in love with the Dragon Skin all-over pattern (Walker II, p. 136). While I prefer the contrast between the smooth body and dense cables of the original, she’s set on my using the design. Unfortunately, the design as presented by Walker needs 26 stitches to manifest nicely. A bit wider than is convenient for this pattern.
So to start. How to start?
First I bought the pattern. (Always a good thing, as “sharing copies” is a pernicious, evil, illegal but all too often seen antisocial behavior).
Knowing that the Dragon Skin pattern in the original was too wide. I began to play with it, and eventually trimmed it down somewhat. Here’s the result:
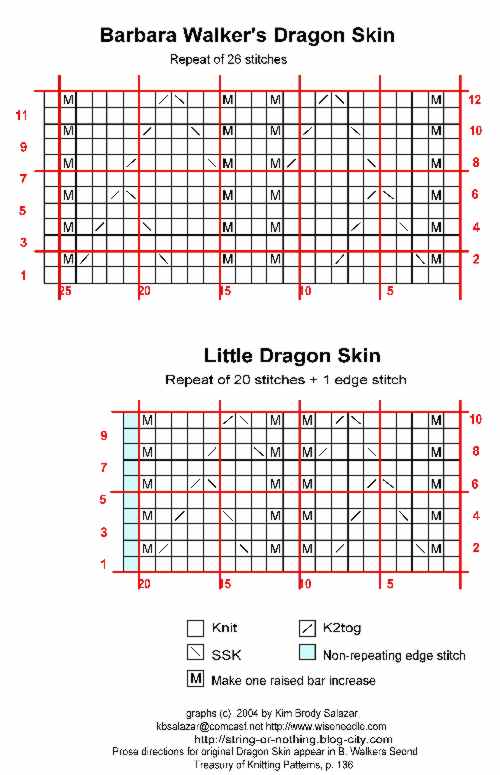
The original is definitely nicer, with wider vertical elements, but the slimmed down version is quite usable and recognizable as the other’s little brother. I’m still dithering whether or not to do the single stitch knit column between the make-ones as a normal or twisted knit stitch.
I swatched my yarn and established an unambiguous gauge for the stuff in my dragon skin patterns. I got a firm 5 stitches per inch total. Not the 4.5 spi the pattern specifies.
What to do?
First I looked at the size appropriate for Target Daughter in the original. Then I looked at the stitch counts of the next two larger sizes. I did the math to see if at 5 stitches per inch, they came anywhere near the circumference of the optimal original size. Serendipity! One did. I am using that size as the basis for all my stitch count estimations. I’ll use that size’s stitch count directions for anything relating to width, but will use the original size’s directions for length. Yes, I’m sure there will be fudging along the way, especially to eke out vertical repeats so that the cables up the side finish nicely, but I don’t think that those tweaks will be too difficult.
Can you take any pattern and do this? Yes and no. It’s relatively easy to translate between Worsted and DK (5 and 5.5spi) and Aran and Worsted (4.5 and 5spi), but harder to make this translation for larger gauge differences. Plus patterns that rely on row gauge like colorwork, or raglan shaping present additional challenges. It’s also easier to do this if you are not at either end of the range of sizes presented. If you already take the largest size in a pattern written for Aran weight yarn, and you wish to use Worsted, there aren’t any sizes left with higher stitch counts for you to play with. (If you were going the other way – you were faced with a Worsted weight 5 spi pattern that was just a tad too small – you might be able to eke out an additional size or two by using Aran weight yarn at 4.5 spi instead.)
I’ve got my basic stitch count now, adjusted for my finer gauge. The next mod is the cardigan one. The advice worked out by others suggests adding an extra stitch to the front and back so that the total stitch count can be divided by two, creating the center front break. I’m going to add three to the front, but two to the back. My width is just a bit skimpy, and I have a feeling that I’d like an extra selvedge stitch in the center front when zipper sewing and I-cord trim time comes. I’m adding one fewer stitches to the back because my new texture design has a center stitch, and I want it run down the center of the back.
The next step is to cast on. I’ll be working my Rogue back and forth rather than in the round (a loss there, I’d much prefer to work it in the round, but steeking would kill the elegance of the cables at the neckline). I note that the thing is written with a hem instead of ribbing. I like that for this cotton. Working it on smaller needles as directed should tame edge flare. Since I prefer a smooth finish inside when using a hem facing, I am using a provisional cast on – the same crocheted onto the needle one I used for Crazy Raglan. Using needles three sizes smaller than my body needles, I cast on the specified number of stitches for my chosen (larger) size, plus five more (three front, two back), and began knitting the facing.
On my first row of the facing, I decided to spot the left and right side areas in which the cable detail will happen. I did the count, figuring out which stitch will be the center sidemost stitch left and right, then counted out the required number for the first row of the cable detail chart, centered on those two stitches. I put markers in my work and left them there. While I’m not up to the post-facing bit yet, I can use the facing rows to re-count and confirm my marker placement. By the time I’m up to the first row of the main body, I should be 100% confident that those markers are in the correct places.
Next headache? Centering the Dragon Skin texture pattern repeat. On the back, I’ll identify the centermost stitch. That will be stitch #11 on my chart above. I’ll count back from that point, and begin my pattern panel on the appropriate stitch. On the fronts, I’ll also plan out from the center, working one plain stitch, then walking backwards from Stitch #21 to figure out where I have to begin my left front; and doing one plain knit then walking forward from Stitch #1 to place the pattern on the right front. One thing to take into consideration – to maintain a stable stitch count there must be an equal number of increases and decreases per row. Because the width of the back and front panels will require that I truncate the repeats, I’ll have to make sure to maintain that stitch count by fudging if that truncation cuts into an increase/decrease pair. I’m hoping that by happy coincidence, I’ll be able to work the pocket openings into the verticals naturally created in the Dragon Skin texture pattern. THAT would be nifty!
Now all that remains is to plug away at the knitting part. Like with all pattern manipulations, there’s no guarantee that my doing this will work out. I’m willing to wing it. By the time I get half-way up the body I’ll have a good idea whether or not finishing IS a good idea. If not – I’ll rip back and design something from scratch. (If you’ve read this far and noticed that I’ve screwed up my logic, please feel free to leave a comment and let me know.)
One final note – for those of you who are wondering how I can slap a copyright notice on a texture design from Walker – I am not copyrighting the pattern. She owns her prose write-up of the thing. I am asserting ownership of only my graphed representation. Have fun. Use it and other patterns shared here for your own knitting; but please do not repost or republish them without my permission.
