CHARTING SOFTWARE – ARAN PAINT
A couple of weeks ago when I wrote about charting knitted texture patterns, a couple of people were curious about Aran Paint, one of the lesser-known programs I mentioned. Here’s an example of what it does.
I’m starting with a twisted stitch texture pattern in Baulerches Stricken 1 by Lisa Fanderl. This is the first volume in a set of three German language knitting books that present traditional knitting patterns gathered from various regions of the country. This series is certainly interesting, but as with many stitch treasuries, presents the patterns using its own rather ideosyncratic notation and symbol set. In this case, the pattern is shown using plain old typeset characters, some linked with bars to indicate the direction of the twisted or cabled stitches. I’ve played with some of thetextured and lacy patternsfrom this series, but to work with a minimum of fuss, I usually had to re-graph them first.
This particular pattern is shown on p. 129 It’s a simple 10-stitch wide panel, and features some twisted knit stitch ribbing manipulated to look like a series of bells connected by chain links. I’m afraid I don’t have my swatch or a knitted sample, but this did look quite nice run as panels up the front of a baby sweater, close together in the upper bodice area, and set progressively further apart by an increasing number of stockinette stitches towards the lower edge.
Here are the results of graphing with Aran Paint:
|
|
 Final Graph |

The program also produced this set of prose instructions as a text file (it also outputs the same material in HTML):
AranPaint-BS1-129a.ara (10 Stitches x 26 Rows)
Repeat these 26 rows for the length required.
Row 1: K1, T2F, P1, K2, P1, T2B, K1.
Row 2: P1, K1, P1, K1, P2, K1, P1, K1, P1.
Row 3: K1, P1, T2F, K2, T2B, P1, K1.
Row 4: P1, K2, P4, K2, P1.
Row 5: K1, P2, K4, P2, K1.
Row 6: P1, K2, P4, K2, P1.
Row 7: K1, P2, K4, P2, K1.
Row 8: P1, K2, P4, K2, P1.
Row 9: K1, P2, K4, P2, K1.
Row 10: P1, K2, P4, K2, P1.
Row 11: K1, P2, K4, P2, K1.
Row 12: P1, K2, P4, K2, P1.
Row 13: K1, P2, T2F, T2B, P2, K1.
Row 14: P1, K3, P2, K3, P1.
Row 15: K1, P3, C2F, P3, K1.
Row 16: P1, K3, P2, K3, P1.
Row 17: K1, P2, T2B, T2F, P2, K1.
Row 18: P1, K2, P1, K2, P1, K2, P1.
Row 19: K1, P2, K1, P2, K1, P2, K1.
Row 20: P1, K2, P1, K2, P1, K2, P1.
Row 21: K1, P2, K1, P2, K1, P2, K1.
Row 22: P1, K2, P1, K2, P1, K2, P1.
Row 23: K1, P2, T2F, T2B, P2, K1.
Row 24: P1, K3, P2, K3, P1.
Row 25: K1, P3, C2F, P3, K1.
You can see that the thing is certainly useful, but that it has its limitations.
-
The program doesn’t include twisted stitches (like knit one through back of the loop). All of the original pattern’s knits are twisted, but I couldn’t show that on my version. YOs and eccentric cable crossings also aren’t included.
-
AranPaint includes its own “artificial intelligence” that prevents one from graphing only every other row, or from placing a cable unit such that it commences on an even numbered row. For example, if you’re working in the round and want to move one stitch over on two succeeding rounds without a plain round between them, you can’t graph it in AranPaint.
-
Symbol keys or glossaries don’t print at the same time as the pattern. While that’s not a big deal, and you can retrieve the keys from the publisher’s website, doing so is a pain and means an extra trip through cut-and-paste land.
-
You can’t easily get output for the mock-up I show at left above. To do this, I had to open AranPaint, take a screen capture, edit the capture down for size in Visio, save it as a *.jpg, then use Macromedia Fireworks to trim the resulting *.jpg down to something that is web-manageable.
-
There’s no undo function beyond “remove last stitch.”
-
Moving elements can be a pain, as there is no drag and drop.
All of these limitations being said, the program is still quite handy. Although I usually use my Visio template system for most “hard core” graphing, I do enjoy doodling with AranPaint, then having the resulting piece turned into an editable texture pattern. Here’s one of my doodles:
 |
 |
and the prose version:
AranPaint-doodle.ara (9 Stitches x 36 Rows)
Repeat these 36 rows for the length required.
Row 1: P2, C5R, P2.
Row 2: K2, P5, K2.
Row 3: P2, K1, C3B, K1, P2.
Row 4: K2, P5, K2.
Row 5: P2, K1, C3B, K1, P2.
Row 6: K2, P5, K2.
Row 7: P2, C5R, P2.
Row 8: K2, P5, K2.
Row 9: P1, T2B, K3, T2F, P1.
Row 10: K1, P1, K1, P3, K1, P1, K1.
Row 11: T2B, P1, C3R, P1, T2F.
Row 12: P1, K2, P3, K2, P1.
Row 13: T2F, T2B, K1, T2F, T2B.
Row 14: K1, P2, K1, P1, K1, P2, K1.
Row 15: P1, C2B, P1, K1, P1, C2F, P1.
Row 16: K1, P2, K1, P1, K1, P2, K1.
Row 17: P1, T3F, K1, T3B, P1.
Row 18: K2, P5, K2.
Row 19: P2, C5R, P2.
Row 20: K2, P5, K2.
Row 21: P2, K1, C3B, K1, P2.
Row 22: K2, P5, K2.
Row 23: P2, K1, C3B, K1, P2.
Row 24: K2, P5, K2.
Row 25: P2, C5R, P2.
Row 26: K2, P5, K2.
Row 27: P1, T2B, K3, T2F, P1.
Row 28: K1, P1, K1, P3, K1, P1, K1.
Row 29: T2B, P1, C3R, P1, T2F.
Row 30: P1, K2, P3, K2, P1.
Row 31: T2F, T2B, K1, T2F, T2B.
Row 32: K1, P2, K1, P1, K1, P2, K1.
Row 33: P1, C2B, P1, K1, P1, C2F, P1.
Row 34: K1, P2, K1, P1, K1, P2, K1.
Row 35: P1, T3F, K1, T3B, P1.
Row 36: K2, P5, K2.
Before you write and ask, remember – symbols and abbreviation setsused in AranPaint write-ups and graphs can be found here.
WORKING REPORT – WATERSPUN PONCHO
UPDATE: THIS WORKING DISCUSSION (INCLUDING HINTS FROM PRIOR PROJECT POSTS) IS NOW AVAILABLE AS AN EASY DOWNLOAD AT THE KNITTING PATTERNS LINK, ABOVE.
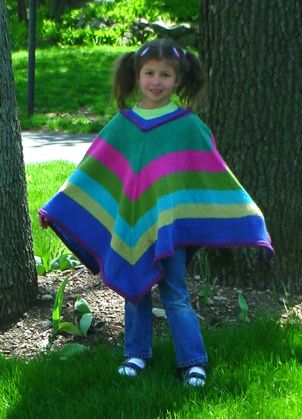
My Classic Elite Waterspun poncho isdone! Here it is mid-block:

I am really loving the improvised blocking wires I got to finish my Forest Path stole. I threaded them through the I-cord edges, two per side, then spread the poncho out on some towels to dry. The edges are straight, the corners are perfect, and dreaded curl-up has been eliminated. And I didn’t even need pins!
And here’s a shot of it on the happy recipient:
For those of you who wrote to ask for the pattern, here it is.
- Make swatches until you get a fabric that you like.
- Figure out your gauge.
- Measure how big a neckline you need to go over your head.
- Multiply that measurement by your gauge, and round it up to the next multiple of four.
- Cast on that number of stitches, placing 4 markers evenly spaced.
- Knit 6 rounds.
- On the 7th round, K1,make one, knit to one stitch before the next marker,make one, K1. Repeat this three times.
- On the 8th round – knit
- Repeat steps 7 and 8 until your poncho is as long/wide as you like it.
- Bind off, or work one or more rounds of attached I-cord to finish.
- If the neck is too wide, pick up purl bump stitches at the base of the rolled collar. You should have the same number as you cast on. Put 4 markers in your work evenly spaced. Then work one round starting with k2 tog, (k1, p1) until you have two stitches left before the next marker, ssk. Repeat between the other markers. Then work a K1, P1 round continuig ribbing as established. Continue this way, alternating decrease rounds and plain ribbed rounds for about 6-8 rows. Bind off VERY LOOSELY, making sure you can still get your head through the hole.
As to what yarns are suitable, what number to cast on given a particular gauge, what size needles to use, how much yarn you’ll need – this is all up to you. Experiment! Here are some thoughts to keep in mind:
What yarn is suitable? Look at it. Will it feel good when worn? Is it hand-wash only, otherwise hard to clean, or a light color? If so – are you prepared to care for it when it gets dirty? Is it loosely or tightly spun? Loosely spun yarns are more prone to pilling, catching and looking “used.” On the other hand, they’re often softer with a more luxurious drape and sheen. Is it heavy? A poncho is a big thing – larger than a lap blanket. Lift about 10 skeins worth. Can you envision yourself dragging around that much weight (or more)? Will the yarn stretch under its own weight when used in a large quantity? Cottons are heavy yard for yard and are infamous for this. Wool is less weighty per yard or meter. Wool/acrylic blends are lighter still. Is the color/texturenot only attractiveon its own, but will it look good on you? A puffy or furry yarn will add bulk andincrease the size of your sillouhette. A giant-gauge or shiny yarn willmake a garment look larger than it really is. Some colors and textureslook fantastic as accents, but applied over an entire garmentmay not be as appealing on every wearer.Decide what’s important to you and choose accordingly. Remember, you can always buy one skein to try out before you commit for the whole project. If that yarndoesn’t work out for a poncho,one skeinmight make a nifty hat or scarf.
What needle size to use? When swatching with a new yarn, start with the needle size recommended by the yarn maker. Do up a good size swatch in your chosen texture stitch or colorwork design. Do you like the feel and drape? If so, measure your gauge – you’re good to go. Swatch feel too stiff and tight? Try again on a size larger needle. Swatch too drapey and holey? Go down a needle size and try again. You’ll know when you’ve hit the best combo. If you’re combining several yarns of different weights or textures, be sure to swatch them as you will use them, using the stitch and needles you intend for the final project, even if that means making a VERY large swatch with multiple stripes. Once you do get the look/feel you like, make a note of your needle size and FINISH YOUR SWATCH. You’ll need it to do both gauge measurements and yarn consumption estimates. (I’m not good at keeping paper notes, so Imake knots in my dangling tail end to help me remember what needle size I used to makemyswatch. For example, four knots = US #4 needles.)
How many to cast on? Simple math. If your gauge is 4.5 stitches per inch, and you’ve decided that a 24 inch neckline is big enough, you start with 4.5 x 24 = 108 stitches. That lucks out because 108 is a multiple of 4, and you don’t need to round up.
How much yarn will you need? You can figure out roughly how much yarn your gauge square took for that number of square inches or centimeters. Draw out a diagram of your project (in this case – a big square), and estimate how big you want the thing to be when it’s done. Figure out its total area and divide that area by the area of your swatch. Got a 6-inch square swatch? Want to make a peice that’s 4 feet on a side? 4 feet x 4 feet = 48 inches x 48 inches = 2304 square inches. 6 inches x 6 inches = 36 square inches. 2304/36 = 64. It will take you about 64 times as much yarn to knit your 4-foot square piece than it took to knit your six inch square. Ravel back your swatch and measure, or weigh itto determine the amout of yarn you used. Now do the math.
Shortcut: If you like a slimmer poncho than this super-easy square one, there’s a poncho pattern generation utility available elsewhere on-line.
PROJECT – ZEN SCARF, HOUSECLEANING
First apologies to the few of you who subscribed to receive notification of site updates. You must have been going nuts since last night because I gave up on Picserver, and ported all of the photos here to a new server. It wasn’t my intent to pepper you with update notes, but I couldn’t turn off the notifications from here. I promise the housecleaning is now over.
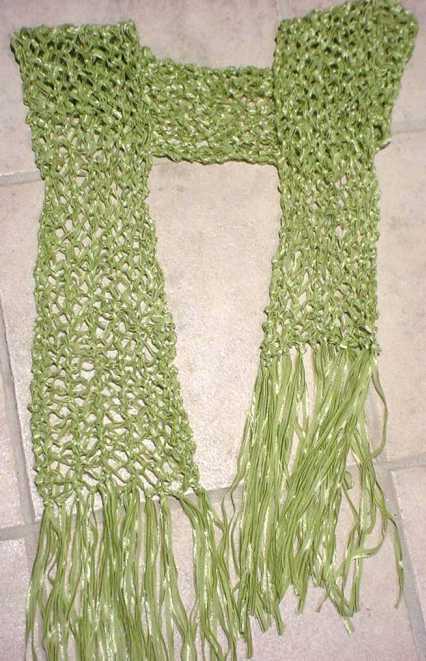
Rick-Rack Mesh Scarf in Berroco Zen
If you’ve ever met me you know I’m absolutely delighted at the prospect of the New Knitter Invasion, but at the same time my eyes are glazing over at all those novelty yarn scarves. I’ve done a few on special request, or as gifts for family and friends – but by and large, I find them pretty but intensely boring (hence my Kombu Scarf pattern).
Still, my pal Pat shop managerat Wild & Woolly in Lexington, MA (my local yarn store) asked me to help her come up with something fun to do with Berroco Zen, a ribbon yarn that’s been overlooked in favor of flashier novelty yarns. I couldn’t say no. (For some reason, Zen is in the yarn review collection twice, so until I get that fixed,there’s another set of reviews here).
Here’s what I came up with:
Here’s the pattern. Eventually I’ll add it to the free pattern pages at wiseNeedle.
<p
Rick-Rack Mesh Scarf in Berroco Zen
Materials:
1 Skein Berroco Zen or approx. 110 yards (102m) of a similar ribbon yarn
US #10.5 needles
Gauge:
Gauge is difficult to measure, but finished scarf will be about 5 inches wide by about 56 inches long (exclusive of fringe).
Instructions:
Using half-hitch cast on or other stretchy cast-on, cast on 14 stitches. Knit one row.
Follow Rick-Rack stitch pattern until scarf measures approximately 56 inches long.
Rick Rack Stitch:
Row 1: K1 (YO, slip one stitch as if to knit, K1, pass slipped stitch over)6x, K1
Row 2: K1 (YO, slip one stitch as if to purl, P1, pass slipped stitch over)6x, K1
Bind off VERY LOOSELY.
Cut remaining yarn into 18-inch lengths, and attach to ends of scarf as fringe.
2004, Kim Brody Salazar, http://www.wiseneedle.com. Not to be duplicated on other websites or in print without permission of the author. Pattern for personal use only. Please contact the author if you wish to make this item up in quantity, even if it is for charitable sale or donation.
