MORAL OF THE STORY…
“Don’t burst your appendix if you can avoid it.”
Younger Daughter is back home, after 19 days at Children’s Hospital in Boston. She’s still got a way to go before she’s school-ready, but she’s happy to be home with quiet, limited interruptions, and familiar food. Thanks to everyone who sent get well wishes!
I’d like to especially thank the staff at Children’s, not all of whose names I caught. They’re a very caring bunch, and did all they could to make the kid better and more comfortable. Here’s her much cherished souvenir – a little squeezy ball they gave to Morgan to exercise her fingers.
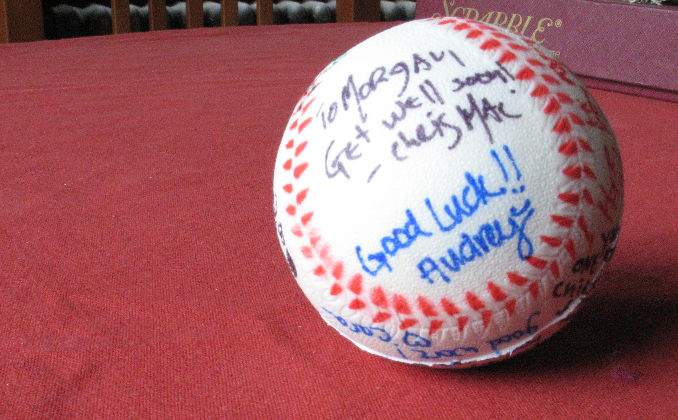
We asked the nursing staff we were assigned to, to autograph our “game ball.” We managed to get most but not all of them. Special thanks to Chris Mac, Sharon, Michelle, Josh, Maria, The Original Chris, Meredith, Rachelle, Caitlin, Paola, Cleanne, Cara, Audrey, Dr. Arnold, Dr. Hamilton, all of the residents on 10NW, and all of the other folk whose names slipped me by when I was in a sleep-deprived fog. The kids still has to go back to have the tatters of her appendix excised, but that’s a one day bit, not another extended stay.
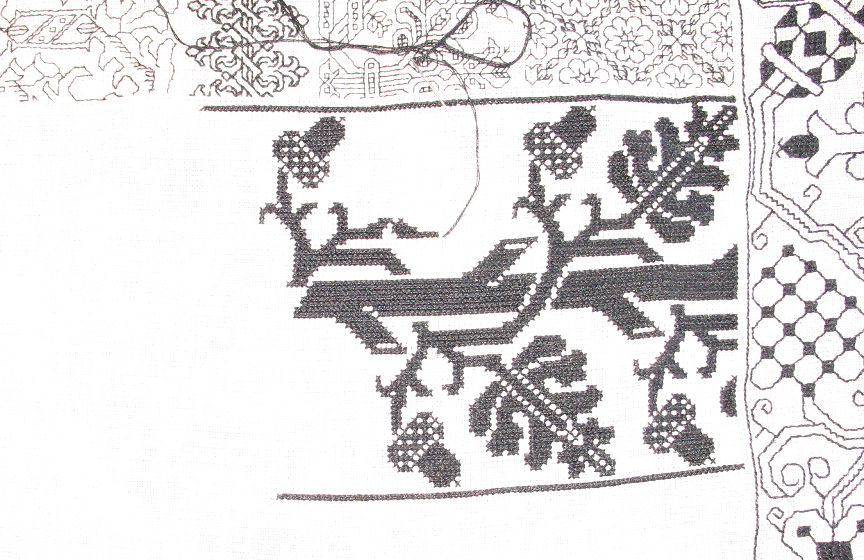
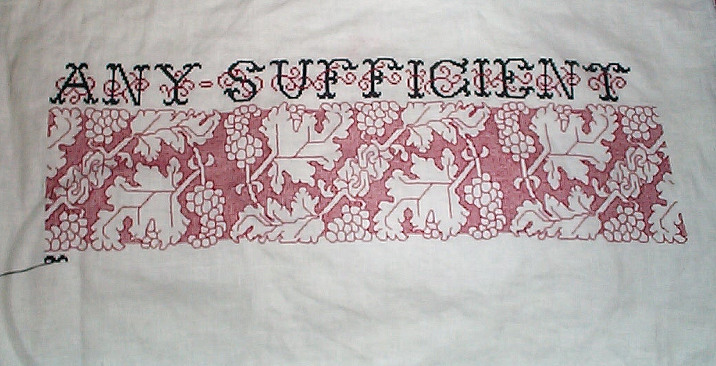
As you can see, while we were there I had lots of time to stitch. I finished out the oak leaves and acorns at the right, and started another band at the left. That one is very dense, in long armed cross stitch, so it’s not exactly zipping along. Also stitching when sleepy led to tons of mistakes and ripping back, so what’s here is probably only about half of what I actually stitched.

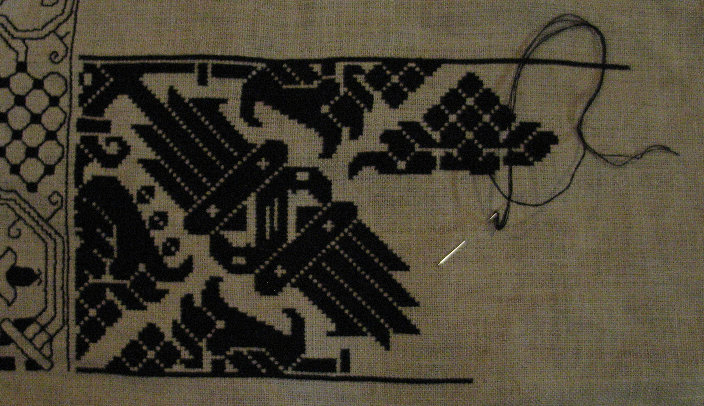
Even with all of the rework, stitching was a much needed self-administered sedative while I was being a bedside mom.
The plan is to make this strip the same length as the oak leaves. Eventually I’ll either find or noodle out an even denser band for the narrow area immediately to the right of the oak leaves, and a less dense but similarly black band to put between the current strip and the established horizontal bands. I might take a break from dense work for a while though, and opt to work something in double running elsewhere on the piece before attempting those two strips. There’s tons more room both north and south of these.
One thing to note. So far, all of the finished strips are bi-directional. At this point there is no up or down on my sampler. Either end could be at the top. I could even opt to finish this out in landscape rather than portrait orientation. Jury is still out on what I will do, but I do have a couple of strips I’d like to include that are figural, with clearly defined ups and downs. Stay tuned to see how I work them in.
MY VEGETABLE LOVE…
…should grow. Vaster than empires and more slow.
This week’s progress is brought to us by an in-Barony performance of Shakespeare’s Measure for Measure, enacted by The Baron’s Players. The troupe is made up largely of friends, and the performance was quite enjoyable, played as a farce it had some laugh-out-loud moments. And as I watched, listened, and laughed, I stitched. This is not considered a faux pas in the SCA, where diligent quiet needlework is an acceptable audience activity, provided the attendee is not so absorbed in it as to be insensible or unappreciative of the performance.
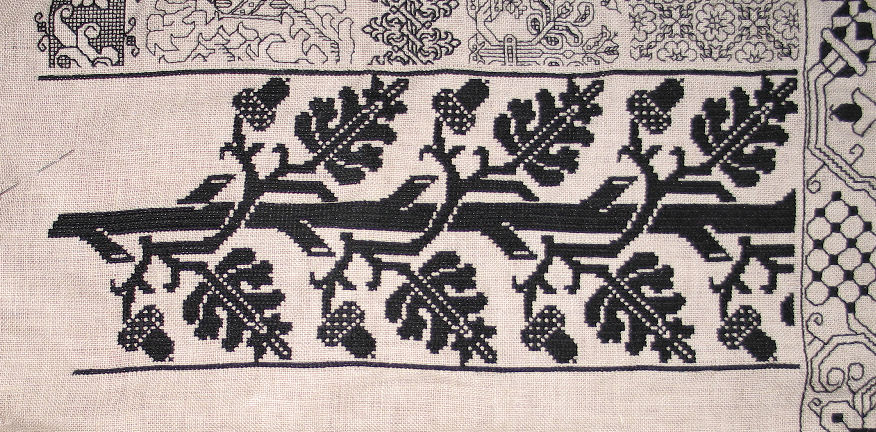
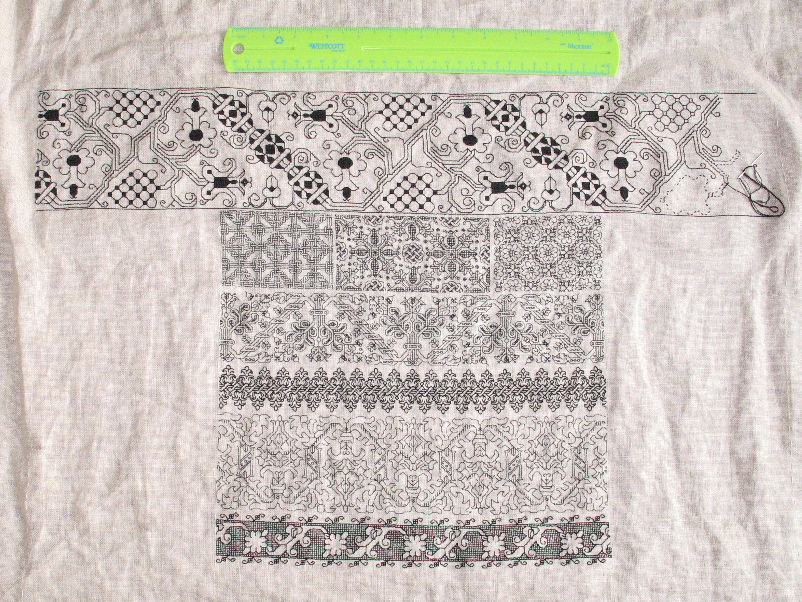
Here you see a sideways view of the accumulated stitchery to date, so you can get an idea of scale and placement:

One more full leaf, plus an acorn sprig and part of a second, and I’ll be done with this strip and on to the next.
To Adelle, sorry to disappoint. I won’t be drafting this project up as a kit and selling it, but all of the designs in it will figure in my forthcoming book.
For those of you who follow such things, barring major crises – I have every intention of being at the Carolingian 40th anniversary at the end of the month, where I will be part of the “dim memories from the ancient past” contingent. I will be wearing my dress with the blackwork underskirt, and in all probability will be seated somewhere comfy where I can watch the fighters and embroider. Stop by and say hello.

LEAF BY LEAF
This week’s progress largely brought to you courtesy of a kid orthodontist appointment. The removal of Younger Daughter’s braces was good for a leaf and a half:
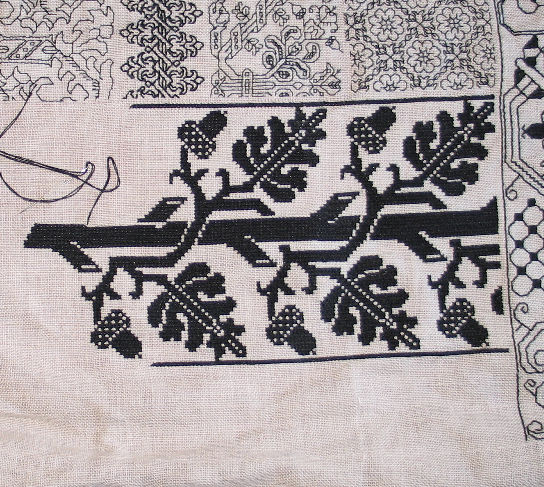
In the photo above you can see the room left for the next narrow band. It’s going to be darker than this one. But what to put there hasn’t been decided on yet.
On the SCA side, I will be at the 40th anniversary of the Barony of Carolingia later this month, where I will be part of the “Long Forgotten Artifacts of Elder Days” contingent. Provided I can rustle up a dress.
DRIVE BY PROGRESS POST
Deadlines have totally consumed me. No time to do more than post this minimal progress; and smile at the plaited look of long armed cross stitch, up close.

ACORNS, TOO
A bit more progress since my Friday last snap (blogged on Sunday). Now you can see the leaves and acorns, plus the beginnings of the twining stems:

I’ve departed a bit from my original graphing, norming the acorn caps a bit.
SCALE
Some progress and some answers. First, the progress:

As usual, not as rapid as I’d like, but work limits the amount of time I have to stitch. Now on to the answers to questions in my inbox:
What stitch are you using for the dark areas in the current band?
I settled on Italian double sided stitch (aka Arrowhead stitch), as shown on page 32 of The Proper Stitch by Darlene O’Steen . (I found my copy years ago when it first came out, at the now long gone Yarn Shop in College Park, Maryland.) However, I’m finding that over 2×2 threads I can’t pull it tightly enough to emphasize the holes and make the appearance as mesh-like as I want. There’s just not enough room to compact the weave of my ground cloth sufficiently. If I do another piece using this technique, I’ll work over 3×3, or find a more loosely woven ground.
This is a squirrelly looking band. Is it original?
It’s a redaction of a 16th century artifact in the collection of the Metropolitan Museum of Art, Accession Number 79.1.59 . It’s one of the many patterns that will be in The Second Carolingian Modelbook.
Which end is up?
I haven’t decided yet.
Why is the current band so big?
No particular reason. I saw it, charted it out and decided to play test it. Yes, it’s at a larger scale than the patterns I’ve worked so far, but it won’t be the largest pattern on the piece, nor will it be the least dense. When it’s done this strip will span the entire width of my stitching area. I’ll run some other patterns perpendicular to the established direction, framing the part I’ve already worked. On the other side of this current band will be several more wide bands of various types. They may also be worked horizon to horizon. I’m improvising as I go along.
Have you done any planning at all?
Yes, in a way, but not by orchestrating the entire piece beforehand. Instead I set ground rules. I established stitching bounds and guidelines. I marked the outline and centers of the total stitching area, and added some additional guidelines at 1/4 width and length intervals. I am leaving four threads bare between all stitched units. I’m trying to balance density as I go. I’m working with only one color (good old DMC 310 black), using either one or two strands, depending on the effect I want to achieve. Eventually there will be spots in the ground for which I cannot find or adapt strips or spot motifs of suitable width or height. For those places I intend to use additional fillings from the Blackwork Fillings Collection. And I’m trying to use all-new patterns – stuff I haven’t stitched before, with the goal of experimenting with as many of my new book’s patterns as possible. So you can think of this as a preview of things to come.
Why aren’t you jumbling these up instead of making reproductions? There are tons of beautiful repro samplers out there you can stitch. Why go to all this trouble?
Because stitching someone else’s repro isn’t something I’m interested in doing. I do admire those pattern drafters and stitchers who chose to do those things, but I find the concept has no appeal for me personally.
I’ve written about this before. (It’s the base stance that makes me a “rogue Laurel” in the SCA.) Exact replication is an extremely high form of craftsmanship to be sure, but it doesn’t manifest the highest level of understanding. Just as in a martial art, being able to reproduce the kata – the formal training exercises – shows extreme skill, but it’s something else entirely to be able to take the kata’s movement vocabulary, and improvise if attacked. Not everyone who can demonstrate kata in the dojo can turn that knowledge into effective fighting. Being able to go beyond kata skills is what differentiates the master from the adept. It’s the same for needlework. Reproductions are kata. Making an entirely new piece from the same vocabulary, such that were the new item to be transported back in time it would fit right in – that’s mastering true understanding. Now my current piece is NOT something that could be transported back in time that seamlessly. I do not make that claim. It’s only a training and teaching exercise. But it is one that’s stretching me in new ways – directions I could never achieve by working a stitch for stitch artifact reproduction, or from someone else’s chart or kit.
I intend to keep learning, and I invite you to learn with me. Needlework is a very safe subset of life in general. But make it exiting. Face uncertainty and possible failure. Think about taking inspiration from whatever you find, wherever you find it. Go for broke, combine old forms in new ways (or new forms in old ways). Start with a blank cloth and bungee jump with me. The ride can be scary at times, but it’s tons of fun.
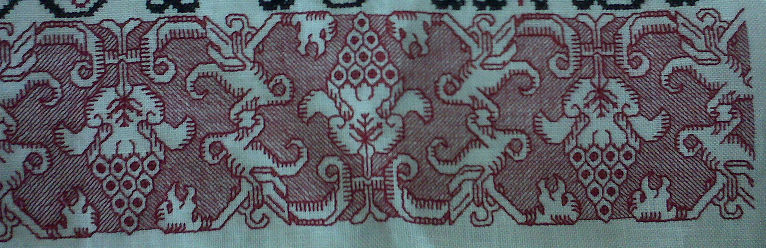
GRAPES – REPEATING ON AND ON ON REPEATS
Now that there’s more stitched it’s probably easier to see the pattern repeat style that I wrote about last week (click on thumbnail below for larger version):

After working with lots of historical graphed strip and border patterns, I can say that the overwhelming majority of the form repeats in three standard ways:
The first one is a straight repeat – no mirroring, and no flipping. It’s common for edging components on larger patterns, like the little acorns on the larger strip below (adapted from V&A T.133-1956), and (no surprise) for totally symmetrical pieces like the multicolor one (adapted from a Siebmacher design from a post 1600 edition that’s not on line):


The second order repeat is a bounce-mirror. There are two vertical centerpoints and the design bounces back and forth between them, but never inverts. Lots of these feature mythical beasts, people or animals – motifs that have a strong up-down identification. Here are two examples from an earlier Siebmacher collection that’s available on line, one with a nifty yale, and one with an abstract heart and flourish.

In the pattern with the yales (heraldic goats) the mirror columns are the center of the flowerpot behind them, and the center of the fountain like object between them. Even this pattern, for all of its complexity is a type 2 – a very wide type 2, with the two mirror columns being the center of the trefoil interlace near the right hand side of the photo, and the center of the heavy stem interlace about a third of the way from the left edge:
![]()
The third order repeat can be the most confusing to stitch, but is extremely well represented in historical artifacts. It’s an elaboration on the two mirror bounce repeat in the second example, with alternating iterations flipped north/south for good measure. Although these repeats employ that flip, they’re actually simpler than type 2s, above.

Why am I calling this one simple? Because there’s really only one mirror column: the centermost axis of the flowers. The north facing and south facing flowers are identical. The design may be visually more complex because of the flip, but when stitched there is less variation – less following of unique chart elements – than in a large type 2 pattern.
Here are some more examples of type 3 repeats:


Now to loop around to my current strip, this one is a hybrid:
The entire four leaf grapevine unit repeats as a type 1 – verbatim, with no flipping or mirroring. BUT inside each unit we’ve got type 3 mirroring/flipping. The mirror column (which the mathematically inclined might call an axis of inversion) runs down the center of the unit, and to make things more complex, is skew, rather than a nice bisecting 90-degree line from top to bottom. This is the same symmetry that my current pattern shows.

Both are rather like sideways Z or S units, with a strong diagonal element down the center (in this case the heavy geometric beads, and for the red grapes, the main stem), with items mirrored and flipped to either side of the axis of inversion. The difference between this and red grape pattern is that the individual units in this one are connected. If I chose to, I could have worked the red grapes with every other unit mirrored (in fact, in the original the pattern is shown with a companion center cluster and the clusters I use repeated on each side of it, but mirrored around the center unit). I don’t have that choice in my current strip of black grapes. The repeats are anchored to each other by those stems.
To sum up, there are many ways that repeats are formed in historical patterns, ranging from the simple to the complex. All are legitimate, with sourced examples of employ in historical artifacts (or in my case, pieces stitched from sourced historical designs). Understanding the symmetry helps deconstruct the complexity of the pattern, and (I find) makes working it easier.
So. Why else should we care? Frankly, I haven’t a clue unless you’re a historical embroidery dilettante like me. I find the way that patterns are used, the way that repeats are made, and the way that symmetry is harnessed for general effect to be endless sources of fascination. But I’m a pattern geek. Your mileage may vary.
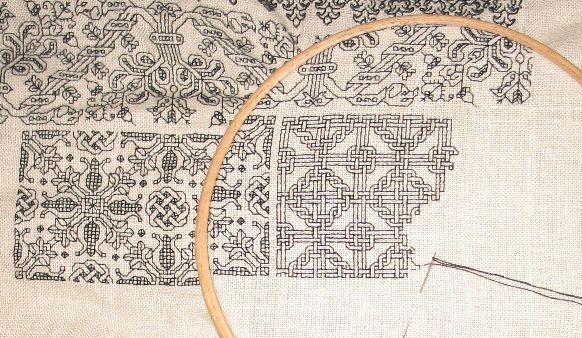
A BIT DIFFERENT
Here’s the latest bit –
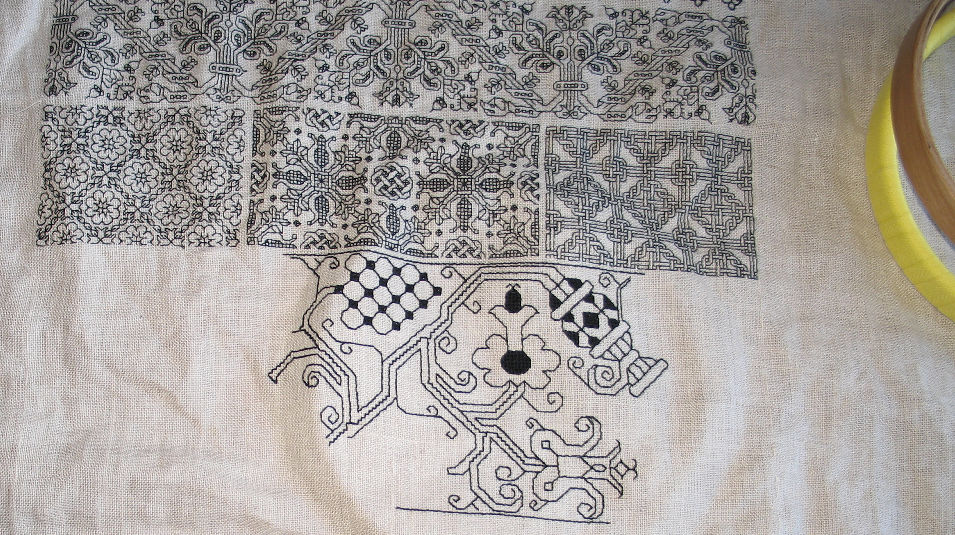
You can see the three fillings from the blackwork filling collection immediately above this new strip. It’s very different in feel from the previous pieces. The proportions are huge. It will span edge to edge (half again as wide as the already-embroidered area, with 25% extra to the right and left of the stitched area. This pattern is one of the ones that will appear in the upcoming book. I’ve charted it from a 16th century artifact in the collection of the Metropolitan Museum of Art in New York.
The original is strip worked in red silk on linen, probably a band of edging on domestic goods – a tablecloth, cover, towel, or sheet (the museum has about 31 inches of this pattern – a bit over four full design repeats). The repeat itself is one of the less commonly seen constructs – more of a large sideways “S” than the standard mirror around two centers bounce repeat.
Here’s a simple two-centers bounce repeat, with a minor bit of complication in the “bindings” that unite the two sprigs between the acorns:

There’s an “up” acorn and a “down” acorn. The design is mirrored to the left and right of each acorn’s centermost spine. The directionality of the bindings is a very minor departure from the bounce-repeat symmetry. Here’s another, more elaborate example of the same type of simple repeat:
Again, there’s a center line down the middle of the main motif flower, and the design is mirrored left and right of it. This one is a little bit more complicated because the “up” and “down” versions of the pattern are different, but it’s still a simple two-center bounce repeat:
![]()
The pattern I’m working on now has a center, and does feature a limited mirror repeat It’s an axis that runs through the bunch of grapes. You can see that I started there, at the not well-defined visual center – it aligns with the center of the pattern immediately above it. I don’t have enough stitched yet to show you how this pattern falls out, but if you zip over to the artifact page, you will see that the grapes and flowers section is in fact a mirrored repeat, BUT the bead line columns do not mirror. (You can see I’ve started one to the right of the trumpet flower). All of the bead-columns in the original slant in the same direction. This method of building a repeat is quite uncommon. Which is one of the reasons why I’m playtesting this particular snippet.
The other reason is the sold black stitching. As discussed, I’m trying to work out the method used to produce the mesh like grids so often used in period voided work. I don’t believe that the originals I’ve been looking at employ a withdrawn thread method to produce the perforated ground, so a pulled thread stitch is most likely. This piece used what looked like the same method, but limited to little accents. I have to say that I do like the look of what I’ve stitched so far in Italian Two-Sided Cross Stitch (ITSCS), pulled as tightly as possible, but I’m not satisfied that I’m using the same stitch as the artifact. Problems of thread thickness and tensile strength for pulled work aside (I’m using two strands of standard DMC cotton floss on 36 count linen), I can’t get enough of a “pull” over my 2×2 thread background to produce the mesh-like ground effect. I’ll finish out this strip with ITSCS, but will continue experimenting, seeking that mesh-like look.
THIRD SMALL INSERT, ON TO THE MYSTERY STITCH
Thanks for the lively discussion! Last week’s post was the most commented upon String has ever had. It’s nice to know that others meet enjoyable people (and poorly socialized idiots) through stitching and knitting in public. And that many of us think alike during these encounters.
I’m moving along on my projects, both on fabric and paper. Progress has been severely slowed as of late due to work related deadlines and a bout of the Evil Flu that’s been going around. But there is some slim progress none the less:
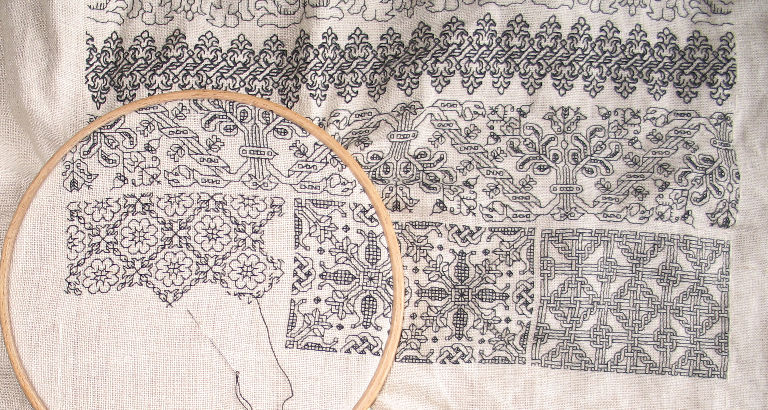
You can see that I finished the eye-boggling interlace, and am now working a relatively tame flower in frame segment. All three are patterns from the blackwork filling collection. I should be finished with this segment by mid-week at the latest.
Next up is a new one though. It’s a double running stitch design graphed out from a photo of a period artifact (part of the upcoming book) but I haven’t tried it yet. The new panel will feature some small areas that are filled in. In the original they are stitched in the same stitch that is used to make a totally overstitched mesh like background on many other contemporary pieces. This style of stitching is most often seen worked in red, so densely stitched that in the mesh like areas no background linen is seen, and it’s most often used as the background on a voided style work, although there are examples of it being used as foreground, and (as in my upcoming trial – a spot accent).
Here’s a good example from the Manchester Art Gallery – you can see that some of the foreground detail is filled in using plain old cross stitch, but the background and the solid fill detail areas are clearly different. This style is a pulled thread technique rather than a withdrawn thread one (neither warp or weft threads of the background material was removed during production of the stitching). Needlework authors cite several stitches as the working method to achieve these mesh like backgrounds including
- Italian Two Sided Cross Stitch
- Four Sided Stitch (aka Quadra, Punto Quatro, or Simple Fagot Stitch)
- Russian Drawn Ground (but this is a withdrawn thread rather than pulled thread technique)
- Double Fagot Stitch (sort of Four Sided Stitch on steroids, with each pass taken twice)
The first two are the most commonly cited. My limited experience with those two makes me lean towards the Two Sided Cross Stitch because Four Sided Stitch usually leaves a little dot of background fabric exposed in the center of each bundled stitch unit (here’s an example – beautiful and regular, but the centers aren’t covered with thread.)
Embarrassing as it is to admit – I’ve not tried any of these in context. Long Armed Cross Stitch, yes. I use it all the time. But the family of pulled thread stitches has always intimidated me. I’ve played with them a bit, but aside from an occasional spate of Italian pulled thread hemming, I’ve never employed them on a “real” work. But there is first time for everything, and I intend to try out the Italian Two Sided Cross Stitch. Stay tuned for more developments!
NO, I’M NOT NUTS
Toodling along on my current sampler…
…working on another pattern shared in my blackwork fillings collection, just stitching along. Once the base repeat is established, I find I can copy off my own work, rather than referring to the printed pattern. Sure, this one is on the complex side, but it’s a regular repeat and not what I’d consider particularly difficut; and without having to refer to a printed sheet, the project is totally portable. So I brought it with me to my kid’s school chorus concert. There’s always a long wait between the participants’ early drop-off time and the public concert’s start. Lots of parents stay rather than going home and returning later. I was not alone.
I’m used to knitting and stitching in public. I’ve gotten all sorts of comments over the years, ranging from real interest to veiled hostility. The overwhelming majority of people are interesting to talk to, and my project is always a convenient conversational icebreaker.
There are the folks who ask after the item being worked, or volunteer stories of their own about knitting or stitching. They’re usually pleasant and I enjoy talking to them. There are invariably people who say things like “Oooh. I could NEVER do that.” (What runs through my head is the reply, “With that attitude, I bet you’re right” but I rarely voice it.) Depending on how dismissive they are I either smile sweetly and don’t reply out loud, or try to explain that it’s not anywhere near as difficult as it looks.
There are kids who are fascinated by what I’m doing. Knitting socks especially seems to boggle them. I have fun with them, explaining he project and chatting about the craft in general.
Unfortunately, not everyone is pleasant. Some people say that they hate wasting time. I usually point out that at this very moment (mid commute, in the doctor’s office – whatever) I appear to be far more productive than they are. A couple of decades ago there were more derisive and ideological comments. Mostly from women, who were eager to point out that domestic tasks like knitting and stitching were ineherently demeaning, and should be shunned, especially in public. I would usually engage with them, responding that “freedom from” also means “freedom to,” that I had a highly technical career thank you, and that I found relaxation in traditional crafts. We usually parted on less divisive philosophical grounds.
But this week, just sitting there stitching, I found a whole new public comment beast. The ones who decide that anyone doing something alien to the commenter is clearly nuts, deranged, crazy, a lunatic, or otherwise mentally abberant; and should be pointed out to everyone else. It also seems that these folk (aside from their insenstivity towards the differently abled) delight in being loud and obnoxious. Maybe it was the ambience of the high school in which the performance was taking place, but I felt like I’d fallen back among locker room bullies again.
What did I do? First of all, I didn’t move my seat. I’d come early and sat underneath one of the few lights bright enough for stitching. When it became clear that glaring and not responding wasn’t working, I asked the commenters to kindly be quiet, that they were disrupting the people around us – in my best Miss Manners icy-haute tone. “Bitchy, too” was the reply, and they went away. Like vultures everywhere they probably flew off to circle over someone else’s carcass.
I won’t stop stitching and knitting in public. Idiots are everywhere, and I refuse to let them win.
Have your own stitching/knitting in public story? Positive or negative, feel free to share.
