DAY OF THE TAMALE – A DIGRESSION FROM KNITTING
Well, three days of the tamale, to be exact.
A good friend of ours hosts a themed Christmas dinner every year. It started out as a “cats and dogs” gathering decades ago, when those who weren’t migrating home elsewhere for the holiday pooled resources and cheer. Over the years it has become a second-family type event, deeply enjoyed by all.
This year’s theme (announced last year) is Mexican food. And in a moment of ebullience and generosity some time after my third egg nog last year, I promised to make tamales for the 2006 crowd. Since tamales freeze well, I decided to do them this weekend. That way should the batch prove unsuccessful, I’d have plenty of time to recover.
Living here in Massachusetts, finding the ingredients can be a challenge. I’ve been collecting corn husks for a couple of years now, buying a bag when I can find them. Fresh peppers, or at least a small selection thereof, can be found here now. Dried peppers are tougher although in some neighborhoods they can be found, too. My own stock is hand-imported from New Mexico and Arizona, either by me during business trips, or through the kindness of another good friend in Albuquerque. And masa flour I can get locally in the local natural/organic food supermarket, or in the same neighborhoods where decent peppers can be found.
So this weekend I spent pretty much in the kitchen. Saturday was cooking the meat filling – in my case pork. Sunday was making the flour, stuffing the tamales and steaming them. And Monday after dinner was assembling and steaming the last few that I ran out of time to complete on Sunday.
I don’t claim to be an expert in making these (I am after all, a nice Jewish girl from Brooklyn, and Mexican only by marriage). My experience is largely a matter of reverse engineering, trying to make tamales that look, feel, and most of all – taste – as close as possible to the ones my father-in-law’s family sends to him. I’m narrowing in on the optimal product now, but I still have a few tricks to learn. Still, these do come out better than any I have had in any Mexican restaurant this side of the Mississippi. So as a mutant multicultural Hannukah/Christmas/Solstice/New Year’s present I share the recipe here.
Please note that these tamales are one of the 365 things you should only eat once per year. Luckily the amount of labor involved limits their appearance to special occasions. This recipe makes enough for a large party or family gathering (recommended), or at 4-5 per serving, enough to freeze for several months of tamale-accompanied meals (see caution on those 365 things).
One Gringa’s Tamales
Makes about 150-165
Special equipment: A huge mixing bowl. A large steamer pot (big aluminum Chinese steamers, large spaghetti pots with steamer inserts, lobster or crab pots with a colander inside all work). Optional: An electric mixer, an immersion blender. One or more helpers for husk-washing and tamale assembly (this is A LOT of hand work for one person)
Meat filling
-
6 pounds of pork shoulder or another fatty, stringy cut, hacked into roughly inch thick slices and gobbets. Plus any bones and skin.
-
About a dozen assorted fresh hot peppers of various types (Fresnos, Serranos, Tepins, yellows, Mirabels, Jalapenos, Mirasols, Cayennes, I use a mix of anything I can find – except habaneros which can overwhelm the dish)
-
About 10 dried New Mexico dried chile pepper pods (use dried California Anaheim peppers if you can’t find the slightly more flavorful and hotter New Mexican ones)
-
About 15-25 other hotter dried peppers (tiny pequins, cascabels, or arbols, again whatever I can find)
-
2 medium or one large onion, finely chopped
-
6 cloves of garlic
-
1 Tbs salt
-
1 can of beer (or equivalent in water)
-
More water to cover
-
1.5-2 tsp dried cumin (comino)
-
2 tsp dried oregano
Day 1: Clean and de-seed dried peppers, soak in beer to rehydrate for at least a half hour. Char and peel fresh peppers. The delicate might want to wear gloves for both of these operations. Finely chop fresh peppers. Crush or mince garlic. Mince or chop rehydrated peppers, saving juice (I cheat by sticking an immersion blender into my beer or water plus peppers and turning the whole thing into a slurry). Toss meat and bones in large stew pot along with all other ingredients, add water just to cover. Simmer for at least two hours, preferably until mean is falling apart, and all the vegetables have denatured into the broth. Taste if you’re brave. The meat should be quite hot because it’s the primary flavoring in the tamale, but is used quite sparingly. Set aside to cool, preferably overnight in the fridge. If you’ve used skin-on shoulder, the broth will set up as gelatin in the fridge. That’s good.
Day 2: The fastidious might want to skim the fat off the top of the cooked meat. I will say as shocking as it sounds – don’t bother. The biggest enemy of tamales is dryness. This is a recipe that I’d rather have full fat once a year, than as a reduced fat shadow of its true self. While the meat is still cool, remove it from the pan (keep the jelled juice and fat – don’t wash the pot yet). Using two forks, shred the meat into strings. Use this opportunity to remove bones and any tough bits. Return meat to the pot and heat it just enough to melt the thickened juice. Pour off as much as is convenient. You’ll probably have between 2 and 4 cups of liquid inclusive of both broth and fat. The meat should be moist, but not dripping. Reserve the liquid and set the meat aside. Fridge both until you assemble the tamales.
Dough and Assembly
-
One 5-lb bag of Masa Harina instant corn flour (to be accurate, the bags are actually 4.4 pounds, I make up the difference from the cupboard)
-
1 pound of lard. Yes lard. This actually makes a tastier and less greasy tamale than the equivalent in vegetable shortening.
-
1 cup of Crisco shortening (reduce this by half if you are only using one 4.5 pound bag of masa). I use this only because I rarely use lard, and I don’t want to buy a second pound and have the remainder sit around forever.
-
2 Tbs salt
-
The reserved liquid from the meat
-
Water or broth. You’ll probably need between 4 and 6 additional cups of liquid, depending on how much you got from your meat and how dry your masa mix is.
-
2 bags dried corn husks
Start by immersing the corn husks in a pot of warm water to cover (you’ll need to weight them down with another pot on top to keep them submerged). Soak for at least two hours. They will almost certainly be a bit dirty, with clumps of dried corn silk in the centers of each bundle. Separate the husk leaves gently, taking care not to split them. Rinse well under running water. Stack them between dishtowels as you clean them. They need to be moist and pliable but not dripping wet when the tamales are assembled.
In a huge bowl (and I mean huge) using an electric mixer, beat the lard and shortening until soft and uniformly creamy. Add all masa and salt and mix by hand until all the fat is incorporated. The dough will look crumbly at this point. Add the liquid from meat – broth, fat and all. Knead to incorporate. Continue adding water (or broth) and kneading by hand until the mixture is just a bit softer than PlayDoh in consistency, sort of like a very stiff peanut butter.
By now your meat should be cool (it’s easier to handle cold). Your corn husks should be softened and clean. Your dough should be ready. It’s time to assemble. Assembly is where my lack of skill really shows. The tamales I’ve had made by my Mexican inlaws’ families are not fat and floppy masa cakes with an open end, like the packaged ones found at Trader Joes supermarkets. Instead they are stogie-thin, with both ends of the husk neatly tucked away to completely encase the filling. I’ve never managed to figure out that second end tuck, so I use a small tie to secure each tamale.
Start by taking roughly a cigar-sized lump of masa and squishing or spreading it onto one of the larger corn husks. Aim for an area slightly right of the center line. You want to make a patch about the width of a pack of playing cards that extends from about an inch from the pointy end of the husk to within about an inch of the wide end, and that is about a quarter inch thick.

Using a fork lay a thin stripe of meat mix down the center of the masa – depending on the size of the corn husk, this can be about a teaspoon or two. Remember – most of the hotness in this recipe is in the meat. The more meat, the hotter the tamale is. Even the hottest meat can be tamed by upping the masa:meat ratio.

Begin rolling the husk and masa tightly to encase the meat.

When you’ve got it mostly enclosed, stop rolling and fold the pointy end of the husk in over the growing roll.

Continue rolling to make a little log with one end tucked neatly away. Now take one of the substandard corn husks (there will be some too shredded or narrow to be useful). Rip off a thin strip and use it to tie the open end securely closed.

Put all your tamales into a the upper part of a steamer pot with the folded side down. They should be packed tightly enough to stay upright, but not so tightly that they don’t wobble a bit (otherwise they will take longer to steam).

Set the tamales to steam for about two hours. At the end of two hours pull a sacrificial tamale from the center of the batch. Unwrap it. If it’s done the filling will be moist but not sticky, and will separate cleanly from the husk. For the record, my large spaghetti pot/steamer basket can hold about 40 tamales at a time. I steam them as I complete them, and did three batches on Sunday and one Monday night. Unsteamed tamales should be returned to the fridge if they have to wait their turn to be steamed. Cooked tamales should be packed into zip-lock plastic bags or plastic containers and frozen as soon as they are cool enough to handle. It’s worth the time to freeze them in meal-sized units rather than all together.
To serve tamales, I thaw them quickly in the microwave or using a steamer. You can serve them just like that. But best of all once they have been thawed is to finish them by baking them in the oven until the husks are dry, or tossing them into a dry skillet or on a griddle to the same ends. Serve as an accompaniment with any Mexican meal, or as a snack or appetizer. Salsa Verde or any other condiment you wish can round out tamales to make a meal.
Enjoy!
FOR THE COOKIE CHALLENGED
Heading out to a friend’s house and need a hostess gift? Is that friend someone who makes you feel like your own cooking skills are limited to opening a jar of peanut butter? You CAN make something edible that they’ll love, and you CAN do it with minimal skill. (Purists may object to using frozen puff pastry. They can make their own. I do it when it really matters, but for this the frozen kind is a useful stand-in.)
Cinnamon Nut Ears
Here’s what you need to make about four to five dozen cookies. Enough for a generous looking pile on a plate. If you need fewer, use only half the box of pastry, half the sugar and cinnamon, and half the nuts. Although you’ll end up using only a bit for brushing, you’ll still need to crack one whole egg, as at last report chickens have not yet learned to lay halves. (Note that precision on the ingredients here doesn’t matter much, so don’t worry if you’re not spot on.)
One box of frozen puff pastry from the supermarket’s frozen desserts aisle.
1/2 cup of sugar, plus a bit more set aside for sprinkling
About 1 cup of shelled nuts (pecans, walnuts, almonds – it doesn’t matter), chopped up fine.
One egg, cracked in a little bowl and beaten
About 3 teaspoons of ground cinnamon
At least one cookie sheet or flat pan. Two if you’ve got them.
A spoon
Baking parchment (looks like waxed paper, but is meant to go in the oven. Supermarkets carry it.) If you can’t find any DON’T use waxed paper, instead smear the cookie sheet with butter or shortening.
A rolling pin, large dowel stick, or cylindrical glass.
Medium size mixing bowl
A knife, preferably serated.
A flipper or spatula to turn the cookies over
A rack or heat-proof surface on which to cool the cookies
1. Take the box of pastry out of the freezer about a half-hour before you begin.
2. Turn on your oven to 400-deg F.
3. Make a spotlessly clean, large clear spot on a countertop or very large cutting board.
4. Sprinkle some sugar on your clean spot.
5. Take the first puff pastry sheet out of the box (there will be two, packaged together). Gently ease it open and flat. Try to keep it from cracking along the folds. Sprinkle some more sugar on top.
6. Roll it out until it’s about 1/8 inch thick. Try to keep it roughly rectangular and untorn.
7. Take a bowl and mix together the nuts, a half cup of sugar, and the cinnamon.
8. Paint the dough rectangle with the egg.
9. The bowl of cinnamon/sugar/nut stuff is enough for both puff pastry sheets, so figure on using only half of it in total for this first sheet. Keeping this in mind, liberally sprinkle your dough with about half of the amount you’re contemplating using on sheet #1.
10. Fold the bottom edge of the dough up to the center line. Fold the top edge of the dough down to the center line.
11. Sprinkle about 2/3 of the nut/sugar mix you’re reserving for this dough sheet on the resulting long thin folded dough blob.
12. Repeat step #10 to make an even narrower log.
13. Sprinkle the remainder of the nut/sugar mix across the top of the log.
14. Fold the log in half and pat it a bit so it stays in a log shape.
15. Using sawing motions instead of squishing motions, cut the log into slices roughly 1/4 inch thick.
16. Put a some parchment paper on the cookie sheet and place the slices on it. (If you don’t have parchment, grease your baking sheet by rubbing butter or shortening on it, then put the cookies directly on the pan.
17. Bake the first sheet of cookies in the 400 degree oven for about 4 minutes. At the end of 4 minutes flip the cookies over and bake them for another 4 to 5 minutes. At the end of that they should be lightly golden and stiff. They may still look a little bit soggy, but they’ll crisp up provided they’ve lost that translucent, doughy look.
18. Slide the whole sheet of parchment to a rack or heat-proof surface to cool. (This is one reason to use the parchment, otherwise you need to pick up the cookies one by one to put them on the rack to cool, plus the baking sheet will need to be washed before you put batch #2 on it).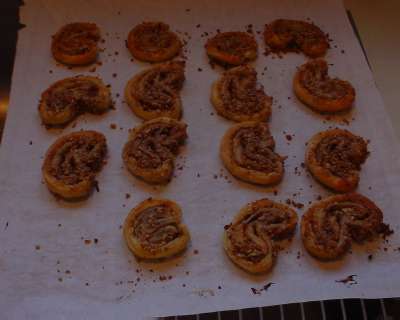
19. After the cookies are cool, you can sprinkle them with confectioners sugar (highly optional) then put them in a box or tin, or cover them with plastic wrap.
See where one’s missing from the photo?? That’s the odd shaped one from the very end of the roll. That’s the taste test portion reserved for the cook. (It served its function.)
Variation:
A savory as opposed to sweet cousin of this is to do pretty much the same thing, but dust the board with flour, but instead of stuffing the dough log with cinnamon and nuts to use lots of grated Parmesan or Asiago cheese (or a mix). A sprinkling of some type of herb or garlic is good, too (but optional). I like to serve this unsweet cheesy type of toast with soup and a salad.
LAST OF THE HOLIDAY KNITTING; GENETICS
One last scarf to go. Since (at this point) I’m brain dead and desperate for something quick and easy, it’s a great thing that Knitty’s latest came with a fast-knitting piece that offers great bang for the time unit investment. Add me to the legion of folks doing up a Wavy Scarf.

I’m using that same sport-weight alpaca I used for the Kombu I finished last week. Because it’s of finer gauge than the standard-issue worsted written up in the pattern, I’ve added an additional six-stitch pattern repeat to make up the width. Mine is done on 48 stitches instead of 42. I’m also visually lazy, so I graphed out the pattern so I don’t have to rely on the prose write-up. Note that if you want to use a different weight yarn, modifying the thing is quick and easy – either add or remove multiples of six stitches.
In other knitting-related news, most of my knit presents are winging their way cross country right now, or are about to be distributed to those nearby. Once this scarf is done I’ll be done, done, done. (Huzzah!)
Cookie Liberation Front
Today’s cookie was an experiment – a coconut/oatmeal drop, based on a standard brown sugar drop cookie recipe, with toasted oatmeal and unsweetened coconut tossed in. Since I had some whole blanched almonds left over, each was topped with a nut. Younger Daughter said the rough-shaped cookies with almonds atop them looked like birds nests, so that is now their name.
Tomorrow’s cookies – Chocolate rounds stuffed with marzipan. I haven’t decided to do them flat or folded in half like little chocolate/almond gyoza yet. Also another experiment, but this one will be a shortcut cheat. I’ll be taking a sheet of frozen puff pastry, painting it with a beaten egg, then spreading it with sugar, cinnamon, and chopped pecans, folding it a bit and cutting it into elephant ears. Pix for sure, as this is something impressive looking even the Cookie Challenged could do.
Genetic Component of Crafting?
Marilyn the Knitting Curmudgeon posted an interesting thought the other day (one of many for her, I might add). She mused about whether or not the urge to do something like knit or make other crafts might have a genetic component to it. That got me thinking…
I’d guess that there would be a large inborn aspect to the desire to do these things. But I think there’s more than one influence at work here. To simplify, I’d guess that there are at least two:
- Some set of things governing the process that generates original ideas
- Some set of things that governs the "gotta-do-it" urge
I know people who have a strong concept-generation bent. They fairly sweat ideas, finding new viewpoints or perspectives, synthesizing disparate influences, or distilling previous exposures in innovative ways. The most affected of them sometimes have a hard time sticking to one idea long enough to bring it to full fruition, and may not have even mastered all of the skills necessary for optimal completion, but neither limitation strikes them as a problem. A person like that is off and running, captive to the next idea before the earlier one is completed.
I also know people who have the "gotta-do-it" urge, but the idea generation set in them is less strongly manifested. They are in constant motion, producing endless streams of items verbatim from directions or patterns. They often have extremely accomplished sets of technical skills, but can be stymied by roadblock problems. I have a friend who would seize upon an idea and explore it in hundreds of minute variations. She’d make wonderful little toys or identical baby sweaters by the dozens (in the case of toys – by the hundreds). All were beautifully crafted, yet it often seemed that once she started, "retooling" to make something else was difficult for her. She’d hum along happy to make even more of the item under current exploration rather than switching to a new thing. For her I think that fulfilling the "gotta-do-it" urge to keep busy was the true reward.
And then there are the folks who have both influences working on them in various proportions. Some feel particularly pressured or depressed because they have an inexhaustible source of new ideas and the urge to see each through to completion, but rarely have the time available to accomplish them all. Others are at constant war with themselves, reining in their urge to start something new before the item at hand is completed, and (sometimes) growing to hate the almost-finished item for blocking the beginning of the next.
Why do I think this might be genetic? Because I’ve seen these urges run through families. Not every person in the family need have the exact same hobby, but the mindsets do replicate through the generations. I know my father was a very compulsive "gotta-do-it" guy. Detail oriented in the extreme, he was a classic definition engineer. He never just sat still, he was always reading something, tinkering with something, or meticulously graphing something (he would have adored PCs and spreadsheets but died before they were sold). I know families where the parents or grandparents are method makers or idea shedders. Their households are sometimes chaotic places, but their kids also scatter innovation behind them and flit from project to project.
Why do I think these things are inborn rather than learned? Because in some cases I see these traits skipping generations; manifested in a household where the older influence was physically absent while the younger example was growing; or emerging later in life. Plus I know from experience it’s very hard to teach either creativity or perseverance. These are bents that people are born with. You can encourage these characteristics, but you can’t transplant them into someone who doesn’t lean that way to begin with.
I’ve got a very strong "gotta-do-it" bent. Perhaps it’s related to the milder forms of ADD, but I find HAVE to be making something, and I’ve been this way as long as I can remember. Even as a little kid I had all sorts projects underway (and heaven help the adult who put them away before I was done). I even fell into needlework at a very early age, and completed my first clumsy cross-stitch sampler before Kindergarten.
Just sitting has always been extremely difficult for me. Even just sitting and listening/watching something is hard. My hands have to be occupied. When my fingers are distracted, my mind is free and I concentrate better. Conversely, if my fingers are free, my mind is bound by the minutiae around me and zeroing in on some one thing in specific is harder. That fly buzzing around the lecturer’s podium; the interesting detail on the curtains behind her; the texture of the cracked wood at the edge of my seat; the air currents around my ankles; an amusing joke the guy sitting across the room told me last week; where I might be meeting with friends after the lecture; the faint sound of sirens outside the lecture hall; what color combo would be best for the thing I’m planning to make the day after tomorrow – all of these at once descend upon me and compete with the content being delivered in the lecture itself. Mindless autopilot knitting has always been my best defense against them.
I have to believe that I was born this way because I certainly didn’t learn this behavior from anyone. I can’t help this, it’s just the way I am and I’m glad to have found the coping mechanism of knitting. So I guess I agree with KC’s basic thought. There’s an enormous genetic component to many people’s affinity for crafts of all types. Why fight it?
Panforte, Piping, Presents, and Paeans
Panforte
I promised a post-tasting report. Yesterday I spread melted bittersweet chocolate over the tops of my two cakes, dusted them with cocoa, and stuck some left-over almonds on top as a decoration. Did I mention that for the past week, I’ve been drizzling rum over one of them – a little bit each day? No? The secret’s out now.
Wow.
This is an adult chocolate dessert. It’s not soft, gooey, and sweet. To be truthful, it’s hard and chewy from all the fruit and nuts. The taste however is out of this world. It’s spicy, more bitter than sweet, yet with just enough sweetness from the fruit to round out the flavor. The faint hint of rum was a good addition, and seemed to bring out more of the toasty notes from the nuts. We served our cakes with a selection of white wines. It would also be great with hot coffee or tea.
This one is a make-again keeper, but unless you’ve got a huge crowd coming or want to freeze or give away cake #2, I’d suggest halving the recipe. I’d also suggest sticking with the hazelnuts and almonds. You can use any dried fruit you wish (I used prunes, dried cherries and apricots because I don’t like citron and figs were too expensive), but I think that substituting walnuts or pecans would overwhelm the cocoa’s flavor and change the character of the cake.
Socks!
More holiday gift socks.
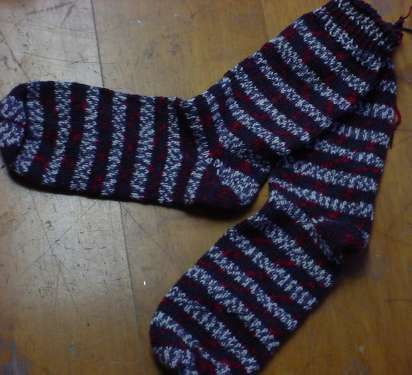
I knit these Saturday night from Lion Brand Magic Socks, while watching Present #1 below. These socks are worked at 7spi/10rpi on 2.5 mm needles (in between a US #2 and #3). The yarn is serviceable enough – a standard wool/nylon blend sport weight as opposed to fingering weight sock yarn. The color patterning is pretty uninspired compared to most. I get two speckled fake “Fair Isle” sections in this repeat, one in gray and white, the other in red and black. The entire repeat cycles in about 1 inch. Not terribly exciting, but at $7.00 US per 100g ball (enough to make up to about a man’s US size 11 shoe) – a very good value.
This pair is for a new neighbor who showed me how our 100-year old hot water heating system works, and helped me figure out the Rube Goldberg device that’s our boiler:

Presents and Paeans
The Resident Male and I buy gifts for the two of us together, but don’t wrap them or bother to save them for holiday debut. This year’s presents were the extended DVD edition of Return of the King (better than the theatrical version, but unsatisfying if you yearn for much of the books lesser themes and characters); the long awaited Lurulu by Jack Vance; and the Vance Integral Edition. The latter most was a major splurge that will count on the present roster for years to come.
Vance is writer whose works are easy to satirize because of his unique style, and who is dismissed all to lightly for it. At the same time, he has a devoted following of readers who appreciate them for what’s deeper underneath. His following in is bigger the UK and Europe than in the US.Vance appears to be especially popular in the Netherlands, Germany, and France – all in translation. That surprises me as so much of the texture of his prose is in his precisely worded detail and structured phrasing – things I wouldn’t think would move well from English to other languages. Even his old fashioned space opera style stories have a depth of character and sardonic insight into the ironies of human nature that push them beyond the genre.
If you’ve never read anything whatsoever by Vance, I’d suggest you start with the widely collected short story “The Moon Moth.” You can find a list of books containing “The Moon Moth” on this page. If you can’t find a copy, you can listen to a dramatization here. After that, pick up anything. His better known works include The Dragon Masters, the Demon Princes series, the Planet of Adventure series, Lyonesse and its sequels; the Alastor cycle; and the Dying Earth books. I’d start with his earlier, shorter works. They’re each masterpieces of tightly crafted plot construction, and fit an amazing amount highly evocative storytelling into some truly slim volumes. Enjoy!
