YARN CRAWL – QUESTIONS
I’ve gotten some questions via eMail about yesterday’s yarn crawl.
How do you know what to buy? Do you go with a list?
Some people do. My pal Kathryn did. She had a prepared list of patterns and requirements, and went looking for yarns specific to those needs. I don’t. When I go to an "exotic" yarn shop I look for things that aren’t available at my local yarn store. Most of the stuff in the front retail store area at Webs is available in my own neighborhood. (I am lucky enough to live in one of the most yarn-shop-dense areas in in the US.) I went looking for back room bargains, off labels, mill ends, and other oddiments that I am leery of purchasing sight-unseen over the ‘net.
In terms of what I was looking for, I do admit that experience with yarns is a plus. I know a bit about different types of yarns and their properties. Not as much as a spinner – but enough to know what yarns are likely to improve with washing, and which ones will remain prickly for their entire life. I’ve got a rough grasp of what both yards per pound figures and the number system of yarn descriptors used for woolen and cotton yarns translate to in standard hand-knitters terms and gauge. I’ve played with wraps per inch (though I admit I didn’t use that measure this trip). I’ve got a calculator and know how to convert pounds to grams, so I can figure out a rough equivalent cost per mythical 50-gram skein. Plus I have a good idea of what colors appeal to me, look well on me (or my target), have classic appeal, and would be fun to knit.
So what I did was wander the back aisles in the walk in warehouse, looking for goodies on special. The goodies had to be of excellent quality, in an appealing color that will transcend trends, of versatile type or construction (not a novelty yarn that will look dated in a fortnight), and represent a significant cost savings. If any "spoke to me" (inspired a particular creative idea upon first sight) all the better. But I was not buying for immediate consumption and went with no particular projects in mind.
Have you ever bought "the wrong yarn"?
Yes and no. I’ve got all sorts of things that have sat in my stash for extended periods of time, but I’ve never bought anything I wished I could return. For example, right now I’ve got two bags of well-aged Classic Elite Artisan in a deep green somewhere between khaki and hunter. At the time I bought it (circa ’99) I had an idea that I’d use it for a cabled sweater. But since then I’ve reconsidered. It’s a bulky weight (3.5spi) and has alpaca in it. A cabled thing in it would end up being both weighty and ultra-warm. Too warm to wear as an indoor/outdoor sweater. Plus I’ve found I prefer knitting in smaller gauges. So it sits, awaiting inspiration, but I wouldn’t say it was a bad purchase or it was "the wrong yarn." Eventually I’ll figure out what to do with it, or I’ll swap it for something else.
How much did Webs pay you to post yesterday’s ad?
Nobody pays me nothin’. I go where I want, and I write what I want on String – bad or good. Please send my greetings to the other conspiracy theorists whose company you must enjoy.
So what are those number system/yards per pound bits you mentioned?
(This wasn’t actually asked, but I’m sure it will be if I don’t address it here). There are several very cogent explanations of the number system and how it’s calculated elsewhere on the Web, but here’s a quick cheat sheet of equivalents for wool. Remember that although this chart makes it look like there are absolute definitions of size, these are approximate average numbers. There is considerable overlap with the values shown above and below each category, dependent on all sorts of things including fiber blends, texture, or how tightly the stuff is twisted (how dense the yarn is).
| Weight (ply weight descriptor equivalent) |
Most Common Gauge |
Approx. Average Yards/Pound (Wool) |
Approx. Average Wraps/ Inch |
Some Count Numbers* For This Weight (100% Wool) |
| Fingering (4-ply) | 7 spi | 1,920 wool |
16 | 4/30, 2/15, 4/24 |
| Sport (6-ply) | 6 spi | 1,500 wool | 14 | 6/24, 2/16, 3/9, 3/11 |
| DK (8-ply) | 5.5 spi | 1,400 wool | 12-13 | 3/8, |
| Worsted (10 ply) | 5 spi | 1,280 wool | 11-12 | 2/10, 10/24, 4/8 |
| Aran (12 ply) | 4.5 spi | 850 wool | 10-11 | 12/24, 2/4, |
| Bulky (14 ply) | 3-4 spi | 680 wool |
9-10 | |
| Super Bulky (16 ply+) | 3 spi or fewer | 500 or fewer | 8 or fewer | 2/2 |
*In wool the first number refers to the number of plies (physical construction, not "ply weight equivalence"), in cotton, the second number refers to the number of physical plies
Please feel free to send me corrections and additions. I’ll be adding to this chart as time goes on, and possibly supplementing it with one for cotton when I get a chance.
WHAT I’VE BEEN UP TO
The work crisis has not yet abated (in fact, it’s just settling in for the long haul). Even if I’m not writing about it, I AM knitting. Plain, boring, unadventurous, run of the mill, miles of stockinette, unchallenging (but comforting) knitting.
In my case, that usually means socks, and reverting back to the sock style I can do in my sleep – toe up with a figure-8 cast on, and short-rowed heel. I’ve been averaging completion of a pair every six days or so. I only knit for an hour or so each evening, so each sock is taking me three evenings to complete.

At the left what we’ve got is a pair of fingering weight socks composed from various leftovers. The vile mustard is a 100% wool yarn I’ve had forever. The label still lists the distributor with a pre-zip code address format. The tweedy green/blue is a partial ball of something (I know not what) I got in trade swapping leftovers with a friend, and the red is some Dale Baby Ull, left over from a sweater knit for the smaller daughter. This is the pair I was referring to when I wrote that in January my color taste departs, and I feel compelled to mismatch in the most garish ways possible. Perhaps it’s a seasonal longing for light and color that happens just after the holidays, when the world returns to winter-drab. In any case, the moire-like patterning of the red tweedy parts isn’t a camera artifact, it actually exists. For some reason the tweedy red bits worked themselves into swirls on the foot of one sock and the ankle of the other. I think they moved in and out of synchronicity this way because in this multi-ply yarn (a true 4-ply four ply), each ply was carrying the same set of colors. While the plies never aligned so that a blob of red hit across all four at the same time, it does appear that if two aligned **just right** I got my swirls. An unexpected effect to be sure, and one I would have preferred either lasted for the entire duration of both socks, or didn’t appear at all. Still, the things are garish enough to begin with, so the red striping is just another element of eye offense.
In the center is half a pair of light worsted weight socks. The other is still on the needles. In this case I had a skein of Little Lola, a variegated yarn. I’ve used it twice before to make Kombu scarves, but the colors for those were tamer. This particular skein presented a problem. The colors in it are less of a set, and more of a street fight, with fuschia, teal, olive, mustard and navy all scuffling for attention. I had set the skein aside when I used its two brothers because I didn’t know how exactly to use it. When I was rummaging through my stash to fuel my holiday knitting I came across two skeins of a yarn I got in a discontinued inventory sale back in 1994 or so, at the late lamented Yarn Shop in College Park Maryland. It’s Classic Elite Paisley Light, a mix of wool and rayon, and matches the all superwash wool Little Lola exactly in gauge and structure. In my case the Paisley Light also matched the fuschia in the Little Lola spot on. By working the toes, heels, and ribbing in Paisley, plus alternating stripes of three rows of Paisley and six of Little Lola, I’ve managed to tone down the discord of the variegated skein a bit. It’s still a riot, but more of a quiet one. (Review of Paisley Light coming soon to wiseNeedle).
Finally the pair on the right is standard issue Regia Mini Ringel. Nothing special here whatsoever. Due to my bad photography you can’t even see the nifty way the stripes miter on the short-rowed heel.
One last bit of blather, the old fashioned way of doing stripes (actually using two skeins of yarn, alternating between them on some sort of fixed count) is a wonderful way to make socks match in length. It’s relatively easy to count four or six rows of color A, then some number of color B. Then when time comes to make sure that the second sock is the same length as the first, all that need be done is count the stripes. Much more accurate than eyeballing or measuring, and far less tedious than counting rows. A final hint, sometimes counting even a small number of rows in stockinette can be difficult if you’re using a dark color yarn, or one that’s highly variegated. Instead of counting on the front side, I take a needle tip and insert it into a column of purl bumps on the reverse side of my stockinette. It’s easy to count off my rows by counting the purl bumps.

LESSONS LEARNED AND ACCOMPLISHMENTS – 2005
One distinct advantage of cataloging my knitting life here – at year’s end, I can look back over my posts and see how productive (or unproductive) I’ve been. It doesn’t look like I actually accomplished much this year in the way of actual knitting. I certainly achieved conservation of un-finished projects, starting as many new ones as old projects that were brought to closure, although I did work on several major efforts. In any case, here’s a catalog of what I learned and did in 2005:
Projects finished
- Crazy Raglan. Knit for the smaller daughter and started in 2004, this was an exercise in the use of DK weight self-striping yarn for something other than socks, scarves and hats. I had several false starts on this one, ripping back when I didn’t like the patterning that resulted. I finally hit upon working the piece in several sections, joined Intarsia style. This allowed the yarn to play better over narrower strips of width. The project was a modified success, with most of the failure laid to the length of time it took me to get it done. In the intervening months, target daughter grew, so the final product was a bit smaller on her than I intended. Oh well. I get to knit her another sweater now.

- Fingerless whatevers – (also see patterns, below). A happy confluence of expedience and need, my hot color combo fingerless mitts made last winter bearable in my drafty house. I can’t say I learned much from this project besides the fact that not everyone sees the charm in garish, magpie color contrasts. But it was fun to do, and resulted in a pattern for general consumption plus a rare item made for me.

- Paisley Shawl – I started with some lovely hand-dyed multicolor lace weight yarn and Sharon Miller’s Birds Eye shawl pattern, but found out that the color variations in the yarn were too fierce and overwhelmed the delicate texture of that design So I began experimenting and looking around for alternatives. I found that the simpler the pattern and larger the plain stockinette (or garter) area, the better texture patterns coexist with color riot. I ended up working a mostly-garter pattern from Spring ’05 Interweave Knits. It’s an easy project, suitable for folk who are just embarking on lacy knitting. My Paisley turned out quite nicely, and became a much-appreciated gift.

- Alcazar – The Hazel Carter pattern. Fun to knit, but again a lesson learned. This type of complex lace knitting needs special care if it’s attempted in something other than wool. Wool’s stretch makes it optimal for the distortions required to span corners and block flat. My Alcazar turned out beautifully, but the unstretchy nature of the faux-silk rayon made it difficult to work with, and limited the effectiveness of the corners, making them a bit more cupped than they would have been had I used wool. Became a very much appreciated gift.

- Small grapevine in long armed cross stitch and double running. Been sitting around forever. I finally finished this one off and gave it as a gift (notice the theme, here?) The next day’s post goes into additional detail.

- Holiday knitting, including five scarves, seven pairs of socks, three hats, a pair of flip-top mittens, and a pair of fingerless mitts. Nothing much exciting here (except for Kureopatora’s Snake, see below). All gifts…
Still in the bag
- Cursed Socks. I can’t say why this is still ongoing, but this pair of socks has sat on the sidelines for the past two years. I could probably finish off the second sock in an evening or two. I hang my head in disgrace.
- Dragon Skin Rogue Cardigan – Starting with the excellent Rogue pattern, I introduced some materials substitution, gauge, sizing and texture modifications. All was going well until a mishap led to the front being pulled off the needles and a tangled mess. Elder daughter looks at me with cow eyes every time she passes the knitting bag containing it. My lesson learned here – take better care of projects in process, and don’t let things languish just because I’m frustrated by the prospect of ripping back a mile, and figuring out where I left off. More chagrin.
- North Truro Counterpane. This one is going to take a very long time, even if I pursue it with dogged determination. Still, I really like the way it’s coming out. I’m about 20% done (by eyeballed estimate), and will continue plugging along – probably as a perennial summer project. The cotton motifs are perfect for knitting when it’s too hot to knit anything else. I’m not embarrassed about this one.
- One total disaster, actually abandoned – the Mystery Project – a felted bag commission undertaken for Classic Elite. Try as I might, I could not get the entire thing to full evenly. My bag ended up a misshapen lump, and the tight deadline I was working under didn’t allow a second try. Horror in a handbag – that’s the only description I can think of that’s near accurate. Packed up in a box with the left-overs and mailed back in shame, so I can’ t truly say it’s still in the bag.
Reference articles
In spite of a dearth of personal knitting, I did write quite a few articles for String that I hope have been useful. So that’s something at least.
- Gauge 101
- Vintage yarn substitution suggestions – more are welcome. If you’ve got additions for this chart, send them along.
- Lillehammer mythology – The famous sweater, with some musings on possible meanings on its various motifs
- Doing the central double increase – with illustrations
- One oversized circ and two-circ methods for knitting in the round
- Two items on two circs, knit side by side – also check out the notes from the following couple of days for more clarifications
- Make one left and make one right – two complementary invisible increases
- Some useful web tools
- Musings on Dutch Heels and inverted Dutch heels
- Cast on Round-Up I and Cast on Round-Up II
- Knitting Needle Roundup, parts I, II, III, IV, V, VI, and VII – describing many of the most commonly available straight and circular needles, their characteristics, actual diameters and lengths
- Shoe sizes, worldwide
- Winding a center pull ball by hand
- Charting 101, 102, 103, 104, 105 and 106 – a series detailing how to go about taking a prose pattern and turning it into a chart
Patterns
And some patterns.
- Morgan’s Paw Warmers – Pattern for super simple wristies/half-mittens knit in the flat from bulky yarn
- Susan’s Impressionist Blues Lemonade – method description on making a stole with pockets
- Fingerless Whatevers – Fingering weight yarn half-mittens with a twisted stitch cuff and gusset thumb
- Ann Kreckel’s Baby Booties – the pattern is provided as a link (it’s Ann’s not mine) but I do offer up a photo essay on how the thing is constructed
- Kureopatora’s Snake – an entrelac style scarf done in ribbing in a wild yarn
- Kombu in German – a translation of my Kombu pattern from wiseNeedle, graciously provided by a German-speaking knitter
Books reviewed
And I posted reviews of a bunch of knitting books not often written about. Mostly these are out of print books I got through my local library. Insert shameless plug for local libraries. Go. Look. Take books out. If these older knitting books just sit on the shelves, the staff will be tempted to clear them out to make room for other stuff, and chances are the new books won’t be about knitting.
- Reversible Two-Color Knitting
- Stitch by Stitch Volume I
- Bantam Step by Step Book of Needlecraft
- Mit Nadel und Faden
- Patchwork Knitting (the other one)
- Design Knitting
- Knitting Stitches and Patterns
- Knit to Fit
- For the Love of Knitting
Plus there have been all sorts of other posts here this year, blathering on about knitting, techniques, horrific mistakes I’ve made in my own projects, nifty things I’ve stumbled across, and the like. Less however since my re-entry into full-time employment, as lengthy notes like this now take a couple of days to complete. I’ll soldier on into the New Year both blogging and knitting. I’ve already got two more pairs of socks I can rack up against my upcoming 2006 grand total.
KNITTING TOOLS IN UNLIKELY PLACES
I have to lead off with a disclaimer – I haven’t tried this yet. It’s from TechTrax – a very useful third party support source for Microsoft applications. Between them and WOPR, I have never failed to find a needed answer to a question about MS Word, Excel, Visio, Project and other MS-official torture devices I use in the course of writing proposals. Most of the time in fact my answers are sitting ready to be found in the various discussion forums and articles on those sites. (Instant expert help is always appreciated).
I know there are lots of people who use Excel or Word to set up knitting charts. Some of them wish knitting fonts were more widely available or (more importantly) more intuitive, or more like symbol sets with which they’re familiar. Others have looked into building their own knitting symbol fonts. That’s a big task, and there are all sorts of tools to help. It turns out that there is a hidden, free tool avaialble to MS Windows users – resident in operating system itself. This tutorial takes you through using this character map editor to build custom symbols.
The same site also recently published an article on creating custom graph paper in MS Word.
Other useful tools:
- Factor generator – useful for quickly figuring out possible repeats
- From the same site as the Factor Generator, a quick metric/imperial unit conversion utility
- And a grams/ounces coverter, too.
And so we see that knitting tools aren’t always found in knitting-specific places. If you’ve come across something useful in an unlikely location please feel free to add a comment here. I can assure you that someone, somewhere will be very, very grateful.
INVERTED HEEL – FURTHER EXPLORATIONS
?Thanks to everyone who left recommendations on inverting heel flap
heels for toe-up socks. There probably are lots of "official"
ways to do it. Leah mentioned one in Gibson-Roberts Ethnic Socks and Stockings. Kathryn says there’s one in Church’s Sensational Socks. Brigid sends us to the KnitSocks Blog.
Emily says just to do a plain old flap heel, as written for cuff-downs,
and Rob points out a totally different approach adapted from Rehfeldt’s
Toe Up Techniques for HandKnit Socks.
You know sometimes there’s a reason to bow to the giants who have gone
before. And sometimes for no reason other than personal
perversity and the joy of fiddling with something on one’s own, there’s
a reason to keep on plugging away despite all the world’s advice to the
contrary. I’ve been feeling contrary.
I worked my heel as described in yesterday’s post. Here’s the result:

I tried it on. It fit, but the sock ended up being too
long. Plus I wasn’t entirely satisfied with the location of the
gusset. it was centered too low on the foot, with too much above. Fabric sort of lumped up on top of the ankle. So in
this aspect at least taking a recommendation from Emily, I ripped my
sock back to about a half-inch below the heel and reknit the thing on
50% of the total stitches. I ended up picking up 15 stitches on
either side of my heel flap.

I like this better. I had thought that not having a heel cup (the
turning the heel bit) that I’d end up with little wings at the corners
of the heel flap. The sock unworn kind of looks that way, but
when worn, everything fills out and no little corners protrude.
Perhaps that’s because my feet are so wide. This particular pair
is a gift, so I’ll have to knit another pair using this heel and give
them a thorough wear testing. I am keeping this heel. (The color on this second photo is closer to Real Life.)
In any case, I’m now up to the ankle part and am about to place the
knit/purl motif I’ve drafted up. It’s a very simple geometric design
based on some rectangles. Thinking on the way knit/purl
patterning looks, I’ll work the foreground in knits, and the background
in purls. I’ll either place it in a stripe of purl that goes
completely around, or box the motif in a purl field. More on this
tomorrow…
CHARTING 106 – SECOND EXAMPLE
Here’s the last item in the chart series. Thank you for all the kind
words. I’m delighted that people are finding this useful.
I
have gotten some questions about why I am not using the standard
Japanese symbol set. That set is quite broad compared to most of the
sets in Western books. My answer is that it’s relatively unknown in the
US and Europe. Perhaps I’ll add a symbol glossary that equates its
symbols to notations used by other more commonly available sources.
That’s a big project though, and might be better suited for wiseNeedle
than for this blog.
Barbara Walker’s Starlight Lace, Second Treasury of Knitting Patterns, p.288
I
will use this last Walker pattern to show some more complications to
charting life. This time, the pattern’s stitch count varies in a couple
of rows, plus there is a large number of edge stitches. My method is to
graph out everything verbatim row to row, then (if needed) introduce
no-stitch boxes for clarity. Again, all quotations from Walker are in
bold. Here goes…
Multiple of 6 st plus 5
Row 1 (wrong side): and all other wrong-side rows – Purl.
Row 2: K2 *yo, ssk, k1, yo, ssk, k1-b; rep from *; end yo, ssk, k1.
The
repeat is only 6 stitches, but I think I’ll chart out three repeats plus
edge stitches. That should give me enough room to see the play of the
edge stitches, and the staggered effect of the offset design itself.
Row 1 is plain old purl, but it’s a wrong side row, so it graphs out as
shown below, with the “1” on the left hand edge rather than the right
hand edge. Remember, I’m just graphing verbatim at this point. I’m
making no effort to read ahead. I just want to get the stitches down on
my chart.

We’ve
got 23 stitches [(6×3) + 5]. Note that the k1-b (knit one stitch
through the back of the loop to twist it) has its own symbol. All wrong
side rows in this pattern are plain – worked as purls if the thing is
knit flat, and as knits if it’s worked in the round.
Digression:
Most modern texture patterns alternate rows with something happening on
them (cable crossings, decreases, increases, etc.) with plain rows, and
many pattern authors don’t bother graphing the alternate rows if
they’re all plain. This can cause a bit of confusion. I got tripped up
recently by Hazel Carter’s Spider Queen shawl. It’s a masterful bit of
charting, but the first chart is stripped of those plain wrong-side
rows. The later charts include them. I wasn’t paying attention, and
didn’t notice that the numbering on that first chart labeled every row,
but counted by twos. I ended up having to rip back a bit when I noticed
that my piece didn’t looklike the project photo. So be warned. Look
at the numbering. If it begins with “1” on the left, and you’re
knitting flat you start off with a wrong-side row. If the “1” is on the
right and you’re knitting flat, you start off with a right-side row. If
every other number is missing, you’ve got a pattern with the plain rows
left out. Look elsewhere in the write-up to find out if those plain
rows are to be knit or purled.
I’ll skip writing up the plain rows, but I will include them in my growing graph:
Row 4: K3, *k2tog, yo, k1-b, yo, ssk, k1-b, rep from *; end k2
Again,
no problems here. Everything graphs out nicely and stitch count is
constant. There are equal numbers of stitches increased (the yos) and
stitches decreased (the ssks and k2togs).
Sometimes if I’m
having problems with a repeat, even if it’s charted, I’ll grab a piece
of graph paper and draw out my stitches. Sometimes I catch an error in
my knitting using my pencil that went totally unnoticed on my needles.
Row 6: k2, k2tog * yo, sl2-k1-p2sso, yo, sl1-k2tog-psso; rep from * end yo, sl2-k1-p2sso, yo ssk, k2.
This
is where that “off to hell in a handbasket” feeling begins to creep in.
We’ve got double decreases, both with the rightmost leg on top
(sl1-k2tog-psso), and with the centermost stitch on top (sl2-k1-p2sso).
We’ve also got a number of yarn overs, and just for fun – a couple of
plain old decreases, and an unknown number of times to do the ** repeat
between the k2, k2tog opening unit, and the end yo, sl2-k1-p2sso, yo,
ssk, k2 closing unit.
To figure this out, we need to remember
that we’ve got 23 base stitches on the previous row. That’s 23 stitches
to play with. All of the plain knits plus the stitches in the decreases
on Row 6 must add up to 23. Let’s look at the math:
- One ** repeat on this row adds up to six stitches (the two double decreases).
- The pre-** opening row unit is four stitches (k2 plus one k2tog)
- The after-** closing row unit is seven stitches (one double decrease plus one ssk and k2)
If
you add up our fixed numbers (the pre- and post-** stitches) you get 11
stitches. The previous row contained 23, and we subtract those 11 from
the total. We get 12, which (serendipity) is a multiple of our ** unit.
We graph out the pre-* stitches (shown in blue) plus two repeats of the
** unit, followed by the post-** unit (also shown in blue.

We’re out of that handbasket, even though our graph is showing a very
short row. Not to worry. Going through and counting stitches confirms
that we’ve got the correct number here. We’ll worry about neatening
everything up and inserting those no-stitch boxes after we get all the
rows charted. So let’s move on.
Row 8: K3, *k1-b, yo, k1, yo, k1-b, k1; rep from*, end k2.
This
row is also problematic. How many times to repeat the stuff between the
**s? Again , stitch count comes to our rescue. Evil Row 6 brought the
stitch count down to 17. Row 7 (worked plain) preserved that count. Now
on Row 8, there are increases, and “as-is” stitches but no decreases.
There should be 17 stitches on this row EXCLUSIVE of the YOs. Again we
do the math. We start with 17 stitches, then account for the three
before the *, and the 2 after – that’s 12 stitches left. NOT counting
YOs, each between the ** repeat contains 4 stitches. We need to graph
out three iterations of the stuff between the **s. Happily once we
graph in these instructions (including the 6 YOs) that restores us to
the original stitch count of 23.

Remember,
we’re not worrying about lining stitches up right now, our only concern
is getting the correct number of them on the chart. We’ll think about
how to represent those low-count rows 6 and 7 later.
Row 10: K2, *yo, ssk, k1-b, yo, ssk,k1; rep from * end yo, ssk, k1
We’re
back to a stable stitch count, with the same number of increases and
decreases per row. Graphing it up is easy. I notice something here
though:

See
those two blue units? They’re identical. It looks like this pattern is
formed by an exact duplicate of rows 1-6, offset by three stitches (one
half of the repeat). While you can see it (sort of) in the prose
directions, the duplication leaps out in the charted ones. I find this
sort of half-drop duplication and charting makes the pattern really
easy to memorize. More on this later, after we’ve charted some more
rows.
Row 12: *K2tog, yo, k1-b, yo, ssk, k1-b; rep from *, end k2 tog, yo, k1-b, yo, ssk.
Again this looks veeerrrryyyy familiar! I’ve highlighted the repeat (in fact I just cut and pasted those boxes).
Row 14: K1, *yo, sl2-k1-p2sso, yo, sl1-k2tog-psso; rep from *, end yo, sl2-k1-p2sso, yo, k1.
Remember
Evil Row 6, with all those double decreases? It’s back! Offset three
stitches, but otherwise the same. We start with 23 stitches on the
previous row, then subtract the 1 before the **, and the 4 after the
**, leaving 18 stitches – so we do the 6-stitch bit between the **s
three times.

Row 16: K1, k1-b, *k1, yo, k1-b, k1, k1-b, yo; rep from * end k1, k1-b, k1.
Just
like row 8, offset again by three stitches. Again we’ve got 17 stitches
on the previous row to account for. Not counting the YOs, we’ve got 2
stitches before and 3 stitches after the ** accounted for, leaving 12 –
so we do the 4-stitch ** unit three times. One you add in the YOs,
we’re back up to to the 23 stitches of our original count.

Now
to add the finishing touches. It looks like each of the decrease units
on Rows 6 and 14 visually caps off the clusters of decreases on the
rows below. So I’ll spread them out across the row, adding in my
no-stitch boxes as best I can to maximize the read of the pattern
compared to the photo of the worked swatch.
I’ll also add in
my stitch key, header and footer info at this point. Remember that
there are NO increases or decreases on alternate rows. Therefore I
don’t need to include that second column of “if it’s a
right-side/wrong-side row” instructions that I had to include in
yesterday’s write-up.
One final note, there is one small bit of
strangeness here. Because of the way that the repeat works out, and the
way that edge stitches are handled, the last decrease on Row 6 is
handled differently if it is the final stitch of an “inside repeat” or
if it is the final stitch of the last repeat on the row. Since this
isn’t easy to graph, I’ve added a special note about it, and made it
blue on the chart.
The memorization thing?? This pattern looks complicated at first glance. Especially if you just look at the prose directions. However it’s not that tough. There are only four substantive rows – 2, 4, 6, and 8. The entire pattern repeat is only six stitches wide. Everything else is a repeat, either straight on the same row, or (in the case of rows 10-16) offset by three stitches (one half the width of the repeat). ? I can’t remember the prose directions verbatim, but I can and do memorize the pattern in its visual representation. Not everyone can memorize a nonverbal visual representation (and it’s no shame not to have that bit of wiring) but many people can, and have surprised themselves by being able to do so after becoming comfortable with charts.
This
concludes my mini-series on graphing – how to read them, how to build
them, and how to solve common problems translating prose directions to
charts. Please feel free to post additional questions about graphing
and reinterpreting prose instructions as charts, but please know I will
not be offering a graphing service here. My goal is to show others how
to do it for themselves, not do it for them.
One last tech note
– the visual presentation of the charts changes mid-way through this
note because I experienced a massive computer failure. I ended up
finishing this post on a different machine using a different version of
MS Visio. The later version has a slightly different GIF translator
than the earlier version I normally use. So it’s not your monitor –
it’s me. Apologies for the visual confusion.
CHARTING 105 – EXERCISES
So far the nominations for stitches to use as object lessons have been rather sparse. I’ve gotten suggestions to do:
- Porcupine Stitch from B. Walker’s Second Treasury of Knitting Patterns, p. 282
- Drooping Elm Leaves from B. Walker’s A Treasury of Knitting Patterns, p. 217
I’ve also gotten notes from people who said that given the hints posted over the past week they’ve been able to graph up
- Mermaid Mesh from Walker’s Second Treasury, p. 267
- Madeira Cascade from Walker’s A Treasury, p. 222
As the big boss at work would say, “Good on ‘ya!”
These two patterns are not quite straightforward. Cascade has five stitches above and beyond the repeat that need to be apportioned into edge stitches. It does however have a very strong central spine – a double decrease that lines up on all right-side rows. Mesh is a bit harder in that it has both lots of edge stitches, plus a massive number of decreases and increases that use natural slant of the decreases to
visually wander left and right. Certainly not a pattern for the
faint-hearted to graph!
For the object lesson I’ll do Porcupine and Walker’s Starlight Lace (Second Treasury, p 288). Drooping Elm is interesting, but doesn’t pose some of the conundrums that these two do. I’ll start today with Porcupine. Starlight will appear later in the week.
Porcupine Stitch from B. Walker’s Second Treasury of Knitting Patterns, p. 282
Porcupine has some interesting features. It’s a 9 row repeat, in which only three rows are substantive. BUT those three rows are each repeated at least twice, and the same instructions are repeated on both the right and wrong side rows of the piece. There are also four stitches requested over the 12 stitch repeat count that will have to be accounted for in edge stitches, but they seem to always stay outside the ** repeat marks, so keeping track of them shouldn’t be a problem.
Walker notes that this texture design is of Victorian origin. It does have a major feature that was much more common in early instructions than in later ones. Porcupine includes patterning on both right side and wrong side rows. You don’t see this often as most modern? patterns confine increases, decreases or other shaping elements to right-side rows only. Flipping the instructions for decreases is far more confusing than just translating knits to purls and vice versa.
My write-up will intersperse the as Walker gives them with how that row ends up being graphed. The Walker quotations will be in bold.
Multiple of 12 stitches plus 4
Row 1: K2, *Yo, K2tog; rep from * to last 2 sts, end k2
Looking at the pattern, I suspect it will be a good idea to graph out two repeats of the pattern, that’s 24+4 = 28 stitches across my chart. We start with a right-side row:

Row 2 and 4: K2, purl to last 2 st, end k2
Very easy. Remember this is a wrong side row, and that mental inversion thing should be invoked to “flip” knits to purls and vice versa.
Row 3: Knit
Because Row 4 is the same as Row 2, I’ll graph up both 3 and 4 here. 
Row 5 and 8: K2, *sl1-k2tog-psso, k4, yo, k1, yo, k4, re from *, end k2
Now it begins to get interesting. Still, stitch counts are maintained. How can I tell this? By looking at the part between the **s. It includes a double decrease that finishes with the rightmost stitch on top, plus
two yos to compensate for the two stitches eaten by the double decrease. Warning though. It’s not all that hard to visualize row 5, it’s a right-side (odd numbered) row, but I can sense some hyperventilation among those who have noticed that this same sequence is repeated on a wrong-side (even numbered) row. We’ll deal with that bit of chaos when we get there.
Row 6, 7 and 9: K2* p3tog, p4, yo, p1, yo, p4, rep from * end k2
We have now hit the twilight zone row – the one that will cause many people to give up graphing. But it’s not impossible. Remember that mental flip thing? Flex your brain because we’re now going to do some gymnastics.
On Row 6, we’ve been told to do a p3tog on a wrong side row. Now, a p3tog on a wrong side row, if viewed from the right side of the work is a dead ringer for a k3tog. How do I know this? The Sainted Barbara tells me so in the glossary of chart symbols in her Charted Knitting Designs (aka Walker III), and A Fourth Treasury of Knitting Patterns (aka Walker IV). Also I experimented. I’ll use my symbol for k3tog, BUT
I’ll remember to build a double column glossary to accompany this pattern that describes what should be done when this symbol is encountered on both right-side and wrong-side rows.

Now on Row 7, we’re told to do the same thing as on Row 6. But we’re on a right-side row. A p3tog on a right side row is a p3tog on a right side row. I don’t have a symbol in my set for a p3tog, so I’ll have to make one up. Visually, in a P3tog done on an odd numbered row, the right hand most stitch of the three worked together ends up on top. I’ll make a hybrid symbol that sort of reminds me that three stitches are being worked together, the right hand most one will end up on top, and that it’s a purl. If it turns out that I like this symbol, I’ll add it to my permanent stencil collection in Visio:

Row 5 and 8: K2, *sl1-k2tog-psso, k4, yo, k1, yo, k4, re from *, end k2
Row 8 is a repeat of Row 5, but it’s done on a wrong-side as opposed to right-side row. Again referring to the Sainted Barbara, we see that a s1-k2tog-psso done on the right side has as its wrong-side counterpart
the delightfully awkward p3tog through the back of the loop. Again – remember we don’t actually have to DO a p3tog through the back of the loop here unless we are doing this pattern in the round, but the symbol we use on the chart is the same one that would be used for one of those awkward puppies worked on the right side. I don’t happen to have a standard symbol for p3tog through the back of the loop, so I’ll invent one.
Row 6, 7 and 9: K2* p3tog, p4, yo, p1, yo, p4, rep from * end k2
Row 9 is a duplicate of Row 7. We’ve already graphed that. So we now have the nine rows of our repeat. It’s also become clear that stitch counts are rock-stable row to row, and that the four extra stitches here are just garter stitch selvedges there for convenience, and aren’t required to eke out partial repeats of the pattern. I’ll mark the four extras off in blue.
But we’re not quite done even though all nine rows are graphed out. We’ve got a repeat made up of an odd number of rows. That means that Row 1 repeats on Row 10. In fact, although rows 10-18 are the same as Rows 1-9, each one graphs up as its opposite-side sibling. (I can sense I’ve lost quite a few of you, so I’ll show rows 10-13:
Row 10 duplicates the action of Row 1, but does it on a wrong-side row. Therefore, the stitches that graph up as K2togs in Row 1 use a different symbol in Row 11. Likewise the knits/purls of rows 11-13 show as their opposite.
Row 14 duplicates Row 5, but as a wrong-side row. We’ve already graphed that bit of twisted thinking on Row 8, so adding it isn’t a problem. Row 15 replicates Row 6, again we already did that flip on Row 9, so a simple cut and paste takes care if it, too.
Row 16 duplicates Row 7, which has its wrong-side counterpart originally on Row 6. Row 17 is another Row 8 in its right-side expression (Row 5). Row 18 is another Row 9 flipped for the wrong side (Row 6). If you place all of them on the chart, add the stitch key, grids, titles, and attributions you end up with this:

Now this may seem a long way to go for a short drink of water compared to Walker’s original write-up. In this case, the prose description is only five lines long, but the chart takes up half a page. There’s no bonus
for brevity awarded for the charted format. But there is one major advantage to having this described in a graph. This chart is equally useful to people knitting in the flat and people knitting in the round, because all the right/wrong side transformations have been done.
People knitting in the round experience every row as a right-side row. To knit this reversible pattern entirely in the round, they’d cast on an even number of the stitch multiple (without the four blue extra stitches) then they’d follow every row starting at the right hand edge of the graph, and using the key symbols as interpreted in the “On Right-Side Rows” column. People knitting in the flat would follow the chart in the manner I described before, starting the odd numbered rows at the right edge, and the even numbered rows at the left, alternately using the appropriate columns from the accompanying symbol key.
Have fun with this one. Try out Porcupine Stitch in a swatch. You’ll find the lacy effect is magnified if a larger needle than one would usually use for a given yarn is used. Lacy or dense, the result will be rather puffy. Given the appropriate yarn it would make nice two-sided scarves, shawls, or blankets. Stay tuned for more adventures in charting!
CHARTING 104 – THINGS THAT MAKE LIFE DIFFICULT
In a perfect world there would be an intuitive set of graphing symbols
that would be quick and easy to understand. They’d cover all possible
maneuvers in knitting, and would be useful in every circumstance. This
is however, a total pipe dream. Knitting is near infinite, and
knitters are fiendishly clever in the variant ways they have found to
produce their desired results. There are a number of knitting
techniques and stitches that pose special problems to charting:
Large numbers of stitches increased or decreased at the same time
When you see instructions like “make 5 in next stitch” you’ll need to invent
a symbol to handle it. I’ve seen German and Japanese charts that use a
variant on something like this:

Decreasing a large number into one stitch would generate need for something
similar, perhaps with the V upside down, and the number of stitches to
be eaten indicated between its open toes.
Also unless you’re dealing with an edging, it will probably be impossible to graph up a
pattern containing massive group increases or decreases without using the
no-stitch boxes we discussed yesterday. Still, these problems fall into
the “inconvenient but not insurmountable” camp.
Bobble and bell-shaped semi-detached units
Some bobble and bell units are produced by knitting back and forth over a
small number of stitches, to make a blister-like addition that’s
attached to the main work at top and bottom. Most chart authors treat
this type of unit as a separate sub-process. The main chart may have a
single box with a specified symbol in it, indicating where the unit is
to be placed. The unit itself will be described either in prose, or in
a “mini-chart” accompanying the main chart as a sidebar. Another
“inconvenient but not fatal” challenge.
Patterns containing stitches either slipped from or knit into the row below
These can pose real charting problems, especially in linen stitch family
textures where large numbers of stitches are worked “out of row.” I’ve
seen large V-shapes superimposed on the graph that are supposed to
represent these distended stitches, but they are visually difficult to
deal with. If there are lots of them, the clutter can be overwhelming,
and some linen stitch or slip-stitch based patterns may be impossible
to graph at all.
It is interesting to note that B. Walker used a special charting notation for her slip-stitch based mosaic colorwork. In that format each row of the chart represented two rows of knitting
instead of the more conventional one row worked = one row charted
ratio. She didn’t try to show stitch deformation by the use of a symbol
set, instead she stuck to two-color mosaic patterns that swapped colors
every two rows. The squares on her charts indicate whether one is to
form the next stitch by working with the current strand, or slipping
the color of the previous two-row set up onto the needle.
Threaded stitches or stitches with right-side floats, or decorative wraps spanning one or more stitches
There are some patterns that form colorwork or texture patterning by using
separate strands that are threaded back and forth through live stitches
during knitting. Other patterns use as decorative elements floats or
wraps of one or more stitches, deliberately formed on the right side of
the work. These are both very difficult to represent in charts. I’d
probably go with some sort of notation in the main chart that Effect #1
happens here, and accompany the chart with a separate detail write-up.
Novelty stitches
Some popular novelty stitches are near impossible to chart. Loop Stitch is a
good example. That’s the stitch used to make a surface completely
covered in shag-rug style loops. The manipulations required to make the
loops don’t lend themselves to graphing, and beyond noting which
stitches carry the loops in a piece that uses both adorned and
unadorned areas for contrast, indicating their presence is of little
value.
In spite of these exceptions, if a pattern contains just knits, purls, cables, simple increases and decreases – even twisted stitches – it can probably be graphed. The graph may be massive, but it can be done.
I’ve got only one nomination for a particularly vexing pattern to use in tomorrow’s object lesson. If you’re got one to suggest, please send me an eMail (replace the “AT” in the address with the standard @ sign).
CHARTING 103 – THE STITCH THAT ISN’T THERE
We’ve covered basic charting, and charting variable width edgings. Now
for panels and insertions. Those are patterns that can be used as
accents in the main body of your piece. Sometimes they show up as
single strip scarves, sometimes several repeats of the design are
combined across to make an all-over design (occasionally fitted
together with half-drop variations), sometimes a single panel is
repeated to make a long stripe in combo with a stockinette ground,
sometimes just one vertical repeat of the design is used as a spot
accent, sometimes panels of different patterns show up side by side.
What makes them different from edging patterns is that they can be
embedded in the center of a piece, and that piece can be knit in the
round.
These insertion style patterns can have either stable or variable stitch
counts from row to row. One with a stable count (either no
increases/decreases or an equal number of increases to decreases on
every row where they occur) are graphed more or less the same way as
the pattern in Charting 101. The ones with changing stitch counts do
pose special problems.
Let’s consider this simple variable count
insertion. It’s my own write up of a simple embossed leaf inside a
framing K2, P2 rib:
Cast on 9
Row 1 (wrong side): P2, K5, P2
Row 2: K2, P2, (K,P,K in one stitch), P1, K2
Row 3: P2, K2, P3, K2, P2
Row 4: K2, P2, (K1, YO)2x, K1, P2, K2
Row 5: P2, K2, P5, K2, P2
Row 6: K2, P2, K2, YO, K1, YO, K2, P2, K2
Row 7: P2, K2, P7, K2, P2
Row 8: K2, P2, K3, YO, K1, YO, K3, P2, K2
Row 9: P2, K2, P9, K2, P2
Row 10: K2, P2, SSK, K5, K2tog, P2, K2
Row 11: P2, K2, P7, K2, P2
Row 12: K2, P2, SSK, K3, K2tog, P2, K2
Row 13: P2, K2, P5, K2, P2
Row 14: K2, P2, SSK, K1, K2tog, P2, K2
Row 15: P2, K2, P3, K2, P2
Row 16: K2, P2, K3tog, P2, K2
As you can see, the thing starts out being nine stitches across, but grows on row 9 to 17 stitches across.
How to chart? The symbol set is pretty straightforward. Each
individual row poses no problems. For example, here’s row 8:

If we normed one edge like we did with the edging patterns, we’d end up with this:
While all the info is there and this chart could be worked from, it’s
deceptive in that it looks like an edging. Plus one of charting’s prime
directives – representing knitting in a format that’s visually akin to
the finished product – has been fouled.
So. Let’s look closer at this pattern, looking for obvious points of internal symmetry or
reference. We quickly see that the thing IS symmetrical. There’s a
center stitch in every row. Let’s stack our rows on the center stitch:
That’s closer. You can begin to see the leaf shape in the center,
but the wiggly edges are still a bit confusing. Here’s another
cut at the same basic concept. This time however, I’ve lined up
not only the center stitch, but also the knit ribs that frame it:
Those gray areas? They don’t exist. Flat out aren’t
there. They’re the equivalent of the stage attendants dressed in
all black who move props around in full view of the audience during a
drama or puppet performance. You’re not supposed to see them, even
though they’re in plain sight.
The grayed out areas are spacing mechanisms introduced for the sake of
visual clarity in the rest of the pattern. They have no
correlation to stitches in the actual knitted piece. Working from
this chart, I’d skip right over the gray background. My first row would
be P2, K5, P2, just as in the written directions. Now different
authors represent non-charted “no stitch” or null spaces
differently. I chose to use a general background shading, with no
boxes marking individual stitches. Other people don’t bother
removing the box notation from the no-stitch spaces. On their
charts the no-stitch boxes can be a bit harder to interpret.
How to know when to use mystery no-stitch boxes? Although it’s a
matter of personal preference, sometimes they’re absolutely necessary
because there just isn’t room to graph out your piece unless they’re in
the mix. I could graph out my embossed leaf without the
no-stitch areas, but if this leaf was part of a larger graph covering a
wider area, the distortion introduced by the width of the longest row
might ripple out and perturb the representation of design elements to
either side. In that case, using the no-stitch boxes would keep
my two edges parallel and let the leaf panel sit more comfortably in
the total project chart. That in turn would help the
knitter keep his or her place on the wider graph.
Tomorrow I’ll look at patterns that are extremely hard (if not
impossible) to chart out. The final piece in this series I’ll
build one chart for a lacy or complex cabled design that has presented
a special challenge. Nominations for the final object lesson will
be accepted. Please contact me off-list before Thursday night if you know of a prose texture pattern you’d like to suggest for group edification.
CHARTING 102 – VARIABLE STITCH COUNTS
I’m delighted that people found yesterday’s post useful. The most asked
question though was TexAnne’s original one – what does one do when
stitch counts change from row to row?
The guiding principle here is clarity of illustration. You want your chart
to reflect as closely as possible the visual appearance of the finished
knitting. That might mean that you handle the problem differently
depending on the general situation. An edging for example might be
graphed up differently than a panel insertion.
Let’s start with the basics – some different types of increases and decreases. They are
after all the Evil Agents that perturb stitch count across rows.
Increases come in two flavors – visible and invisible. A visible increase is
something like a yarn over. It’s an increase that leaves an intentional
eyelet hole in the piece. Invisible increases come in all sorts of
flavors – some more invisible than others. Often an invisible increase
is called a make one. Some people favor raised bar style increases,
others do the knit into a stitch of the row below, and others go for
the less invisible knit/purl into the same stitch (or k1 front, k1 back
into the same stitch). Which method of invisible increase is used is up
to the knitter, although the designer may suggest one that works
particularly well for the project in hand. In general though, the two
types of increase have different notations in charting. I favor a boxed
circle for a visible increase and a boxed M for an invisible increase.
I even go so far as to slap a bar across the M if I want to
specifically call for an invisible increase that forms a purl stitch.
Here are the symbols I use for some of the more common increases and
decreases:
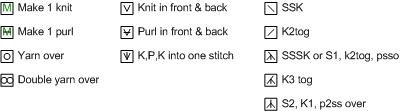
Apologies for the size of the illustrations today. I’m having an argument
with the picture upload facility, and this is the best resolution that
I can get working this morning. Although my symbols were inspired
by B. Walker’s and L. Stanfeld’s two, apparently I stuck to industry
standard practice, doing whatever the heck I felt like doing and coming
up with my own set.
Now. How do you use these?
Let’s start with a simple edging. Edgings generally have one straight edge
where they attach to the thing being trimmed, and one that’s dagged,
pointed, crenelated, scalloped, picoted or otherwise fancified in some
way. The fancy bits (I’ll call them all points for simplicity of
reference), are formed by increases and decreases. In some the
decreases come as partially bound off rows. Here’s a good example. This
one is the edging I used on my Kombu scarf:
Cast on 4
Row 1, 3, 5 (wrong side) Knit
Row 2: K1, YO, K1, YO, K2
Row 4: K2, YO, K2tog, YO, K2
Row 6: K3, YO, K2tog, YO, K2
Row 7: Bind off 4, K3 (4 stitches remain)
Repeat rows 2-7
First off – assume that all edgings knit side to side are knit in the flat.
The ‘wrong side’ notation confirms this. Row 7 starts with binding off
and is a wrong side row. That means that if you hold the piece with the
RIGHT side facing you, the straight edge will be on your right, and the
ziggy-zaggy one will be on your left. Row 1 is not repeated, and
appears to be just a foundation row. Armed with this orientation info,
we begin charting rows 1 and 2.
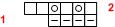
Row one is a wrong-side row, so even though the directions say “knit” the
stitches are plotted as purls (that chart = right side view
thing). On row two we’ve got two yarn overs. They increase
the total stitch count by two. We know that this is an
edging. We know that the jagged edge will be on the left when
viewed from the right side. Therefore I have chosen to make the
stitches line up along the right hand edge. Here’s a proofing
trick. There are no decreases in this row, therefore number of
stitches in this row EXCLUSIVE of the yarn overs should be equal to the
number of stitches in the row below. 4=4, we’re o.k. Let’s
continue:
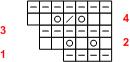
Row 4 contains two yarn overs, but the total stitch count is
increased by only one block. That’s because it also contains a
K2tog (stitch count +2yos -1k2tog = stitch count +1, not +2.) Row
5 is just another all knit row. Proofing stitch counts vis
a vis the previous row can be done by counting the number of plain
knits, plus two for every K2tog or SSK decrease. In this case
we’ve got 6=6. It works.
Row 6 and 7 get interesting. There is no uniformly acknowledged
(or obvious) symbol for binding off, therefore charts that contain
bound off stitches often use a text notation to indicate what’s going
on. Also remember if you bind off stitches you end up with one
remaining loop on the needle:
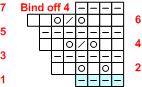
Again Row 6 increases total stitch count by only one (two steps
forward, one step back covers the YOs and the decrease). Row 7
includes the instruction to bind off four stitches, BUT there’s a
visual discrepancy between the chart and the written directions.
The chart says BO4, K3. The chart shows four stitches.
That’s because one of those is the loop that remains after you’ve bound
off the four stitches at the beginning of Row 7. You have that
loop on the needle, then you knit the remaining three stitches, for a
total of four stitches on the needle. I’ve also shaded out Row
#1. Just like the edge stitches in yesterday’s illustration, this
indicates that Row 1 is not part of the regular repeat. It’s a
foundation row worked at the start of the edging strip, and not
repeated thereafter.
As you can see, simple edgings are relatively easy bits of lace to
graph. Stitch counts do vary from row to row, but because they
have a stable edge, those extra stitches have someplace to go,
visually. Having built this foundation of basic concepts,
tomorrow we’ll do a panel pattern that doesn’t have the luxury of
a free edge, and introduce The Stitch That Isn’t There bugbear.
