TWISTING THE NIGHT AWAY
I was showing something about twisted stitchesto a knitting pal the other day, and I thought that other knitters might like to see it too. I know that I’ve discussed them here before as part of the post about knitting backwards, but I’ll recap.

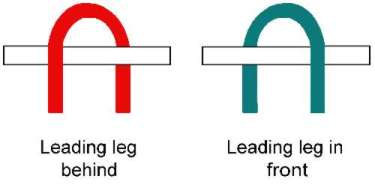
Twisted stitches are made when you knit or purl into the back as opposed to the leading leg of an existing stitch. Sometimes people make them inadvertently when they work a stitch as usual, but that stitch was mounted with the leading leg behind the needle:
The person I was working with does exactly what my mother does – forming stitches so that she routinely ending up with leading legs behind after working a knit row, then untwisting the stitch on the purl row. Ifmom is working stockinettein the flat, the final product looks like everyone else’s knitting, but ifshe’s working stockinette in the round, they end up with all twisted stitches because there are no purl rows on which to de-twist. My knitting pal was having the same problem. We worked on being able to tell the difference between legs in front and legs behind so that she could choose to either compensate or alter her technique. While learning to recognize and compensate is certainly a good solution, it is a limiting one. To this day my mom prefers knitting in the flat and working intarsia to knitting in the round or doing texture patterns. She especially dislikes texture patterns that do not include rows of plain purling in between the rows in which other manipulations occur. With no plain purl rows to un-discombobulate her stitches, she runs into that same twisting problem.
But twisted stitches aren’t entirely bad. Sometimes there’s good reason to make them. They’re great decorative accents, and have structural uses as well. I happen to like using twisted stitches in my work. In terms of structure, Ifind them particularly useful for working ribbing on cottons, silks and linens because they are a bit firmer than regular knit stitches, and help the ribbings in those fibers keep their shape between washings. That firmness and crispness of line is also a great tool to use in surface decoration. Here’s an example from a pattern available on wiseNeedle.

The pattern is for a lacy blouse with a wide vee neck and clingy fit. The combo of the diagonal lines of openwork and the vertical ribs makes it especially flattering to the zaftig among us. Here the firmness of the twisted stitches is put to use making the cotton yarn hold its ribbed, body-hugging shape. Also the verticals formed by the twisted ribbing really stand out. I chose to do them synchopated, so that the K2, P2 ribs don’t line up after they’ve been intersected by the eyelet diagonal. That movement of line makes the piece more lively, with a more interesting total surface effect. (Or so I think.)
Here’s another nifty use for twisted stitches. In this case, I can take credit only for execution. The pattern is from Reynolds, and was put out around four years ago in a summer book for their Saucy Sport yarn. Look at the nifty way the twisted stitches are used to make the lobster’s outlines, feet, feelers, and to differentiate the textures of the filled-in areas in head, body, tail, and claws. All in all, a very clever design:

Apologies both for the quality of the photo, and for the wear-and-tear on the lobster. This is one of my favorite summer sweaters, and he’s no longer fresh from the trap.
What yarn are these two samples knit in? It so happens that I used the same yarn for both. It’s Silk City Spaghetti, a cotton sport-weight woven tape, now long discontinued. I love this stuff, and even though it does shrink in the wash(my lobster sleeves are now about an inch too short), I’d buy it in a flash were I to find it still available. I do have enough left over from my cones of the khaki and paprika that I might be able to do a shell out of each. Or if I could countenance the resulting color combo, combine them in some sort of a two-tone piece. The jury is still out on the color combo thing.
IN ABSENTIA – FILET OF DRAGON; CROCHET
Another in-absentia post. This one reports progress as of 1 July. Again sorry to be not here.
Crochet in General
Crochet is not a dirty word. I know there’s an ongoing friendly rivalry between knitters and crocheters, but I think the two crafts aren’t mutually exclusive. In fact, I teach a one-day workshop entitled "Crochet for Knitters" offered sporadically at my LYS and to local guilds (when scheduling allows). It covers basic crochet techniques, then veers off to cover techniques of special use:
- Crocheted chain cast-on, both free and done onto a knitting needle
- Crocheted buttons and button loops
- Simple crocheted edge treatments, including the dreaded Shrimp Stitch (reverse single crochet)
Crochet and knitting do produce fabrics with very different properties. Knitting by nature makes the thinnest, most flexible non-woven textile possible from a strand of yarn – loops are single-thickness, and lie as flat as possible. Given yarn and needles of equivalent size, crochet produces a much thicker, heavier, denser fabric – multiple loops drawn through each other form the basic stitch unit. Knitting has an elasticity and drape that no crochet can equal (again given equivalent weight yarn and needles).
On the other hand, crochet has its own set of advantages. For the most part, it lies flat compared to knitting – especially to stockinette knitting. It produces a very durable, stable fabric. It’s also less constrained to "typewriter" row-based production (back and forth or round and round on a single plain of work). This makes things like relief work (think Irish Crocheted Lace), and 3-D freeform production possible. The learning curve for basic technique is also less steep. Crochet has only one basic movement – hooking a loop and pulling through another loop. Knitting has several?- forming knits, forming purls, and their several variants.
I learned to crochet long, long?before I learned how to knit. Like knitting, I taught myself from a book.I was around 7 when I?began making odd little squares with no particular use in mind, ?but I was a strange kid who read early and liked sitting quietly and making things.Knitting by contrast I didn’t pick up seriously until after college graduation. ?One of the reasons I found Continental style knitting easy and natural was that I was already well schooled in holding and tensioning thread or?yarn with my left hand, an artifact of this previous experience. In fact, I believe that people having problems learning Continental style might benefit from a brief side-trip to crochet because doing so would acustom them to this skill.
Crochet has many forms. The ones I favor are the finer styles of cotton crochet, done with threads of various thicknesses. Although I did quite a bit of it before learning how to knit, I no longer do much large-gauge crochet with yarn heavier than fingering weight. I find the resulting fabric too thick and stiff for most uses. Afghans, hats and bags are the exception, although I much prefer the airy drape of knitted blankets to the heft of crocheted ones. Hats and bags however can benefit from the additional?weight and structure. Note that I do not recommend fulling or felting crochet. I’ve never had a good result doing so, probably because I’ve never hit upon the right ratio of working looseness that would give the yarn enough room to shrink evenly.
A final note on crochet – I get lots of questions at wiseNeedle on how to go about converting a knitted pattern to a crocheted one. Although books have been written on the subject, my answer is usually "with difficulty, and probably not successfully with the original yarn specified in the pattern."? This goes back to basic stitch structure. For a piece of crochet to have anything like the same drape as a piece of knitting, it has to be made from a much thinner yarn. A knitting pattern written for worsted weight yarn cannot be crocheted in worsted weight yarn with the same result. I’d use a fingering weight yarn, light sport at the absolute heaviest. Then I’d draft out a pattern schematic from the original design, do a crocheted swatch, and re-draft all of the required pieces based on the gauge of that swatch. There are no short-cuts or magic formulae, just plain old trial and error and calculation.
Filet of Dragon
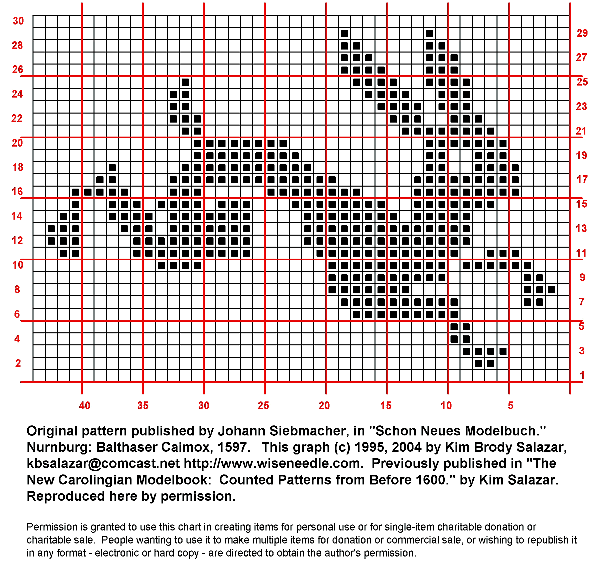
For all of crochet’s free-form possibilities, filet crochet is the most row-oriented form of the craft. Filet takes a graphed design, and interprets it in open mesh and worked mesh squares – sort of like net with some of the holes filled in. As I think I mentioned before, this is an aesthetic that dates back a long time, with several different crafts called into service to do it over the years. There are forms of darned netting and grounds, withdrawn thread work, and freeform needle lace that all produce roughly similar filled/unfilled box-based patterns. Crochet is the most recent, and (having tried most of the others), I can say?the fastest method developed so far.
Filet crochet production marches across a graph row by row. Reading charts for filet production is very much like reading a chart for stranded knitting done in the flat. You begin at the lower right hand corner, work across the first row right to left, then on the next row, return by reading across in the opposite direction. Filet crochet though exacting is a very easy technique. There are several excellent on-line tutorials. This one is my favorite. There are also quite a few filet pattens on line, but any design that can be graphed up on a grid using two values (open and filled squares) can be used.
All this being said, here’s the progress on my filet curtain panel:

The 4.3 rows shown represent about three hours of work. I’m a much slower crocheter than I am a knitter, as unlike knitting, I have to actually watch my fingers to ensure the stitches are formed correctly and are in the right spot. The piece is about 17 inches across. The dragon panel will happen in the center, with mirrored strips of a vine-like edging at top and bottom. The safety pins mark the transition point between the dragon panel and the framing vines.
I’m getting?a bit more than 5?meshes per inch using a 1.15mm Bates hook and Size 30 thread (thicker than sewing thread, but not as thick as perle cotton or bakery string). Each open mesh is formed by a double crochet followed by two chains (the next mesh forms the other leg of the box); each filled mesh is formed by three double crochets (again the first DC of the next mesh completes the box). For UK visitors, read treble instead of double crochet here, as for some reason terminology differs on the two sides of the pond.
My intent during this blogging hiatus is to keep plugging away on this thing. My curtain panel is about 30 inches wide x 17 inches tall. I’m working across the shorter dimension to save sanity. Once the panel is done, I need to go back and add another couple of rows top and bottom with larger holes through which the curtain rods will be inserted. I want to block out the piece before I do so, as the width between my curtain rods is fixed. Adding on these strips after the main motifs are completed will allow me to do any late course corrections to ensure a snug and proper final fit.
A final word – as I was starting out on this project I received some very valuable advice on filet crochet from a good friend and needlework buddy?of long acquaintence. Kathryn Goodwyn may or may not be reading this blog, but if she is – ten thousand thanks!? My dragon would not be crawling out from under his rock without you. (Kathryn is an exacting?researcher and needlework/historical clothing?re-creator. Her?favorite sig line "Too many centuries, too little time," which says?quite a bit?about the breadth of her interests and expertise.)
CHARTING SOFTWARE – ARAN PAINT
A couple of weeks ago when I wrote about charting knitted texture patterns, a couple of people were curious about Aran Paint, one of the lesser-known programs I mentioned. Here’s an example of what it does.
I’m starting with a twisted stitch texture pattern in Baulerches Stricken 1 by Lisa Fanderl. This is the first volume in a set of three German language knitting books that present traditional knitting patterns gathered from various regions of the country. This series is certainly interesting, but as with many stitch treasuries, presents the patterns using its own rather ideosyncratic notation and symbol set. In this case, the pattern is shown using plain old typeset characters, some linked with bars to indicate the direction of the twisted or cabled stitches. I’ve played with some of thetextured and lacy patternsfrom this series, but to work with a minimum of fuss, I usually had to re-graph them first.
This particular pattern is shown on p. 129 It’s a simple 10-stitch wide panel, and features some twisted knit stitch ribbing manipulated to look like a series of bells connected by chain links. I’m afraid I don’t have my swatch or a knitted sample, but this did look quite nice run as panels up the front of a baby sweater, close together in the upper bodice area, and set progressively further apart by an increasing number of stockinette stitches towards the lower edge.
Here are the results of graphing with Aran Paint:
|
|
 Final Graph |

The program also produced this set of prose instructions as a text file (it also outputs the same material in HTML):
AranPaint-BS1-129a.ara (10 Stitches x 26 Rows)
Repeat these 26 rows for the length required.
Row 1: K1, T2F, P1, K2, P1, T2B, K1.
Row 2: P1, K1, P1, K1, P2, K1, P1, K1, P1.
Row 3: K1, P1, T2F, K2, T2B, P1, K1.
Row 4: P1, K2, P4, K2, P1.
Row 5: K1, P2, K4, P2, K1.
Row 6: P1, K2, P4, K2, P1.
Row 7: K1, P2, K4, P2, K1.
Row 8: P1, K2, P4, K2, P1.
Row 9: K1, P2, K4, P2, K1.
Row 10: P1, K2, P4, K2, P1.
Row 11: K1, P2, K4, P2, K1.
Row 12: P1, K2, P4, K2, P1.
Row 13: K1, P2, T2F, T2B, P2, K1.
Row 14: P1, K3, P2, K3, P1.
Row 15: K1, P3, C2F, P3, K1.
Row 16: P1, K3, P2, K3, P1.
Row 17: K1, P2, T2B, T2F, P2, K1.
Row 18: P1, K2, P1, K2, P1, K2, P1.
Row 19: K1, P2, K1, P2, K1, P2, K1.
Row 20: P1, K2, P1, K2, P1, K2, P1.
Row 21: K1, P2, K1, P2, K1, P2, K1.
Row 22: P1, K2, P1, K2, P1, K2, P1.
Row 23: K1, P2, T2F, T2B, P2, K1.
Row 24: P1, K3, P2, K3, P1.
Row 25: K1, P3, C2F, P3, K1.
You can see that the thing is certainly useful, but that it has its limitations.
-
The program doesn’t include twisted stitches (like knit one through back of the loop). All of the original pattern’s knits are twisted, but I couldn’t show that on my version. YOs and eccentric cable crossings also aren’t included.
-
AranPaint includes its own “artificial intelligence” that prevents one from graphing only every other row, or from placing a cable unit such that it commences on an even numbered row. For example, if you’re working in the round and want to move one stitch over on two succeeding rounds without a plain round between them, you can’t graph it in AranPaint.
-
Symbol keys or glossaries don’t print at the same time as the pattern. While that’s not a big deal, and you can retrieve the keys from the publisher’s website, doing so is a pain and means an extra trip through cut-and-paste land.
-
You can’t easily get output for the mock-up I show at left above. To do this, I had to open AranPaint, take a screen capture, edit the capture down for size in Visio, save it as a *.jpg, then use Macromedia Fireworks to trim the resulting *.jpg down to something that is web-manageable.
-
There’s no undo function beyond “remove last stitch.”
-
Moving elements can be a pain, as there is no drag and drop.
All of these limitations being said, the program is still quite handy. Although I usually use my Visio template system for most “hard core” graphing, I do enjoy doodling with AranPaint, then having the resulting piece turned into an editable texture pattern. Here’s one of my doodles:
 |
 |
and the prose version:
AranPaint-doodle.ara (9 Stitches x 36 Rows)
Repeat these 36 rows for the length required.
Row 1: P2, C5R, P2.
Row 2: K2, P5, K2.
Row 3: P2, K1, C3B, K1, P2.
Row 4: K2, P5, K2.
Row 5: P2, K1, C3B, K1, P2.
Row 6: K2, P5, K2.
Row 7: P2, C5R, P2.
Row 8: K2, P5, K2.
Row 9: P1, T2B, K3, T2F, P1.
Row 10: K1, P1, K1, P3, K1, P1, K1.
Row 11: T2B, P1, C3R, P1, T2F.
Row 12: P1, K2, P3, K2, P1.
Row 13: T2F, T2B, K1, T2F, T2B.
Row 14: K1, P2, K1, P1, K1, P2, K1.
Row 15: P1, C2B, P1, K1, P1, C2F, P1.
Row 16: K1, P2, K1, P1, K1, P2, K1.
Row 17: P1, T3F, K1, T3B, P1.
Row 18: K2, P5, K2.
Row 19: P2, C5R, P2.
Row 20: K2, P5, K2.
Row 21: P2, K1, C3B, K1, P2.
Row 22: K2, P5, K2.
Row 23: P2, K1, C3B, K1, P2.
Row 24: K2, P5, K2.
Row 25: P2, C5R, P2.
Row 26: K2, P5, K2.
Row 27: P1, T2B, K3, T2F, P1.
Row 28: K1, P1, K1, P3, K1, P1, K1.
Row 29: T2B, P1, C3R, P1, T2F.
Row 30: P1, K2, P3, K2, P1.
Row 31: T2F, T2B, K1, T2F, T2B.
Row 32: K1, P2, K1, P1, K1, P2, K1.
Row 33: P1, C2B, P1, K1, P1, C2F, P1.
Row 34: K1, P2, K1, P1, K1, P2, K1.
Row 35: P1, T3F, K1, T3B, P1.
Row 36: K2, P5, K2.
Before you write and ask, remember – symbols and abbreviation setsused in AranPaint write-ups and graphs can be found here.
FUN WITH LAGOMORPHS
UPDATE: THIS DESIGN IS AVAILABLE ON THE EMBROIDERY PATTERNS LINK ABOVE, IN EASY-TO-PRINT PDF FORMAT.
SECOND UPDATE:
The source for this is under re-evaluation. I’ve found it in Bernhard Jobin’s New kuenstlichs Modelbuch von allerhand artlichen und gerechten Moedeln auff der Laden zuwircken oder mit der Zopffnot Creutz und Judenstich und anderer gewonlicher weisz zumachen, published in 1596. I believe that when I first transcribed this from microfiche in the early ’70s there was a mixup in the labeling of the fiches I consulted. If TNCM gets reissued, I will insert the correction.
I was re-graphing this rabbit from my book of embroidery patterns, and I thought angora-fanciers might like to work it into a headband or sweater front.
The original plate from 1597 showed a large group of animal motifs clustered together to save space. It included this one, two coursing dogs (possibly greyhounds) a squirrel, an owl, a stag, a unicorn,a parrot, a yale, and the lion I previously shared for Gryffindor pullovers.
I-CORD TRIX
I was playing around with I-cord last night, in part because I’ve decided to re-think the Entrelac piece (I’m going to do the vertical strips thing, as an entire front of unbroken entrelac in my size boded to make me look like thebacksideof an enormouspoison arrow frog).
I’m sure I’m not the first one to do this, but given recent explorations on knitting edgings onto things, and to attaching I-cord to terminal stitch edges (like in the poncho); I wanted to see if I could do I-cord attached to a vertical edge. I fooled around a bit and came up with this sample:

I apologize for the blurry pix. I had better luck knitting the sample than I did in photgraphing it.
This piece is ten stitches wide. It has I-cord at both the left and right edges, knit at the same time as the two-stitches of garter in the center. Here’s what I did:
Cast on 10
Row 1: K6, bring the yarn to the front without making a loop on the needle; slip 4 stitches purlwise
Repeat Row 1, making sure topull thefirst stitch especially tightly to create the I-cord effect
I could have done something similar to create a double I-cord strip for the poncho, had I started with 8 stitches, and done K4, slip 4.
As is at 10 stitches wide, this sort of strip might be useful for someone making belts or bag handles. It would work well fulled to make a wider bag handle than standard I-cord. I need to experiment more, but I think that if I started out with 12 stitches (4 for each edge, plus 4 for the center), I might be able to do some order swapping to make a braided cable.
But there’s no reason to stop there. I happen to detest the loose, flabby edges on most simple scarves and blankets. The next time I knit a scarf or blanket, I’m going to figure in four stitches on each side. I’ll begin each row with four knits, and slip the last four stitches purlwise. I’ll need to experiment more to see if this sort of thing tames Dreaded Stockinette Curl (I rather doubt it), but I think it would be a nifty edge treatment none the less.
WORKING REPORT – ENTRE DEUX LACS TEE
Thank you to everyone who wrote with hints on how to tame the entrelac beast!
I mentioned wanting to introduce shaping into my garment, and Jaya (of extensive modular knitting experience) suggested I plan on changing the size of the entrelac blocks in those areas. She says she uses either extra decreases or increases to alter the size of individual modules as required and then restores them to their original shape after the need for the width alteration has passed. (You can see some of Jaya’s killer work in her picture album). She also suggested I look at Annabelle Dawson’s entrelac sock pattern because that uses entrelac diamonds of different sizes to change the diameter of the total piece.
Debbi sent in some thoughts about yardage consumption. She said that the entrelac front of Oat Couture’s Tuxedo Vest used less yardage than she would have expected, so I shouldn’t worry about not having enough yarn. Just in case, I’ll do the front of my project first. I can always do plain stockinette for the back.
As to what that thing will be, I’m not sure yet, but I didn’t let that stop me from casting on. I did the math on my gauge swatch, and cast on 138 stitches. I’m working the short-row method for the foundation row of triangles, as per Carol Wyche’s Untangling Entrelac article(great resource!).
I’ll do a couple of courses then begin to think about trimming out a small bit of bulk to make a nip-in at the waist. Not much, but enough to avoid an overly boxy sillhouette. I haven’t decided on much for the upper body. I’m thinking square neckline. I’ve got an Elizabethan shape, so they work well on me, plus it should be easier to do a square neckline than a Vee in entrelac. We’ll see how much yarn I end up having left over for sleeves. I’m open to anything from "just barely" to three-quarters. Which brings me to my big learning experience of the day:
Backwards We Will Be Knitting
The most commonly repeated hint I ran across was that given the back-and-forth nature of entrelac, lifewould beless cumbersome if one learned to knit backwards – from left to right. That way the little entrelac gobbets could be done without the need to flip the work over. Given the fact that I’ll be doing LOTS of 6-stitch wide gobbets, I thought I’d play with it.
Since the whole idea of knitting backwards is to minimize all interruptions in the flow of stitch formation, I decided I didn’t want to switch the hands in which I was holding my yarn. That means I’d be going forward in my usual Continental style, but heading back doing some left-handed variant on English/throwing style.
Now, I’m a Continental knitter to the bone. I’ve done contrasting colors in using throwing, mostly back before I learned to hold both colors in the same handwhile stranding. I’ve also taught others to do it, and in a pinch can demonstrate most techniques in it for people who have problems seeing what I do and translating it to their way. But it’s not my method of choice, and certainly far from a habit that’s become hard-wired for me (I knit Continental exclusively when I dream about knitting. What? you don’t dream about knitting? Hmmm….) At this point, I have to think hard to knit properly using throwing.
I killed most of yesterday playing with different ways of wrapping the yarn and forming the stitches. First forwards, then backwards – sometimes both at once on two different sets of needles so I could see where I was going wrong. I will say that if you want to experiment with this, there are two knitting basics of which youmust be aware. First, make sure you’refamiliar with the difference between stitches mounted on the needle with their leading legs in front, and stitches mounted with their leading legs behind:

The leg in front orientation is the most common. It’s the expected orientationagainst which 99.999% of knitting patterns are written. There are exceptions of course. People who knit Eastern Uncrossed like my mom alternate orientations between knit and purl rows, but they knit into the back of their stitches when working stockinette so that they avoid making twisted stitches. The second thing to recognize is whether or not the way you are forming a stitch will produce a normal U-shaped stitch, or a twisted one. (The twisted ones look like toddlers-in-trainingpostponing the inevitable.)

Recognize these knitting basics and experiment with different ways of wrapping the yarn and making stitches so you know what combo of stitch entry and yarn looping produces each effect. That will make it easier to figure out what’s happening when you try toknit backwards. It took quite a few passes before I was able to produce normal untwisted/leading-leg-forward stitches.
What I ended up doing was keeping my yarn in the left hand, exactly as I usually hold it. I took my left hand needle tip and put it into the stitch to be knit, from front to back, as if I were knitting through the back of the stitch (pretty much what my Mom does when she makes a knit stitch, but from left to right instead of right to left). Then I used my yarn-holding index finger to wrap my yarn down over the left-hand needle tip. I then used the right-hand needle to lift the old stitch over the newly made loop, dropping it off the end of the needle. Voila! One backwards-knit knit stitch.I apologize for not having pix, but I’m alone right now and without growing several new appendages, I can’t photograph and knit at the same time.
Needless to say I’m kitten-clumsy on this, and have nothing like the speed with which I can knit in the normal orientation. But after working across my entire short-rowed set of edge triangles, it doesn’t feel as abjectly alien as it did last night.
WORKING REPORT – LACY SCARF, FULLED PILLOW II
I continue to make progress on my two at-hand projects.
Lacy Scarf
I finished the center strip of the lacy scarf on Saturday night. The center strip took almost one entire skein of the hand-spun lace weight Merino. That rate of consumption put the last stake in the heart of my first choice of edging (with minimal modifications). I did’t think I would have had enough yarn to do one that wide.
So as I predicted, it was back to the drawing board. I spent my knitting time on Sunday and Mondaymessing around with stitch dictionaries bothhard-copy and on-line, usingthe little bit of yarn leftover from Skein #1, swatching out possibilities. Disappointment. Overall, I felt like a cable TV viewer – I’vehad hundreds of choices, but nothing to watch.
I started with several possiblities from books, then tinkered with them. I even drafted up a couple ideas from scratch.I wanted to use diagonals and/or diamonds to mirror the motifs on the scarf end. The thing should be rather demonstrative as the bulk of the body is so plain. I neededmy edgingto be no wider than 12-14 stitches at its widest point. Asawtooth or point detailwould make going round the corner easier.
After extensive fiddling with dozens of patterns (enough to actually wear out my short length of practice yarn from all the knitting up and ripping back), I cycled back to my original pick.It had the best combo of diagonals and I liked the balance of opage to openwork areas. All that effort wasn’t lost though. What practice did do was give me a better feel for how patterns can be changed around. My initial efforts at modifying the pattern book original were pretty tame – taking out a small insertion detail. This last time I chopped it right in the middle of a vertical pattern element, narrowing the thing down by half. As you can see, it’s working:
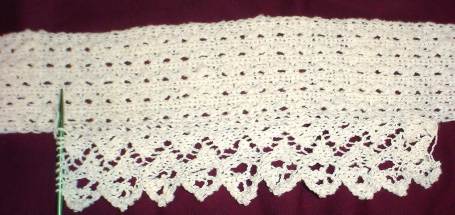
Stitch counts on the eding range from 10 to 15 (the body by contrast is 27 stitches wide, butbecause it’s a ribbing, it looks narrower than that).
To attach my edging, I’m using the same pull-a-loop method employed in the Forest Path Stole. It’s fussy, but it makes a very airy join, with no heavy column of attachment stitches. I will work from the point shown, rounding the first corner to the center of the end. Then I’ll weigh my remaining yarn. That should give me a handle on yarn consumption. If I’ve used more than a quarter, I’ll rip back and slash another three columns from the edging’s repeat, then begin again.
Fulled Pillow II
The fulled pillow went through five wash/tumble drycycles over the weekend, keeping company with the family’s regular laundry. I didn’t expect much in terms of total shrinkage. I’ve used this yarn before and it takes quite a few tries before it’s sufficiently de-lanolined to full.
It did start to fuzz up around Wash #3. I can still see garter stitch ridges, but the individual stitches are getting harder to spot. The pillow has also begun to get denser, and a small bit of shrinkage has occurred, but it’s not worth photographing yet.
Original dimensions were 26 x 14 inches (66 x 36 cm). Right now it’s roughly 23 x 13.5 inches (58.4 x 35 cm). I do note that the yellow stripes account for about half the shrinkage so far. The blue and green ones haven’t tightened up as much. I’ll keep washingthe pillowuntil I’m satisfied but as laundry is only done on weekends, you won’t be hearing about this piece again until next week.
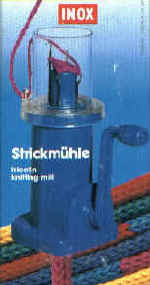
GADGETS – STRICKMUHLE
A while back I asked for advice on buying one of those little hand-cranked I-cord knitting machines. I now present the outcome. This one is very definitely a boutique sort of item. Not everyone has use for miles of I-cord. I do.
I knit lots of baby booties using the pattern Ann Kreckel posted to the KnitList in the summer of 1995. The pattern is available at Woolworks. There’s a similar pattern in Taunton Press’ Knitting Tips and Trade Secrets. I make them as gifts for friends and family, or for charitable donation.
I don’t have any finished booties on hand right now and my sock yarn stash is in the storage cubby, otherwise I’d whip up a pair to photograph. I’ve modified the pattern a little bit, knitting the cuff with fewer rows so that it is more rolled than folded. I also like the look of I-cord rather than crocheted, braided or longitudinally knitted ties. But I-cord is tedious. It takes me almost as long to knit the I-cord ties as it does to make a bootie, so I splurged on a gizmo to do it for me.
About three years ago I got sick of hand-knitting the ties. I looked at the Bond Magicord Machine, the Inox Strickmuhle, and a couple of older models I found on eBay. Both the Inox and Bond machines have changed from the ones available at that time. Except for color, they’re now identical, both sporting little clear plastic sleeves surrounding a 4-hook needle bed.
|
|
|

My older version of the Strickmuhle has no sleeve, uses a different type of weight, and has a protruding arm to position the yarn feed:
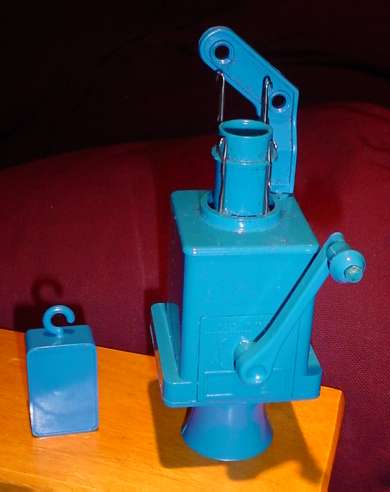
Back when I bought this one there was a big difference in quality between the Magicord and the Inox, with the Inox being much sturdier. Now they’re the same machine, so any differences will be in the accompanying documentation (if any).
You can see the hook-weight on mine(there’s a block of metal inside). On the newer models the hook-weightappears to have been replaced by some sort of clip. Mine also came with a second slightly smaller collar (that’s the blue circle that you can see sticking up among the four hooks). In theory, the smaller collar should be used for fingering and 3-ply yarns, and the larger one should be used for sport and DK, but I’ve never found the two collar sizes to have any effect on ease of production or I-cord evenness.
My machine works best on fingering through DK weight yarn, with best results from sport weight (6 spi). I’ve forced some Cascade 220 worsted through it (5 spi). It worked, and I got I-cord that I later used in a fulling project, but I wouldn’t recommend it for worsted as a matter of course. There’s areal knack to using this toy, especially with heavier yarns. Starting a new cord can be especially trying.
I did pick up a couple of starting tips from the French language instruction card (it came with a French, German and English card, but my English card was missing) – When starting out, make a loop, then stuff the yarn end into the tube’s body. Hang the weight from the loop. Then lay the yarn and turn the crank VERY slowly, skipping every other hook on the first round. You will be using Hook #1,Hook #3, then Hook #2 and finally Hook #4. After you get to Hook #4 you can let the yarn feed without skipping hooks. The combo of constant weight on the dangling yarn, plus the skipping-hook row produces a nice even end and minimizes the un-caught stitches that can make starting a cord difficult.
Once a cord is started, the thing does work quite easily. I often hand off my gizmo to one of my kids and have her crank out the required length. My weight isn’t as convenient as the spring clips, but I can move it up the cord if I need more yardage than the 5-year old is tall. Ending off is easy. I snip the yarn and keep turning the crank until the cord falls through. Then I use a tapestry needle and the dangling end to thread through the cord’s four loops. If I’m making bootie ties, I don’t bother making a two separate cords. Because starting is the trickiest part of operation I make a single cord that’s double long, plus a couple of rows – then snip the thing in the middle and bind off the two new ends.
Looking around, I see other people playing with these toys. Jenanne posted a summary of her experiments with the new version Bond and an Aran weight yarn (4.5 spi). Kate at Will Knit for Food also wrote about making I-cord from worsted weight yarns, then fulling it for bag handles.
Other than cost ,limits on the weight of the yarns it can handle, the difficulty of holding the thing, the yarn and cranking all at the same time (I wish it had a table clamp), and some trickiness starting off a new cord, my biggest disappointment is that the user is unable to alter the number of hooks being used. You get four-stitch I-cord. That’s all. One of the pre-1940s-vintage German-made all-metal machines I was tracking on eBay came with 6 hooks, and could be used with as few as two (sort of as a turbocharged lucet).
I also ran across the Hobby-Knit on eBay:

It looks interesting, but I couldn’t get anyone to confirm whether or not it could be used with a variable number of hooks. Also the very few of them that seemed to offered in operational condition were selling for upwards of $100. Much more than I could justify for such a trivial function.
If anyone knows more about this vintage toy, feel free to clue me in.
CHARTING SOFTWARE – GRAPHIC BUT NOT VIOLENT
Some people have sent in questions about how I am charting up the patterns I intend to use in the lacy scarf. In specific, they wanted to know if I am using one of the commercially available dedicated charting program.
I’ve tried demos for almost all of them. Alsoabout four years agoI broke down and bought Garment Styler Goldand Stitch Painter. I was sorely dissapointed in the usability of themodules and the quality of support available for both of those programs. Fewer than half of GS’s features worked and repeated requests for help were answered by "Sorry. It’s your machine and not our problem," in spite of the fact that I was able to replicate the failures on five more machines running an assortment of video cards and operating system versions. On top of that, Stitch Painter was primitive at best, and interfaced very poorly with the GS main program. Both may have gotten better since then, but I didn’t want to throw good money after bad.
Since2002 I’ve beenusing Sweater Wizardfor garment design assistancewith no problems. I didn’t get the companion Stitch and Motif Maker program.AlthoughI was a beta tester for the new version of SMM, andfound theprogramto beextremely handy,it’s not a major improvement over what I’m using now.What I really want is acombo program that truly integrates both garment design and motif design, producing shaped charts based on actual garment dimensions, or can superimpose garment outlines on a larger charted piece (like in Rowan and Jaeger magazines).
I’ve also fooled around with AranPaint. It’s a shareware program that produces custom graphs of texture patterns. The registered user version is the same as the demo, but restores the ability to print. AP does a nice job of charting simple cable and twisted-stitch texture pattern repeats. It’s able to produce a visual mock-up of what the design will look like, a chart with (more or less) standard symbols, and a prose printout of the directions. It’s biggest limitation is the small number of different symbols/stitches it can represent. AP can display/chartK, P, bobble, and 2 to 6 stitch cable crossings, not including most of the more eccentric ones (biggest lack – no YO). It also has a space limitation on the area. 50×50 stitches isbig enough for most people, but not big enough for many of the things I do. If an update of this one ever comes out and it includes more stitches, I’ll cheerfully pay for an upgrade.
My interim motif/stitch solution is to use Microsoft Visio Professionalas a stand-alone charting program. I regularly useit in my real-world work – answering Requests for Proposal (RFPs) for engineering and telecom companies.Visio isnot cheap. I certainly wouldn’t recommend anyone run out and buy a $400+ pro-grade drafting program just for graphing up knits when Stitch and Motif Maker can be had for less than a quarter of that. ButI couldn’t justify spending more on aboutique program (no matter how good) when the big boy could be tweaked to serve the same purpose.
I’ve concocted a series of stencils that contain all of the symbols I use, plus line and stitch numbers and 10×10 and 5×5 master grids. Each symbol is a small graphic unit, and all are predicated on little squares. I assemble my graphs square by square, building them like a little kid builds a wall of alphabet blocks by dragging over the symbols I need. Here’s a screen shot:

I used this to make all my graphs, including the extremely large one that accompanies the Raiisa lacy T on wiseNeedle. The screen shot shows just the basic knitting symbol shapes on the first stencil. Additional shapes are available on the cables and increases/decreases stencils (seen at the bottom of the green column). I built each shape myself, using plain oldsquares and rectanglesand the standard Arial font. While I haven’t incorporated any rules-based properties formy stitch shapesyet, each one does have a pop-up help window that gives a how-to for that particular stitch for both right-side and wrong-side implementation.
I can create more symbols as I please, adding them to the stencils if necessary. For example, if I’m charting colorwork, I’ll create a contrast color block for each color I intend on using, then store them on a separate stencil to re-use as needed. I even use stencils to store commonly used motifs, like the quaternary star that shows up as snowflake in so many Scandinavian patterns:

Symbols can be grouped, rotated, mirrored or arranged in layers.There are limitations:
- I can’t select all the squares of one color and change them to another unless I’ve placedor senteach color on its own drawing layer (think stacked transparencies, each bearing just one color of the design). If I’ve sorted my motifs this way into layers, I can flood-fill all of the boxes on one layer with the same new color.
- The *.jpgs produced by Visio are very large. I need to run them through something like Macromedia Fireworks to reduce resolution and size so that they’re not unwieldy for Web placement. The star above was 552 KB, which I slimmed down to 12 kb using Fireworks.
- There’s no "flood fill" with a chosen symbol. I can’t draw just the foreground, then flood the background with purls unless I create an all-purl layer and superimpose a layer bearing my motif upon it.
There’s no particular reason why any other drafting/drawing program with a stamp or stencil feature and layers can’t be tweaked this way. One final warning – Visio drawings and stencils in their native format are difficult to export to other drawing/drafting programs. They can be viewed by anyone using the free Visio viewer provided by Microsoft. Visio can export to many formats, including *.jpg, *.gif and several specific to various commonly used CADD platforms. But those are one-way solutions that send over images of the final product, not components that can be further manipulated. I work inside Visio, then export to *.jpgor print via Acrobat if I need to post a graph on the Web.
I’ve offered up my stencils before, but so far no one has been interested. I’ve got templates for Visio 5 and Visio 2000. The 2000 set should also work in Visio 2003. If sufficient demand is seen, I’ll postboth setson wiseNeedle in the tools section.
WORKING REPORT – LACY SCARF/FULLED PILLOW II
The past two days’ posts aside, I have been making progress on bothmy lacy scarf andmy fulled pillow. Knitting on the pillow is almost done. I’ve got maybe one more evening of garter stitch left. This weekend I intend on fulling it when I do laundry. I’m rushing a bit on it because I want to be sure to be able to full it completely before I have to leave this washing machine behind (it was a negotiated sacrifice in my house sale). I’m afraid the older hand-me-down machine at the new house might not be up to the challenge.
On the lacy scarf, I’ve finished re-graphing the patterns I intend on trying out. I’m working on modifying them a bit so that they play off each other better. I’m also narrowing the edging by either messing with or eliminating the double column of faggotting shown in the pattern original.
For those new to the term, faggotting is a true lace knitting stitch, in whichincreases and decreases occuron every row (as opposed to a lacy knitting stitch, in which rowscontaining increases and decreases alternate with plain knitted or purled rows). One common form of this effect when worked in the flat takes only two stitches and two rows for the entire repeat. Row 1 would be an endless repeat of the (YO, SSK) unit. The accompanying Row 2 would be an endless repeat of (YO P2tog).
So? Why is it called "faggotting" anyway? [Warning. This is a Kim-theory, so go chip yourself an enormous grain of salt before reading on.]
It’s not immediately evident why the name stuck to this particular knitting texture stitch.In historical usage, faggots are bundles of sticks – especially twiggy sticks used as kindling or cheap firewood. Nothing much looks bundledif you examine justknitted pieces. But if you look at those pieces in in the context of other needlework contemporary to the Great Whitework Cotton Knitting Craze of the mid to late 1800s the reasoning is pretty clear.
Withdrawn thread embroidery was one of those contemporaryneedlework styles. Commonly used for hemming or decorative insertions, it can range from the pretty simple to the amazingly complex. The sampler below shows several withdrawn thread patterns spanning several different substyles (the lacy white-on-white bits). Disclaimer and attribution: this sampler isn’t my own work, it’s a piece in the collection of the National Academy of Needle Artsthat I found doing a Google image search. I didn’t find a more exact attribution on their website for it. Great work though!

The topthree little bands on the sampler are the most widely known and used forms of the technique. The others, while nifty aren’t as often seen. The two most common names for this substyle that includes the top three are "Italian Hemstitching" and "Faggotting." The multicolor bands are double running stitch (aka Holbein Stitch or Spanish Stitch).
You can see in the openwork bandsthat the horizontal threads of the linen groundweresnipped at the left and right, then teased out. The cut ends were secured with stitches, usually before any cutting took place. The remaining vertical threads were bundled tightly with tiny hemming stitches that tie the fabric threads together like little bunches of sticks. In the more complex forms on this sampler, these bundleswere further embellished with threads woven in among them, orwere subdivided and/or twisted by additional stitching.
The second strip of the sampler with it’s running VVVVVs is the most interesting one for knitters. Compare the zig-zag pattern of one often-seen type ofknitted faggotting:
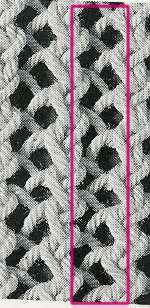
The zig-zags produced by faggotting in knitting mimic thegroups of verticalscreatedin withdrawn thread hemstitching. That’s where the bundle idea came in, andfrom where I believe the knitting stitchborrowed its name. This snippet is excerpted from Lewis’ Knitting Lace, p. 146 (Yow! I just saw the used bookprice. Ineed to update my insuranceto cover my library!)
