LONG LOST SIBLINGS?
As I wander through on-line collections, occasionally I spot things that look very familiar. There are pattern style families, even specific motifs and strip designs that persist over time, popping up in multiple locations, over periods of decades. Those are fun to trace, and to try to figure out branching traditions, and to try to pinpoint ultimate origins, although that’s rarely possible.
Today’s pieces though are something different. I believe them to be either part of the same original artifact or set of artifacts.
To begin with, here they are. At left is a piece from the Art Institute of Chicago (accession #1907.740); at right is a piece in the Hermitage Museum’s on line collection (accession #T-2734).


The AIC’s piece has a more complete annotation, noting the dimensions of the various component parts, describing the materials and stitches used (“long armed cross stitch, cut and drawn thread work… insertion of silk needle lace”), and giving a provenance and date of Italy, 1601-1650. They call the piece “unfinished.” It was acquired by the museum in 1907.
The Hermitage’s piece provides less detail, silk on linen, and overall dimensions. They call the stitch used “double Italian cross” (or that’s what the Russian translates as). They cite origins as Italy, 16th-17th century, and say the piece came to them from the private collection of Baron Stieglitz. I am unsure which member of that family they are citing, but the the Stieglitzs were prominent bankers and aristocrats during the 1800s, and up to the time of the Russian revolution. They were known for amassing opulent art and antiques collections, among other extravagances.
When my Stealth Apprentice brought the Russian-collected example to my notice last year, she opined that it was unusual to see the very coarse voided strip, needle lace, and more delicately done center piece all in one composed work. I agree with her. It is curious – all the more so because of the second example from Chicago.
Let’s look more closely at the two. Chicago’s larger piece seems to start at the right edge at the same design point of the urn/flower cycle as the Hermitage’s. The count and spacing on the motifs are identical on both pieces, although the Russian sample is very slightly taller – about four or five rows of the flower/urn area pattern. Both seem to be “full length” slices north/south. But that left edge on the Russian example is very clearly cut and truncated, with the narrow border removed from a work’s right edge and seamed to the larger field. AND look at the top area. Not only was the piece sliced off and then replaced on the urn/flower area, that same cut and sewn seam ascends all the way to the top, cutting through BOTH the needle lace band, and the coarsely executed voided strip. It’s also clear that the strip that was cut was taken from the left edge of the original source piece, because the fragment of the narrow border flower at the top left has “turned the corner.”
Further, because both artifacts include an intact right hand edge with no seaming, these were probably descended from a set of two matching items.
Both pieces seem to have been cut off at the right edge, snipped through the narrow needle lace strip, and both show signs of stitching remains on their bottom edge – possibly fragments of more needle lace. On the Russian bit, there’s even evidence of red remnants along the outer edge of the applied border strip. Both works show clear signs of there being a finished hem around the central flower/urn plus companion border section; but no hem is in evidence on the voided strips. Even the linen ground’s weave on the voided strip parts looks coarser than that in the center area’s ground.
So. What do we have?
Here’s one possible flight-of-fancy. I have no evidence to claim this as being true, so it’s just postulation and theory: two rounds of re-use.
Our piece starts off as the urn/flower part – two strips, about 42.3 cm (16 5/8 in) tall, but of an indeterminate length. They might have been bed hanging, long towels, or something akin in shape or proportion to a modern table runner (historical use unknown).
At some point in time, these items gets turned into something else. Possibly a deeper set of bed valences, or possibly one or more rectangular bolster or cushion covers, through the addition of the side strips of voided work, attached by the decorative needle lace sections. These additional bits were done by a different hand than the older flower/urn section. (I do note that there are other examples of artifacts that employ side strips to turn rectangular flat pieces into square-edged 3D cushion covers.)
Fast forward to the second moment of re-use… The second-use bed hanging or bolster cover is cut down again. The unknown recycler may have intended to make multiple covers for smaller cushions, or other smaller covers/bags/whatever. And it’s possible she or he never finished that project – that’s why we have the partial cut-down-and-reassembled Hermitage fragment, and the unfinished fragment in Chicago.
And for the piece’s final disposition among multiple museums – I do know that in the late 1800s, lace and embroidery collecting was a fad among the wealthy and fashionable. Many American museum textile collections crystallized around donations from prominent families – items they picked up on Grand Tours of Europe. I have come across quite a few artifacts that may be pieces sundered in that process – cut apart by antiquities dealers who then sold smaller bits to multiple buyers, rather than keeping artifacts intact and making only one sale. I posit that our flower/urn twins are a pair of those pieces, and having fallen victim to profitable multiple sales, ended up fragmented between two continents.
WHEN IS MORE OF THE SAME NOT MORE OF THE SAME?
Another post that only a stitching history nerd will love.
The last post explored some differences between modelbooks that looked like they featured the same patterns, but in fact were not printed from the same plate. This one looks at one of the most widely reprinted and well known modelbook authors – Johann Siebmacher, and three of his works, all available in on-line editions. All of the excerpts below are from these three sources:
- Schön Neues Modelbuch von allerley lustigen Mödeln naczunehen, zuwürcken unn zusticken, gemacht im Jar Ch. 1597, Nurmberg, 1597, – the source work for Mistress Kathryn Goodwyn’s Needlework Patterns from Renaissance Germany
- One reprinted in 1886 as Kreuzstich- Muster: 36 Tafeln des Ausgabe, 1604, that calls out Siebmacher as its author.
- One indexed simply as Newes Modelbuch with him as author, possibly 1611, but unclear from the source
Many of the designs in these books seem to repeat edition to edition. Some are unique to only one. Before we begin, it’s worth remembering that these books are survivals. Long use and reuse over decades have resulted in page loss. None of the editions are complete, as in “all intact in one original binding,” and some may have been re-composed at a later date from other partial works. But we do what we can with what we have, and Siebmacher’s editions have title pages in them, and distinctive numbering and framing conventions that can lead to a reasonable conclusion that they were from the same printing workshop.
All of the books show graphed designs suited for reproduction using several techniques, including various styles of voided work on the count, lacis (darned knotted net), and buratto (darned woven mesh). Twp of them also include patterns that would be suitable for other forms of lace. Over time these patterns went on to be executed in weaving, cross stitch, filet crochet, and knitting, too. The descendants of these designs ended up in multiple folk traditions and samplers on both sides of the Atlantic.
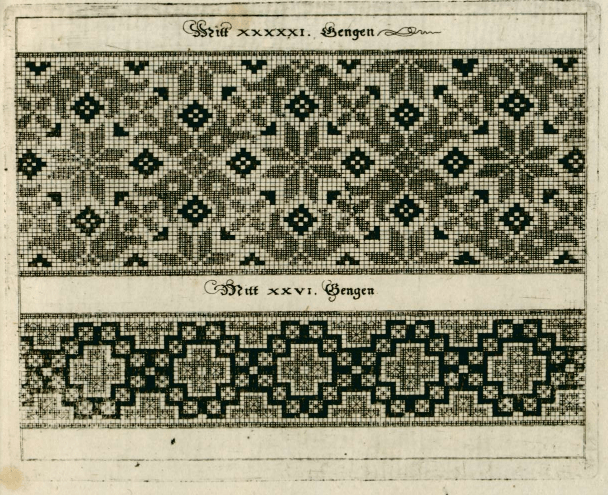
In addition to the longevity of their contents, Sibmachers books are among the earliest that seem to indicate execution of the design using more than one color or texture, a feature not common in the black-and-white printed early modelbooks. Here are examples the first two books. But I don’t think that these pages were originally printed two-tone. I think they were hand-colored to add the darker squares, either at the time of manufacture or later.
| 1597 | The possibly 1611 edition |
 |
 |
Obviously, the two samples above were printed from the same block. But the pattern of the darker squares is different, and if you look closely, the some of the solid squares looked colored in, as opposed to having been originally printed that way. I can say the retoucher who did the 1597 was a bit neater. I don’t think these were colored by the book buyer, because every single edition of Siebmacher’s works that I’ve seen have included multi-tone pages like this.
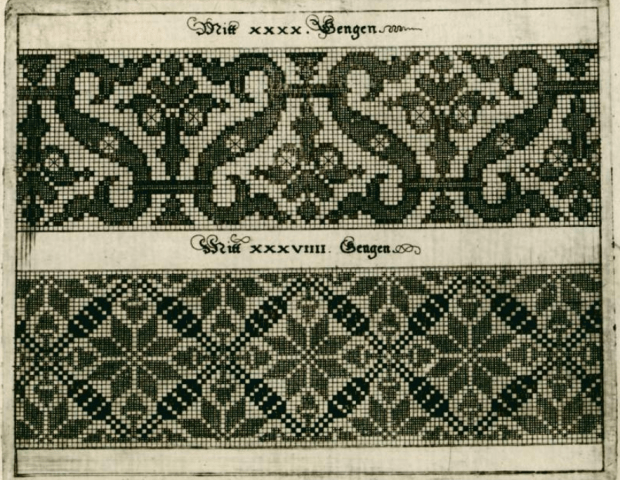
Here are other single- and multi-tone blocks that repeat between these two editions:
| 1597 | The possibly 1611 edition |
 |
 |
 |
 |
 |
|
 The brown ink on the G near the talon matches the color of the hand-drawn designs at the back of the book – post-publication additions.
The 1604 edition has similar pages that sport two-tone presentation:

But these books are not the same.
That 1604 edition… It’s curious that there are no blocks that are in the other two Siebmacher works that are also in the 1604 edition, yet all three books are clearly signed by him. And the majority of the block labels that show stitch counts for the repeat, or pattern height in units – they are curiously different between the 1604 and the others, too. But still, there evidence of style affinity across the works. Zeroing in on some specific pattern features:
A very familiar stag, that shows up on some of the earliest samplers, with descendants on American Colonial samplers, all the way up to pieces done in the 1800s.
| 1604 | 1597 |
 |
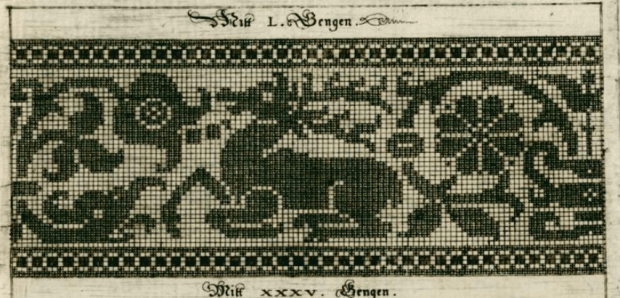 |
Similar, yet not the same.
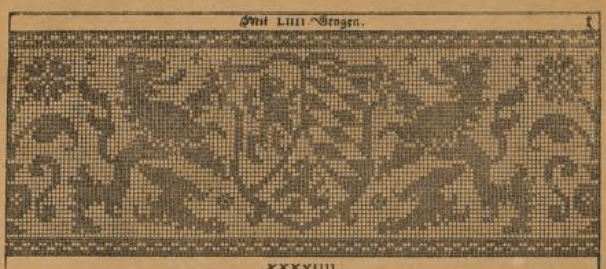
Here is a set that’s confounding. First the hippogriff and undine from 1604:

Compare the item above to these two designs – a winged triton and an undine, each from the 1597 work:
 |
 |
Lions rampant?
| 1604 | 1597 |
 |
 |
Even the geometrics are close but not duplicates
| 1604 | 1597 |
 |
 |
All this aside, even the seemingly close 1597 and possibly-1611 versions have significant differences between them, although they do have exact page duplicates between them. Not so with 1604 – it’s unique when closely compared to the other two, even though all three have the same author attribution, and very similar styles. This is VERY odd considering the vast amount of physical labor that had to go into producing these blocks.
So. What’s going on with the 1604 edition? Why is it so different from the other two? Has anyone read an academic work that examines this issue in more detail, or corroborates these findings with other editions that are not published on line?
So many patterns, so many questions, so little time to do in depth research.
BUSY BUSY BUSY
I wish I weren’t but it’s been so, and for a while.
Sadly this means that not much substantive is getting done on any of my main projects. I feel quite badly about this because I promised a pair of Octopodes Mittens to a niece. Thanks to the ungentle hands of the Philistines at TSA, during my trip to Florida, my on-the-needles project was unceremoniously dumped out into my checked baggage, the needles were pulled out of the work (and one was lost); the magnet board I was using was bent, the magnetic strip that marked my place is missing, and they broke the yarn to remove and lose the Strickfingerhut knitting thimble thingy I use to make stranding easier. So progress has been stalled while I replace the needles, Strickfingerhut, and magnet board.
Here is the barely-begun first mitten prior to TSA’s pillaging:

Back to Square One on that project.
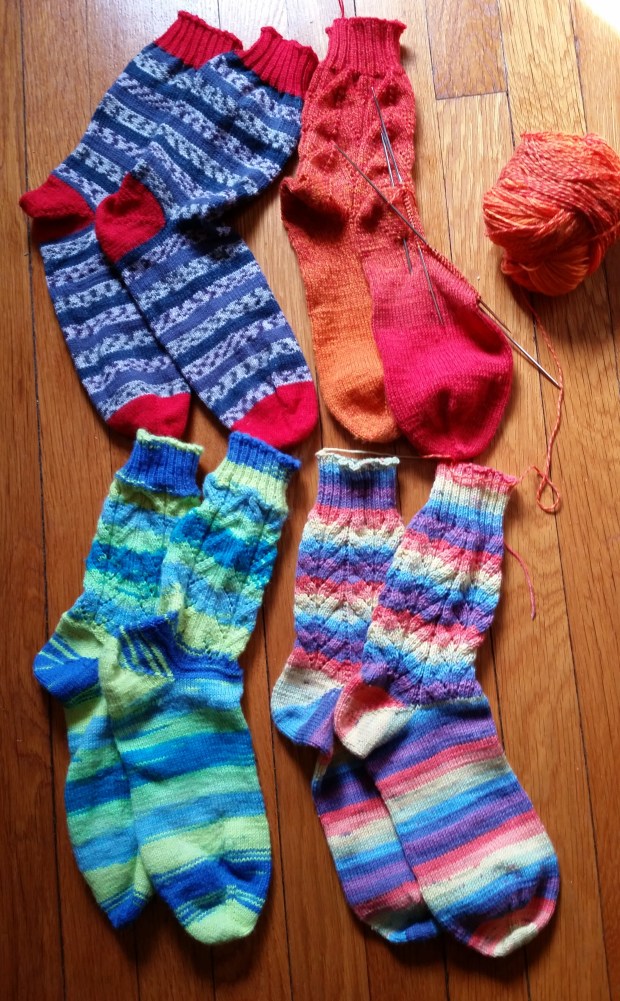
In the mean time, my mindless “briefcase project” socks march on. These require little to no thought, and are done in stolen hours while waiting on line at the post office, in large group meetings at work, and the like. The ankle patterns are improvised on the fly. Since January, I’ve done 3.75 pairs – all toe-up, quick knits on 76 stitches around, (US #00s – big as logs…)
Starting with the blue pair with red accents, yarns used were blue striped Cascade Heritage 150 Prints, with Kroy Sock toes/heels/ribbing; orange Cascade Heritage 150; Plymouth Neon Now (it really does glow under UV light); and Berroco Comfort sock, in pastels – which is an acrylic/nylon blend with no wool in it at all. The last one is an experiment, we’ll see how it feels to wear, and how well it holds up in regular sock rotation.
Now that I have the requisite replacement materials, it’s back to the Octopodes Mittens. Winter 2018 may be almost over, but I have a feeling the niece will appreciate them in 2019.
CORDAGE FILET AND FINISHES
Over the holiday weekend, I found myself between projects, with a yen to play. The summer adventure in yarn-bombing was the first time I’d touched crochet in years, and left me hungry for more, so I decided to try something off-beat.
I had a large cone of a rather industrial heavy cotton cordage. It’s about worsted weight equivalent in thickness, but is much, much denser than regular cottons of that weight offered up for hand-knitting. I got it at the old Classic Elite mill end store, when it was still co-located with the mill itself, before it moved into a location a few doors down from the mill, and long before it migrated down from Lowell. I’ve used this yarn to model various lace knitting problems, relying on its size and durability to help me figure out the problem section before I tried the same bit in the fragile lace yarn being used for my main project. But I’ve always wondered what else could be done with the stuff, so I decided to experiment.
My first thought was a market bag, done in filet. So I picked out a simple 35 unit square from Dupeyron’s Le Filet Ancien au Point de Reprise VI, itself an on-line offering in the Antique Pattern Library’s filet crochet section. It quickly became apparent that my gauge with a 3mm hook for this yarn wasn’t square. I didn’t like the look of it for this style with a larger hook (filet should have a strong contrast between the solid and meshy areas), so I kept going, in spite of the skew. In a fit of serendipity, while my finished proportions were way off for a bag, and I doubted I would have enough yarn for an effective throw, what I ended up with was perfect for a placemat (mug shown for scale).

This crocheted up quickly, in one weekend. I plan on doing as many more as my cone of string will allow. A set of four for sure, probably six, and remotely possible – eight or four plus runner. Oh. With the wealth of 35×35 squares in the book above, each mat will be a different design. Mostly mythical beasts. Possibly some other motifs if I tire of those.
And I also have several finishes to report. The most important is to finally post the baby blanket knit for new niece Everly, born to Jordan and Paul (the Resident Male’s brother) last week. I had finished it some weeks ago, but I hesitated to post pix lest I spoil the surprise. Yes, I did end off the ends and wash it prior to sending. 🙂

A home-grown pattern, based on the Frankie Brown 10-stitch garter spiral concept, and an original edging previously posted here. It’s knit in Bernat Handcrafter cotton (pink and cotton were special requests), a washable worsted weight yarn.
The other finishes include two pairs of socks. Younger Daughter’s Bee Socks, plus a pair of “briefcase project” socks of my own. Pix of those when they are out of the wash, having already been integrated into our wardrobes.
There’s also this scarf for me. This one is based on Sybil R’s Little Rectangles pattern. I changed the proportions of the blocks a bit to better suit the very short color segments of the Madelinetosh variegated merino fingering. Note that the original called for two skeins of yarn (about 780 yards/722 meters), but my variant (about 5 inches x 80 inches/12.7 cm x 203 cm) used every scrap of just one skein, making it a spectacular but economical gift item. Gauge is about 9 stitches = 1 inch; each little block is about 1” x .75 inch.
Apologies for the blurry photo. Artificial lights at dawn aren’t my forte. The second detail shot is not color-true, but shows the garter construction a bit better.


MORE BEACH!
Time for the annual promotional post here at String.
Love the beach? Want to enjoy it up close and personal? We have the place for you!
Our summer condo in North Truro, Cape Cod, right on the beach close to the Provincetown line is up and available for booking. for the summer 2017 season.


View from the deck looking back towards Wellfleet, and sunset over Provincetown in the opposite direction (arrow on the map is back towards Wellfleet).

We are at Beach Point, with parking for two cars, right at a bus stop for the local shuttle to Provincetown – a quick trip to restaurants, galleries, theater, and night life, with or without your car.
The condo is on the second floor, with a covered deck (the one with the red deck chairs, below). The Shoreline development has its own private beach, and offers picnic tables, lounge chairs, kayak and bike racks, and grills to all who stay.

The apartment itself is two bedroom, with a full kitchen (full size stove with oven, fridge and microwave, sink, coffee maker, blender, lobster pot). It is air conditioned, and also has a washer and dryer, and a full bath with shower and whirlpool tub.


There is TV in the living room and each bedroom, cable, and WiFi. The bedrooms each have a queen-size bed, and the living room sofa also converts to a queen size bed.
Pricing and availability are listed at the agent’s website. Prices vary by week, with significant savings in the shoulder seasons.
So, come and pull up a chair. Put your feet up, pour a glass of your favorite beverage, and feel the relaxation!

ESCAPE KNITTING
So here we are at the beach again, seizing a weekend unoccupied by renters, to enjoy our place in North Truro. It’s not as warm as it can be in full summer, but it’s plenty comfortable enough for lounging on the beach, wandering the shoreline, and nosing around Provincetown.
And what’s lounging on the beach without a knitting project? It can be difficult to knit from a complex pattern on the beach – hard copy pages get damp, and tend to blow around. It’s often too bright to knit from designs stored on the iPad, the screen washes out in the sun. So I tend to look for projects that are mindless, memorized, or free-form.
So here’s the latest, photographed in full sun on our deck.

I’m working entirely without a pattern, using a rustic style Aran weight wool. I’ve got several skeins of well-aged Bartlett two-ply Maine wool, that are taking up all to much room in my stash boxes I’d prefer to put to other use.
I have a couple of heathered garnet red; a couple that are ragg-mix of one ply of the garnet, and one of a navy; and a couple of a medium blue which is too light to use in combo with the others. None are enough for an entire adult sweater but it’s time they earn their keep. Also the ragg style blue/red mix would overpower most texture work. So what to do?
A unisex, simple raglan, worked top down was the obvious choice. No pattern, no gauge. I started by casting on 100 stitches, and working a rolled stockinette collar on a US #8 (5mm) needle. I changed to a US #10 (6mm) needle. I’ve now got about 172 stitches around – roughly a 44-45-inch chest circumference. The fit is slouchy and sweatshirt-like, and the high lanolin content rustic yarn (though a bit itchier than Merino, and hand-wash) guarantees a hard wear sweater ideal for cool weather hiking, and winter sports. It’s a bit small for me, but between spawn, and a huge army of nieces and nephews, plus lots of outdoorsy friends, it’s bound to fit someone.
So, what do I call this no-pattern piece? The Wesley Crusher, of course. Named for the ubiquitous shoulder-colorblock casual sweaters and uniform blouses worn by him and the rest of the STNG crew.
Minor discovery during the course of this one. Many circular needles in larger sizes have a noticeable “bump” where the needle part slims down to the cable’s thin diameter. It can be annoying to shuffle stitches up that steep incline as you knit in the round. But you can minimize the problem if you are using an interchangeable needle set. I’ve outfitted one of the circs with a size #10 on one end, and a #8 on the other. Since stitch size and gauge is dictated by the needle you are using to form the stitches (as opposed to the one being knit from), the smaller size needle sits on the “feed” side of the round, and its slightly smaller diameter presents less of an impediment when shuffling the stitches around into “knit me” position. Give it a try!
And in other knitting news, I have finished the leaf shawl/scarf:

It looks like work/home will crawl back to a more manageable schedule, so I hope to be posting more regularly again in the weeks to come. Next up is a tutorial on a simple method to finish out a sampler into a backed hanging.
BELATED FINISH
A very hectic month, between work and other obligations. I’m glad to say we’ve gotten Younger Daughter off and installed at college, purple hair and all:

And I finished her vintage shrug:


An interesting project, this was a very quick knit, but it did take a bit of attention in finishing. The instructions for seaming in the original are pretty rudimentary. Here’s what I did, in case you want ot make one of these for your own:
- Leave stitches live instead of binding off the final row
- After blocking, graft live stitches to the cast on edge, taking care to match the drop stitch ribs.
- Next, sew up the two sleeves, using grafting along their finished edges. Again, match the ribs.
- You now have the final seam left. Carefully match the center back seam to the center of the shoulder strip, and pin.
- Use mattress stitch to join the two strips together.
In effect, what you end up with is a T-shaped seam in the back, with the horizontal running between the lower edge of the armholes, and a vertical seam at the “spine” of the lower strip forming the center back. Both are hard to see in my photo of the back because (to brag) I took great care with my grafting and seaming.
Quite pleased with this one. Younger Daughter is into swing dancing, and will wear it not with t-shirts as shown, but with her 1940s/1950s-style dance dresses.
THE BEACH PLACE
And now, a blatant advertisement from the Management of String.
WANT BEACH? WE HAVE IT, AND YOU CAN STAY THERE.
Seriously – we are now the happy owners of a beachfront condo in North Truro, Cape Cod – just one shuttle bus stop away from the Provincetown line. Our newly renovated two-bedroom upstairs unit is available for week-long rentals for the balance of the summer and through into September/early October.

As you can see from this sand-side photo, the building is right on the beach, on the quiet bay side. Our unit (indicated) has a covered private deck. It sleeps six total, with two bedrooms (a queen size bed in each), plus a new queen-size sleeper sofa in the living room. One bedroom has views of the bay beach, the other looks out on Pilgrim Lake.
It comes with a full, new kitchen, including a four-burner stove, oven, dishwasher, full size fridge, plus coffeemaker, blender and toaster. There’s a full bathroom with both a stall shower and whirlpool tub; and an in-unit washing machine and dryer.
The great room has an eat-in table that seats a cozy six, and the aforementioned sofa in a comfy seating overlooking the bay. The unit is also air conditioned, with WiFi and cable TV (including HBO) in the living room, and additional flat screen cable TVs in both bedrooms.
Outdoor amenities include full access to the private beach; two numbered, reserved parking places; a grill/picnic area open to all residents; bicycle racks; and a stop for the Provincetown shuttle bus directly in front of the building.

The address is 556 Shore Road, Unit #12, North Truro, MA in the Shoreline development (the map arrow points back to Wellfleet, and ultimately, the mainland.)


UPDATE: We have changed our rental agent. You can reserve the unit on-line via Kinlan-Grover – the unit code is WSALA.
I leave you with a sunset picture of Provincetown, taken from our deck. Admit it – you really want to get away and admire this view in person.

A HECTIC WEEKEND, WITH MORE TO COME
We’re in the final glide path to high school graduation here, plus birthdays. We spent the weekend cleaning and gardening like crazy – and there’s still a ton to do.
That means removing a frosting of construction dust from every surface of the house; unpacking and placing the remaining kitchen goods (sorting out stuff to save for future spawn-apartments, or for charitable donation); washing all the floors; replacing the rugs stowed away from the chaos; waking up the garden from winter doldrums; building the new bean trellis out of last year’s giant grass canes; planting the beans; attacking the colonizing blanket of unwelcome weeds in the flower beds; staking the peonies; scrubbing down the bathrooms (similarly affected by construction dust); and generally putting everything to order. We didn’t finish, but we put a huge dent in it all. That means no time spent on detailed photography of the new orderly and in-service kitchen, and precious little time on needlework or knitting (although I did finish the last of my stack of Birthday (and Un-Birthday) socks in time). Plus the normal weekend regimen of cleaning and cooking for the ensuing week. I am now exhausted just tallying it all up.
Here is what I can report photographically.
The kitchen works! This is old news already – The Resident Male making short ribs last weekend:

Younger Daughter and The Denizen got all decked out for the Senior Prom. The went with a herd of friends, and had a great time.


Spiffy, no?
And we had an amazing joint birthday cake – home-baked, of course, courtesy of Younger Daughter. She used the America’s Test Kitchen Salted Caramel Chocolate Cake recipe in her first trial run of the new ovens. Oh, so good!

SO CLOSE I CAN ALMOST TASTE IT…
We’re finally closing in on the last leg of the Great Kitchen Rehab.
Cabinets are in. Appliances are in and working. Most of the drawer and cabinet pulls are installed. The protective covers on the tile floor, soapstone counters, and range hood are gone. All that remain are the missing pulls (the hardware order was short), a minor electrical fix on the overhead fan and its controls, final clean-up plus oiling down the soapstone, and painting.


Most of the missing pulls are cup-style, as seen on the left, below. And one detail that wasn’t seen before is the leaded glass panel suspended in front of the transom window. Apologies for the odd lighting – it’s tough to get a photo of a clear window in the late evening.


The backsplash extends across the entire wall below the cabinets on the sink side, and behind the rangetop, under the window and up the other side of the window (a skinny strip) on the other side of the room. The end wall surrounding the door to the dining room is bare.
The soapstone will darken considerably when oiled/waxed.
The painter should start next Monday, possibly earlier if he is available. It’s just the one room, so it shouldn’t take long. The walls are a very pale dove grey, with the now-poplar-color window, door and baseboard trim done in an enamel, one click darker. The ceiling will be white.
After painting we have the next challenge – moving everything back into the kitchen, figuring out where it goes and stowing it all safely away. I’ve already ordered oilcloth to line the pull-out drawers of the pantry, so with luck we’ll avoid those sticky circles under bottles of oil or molasses, that happen no matter how carefully they are wiped down.
The next post on the kitchen rehab will be the last one, with everything done, plus a before and after set to finally banish the ghosts of the vaguely Colonial style cherry veneer that used to be.
What will we cook first in our new kitchen? Hmmm…..
