CHEST OF KNITTING HORRORS – WORLD’S UGLIEST CROCHETED BLANKET
Yes, it’s true. I made this:
![]()
My excuses:
- It was 1970
- Limited yarn budget, using whatever I could find in the 25-cent bin, or beg or borrow from friends, relations and people with a grudge against me
- Unlimited time
- Not yet knowing how to knit
- Hating the seaming and end-darning common to standard issue granny square blankets
- Having no concept whatsoever of what a useful size might be
- Being 14 years old at the time
I came across it on Saturday, at the bottom of a box of first apartment leftovers I rescued from a narrowly averted basement flood. I did actually use the thing. I did most of my Junior High School and High School homework while wrapped in it. It also accompanied me off to college, where it kept other people from sitting on my bed, or provided a modicum of insulation when hung up against a very cold cinderblock wall.
I will say the haphazard design and awful colors sort of grow on you after a while. Kind of like fungus, or a particularly gruesome looking pet. My kids want to use it as our TV room sofa throw. Maybe you have to be pre-adult to appreciate it. Plus it’s absolute proof that Acrylic Is Forever.
INSTANT GRATIFICATION
After the overland slog on the Mystery Project, I felt the need for some instant gratification. I did a couple of pairs of booties (already distributed to the deserving, and not available for photographs). Then I took that beautiful hand-dyed sock yarn I mentioned the other day and started in on another pair of halfie mittens. I started (more or less) with the Fingerless Whatever pattern written up here earlier, but went free-form pretty early on.
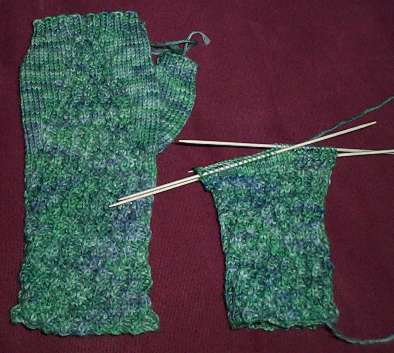
To
start, I’m using a traveling twisted stitch instead of ribbing. It
goes all the way around the cuff portion, but when the thing gets to
the heel of the hand, the palm side switches to plain stockinette.

After the heel of the hand transition, the twisted traveling stitch
pattern drops a half-repeat at each cable crossing, and ends up forming
a slave bracelet sort of triangle on the back of the hand. The thumb
gusset is worked in the plain stockinette part, and is exactly the same
as the one on Fingerless Whatevers. The hand and thumb bit end off with
a bit of plain old K2, P2 rib.
Yes, the patterning would be
shown to greater advantage were I not using hand-dyed yarn. But I like
the seaweed-like effect of the mottled greens and blues, and the way
the colors play with the highly embossed texture vs. the flat
stockinette part. I’m pleased with my minor diversion, and as
this yarn was a gift, thank yous are in order. (Plus I’m sure the
giver would be curious to see what her offspring ended up becoming.)
Another postscript
Strange intersections of my professional employment and personal avocation keep cropping up elsewhere. I will soon be forced to knit my own robot.
ALCAZAR DONE
At last – my Hazel Carter Alcazar finished, blocked, dried, and
unpinned – placed on a plain white sheet so you can see it better:

My Alcazar (post block) is about 41 inches (104.14 cm) square measured from picot point to picot point across the center. All in all, I found this pattern to be easier than Hazel Carter’s Spider Queen:

Working Alcazar without the diagonal seams in the corners helped. The
charts are a bit easier to follow than SQ’s. Alcazar’s charts are presented in both half-width
(mirror repeat) and full width formats. SQ’s are done in with significant mirror repeats. SQ is significantly larger, and in general
Alcazar’s consitutent lace patterning is less complicated than SQ’s as the patterns are more repetitious and there are fewer of them. Still, I didn’t have any problems
with Queen either, and rate both as excellent projects for those who
are comfortable working from charts.
I touched on my biggest lesson learned yesterday – fiber choice.
My piece is supple and soft, and a wonderful arterial red, but being
rayon was not optimal for this particular pattern. Look at this
corner:

See that cupping just inside the edging? The pattern was good,
but the piece did not block out flat. That’s my fault. A
lace weight wool would have stretched to accommodate working around the
corner. I should have anticipated the no-stretch factor and
changed the rate of attachment along the entire border, perhaps adding
as much as one or two entire points per side. That would have given
enough ease for the piece to block out flat. A minor
disappointment to be sure, and an object lesson in fiber choice.
So it goes…
Postscript
And proof that I’m not the geekiest stitcher out there. While this proof is not quite as elegant as June Oshiro’s DNA cable scarf, in certain circles it would be intensely appreciated.
ALCAZAR – BLOCKING AT LAST
At long last, here it is. My Alcazar, knit in red faux-silk rayon – blocking out on my makeshift blocking board, all thanks to the Columbus Day holiday.
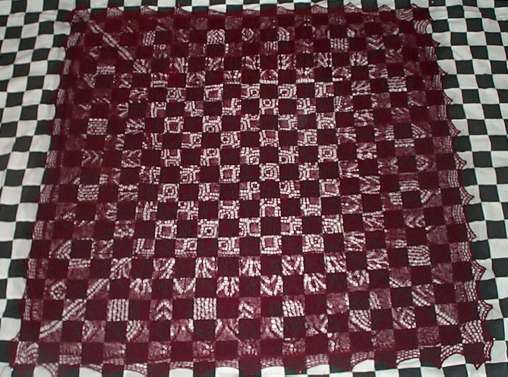
What I’ve got here is a kids’ area rug, topped by some bath towels with a checkerboard flat sheet thrown on top. Over that goes the shawl, pinned out by the points. The checks are nice, even 2" (5cm) squares, and make keeping things even much easier.
I had wanted to do this bit of blocking the Curmudgeonly Way – using my blocking wires to stretch out the central square, then pinning the points out from there. What a brilliant idea! Unfortunately, the stretch coefficient of this rayon is not very high, and I ran into all sorts of problems at the corners trying to even things out. So I winged it, pinning out just the points. (Memo to self – if most lace is knit using soft, supple, and elastic fibers, there’s probably a reason why people are doing it that way.)
In any case, here’s the piece. Dripping a bit red, no surprise there as red runs and red rayon is infamous for running even more than other reds. But it’s mostly rinsed out. I still like it, flawed fiber choice and all. Now to decide whether I keep my Alcazar; or give it as a gift, or donate it to an upcoming charity auction and make myself something else.
Pix tomorrow of it nice and flat and dry, without the eye-popping Peter Max background.
CREWEL EMBROIDERY ON FULLED KNITTED GROUNDS
I’m well into the stitching on my Mystery Project. I’ve been forced to
abandon some of my more ambitious ideas. Working on the fulled ground
presents some problems, only some of which I anticipated.
First
– there’s the Fuzzy Texture problem. It’s no so easy to transfer the
design to be stitched onto a fuzzy, uneven ground. I started by drawing
my design freehand on paper, then pricking and pouncing. That’s the
time-honored technique of taking a pin, a fork, or one of those spiked
tracing wheel gizmos and piercing a paper pattern. While the modern
equivalent uses a waxy equivalent of carbon paper behind the paper
pattern, transferring its color to the substrate ground as it’s
pierced, the ancient method is slightly different. In the old way, once
the paper was pierced, it was placed on the ground and finely crushed
chalk (or charcoal, or another substance) was sprinkled on the pattern.
The theory was that the fine dust would filter through the holes and
mark the ground fabric. Once the ground fabric was marked the stitcher
could make the design less likely to blow away by over-basting the
chalked lines.
I do something similar. I prick the paper, lay it
down on my cloth, then trace over the lines using a fat and crumbly
piece of sidewalk chalk stolen from the kids. That leaves dots. Then I
either stitch directly over the dotted lines, or baste over them so
that they don’t flutter or blot away ask I work. This works well
enough, and seemed to be the best way transfer the design to my fulled
surface. But it wasn’t really perfect. The fuzz made the lines less
than crisp, and I did a lot of eyeballing where design elements were to
be as I went along.
The other problem posed by the surface
texture was the loft of the fuzz. I did go back and re-wet my surface,
whacking it down a bit to smooth it out, but even so – tufts of fuzz
sometimes bloom between embroidery stitches. That’s not the neatest
look.
Second, there’s the Substrate Structure problem. While the
fulling looks nice and uniform on the surface, the original stitch
construction is still very much present inside the fulled fabric. That
means that it is very difficult to get neat, smooth edges on stitches
that require them because in some cases the spot where a stitch needs
to be made isn’t dense enough to support the stitching. As a result,
edges that cross knit stitch columns or rows tend to reveal the
underlying structure as they deform around it. Satin stitch and the
flavors of ground-cover type couching I wanted to use suffer from this
ragged edge forced by fabric structure problem.
And third, there’s the Ground Thickness problem I anticipated.
The fulled fabric is thick and springy. It’s not easy to pull a needle
threaded with worsted through it (at least not in every spot).
Therefore stitches have to "nip" the ground rather than fully penetrate
it. This is annoying as the best effects and crispest edges are
often associated with plunging the needle through the cloth
perpendicular to its surface, rather than scooping up a bit on the end
of the point.
To deal with these problems, I’ve retreated a bit. I’ve greatly
simplified the design I’m attempting. I’m using a lot of stem and
outline stitch, and a little bit of Romanian couching. I’m also using
a little bit of a trellis style laid ground typical of Jacobean crewel
work. For an idea of what I’m taking about, here’s some else’s pomegranate (although I’m doing the same fruit, mine looks quite different from this kit).
MORE MYSTERY, BUT WINDING DOWN
A happy New Year to everyone who celebrates the same this week.
Progress continues on the Mystery Project. Apologies to those who
have written in dying to know what it is, but I can’t reveal more
details without permission from those who have contracted for the
article in question. I haven’t asked them yet if I can do
so. Being late on delivery doesn’t put me in a position of moral
certitude from which to ask special favors.
What I can say is that it’s fulled, it’s knit from Classic Elite
Renaissance in purple, it’s double stranded, and it’s being embroidered
right now. In addition to the base purple, I received several
complementary colors of the same yarn in which to do the ornamental
stitching. The design I’ve sketched out is a fanciful fruit, sort
of like a Renaissance pomegranate. Given the colors supplied, it
was either going to be that or autumn leaves, and leaves are all too
commonly seen. Because the stitching yarn is worsted weight and
the ground is fulled quite thickly, I’m taking pains to use stitches
that cover ground and anchor without requiring that the stitcher pierce
the fulled cloth completely. Yanking a needle full of worsted
through a tight fabric is a huge pain. There’s also a bit of
couching, in which a lighter thread is used to fix down the heavier
worsted.
On yarn consumption – I’ve seen people dither at yarn shops because the
project they wanted to make required just a bit of a contrasting yarn
for the ornamentation. They’ve wondered if it’s truly necessary
to buy a whole skein for just a yard or two. Sometimes it’s
not. If you’ve got a good stash and have yarns roughly comparable
to the suggested one on hand and you are comfortable color matching (or
selecting a whole new color suite) – there’s no particular reason to
buy a whole skein for a tiny bit of embroidery or other
embellishment. Stitching in the same color as the ground is also
a possibility, especially for fulled items, as the color/texture play
of the original texture yarn used for the stitching and that of the
fulled background can be very effective. Or if wools are being
used, I sometimes look to the yarns sold for needlepoint. They’re
thinner than knitting yarns, but can be worked multi-stranded to make
up the equivalent. Personally, I prefer the look of stitching
when done in thinner wools, so I’d probably use tapestry in less than
worsted thickness equivalents, but a commission is a commission and for
this item at least I’m sticking to the "use what’s furnished"
paradigm.
I’m still not 100% pleased with the item. In spite of intensive
swatching, my final row:stitch gauge fulling ratios were off a bit and
the shapes didn’t turn out as I had hoped. I wish I could do it
again, taking the lessons learned on this piece to make the second one
better. That’s a big problem with fulled pieces compared to plain
knit ones. Unlike unfulled projects where you can always rip back
and start again, you only get one shot at the fulling. After that
you’ve got what you’ve got and you can’t return to the beginning.
THE ABYSS OF FAILURE
Heroic efforts not withstanding, I am now an Official Failure. I
did not manage to complete my Mystery Project to meet the contractual
deadline. Last minute complications included a surprise 14 hour work day
(my career takes precedence over my hobbies); and the fact that the
miserable excuse for a clothes moistener acquired as part of last
year’s house purchase is totally inadequate to the job of
fulling (it barely washes garments). I gave up after four washes and ended up fulling by hand. That was very time consuming.
I can however report a success!? The yarn I used – Classic Elite Renaissance –
given an adequate method of fulling does in fact do so
beautifully. My stockinette piece is soft, dense, and without
stitch detail, although one area where I carefully lined up decreases
does show, and is now a nice textural contrast to the rest of the surface.
The piece is still not totally done, but I do intend on finishing
and furnishing the pattern even if it’s late. Having taken two
nights (or one evening plus what was left of the other after my 14 hour
day) to full the piece, I now have to do some minor seaming and the
embroidery. Flowers, leaves, abstract paisleys or
acanthus-like scrolls – all are possibilities. I’m a stitcher
though, so the embroidery I feel might be achievable by knitting
advanced beginners/intermediates might in fact be too much to attempt.
I invite comment. There are many embroidery stitches that could
be used, although the selection is somewhat limited due to the thick
and dense nature of the felt ground. I am thinking of using
variants on Romanian couching, herringbone, or other mostly-surface type stitches instead of satin stitch, which most embroidery beginners find easier to understand, but very difficult to execute cleanly. Perhaps a chain stitch variant, plain couching or knot stitches (coral stitch?)
as well. My question is – this is a knitting project, not
an embroidery project. Given clear stitch diagrams, including
motif placement and how-tos for all stitches, what’s your threshold
level beyond which a program of embroidery becomes unmanageable??
How much is too much, or how complex is too complex?? Where do you draw the line?
MYSTERY PROGRESS
I’ve finished the knitting on my Mystery Project. I fear I will
miss the extended deadline, though. This will be the first deadline
I’ve defaulted on in my knitting and I’m disgusted with myself over
it. I didn’t count on some personal stuff getting in the way, or
in three high intensity weeks at work. Family and earning a living
do come first.
In any case – I’ve got one shot to do this; to take the knitting, full
it, and finish the project. I will sew the piece together
partially before fulling. I’m afraid to join segments where a
horizontally knit section meets a vertically knit one. Row and
stitch count shrink at different rates. Something that’s smoothly
sewn now will end up a rumpled mess after fulling. So instead,
I’ll sew the seams that butt up pieces knit in the same orientation
before fulling, and the other seams after fulling. Then do the
embroidery (which I haven’t designed yet.)
I’ll set a wash going before I leave for work today, and do the first
dry when I come home. If sufficient fulling isn’t achieved (and I
bet it won’t be based on previous experience), I’ll run the thing
through again tonight, or do some hand fulling. With tons of luck
I’ll be able to finish the piece tonight. And if I’m even luckier
than that, I’ll be able to figure out a way to turn it in to meet the
photo shoot deadline tomorrow.
Oy.
EMPLOYMENT OPPORTUNITY
News flash via NPR!
Love to knit?? Is stranding a way of life for you?? Want to
retreat from the hubbub of the big city?? Fair Isle – yes, THE Fair
Isle, is looking to increase its population. Not much there in
the way of employment opportunities outside knitting and the building
trades, but oceans of beautiful vistas, friendly people, and the depth
of character that living on the edge in a non-cushy environment can
bring. Listen to Anne Sinclair, knitter extrodinaire on this All Things Considered audio clip, broadcast last evening.
TWO STEPS BACK, ONE STEP FORWARD
I am ever so thankful that the deadline for my Mystery Project has been
extended. Over the weekend I ended up trying out and then
scrapping two more construction schemes. The worst of which was a
re-work of the center-out disaster from last week. The result
still looked like one of Madonna’s nose cone outfits. I can’t show pix
for several reasons, not the least of which being that I’m working from
a very limited amount of yarn, and the abortive attempts have been
ripped out and re-used.
The latest attempt circles back to the original idea – a stockinette
piece knitted back and forth in the flat. I’ve moved back to
double strand, as the single strand stockinette after fulling was too
flabby for my intended use. I moved the increase points several
stitches in from the edges. This is creating a smoother contour,
and a shape more true to the design paradigm furnished with the
assignment. The flat construction is also much easier to describe
in written directions, a good thing as part of my directive is to
create a project that’s not too intimidating for relative beginners.
I’ve finished one of the two identical pieces that make up my Mystery
Project, and am well along in piece #2 (a duplicate of #1). The
third piece is differently shaped, and needs to be knit in an
inconvenient direction in order to keep the coefficient of shrinkage
uniform among all three. Why three pieces?? In this
case I thought that having a seam would be a strengthening and
supportive feature, with the extra thickness of the seam allowance
acting as a skeletal element.
Of course the scariest part will be the fulling. I’ve adjusted
the proportions of the knit original to mirror the shrinkage ratios of
the swatch. It looks rather odd – longer than it’s wide but if
I’m lucky, it should end up being close to the target
measurements. To top it off, I’ll probably be fulling this by
hand rather than in the washing machine. My machine is not very
good for this sort of thing.
As someone who believes in statistics, probability and the value of
planning rather than luck, I am not that comfortable right
now. Plus I’m fighting off project fatigue.
That’s the feeling I get when I’ve learned about all I can from a
particular effort or am confronted by a problem I don’t think is worth
the tedium to solve, and am not looking forward to the slog to
completion. Deadlines make it worse. This is the point when
I often set work aside, or feel the seduction of a parenthetical
project. Several are calling to me siren-like right now.
Not the least being a beautiful skein of blue/green hand dyed sock
weight merino graciously given to me by uber-talented June
Oshiro. That’s
calling out to become a pair of fingerless mitts. It’s a reedy
little voice, but an insistent one, and it gets louder every time I sit
down to work on the Mystery Project.
Moral of the story:? Knit for fun, not profit.
