DUTCH HEEL
A couple of people have asked me why I thought a Dutch heel was easier than other forms of heel-flap sock heels; and how they fit.
First, there are lots of other treatises on Dutch heels elsewhere on the Web. Judy Gibson has a nice write-up on this heel variant. It’s part of the Socknitters Cybersocks on-line sock tutorial. Regina Williams has done a work-up on the math needed to construct Dutch style heels on toe-ups.
In terms of history Dutch heels date back to at least the 1880s. I found one mention of them on the Web in a transcription of an 1883 edition of The Girl’s Own Paper, a typical young women’s interest magazine of the time. They may in fact be older, but sources on sock heels before 1883 at my fingertips as I type this aren’t very copious.
In terms of fit, Dutch heels have the ample instep (upper foot/ankle) of other shaped heels. That means they’re deeper in the ankle than are short-rowed sock heels. They are also a bit more snug side to side than other forms of round or square heels. People with average to narrow width feet and especially people with narrow heels will find them quite comfortable. While my own feet are in the walrus flipper range of size, my heels are narrower than one would expect given my paddle-like toes. I am still experimenting with Dutch heels, knit both cuff down and toe up. I’ll report back on comfort and fit as compared to short-rowed heels once I get a few more pairs into my wash/wear cycle.
I think the Dutch heel I’ve learned is easier than a standard round heel because the heel cup area maintains the same stitch shaping repeat throughout. the short-row segment that forms the heel has parallel sides. You don’t need to keep as close track of where you are in the shaping’s progression as you complete that stage of the work.
Here’s an example of a hypothetical Dutch heel, worked on 7.5 stitches per inch/10.5 rows per inch (the standard label gauge of Schoeller/Stahl Fortissima/Socka – a textbook classic sock yarn). I’ve calculated this for a average sized cuff-down sock, one that would probably fit someone wearing a US Women’s 7-8 medium shoe size. This works out to a very average sock of 60 stitches around. To simplify things, I’ll suppose a plain stockinette heel flap.
I’d work the ankle as desired. When it was completed, I’d work my heel on 30 stitches (half the available circumference). Because I normally use a set of 5 DPNs, that means I’d be doing my heel across two of them. People using two circs would work this across one of their needles. Magic Loop folks would work this across the stitches on one side of their needle’s loop.

I’d knit the heel flap in plain stockinette, slipping the first stitch of each row to make nice easy to pick up in chain selvedges. I’d probably make it about 30 rows deep, ending after completing a wrong-side row.
To turn the heel, starting on a knit side row, I’d knit 18, work a ssk, then turn my work over. Heading back in the other direction, I’d slip the first stitch, then purl 6. Then I’d do a purl two together, and flip my work over again. Back on the knit side row, I’d slip the first stitch (that’s the one I purled two together on during the previous row), then knit 6 and work another ssk. I’d repeat the slip 1, purl 6, p2tog, turn row; followed by the slip one knit 6, ssk, turn row until I had consumed ALL the stitches available on my heel needles, and my total on-needle(s) stitch count was 8, after the completion of a purl side row.
To make the gusset, I’d knit across the top of the heel to put myself in position to start the gusset pick-ups. Looking down the left side of the heel flap, I’d pick up 15 stitches in the chain stitch selvedge loops. At the bottom of the heel flap I’d do the anti-hole cheat by picking up an additional stitch at the base of the flap, for a total of 16 new stitches. Then I’d pick up my dormant instep needle and work across the top-of-foot stitches. If I were using the circ methods, I’d switch back to my heel-bearing circ or circ segment after the foot-top stitches were done. Now At the base of the heel flap on the other side of the foot-top stitches, I’d first pick up that anti-hole cheat stitch, then 15 in the chain stitch selvedge loops heading back up the right side of the heel flap.
I now have all the stitches I need to create my gusset. I’d knit across the heel flap and down the left hand edge until only three stitches remained, then I’d do a K2tog, and knit the last stitch on the needle. Changing to my top of foot needle(s) I’d work those stitches, then switch back to my heel needle(s), working a K1, ssk, and then knitting back up the side of the gusset and across the top of my heel. I’d knit the next round plain (no K2tog or ssk decrease at the corners of the gusset). After the plain row, I’d do another decrease row, alternating decrease rows and plain rows until I was back to having 60 stitches total again, the same number I had before the heel began.
so we see that the only real difference between a Dutch heel and the other standard heel flap and gusset heels is in the formation of the heel turn (heel cup). In the Dutch heel there are only two rows to remember – s1, knit (x), ssk; and s1, purl (x), p2tog. That to me at least makes it easier to calculate and to teach. Also to work in fits and starts, as my briefcase sock per force should be a project in which the need to keep track of where I am is minimal.
BRIEFCASE SOCKS
Not much knitting progress to report on Rogue. Other priorities intrude this week. I have however gotten a fair bit done on my "briefcase sock."? That’s the pair of socks in progress that live in my work backpack. I like to keep one going that’s done while waiting for appointments, in line at the post office, and in those other bits of time that would otherwise be frittered away.
Briefcase socks are usually not of the most elaborate styling or construction. They have to be able to be picked up and put down without losing one’s place in a pattern, and mindless enough to do with only minimal attention. As such, self-patterning yarns are ideal. This pair is in Reynolds Swizzle. It’s marked at 7.5 stitches on a US #1 or #2. I’m using 1.25mm needles (US #0000), and getting 10.5 spi. This particular sock is 80 stitches around. As you can see, even at the much smaller gauge, I’m getting accent stripes that are perfectly satisfactory. They’re mostly one row wide, with a two row overlap of about 25-29 stitches. This pair is being done in the standard toe-up/short-row heel style that has become my automatic default. I began the sock at the very beginning of a yellow stripe. I’ve just started the short-row heel section at the blue stripe now just off the needles. I’ll probably begin the second sock at the start of either the blue or green accent stripe, just to be playful and have a pair of fraternal rather than identical twins.
Why do I knit my socks at such annoyingly tiny gauges?? I like them better. I find densely knit socks to be more comfortable, with none of that walking on pebbles feeling others report as a reason for not liking hand-knit socks. I have found that densely knit socks wear better and last longer, especially ones that are a bit tight on the foot. Socks that are large enough around to permit shifting can bunch up inside the shoe and either wear themselves thinner over time, or create blisters.
I find that most 4-ply fingering weight sock yarns work just fine for knitting at gauges significantly finer than they are marked. Three ply weight fingering is even thinner. It’s tough to find it now that the old Kroy 3-ply is history, but I can get up to 12 stitches per inch out of a good 3-ply. That’s fine enough to knit many pre-1900 era sock patterns verbatim. Cast on 96 stitches?? No problem with a 3-ply.
Finally how am I liking the Swizzle compared to other sock yarns?? It’s o.k. Not great. I find it a tad harsher than the Regia line and the Fortissima/Socka line. It’s also thinner looking un-knit, but denser (less airy) than the other two. The narrow, widely spaced skinny stripe is different, but boring. I may try to liven up the sock ankle a bit by either purling the accent rows, or by playing with a slip stitch or mosaic pattern on them.
Aside:? Welcome to my Japanese visitors!? I have no idea what the referring page says, but you are more than welcome to wander around and rummage through my past entries. Google translation tells me this
???????!
means "Happy knitting!"?? Although automatic translations are usually too literal (and usually produce silly output) I hope it’s not too far off.
MORE ROGUE; WEB TOOLS
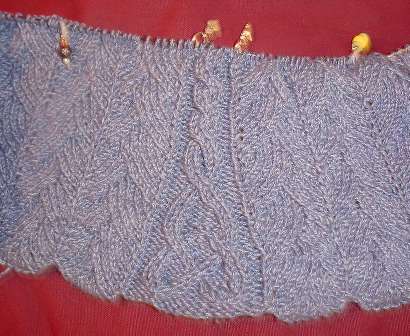
Here’s about 11 inches or so of Rogue. In the continuing cascade of mods made necessary by my shifting to a thinner yarn and smaller gauge, I’ve worked six of the side cable repeats before branching back to complete the side panel chart. No problem there.
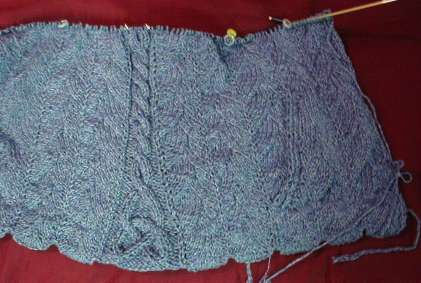
I do note however that as expected – this is going to be a weighty object in cotton. Cotton weighs more per yard than wool. 50 grams of cotton yarn will contain fewer yards than 50 grams of a comparable thickness wool. So far I’ve used about 300 grams of cotton. That’s roughly 2/3 of a pound. My finished piece may end up weighing as much as 2 or 3 pounds!
Useful tools and toys:
I’ve gotten quite a few notes lately asking for help with metric conversions, needle sizes, fabric care, garment sizes and yarn weights; confusion about how to figure out repeats given a set stitch count; and requests for descriptions of basic knitting techniques. Here’s a raft of tools that I find useful for these purposes, plus some other useful or interesting (or amusing) things tossed in.
Knitting needle size equivalencies (FiberGypsy):
http://www.fibergypsy.com/common/needles.shtml
Metric/Imperial unit conversion calculators:
http://www.sciencemadesimple.com/conversions.html
http://www.mcnichols.com/products/productsupportfiles/conv.calc.htm
Factor generators (good for finding possible pattern repeats from a stitch count total)
http://www.markhorrell.com/tools/factors.asp
http://www.counton.org/explorer/primes/primecalc.shtml
Descriptions of the count (X/X) systems of yarn weight and yardage used by machine knitters:
http://www.cara4webshopping.com/cara_free/yarn-wts.htm
http://www.yarns-and.com/yarnto.htm
How-to videos or animations showing basic knitting techiques:
http://www.knittinghelp.com
http://www.dnt-inc.com/barhtmls/knittech.html
Tutorial on reading lace knitting charts (Heirloom Knitting):
http://www.heirloom-knitting.co.uk/pages/beginners_guide2.html
Fabric care label symbols:
http://ohioline.osu.edu/hyg-fact/5000/5556.html
Heel stitch count chart (dead link retrieved using Wayback Machine)
http://web.archive.org/web/20021016042840/http://www.magma.ca/~vanmac/heels.htm
Garment size charts:
http://www.yarnstandards.com/sizing.html
http://www.fibergypsy.com/Charts_and_Other_Helpful_Resources/Size_and_Measurement_Charts/
Sock size survey results:
http://www.needletrax.com/SockSizeAnalysis.html#
Jaya’s round-up of knitting software availble for Palm handhelds:
http://www.palmsource.com/interests/knitting//
Back neck shaping for the Math-Aware:
http://www.hillcrestknitwear.com/knitting%20info/ff%20back%20neck%20formula.html
Toys
Sockman
http://www.renfro.com/consumer/Renfro/funstuff/sockcalculator/
Assorted esoteric Google time-wasters (Google Blogoscoped):
http://blog.outer-court.com/archive/2005-01-29-n34.html
DEMO SOCKS; STITCH FACTORY – MAKE ONES
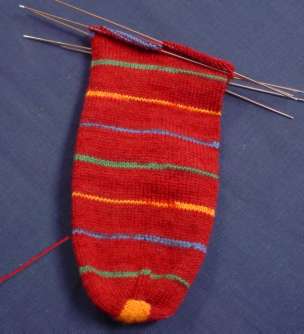
I’m split among several different knitting foci right now. First, there’s the upcoming class. I’ve finished the hand-outs I’ll be distributing covering both two circ and one giant circ production;? the practice pair of socks; and the sample mini-sock we’ll be making during the workshop. I’m as ready as I’ll ever be. I’ve also gotten word of a potential design commission. If and when that occurs and I’m permitted to bruit about the details, I’ll report them here. In the mean time, here are my practice socks, dutifully completed one with the one giant circular technique, and the other using the two-circ method:

Nothing special. Just plain old Regia 6-ply Crazy Color stockinette socks, with Dutch heels, and standard toes grafted to finish. On the pair with the turquoise toe I took care to finish out the color repeat such that the line of grafting ended up being a contrasting color, so the class can see where it is.
Having put the class socks to be, I’ve picked up Rogue again. A couple of people have asked if I’m doing mirror image Make Ones on either side of the verticals that run up the design. The answer is "Yes."? I don’t usually stoop to this level of ultra-refinement, but for this project because the two Make Ones are separated by only one stitch, using them does make a visual difference. Here’s how I do them:
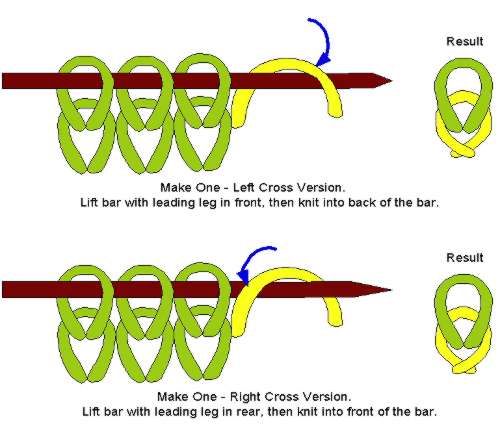
To get a make one with a top leg that crosses lower right to upper left (S-style), I lift the running bar between two stitches, mounting it such that the leading leg of the bar is in the front of the needle (standard stitch orientation). Then I knit into the
back of that bar.
To produce a make one with a top leg that crosses lower left to upper right (Z-style), I lift the running bar between two stitches, mounting it such that the leading leg of the bar is in the back of the needle (opposite of standard stitch orientation). Then I knit into the FRONT of that bar.
As to which to deploy in what situation – most of the time I doesn’t matter. My standard issue default Make One is S-style. If a pattern just calls for one, that’s the one I do. In cases where mirrored ones are needed, I’ll experiment. Sometimes the final result looks better if the S-style Make One is deployed on the left of a visual unit, with its sister Z-style deployed on the right. Sometimes it’s the other way around. On my Little Dragon Skin I’m working the Z-style on the left of the center spine, and the S-unit on the right.
Rogue photos later this week. I promise.
WOOLY FOOD
An adorable link, found courtesy of someone who posted it in a LiveJournal knitting community. The thing is in Japanese, but you can enjoy the pictures and objects without reading along.
From what I can gather using the Google language tools, while most of these items are crocheted, the strawberry shortcake (minus the berries) is machine knit. The fruit trifle tart is a box that opens up. The pear purse is trimmed with metallic beads. The chocolates are fridge magnets, and the artist suggests using the cherry topped ice cream bon-bons, the cup of cocoa and the hamburger as pincushions. The moon pie looking thing (two cookies with white filling) hides a tape measure, and the component pieces of the hamburger can be used as coasters – except for the sunny side up egg, which the author notes is too bumpy in the center for stability.
Very clever.
CLASS SOCK; kNITTING TWO ITEMS SIDE BY SIDE
No Rogue progress. My knitting time is consumed with class-related experimentation. Here’s the surviving result:

No surprise. It’s a sock knit from leftovers of the same DK-weight Regia 6-Ply Crazy Color yarn I used for The Small One’s Crazy Raglan. It’s on a single US #3 size 40-inch circ. I’m working these socks at this (for me) giant gauge so I can get in as much experimentation as possible before the actual class.
I’ve been experimenting with various heels, trying to decide which will be the easiest "classic heel" to use in the workshop for our knit-together project. I’m doing this because I’ve been told that the majority of people who have signed up have never made socks before. Some have never even knit in the round. I want the class to get through the danger spots of sock construction – cast on, a heel and a toe.
What you see above is a simple Dutch heel. It’s not as form-fitting as a round or other more finely shaped heel, but of all the turned heels (as opposed to short-row heels), I think it will be the simplest to both describe and work.
I’m still waffling between showing the heel worked entirely on one side of the sock, with the cable needle looping out done at the left and right of the piece, or re-assorting the stitches after completion of picking up along the sides of the gusset, then working the rest of the sock with the looping out at the center top and bottom of the foot. And as you can see, I’ve not yet experimented with toes. That’s next. Toes may be the kicker on stitch reapportionment. If I’m getting too much laddering with the split on the sides as established, I might re-engineer my thought and move the stitches around either immediately after completion of the final gusset row, just before the toe itself, or back before the gusset decreases are started. And that means that the poor sock you see above will cease to exist in the current form, and be sacrificed to the minor gods of ripping back.
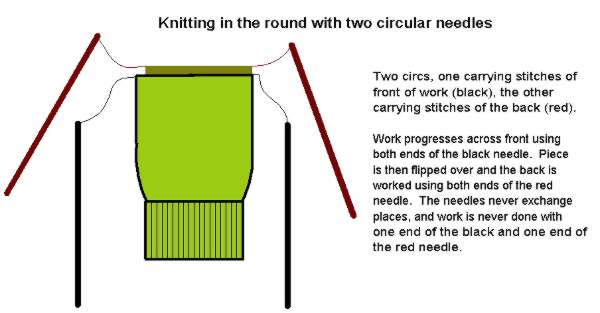
Two items side by side on two circs
An anonymous person asked if I could show or explain how to do two things side by side on two circs.
I have to admit, I cheat somewhat because casting two items on side by side can make for confusion and twisted cast-on rows. I begin each item individually and work the first row before mounting my two items side by side. After I’ve got a scrap of knitting, i divide the stitches in half. I thread the first half of Item A onto a circ, followed by the first half of item B. Then I take a second circ and thread the other half of item B onto it, followed by the second half of Item A’s stitches.

I now have a piece that should look (more or less) like the drawing above. I work across the front side of item A, knitting from it’s own ball of yarn. Then I drop that strand, pick up the other and work across the front side of item B. When I finish the last stitch of this side of B, I flip the whole thing over, and using the same B yarn, work back along the reverse of B. Then I drop that strand, pick up the A yarn and work the back side of Item A. At the conclusion of this cycle, I will have completed a full round on both A and B, and have both strands of yarn back in the positions shown in the illustration.
ONE CIRC/TWO CIRC METHODS FOR SOCKS
I’m well into my learning sock now, and I have to say that like any method, the one oversize circ technique for knitting in the round (popularized by Bev Galeskas under the name "Magic Loop") has its plusses and minuses. But so do both the two circ method and using traditional DPNs.
Advantages will be mostly felt by newer sock knitters who aren’t used to working on DPNs. They include not having all those DPNs in the work, and not having to worry about them falling out in one’s knitting bag, or having stitches drop off the ends. Also, because there’s a moment where one can pull the yarn of the last stitch on the other side of the needle tight around the circ’s cable, it’s easier to avoid those corner ladders that can form if tension isn’t just right.
Deviating from the Galeskas method a bit, I found standard (round, Dutch, Vee) heels are a bit easier to visualize if?the flap is worked back and forth on one side of the piece, and picking up to form both gusset edge is done so that all heel-forming stitches end up on?one side of the circ. Depending on the depth of the heel and heel style chosen some reapportionment of stitches may be needed just before the heel is started, so that one side of the?circ carries only the stitches needed for the heel flap, and the other carries the rest of them destined to become the top of the foot. After the heel flap is done and the gusset stitches are picked up, the gusset decreases are worked until the foot’s stitch count around?has been reached. At that point if there are unequal numbers of stitches on the two sides of the circ they can be re-divided into equal parts so that toe formation is easier. Short-row heel production is pretty close to the same compared to DPNs, except that the heel unit is worked entirely on one circ half as opposed to being done on a unit composed to two DPNs.
For me however, the method presents a couple of disadvantages. First, I’m taking a severe cut in production speed compared to using five DPNs, as after each half-round I have to stop and thread the circ through the stitches on the needle so that the points are correctly placed for the next half. I am not particularly fond of the bit of wrestling needed to move the stitches back and forth over the cable joins at the base of the needles, and I find the first row to be particularly annoying, especially with the stretchy half-hitch cast on I favor for sock tops. Also very short circumference rows are more of a pain than wider circumference rows. I’m going to be sorely tempted to move my knitting to DPNs when I get down to the toe, rather than finishing out the piece entirely on the giant circ.
I can also see that extended use of a circ in this fashion is more stressful on the needle than conventional knitting in the round. I’d be wary of using a needle from a multisize kit in this fashion, were they to come in a suitably long enough length. I also note that most people are using very long circs (36" or 40") to knit relatively small circumference things like socks (although if only one sock was being made at a time, some knitters might be able to get away with one size shorter needle). These are expensive and can be difficult to find. Items wider than say hats would be difficult to do using the one oversized circ method unless a really long needle could be found.

The giant circ method is very close to the two-circ method in terms of execution. Both divide the stitches in half. In the giant loop method, the halves are separated by the teased out cable loop. In the two circ method, each half of the sock is on its own needle. Working methods are the same, except there is no teasing the needle back through the work each half row with two circs. To be fair, there is a moment of drop and hunt as the needle end needed for the next half row must be selected from the three danglers. Heels are worked in the same manner, with the heel unit being contained entirely on one circ. And both methods can be used for side-by-side sock production, in which both socks of the pair can be knit at the same time, each from its own ball of yarn.
To my mind, there’s one more clear advantage of the two-circ method over the one-circ method – while you do need to shell out for two needles, they needn’t be extra long. Many people may have two circs of sufficient matching diameter already in their collections. The two-circ method can be done even using two circs of unequal length (if the difference in length is very large, stitches may have to be divided in a smaller and larger group rather than evenly). Even using shorter or mis-matched circs there is less limitation on how large in circumference an item can be done than there is using the one-circ method. In fact, if one WERE to use two 40-inch long circs in the two needle method, one could knit a tube of around 75- 80 inches around (or bigger if the yarn/stitches were squishable). Of course, at the lower end of the range, the two-circ method has the same weakness as the one-circ method – smaller circumferences and fewer stitches are more of a pain than larger ones because there is more stop and grab or needle shifting compared to knitting time as a whole.
Finally, any sock pattern knit in the round – toe up or cuff down – can be used with both methods. Patterns written for five DPNs (four in the work, one to knit with) translate the easiest, as each side of the sock is equivalent to one of the circs in two-circ; or half of the stitches placed on one side of the giant circ in the one-circ method. Patterns written for three needles just need a tiny bit of tinkering to divide the available stitches between two needles. For sanity, I’d suggest dividing the stitch groups at the point between the ones that will form the top of the foot (the instep stitches that are not worked during heel production); and all others. In some cases this should be evenly in half, in others, there may be one needle at the sock’s outset that carries a few more than the other.
I’ll continue and finish out this pair of socks using the one-circ method. I’ll probably do another using two-circ just to keep parity. But being DPN-handy, I won’t be switching over to use either method for routine sock production. However both methods ARE handy tools to keep in one’s knitting toolbox. I DO use two-circ now quite often for knitting sweater bodies in the round, and find it a godsend for working two in-the-round sleeves side by side (no more "is the second sleeve long enough yet?" guesswork). I might use the giant circ method for hats or leg-warmers, but for something as narrow as a sock, mitten, or wristlet, it’s just too much needle manipulation for me.
To sum up – both methods are nice additions to one’s knitting tool set. Both have advantages and limitations. While both are useful (especially for the DPN-shy), neither is an absolute substitute for DPN skill for everybody, nor for every instance in which DPNs are commonly used. I encourage everyone to expand their skill sets. You never know when a left-handed wratchet-ended sawtooth crimper is required, and it’s nice to have one available when faced with that need.
If you want to learn more about these techniques I’d suggest Galeskas’ The Magic Loop: working Around on One Needle (Fiber Trends, 2002) for the one-circ method; and Cat Bordi’s Socks Soar on Two Circular Needles (Passing Paws Press, 2001) for the two needle method. Both books present these methods in well-explained detail, accompanied by patterns and sample projects. Both are widely available through general merchandise and needlework/knitting specialty booksellers.
KNITTING FROM GRAPHS; ROGUE; SOCK CLASS
Answer to a quick question:
Can the Fleur de Lys motif shown yesterday be used for knitting?
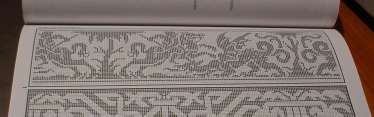
Sure. Like anything graphed, the fleur can be knit, but with a caveat. In cross stitch, the individual units that build a motif are square. They have a 1:1 aspect ratio, as wide as they are tall. Likewise, needlepoint units are (mostly) square. They’re worked on a square grid, but if they’re in tent stitch the stitches themselves are a diagonal spanning that square. Therefore the edges of color areas don’t always appear as neat and trim as in cross stitch. This graph is composed of square units, and is intended mostly (but not exclusively) for stitchers.
Knitting presents a different challenge. It’s rare for a knitting stitch to have a 1:1 aspect ratio. Knitting stitches are usually wider than they are tall. It’s not uncommon to have a stitch gauge of 22 stitches = 4 inches, but a row gauge of 30 rows = 4 inches (that’s the standard for a classic DK weight yarn). That works out to an aspect ratio of 22:30 or 5.5/7.5 if you simplify the representation. That’s NOT square. If you knit up a graph that’s been drawn out on a square ratio grid in this aspect ratio, you’ll end up with a motif that’s somewhat squished looking north/south direction.
There are several ways around this. First is to choose designs that have a bit of north/south spread in them to begin with. They’ll look different when compressed, but if they’re elongated enough to begin with, they’ll end up with a reasonable set of visual proportions. My lion graph, shared eons ago for people who wanted to do lion sweaters as described in the Harry Potter books is this kind of design. It’s got enough "natural" height so that it looks o.k. if worked verbatim in a somewhat squashed aspect ratio.
The second is to graph out your design on a grid that has an aspect ratio that matches your knitted gauge. If you want to do this, the English language Japanese website ABCs of Knitting features a very nice graph paper generator. It’s listed among the tools on the page’s lower right.
A third way to get around this problem is to blow up the design. Very simple motifs can sometimes be made quite dramatic by reading a unit of two knit stitches by three rows for every square on the grid. Not practical for larger gauge knits, as even a small motif could outgrow the area intended for display, but occasionally useful none the less.
A fourth fix is more of a fudge. Depending on the complexity of the motif you want to knit, you can take a plain old square unit graph and by repeating every third or fourth row (depending on your gauge), you can stretch it out to compensate for aspect ratio squish. Obviously, this works best for simple motifs rather than complex ones, and at finer gauges. I’ve done it in sport weight yarn or finer, and it has worked well enough, with the duplication fading into the overall look and not being evident. This method can be problematic though for things like graphed letters adopted from cross stitch samplers, and for ultra-small geometrics whose motifs are built on single square units. For the latter, I might be tempted to use the third method, above.
Of course one can always ignore the problem all together, placing the borrowed motif so that the stretched dimension becomes a design feature and not a bug. This is what I did with last year’s crocheted dragon curtain. I worked across the narrow dimension of the curtain rather than starting along the bottom edge, in part because the non-square nature of my filet crochet blocks would distort the motif too much if worked in the latter direction. You can see the original proportions of the graph, and the finished piece.

If you look the knight, you’ll see that in my crochet he’s taller and a bit squashed east/west compared to the original. But if I hadn’t called out the difference, I’d bet you’d not have noticed.
Rogue
Rogue progresses. I’m another two inches or so into the body. Not much more to show beyond yet another blurry photo of a slightly larger blue object, so I’ll hold off until I can post pix with more content. I can say that in spite of competing demands on my time reducing the total amount I can spend on the thing, now that I’m past the pockets and my multiple mistakes, it is fairly flying along. I am looking ahead to the next set of complications – alterations to the armhole area and beginning of the hood’s frame that might be necessary due to my gauge re-computation.
Sock Class
I’m beginning my prep for my upcoming sock knitting class, reading up on and trying out the Magic Loop technique. It may be heresy to admit, especially for someone who is going to be teaching a workshop on this method, but I find it to be fiddly and (for me) much slower than using DPNs. But I realize that there is a legion of DPN-haters out there who view this method as being their ticket to finally making socks. So I’ll persevere for their sake.
The plan is for a three-hour workshop, during which I’ll hand out an original pattern for a very abbreviated small cuff-down sock – roughly baby size, but with sadly truncated ankle and foot parts to save time. The idea is to walk the class through that ENTIRE sock in the given time, from the cast on, through the heel, and finally down to the toe. A normal size sock would be too time-consuming to get far enough for a meaningful experience, especially around the heel, so I’ll cut back on the plain old stockinette areas, leaving in just enough to get familiar with the manipulations of the needle(s). I’ll also hand out an original pattern for a normal size sock that the class can take home and use for practice.
One further complication – I prefer to teach on socks knit at DK or worsted gauge – again, fewer yet larger and easier to see stitches. But the extra-long circs for the Magic Loop method are in short supply, and are quite expensive. Likewise for the two circs needed for that method. I don’t think it’s fair to ask the class to come equipped with needles in a size that they (probably) won’t be using for their regular sock knitting, so I’m going to do the thing using standard issue sock weight yarn.
I’ve taught knitting classes before, mostly on toe-up socks, basic crochet, and on beginning knitting. I’ve been told I pack too much detail into the time alloted. In this case I will have to agree. Ideally I’d do either single oversized circ or two circ socks, not both. I do intend the choice to be either-or, as the methods are largely compatible. Learners will get their choice of working one or the other, and except for needle manipulation the basic sock-making steps should be the same for both. Obviously more thought on this is in order. If any blinding insights of clarity and nuance suggest themselves to me, I’ll post them here. Otherwise, it’s just more socks.
ROGUE – PROGRESS; SOCK CLASS
UPDATE: FLEUR DE LYS DESIGN BELOW HAS BEEN ADDED TO THE PDF COLLECTION UNDER THE EMBROIDERY PATTERNS LINK, ABOVE.
Well, I did make some progress on Rogue over the past several days. I’ve finally gotten past the grief of the pocket (my fault); finished the equivalent depth of the body behind the pocket, and fused the two together.

Here you see the area adjacent to the nifty pretzel-terminated side panel, showing off the contrast between that knotwork design and the Little Dragon Skin patterning.
The pocket fusing step went off without a hitch. I remembered to bind off four stitches of the body at either side of the pocket fusing row, again to leave a notch inside which the zipper will be installed. Here’s a process shot, with the pocket stitches held on the pink needle, and the body on the silver circ. Because my right-side rows have so much shaping, I made sure to do the fusing on a wrong-side row – all purls in the patterned part.

Progress however has been somewhat less than it might have been because I’ve gotten two new needlework assignments since Thursday.
First, my mother has asked me to design a needlepoint pillow top for her that incorporates multiple Fleur de Lys motifs in wine, an off white background, and some sort of framing mechanism. She’s looking to make a piece on 16-count canvas. This is pretty much a “bring me a rock” assignment (one of those in which your efforts are greeted by the response “Wrong rock. Try again.”) Here’s my first attempt at just a single motif:

The second was a last-minute request from Wild & Woolly in Lexington, MA to cover a class in sock making. They has a workshop scheduled for March 20th that covers cuff-down socks on two circs and one oversized circ (aka “Magic Loop”), and the original instructor has had a last-minute conflict. I’m the designated hitter for this one. Which means that because my own favored method for socks is toe-up on DPNs, I have to do a bit of brushing up before I can demo and explain those methods to others. If you’ve signed up for this class, please don’t worry. I guarantee that in two weeks I’ll be fully confident in the material to be covered.
OOP BOOK REVIEW – KNIT TO FIT
Since writing about The Complete Book of Progressive Knitting last summer, I’ve found out a tiny bit more about Ida Riley Duncan.
First, she was a VERY big name in knitting in the 1950s. Not only did she write Progressive Knitting, she also wrote at least three works, including a book on sewing and dressmaking/tailoring, a comprehensive overview of needlework in general, and today’s subject: Knit to Fit, New York: Liveright, 1963. (My local public library’s edition is the reissue from 1966; another expanded edition was put out in 1970). Ms. Duncan was a professor of home economics at Wayne State University in Michigan. She also ran a knitting design school in Detroit that offered both on-site and home study courses. Her school was a perennial advertiser in knitting magazines of the 1950s including Vogue Knitting.
Knit to Fit is pretty impressive. This book contains the entire home-study text component of Duncan’s "Progressive School of Knitting Design" course. It’s framed as a study course, with chapters that have challenges at the end of each one, and an answer section in the back that provides the solution to each challenge.
It’s aimed at both machine and hand knitters, and goes far deeper into the transformation of body dimensions into garment patterns than any other vintage book I’ve looked through so far. She’s especially strong on skirts and tailored tops of all types. Her treatment of garment proportions in addition to plain old fit should be required reading for all too many of the people designing for contemporary knitting mags.
Among the proportion and fit problems she addresses in specific are saggy, overwide necklines, bunching under the arms; bubble-butt distortion on knit skirts (albeit it under a far more genteel label); armhole gap-itis in sleeveless garments and vests; the mistake of addressing front bust measurement and back chest measurements as one circumference; badly mated full fashioned sleeve caps and armscyes; the mystery of dart shaping and placement; collars and lapels that won’t stay folded down; fitted waists that aren’t; and and pigeon-busted raglans. In fact, she appears to be one of the first to write up the percentage system for raglan design.
Other bits that are covered include knitting with ribbon, and how to tame a ribbon knit piece with extreme blocking; and how to run a knit shop and what to charge (or what one would have charged in 1963). She also provides typical measurements of various US women’s sizes circa 1963 – very valuable info for those who are looking to knit from patterns of that era. For example, a size 18 in 1963 was predicated on a bust measurement of 36 inches, while a size 12 had a 25 inch waist. Ease was then added to those figures. It’s interesting to note that from childrens’ size measurements she provides that they haven’t changed as much over the years. One obvious lack here – there is no guidance provided specific to men’s measurements or sweaters, although some man-tailored details like points at the bottom of buttoned weskit style vests are discussed.
Yes, this isn’t a modern knitting book with photos and shelf appeal. It’s black and white mostly text, with lots of line drawings and schematics. No, there aren’t patterns in this book. Instead it’s a comprehensive course on drafting out your own. Even though the styles it details are not current, enough of a designer’s treasure to rate "seek me out" status. I will be looking to add both it and Duncan’s Progressive Knitting to my own reference shelf, where both books will take their place next to Mary Thomas’.
