CHARTING SOFTWARE – GRAPHIC BUT NOT VIOLENT
Some people have sent in questions about how I am charting up the patterns I intend to use in the lacy scarf. In specific, they wanted to know if I am using one of the commercially available dedicated charting program.
I’ve tried demos for almost all of them. Alsoabout four years agoI broke down and bought Garment Styler Goldand Stitch Painter. I was sorely dissapointed in the usability of themodules and the quality of support available for both of those programs. Fewer than half of GS’s features worked and repeated requests for help were answered by "Sorry. It’s your machine and not our problem," in spite of the fact that I was able to replicate the failures on five more machines running an assortment of video cards and operating system versions. On top of that, Stitch Painter was primitive at best, and interfaced very poorly with the GS main program. Both may have gotten better since then, but I didn’t want to throw good money after bad.
Since2002 I’ve beenusing Sweater Wizardfor garment design assistancewith no problems. I didn’t get the companion Stitch and Motif Maker program.AlthoughI was a beta tester for the new version of SMM, andfound theprogramto beextremely handy,it’s not a major improvement over what I’m using now.What I really want is acombo program that truly integrates both garment design and motif design, producing shaped charts based on actual garment dimensions, or can superimpose garment outlines on a larger charted piece (like in Rowan and Jaeger magazines).
I’ve also fooled around with AranPaint. It’s a shareware program that produces custom graphs of texture patterns. The registered user version is the same as the demo, but restores the ability to print. AP does a nice job of charting simple cable and twisted-stitch texture pattern repeats. It’s able to produce a visual mock-up of what the design will look like, a chart with (more or less) standard symbols, and a prose printout of the directions. It’s biggest limitation is the small number of different symbols/stitches it can represent. AP can display/chartK, P, bobble, and 2 to 6 stitch cable crossings, not including most of the more eccentric ones (biggest lack – no YO). It also has a space limitation on the area. 50×50 stitches isbig enough for most people, but not big enough for many of the things I do. If an update of this one ever comes out and it includes more stitches, I’ll cheerfully pay for an upgrade.
My interim motif/stitch solution is to use Microsoft Visio Professionalas a stand-alone charting program. I regularly useit in my real-world work – answering Requests for Proposal (RFPs) for engineering and telecom companies.Visio isnot cheap. I certainly wouldn’t recommend anyone run out and buy a $400+ pro-grade drafting program just for graphing up knits when Stitch and Motif Maker can be had for less than a quarter of that. ButI couldn’t justify spending more on aboutique program (no matter how good) when the big boy could be tweaked to serve the same purpose.
I’ve concocted a series of stencils that contain all of the symbols I use, plus line and stitch numbers and 10×10 and 5×5 master grids. Each symbol is a small graphic unit, and all are predicated on little squares. I assemble my graphs square by square, building them like a little kid builds a wall of alphabet blocks by dragging over the symbols I need. Here’s a screen shot:

I used this to make all my graphs, including the extremely large one that accompanies the Raiisa lacy T on wiseNeedle. The screen shot shows just the basic knitting symbol shapes on the first stencil. Additional shapes are available on the cables and increases/decreases stencils (seen at the bottom of the green column). I built each shape myself, using plain oldsquares and rectanglesand the standard Arial font. While I haven’t incorporated any rules-based properties formy stitch shapesyet, each one does have a pop-up help window that gives a how-to for that particular stitch for both right-side and wrong-side implementation.
I can create more symbols as I please, adding them to the stencils if necessary. For example, if I’m charting colorwork, I’ll create a contrast color block for each color I intend on using, then store them on a separate stencil to re-use as needed. I even use stencils to store commonly used motifs, like the quaternary star that shows up as snowflake in so many Scandinavian patterns:

Symbols can be grouped, rotated, mirrored or arranged in layers.There are limitations:
- I can’t select all the squares of one color and change them to another unless I’ve placedor senteach color on its own drawing layer (think stacked transparencies, each bearing just one color of the design). If I’ve sorted my motifs this way into layers, I can flood-fill all of the boxes on one layer with the same new color.
- The *.jpgs produced by Visio are very large. I need to run them through something like Macromedia Fireworks to reduce resolution and size so that they’re not unwieldy for Web placement. The star above was 552 KB, which I slimmed down to 12 kb using Fireworks.
- There’s no "flood fill" with a chosen symbol. I can’t draw just the foreground, then flood the background with purls unless I create an all-purl layer and superimpose a layer bearing my motif upon it.
There’s no particular reason why any other drafting/drawing program with a stamp or stencil feature and layers can’t be tweaked this way. One final warning – Visio drawings and stencils in their native format are difficult to export to other drawing/drafting programs. They can be viewed by anyone using the free Visio viewer provided by Microsoft. Visio can export to many formats, including *.jpg, *.gif and several specific to various commonly used CADD platforms. But those are one-way solutions that send over images of the final product, not components that can be further manipulated. I work inside Visio, then export to *.jpgor print via Acrobat if I need to post a graph on the Web.
I’ve offered up my stencils before, but so far no one has been interested. I’ve got templates for Visio 5 and Visio 2000. The 2000 set should also work in Visio 2003. If sufficient demand is seen, I’ll postboth setson wiseNeedle in the tools section.
WORKING REPORT – LACY SCARF/FULLED PILLOW II
The past two days’ posts aside, I have been making progress on bothmy lacy scarf andmy fulled pillow. Knitting on the pillow is almost done. I’ve got maybe one more evening of garter stitch left. This weekend I intend on fulling it when I do laundry. I’m rushing a bit on it because I want to be sure to be able to full it completely before I have to leave this washing machine behind (it was a negotiated sacrifice in my house sale). I’m afraid the older hand-me-down machine at the new house might not be up to the challenge.
On the lacy scarf, I’ve finished re-graphing the patterns I intend on trying out. I’m working on modifying them a bit so that they play off each other better. I’m also narrowing the edging by either messing with or eliminating the double column of faggotting shown in the pattern original.
For those new to the term, faggotting is a true lace knitting stitch, in whichincreases and decreases occuron every row (as opposed to a lacy knitting stitch, in which rowscontaining increases and decreases alternate with plain knitted or purled rows). One common form of this effect when worked in the flat takes only two stitches and two rows for the entire repeat. Row 1 would be an endless repeat of the (YO, SSK) unit. The accompanying Row 2 would be an endless repeat of (YO P2tog).
So? Why is it called "faggotting" anyway? [Warning. This is a Kim-theory, so go chip yourself an enormous grain of salt before reading on.]
It’s not immediately evident why the name stuck to this particular knitting texture stitch.In historical usage, faggots are bundles of sticks – especially twiggy sticks used as kindling or cheap firewood. Nothing much looks bundledif you examine justknitted pieces. But if you look at those pieces in in the context of other needlework contemporary to the Great Whitework Cotton Knitting Craze of the mid to late 1800s the reasoning is pretty clear.
Withdrawn thread embroidery was one of those contemporaryneedlework styles. Commonly used for hemming or decorative insertions, it can range from the pretty simple to the amazingly complex. The sampler below shows several withdrawn thread patterns spanning several different substyles (the lacy white-on-white bits). Disclaimer and attribution: this sampler isn’t my own work, it’s a piece in the collection of the National Academy of Needle Artsthat I found doing a Google image search. I didn’t find a more exact attribution on their website for it. Great work though!

The topthree little bands on the sampler are the most widely known and used forms of the technique. The others, while nifty aren’t as often seen. The two most common names for this substyle that includes the top three are "Italian Hemstitching" and "Faggotting." The multicolor bands are double running stitch (aka Holbein Stitch or Spanish Stitch).
You can see in the openwork bandsthat the horizontal threads of the linen groundweresnipped at the left and right, then teased out. The cut ends were secured with stitches, usually before any cutting took place. The remaining vertical threads were bundled tightly with tiny hemming stitches that tie the fabric threads together like little bunches of sticks. In the more complex forms on this sampler, these bundleswere further embellished with threads woven in among them, orwere subdivided and/or twisted by additional stitching.
The second strip of the sampler with it’s running VVVVVs is the most interesting one for knitters. Compare the zig-zag pattern of one often-seen type ofknitted faggotting:
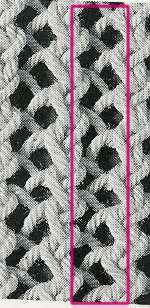
The zig-zags produced by faggotting in knitting mimic thegroups of verticalscreatedin withdrawn thread hemstitching. That’s where the bundle idea came in, andfrom where I believe the knitting stitchborrowed its name. This snippet is excerpted from Lewis’ Knitting Lace, p. 146 (Yow! I just saw the used bookprice. Ineed to update my insuranceto cover my library!)
Math! Knitting! Math!
Here’s an article that rises above the usual run of cutesy "ain’t your gramma’s knittin’" drivel:
http://news.scotsman.com/scitech.cfm?id=627352003
It’s wildly immodest to quote oneself, but it’s an "I told you so" moment. I posted this to the KnitList back around ’95: "Knitting is at its fundamentals, a binary code featuring top-down design, standardized submodules, and recursive logic that relies on ratios, mathematical principles, and an intuitive grasp of three-dimensional geometry."
So all knitters should hold their heads high. Even the most math-anxious among usare using neurons that have atrophied among the population as a whole.
TOO CUTE
O.k. I don’t do ‘cute,’ and as a rule I refrain from domestic blather. But this weekend past was Mothers’ Day and I believe that gives me license.
My Kindergartner gave me a hand-drawn Mom Book as a present. In it I discovered this page:

What I really liked was the self-portrait in the rainbow sweater (extra big, just so you know the relative importance of the individuals involved); and the knitting needles heldlike picadors’ lances by the drab mom (implied threat negated by big smile). Yarn though is curiously absent, so my guess is that process is less important than product to the average self-absorbed 5-year old. Especially when she or he is to betherecipient of a custom-made present.
Good thing I’d just finished her poncho or the book would have ended with the page captioned "My mom is old." That one I leave to your imagination.
DEJA VU ALL OVER AGAIN
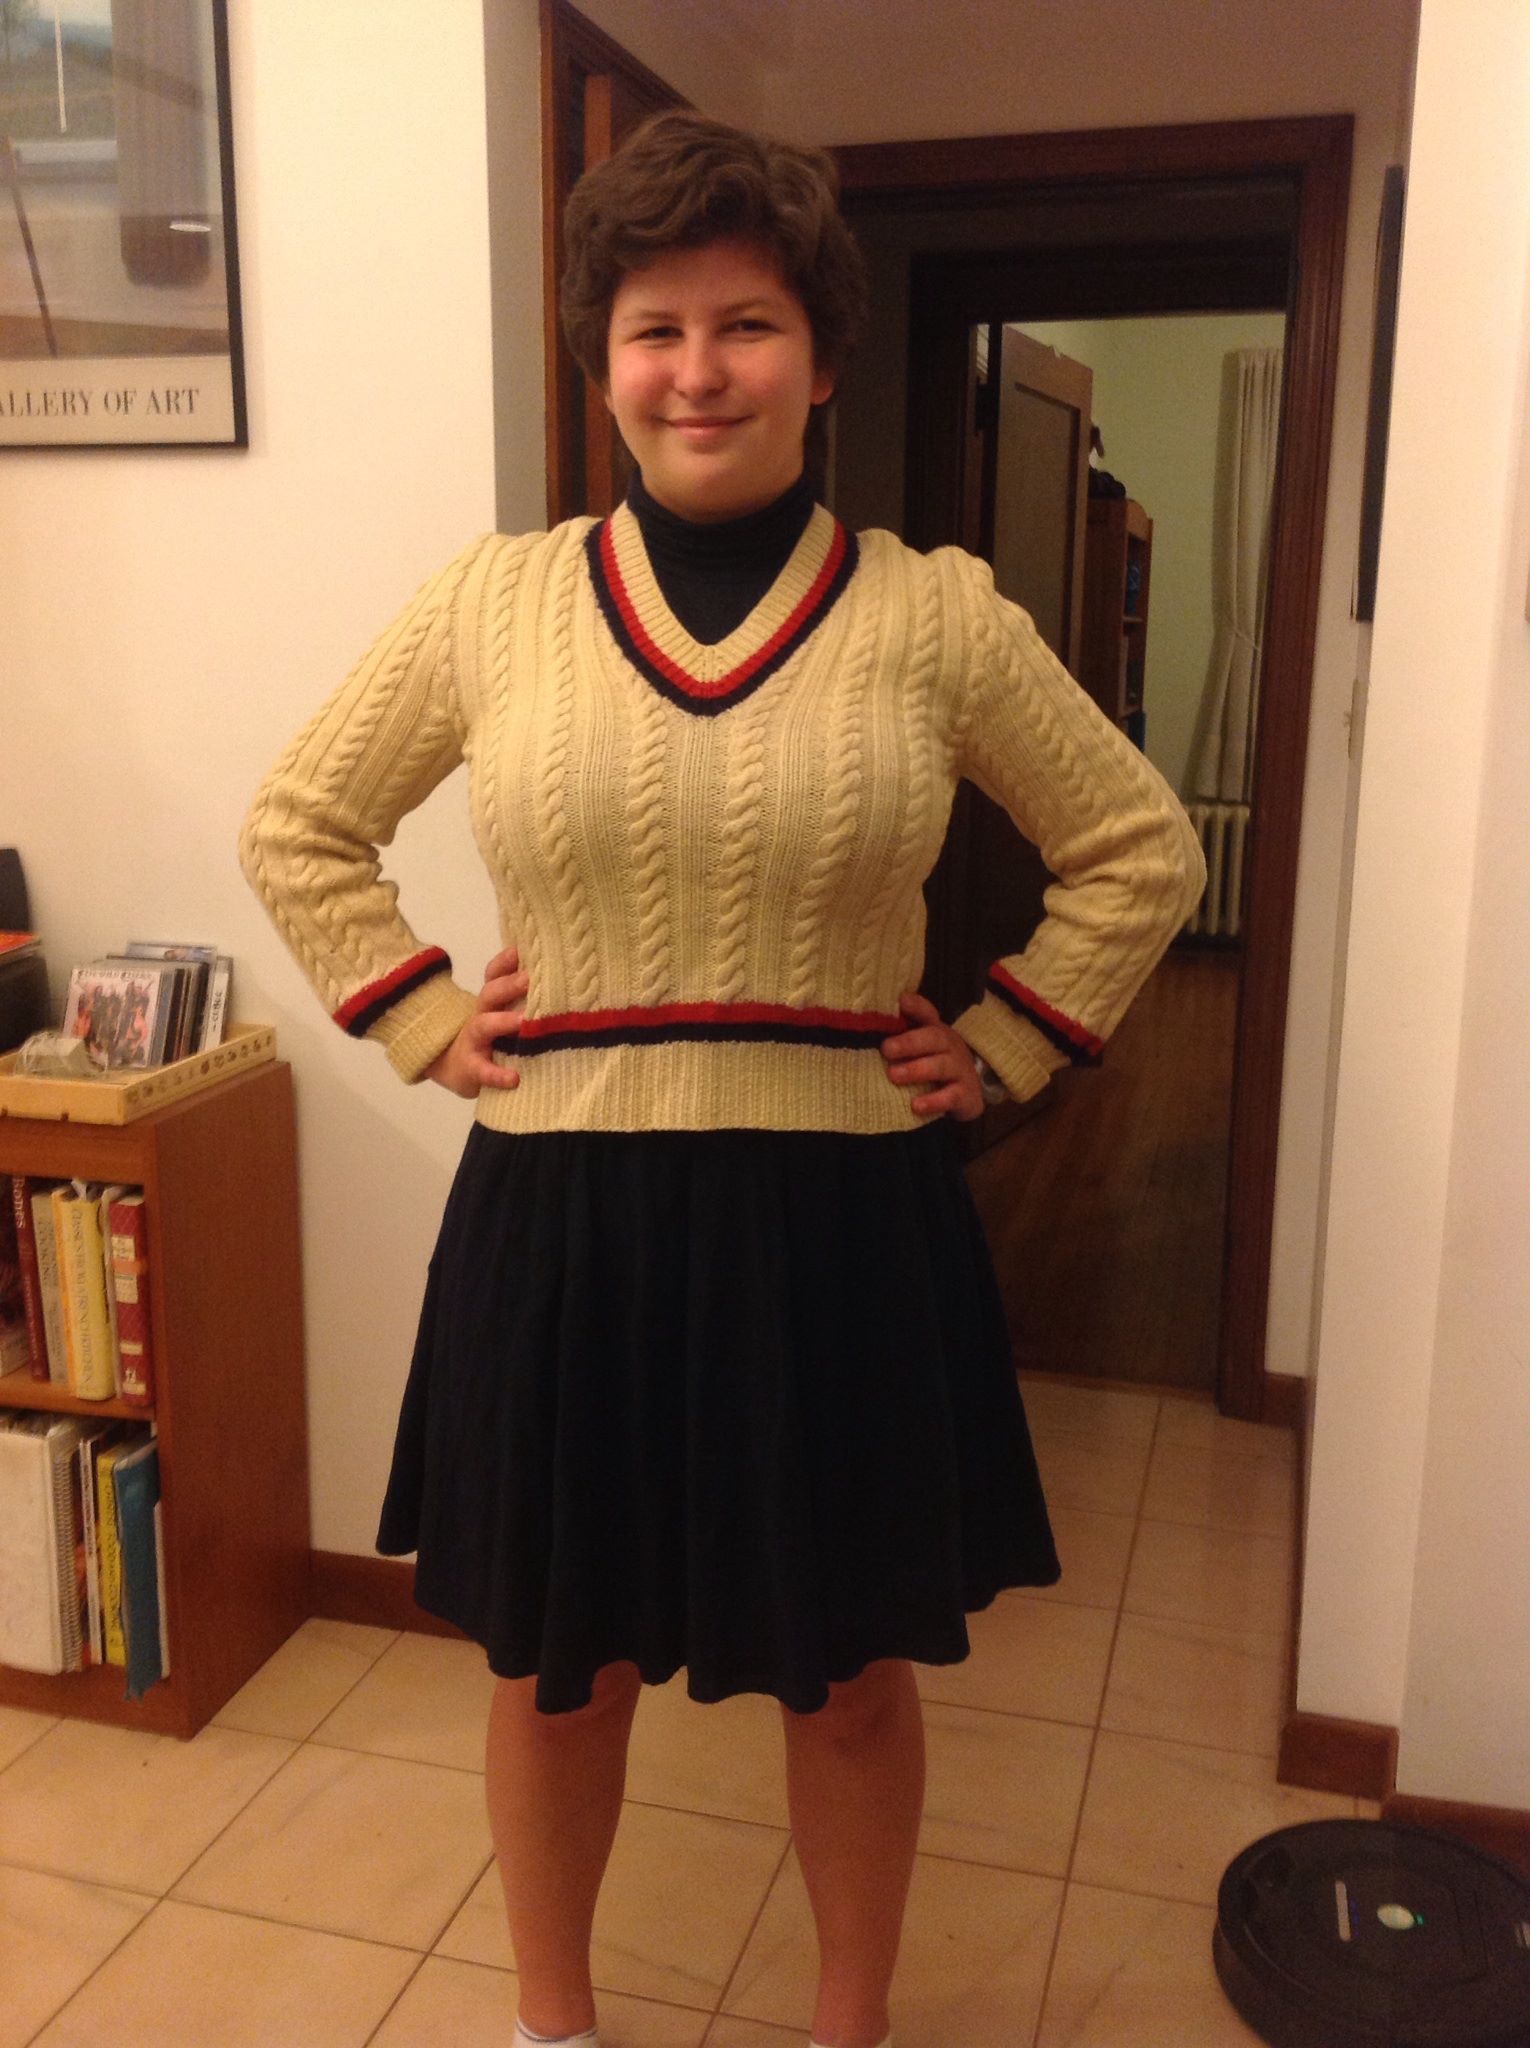
Yesterday I went out web-walking – mostly to read other people’s blogs. I came across Life in the Frogpond, and a post on it made earlier in the week by Becky of skinnyrabbit.com. She was looking at vintage tennis sweater patterns, and offered up this one from a1956 Bernat Handicrafter pattern leaflet (this scan is Becky’s, but the original copyright on both pattern and image is held by Emile Bernat & Sons):
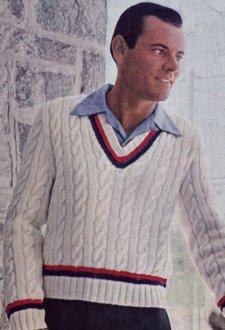
I collapsed into a pile of amusement, because my mother had knit this **exact** sweater for my uncle when he was a teenager, probably circa 1958 or so. This sweater still exists! I have it in my closet right now:
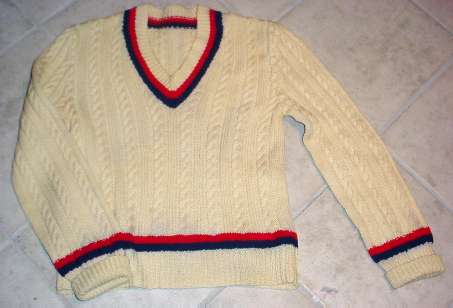
It’s held up extremely well. No excessive wear, weak spots or moth holes in the entire piece, although once natural color ecru wool has aged somewhat to a beige/light yellow, and somewhere along the line aggressive laundering seems to have migrated some of the dye from the blue stripes.
Not only do I have the piece, I also have a photo of ME wearing it as a teen. This is from my high school yearbook. As you can tell from the wire frame glasses, nerd-bunch hair and wide shirt collar, was taken in the ’70s:
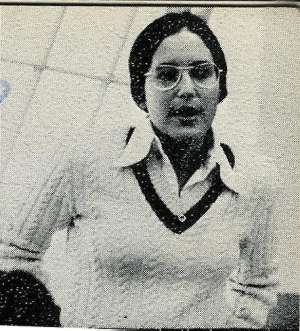
Now that I’ve dated myself, I can also say that this46-year old tennie is waiting for my own Tween-ager should she want to wear it when she’s big enough.
Moral of the story: Use good wool. It lasts forever.
UPDATE:
I got my wish. Younger Offspring, sporting the same sweater, circa 2014.
WORKING REPORT – LACE SCARF; ANOTHER FULLED PILLOW
Having finished the poncho yesterday, I scuff around with what little yarn remains here in the house (my stash being stowed in the storage cubby pending our upcoming move.)
At theGore Place SheepshearingFestival last month I bought two skeins of hand-spunfine gaugeMerinofrom Greenwood Hill Farm. Each is around200 yards so I have about 400 yardstotal. In my opinion it’s more like a light fingering weight than a truelace weight. I bought them with a lacy scarf in mind. No pattern in particular. I thought I’d noodle out one on my own.
I’ve decided to make a piece with two fancy ends, a rather plain but coordinating lacy middle, andtrimmed all the way around with a killer edging.
I swatched on several size needles, and decided I liked the way that lacy stitches felt when knit on a US #6. (That’s an argument that this stuff is trulyfingering weight, because I like lace weight knit on #3s.) Gauge is hard to estimate because I haven’t decided on pattern stitches yet, but I’m not worried about making a scarf fit. The various lacypatterns I played with worked up at between 5.5 and 5 stitches per inch, so I know roughly how wide a pattern I should be looking for to make a scarf of around 5 inches in diameter.
To that end I started paging through some of my knitting books and stitch dictionaries today. I found several things that had elements I liked. First, I found a wide diamond band in Lewis’ Knitting Lace (pattern #42). Nice wide diamond frames, filled with a smaller diamond pattern in the center. It’s a 12-stitch repeat, with 2 stitches before and one stitch after the end repeats. That’s 15 total for one repeat. Narrow, but I’m planning on adding an edging.
To complement the diamond pattern, I’m looking at a couple of simple lace grounds. Right now the leading candidate is a mini leaf pattern from Walker 1 (p.215, #3 in the set), but I’m not sure it will work out. I’d like to use a divider to set this pattern off from the diamonds. I’ve always liked a plain row of YO, K2tog framed by garter stitch welts.
Finally we get to the killer edging. I’m looking at Heirloom Knitting by Miller, the Victorian Zigzag Edging on p. 125. That’s a WIDE piece as written – 20 stitches at cast-on, widening to 26. I might have to eliminate some of the openwork on the attachment side to slim it down some.
The next step is to swatch a bit with each of the given patterns. Before I do that however, I’m going to redraft them using a uniform symbol set and put all the patterns I intend to try out on one sheet of paper. It’s easy enough to adapt to each book’s ideosyncratic style of stitch representation, but it’s a pain to switch gears between systems and flop all those heavyvolumes around while I’m knitting.
I give no guarantee that this process will lead to an Actual Design. I begin two or three of these for every one that ends up as an on-the-needles project.
In the mean time just to have something mindless on the needles for last night’s and tonight’s weekend sofa movies, I took my other Sheepshearing Festival acquisition and cast on for another felted pillow similar to the one I did in Manos del Uruguaywool. This one is also done in the rustic Nick’s Meadow Farm yarn I’ve mentioned before. The pale blue, light moss green, and light butter yellow skeins together cost less than one skein of Manos.
The movies that accompany this excercise in autopilot garter stitch? Last night it was Master and Commander. Tonight it’s John Cleese in Shakespeare’s Taming of the Shrew. If you like either adventure stories or Jane Austin, you’ll enjoy the series of books from which the former was adapted. The movies skipped over the whole drawing-room/social manners side of O’Brian’s books, especially the rivalries in love that divide the two lead characters. As for the Shrew – it’s so non-PC it’s over the top, but it’s also one of my favorite plays. I’m really looking forward to seeing Cleese as Petruchio, and finding out how the actors cast as Katherine and Grumio stand up to him.
Back to knitting. Thumbing through my stitch books I lighted againupon Indian Cross Stitch (Walker I, p. 112), a variant on enlongated stitches. I used itinmy Suede T. It seems that in just the past three months, I’ve seen elongated stitches, including this oneand Seafoam (Walker II, p. 21 ) all over the place,including the latest Interweave Knits and Knitters, Berroco’s patterns, and Lana Grossa’s patterns. Given the long lead time of both magazine and yarn makers’ pattern development cycles, it’s always interesting to see the same idea hit multiple sources at the same time. Shadow knitting cropped up in parallel issues of IK and Knitters a while back. Lacy knitting featuring lily of the valley-inspired textures is another recurring theme (IK led the pack with Forest Path last summer).
About the only explanations for this parallelism I can come up withare that the designing knitting community is quite small; some things are natural fits (elongated stitches work well with ribbons, ribbons are hot right now); and many designers draw inspiration from the same fashion industry sources (deconstructed/slashed looks were big on the runways two seasons ago, and it takes a season or two for runway ideas to percolate into retailknitting patterns.)
So far most sources talk about doing the elongated stitches do them with the multiple wrap method. Can a revival of Condo Knittingbe far behind?
WORKING REPORT – WATERSPUN PONCHO
UPDATE: THIS WORKING DISCUSSION (INCLUDING HINTS FROM PRIOR PROJECT POSTS) IS NOW AVAILABLE AS AN EASY DOWNLOAD AT THE KNITTING PATTERNS LINK, ABOVE.
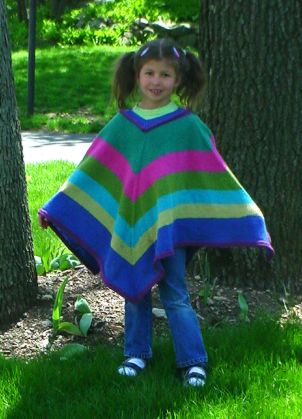
My Classic Elite Waterspun poncho isdone! Here it is mid-block:
I am really loving the improvised blocking wires I got to finish my Forest Path stole. I threaded them through the I-cord edges, two per side, then spread the poncho out on some towels to dry. The edges are straight, the corners are perfect, and dreaded curl-up has been eliminated. And I didn’t even need pins!
And here’s a shot of it on the happy recipient:
For those of you who wrote to ask for the pattern, here it is.
- Make swatches until you get a fabric that you like.
- Figure out your gauge.
- Measure how big a neckline you need to go over your head.
- Multiply that measurement by your gauge, and round it up to the next multiple of four.
- Cast on that number of stitches, placing 4 markers evenly spaced.
- Knit 6 rounds.
- On the 7th round, K1,make one, knit to one stitch before the next marker,make one, K1. Repeat this three times.
- On the 8th round – knit
- Repeat steps 7 and 8 until your poncho is as long/wide as you like it.
- Bind off, or work one or more rounds of attached I-cord to finish.
- If the neck is too wide, pick up purl bump stitches at the base of the rolled collar. You should have the same number as you cast on. Put 4 markers in your work evenly spaced. Then work one round starting with k2 tog, (k1, p1) until you have two stitches left before the next marker, ssk. Repeat between the other markers. Then work a K1, P1 round continuig ribbing as established. Continue this way, alternating decrease rounds and plain ribbed rounds for about 6-8 rows. Bind off VERY LOOSELY, making sure you can still get your head through the hole.
As to what yarns are suitable, what number to cast on given a particular gauge, what size needles to use, how much yarn you’ll need – this is all up to you. Experiment! Here are some thoughts to keep in mind:
What yarn is suitable? Look at it. Will it feel good when worn? Is it hand-wash only, otherwise hard to clean, or a light color? If so – are you prepared to care for it when it gets dirty? Is it loosely or tightly spun? Loosely spun yarns are more prone to pilling, catching and looking “used.” On the other hand, they’re often softer with a more luxurious drape and sheen. Is it heavy? A poncho is a big thing – larger than a lap blanket. Lift about 10 skeins worth. Can you envision yourself dragging around that much weight (or more)? Will the yarn stretch under its own weight when used in a large quantity? Cottons are heavy yard for yard and are infamous for this. Wool is less weighty per yard or meter. Wool/acrylic blends are lighter still. Is the color/texturenot only attractiveon its own, but will it look good on you? A puffy or furry yarn will add bulk andincrease the size of your sillouhette. A giant-gauge or shiny yarn willmake a garment look larger than it really is. Some colors and textureslook fantastic as accents, but applied over an entire garmentmay not be as appealing on every wearer.Decide what’s important to you and choose accordingly. Remember, you can always buy one skein to try out before you commit for the whole project. If that yarndoesn’t work out for a poncho,one skeinmight make a nifty hat or scarf.
What needle size to use? When swatching with a new yarn, start with the needle size recommended by the yarn maker. Do up a good size swatch in your chosen texture stitch or colorwork design. Do you like the feel and drape? If so, measure your gauge – you’re good to go. Swatch feel too stiff and tight? Try again on a size larger needle. Swatch too drapey and holey? Go down a needle size and try again. You’ll know when you’ve hit the best combo. If you’re combining several yarns of different weights or textures, be sure to swatch them as you will use them, using the stitch and needles you intend for the final project, even if that means making a VERY large swatch with multiple stripes. Once you do get the look/feel you like, make a note of your needle size and FINISH YOUR SWATCH. You’ll need it to do both gauge measurements and yarn consumption estimates. (I’m not good at keeping paper notes, so Imake knots in my dangling tail end to help me remember what needle size I used to makemyswatch. For example, four knots = US #4 needles.)
How many to cast on? Simple math. If your gauge is 4.5 stitches per inch, and you’ve decided that a 24 inch neckline is big enough, you start with 4.5 x 24 = 108 stitches. That lucks out because 108 is a multiple of 4, and you don’t need to round up.
How much yarn will you need? You can figure out roughly how much yarn your gauge square took for that number of square inches or centimeters. Draw out a diagram of your project (in this case – a big square), and estimate how big you want the thing to be when it’s done. Figure out its total area and divide that area by the area of your swatch. Got a 6-inch square swatch? Want to make a peice that’s 4 feet on a side? 4 feet x 4 feet = 48 inches x 48 inches = 2304 square inches. 6 inches x 6 inches = 36 square inches. 2304/36 = 64. It will take you about 64 times as much yarn to knit your 4-foot square piece than it took to knit your six inch square. Ravel back your swatch and measure, or weigh itto determine the amout of yarn you used. Now do the math.
Shortcut: If you like a slimmer poncho than this super-easy square one, there’s a poncho pattern generation utility available elsewhere on-line.
TALE OF THE TEENY SOCK
A while back I worked for Bay Networks, before they were on the receiving end ofthe Nortelengulf-and-devour experience. Like most companies, Bay did many things right, but others with less precision. One of the things they did right was to insist that all sales and marketing employees actually know and have experience with the products they sold. As a proposal drone, I was sent off to the same training sessions as the sales engineers. Training was dense-pack: thorough, totally useful, informative, and lasted an entireweek. A long week. An interminable week. Did I mention that it took five solid 8-to-5 days?
For four days I sat in adank conference room watching two things – theoh-so-serious instructor and (through the door-side window) the traffic in the elevator lobby in front of the training room. On the opposite wall of the lobby from the conference roomwas a sailfish, stuffed and mounted on a trophy plaque. It was a handsome blue devil, gape-mouthed and arching mid-leap in fishy defiance, but like all long dead and dustythings – it never moved.
Late in the afternoon onDay #4 I had an inspiration. I went home that night and knit up a teeny gray and redsock. I stuffed it with a piece ripped from my business card. The next morning I got to class early, and slipped the thing into the sailfish’s mouth. The little toe and heel poking out of the fish’s mawmade it look like a tinyperson was being swallowed alive. Day #5 was infinitely more interesting as I watched people doing a double take as they passed by and noticed my addition.
I left the sock in place for the entire three years I worked at Bay/Nortel. Finally the time came for us to part ways. I went back to the fish’s building to retrieve my sock. Some people tried to stop me, as the display had become a building mascot.I had them remove the sock and reveal the business card fragment inside. There was my name, and I took my knitting.
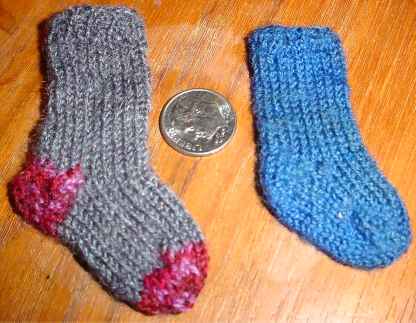
The blue one I knit upas aKnitList membership badge for the ’97 Maryland Sheep & Wool Festival.It was however too small for that purpose, and no onenoticed that I was wearing it until I pointed it out.
Both of these were knit from the reinforcing yarn that came with Special Blauband. They’re both fully-fashioned toe-ups, using exactly the same figure-8 cast on, short-rowed heel and ribbed cuffs I use to make all of my more wearable socks. I used flat toothpicks to make them, although now in retrospect I probably could have used blunt needles intended for tapestry or needlepoint. Gauge on the gray is something like 14 spi, although it’s tough toestimate accurately. It measures about 2 (5.1 cm) inches from toe to heel, and 2 inches (5.1 cm) from heel to cuff. Little Blue is about 1.5inches (3.8 cm) from toe to heel, and about 1.75inches (4.4 cm)from heel to cuff.
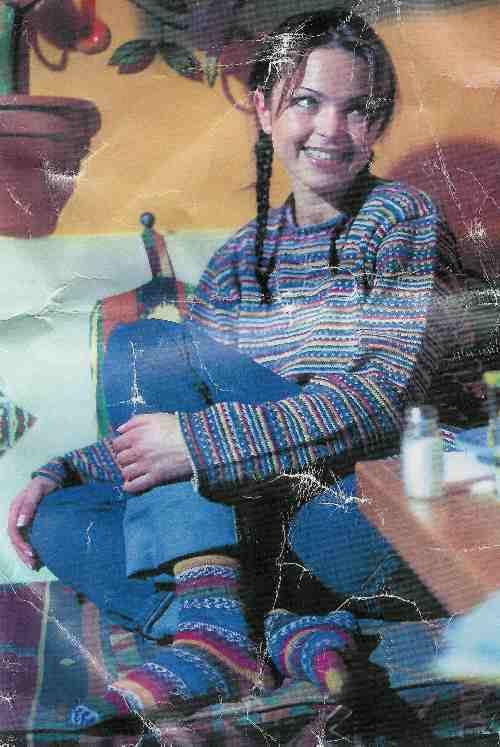
CHEST OF KNITTING HORRORSTM – MEXIKO PULLOVER
I’ve mentioned this resident of my Chest of Knitting HorrorsTM before. It’s my Fortissima Colori/Socka Color Mexiko pullover. This yarn has since been renamed Fortissima Colori/Socka Color Mexiko Disco, and the fiber content has changed. No review yet under that entry.
The pattern was issued by the manufacturer. It’s one-size-fits-most with the sizing limited by the width needed to express the yarn’s flash patterning, and I’m at the upper end of the fit range. I bought itkitted with five 100gballs of the stuff. Here’s what I’m supposed to end up with. Thankfully, braids, salt,and the forced toothy smile are not required accessories:
My copy is a bit worse for the wear, but you can see the happy striping. This effect is achieved by worked flat from one ball for front and back and from two balls for the sleeves (2 rows A, then 2 rowsB). Thrilled to have a fine-gauge pattern and to be using sock yarn for something larger than socks, I took the plunge. Here’s what I’ve got so far:
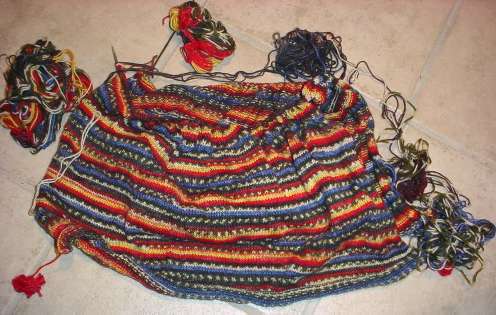
Just to be annoying, Idecided to knit the front and back side by side, althuogh each is knit flat from its own ball of yarn. I wanted the patterning to sort of match at the side seams. I’m not going for absolute fanaticism on this, a rough approximationis good enough. I found comparable spots in two skeins and started on in. It went o.k. for the first six inches or so. Then the problems started.
See all those balls hanging off the ends? Those are out-takes where the yarn’s color repeat went off-phase, got muddy enough for long enough to interrupt three or more full rows, or disappeared entirely. My intent was to loop out such annoyances, then later go back and use them on the sleeves. (I kept them attached to the work so that in theory – when I went back to re-use themI would have a better idea of where they fit in sequence.)
I’m still hoping to eke out a semblance of matching until I get to the point where sleeves are introduced. Since the front and back will no longer butt up against each other, mismatches will be easier to ignore. I long ago gave up any thought whatsoever of color or pattern-balancing the two sleeves.
As you can see, the problem is getting worse. What started out as a fun lark in fingering weight has turned into an agonizing slog on #3s, with all too many excised bits. I put it down when the fun leaked out. I do hope to take it up again because I still want to be able to wear this piece. Someday…
Moral of this sad tale? If you make life more difficult for yourself, things are not going to be easy.
