GADGETS – MAGNETIC BOARDS, BOUGHT & IMPROVISED
As I’ve posted before, I’m in the throes of moving. My entire stash, most of The Chest of Knitting HorrorsTM and the majority of my knitting tools are packed away in the storage cubby. Need however, does not sleep.
This weekend past I needed to work from charts. I like to use a magnetic board, but my slab-o-steel and fancy magnets were packed away with the rest of my goodies. I had several alternatives to the keeping-my-place problem. I could use plain old pencil ticks, marking off rows as they were completed. I could use yellow sticky notes to keep track of where I was. Or I could improvise a magnetic board.
Pencil ticks are a pain, and while they help me see what’s been done, they’re of little use mid-row, especially in a long, or wide repeat. Post-its are useful, but the stickum wears out, and any time I take a stack of them out of the Forbidden Drawer, the kids attack (corollaries to this type of household piracy include liberation of Mom’s Good Scissors, and unauthorized Scotch tape squandering.) Repositioning them is also trickier compared to just nudging a magnet bar.
As a result, I turn time and time again to my magnet board. I’ve gotthe standard issue 8×10 flat model:

Lo-Ran appears to be the leading (perhaps only) outfit marketing these.Boards come in several sizes both with and without pencil ledges at the bottom. Theyare marketed in several bundles, some with additional accessories. Accessory packs are also sold separately. Mine didn’t come with the little white magnetic ruler pictured, but I bought it a zillion years ago. I also don’t use the magnifying bars, stands, or other supplemental gadgets. The half-barrel shaped magnifiers distort too much for my liking, and as a Wandering Knitter – the less impedimenta, the better.
About the only down sides to using the boards are:
- Even though the corners are now rounded off, the edges can be sharp. I suggest covering them with book repair tape or some type of tape that doesn’t bleed adhesive over time (NOT duct tape, woven electrical tape, or first-aid tape).
- 8×10 is smaller than my pattern pages, so my copy gets battered;
- Being thin, they bend easily. The magnets don’t stick well to an undulating surface, so I’ve had to resort tobangingmine back into shape with a rubber mallet a couple of times over the years.
If I’m using a published pattern, I make a photocopy and put my original back on the shelf (fair use under copyright laws – if I’ve annotated it with notes I want to keep, I staple it to the original and file both away after use; if not, I destroy the copy).I slide the copy into a plastic document sleeve or zip-lock bag, along with my thin metal magnet board. Then I use the magnets on the outside of the sleeve, positioning them as needed to highlight my working section. I place my magnet to cover the row above the one on which I’m working, sliding it up as I go along. That way I can see both the row I’m on, and the rows I’ve just completed. In knitting it’s rarely necessary to mark a vertical, but some people I know do position two additional magnets to frame a repeat, removing these vertical markers when they get to the final iteration and need to work any non-repeating stitches at the end of their rows.
Without my board thisweekend past, I had to improvise. My kid refused to let me borrow her magnetic paper dolls set, having seen my true nature when Iinvaded her K’Nex building toy set for rings to use as stitch markers. Not having a typist’s metal copy stand (remember those?), a tabletopmusic stand, or access to sheet steel and a machine shop, I raided the kitchen.
I found a flimsy, cheap Ecko raised lip cookie sheet/jellyroll panI bought back when I got my first apartment. You know the kind – the type of flat panthat warps at any temperature over 250F, and is guaranteed to burn anything baked on it. I’m sure you’ve got one squirreled away somewhere, making appearances to re-heat pizza or catch drips, but not to do any real cooking. Mine is the worse for wear, havingrecently been rescued froma three-year turn outdoors underneath the barbeque. It’s scrubbed clean, but it’s too nasty looking to use without foil between it and food.
Then I scarfed one of those promotional business-card style fridge magnets that breed with the same frequency as AOL CDs or coat hangers. This whopping big index-card size one came with the thank-you for your membership letter from WERS, a Boston-area Public Radio station based at Emerson College. (Just because I’m ancient doesn’t mean I have to give up on college radio.)
I cut the flexible WERS magnet into strips, slapped my chart on my pan and had my no-cost magnet board. While it’s not as flat as my regular fancy board, it is larger than my sheet of paper, so the edges aren’t getting battered. Also the pan shape has been very usefulas a tray forcontaining spare DPNs, pencils, and other items as I carry my knitting room to room:

My solution isn’t pretty or elegant, but it works; and using all scrounged materials – it was free.
WORKING REPORT – LACY SCARF, FULLED PILLOW II
I continue to make progress on my two at-hand projects.
Lacy Scarf
I finished the center strip of the lacy scarf on Saturday night. The center strip took almost one entire skein of the hand-spun lace weight Merino. That rate of consumption put the last stake in the heart of my first choice of edging (with minimal modifications). I did’t think I would have had enough yarn to do one that wide.
So as I predicted, it was back to the drawing board. I spent my knitting time on Sunday and Mondaymessing around with stitch dictionaries bothhard-copy and on-line, usingthe little bit of yarn leftover from Skein #1, swatching out possibilities. Disappointment. Overall, I felt like a cable TV viewer – I’vehad hundreds of choices, but nothing to watch.
I started with several possiblities from books, then tinkered with them. I even drafted up a couple ideas from scratch.I wanted to use diagonals and/or diamonds to mirror the motifs on the scarf end. The thing should be rather demonstrative as the bulk of the body is so plain. I neededmy edgingto be no wider than 12-14 stitches at its widest point. Asawtooth or point detailwould make going round the corner easier.
After extensive fiddling with dozens of patterns (enough to actually wear out my short length of practice yarn from all the knitting up and ripping back), I cycled back to my original pick.It had the best combo of diagonals and I liked the balance of opage to openwork areas. All that effort wasn’t lost though. What practice did do was give me a better feel for how patterns can be changed around. My initial efforts at modifying the pattern book original were pretty tame – taking out a small insertion detail. This last time I chopped it right in the middle of a vertical pattern element, narrowing the thing down by half. As you can see, it’s working:
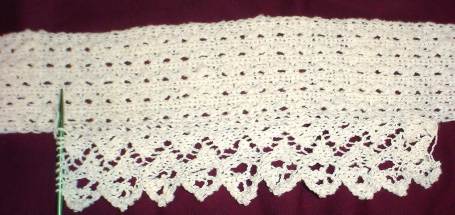
Stitch counts on the eding range from 10 to 15 (the body by contrast is 27 stitches wide, butbecause it’s a ribbing, it looks narrower than that).
To attach my edging, I’m using the same pull-a-loop method employed in the Forest Path Stole. It’s fussy, but it makes a very airy join, with no heavy column of attachment stitches. I will work from the point shown, rounding the first corner to the center of the end. Then I’ll weigh my remaining yarn. That should give me a handle on yarn consumption. If I’ve used more than a quarter, I’ll rip back and slash another three columns from the edging’s repeat, then begin again.
Fulled Pillow II
The fulled pillow went through five wash/tumble drycycles over the weekend, keeping company with the family’s regular laundry. I didn’t expect much in terms of total shrinkage. I’ve used this yarn before and it takes quite a few tries before it’s sufficiently de-lanolined to full.
It did start to fuzz up around Wash #3. I can still see garter stitch ridges, but the individual stitches are getting harder to spot. The pillow has also begun to get denser, and a small bit of shrinkage has occurred, but it’s not worth photographing yet.
Original dimensions were 26 x 14 inches (66 x 36 cm). Right now it’s roughly 23 x 13.5 inches (58.4 x 35 cm). I do note that the yellow stripes account for about half the shrinkage so far. The blue and green ones haven’t tightened up as much. I’ll keep washingthe pillowuntil I’m satisfied but as laundry is only done on weekends, you won’t be hearing about this piece again until next week.
WORKING REPORT – LACY SCARF
Thank you to everyone who wrote to say that they liked the level of detail in these posts. I blush a bit. I’m writing a blog that I’d find interesting to read. But my mom’s main point is taken – not every post need be essay length. I’ll try to make things a bit more readable, perhaps splitting longer thoughts over two or more days.
Lacy Scarf
I ran into a temporary snag on the lacy scarf pattern, but I think I’ve beaten the problem.
I chose a bunch of texture patterns thatI thought would lookgood together. Lots of play among them on diamonds and sharp diagonals. My idea was to knit a pattern panel at each end of the scarf, and use a simpler, coordinating pattern between them for the scarf body, with the entire piece trimmed with a killer edging.
I drafted up my patterns, and swatched each one. Here’s where the mistake came in. I’ve got**just enough**yarn with no chance of getting more, so I swatched each pattern in turn by itself, ripping back and re-using the yarn between swatches. Each looked great on its own, so I cast on and began the piece as a whole. End pattern #1 worked fine. The welted eyelet divider looked fine. But the simpler plain diamond pattern for the scarf body was wrong, wrong, wrong. The proportions of the diamonds just didn’t fit the proportions of the end pattern. They fought, and the piece looked way too busy.
So in a Wile E.Coyote moment, it was back to the drawing board. I decided to go with a contrasting pattern/texture. I had played with the rick-rack rib stitch in the Zen scarf pattern. It looked nice enough in a large gauge, but the texture didn’t really come out. I decided to play with it some more. I separated each column of the zig-zag by a column of p1, k1, p1. I like the look and I think that it’s enough different from the first panel to stand on its own:
Thinking on the edging I’ve graphed out, I think am going to have the same problem. I’ll scout around today to see if I can find something narrower that has a coordinating presentation.
The yarn is wonderful. It’s a hand-spun super-soft Merino wool, labeled as laceweight, but actually closer to fingering. (I’ll add a yarn review after the project is finished and blocked). It’s fromGreenwood Hill Farm, asmall producer here in Massachusetts, and is my souvenier from this year’s Gore Place Sheepshearing Festival. It’s a rustic-looking two-ply yarn in that there are thick and thin/tightly spun and looser spun, fluffysections on each ply. This makes a very informal feeling bit of lacy knitting – snuggly rather than crisp. (You can see some o the slubby, puffy sections in the piece above – look at the top corner of the top leftmost diamond.) It knits up evenly, there’s none of the kinking back on itself I’ve found in some other small-production hand-spun yarns. One minor annoyance – there was quite a bit of tiny, sharp vegetable fragments in the first third of my skein – about one thorn or spriglet every two inches. I understand the logistical problems/economics ofwhy these shards remain.I don’t expect this type of sheep-to-knitterenterprise to produce pristine yarn; but it’s a minor pain to keep the tweezers on hand to pull out the stickers as one knits. In spite of the rustic look and occasional tiny thorn, thisyarn slides like butter and feels like a cloud. It’s the absolute poster-child for non-itchy natural Merino. I’ve got about 400 yards, enough for a very short overlap style inside-the-coat scarf (as opposed to a wrap-around-the-neck grand scarf). If it performs as I expect it will, I’ll be trying out their sport weight real soon.
Another departure from my original idea: At first, I was going to work this scarf like I didmy Kombu Scarf – starting with a strip of edging, picking up along its spine, then working the edgings at the same time as the scarf body. I decided to work it differently this time, just for the sake of the challenge.
I am going to knit the entire center strip, end to end. Then starting in the scarf’s center (the part usually at the back of the neck), I’ll knit on the edging. I willcalculate the length of each edgingrepeat, so I should be able to work in an even number to the corner. If the edging I end up using is narrow and flexibleenough, I might be able towrap the corner easily, working an extra iteration on the cornerto avoid cupping. If it ends up being too wide for that I think I’ll try mitering the corner with short-rowsto makea nice, finished end. Remember,both approaches are"in theory." I’m not quite sure how I’ll go aboutthe cornersyet. In the mean time, I’ll just keep knitting the center strip.
WORKING REPORT – FULLED PILLOW II
Today I’ll keep it short. My mom found this blog and has told me that I go on so long it’s too much like work to be enjoyable reading.
I’ve finished the garter stitch tube destined to be The Small One’s pillow. I intend to full it as-is, then add some sort of buton or trim to fasten the ends. Although one can never be certain, based on previous experience with this yarn I’m anticipating 40% shrinkage in length and about 10-15% in width. It’s 26 x 14 inches (66 x 36 cm), so I should end up with somethingin the neighborhood of 15.5 x 12 inches (40 x 30 cm). That would let me use a 12-inch square pillow form, in a style similar to the Manos pillow.
Of course, I have to winkle her out of the thing first. She’s taken a liking to it as some sort of kid-specific cocoon:

Which makes me think that knitting up a cuddly tube to use as a nap-sack wouldn’t be a bad idea at all. Hmm….
GADGETS – STRICKMUHLE
A while back I asked for advice on buying one of those little hand-cranked I-cord knitting machines. I now present the outcome. This one is very definitely a boutique sort of item. Not everyone has use for miles of I-cord. I do.
I knit lots of baby booties using the pattern Ann Kreckel posted to the KnitList in the summer of 1995. The pattern is available at Woolworks. There’s a similar pattern in Taunton Press’ Knitting Tips and Trade Secrets. I make them as gifts for friends and family, or for charitable donation.
I don’t have any finished booties on hand right now and my sock yarn stash is in the storage cubby, otherwise I’d whip up a pair to photograph. I’ve modified the pattern a little bit, knitting the cuff with fewer rows so that it is more rolled than folded. I also like the look of I-cord rather than crocheted, braided or longitudinally knitted ties. But I-cord is tedious. It takes me almost as long to knit the I-cord ties as it does to make a bootie, so I splurged on a gizmo to do it for me.
About three years ago I got sick of hand-knitting the ties. I looked at the Bond Magicord Machine, the Inox Strickmuhle, and a couple of older models I found on eBay. Both the Inox and Bond machines have changed from the ones available at that time. Except for color, they’re now identical, both sporting little clear plastic sleeves surrounding a 4-hook needle bed.
|
|
|

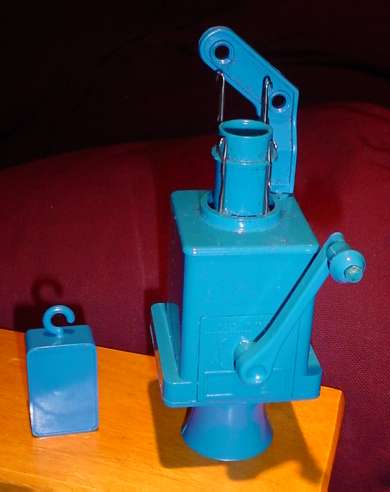
My older version of the Strickmuhle has no sleeve, uses a different type of weight, and has a protruding arm to position the yarn feed:
Back when I bought this one there was a big difference in quality between the Magicord and the Inox, with the Inox being much sturdier. Now they’re the same machine, so any differences will be in the accompanying documentation (if any).
You can see the hook-weight on mine(there’s a block of metal inside). On the newer models the hook-weightappears to have been replaced by some sort of clip. Mine also came with a second slightly smaller collar (that’s the blue circle that you can see sticking up among the four hooks). In theory, the smaller collar should be used for fingering and 3-ply yarns, and the larger one should be used for sport and DK, but I’ve never found the two collar sizes to have any effect on ease of production or I-cord evenness.
My machine works best on fingering through DK weight yarn, with best results from sport weight (6 spi). I’ve forced some Cascade 220 worsted through it (5 spi). It worked, and I got I-cord that I later used in a fulling project, but I wouldn’t recommend it for worsted as a matter of course. There’s areal knack to using this toy, especially with heavier yarns. Starting a new cord can be especially trying.
I did pick up a couple of starting tips from the French language instruction card (it came with a French, German and English card, but my English card was missing) – When starting out, make a loop, then stuff the yarn end into the tube’s body. Hang the weight from the loop. Then lay the yarn and turn the crank VERY slowly, skipping every other hook on the first round. You will be using Hook #1,Hook #3, then Hook #2 and finally Hook #4. After you get to Hook #4 you can let the yarn feed without skipping hooks. The combo of constant weight on the dangling yarn, plus the skipping-hook row produces a nice even end and minimizes the un-caught stitches that can make starting a cord difficult.
Once a cord is started, the thing does work quite easily. I often hand off my gizmo to one of my kids and have her crank out the required length. My weight isn’t as convenient as the spring clips, but I can move it up the cord if I need more yardage than the 5-year old is tall. Ending off is easy. I snip the yarn and keep turning the crank until the cord falls through. Then I use a tapestry needle and the dangling end to thread through the cord’s four loops. If I’m making bootie ties, I don’t bother making a two separate cords. Because starting is the trickiest part of operation I make a single cord that’s double long, plus a couple of rows – then snip the thing in the middle and bind off the two new ends.
Looking around, I see other people playing with these toys. Jenanne posted a summary of her experiments with the new version Bond and an Aran weight yarn (4.5 spi). Kate at Will Knit for Food also wrote about making I-cord from worsted weight yarns, then fulling it for bag handles.
Other than cost ,limits on the weight of the yarns it can handle, the difficulty of holding the thing, the yarn and cranking all at the same time (I wish it had a table clamp), and some trickiness starting off a new cord, my biggest disappointment is that the user is unable to alter the number of hooks being used. You get four-stitch I-cord. That’s all. One of the pre-1940s-vintage German-made all-metal machines I was tracking on eBay came with 6 hooks, and could be used with as few as two (sort of as a turbocharged lucet).
I also ran across the Hobby-Knit on eBay:

It looks interesting, but I couldn’t get anyone to confirm whether or not it could be used with a variable number of hooks. Also the very few of them that seemed to offered in operational condition were selling for upwards of $100. Much more than I could justify for such a trivial function.
If anyone knows more about this vintage toy, feel free to clue me in.
CHARTING SOFTWARE – GRAPHIC BUT NOT VIOLENT
Some people have sent in questions about how I am charting up the patterns I intend to use in the lacy scarf. In specific, they wanted to know if I am using one of the commercially available dedicated charting program.
I’ve tried demos for almost all of them. Alsoabout four years agoI broke down and bought Garment Styler Goldand Stitch Painter. I was sorely dissapointed in the usability of themodules and the quality of support available for both of those programs. Fewer than half of GS’s features worked and repeated requests for help were answered by "Sorry. It’s your machine and not our problem," in spite of the fact that I was able to replicate the failures on five more machines running an assortment of video cards and operating system versions. On top of that, Stitch Painter was primitive at best, and interfaced very poorly with the GS main program. Both may have gotten better since then, but I didn’t want to throw good money after bad.
Since2002 I’ve beenusing Sweater Wizardfor garment design assistancewith no problems. I didn’t get the companion Stitch and Motif Maker program.AlthoughI was a beta tester for the new version of SMM, andfound theprogramto beextremely handy,it’s not a major improvement over what I’m using now.What I really want is acombo program that truly integrates both garment design and motif design, producing shaped charts based on actual garment dimensions, or can superimpose garment outlines on a larger charted piece (like in Rowan and Jaeger magazines).
I’ve also fooled around with AranPaint. It’s a shareware program that produces custom graphs of texture patterns. The registered user version is the same as the demo, but restores the ability to print. AP does a nice job of charting simple cable and twisted-stitch texture pattern repeats. It’s able to produce a visual mock-up of what the design will look like, a chart with (more or less) standard symbols, and a prose printout of the directions. It’s biggest limitation is the small number of different symbols/stitches it can represent. AP can display/chartK, P, bobble, and 2 to 6 stitch cable crossings, not including most of the more eccentric ones (biggest lack – no YO). It also has a space limitation on the area. 50×50 stitches isbig enough for most people, but not big enough for many of the things I do. If an update of this one ever comes out and it includes more stitches, I’ll cheerfully pay for an upgrade.
My interim motif/stitch solution is to use Microsoft Visio Professionalas a stand-alone charting program. I regularly useit in my real-world work – answering Requests for Proposal (RFPs) for engineering and telecom companies.Visio isnot cheap. I certainly wouldn’t recommend anyone run out and buy a $400+ pro-grade drafting program just for graphing up knits when Stitch and Motif Maker can be had for less than a quarter of that. ButI couldn’t justify spending more on aboutique program (no matter how good) when the big boy could be tweaked to serve the same purpose.
I’ve concocted a series of stencils that contain all of the symbols I use, plus line and stitch numbers and 10×10 and 5×5 master grids. Each symbol is a small graphic unit, and all are predicated on little squares. I assemble my graphs square by square, building them like a little kid builds a wall of alphabet blocks by dragging over the symbols I need. Here’s a screen shot:

I used this to make all my graphs, including the extremely large one that accompanies the Raiisa lacy T on wiseNeedle. The screen shot shows just the basic knitting symbol shapes on the first stencil. Additional shapes are available on the cables and increases/decreases stencils (seen at the bottom of the green column). I built each shape myself, using plain oldsquares and rectanglesand the standard Arial font. While I haven’t incorporated any rules-based properties formy stitch shapesyet, each one does have a pop-up help window that gives a how-to for that particular stitch for both right-side and wrong-side implementation.
I can create more symbols as I please, adding them to the stencils if necessary. For example, if I’m charting colorwork, I’ll create a contrast color block for each color I intend on using, then store them on a separate stencil to re-use as needed. I even use stencils to store commonly used motifs, like the quaternary star that shows up as snowflake in so many Scandinavian patterns:

Symbols can be grouped, rotated, mirrored or arranged in layers.There are limitations:
- I can’t select all the squares of one color and change them to another unless I’ve placedor senteach color on its own drawing layer (think stacked transparencies, each bearing just one color of the design). If I’ve sorted my motifs this way into layers, I can flood-fill all of the boxes on one layer with the same new color.
- The *.jpgs produced by Visio are very large. I need to run them through something like Macromedia Fireworks to reduce resolution and size so that they’re not unwieldy for Web placement. The star above was 552 KB, which I slimmed down to 12 kb using Fireworks.
- There’s no "flood fill" with a chosen symbol. I can’t draw just the foreground, then flood the background with purls unless I create an all-purl layer and superimpose a layer bearing my motif upon it.
There’s no particular reason why any other drafting/drawing program with a stamp or stencil feature and layers can’t be tweaked this way. One final warning – Visio drawings and stencils in their native format are difficult to export to other drawing/drafting programs. They can be viewed by anyone using the free Visio viewer provided by Microsoft. Visio can export to many formats, including *.jpg, *.gif and several specific to various commonly used CADD platforms. But those are one-way solutions that send over images of the final product, not components that can be further manipulated. I work inside Visio, then export to *.jpgor print via Acrobat if I need to post a graph on the Web.
I’ve offered up my stencils before, but so far no one has been interested. I’ve got templates for Visio 5 and Visio 2000. The 2000 set should also work in Visio 2003. If sufficient demand is seen, I’ll postboth setson wiseNeedle in the tools section.
WORKING REPORT – LACY SCARF/FULLED PILLOW II
The past two days’ posts aside, I have been making progress on bothmy lacy scarf andmy fulled pillow. Knitting on the pillow is almost done. I’ve got maybe one more evening of garter stitch left. This weekend I intend on fulling it when I do laundry. I’m rushing a bit on it because I want to be sure to be able to full it completely before I have to leave this washing machine behind (it was a negotiated sacrifice in my house sale). I’m afraid the older hand-me-down machine at the new house might not be up to the challenge.
On the lacy scarf, I’ve finished re-graphing the patterns I intend on trying out. I’m working on modifying them a bit so that they play off each other better. I’m also narrowing the edging by either messing with or eliminating the double column of faggotting shown in the pattern original.
For those new to the term, faggotting is a true lace knitting stitch, in whichincreases and decreases occuron every row (as opposed to a lacy knitting stitch, in which rowscontaining increases and decreases alternate with plain knitted or purled rows). One common form of this effect when worked in the flat takes only two stitches and two rows for the entire repeat. Row 1 would be an endless repeat of the (YO, SSK) unit. The accompanying Row 2 would be an endless repeat of (YO P2tog).
So? Why is it called "faggotting" anyway? [Warning. This is a Kim-theory, so go chip yourself an enormous grain of salt before reading on.]
It’s not immediately evident why the name stuck to this particular knitting texture stitch.In historical usage, faggots are bundles of sticks – especially twiggy sticks used as kindling or cheap firewood. Nothing much looks bundledif you examine justknitted pieces. But if you look at those pieces in in the context of other needlework contemporary to the Great Whitework Cotton Knitting Craze of the mid to late 1800s the reasoning is pretty clear.
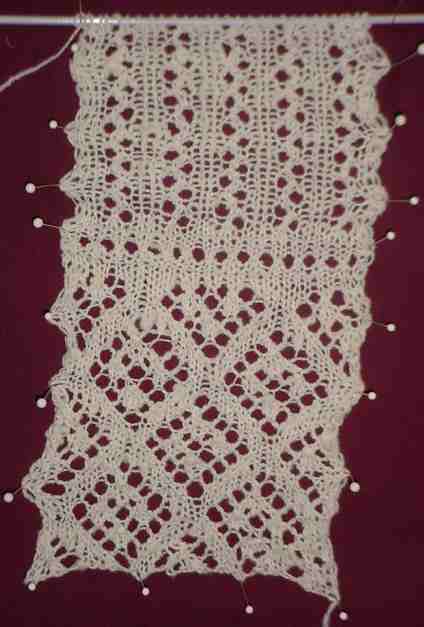
Withdrawn thread embroidery was one of those contemporaryneedlework styles. Commonly used for hemming or decorative insertions, it can range from the pretty simple to the amazingly complex. The sampler below shows several withdrawn thread patterns spanning several different substyles (the lacy white-on-white bits). Disclaimer and attribution: this sampler isn’t my own work, it’s a piece in the collection of the National Academy of Needle Artsthat I found doing a Google image search. I didn’t find a more exact attribution on their website for it. Great work though!

The topthree little bands on the sampler are the most widely known and used forms of the technique. The others, while nifty aren’t as often seen. The two most common names for this substyle that includes the top three are "Italian Hemstitching" and "Faggotting." The multicolor bands are double running stitch (aka Holbein Stitch or Spanish Stitch).
You can see in the openwork bandsthat the horizontal threads of the linen groundweresnipped at the left and right, then teased out. The cut ends were secured with stitches, usually before any cutting took place. The remaining vertical threads were bundled tightly with tiny hemming stitches that tie the fabric threads together like little bunches of sticks. In the more complex forms on this sampler, these bundleswere further embellished with threads woven in among them, orwere subdivided and/or twisted by additional stitching.
The second strip of the sampler with it’s running VVVVVs is the most interesting one for knitters. Compare the zig-zag pattern of one often-seen type ofknitted faggotting:
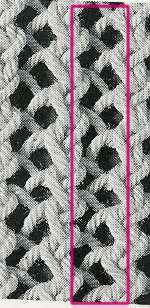
The zig-zags produced by faggotting in knitting mimic thegroups of verticalscreatedin withdrawn thread hemstitching. That’s where the bundle idea came in, andfrom where I believe the knitting stitchborrowed its name. This snippet is excerpted from Lewis’ Knitting Lace, p. 146 (Yow! I just saw the used bookprice. Ineed to update my insuranceto cover my library!)
Math! Knitting! Math!
Here’s an article that rises above the usual run of cutesy "ain’t your gramma’s knittin’" drivel:
http://news.scotsman.com/scitech.cfm?id=627352003
It’s wildly immodest to quote oneself, but it’s an "I told you so" moment. I posted this to the KnitList back around ’95: "Knitting is at its fundamentals, a binary code featuring top-down design, standardized submodules, and recursive logic that relies on ratios, mathematical principles, and an intuitive grasp of three-dimensional geometry."
So all knitters should hold their heads high. Even the most math-anxious among usare using neurons that have atrophied among the population as a whole.
TOO CUTE
O.k. I don’t do ‘cute,’ and as a rule I refrain from domestic blather. But this weekend past was Mothers’ Day and I believe that gives me license.
My Kindergartner gave me a hand-drawn Mom Book as a present. In it I discovered this page:

What I really liked was the self-portrait in the rainbow sweater (extra big, just so you know the relative importance of the individuals involved); and the knitting needles heldlike picadors’ lances by the drab mom (implied threat negated by big smile). Yarn though is curiously absent, so my guess is that process is less important than product to the average self-absorbed 5-year old. Especially when she or he is to betherecipient of a custom-made present.
Good thing I’d just finished her poncho or the book would have ended with the page captioned "My mom is old." That one I leave to your imagination.
