DEJA VU ALL OVER AGAIN
Yesterday I went out web-walking – mostly to read other people’s blogs. I came across Life in the Frogpond, and a post on it made earlier in the week by Becky of skinnyrabbit.com. She was looking at vintage tennis sweater patterns, and offered up this one from a1956 Bernat Handicrafter pattern leaflet (this scan is Becky’s, but the original copyright on both pattern and image is held by Emile Bernat & Sons):
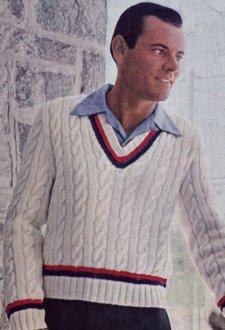
I collapsed into a pile of amusement, because my mother had knit this **exact** sweater for my uncle when he was a teenager, probably circa 1958 or so. This sweater still exists! I have it in my closet right now:
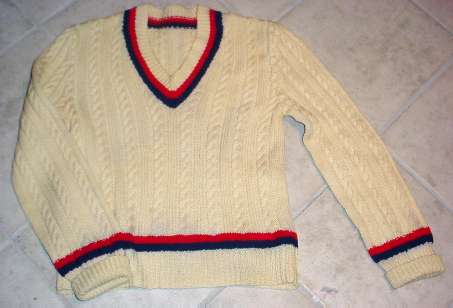
It’s held up extremely well. No excessive wear, weak spots or moth holes in the entire piece, although once natural color ecru wool has aged somewhat to a beige/light yellow, and somewhere along the line aggressive laundering seems to have migrated some of the dye from the blue stripes.
Not only do I have the piece, I also have a photo of ME wearing it as a teen. This is from my high school yearbook. As you can tell from the wire frame glasses, nerd-bunch hair and wide shirt collar, was taken in the ’70s:
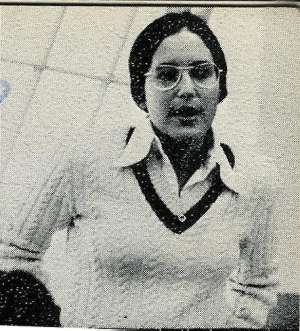
Now that I’ve dated myself, I can also say that this46-year old tennie is waiting for my own Tween-ager should she want to wear it when she’s big enough.
Moral of the story: Use good wool. It lasts forever.
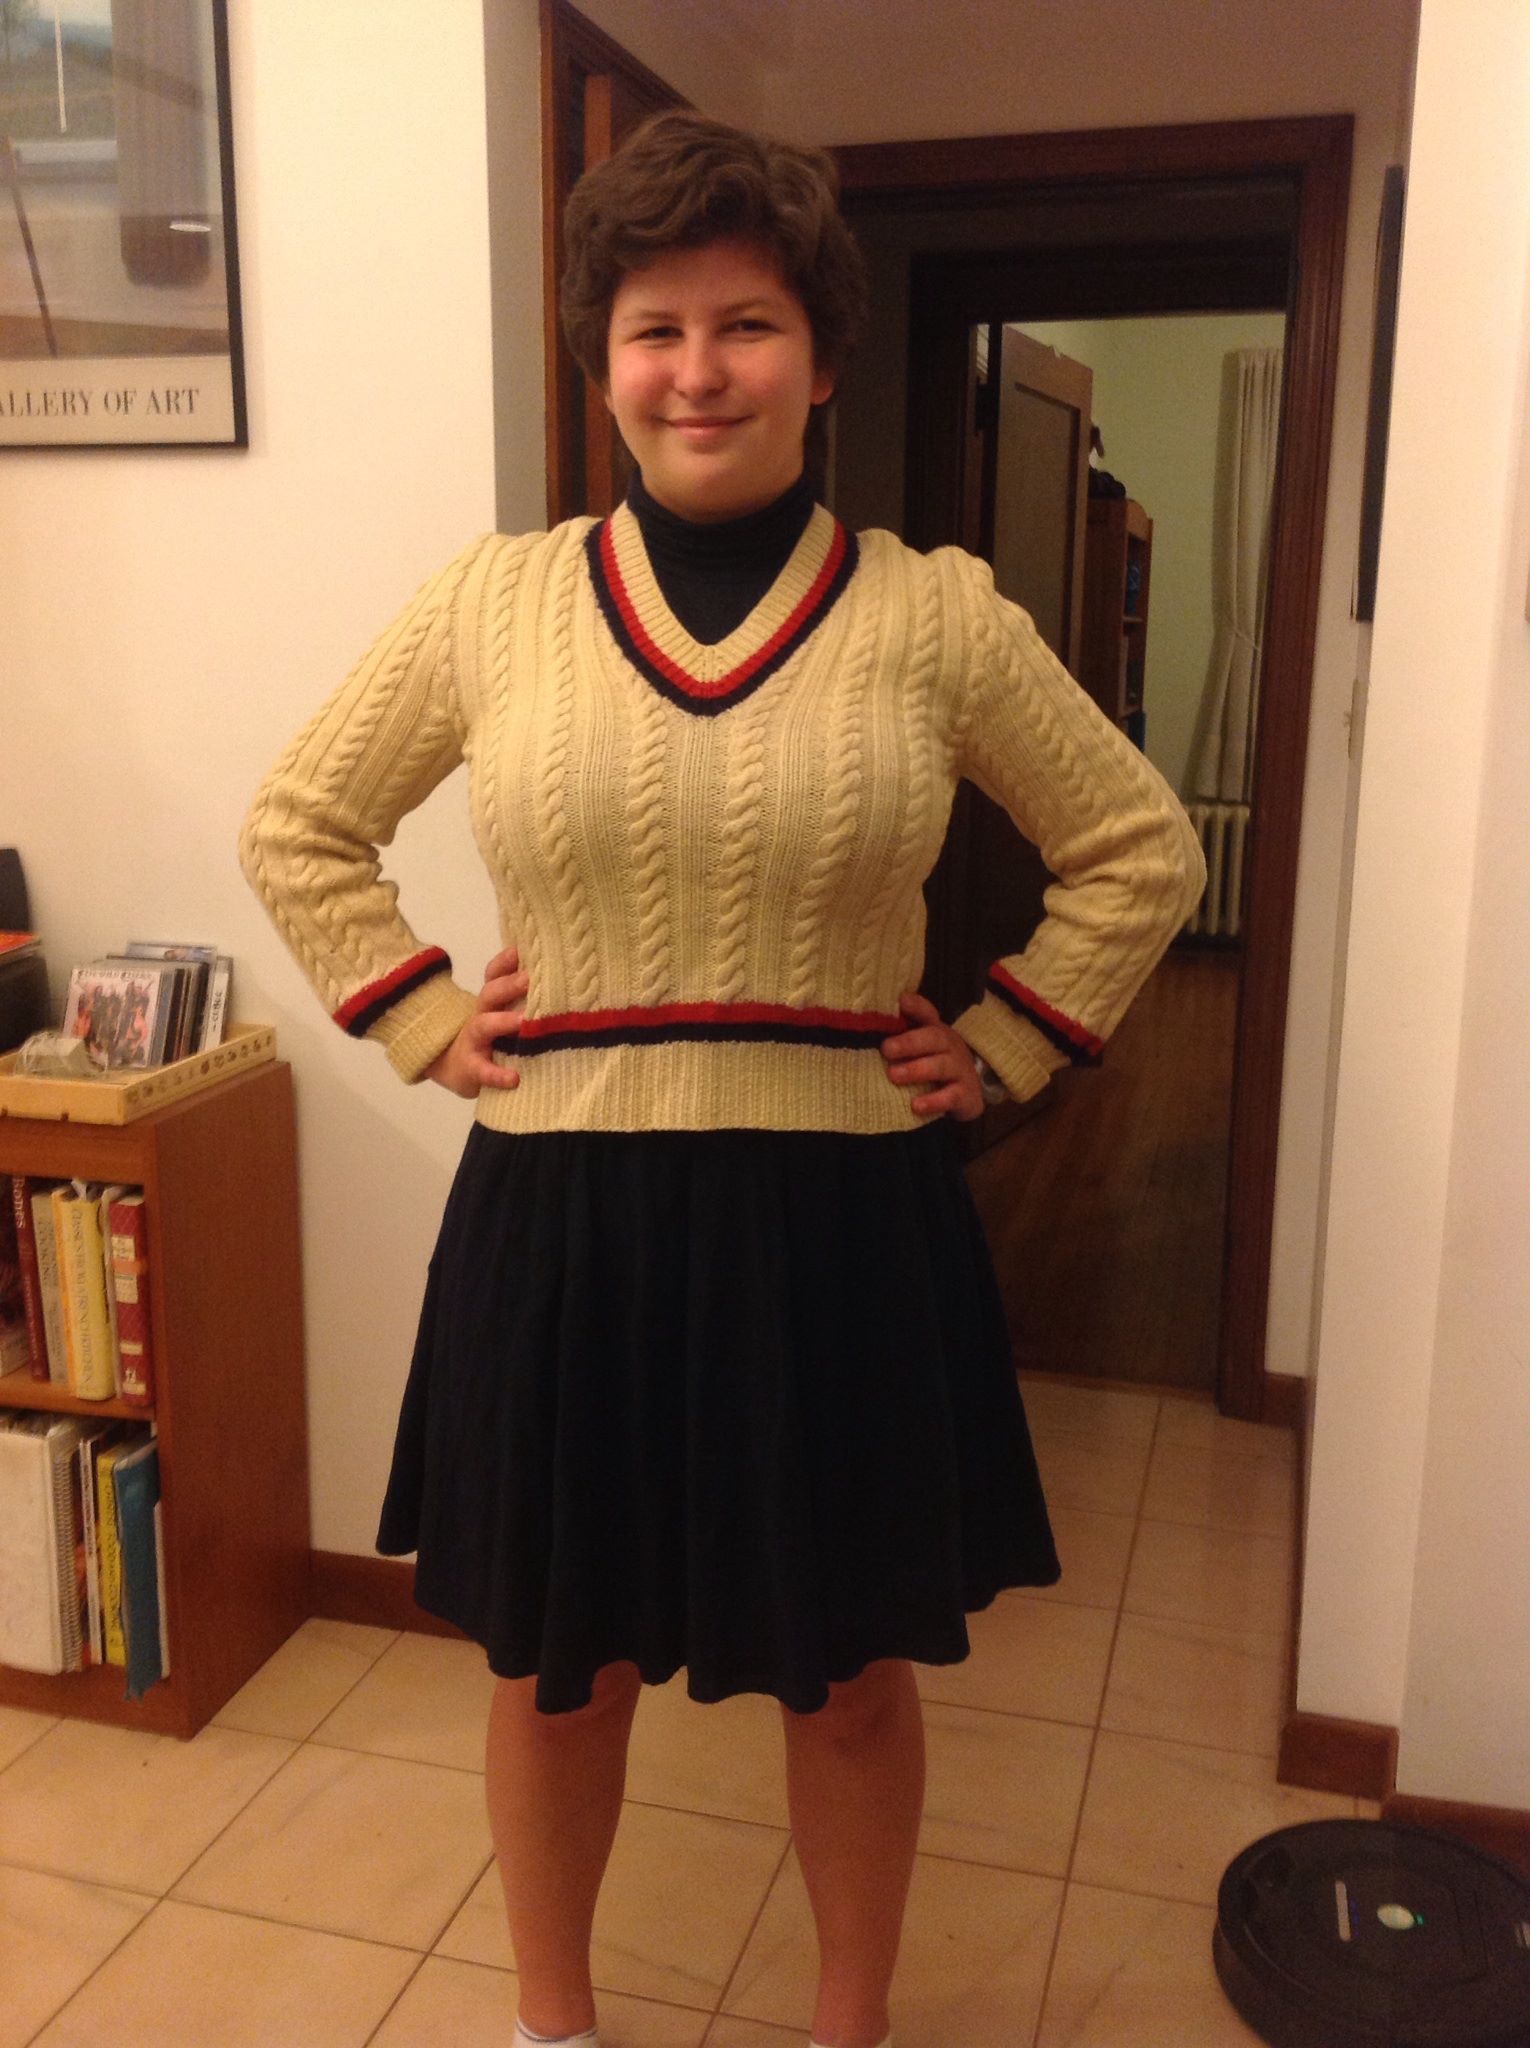
UPDATE:
I got my wish. Younger Offspring, sporting the same sweater, circa 2014.
WORKING REPORT – LACE SCARF; ANOTHER FULLED PILLOW
Having finished the poncho yesterday, I scuff around with what little yarn remains here in the house (my stash being stowed in the storage cubby pending our upcoming move.)
At theGore Place SheepshearingFestival last month I bought two skeins of hand-spunfine gaugeMerinofrom Greenwood Hill Farm. Each is around200 yards so I have about 400 yardstotal. In my opinion it’s more like a light fingering weight than a truelace weight. I bought them with a lacy scarf in mind. No pattern in particular. I thought I’d noodle out one on my own.
I’ve decided to make a piece with two fancy ends, a rather plain but coordinating lacy middle, andtrimmed all the way around with a killer edging.
I swatched on several size needles, and decided I liked the way that lacy stitches felt when knit on a US #6. (That’s an argument that this stuff is trulyfingering weight, because I like lace weight knit on #3s.) Gauge is hard to estimate because I haven’t decided on pattern stitches yet, but I’m not worried about making a scarf fit. The various lacypatterns I played with worked up at between 5.5 and 5 stitches per inch, so I know roughly how wide a pattern I should be looking for to make a scarf of around 5 inches in diameter.
To that end I started paging through some of my knitting books and stitch dictionaries today. I found several things that had elements I liked. First, I found a wide diamond band in Lewis’ Knitting Lace (pattern #42). Nice wide diamond frames, filled with a smaller diamond pattern in the center. It’s a 12-stitch repeat, with 2 stitches before and one stitch after the end repeats. That’s 15 total for one repeat. Narrow, but I’m planning on adding an edging.
To complement the diamond pattern, I’m looking at a couple of simple lace grounds. Right now the leading candidate is a mini leaf pattern from Walker 1 (p.215, #3 in the set), but I’m not sure it will work out. I’d like to use a divider to set this pattern off from the diamonds. I’ve always liked a plain row of YO, K2tog framed by garter stitch welts.
Finally we get to the killer edging. I’m looking at Heirloom Knitting by Miller, the Victorian Zigzag Edging on p. 125. That’s a WIDE piece as written – 20 stitches at cast-on, widening to 26. I might have to eliminate some of the openwork on the attachment side to slim it down some.
The next step is to swatch a bit with each of the given patterns. Before I do that however, I’m going to redraft them using a uniform symbol set and put all the patterns I intend to try out on one sheet of paper. It’s easy enough to adapt to each book’s ideosyncratic style of stitch representation, but it’s a pain to switch gears between systems and flop all those heavyvolumes around while I’m knitting.
I give no guarantee that this process will lead to an Actual Design. I begin two or three of these for every one that ends up as an on-the-needles project.
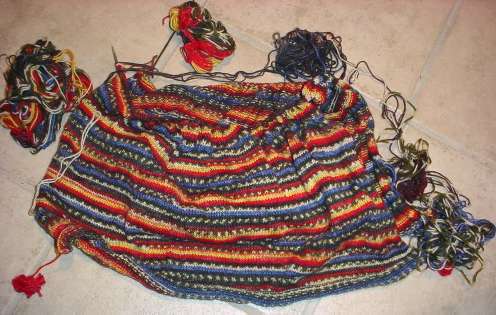
In the mean time just to have something mindless on the needles for last night’s and tonight’s weekend sofa movies, I took my other Sheepshearing Festival acquisition and cast on for another felted pillow similar to the one I did in Manos del Uruguaywool. This one is also done in the rustic Nick’s Meadow Farm yarn I’ve mentioned before. The pale blue, light moss green, and light butter yellow skeins together cost less than one skein of Manos.
The movies that accompany this excercise in autopilot garter stitch? Last night it was Master and Commander. Tonight it’s John Cleese in Shakespeare’s Taming of the Shrew. If you like either adventure stories or Jane Austin, you’ll enjoy the series of books from which the former was adapted. The movies skipped over the whole drawing-room/social manners side of O’Brian’s books, especially the rivalries in love that divide the two lead characters. As for the Shrew – it’s so non-PC it’s over the top, but it’s also one of my favorite plays. I’m really looking forward to seeing Cleese as Petruchio, and finding out how the actors cast as Katherine and Grumio stand up to him.
Back to knitting. Thumbing through my stitch books I lighted againupon Indian Cross Stitch (Walker I, p. 112), a variant on enlongated stitches. I used itinmy Suede T. It seems that in just the past three months, I’ve seen elongated stitches, including this oneand Seafoam (Walker II, p. 21 ) all over the place,including the latest Interweave Knits and Knitters, Berroco’s patterns, and Lana Grossa’s patterns. Given the long lead time of both magazine and yarn makers’ pattern development cycles, it’s always interesting to see the same idea hit multiple sources at the same time. Shadow knitting cropped up in parallel issues of IK and Knitters a while back. Lacy knitting featuring lily of the valley-inspired textures is another recurring theme (IK led the pack with Forest Path last summer).
About the only explanations for this parallelism I can come up withare that the designing knitting community is quite small; some things are natural fits (elongated stitches work well with ribbons, ribbons are hot right now); and many designers draw inspiration from the same fashion industry sources (deconstructed/slashed looks were big on the runways two seasons ago, and it takes a season or two for runway ideas to percolate into retailknitting patterns.)
So far most sources talk about doing the elongated stitches do them with the multiple wrap method. Can a revival of Condo Knittingbe far behind?
WORKING REPORT – WATERSPUN PONCHO
UPDATE: THIS WORKING DISCUSSION (INCLUDING HINTS FROM PRIOR PROJECT POSTS) IS NOW AVAILABLE AS AN EASY DOWNLOAD AT THE KNITTING PATTERNS LINK, ABOVE.
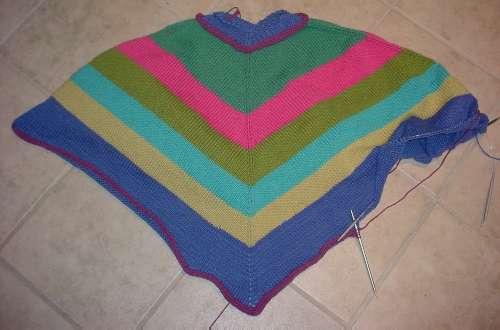
My Classic Elite Waterspun poncho isdone! Here it is mid-block:
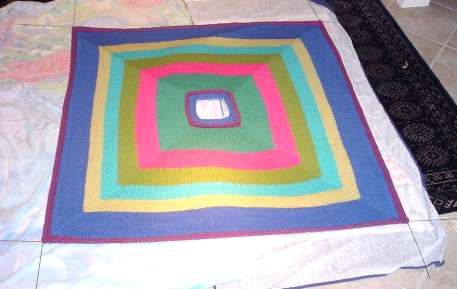
I am really loving the improvised blocking wires I got to finish my Forest Path stole. I threaded them through the I-cord edges, two per side, then spread the poncho out on some towels to dry. The edges are straight, the corners are perfect, and dreaded curl-up has been eliminated. And I didn’t even need pins!
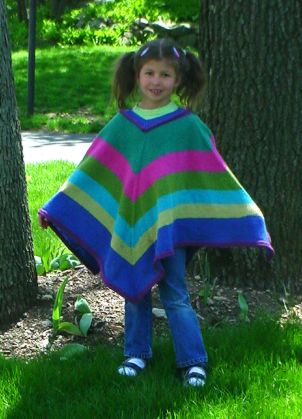
And here’s a shot of it on the happy recipient:
For those of you who wrote to ask for the pattern, here it is.
- Make swatches until you get a fabric that you like.
- Figure out your gauge.
- Measure how big a neckline you need to go over your head.
- Multiply that measurement by your gauge, and round it up to the next multiple of four.
- Cast on that number of stitches, placing 4 markers evenly spaced.
- Knit 6 rounds.
- On the 7th round, K1,make one, knit to one stitch before the next marker,make one, K1. Repeat this three times.
- On the 8th round – knit
- Repeat steps 7 and 8 until your poncho is as long/wide as you like it.
- Bind off, or work one or more rounds of attached I-cord to finish.
- If the neck is too wide, pick up purl bump stitches at the base of the rolled collar. You should have the same number as you cast on. Put 4 markers in your work evenly spaced. Then work one round starting with k2 tog, (k1, p1) until you have two stitches left before the next marker, ssk. Repeat between the other markers. Then work a K1, P1 round continuig ribbing as established. Continue this way, alternating decrease rounds and plain ribbed rounds for about 6-8 rows. Bind off VERY LOOSELY, making sure you can still get your head through the hole.
As to what yarns are suitable, what number to cast on given a particular gauge, what size needles to use, how much yarn you’ll need – this is all up to you. Experiment! Here are some thoughts to keep in mind:
What yarn is suitable? Look at it. Will it feel good when worn? Is it hand-wash only, otherwise hard to clean, or a light color? If so – are you prepared to care for it when it gets dirty? Is it loosely or tightly spun? Loosely spun yarns are more prone to pilling, catching and looking “used.” On the other hand, they’re often softer with a more luxurious drape and sheen. Is it heavy? A poncho is a big thing – larger than a lap blanket. Lift about 10 skeins worth. Can you envision yourself dragging around that much weight (or more)? Will the yarn stretch under its own weight when used in a large quantity? Cottons are heavy yard for yard and are infamous for this. Wool is less weighty per yard or meter. Wool/acrylic blends are lighter still. Is the color/texturenot only attractiveon its own, but will it look good on you? A puffy or furry yarn will add bulk andincrease the size of your sillouhette. A giant-gauge or shiny yarn willmake a garment look larger than it really is. Some colors and textureslook fantastic as accents, but applied over an entire garmentmay not be as appealing on every wearer.Decide what’s important to you and choose accordingly. Remember, you can always buy one skein to try out before you commit for the whole project. If that yarndoesn’t work out for a poncho,one skeinmight make a nifty hat or scarf.
What needle size to use? When swatching with a new yarn, start with the needle size recommended by the yarn maker. Do up a good size swatch in your chosen texture stitch or colorwork design. Do you like the feel and drape? If so, measure your gauge – you’re good to go. Swatch feel too stiff and tight? Try again on a size larger needle. Swatch too drapey and holey? Go down a needle size and try again. You’ll know when you’ve hit the best combo. If you’re combining several yarns of different weights or textures, be sure to swatch them as you will use them, using the stitch and needles you intend for the final project, even if that means making a VERY large swatch with multiple stripes. Once you do get the look/feel you like, make a note of your needle size and FINISH YOUR SWATCH. You’ll need it to do both gauge measurements and yarn consumption estimates. (I’m not good at keeping paper notes, so Imake knots in my dangling tail end to help me remember what needle size I used to makemyswatch. For example, four knots = US #4 needles.)
How many to cast on? Simple math. If your gauge is 4.5 stitches per inch, and you’ve decided that a 24 inch neckline is big enough, you start with 4.5 x 24 = 108 stitches. That lucks out because 108 is a multiple of 4, and you don’t need to round up.
How much yarn will you need? You can figure out roughly how much yarn your gauge square took for that number of square inches or centimeters. Draw out a diagram of your project (in this case – a big square), and estimate how big you want the thing to be when it’s done. Figure out its total area and divide that area by the area of your swatch. Got a 6-inch square swatch? Want to make a peice that’s 4 feet on a side? 4 feet x 4 feet = 48 inches x 48 inches = 2304 square inches. 6 inches x 6 inches = 36 square inches. 2304/36 = 64. It will take you about 64 times as much yarn to knit your 4-foot square piece than it took to knit your six inch square. Ravel back your swatch and measure, or weigh itto determine the amout of yarn you used. Now do the math.
Shortcut: If you like a slimmer poncho than this super-easy square one, there’s a poncho pattern generation utility available elsewhere on-line.
TALE OF THE TEENY SOCK
A while back I worked for Bay Networks, before they were on the receiving end ofthe Nortelengulf-and-devour experience. Like most companies, Bay did many things right, but others with less precision. One of the things they did right was to insist that all sales and marketing employees actually know and have experience with the products they sold. As a proposal drone, I was sent off to the same training sessions as the sales engineers. Training was dense-pack: thorough, totally useful, informative, and lasted an entireweek. A long week. An interminable week. Did I mention that it took five solid 8-to-5 days?
For four days I sat in adank conference room watching two things – theoh-so-serious instructor and (through the door-side window) the traffic in the elevator lobby in front of the training room. On the opposite wall of the lobby from the conference roomwas a sailfish, stuffed and mounted on a trophy plaque. It was a handsome blue devil, gape-mouthed and arching mid-leap in fishy defiance, but like all long dead and dustythings – it never moved.
Late in the afternoon onDay #4 I had an inspiration. I went home that night and knit up a teeny gray and redsock. I stuffed it with a piece ripped from my business card. The next morning I got to class early, and slipped the thing into the sailfish’s mouth. The little toe and heel poking out of the fish’s mawmade it look like a tinyperson was being swallowed alive. Day #5 was infinitely more interesting as I watched people doing a double take as they passed by and noticed my addition.
I left the sock in place for the entire three years I worked at Bay/Nortel. Finally the time came for us to part ways. I went back to the fish’s building to retrieve my sock. Some people tried to stop me, as the display had become a building mascot.I had them remove the sock and reveal the business card fragment inside. There was my name, and I took my knitting.
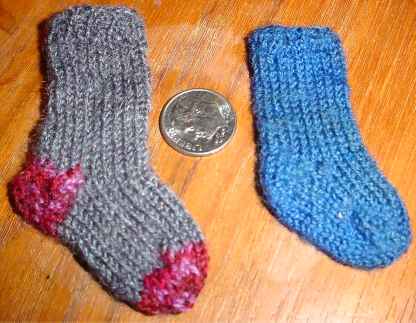
The blue one I knit upas aKnitList membership badge for the ’97 Maryland Sheep & Wool Festival.It was however too small for that purpose, and no onenoticed that I was wearing it until I pointed it out.
Both of these were knit from the reinforcing yarn that came with Special Blauband. They’re both fully-fashioned toe-ups, using exactly the same figure-8 cast on, short-rowed heel and ribbed cuffs I use to make all of my more wearable socks. I used flat toothpicks to make them, although now in retrospect I probably could have used blunt needles intended for tapestry or needlepoint. Gauge on the gray is something like 14 spi, although it’s tough toestimate accurately. It measures about 2 (5.1 cm) inches from toe to heel, and 2 inches (5.1 cm) from heel to cuff. Little Blue is about 1.5inches (3.8 cm) from toe to heel, and about 1.75inches (4.4 cm)from heel to cuff.
CHEST OF KNITTING HORRORSTM – MEXIKO PULLOVER
I’ve mentioned this resident of my Chest of Knitting HorrorsTM before. It’s my Fortissima Colori/Socka Color Mexiko pullover. This yarn has since been renamed Fortissima Colori/Socka Color Mexiko Disco, and the fiber content has changed. No review yet under that entry.
The pattern was issued by the manufacturer. It’s one-size-fits-most with the sizing limited by the width needed to express the yarn’s flash patterning, and I’m at the upper end of the fit range. I bought itkitted with five 100gballs of the stuff. Here’s what I’m supposed to end up with. Thankfully, braids, salt,and the forced toothy smile are not required accessories:
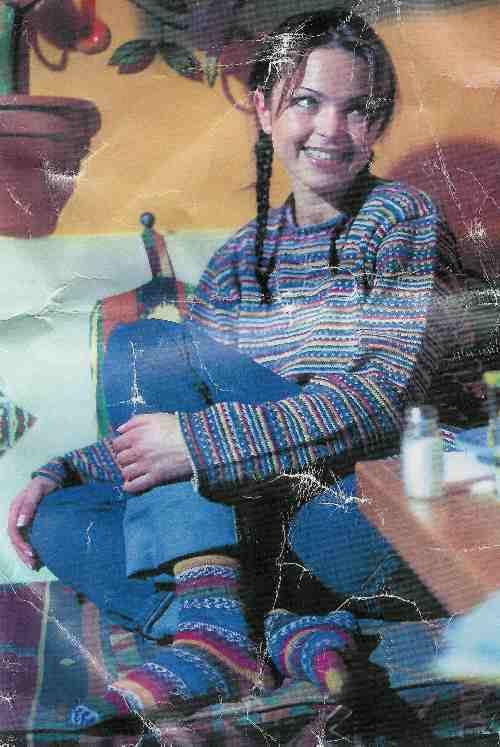
My copy is a bit worse for the wear, but you can see the happy striping. This effect is achieved by worked flat from one ball for front and back and from two balls for the sleeves (2 rows A, then 2 rowsB). Thrilled to have a fine-gauge pattern and to be using sock yarn for something larger than socks, I took the plunge. Here’s what I’ve got so far:
Just to be annoying, Idecided to knit the front and back side by side, althuogh each is knit flat from its own ball of yarn. I wanted the patterning to sort of match at the side seams. I’m not going for absolute fanaticism on this, a rough approximationis good enough. I found comparable spots in two skeins and started on in. It went o.k. for the first six inches or so. Then the problems started.
See all those balls hanging off the ends? Those are out-takes where the yarn’s color repeat went off-phase, got muddy enough for long enough to interrupt three or more full rows, or disappeared entirely. My intent was to loop out such annoyances, then later go back and use them on the sleeves. (I kept them attached to the work so that in theory – when I went back to re-use themI would have a better idea of where they fit in sequence.)
I’m still hoping to eke out a semblance of matching until I get to the point where sleeves are introduced. Since the front and back will no longer butt up against each other, mismatches will be easier to ignore. I long ago gave up any thought whatsoever of color or pattern-balancing the two sleeves.
As you can see, the problem is getting worse. What started out as a fun lark in fingering weight has turned into an agonizing slog on #3s, with all too many excised bits. I put it down when the fun leaked out. I do hope to take it up again because I still want to be able to wear this piece. Someday…
Moral of this sad tale? If you make life more difficult for yourself, things are not going to be easy.
PROJECT – SAMPLER SOFA PILLOWS
There are lots of stitch patterns that look tempting in the various stitch dictionaries on my shelves. Some I’ve been able to place on garments, but others just haven’t worked out – mostly because they were too wide or presented composition problems if used over the topography of a person’s body.
About 8 years ago, right after we moved into the house we’re on the cusp of leaving, I decided to take some of these difficult-to-place patterns and do up two sofa pillows. Anticipating severe pillow-abuse that only homes with small children face, I decided not to spend a lot making them. I got three large skeins of Lion Fisherman Wool from a discount crafts store; and pulled out a pair of US #8 needles and some of my stitch treasuries. I started right in, not worrying much about absolute size.
I chose a bunch of patterns from the treasuries, planning out my pillows around an average gauge of 4.5 spi and a target size of around 15 inches, square. If I was off a bit I didn’t worry, knowing my knit pillow tops would stretch to compensate. Just for kicks, I decided to use different patterns for each side:
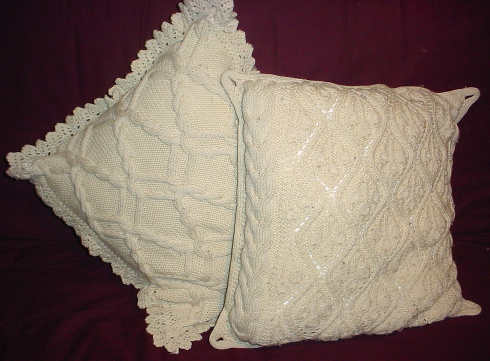
If you’re a texture pattern junkie like me, in the top picture you’ll recognize Rocking Cable (Walker 3, p. 130) and Medallions with Cherries (Walker 2, p. 141) framed by Bulky Double Cable (Walker 1, p. 243). The simple lacy edging is adapted from #57 in Classic Knitted Cotton Edgings by Hewitt and Daly (p. 44), but I narrowed it a bit by eliminating the openwork along the top edge.
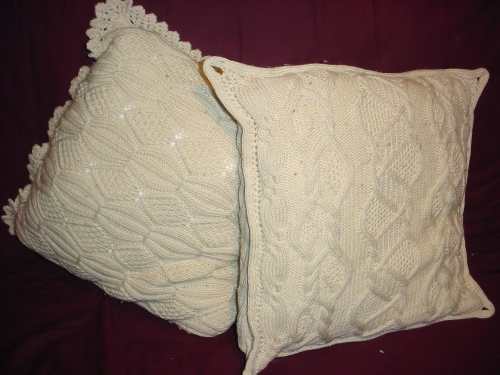
On the other side of these pillows I used Wheat Sheaves (Walker 2, p. 138); and a combo of Patchwork Cable II (Walker 3, p. 93) and Grand Swinging Cable (Walker 3, p. 91). Note that the Patchwork Cable and Grand Swinging Cable match up exactly in row count. I was able to tuck them in together side by side in a playful combo I intend on using someday for a kid’s pullover. That pillow is also framed with #89 from Stanfield’s New Knitting Stitch Library (p. 59).
Once I had my four sides knit and blocked, assembly was easy – even considering that Iput a zipper in each so I could remove the covers for washing. In fact, if you’ve never sewn a zipper into a piece of hand-knitting pillows are excellent practice pieces. To make life easier, I sewed in my zippers first:
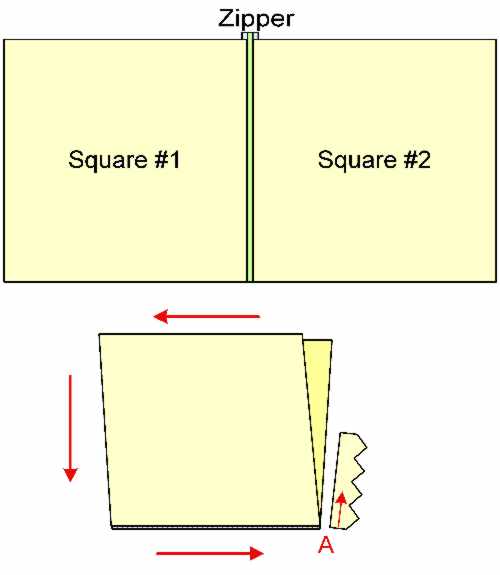
I laid the two squares side by side, and pinned the zipper between them. Then I hand-stitched the zipper to each square. Once the zipper was set, I folded the two squares along it, so that the wrong sides were sandwiched between. Then starting at the foot of the zipper, I worked either I-cord or an edging up along the outer edge of my two matched squares, effectively joining them together at the same time as the edging or I-cord was created and skipping the sew-up-the-pillow step. I went around the three open ends of the pillow, joining as I went. When I got to the zippered side, I worked the edging along only ONE of the squares taking care not to foul the path zipper pull with yarn. My (now camouflaged) zipper nestles along that side at the base of the edging. “Zip open, shove in store-bought pillow form, zip shut” were the final steps of assembly.
To fasten the pillow sides together I used the second of the two I-cord attachment methods I described yesterday. The I-cord edged pillow worked exactly the same way, but instead of picking up both legs of the stitches running down the length of the previous round of I-cord, I held the two sides together and picked up the innermost leg of the edge stitch from each one. This turned the outermost legs inside as a selvedge, and made a nice, neat join without gappy holes.
The pillow with the lacy edging was done in a similar manner. Unlike the I-cord however, I had wrong-side rows on the lace. I did my lace trim, using three plain knits on the straight side as my point of attachment. I ended every right-side row of the lace with SSK, pick up one stitch, just like the I-cord. Then I flipped my work over, slipped the first stitch purlwise, knit 1, and continued with rest of my wrong-side row.
Just like in joining the first round of I-cord to my poncho, for both the I-cord and lacy edgings I had to adjust the ratio of stitches picked up to rows or stitches on the piece’s body. I believe I used needles two or three sizes smaller for both the I-cord and lacy edgings. I also ended up working 4:3 on the sides of the piece and 2:3 along the top and bottom. Experimentation at the outset and a willingness to rip back a few rows and try again are both always required when you’re adding a knit-on edging.
I’m pleased with the way these turn out, and surprised at how well the inexpensive wool I used has held up. The pieces were a bit stiff and slightly real-wool itchy when first knit, but softened up quite nicely when washed and blocked. Sure, there’s some pilling, but these pillows have survived 8 years of slumber party pillow fights, general abuse and spills of all sorts. They’ve resisted stains, and freshen up quite well after a general pill-pluck and washing with Eucalan. My only cautions on the Lion Fisherman yarn are that even washed it isn’t Merino-soft; and that my gauge of 4.5 spi worked but is a bit loose for it in garments. I think it would look better knit a tad more firmly as a true worsted.
WORKING REPORT – PONCHO WITH ATTACHED I-CORD
Messing around with the edging on the Waterspun poncho, I realized that I was using two different methods of attaching I-cord, and that "How do I work attached I-cord?" is a common question.
Recap: The first round of I-cord edging was applied to live stitches. Instead of binding off my last row of the poncho body, I left its stitches on the circs. Using a DPN and a half-hitch cast on, I cast on four stitches and knit one row of I-cord. On the second row, I knit three stitches, then did an SSK, working the last stitch of the I-cord together with one stitch of the poncho body. I worked this way, doing three rows of attached I-cord, followed by one round of "free" I-cord. This 3:4 ratio of attached rows:total rows kept the edging from being either gathered or ruffled. When I got all the way around my piece and had incorporated all of the body stitches, I grafted the live stitches at the end of my I-cord to its beginning.
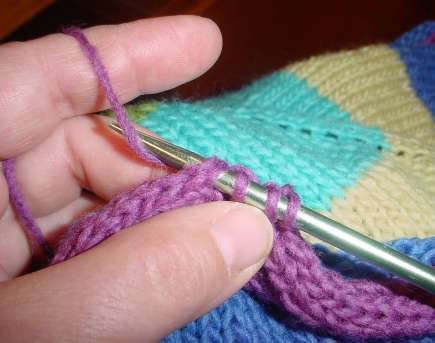
On the second round of I-cord I was not working with live stitches. Instead, I was picking up stitches along the outer edge of an established row of 4-stitch I-cord. On the previous round of cord one stitch was "eaten" by the attachment row. That left three to form the rounded edge. I used the centermost of these three as my line of attachment. To do this round of edging, I again cast on four stitches using half-hitches, and knit one row of unattached I-cord. Then I began working it onto the established round of edging. On the next row I knit two stitches, then did a SSK and picked up a stitch under both legs of the designated spot on the previouslyfinished I-cord. In this shot you can see the knit two, the SSK (under my thumb), and the needle thrust under the stitch of the existing I-cord, ready to do the pick-up.
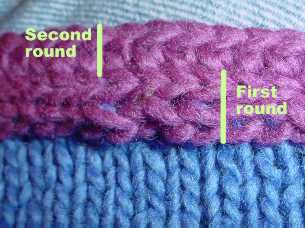
The reason why I didn’t use this method to attach the first round of I-cord is that theattachment rows of each method look different. Pre-block waviness aside, you can see that the first round of I-cord has a smooth chain-stitch like appearance to its bottom edge. The secondmethod produces an attachment row thatlooks rather like crochet, although you can’t see the non-crochet look rounded multi-stitch upper edge from this angle:
I prefer the speed of the second round’s style of attachment (less fumbling and shifting stitches between needles), but I like the look of the first round’s style of attachment. Note that the reverse of the second round’s style is a bit smoother and less leggy. Sometimes I work it around something clockwise instead of counterclockwise, so that the I-cord’s other side presents itself on the public side of my piece.
There’s another nifty use for this second method of attachment. You can use it along with I-cord or a lace edging to make a decorative seam, or you can use it for counterpanes or pieced blankets,multi-directional or domino-style knitting to joinmotifs or sectionstogether without sewing. More on using this for decorative seaming tomorrow.
PROJECT – DOUBLE KNIT HAT GRAPH
Again apologies to those on the updates mailing list. I did a bit more maintenance, adding categories to all the existing posts so it’s easier to page through this ever-growing mound.
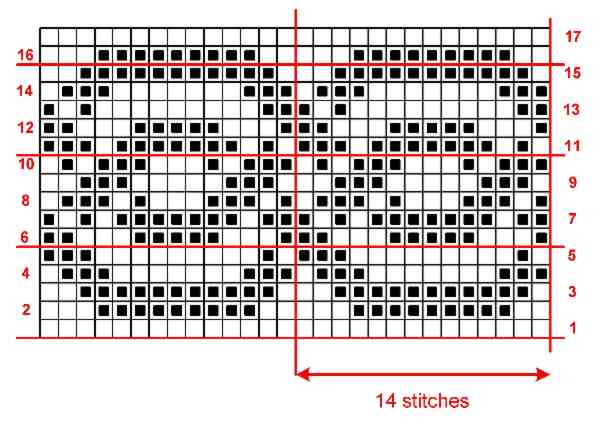
A couple of people have asked for the graph I used to knit the interlace shown on my overly warm teal and black alpaca hat. Here it is.
This one didn’t make the cut for my book because it’s one of the designs for which I lost my notes. A long time ago I had a miserable move between apartments. Several boxes were stolen off the back of my truck. Among the things that went missing was a notebook full of source notations for counted embroidery patterns. I had been researching them casually for more than ten years, and had hundreds compiled. The sketches for most of them had already been redone on my ancient Macintosh, but all associated notes remained solely on paper.
When I was composing The New Carolingian Modelbook I had to go back and confirm the exact origins for all the counted patterns I wanted to include. I managed to find the sources for about 200 of them, but a third as many more have eluded me. This particular interlace is from my collection of the lost. It is similar to designs by Matteo Pagano as published in his 1546 book Il Specio di Penfieri Dell Berlle et Virtuoise Donne, but I can’t swear that it came from that or one of his other works. Given the relatively clumsy, heavy spacing and short repeat it might even have been something I doodled up myself after a day of research.
Many of these early Modelbook designs got there by way of Islamic influences (especially patterns cribbed from woven carpets and embroidered textiles). Over the years the patterns drifted away from work worn by the elite to work worn by middle and then lower social classes, eventually ending up in folk embroidery where they never quite died out. Counted thread needlework styles were revived big-time among the fashionable in the mid 1800s. Researchers found and reproduced surviving older pattern books, and began collecting motifs from traditional regional costumes and house linen. Some of the later and folk uses of counted patterns include standard cross-stitch, Hedebo, Assisi-style voided ground stitching, and various types of pattern darning or straight stitch embroidery done on the count.
This pattern can be interpreted in many crafts. Historically accurate uses contemporary with first publication include cross stitch panels (the long-armed style of cross stitch is overwhelmingly represented in historical samples compared to the more familiar x-style cross stitch); weaving, or lacis and burato (types of darned needle lace).
Counted patterns are a natural for knitting. The first book of general purpose graphed designs that listed knitting as a specific use came out in 1676 in Nurnberg, Germany and was published by a woman: Rosina Helena Furst’s Model-Buchs Dritter Theil. (the title is actually much longer). There may be others that predate this book, but I haven’t seen mention of them, and I haven’t seen the Furst book in person. It’s in the Danske Kuntsindustrimuseum in Copenhagen, a tad far for a day trip from Boston, Massachusetts. The entire group of graphed designs displayed in the early Modelbooks shows a straight continuity with the geometric strip patterns found in modern northern European stranded knitting.
The short 14-stitch/17 row repeat of this graph does work well at knitting gauges. I’ve always meant to use this one again on socks -either as-is or stretching it a bit by repeating the centermost column so that it better fits my sock repeat, or doing eight full repeats at an absurdly tiny gauge. As is, you’d need a multiple of 14 stitches around. A standard 56-stitch sock could accommodate 4 full iterations of the design without adding any columns.
Some people have asked how to get a hold of my book. The answer is, aside from the used market where it is going for quite a premium, I haven’t a clue. Sadly all I can report is that the publishers absconded shortly after publication. I have no idea where they went, and have had no replies from them to any queries since 1996. I received only about a year of royalties on the first 100 or so copies, in spite of the fact that the book went through at least two printings with an estimated total run of 3,000. New copies continue to trickle onto the market even today (they’re sold as used but mint). The new-copy seller has rebuffed my attempts to find the ultimate source.
Moral of the story – don’t enter into publication contracts without a literary agent, and if the company has a name like “Outlaw Press” there’s probably a reason.
WORKING REPORT – WATERSPUN PONCHO
I’m still nibbling away at the The Small One’s Waterspun poncho. To recap – I had seven colors to start, but only about 80% of a skein of each. I decided I really had to have at least one more skein of yarn, so I went out looking throughthe myriad local yarn stores for Waterspun.
How many local yarn stores make up a myriad? An amazing number. I live in the Boston metro area – a yarn paradise compared to most of the rest of the USA. Here’s just a sampling of the shops within an hour’s drive of my home, and most of these are reachable within a half-hour. This list doesn’t include the "big box" hobby shops sellingmostly mass-market yarns:
| Places I’ve been: Wild & Woolly, Lexington (favorite & "home base" LYS) Woolcott, Cambridge Minds Eye Yarns, Cambridge Hub Mills/Classic Elite Outlet, Lowell Fabric Place, Woburn and Newton The Knitting Room, Arlington |
Places I’ve never been: |
Please don’t be jealous. The cost of living in this yarn heaven is very steep, and the economy ofeastern Massachusetts is still hit hard by the Great Tech Crash. Those things make up quite a bit for having so many knitting sources nearby.
In any case, I quickly found that even with a ton of local yarn shops, very fewstock Waterspun during the summer season. Even fewer had a range of colors on hand. I could place a special order formy yarnjust about anywhere, but doing so would mean taking a full single-color bag – much more than I needed. Since I know with absolute dead certaintythat Waterspun is NOT about to disappear, I decided on trekking the 45 minutes up to the Hub Mills/Classic Elite outlet. I had a lunch date aboutten minutes away from the place anyway, so I was able to piggyback my errand and save some gas.
Hub Mills is two small, dusty rooms in the same 19th century brick mill building that houses the Classic Elite manufacture/distribution facility and design offices. Think crumblingblock in an industrial New England mill town, complete with a silted-in canalacross the street. Aside from the usual suspects from the standard set of makers in their full-price inventory, they stock cone-ends and "out-takes" of Classic Elite’s various lines. Fantastic bargains can be had, but like every mill-end shop, it’s hit or miss.People who head for the yarn first and are able to figure out what to do with limited quantities or variant dye lots are the best suited tothis type of shopping. I head up there maybe once every 18 months or so,butI’ve found some interesting bits over the years including samples of a heavier version of Sand that never madeit into distribution, odd cones of Montera and Provence, and assorted Fox Fiber natural-color cottons in non-standard weights, all for bargain-basement per-pound prices. I’ve also made the trip but returned empty-handed because the discount shelves were empty.
This time I found my Waterspun, even though the outlet store didn’t have much either. I found one more skein of the plum, plus a remnant cone of the blue that weighed out to the equivalent of about a skein and three-quarters. The plum’s dyelot looks quite close to my yarn. The blue was off a bit. Here’s what I did with them:
First using the method I described earlier. size US #6 (4mm) needles and my new blue yarn, I picked up 100 stitches around the inside of the neck edge. I placed a marker at the point corresponding toeach corner in theponcho body. I worked nine rows in K1, P1 ribbing. Every other row I started each between-marker section with a SSK, and ended with a K2tog. Because I was decreasing 8 stitches every other row I ended up binding off 68 stitches.
Then I went back to the bottom edge. I had already knit the final blue stripe, but I ripped it back because I wanted to alternate rounds between the new and old blue yarns in order to make the different dye lots less evident. (You can still see some minor striping thanks to the wonders of flash photography. In person the difference is less noticeable). I kept going, alternating yarns until I ran out of my old yarn. I finished up using every scrap of the new yarn.One interesting effect I got from using more or less the same quantity of each color (until the blue) was that with the increasing circumference of the piece, the width of the color stripes changed. I didn’t have more teal than pink, more pink than green and so on. That’s just the way the piece worked out. Had I used only the blue I had on hand, the final stripe would have been proportionally smaller. Adding the yarn I did is why it breaks the established progression of diminution. I’m pleased though. I ended up having a blue strip that’s about twice the width of the previous one. Although it is wider, the proporations aren’t all that bad.
The last step is adding an four-stitch I-cord edging in plum onto the live blue stitches. I’m using US #9(5.5mm) needles, the same size employed for the body. I’m attaching the edging by working the last stitch of the I-cord row as a SSK along with a live blue stitch. I’m doing this at a 3:4 ratio – three attached rows of I-cord, followed by one "free" unattached row. This is keeping the I-cord from bunching up the poncho into a gathered edge. (I could make a ruffled bottom by increasing the number of free I-cord rows.) I’m handling the points by working four unattached I-cord rows at the corner tips.
So far I’ve used less than a quarter of my remaining original ball of plum, and have completed more than a quarter of my I-cord. I should have enough to go around the entire piece once. But as you can see, I’ve got the classic stockinette edgeroll problem. I need more weight to stabilize the thing and tame the roll. Iplan toadd another round of the I-cord on top of the one that’s already there. I’ll document how I attach one row of I-cord to an existing row of I-cord in my next progress report.
