BLUE PONCHO – MORE TWISTS AND TURNS
For such a butt-simple project, this poncho has taken me on more twists and turns than I care to think about. Perhaps it’s knitting it for a new teen. Perhaps it’s that I find ponchos to be such boring things to make.
Latest iteration- my choice of the texture pattern is "too heavy" in the opinion of the targetwearer. Something lighter is called for. So I’ve thrown in the towel on coming up with something original, and am retreating to a freebie pattern on the ‘net: the Classic Elite Charmed Poncho.
Of course I won’t be making it in the cashmere blend Charmed or all cashmere Lavish. Prices for Charmed hover around $32. US per skein; Lavish is something like $64. US per skein. I’d need four. Maybe your teen deserves such spoiling, but it’s not going to happen in this house. Besides which, were I to miraculously come up with the funds, she’d expire at the thought of blowing it on yarn instead of a PlayStation game console.
Current plans include sticking with the un-plyed blue Paternayanyarn for the thing. She adores the colors, and being in stash – is already paid for long ago. One other good feature of this pattern is that it’s in ladder stitch (knit stockinette, deliberately unravel every 3rd stitch top to bottom). That means that for the width it’s VERY yarn-efficient. While that’s a good thing if you’re knitting with $64. per skein yarn, it works out well for me, too. The poncho as written requires only 520 yards of yarn. It’s small though – more like a ponchette. I’ll be making this one a bit wider and longer, but will still have plenty in my bag of mixed blues.
Although my gauge is roughly 3spi, as my unplied isn’t as heavy as the original yarns. Not a problem though. Airy works. I’ll do amultiple of3 stitches, plus 8 edge stitches.According to the printed gauge, the original works out to be 16 inches wide before the laddering (18 inches after unravelling). That’s an expansion factor of roughly .125 (18/16). If I work my piece on 53 stitches (15×3 + 8), my before-ladderwidth should be about 17.7 inches wide (17 3/4, rounded up). After laddering, it should be about 19.9 inches wide (20 inches, rounded up). To keep the proportions of the original 18 wide:26 long, I need to make my rectangles about 29 inches long (26/18 = 1.44; 1.44 * 20 = 28.8) . I’ll also add two selvedge stitches which I’ll slip to make sewing up and crocheting an edge easier.
In another serendipitous occurrence, having de-plyed the yarn, I’ve got all this one-ply stuff that matches it exactly.
Why is this a good thing? I note that the original poncho sports a minimal crocheted finish along the edges to stabilize the ends after laddering back. I’ll work the crochet, but I’ll probaby use a simple edging pattern instead of just plain old single crochet. Since crochet’s product is thicker and bulkier than knitting given the same yarn, working the crochet out of one instead of two plies should make the edging more in proportion to the knitting than it would be if I used the whole, unsplit yarn. This plain old stockinette piece will be ultimo boring to knit, but will be an interesting experiment to prove or disprovesome of the points in my pastcrochet diatribes.
So there you have it. Cast on 55 stitches. Working the first and last stitches as a slipped selvedge edge, work in stockinette until the pieceis 29 inches long. Work last purl row and finishing as described in the Classic Elite original. Sew up, finish all edges with some simple crocheted edging to be chosen later. I’ve got to save something to write about later next week, as pix of two large striped blue stockinette rectangles will put everyone to sleep. (Even those who have made it through the math of this entry.)
NOT OOP BOOK REVIEW – BEAD CROCHET
Pork in the Trees?
Well, as asomewhat pessimisticfollower of Boston baseball, I had to go out and inspect the tops of the neighborhood oaks. Surely pigs flew last night, andsome might still be up there. But on to needlework.
Not OOP Book Review – Bead Crochet
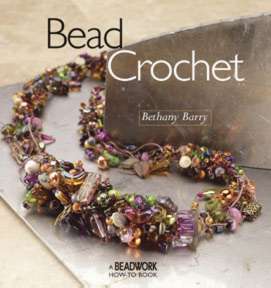
I’ll break with my pattern of only reviewing long out of print books, and pick on something contemporary. I found Bead Crochet by Bethany Barry in the library (Interweave Press, 2004).
I have to say, I was highly disappointed. Maybe my taste is entirely in my mouth. I do like demonstrative jewelry and embellishment, but aside from a couple pix of historical and contemporary pieces in this book, the contents – especially the projects – left me stone cold.
I was also extremely surprised that any book presenting a capsule history of crochet put out by Interweave can fail to cite Lis Paludan’s wonderfully complete Crochet History and Technique – another Interweave Press publication. The background of crochet given in the Beading book is vague at best, and flat out contradictory at worst. It repeats the old nun’s work saw on crochet’s beginnings, and offers up adisciples-of-Christ origin for shepherd’s knitting. She mentions advanced bead crochet being taught in a Philadelphia academy inthe 1820s (which seems a bit early to me based on other readings), but gives no exact citation for it. There are several exquisite examples of late 19th century beaded crochet in the book. Most of these can be seen in the Amazon peek-inside preview. Unfortunately the rest of the text has nothing to do with them.
O.K., picky historycriticisms aside, as this is clearly not a needlework history book. On to the techniques and projects. You see that large chaotic rope of beads on the cover? All the projects inside look like that. Large ones, small ones, square ones, pouch-style ones, flower shaped ones, ones done with eyelash yarns, and ones done with smooth yarns. If you like the necklace on the cover and want to learn to make lots more encrusted things exactly like that, this is the book for you.
To be fair, there is one project featuringinstruction on how to crochet a basic beaded rope. That’s useful. There are four pages of basic description for simple off-loom needle beading techniques(peyote stitch, brick stitch, square stitch, African herringbone weave) – but these things are described in passing, as adjuncts to the book’s main premise – beaded crochet.
What was I expecting? More substance, perhaps less art. More detailed techniques, dipping into historcial sources for something besides clumps of randomly-encrusted crochet. Maybe I wanted to see a range of things that can be done in bead crochet, and learn some techniques to make them. While the gallery section at the backdoes showa wide range of pieces (some of which I do like), there is no relation between them and the techniques presented earlier.
So to sum up – I’m glad I borrowed this one from the library before buying it. As much as I like crochet and adore embellishment, I won’t be adding this one to my permanent collection.
TEENY RED SOCK – PATTERN
UPDATE: A REVISED, EASY TO PRINT VERSION OF THIS PATTERN IS AVAILABLE AT THE KNITTING PATTERNS LINK, ABOVE.

Several people have written to ask for the pattern for the teeny Red Sox sock.
It’s pretty much the same as the sock patterns on wiseNeedle. If you’ve done a toe-up sock with a Figure-8 no-sew toe and a short rowed heel, you’ve got it. I don’t want to re-write the entire thing with detailed instructions here. For that you can go to any of the sock patterns on wiseNeedle:
http://www.wiseneedle.com/knitpatterns.asp#socks
But here’s an abbreviated version. For any how-tos or further details, refer to the comparable section of any of these other sock patterns.
Teeny Red Sox Sock
(c) 2004, Kim Brody Salazar
Permission granted to link to this pattern and make socks for personal
consumption, but not to reproducethepattern or make socks for sale
without the author’s consent
1 card Special Blauband darning yarn, bright red
1 card Special Blauband darning yarn, white
1 set of five double pointed needles in any teeny size you have, preferably #000 or smaller
Gauge: Pretty much unimportant, although the darning yarn looks best at 12 stitches per inch or smaller.
Using the white yarn, work a figure-8 cast on starting with two needles and four loops on each needle. Knit the first row as usual, taking care to untwist the stitches that will be mounted wrong on one of your needles.
Toe and Foot:
Row 1: k1, M1, k1. Using another dpn, k1, M1, k1. Using a third dpn, k1, M1, K1. Using the fourth dpn – K1, M1, K1. You should now have 4 live needles in your work, each with3 stitches on it.
Row 2: Knit all stitches.
Row 3: *k1, M1, k2. K2, M1, K1* repeat. Each needle should now have four stitches on it. Your toe is done.
Row 4: Switch to red and continue knitting until sock measures approximately 3/4 of an inch measured from the tip of the toe.
Heel:
Determine where the bottom of your foot will be. With white yarn, work the following on the two needles that hold the stitches for the bottom of the foot. Think of the two needles that hold those stitches as being one unit:
Row 1 of decrease: K7, yf, slip next stitch purlwise onto right needle. Turn work.
Row 2: Yf (wrapping the yarn around the slipped stitch that was just slipped and return it to the right hand needle – it should look like it has been lassoed by a noose), p6, slip the next stitch purlwise (keeping the yarn in front of the work). Turn work.
Row 3: Yf (wrapping the yarn around the stitch you just slipped and returning it to the right hand needle), K5, yf, slip the next stitch knitwise onto the right needle. Turn work.
Row 4: Yf (wrapping the yarn around the stitch you just slipped and returning it to the right hand needle), p4, slip the next stitch purlwise (keeping the yarn in front of the work). Turn work.
Row5 (first increase row:) K4, knit the next stitch through the back along with the wrapped loop around its base. (I do this by picking up the loop on the point of my right hand needle, then knitting the loop and the stitch together), yf, slip next stitch knitwise onto the right needle. Turn work.
Row 6: Yf, (wrapping the yarn around the slipped stitch so that there are now TWO wraps at its base and returning it to the other needle), p5, purl the next stitch along with the loop wrapped around its base, slip next stitch purlwise (keeping the yarn in the front of the work). Turn work.
Row 7: Yf (wrapping the yarn around the base of the slipped stitch and returning it to the other needle), k6, knit the next stitch through the back of the loop along with the two loops wrapped around its base, yf, slip next stitch knitwise onto right needle, DO NOT TURN WORK.
Ankle and Ribbing:
Switch back to red, and continue knitting entirely around the ankle of the sock. On the first row of the ankle when you get around to the white stitch at the right hand edge of the heel, knit it along with the wraps around its base. Continue to work in stockinette until it is approximately 3/4 of an inch measured from the top of the heel
Ribbing Row 1: *K1 red, K1 white* repeat
Ribbing Row 2 and 3: *K1 red, P1 white* repeat
Bind off all stitches using red. Darn in ends.
YES, I LIVE NEAR BOSTON
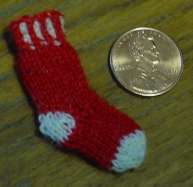
Fully fashioned toe-up, short row heel sock with corrugated ribbing, 16 stitches around. Knit from Froelich Special-Dekatur reinforcement yarn using US #00000 (1.0mm)needles. Approximately 1 inch (2.5cm) from top of cuff to bottom of heel, and approximately 13spi/20rpi. I may not be wearing my heart on my sleeve, but I will be wearing a tiny sock on my lapel.
WORKING REPORT – BLUE PONCHO
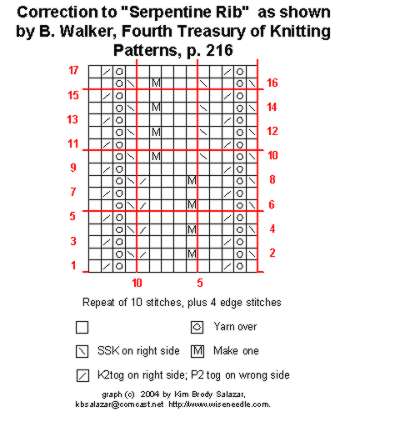
Well, teens are known for being fickle and changing their minds. My just-barely-teen is typical. She’s decided she didn’t like the patterns I’d been swatching, and picked out another from my stitch dictionary library. It’s “Serpentine Rib” from Barbara Walker’s FourthTreasury of Knitting Patterns, p. 216. The kid hasgood instincts, though. I have to agree with her. The stuff I’d been playing with looked way too clunky in the scale yarn I was using. We’re both happy now, and I’m off an running.
One very minor glitch – I have to say that I’ve caught the sainted Barbara in a rare mistake. Her graph presents even numbered rows (right side rows) of the pattern. The direction for the set-up and subsequent wrong side odd-numbered rows is given in prose.It’s given as “*P2tog, YO, P8: rep from *, end last repeat p2.It’s off by one stitch (not a big mistake), and it’s pretty obvious if you’ve ever worked faggotting in lace knitting. If you start thewrong side row at that point Walker does, you won’t produce theneat wavy lines of openwork as shown in her illustration.
Here’s my own graph of the corrected pattern, showing both odd and even numbered rows. If you try this one, be sure to remember that it does start on an odd numbered, wrong side row:
In the mean time, I’ve cast on for the poncho and have knit about 2 inches, the first of which is in seed stitch so that the edge doesn’t curl too badly. I don’t like the width though. I may end up ripping back and working one fewer repeats, narrowing the body somewhat. Otherwise I have the sneaking suspicion that I’ll run out of yarn. Not a good sign if I’m unsure this early in the project…
OOP BOOK REVIEW – THIS IS KNITTING
Still unplying. Nothing much to report that’s interesting on that front, so I turn to an old stand-by. Yet another review of A Knitting Book that Time ForgotTM.
This one is This is Knitting by Ethel Evans. It was published inNew York by Macmillan, and bears a copyright date of 1948. Here’s a typical page.
Evans book is clearly different from the Teenage Knitting book I wrote about earlier this week. For starters, it’s aimed at a general knitting audience, not one that’s mostly high school and college aged. It’s divided more or less in half. The first half presents about 40 knitting patterns for women, plus 20 each for babies, and men. The second half of the book is a stitch dictionary, giving photos and directions for about 80 or so knitting standards, including knit/purl textures, simple cables, basic lace stitches, and even some tweedy linen stitchstyle colorwork. There are no stitches in this collection that aren’t also in either Walker ‘s First or Second Treasury.
Directions are entirely in prose and like the other book, avoid confusing shorthand but are incomplete by modern standards. Finishing directions are rudimentary at best "Press pieces, sew up." Shaping isn’t dealt with well. Some photos of the adult garmentsclearly show more shaping than the pattern pieces as written will yield (perhaps judicious tailoring was done during sewing up, but that isn’t mentioned). Buttonhole placement isn’t described at all, although directions for buttonholes follow some patterns. I-cord trim used on some adult jackets is only hinted at, although it is clearly shown on the photos.
Some other odd things stand out about this book. First, there are no patterns for kids garments between about two years of age and late adolescence (when they can wear grown-up stuff). Second, the rudimentary how-to section is illustrated by flat photos of knitting on knitting needles – no hands holding them or in-process shots. It’s tough to see what is supposed to be happening in those photos. My guess is that the how to section is just preaching to the choir. I don’t think the author ever intended for anyone to actually learn knitting from this book. Maybe to use it as a refresher to remember skills learned long ago, but certainly not as a prime source of knowledge.
That being said, patterns here are more of the classics. Simple cardigans, pullovers, jackets and vests, almost all with shoulder pads. There are a couple of patterns written at worsted gauge (5spi); but most hover around 8spi. Mens patterns are restricted to very conservative vests. Even so, if you like fine gauge retro classic, you’ll find several wide-ribbed, body hugging women’s (and men’s) pieces that might pique your interest.
The two more valuable sections of the book are the baby patterns and the accessory patterns. All of the baby knits are very simple, classic shapes that are wonderfully wearable today.There are several layette sets withmatching hats, sweaters, booties and mittens abound. There is a surplice sweater plus several baby blankets that are particularly nice – the blankets being mostly the center panel in a texture stitch/wide garter or seed stitch border type. All of the baby things are very simple in design, but again like the adult patterns, the write-upsaren’t as detailed as new knitters might like. Still, shapesand techniques arebasic enough for an adventurous newbie to use this book, provided he or she is of the plunge-on-through mindset. Sadly the copy I borrowed had several pages torn from the center of the baby pattern section, including the instructions for both the sweater and blanket I liked best. (Death to the mutilators of library books!)
Accessories can be found throughout the thing. There’s a triangular head scarf that my daughter tells me would pass muster in her high school today. Gloves, socks and mittens are here, too. The glove patterns look especially nice. There’s one pair with triplecabled back I especially like. One shortcoming – the argyle sockpattern in this book is severely simplified, and doesn’t sport those nifty cross-hatchings that distinguish a true argyle from a plain olddiamond pattern – probably because NO charts are used anywhere in the directions and the write-up on where to put all those single-stitch wide lines (or to position them using duplicate stitch) would have driven the copy editor mad.
Like most of these older books anyone trying to duplicate patterns will probably run into yarn substitution problems. Looking at the list of yarns used in the book, my starting (and unswatched)swappingsuggestions would be:
| Yarn/typical gauge in book |
Modern Substitute |
| Knitting Worsted/5-6spi | Modern DK weight wool, like Heirloom Easy Care 8-ply |
| Germantown yarn/5spi | True worsted, like Cascade 220 |
| Sport Yarn/7-8spi | Fingering weight wool (too many different styles of item use this in the book to peg it down to just one) |
| Shetland Floss | Light fingering weight wool, like Jamiesons Shetland Spindrift |
| 3-ply Saxony/8spi | Easy care fingering weight baby wool. Dale Baby Ull would work. |
| 2-ply Saxony/10spi | Lighter weight fingering. Patons Kroy 3-ply? Brown Sheep Wildfoot? Regia 3-Ply? |
| 2-Ply Angora/8spi | Fingering weight angora. Austermann Angora Wolle? |
| Sock yarn/8spi | Most modern sock yarns, Regia, Socka, Fortissima |
| Crochet cotton/9 spi knit |
Modern cotton sock yarns. Fortissima Cotton, Regia Cotton |
To sum up – not asuseful nor as easy to follow as the Teenage Knitting Book. This is Knitting has some items of note, especially in the baby section and for glove knitters, but other than those, the book is interesting more as a historical document than as a still-living instruction book.
Side question: Do people find these reviews interesting or useful? Does anyone else care about old books found in musty library stacks, or about knitting’s recent history?
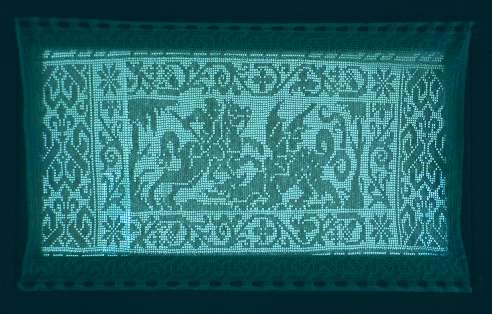
QUESTIONS – DRAGON AND PONCHO
As you probably figured out, I posted a couple of days of entries in advance. So to get back to feedback from Monday, thank you all for your kind words about Dragon. I hope (if nothing else) I’ve proven that projects like this that look overwhelming when done are worked in stages – everything is possible given time and determination. Pick up a favorite chart and try out filet crochet. There’s no law that says you have to do it in teeny string to start. Size #20 or #10 cotton will give nice results and will both go faster than my piece. On to questions:
Dragon Questions
What did you use to block?
The same hardware store brass tubing I used to block the Forest Path stole, and my daughter’s Waterspun poncho. The stole write-up describes them They’re described in more detail at the bottom of this post.
Why are the edges rippled?
As I wrote, I was a bit nervous about how much the piece had contracted in the wash, so when I blocked it I blocked it to the full north-south dimension. I shouldn’t have been so aggressive. I ended up with a piece that’s not under tension north-south in spite of being threaded on stretcher bars. The next time I wash it I will go for east-west stretch instead because I could stand to gain an inch in that dimension, and go for the on-door mounting bars to provide the requisite tension. That should elminate some of the looseness at the left and right edges.
How did you know how big to make the holes for the curtain rods?
After I’d done a couple of rows I tested them out with the bars from the curtain scrap left behind by the previous house owners. They fit. If they hadn’t I’d have figured out an another way to hang the curtain panel.
Are you afraid the curtain rods will discolor the panel?
Not very. It’s true they’re brass, but they’re quite old and the tarnish doesn’t rub off. I don’t intend on polishing them (I don’t want to get polish residue on the curtain). The curtains will get dusty over time. The thread I used is machine washable. In fact,I tossedmy Dragon in the light color/warm water wash just after completion, before blocking. After an entire summer and early fall of being dragged around accumulating hand-dirt, sunscreen, household dust, and the odd fleck of wine it seemed like a good idea.
Did you steal the dragon pattern from these towels?
http://hometown.aol.com/noramunro/Perugia/showsseveral beautiful set of woven towels by Alianora Munro (another member of the SCA). The last set shownhas a very familiar dragon on them. She used the same ultimate source as I did: Johann Siebmacher, Schon Neues Modelbuch, published in Nurnburg, 1597. My version is the one I graphed up for inclusion in my book The New Carolingian Modelbook: Counted Embroidery Patterns from Before 1600. There’s also a nifty drafting of the original in my friend Katheryn’s reissue of patterns from that work under the title Needlework Patterns from Renaissance Germany. (Both books are hard to come by these days, but occasionally surface used or on eBay.)I have also seen at least one commercial chart for a counted thread sampler that has a simplified version of the same motif, but I can’t find it on line right now.
Can you send me the pattern?
No. Why is at the bottom of this page.
Washing machine!! You put THAT in the washing machine?
Well, yes. The string is marked as being warm water machine washable (no dryer, no bleach). I had a load of white and light colored t-shirts with no buttons, zips or adornments to melt, snag, or run, so I put the curtain in along with them for a normal warm water/cool rinse wash. I took it out and blocked it wet. Was I nervous? Not particularly, but I had already made and test-washed a swatch, so I knew that the yarn would survive the process.
Poncho Questions
I’ve only seen the Paternayan yarn in cut lengths ready for needlework. Where did you find whole skeins?
I lucked into it at Wild & Woolly in Lexington, MA – my local yarn store. I don’t know if they had it left over from long, long ago when they might have stocked needlepoint yarn, or if they had it more recently, but by the time I found it at one of their legendary semi-annual sales all that was left was a heavily discountedmixed bag of blues – a refugee from at least two prior mid-winter sales events. I have however seen other retailers on line selling the stuff in large uncut hanks. A quick Google search on "Paternayan wool" will turn them up.
How big will you make the poncho’s rectangles?
I don’t know yet. Probably something like 13 inches wide and 39 inches long each. That’s a nice eye-pleasing 1:3 ratio. When I get up to that point I’ll cut out some paper and tape it together to make sure the target child approves of the size.
Why bother?
Why not? I have to admit that right now I’m on a bit of a yarn diet, constrained by new house expenses to using up yarn from my stash before buying new. The target child saw the bag of mixed blues and fell in love with the color. I knew thatat the fullthree plysI wouldn’t have enough yardage, and that she wanted something lacy anyway. So I began unplying…
Why do you do everything the hard way, figuring out your own patterns or just starting stuff without a good idea of how it will be accomplished?
Again, why not? People knit for different reasons. I enjoy confronting problems, figuring out solutions, and making my own way. Yes, it’s not the most productive method of working as there is more two-steps-forward-one-step-back motion than most people prefer. To me though learning something on the journey is more important than the end product, however nice. So I make a mad plunge forward on almost every project. Sometimes I shelve them for greater or shorter lengths of time. Sometimes everything falls into place and I finish. Usually I do learn something along the way, even if the thing at hand ends upvacationing inThe Chest of Knitting HorrorsTM.
Other Questions
What about the Crazy Raglan and the entrelac piece? Are you going to finish them?
Both were in the same bag and went AWOL during our move. I finally found them over the weekend and will (eventually) finish them. In the mean time, I’ve got other obligations lined up. After the poncho I’m on the hook for a triangular knitted shawl for the sister who didn’t end up with the Forest Path lace stole. I’m thinking of the Heirloom Knitting Bird’s Eye Lace free pattern, done in Lorna’s Laces Helen’s Lace in purples and blues. Possiblyadding a border strip to the long top edge of the triangle. But if I think too much about that project I’ll get derailed from the poncho, and those sad puppy eyes brook no delay.
And the Cursed Socks?
Those I AM working on right now, in between winding yarn for the poncho. After all, I can’t schlep the swift and ball winder with me to appointments. I’m about half-way through the heel of Sock #2, and hope to be done in the next couple of days soI can write up the pattern for wiseNeedle and post it along with the pattern for the Summer Lightning lacy scarf in time for people looking to knit holiday gifts.
What do you call those nifty lookingcross-hatchedwindows next to the door in your house?
My friend Kathryn (who knows lots of neat stuff) tells me that the proper name for a window divided into small panes is "mullioned." Mullioned windows appear to come in many types, including ones with lead as well as wooden dividers. Lozenge is the name for a diamond shaped pane, so I guess I’ve got a circa 1912 Arts and Crafts style two story bungalow (bungaloid?) with casements featuring mullioned lozenge transoms in the living room and dining room. Which is a long winded way of saying "old house with nifty windows that are a pain to dust."
OOP BOOK REVIEW – TEENAGE KNITTING BOOK
Here’s another review of a knitting book that time forgot. This one is The Teenage Knitting Book by Betty Cornell. New York: Prentice Hall, 1953.
Intro to knitting books weren’t invented with Yarn Girl’s Guide to Simple Knitsor any of the other ten thousand beginner books that have recently flooded the market Nor is the retargeting of knitting at a younger group of knitters something new. Yes, books are better illustrated now, yarns are heavier, and the level of knitting skill expected from beginners has decreased somewhat; but the basic idea – writing trendy patterns in a chirpy styleto encourage new knitters and enable them to learn new skills – hasn’t changed.
This book is a case in point. It’s by a woman whose other credits include a large number of girl’s grooming and fashion books. My mother says that her name would have been recognized at the time. She touts all the familiar stuff: knitting is wonderfully relaxing, it’s great to fill up time and/or keep your fingers busy, it presents a grand sense of accomplishment, it fills tactile needs, and it’s fun to get together and knit in groups. As one would expect it also asks "whynot make that ultra-trendy stole in the exact color you want instead of buying what’s available at the store" just likeits recent descendents.
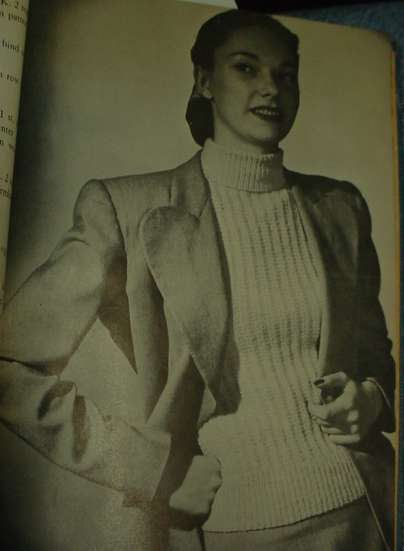
After a brief intro, the book is off and running presenting several dozen patterns for blouses, sweaters, stoles, socks, hats, and dresses. Patterns range from dead simple (a dropped stitch stole flat out identical in concept to the "magic scarf" pattern floating around the Web right now); to severalpullovers that sport some nice shaping and tailored details. Yarns are small. Most pieces are knit in fingering or sport weight yarns. Sizes are also small. Although they’re labeled as being sizes 14-18, those sizes are peggedto finished sizes ranging from 34-36 inches finished chest measurement for the 14 to 36-38 inches finished chest measurement for the 18, depending on how tightly they fit. Remember – this was the sweater girl era, and fit is generally quite sleek, so I’d estimate these as being the equivalent of modern size 8-10-12. In spite of that, there are several pieces in the book that are very interesting. Here’s one of the more unusual:
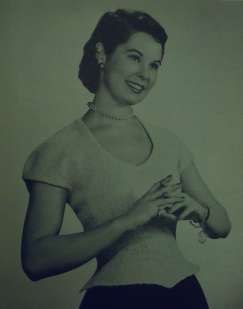
If you get past the strange yearbook pose and black and white presentation, you’ll see a piece with complex waist shaping, an interesting neckline, and set-in cap sleeves. It could be worn today. Not necessarily with pearls and a Pepsodent smile, but could be quite interesting and depending on the yarn choice – could compliment anything from jeans to velvet.
Here’s another – a classic cable sweater. This one has shoulder pads inside and the model is probably wearing a girdle to create extra waist shaping.

Not a boxy rendition of the standard cable, but a tailored piece featuring two different stitch patterns. Note the push-up sleeves. You don’t get that kind of fit from a bulky yarn. I especially like the way the cables flow down without interruption to the ribbing at the cuff. This piece is knit in fingering weight. Wearable now as a classic? You bet.
There are several cardigan patterns, ranging from little cropped length pearl-button cap sleeve ones to longer stylespaired with knit skirts. Very retro, yet again – wearable today. There are some men’s patterns. The one I like best is a seaman-style sweater with a very long ribbed sections at waist and cuffs – both meant to be worn folded up. It looks like something to be worn ina remake ofOn the Waterfront:
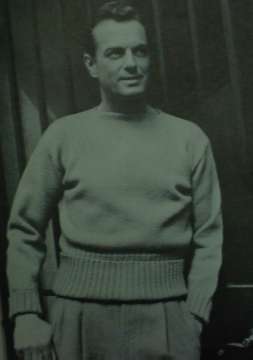
I think that QueerJoe would look killer in this simple piece.
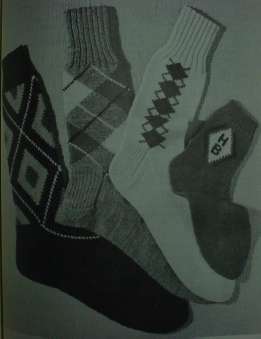
There are also patterns for golf club covers (woefully small for today’s oversized drivers)and a couple of easy tomake afghans. A bonus in all knitting books of this vintage, there are sock, hat, glove and mitten patterns, including a very nice plain anklet, andthe hot, hotmust-have item of the day – the argyle:
The patterns are more completely written up than most patterns of similar vintage. Colorwork is charted, but except for that all instructions are offered in prose. They don’t use the arcane shorthand common to most late 1940s/early 1950s patterns, instead directions areare presented in complete sentences. There are some major assumptions made – like the entire direction on shaping the waist frill in the top photo reads "Block peplum, then face with taffeta leaving approximately 2 inches free at each side seam to allow stretch and tacking top loosely." It may be a beginner knitting book, but some sewing skills here are clearly expected from the knitter.
The book finishes up with an 8-page how to knit and crochet section, illustrated with line drawings. Unlike most American-made books of its time, it shows Continental style instead of throwing. It’s prose-heavy compared to modern how to books, but the info it offers is succinct and well-written, covering all of the basics needed for the preceding pattern sections.
So like many of the knitting books time forgot, this one is interesting and deserves a second look in spite of its dated black and white pix, aged and plain library binding, and 1953 copyright date. Many local public libraries have vintage books that you may have skipped past in your search for newer stuff. Go back and revisit the older volumes. Not only are they knitting history, they’re an excellent source of inspiration for knitters today. Besides, if they sit on the shelf idletoo long the library staff might cull them from the collection, and we’ll lose valuable info that can be supplanted, but can never be replaced.
WORKING REPORT – BLUE PONCHO
Now with Dragon put to bed, I can turn to my daughter’s blue lacy poncho. Over the weekend we went paging through pattern books and looking at old projects. She lit upon a couple of lacy looking stitches that she liked.
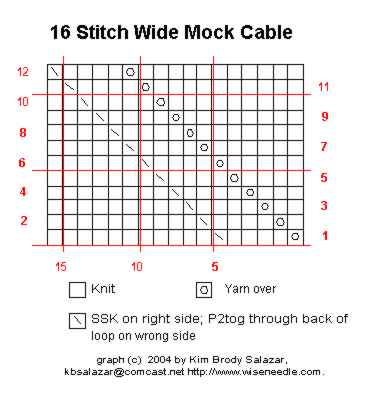
The first is the mock cable I used as the edging for Justin’s Blanket on wiseNeedle. The thing didn’t photograph well there, and the instructions for that counterpane are in prose, so here’s a wider version of the same idea. (Apologies for the lousy quality of these charts. For some reason my standard Visio to Fireworks graphics prep cycle is spitting out oddlynon-uniform results today.)
The second is a lacy panel adapted from a wider pattern appearing in B. Walker’s Second Treasury of Knitting Patterns. The original isn’t graphed, starts in a different place of the repeat, and is set up for multiple iterations of the ribbon. I pared it down to just one repeat to make a self-contained panel:
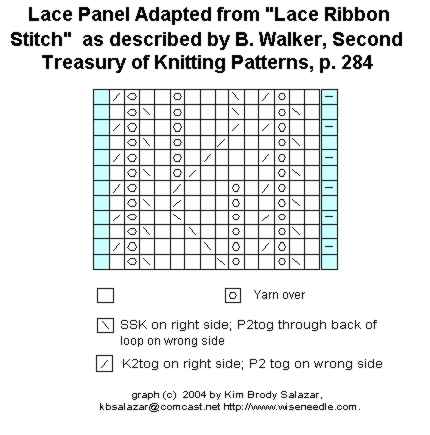
Both are lace knitting patterns in that they have something happening on every row. If one is knitting in the flat (back and forth on two needles) you can see that maneuvering to do a P2tog tbl (purl two together through the back of the loop) on a wrong-side row might be awkward. Whichever panel is chosen, it will probably alternate between sections of K2 P2 or K3 P3 rib.
As far as swatching goes, I’ve been playing with my de-plyed Paternayan. Thinking that the 2-ply result of my pains was rather thicker than sport, but thinner than DK, and that I wanted a lacy effect, I started swatching on US #9s (5.5mm), and worked my way up through needle sizes to #13s (9mm). I’m wavering between #11s (8mm) and the #13s. More swatching is in order, especially swatching to see if the 11 or 13 looks best with the plain old ribbed part, and to make a nice, even piece to determine gauge over both textures.
In the mean time, I’ve decided to run the color stripes on the vertical rather than the horizontal. That means I’ll figure out how wide the rectangles will need to be for this poncho, figure out some pleasing alternation/panel widths for the chosen lacy part and ribbed sections, then decide which panels need to be in which of my three available colors (blue variegated, plus wedgewood and slate blue). Once that’s decided it’s cast-on time, working the color stripes with Intarsia joins between them – each from its own ball.
Did I mention “Figure out if I’ve got enough yarn?” Gotta do that to, especially because seven skeins (3 variegated blue, 2 each of my two blues) de-plyed into 10.5 skeins (4.5 variegated, 3 of each blue)equals 1,764 yards That’s 756 yards of variegated blue, plus 504 yards each of the two blues. In total it should be enough, but I may need to get very clever with color placements to make sure I don’t run out of anything.
DRAGON RESPLENDENT
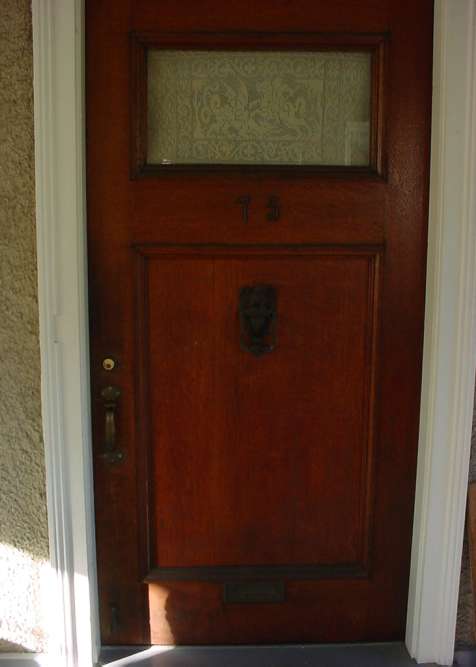
The dragon blocked, finished and mounted. From the outside:
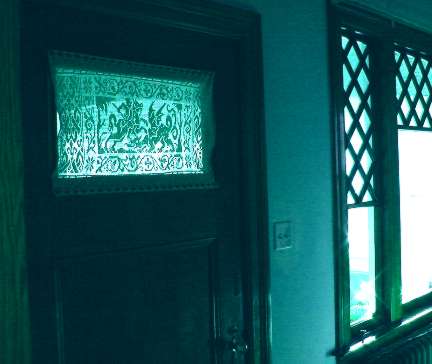
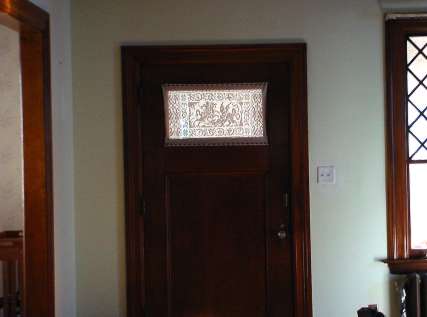
and inside:
 |
 |
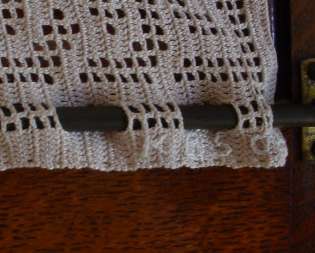
Close up from inside, showing the brass rods running through the top and bottom double-wide meshes:
Signature (KBS, ’04)
As you can see I was a tad overly aggressive in blocking north-south. I noted that it had shrunk a bit in the wash (yes, I machine washed it), and stretched it severely. I needn’t have because the stretcher bars that are used to mount the thing would have taken care of that.I could instead have stretched it more east-west so that the edges don’t draw in so much. The next time I wash and block my dragon panel, I’ll do just that.
Am I happy with it? You bet!
