A quick side trip. Faced with a need for a last-minute small baby gift, and having at my disposal some orphaned leaf green Dale Baby Wool provided by my pal Kathryn (Thanks, Kathryn!), I do up a quick pair of booties from a time-honored pattern.
Ann Kreckel posted this pattern for Janes Baby Booties to the KnitList in 1995. Her pattern was collected and preserved at Woolworks, itself (in Internet terms) a venerable Ur-source of knitting info – one of the first generation of knitting sites on the Web. Woolworks is now defunct as I update this post in 2021, but bits can still be found on the Internet Archive (aka The Wayback Machine).
Ann’s booties are a version of the classic Stay On Baby Bootie. Her pattern, though all text is clear and easy to follow. I can vouch for the fact that these booties do stay on. In fact of all the booties I knit for my spawn in their larval stages, these were the only ones that ended up being at all practical. (Thank you Ann, wherever you are today.) Other versions of this same basic idea exist, including ones published in the Taunton Press Knitting Tips & Trade Secrets book (1996, reprinting a letter to Threads circa 1991), and the XRX Socks, Socks Socks book (1999). Based on these sources and other hints of similar items, I suspect (but can’t document) that the fundamental design of these booties goes back through “knitting for charity and bazaars” leaflets and oral traditions that probably reach back to at least sometime between 1900 and 1920.
There used to be several websites around that showed pictures of the finished items. The only other one I can find is here, but it doesn’t show the eyelets and ties. I remedy the lack and post some interim progress shots as well.
Knitting the first part – the strip of garter stitch that will become the sole. I used US #0 (2mm) needles to achieve a newborn size. I slipped the first stitch of each row purlwise. This made both counting my progress and picking up easier. When I had 18 edge stitches on both sides, it was time to begin the next step, with no need to sit down and count out 36 actual rows:

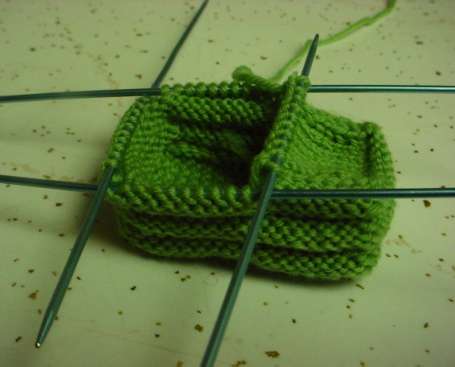
Here’s picking up around the outside edge. As you can see, I used a set of five DPNs. That allowed me to assign one needle to each side of the rectangle. Much easier than fiddling with dividing the stitches among fewer needles:

Here’s a photo after the completion of the knit and purl welts that form the sides of the foot box. These can be made a bit wider or narrower. (Hint: If I’m doing the purl welts in a contrasting color yarn, I switch on the LAST KNIT ROW before the new color welt begins):
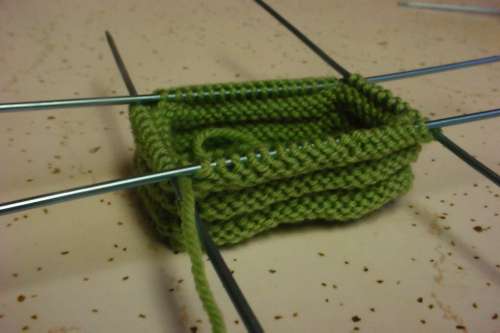
Yes, at this stage the bootie looks rather like a cozy for a tiny box of facial tissues. Don’t worry. Baby feet are small things with roughly the same proportion as bricks. These WILL fit, in spite of their boxy appearance.
Here’s working the top of the foot. Here I chose to do this part in stockinette. I find it easier to knit or purl the last stitch of the top of the foot along with the first stitch on the side needle by transferring the last stitch over to the appropriate side needle, then working the K2 (or P2) from the side needle.
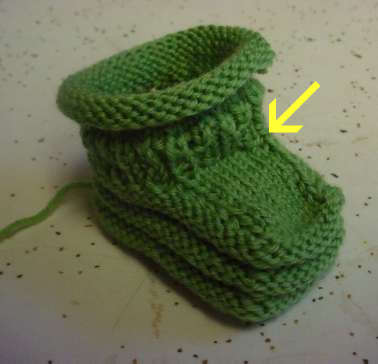
The next step is the transition to working the ankle. This is the only tricky bit in the booties, and Ann provided a very useful tip to get past it. There is a slight tendency for a hole to form at the indicated spot. I fudge this using Ann’s method. Just before working the last stitch of the first ankle round, I look at the spot I’m approaching – the first stitch of the round I am completing. I slip the loop of the stitch just below that first stitch onto my needle end, and when I work the last stitch of the round, I do it together with that “rescued” loop. Done this way there’s no chance for a little hole to form at the juncture point.
I often part company with Ann’s instructions after the eyelet rib section is completed. Here’s the spot to get playful. In this case I’ve opted for expedience instead of playfulness, and finished my bootie with ten plain rows of stockinette to make a simple roll-top. Sometimes I work a very small knit or crocheted edging onto this live stitch edge, working perpendicular to the established rows and attaching the edging as I go along.
Once the booties are done I work my ties on my Strickmuhle I-cord machine. I used to do the I-cord by hand, but the ties often took as long to knit as did the pair of booties, so I switched. I’ve done braided, crocheted, ribbon-insert, and lucet style cords as ties, too but I like the clunky look of the I-cord the best. In this case I’ve used a bit of yellow Baby Ull left over from a previous project (There are no such things as leftovers, just bits of future projects waiting to be hatched.)
And the finished product, just in time for a spring baby:
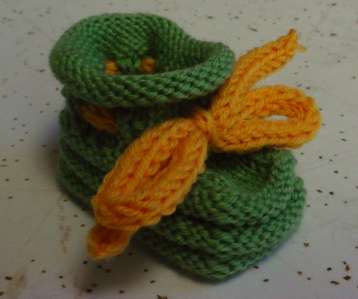
The yellow is actually paler and less mustardy than my lousy photography skills can show.

[…] Here is my mini tutorial on knitting her pattern. […]
[…] Yes, it’s been dark here longer than usual at String. My life has not been my own, with raging work-related deadlines consuming every inch of me. But in spite of those, I had a special commission from The Resident Male. He asked me to do some baby knitting for a workpal of his, whose wife is expecting. So I whipped out my needles and made up a pair of standard booties, from the Ann Kreckel pattern I favor, and improvised a matching hat. I’ve posted about the booties many times before, including an illustrated tutorial. […]
[…] the past I’ve posted a mini-tutorial on making these, and invented and shared a hat to […]