CAST ON ROUND-UP – II
Following up on last Wednesday’s post on looped cast-ons, today I’ll blunder through the family of knitted-on cast ons. Reference books not detailed below are listed in the original post.
There are dozens and dozens of cast ons. I know I haven’t gotten you your particular favorite yet. Eventually I hope to cover as many as I can find. Why bother?? Because it’s always nice to have options, to find new ways to do things and in doing so – to find out that some might just be a tad better than others in a specific use case. To someone who only owns a hammer, everything looks like a nail. To someone with a whole toolbox at their disposal, the hammer might not always be exactly what’s needed.
I’ll keep posting these. For the ones that are well illustrated or easy to describe, I’ll forgo illustrations, presenting instead these reference links. When I get to some of the less widely seen (or harder to describe) styles, I’ll begin adding my own illustrations. But we’re still well within the Known World here, so please forgive the lack of pix.
Simple Knit-On Cast On
This is a very popular cast on, although it’s more often taught outside the US. It’s often taught to children learning in large class situations. I know several knitters who learned to knit as small children in schools as far flung as Hong Kong, Brasilia, and Bangalore, all of whom report this as the first cast on they were taught.
Knitting on produces a neat, even edge that’s less elastic and more robust than that produced by the half-hitch cast-on. It can be worked either as the foundation for an entire piece, or as a method of adding stitches at the end or in the middle of a row. It’s not uncommon for example to find a scrap of knitting on (or a sister technique) forming the top edge of a buttonhole.
Advantages:? No need to measure out long tail lengths. Easy to teach absolute beginners. Miller in Heirloom Knitting mentions the utility of this simple cast on for lace (she uses half-hitch and invisible cast ons, too), citing the edge construction as being suitable for going back later and picking up or attaching additional stitches.
Disadvantages:? Not as stretchy as some cast-ons, but stretchy enough for most uses, even lace. The front and back have a different appearance. Some people don’t like the look of one or the other, and add a row to their pattern to make sure that the preferred side is visible when the garment is finished.
On line references:
http://www.knittinghelp.com/knitting/basic_techniques/index.php
http://www.wonderful-things.com/newknit1.htm
http://www.mycraftbook.com/Cast_On_Stitch.asp (a little hard to follow)
http://www.learntoknit.com/instructions_kn.php3
http://www.knitting.co.nz/pages/knitting/caston.php
Book references:
DMC Encyclopedia, Fig. 419
Vogue p. 26
Bantam, p. 17
Miller, Heirloom Knitting, p. 33
Cable Cast On
The cable cast on is very closely related to plain old knitting on. The difference is in the formation of the new loops. In knitting on, the needle is inserted in a stitch in the normal fashion, and the new loop is pulled through the old stitch and placed on the end of the left hand needle. In cabling on, the new loop is formed in the space between the last stitch cast on and the one before it. (The first stitch in a cable cast-on is always a plain on knit on stitch because at the outset there aren’t two loops on the needle in between which one can pick up that new stitch).
Advantages:? No need to calculate tail lengths. Very firm stitch with a pronounced decorative edge. One of the least stretchy cast-ons. Excellent for cuffs, hems, but less useful for necklines, sock tops and other high-stretch scenarios. Very good choice for cottons or other less-elastic yarns that have a tendency to stretch out (and stay stretched) with wear. Makes excellent, long-wearing buttonholes.
Disadvantages:? Stretch (see above). Like knitting on, this has two very different sides visually. Some people add or subtract a row from their pattern to make sure that the preferred side ends up on the front of the work.
On-line sources:
http://www.knittinghelp.com/knitting/basic_techniques/index.php
http://www.wonderful-things.com/newknit1.htm
http://www.knittingatknoon.com/cable.html
http://www.worldknit.com/howto/howtoknit/beginningtechniques/castingon.html
Book references:
Stanfield, p. 16
Vogue, p. 26
Bantam, p. 17
Alternate Cable Cast On
I’ve only seen this one detailed in Vogue. It’s a variant of the standard cable cast-on, made even firmer by working the cast-on row’s stitches through the back, rather than through the front of the piece. I haven’t tried it myself, so I can only report the book’s assertion that this method creates a firm edge. Also, from the accompanying illustration, it has a much less defined "edge spine" running across the bottom edge. People wishing to avoid that visual edge at the bottom of ribbing may want to experiment with this method.
Book reference:
Vogue, p. 26.
NOT SO OOP BOOK REVIEW – FOR THE LOVE OF KNITTING
Thank you for all the get-well wishes. I’m still flu-laden, and now joined with two sick kiddies at home, I am at least clear headed enough to sit vertical, type and knit. I don’t know where this particular bug came from, but it appears to take 10 days to run its course. An eternity of delight…
For the Love of Knitting
Despite some huge budget problems, my local library is still getting a trickle of new books. Patrolling the new book shelves, I found For the Love of Knitting: A celebration of the Knitter’s Art, edited by Kari Cornell (Stillwater,Minnesota: Voyageur Press, 2004).

This one is a knitting coffee table book. Big format, copious, colorful illustrations, lots of "name appeal," but little content. It’s a collection of essays by the likes of Zimmerman, , Falick, Swansen, Klass, and other knitting writers. About a third (including the Zimmerman, and Klass pieces) have appeared before in magazines, newspapers, and even in other knitting inspiration books like Knitting Lessons, Knitting Sutra, and KnitLit. I was surprised to see so much material mined from recent sources and reprinted in a book of this type.
While this book is certainly pretty, and the essays are interesting, no one is going to learn anything new from this book. There are no projects. There are no descriptions of techniques. The majority of the pictures are of knitting booklets from before 1960, shots of yarn baskets, archive photos of knitting and knitters, and pictures of knitting in art. Only a couple of the essays have pictures of immediate relevance in them. In terms of garment inspiration, there are a couple of close-ups of some of Solveig Hisdal’s stranded work (taken out of context because the whole garment isn’t shown); plus several shots of "art knitting" – a couple of wearables, plus various soft and hard installations incorporating knitted fabrics. Very little for a book so large and so copiously illustrated.
I also found the editorial tone of the thing got increasingly irritating. An example the caption on a Russian postcard, found on page 50. "Knitting Companion: In this quaint Russian postcard, a young woman keeps one eye on her knitting and another on her cat, who looks about ready to pounce on the next free stand of yarn." I can see the picture. there’s no reason to describe it in the caption. I want to know more about the postcard. Were such things common? When was it made? The style in the picture makes me think it might be from the 1920s. A Russian postcard from the 1920s? There has to be a story there, but there is no further attribution or sourcing for the postcard. Nothing whatsoever beyond showing the picture and then describing it overly cutely.
So if a sample course of essays describing knitting (as opposed to knitting technique), illustrated with patronizingly described eye candy appeals to you, you’ll probably enjoy this rather formulaic book. If nothing else, you may find a first taste of someone’s writing here that would lead you on to her or his other works.
Final verdict: Save yourself the $30.00 cover price. Borrow this one from the library.
PERSEVERE!
My older daughter is new to knitting. She just began at the Boston Knit Out this past fall. So far she’s done several foofy garter scarves for herself and her friends (first lesson in casting on and the knit stitch); a 42-stitch hat (using DPNs to knit in the round, decreases); and a felted bag (more reinforcement of knitting in the round, plus making a larger project, and I-cord, and picking up along an edge).
You’ll notice that all of her finished items were all-knit/big yarn projects. She wanted to “graduate” from all-knit and learn purling. She also wanted to use smaller needles. So we talked it over, and she suggested doing a pair of ribbed fingerless mitts. In fingering weight yarn. On US #0s. Without a pattern.
Now, did I tell her that many adults break out in prickly heat at the thought of using DPNs, let alone size #0s? Or that a 56-stitch around wristlet can contain as many stitches as an entire big-needle sweater? Or that I’ve seen grown women cry when someone suggests they knit (gasp) without a pattern?
Naah. What she didn’t know couldn’t daunt her.
So she cast on and began knitting. And knitting. And knitting. She plugged away at her mitts every evening after homework, while we (as a family) played video games. At first, being new to purling, her stitches were loose and wobbly, with ladders in the corners between the DPNs. But practice soon took care of that:
For everyone who has ever said to me, “I tried DPNs but I couldn’t manage them,” or “It takes too long to learn something new,” I present her learning progression. She worked the bottom one first, then the top one, both using the same yaran, stitch count and needles. You can see how her gauge, stitch accuracy and general neatness improved steadily throughout the project.

Sure, one’s bigger than the other, but both are wearable, and she does wear them proudly.
Knitting takes time to learn – there’s no getting out of that fact. Some people DO learn faster than others, but everyone who wants to learn IS capable of doing so. The key is practice. Unfortunately practice is a dirty word in today’s instant-dissolve, short attention span world.
Not satisfied with how something is turning out? Keep at it. Do something small and inconsequential that uses the same skills. Work out the kinks and bugs on the practice piece rather than the luxe yarn you chose for your “real” project. But keep going. You CAN do it. As the Target Child says “No stinking piece of string was going to defeat me!”
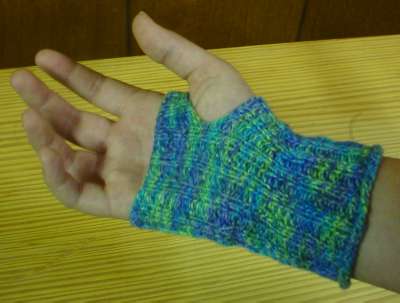
Here’s her pattern. (She?thinks her fingerless mitts look like the disc-shooting zapper gauntlets worn by a character in one of her favorite PS2 games).
Zapper Gauntlets
About 150 yards or so of a smooth non-itchy fingering weight sock yarn. This pair was knit in some remnants of On Line Linie 6 Supersocke 100 Cotton, but any sock yarn will do.
5 DPNs, Size US #0 (2mm)
Gauge: Approximately 9 stitches = 1 inch (2.5cm), measured over K2, P2 ribbing.
Cast on 56 stitches (14 stitches per needle). Join to continue working in the round. Knit six rows. Change to K2, P2 rib and work until piece measures approximately 4 inches long (10cm).
At the beginning of the next round, bind off 10 stitches. Continue working around wristlet. You should have one needle with 4 stitches on it, then three needles each with 14 stitches. When you get to the hole created by the bind-off, flip the work over and head back in the other direction. Work five more rows of K2, P2 rib this way – flat, ending at the right side of the growing thumb hole.
On the next row we return to knitting in the round. Start Needle #1 by casting on 10 stitches (all needles should have 14 stitches again). Continue in established K2, P2 ribbing pattern, working in the round until piece measures approximately 1 inch (2.5cm) measured from cast-on row above thumb opening. Bind off loosely in pattern, and darn in all ends.
That’s it!
(More in the cast-on series next week, I promise. Looking up all those links is more work than I have time for right now mid-deadline.)
CAST ON ROUND-UP – I
Monday I posted about teaching my sock class, and as part of it – teaching the backwards loop (half-hitch) cast-on for sock tops. I wrote that I thought the half-hitch cast-on was the stretchiest one I knew. I use it often both for sock tops, the bottom edge of lace pattern pieces, and the edge of watch caps – in fact, most things I want to stretch to their maximum potential. Sockbug wrote in to say there were other, stretchier choices.
I’ve heard people express skepticism on the durability of a simple half-hitch sock top edge, but not its potential for stretch. (For the record, out of around 30 pairs of socks in my own drawer, and easily another 75 knit for other people, I’ve never experienced nor had feedback that a half-hitch cast on edge has failed). Still, I’m always open to learning new things (there’s a nifty one below I’ll be trying out soon.)
Just to make sure we’re talking about the same thing, here’s the half-hitch cast-on:

Now I can’t say I’ve used every other cast-on out there (there are dozens and dozens). I’m always looking for more. Here’s a round-up of what I can find on the Web, and in some standard reference books. Today’s group is the family of half-hitch/backwards loop cast-ons, including a couple of rarely seen variants.
Reference book key:
Vogue Knitting. I have the old edition, (c) 1989. Page refs are good for that one.
DMC Encyclopedia is also known as Therese de Dillmont’s Complete Encyclopedia of Needlework. It exists in dozens of editions. Mine is the Running Press one put out in 1974. Page numbers can vary, but the fig numbers accompanying the text are uniform in all editions. Where possible, I’ve given the fig numbers as they appear in the knitting section.
Bantam Needlework. The Bantam Step by Step Book of Needlework I’ve reviewed this one before. It also exists in several editions. Mine is the 1979 issue. To my knowledge, page numbers are constant across editions.
Dictionary of Needlework. The Dictionary of Needlework by S. Caulfield, and B. Saward. This is a big wandering needlework omnibus, first put out in 1882. I have the 1972 Arno Press reproduction.
Stanfield. Encyclopedia of Knitting. This is a newer book, (c) 2000 – and is one of the easiest to grasp, yet unpatronizing or project dependent of the current crop of books for beginning knitters.
Apologies for not citing Mary Thomas. That book is Somewhere. Somewhere being defined as "within the house, but AWOL."
Half Hitch (Backward Loop; Single) Cast-On
This one is the simplest of all – just a series of loops mounted on the needle. I’ve seen people work the half-hitches in either the right or left orientation. I like to follow up this particular cast-on with a single row of plain knit before I launch into a ribbing. This seems to firm it up a bit, and avoids the untwisting purl problem that some people experience when working in the round.
Advantages: No need to measure out a long length, then hope you have enough set aside to accomplish all the required stitches. Very stretchy. Easy to teach to absolute beginners. A standard choice for adding stitches at the end of rows, or replacing stitches mid row (as in some buttonholes).
Disadvantages: Purls can untwist the simple loops of the cast-on row. Not the sturdiest, most stable edge. Some people think makes a sloppy, loose looking edge compared to other methods.
On line references:
http://www.dnt-inc.com/barhtmls/knit/sco.html
http://www.socknitters.com/toe-up/tulessonone.htm
http://www.knitnet.com/common/support/caston.htm
http://www.knittinghelp.com/knitting/basic_techniques/index.php
http://www.wonderful-things.com/newknit1a.htm
Book references:
DMC Encyclopedia, Fig 420
Vogue, p. 25
Bantam, p. 16
Stanfield, p. 17
Double Loop Variant of Half-Hitch Cast-On
I haven’t tried this one myself, and just ran across it researching this note. The source cites it as being very suitable for lace edges in which multiple increases occur rapidly on the succeeding row. That leads me to believe it’s also quite stretchy. It also looks a bit more open than the plain half-hitch cast on.
The best way I can describe it is to form a standard half-hitch loop, but before pulling it snug up against the previously formed stitches, to take it and give it a half twist, then place the loop formed by the half twist on the end of the needle – in effect making two stitches from every half-hitch loop.
Book reference:
DMC Encyclopedia of Needlework: Figure 421
Double Cast-On or Thumb Cast On
I learned this one only recently. It’s a useful addition to my bag of ticks, but I haven’t settled on a best use case scenario for it yet, although I could probably substitute it for other places in which I’d do a standard long tail cast-on.
I’m grouping this one with the half-hitch family because the ultimate row formed at the bottom of the work is secured by half-hitches, although it could be argued that it more properly belongs in the long-tail family. It’s a simpler version of the long tail method, and starts by leaving an ample tail (about 3x the width of the thing to be cast-on); and making a slip knot. The knitter forms a half-hitch using the long tail, but holds it open with the thumb. Into this loop around the thumb he or she then knits a stitch using the working strand of yarn (NOT the long tail).
Advantages: Firmer than half-hitch. Slightly easier to teach than some other long-tail methods.
Disadvantages: Has a tendency to become too tight. I correct this by casting on over two needles held together. Needs a guesstimate on how long the tail needs to be to accommodate the required number of stitches (I sometimes cheat by knotting together two strands for the first row, cutting one at the end of the cast-on and accepting the fact that I’ll have an extra end to darn in later). Because the bottom end is half-hitch, it isn’t as firm as some other cast-ons. Some think it may be as prone to wear as the half-hitch.
On-Line references:
http://www.wonderful-things.com/newknit1a.htm
http://www.knittinghelp.com/knitting/basic_techniques/index.php (last link under long tail)
http://www.mycraftbook.com/Cast_On_Stitch.asp
and an interesting variant – doing this in pattern for ribbing to create an edge with no visual ridge along it. I’d not seen this one before today either. I’m going to have to try this one out myself!
http://morcatknits.typepad.com/cast_on_workshop/
Book reference:
Bantam, p. 16
Vogue, p. 25 (long tail thumb method)
Dictionary of Needlework, p. 281
Stanfield, p. 17
DUTCH HEEL
A couple of people have asked me why I thought a Dutch heel was easier than other forms of heel-flap sock heels; and how they fit.
First, there are lots of other treatises on Dutch heels elsewhere on the Web. Judy Gibson has a nice write-up on this heel variant. It’s part of the Socknitters Cybersocks on-line sock tutorial. Regina Williams has done a work-up on the math needed to construct Dutch style heels on toe-ups.
In terms of history Dutch heels date back to at least the 1880s. I found one mention of them on the Web in a transcription of an 1883 edition of The Girl’s Own Paper, a typical young women’s interest magazine of the time. They may in fact be older, but sources on sock heels before 1883 at my fingertips as I type this aren’t very copious.
In terms of fit, Dutch heels have the ample instep (upper foot/ankle) of other shaped heels. That means they’re deeper in the ankle than are short-rowed sock heels. They are also a bit more snug side to side than other forms of round or square heels. People with average to narrow width feet and especially people with narrow heels will find them quite comfortable. While my own feet are in the walrus flipper range of size, my heels are narrower than one would expect given my paddle-like toes. I am still experimenting with Dutch heels, knit both cuff down and toe up. I’ll report back on comfort and fit as compared to short-rowed heels once I get a few more pairs into my wash/wear cycle.
I think the Dutch heel I’ve learned is easier than a standard round heel because the heel cup area maintains the same stitch shaping repeat throughout. the short-row segment that forms the heel has parallel sides. You don’t need to keep as close track of where you are in the shaping’s progression as you complete that stage of the work.
Here’s an example of a hypothetical Dutch heel, worked on 7.5 stitches per inch/10.5 rows per inch (the standard label gauge of Schoeller/Stahl Fortissima/Socka – a textbook classic sock yarn). I’ve calculated this for a average sized cuff-down sock, one that would probably fit someone wearing a US Women’s 7-8 medium shoe size. This works out to a very average sock of 60 stitches around. To simplify things, I’ll suppose a plain stockinette heel flap.
I’d work the ankle as desired. When it was completed, I’d work my heel on 30 stitches (half the available circumference). Because I normally use a set of 5 DPNs, that means I’d be doing my heel across two of them. People using two circs would work this across one of their needles. Magic Loop folks would work this across the stitches on one side of their needle’s loop.

I’d knit the heel flap in plain stockinette, slipping the first stitch of each row to make nice easy to pick up in chain selvedges. I’d probably make it about 30 rows deep, ending after completing a wrong-side row.
To turn the heel, starting on a knit side row, I’d knit 18, work a ssk, then turn my work over. Heading back in the other direction, I’d slip the first stitch, then purl 6. Then I’d do a purl two together, and flip my work over again. Back on the knit side row, I’d slip the first stitch (that’s the one I purled two together on during the previous row), then knit 6 and work another ssk. I’d repeat the slip 1, purl 6, p2tog, turn row; followed by the slip one knit 6, ssk, turn row until I had consumed ALL the stitches available on my heel needles, and my total on-needle(s) stitch count was 8, after the completion of a purl side row.
To make the gusset, I’d knit across the top of the heel to put myself in position to start the gusset pick-ups. Looking down the left side of the heel flap, I’d pick up 15 stitches in the chain stitch selvedge loops. At the bottom of the heel flap I’d do the anti-hole cheat by picking up an additional stitch at the base of the flap, for a total of 16 new stitches. Then I’d pick up my dormant instep needle and work across the top-of-foot stitches. If I were using the circ methods, I’d switch back to my heel-bearing circ or circ segment after the foot-top stitches were done. Now At the base of the heel flap on the other side of the foot-top stitches, I’d first pick up that anti-hole cheat stitch, then 15 in the chain stitch selvedge loops heading back up the right side of the heel flap.
I now have all the stitches I need to create my gusset. I’d knit across the heel flap and down the left hand edge until only three stitches remained, then I’d do a K2tog, and knit the last stitch on the needle. Changing to my top of foot needle(s) I’d work those stitches, then switch back to my heel needle(s), working a K1, ssk, and then knitting back up the side of the gusset and across the top of my heel. I’d knit the next round plain (no K2tog or ssk decrease at the corners of the gusset). After the plain row, I’d do another decrease row, alternating decrease rows and plain rows until I was back to having 60 stitches total again, the same number I had before the heel began.
so we see that the only real difference between a Dutch heel and the other standard heel flap and gusset heels is in the formation of the heel turn (heel cup). In the Dutch heel there are only two rows to remember – s1, knit (x), ssk; and s1, purl (x), p2tog. That to me at least makes it easier to calculate and to teach. Also to work in fits and starts, as my briefcase sock per force should be a project in which the need to keep track of where I am is minimal.
BRIEFCASE SOCKS
Not much knitting progress to report on Rogue. Other priorities intrude this week. I have however gotten a fair bit done on my "briefcase sock."? That’s the pair of socks in progress that live in my work backpack. I like to keep one going that’s done while waiting for appointments, in line at the post office, and in those other bits of time that would otherwise be frittered away.
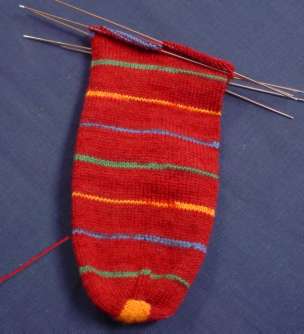
Briefcase socks are usually not of the most elaborate styling or construction. They have to be able to be picked up and put down without losing one’s place in a pattern, and mindless enough to do with only minimal attention. As such, self-patterning yarns are ideal. This pair is in Reynolds Swizzle. It’s marked at 7.5 stitches on a US #1 or #2. I’m using 1.25mm needles (US #0000), and getting 10.5 spi. This particular sock is 80 stitches around. As you can see, even at the much smaller gauge, I’m getting accent stripes that are perfectly satisfactory. They’re mostly one row wide, with a two row overlap of about 25-29 stitches. This pair is being done in the standard toe-up/short-row heel style that has become my automatic default. I began the sock at the very beginning of a yellow stripe. I’ve just started the short-row heel section at the blue stripe now just off the needles. I’ll probably begin the second sock at the start of either the blue or green accent stripe, just to be playful and have a pair of fraternal rather than identical twins.
Why do I knit my socks at such annoyingly tiny gauges?? I like them better. I find densely knit socks to be more comfortable, with none of that walking on pebbles feeling others report as a reason for not liking hand-knit socks. I have found that densely knit socks wear better and last longer, especially ones that are a bit tight on the foot. Socks that are large enough around to permit shifting can bunch up inside the shoe and either wear themselves thinner over time, or create blisters.
I find that most 4-ply fingering weight sock yarns work just fine for knitting at gauges significantly finer than they are marked. Three ply weight fingering is even thinner. It’s tough to find it now that the old Kroy 3-ply is history, but I can get up to 12 stitches per inch out of a good 3-ply. That’s fine enough to knit many pre-1900 era sock patterns verbatim. Cast on 96 stitches?? No problem with a 3-ply.
Finally how am I liking the Swizzle compared to other sock yarns?? It’s o.k. Not great. I find it a tad harsher than the Regia line and the Fortissima/Socka line. It’s also thinner looking un-knit, but denser (less airy) than the other two. The narrow, widely spaced skinny stripe is different, but boring. I may try to liven up the sock ankle a bit by either purling the accent rows, or by playing with a slip stitch or mosaic pattern on them.
Aside:? Welcome to my Japanese visitors!? I have no idea what the referring page says, but you are more than welcome to wander around and rummage through my past entries. Google translation tells me this
???????!
means "Happy knitting!"?? Although automatic translations are usually too literal (and usually produce silly output) I hope it’s not too far off.
MORE ROGUE; WEB TOOLS
Here’s about 11 inches or so of Rogue. In the continuing cascade of mods made necessary by my shifting to a thinner yarn and smaller gauge, I’ve worked six of the side cable repeats before branching back to complete the side panel chart. No problem there.
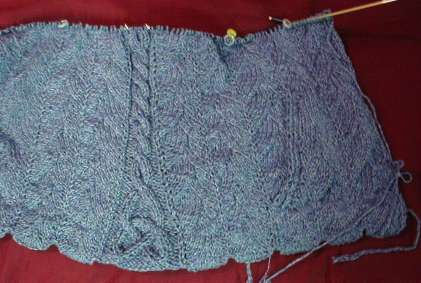
I do note however that as expected – this is going to be a weighty object in cotton. Cotton weighs more per yard than wool. 50 grams of cotton yarn will contain fewer yards than 50 grams of a comparable thickness wool. So far I’ve used about 300 grams of cotton. That’s roughly 2/3 of a pound. My finished piece may end up weighing as much as 2 or 3 pounds!
Useful tools and toys:
I’ve gotten quite a few notes lately asking for help with metric conversions, needle sizes, fabric care, garment sizes and yarn weights; confusion about how to figure out repeats given a set stitch count; and requests for descriptions of basic knitting techniques. Here’s a raft of tools that I find useful for these purposes, plus some other useful or interesting (or amusing) things tossed in.
Knitting needle size equivalencies (FiberGypsy):
http://www.fibergypsy.com/common/needles.shtml
Metric/Imperial unit conversion calculators:
http://www.sciencemadesimple.com/conversions.html
http://www.mcnichols.com/products/productsupportfiles/conv.calc.htm
Factor generators (good for finding possible pattern repeats from a stitch count total)
http://www.markhorrell.com/tools/factors.asp
http://www.counton.org/explorer/primes/primecalc.shtml
Descriptions of the count (X/X) systems of yarn weight and yardage used by machine knitters:
http://www.cara4webshopping.com/cara_free/yarn-wts.htm
http://www.yarns-and.com/yarnto.htm
How-to videos or animations showing basic knitting techiques:
http://www.knittinghelp.com
http://www.dnt-inc.com/barhtmls/knittech.html
Tutorial on reading lace knitting charts (Heirloom Knitting):
http://www.heirloom-knitting.co.uk/pages/beginners_guide2.html
Fabric care label symbols:
http://ohioline.osu.edu/hyg-fact/5000/5556.html
Heel stitch count chart (dead link retrieved using Wayback Machine)
http://web.archive.org/web/20021016042840/http://www.magma.ca/~vanmac/heels.htm
Garment size charts:
http://www.yarnstandards.com/sizing.html
http://www.fibergypsy.com/Charts_and_Other_Helpful_Resources/Size_and_Measurement_Charts/
Sock size survey results:
http://www.needletrax.com/SockSizeAnalysis.html#
Jaya’s round-up of knitting software availble for Palm handhelds:
http://www.palmsource.com/interests/knitting//
Back neck shaping for the Math-Aware:
http://www.hillcrestknitwear.com/knitting%20info/ff%20back%20neck%20formula.html
Toys
Sockman
http://www.renfro.com/consumer/Renfro/funstuff/sockcalculator/
Assorted esoteric Google time-wasters (Google Blogoscoped):
http://blog.outer-court.com/archive/2005-01-29-n34.html
DEMO SOCKS; STITCH FACTORY – MAKE ONES
I’m split among several different knitting foci right now. First, there’s the upcoming class. I’ve finished the hand-outs I’ll be distributing covering both two circ and one giant circ production;? the practice pair of socks; and the sample mini-sock we’ll be making during the workshop. I’m as ready as I’ll ever be. I’ve also gotten word of a potential design commission. If and when that occurs and I’m permitted to bruit about the details, I’ll report them here. In the mean time, here are my practice socks, dutifully completed one with the one giant circular technique, and the other using the two-circ method:

Nothing special. Just plain old Regia 6-ply Crazy Color stockinette socks, with Dutch heels, and standard toes grafted to finish. On the pair with the turquoise toe I took care to finish out the color repeat such that the line of grafting ended up being a contrasting color, so the class can see where it is.
Having put the class socks to be, I’ve picked up Rogue again. A couple of people have asked if I’m doing mirror image Make Ones on either side of the verticals that run up the design. The answer is "Yes."? I don’t usually stoop to this level of ultra-refinement, but for this project because the two Make Ones are separated by only one stitch, using them does make a visual difference. Here’s how I do them:
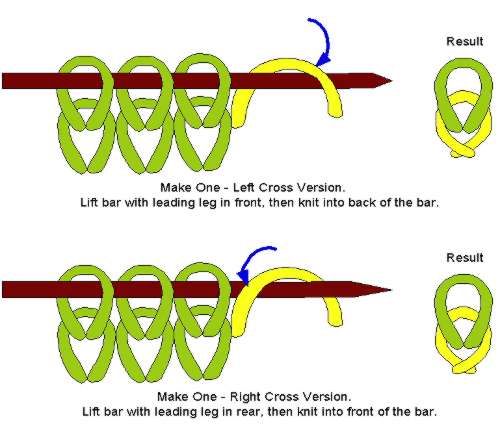
To get a make one with a top leg that crosses lower right to upper left (S-style), I lift the running bar between two stitches, mounting it such that the leading leg of the bar is in the front of the needle (standard stitch orientation). Then I knit into the
back of that bar.
To produce a make one with a top leg that crosses lower left to upper right (Z-style), I lift the running bar between two stitches, mounting it such that the leading leg of the bar is in the back of the needle (opposite of standard stitch orientation). Then I knit into the FRONT of that bar.
As to which to deploy in what situation – most of the time I doesn’t matter. My standard issue default Make One is S-style. If a pattern just calls for one, that’s the one I do. In cases where mirrored ones are needed, I’ll experiment. Sometimes the final result looks better if the S-style Make One is deployed on the left of a visual unit, with its sister Z-style deployed on the right. Sometimes it’s the other way around. On my Little Dragon Skin I’m working the Z-style on the left of the center spine, and the S-unit on the right.
Rogue photos later this week. I promise.
WOOLY FOOD
An adorable link, found courtesy of someone who posted it in a LiveJournal knitting community. The thing is in Japanese, but you can enjoy the pictures and objects without reading along.
From what I can gather using the Google language tools, while most of these items are crocheted, the strawberry shortcake (minus the berries) is machine knit. The fruit trifle tart is a box that opens up. The pear purse is trimmed with metallic beads. The chocolates are fridge magnets, and the artist suggests using the cherry topped ice cream bon-bons, the cup of cocoa and the hamburger as pincushions. The moon pie looking thing (two cookies with white filling) hides a tape measure, and the component pieces of the hamburger can be used as coasters – except for the sunny side up egg, which the author notes is too bumpy in the center for stability.
Very clever.
CLASS SOCK; kNITTING TWO ITEMS SIDE BY SIDE
No Rogue progress. My knitting time is consumed with class-related experimentation. Here’s the surviving result:

No surprise. It’s a sock knit from leftovers of the same DK-weight Regia 6-Ply Crazy Color yarn I used for The Small One’s Crazy Raglan. It’s on a single US #3 size 40-inch circ. I’m working these socks at this (for me) giant gauge so I can get in as much experimentation as possible before the actual class.
I’ve been experimenting with various heels, trying to decide which will be the easiest "classic heel" to use in the workshop for our knit-together project. I’m doing this because I’ve been told that the majority of people who have signed up have never made socks before. Some have never even knit in the round. I want the class to get through the danger spots of sock construction – cast on, a heel and a toe.
What you see above is a simple Dutch heel. It’s not as form-fitting as a round or other more finely shaped heel, but of all the turned heels (as opposed to short-row heels), I think it will be the simplest to both describe and work.
I’m still waffling between showing the heel worked entirely on one side of the sock, with the cable needle looping out done at the left and right of the piece, or re-assorting the stitches after completion of picking up along the sides of the gusset, then working the rest of the sock with the looping out at the center top and bottom of the foot. And as you can see, I’ve not yet experimented with toes. That’s next. Toes may be the kicker on stitch reapportionment. If I’m getting too much laddering with the split on the sides as established, I might re-engineer my thought and move the stitches around either immediately after completion of the final gusset row, just before the toe itself, or back before the gusset decreases are started. And that means that the poor sock you see above will cease to exist in the current form, and be sacrificed to the minor gods of ripping back.
Two items side by side on two circs
An anonymous person asked if I could show or explain how to do two things side by side on two circs.
I have to admit, I cheat somewhat because casting two items on side by side can make for confusion and twisted cast-on rows. I begin each item individually and work the first row before mounting my two items side by side. After I’ve got a scrap of knitting, i divide the stitches in half. I thread the first half of Item A onto a circ, followed by the first half of item B. Then I take a second circ and thread the other half of item B onto it, followed by the second half of Item A’s stitches.

I now have a piece that should look (more or less) like the drawing above. I work across the front side of item A, knitting from it’s own ball of yarn. Then I drop that strand, pick up the other and work across the front side of item B. When I finish the last stitch of this side of B, I flip the whole thing over, and using the same B yarn, work back along the reverse of B. Then I drop that strand, pick up the A yarn and work the back side of Item A. At the conclusion of this cycle, I will have completed a full round on both A and B, and have both strands of yarn back in the positions shown in the illustration.
