There must be something in the water (please excuse me for not drinking).
I find myself knitting booties for a flood of the newly
expecting. So many in fact that over the past two weeks, for the
sake of fun I’ve taken to playing with ankle part after the eyelet
holes for the drawstring style bow.
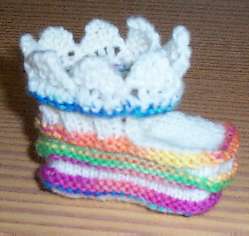
This bootie is a combo of Dale Baby Ull and tiny leftovers from three
candy color different self-striping sock yarns. Like I wrote
before, just a yard is enough to do a stripe, so I save every scrap.
You could argue that my petaled bootie isn’t entirely successful, that
the top round of contrasting welting should be deeper, and that I
should have worked a round in white before launching into the crown-like
points at the top. But hey – these booties are the knitting
equivalent of potato chips – quick snacks tossed off in between more
substantial meals. However they are excellent for playing with
some basic concepts before risking those ideas on a larger piece.
In this case, I looked at the thing (shown above before the bow tie is
inserted), and thought that I’d like a pointy finish. I didn’t
want it elaborate or deep, and was too lazy to haul myself over to my
bookshelf and dig through my collection of stitch pattern books.
It being a no-brain night, I decided to improvise on the fly and do a
no-brain edging knit onto the live stitches of my bootie ankle to
eliminate seaming (a pain on something so small.)
These booties finish out with 40 stitches – 10 on each of four
needles. 40 is a good number, it’s an even multiple of 4 or 5, so
an edging worked on 40 live stitches can have a 4 or 5 stitch
repeat. For no reason whatsoever, I picked 5.
I cast two stitches onto a DPN, and knit one, then did a yarn over and
worked the second together with the first stitch of my bootie ankle
using a SSK. On the second bootie-out and all subsequent
bootie-out rows, I flipped the thing over and knit back to the outer
edge. On the next and edge-in subsequent rows, I knit until just
before the last stitch, finishing out the row with a YO, SSK
incorporating one stitch from the bootie ankle. After I’d "eaten"
up four stitches of the bootie ankle and was ready for the fifth edge
in row, I bound off until I had one stitch on the right hand needle and
one stitch on the left. This last stitch I worked together with
the fifth bootie ankle stitch. Voila!? A very simple 10-row
petal edging custom-matched to the stitch count of the piece being
trimmed. I did seven more points (eight in all – two per bootie
ankle needle) and grafted the last two stitches to the cast on
row. Bootie done, and neither seaming nor casting off was
required.
Neither knitting an edging onto live stitches nor creating a very
simple edging in this manner are new ideas, but both evoke a bit of
"How did you do that" when seen outside of lace knitting circles.
I would improve this a bit were I to do it again. Instead of each
point "eating" five ankle stitches and taking 10 rows to complete, I’d
cheat a bit. I’d do an 8-row repeat, working my bind off on the
fourth edge in row instead of the fifth, BUT instead of working a SSK
with one edging stitch and one bootie stitch to conclude the bind-off
row, I’d work a SSSK, fusing together one edging stitch and TWO bootie
ankle stitches. In effect, I’d be working an 8-row repeat
attached to five ankle stitches. This will draw in just a bit and
counter the tendency for the edging to stretch the live stitches, and
be wider than the tube of the item it completes. Most lace
projects that? are ended off with an edging knit perpendicular to
the body and don’t exploit this natural tendency to ruffle do vary the
stitch attachment count in a ratio closer to 3:2 than 1:1.
So, the next time you do a top-down hat, a tubular iPod case, or even a
toe-up sock, think of finishing it off with a bunch of slightly silly,
fluttery petals instead of the standard bind-off row. Or if you
feel really ambitious – thumb through the lace edging section of your
stitch dictionary, pick one with an appropriate row count and try it
out out to put a crowning touch on your piece.
