This poor little bird at the top had the bad happenstance of appearing on the edge line of the Unstitched Coif outline cartoon. He’s been horizontally bisected. I felt bad for him so I used an especially playful fill on his body.

Obviously I’m still soldiering on.

No doubt about it, 2×2 countwork on 70+ thread per inch linen moves along slowly. But I am about to hit two major milestones. The first is 50% completion. That’s just a couple of flower sprigs away. The second is consumption of my first full 100 meter spool of Au Ver a Soie’s Soie Surfine – the ultra-fine silk I am using for the fills. I have more than enough in reserve to continue on, so no supply side worries loom.
I’m now pretty well adapted to the magnifiers, but even so a forehead break every 20 minutes or so is needed. The headband mount stays seated in my optimum viewing range longer and and accommodates use of my usual bifocals, much better than using the glasses frame “arms.” Neither is comfortable, but I’ll pick discomfort + better sight every time.
I do wish that the magnifier would eat batteries more slowly. I only use the supplemental LEDs on the magnifier when working actual countwork in suboptimal light conditions. I don’t need the extra illumination when working the outlines or doing the goldwork and spangles. But even so, one set of three tiny coin batteries lasts for only about four days of stitching – roughly 14 to 16 hours. If I had a do-over I’d buy something with the same magnification levels, but that came equipped with a rechargeable light source. It would be very handy to plug it in each night and be ready for the next day’s stitching.
I still haven’t repeated fills between sprigs or insects (with one tiny exception). Folk have asked where I’ve gotten them, and how I use them (planning/choice and execution).
The sources for the fills I’ve used include the set painstakingly drafted out by our Fearless Leader, from close observation of select Actual Artifacts in the Victoria & Albert Museum’s collection. She has provided them as part of the tool set for this project. But I have to admit that the overwhelming majority of the fills I have used come from my own doodle notebooks, including the Ensamplario Atlantio series. Others I’ve improvised as I stitched, noodling up something unique to fill a difficult to render petal or bug body segment.
I reiterate that I am not sitting down and planning placements ahead of time. Nor am I drawing out the shapes on paper, then penciling in fills and stitching from those plans. I’m deciding on them as I come upon the spaces. Occasionally I get to a flower and say, “Hmm. Six segments, I can do six fills, three fills twice, or two fills three times.” Then I pick a treatment, and go looking for the first fill. In general I start with the largest segment of the design, pick something demonstrative for that space – roughly centering placement of the design by eye and working out from there; then select designs for the accompanying spaces to contrast or compliment. Take the Borage flower, for example:
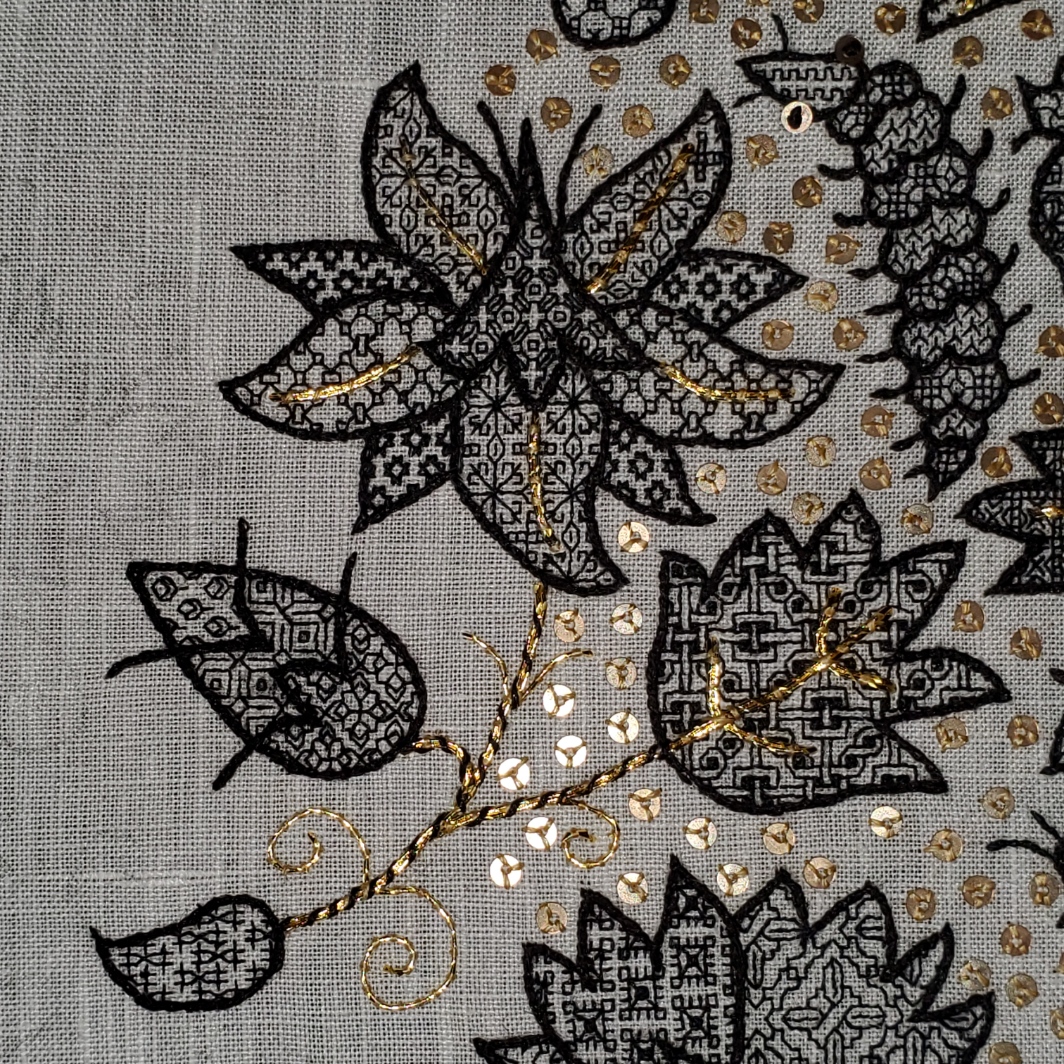
I started this one by doing the big leaf with the interlace fill. That one is from my doodle notebooks. It’s a grand fellow, and one of my favorites. I was waiting for a suitably large space to use it, so in it went. And no, I didn’t mind that it would be partly overworked with gold for the veins. It’s bold enough to stand up to that treatment.
Next I turned to the flower itself, starting with the largest downward extending petal in the center. I used one of the fills provided by the project leader, graphed from V&A accession T.230-1929, a sampler of fill designs. It’s six from the end on this page. It’s repeat is smaller than that in the leaf, but it still needs room to play. I also chose it because I liked the way its spiky linearity contrasted with the closed, boxy interlace nearby.
While I was working the first petal, I decided to divide the flower into a set of three petals, two petals, and four petal/sepals, and shade them so the set of four would be the darkest, and “recede” to the back. I worked the other two petals of the three-set with the same design I just completed, then went looking for a lighter, less dense one for the two-set, ending up with another from my doodle notebooks. It’s light and airy, and quite quick to stitch up. Although it uses a lot of lines and has squares, it is a nice complementing contrast with the first design, and it had enough space to let the design show. It was clear with these five petals done that the four-set would need to be significantly darker and smaller, but I didn’t want to do a tiny repeat because I’m saving those for the many-tiny-petals Marigold flowers. I found a small, dense one, again from my doodles.
With all of the petals done, I thought that a darker center “cone” was in order. I pawed through the project collections and my notebooks but didn’t see anything tasty, so I just improvised this final fill, starting with the familiar cross and circle base, and adding detail until I got the density I wanted. (I did add it to my current notes, though.) The feel of it is almost the opposite of the star-like fill I used in the four-set petal/sepals. Once the final fill was completed, I went back and worked the black raised outline in reverse chain, using two separable strands of a thicker four-strand silk floss, hand dyed by a friend of mine (a softer black from a historically accurate iron/tannin recipe).
On to the bud. All three of the designs I used in it are from my notebooks, although the bud design is very common, and a feather-line variant of it is in the project’s collection of designs from V&A Accession T.82-1924 (a cushion cover). Again, I picked three in ascending density from the base to the bud tip, looking for ones that contrasted both in tonal value and in composition. As per usual, the outlines were last.
The small paisley at the sprig’s base was last. Originally I had intended to use its fill elsewhere, but I decided to employ it as a stand-alone because it is Very Special. It’s from the project collections, drawn from V&A Accession T.12-1948 (a coif) by our Fearless Leader. It’s third from the end on this page.
It’s special because of the stitches used to form the center X in the double stirrup shaped motifs. Those are two 1 unit by 2 unit stitches, crossing in the center. I call them “knight’s move” stitches. They are vanishingly rare in historical count work, appearing most often as a component of eyelet type constructs, where many stitches radiate from a single center hole. But stand-alone? This is the FIRST time I’ve encountered one on an actual artifact or contemporary pattern graph. Yes, they are quite common in modern blackwork and strapwork because they add an angle to the designer’s toolbox. It’s a very useful and graceful angle that many designers employ to excellent effect (especially Banu Demirel of Seba Designs), but to my eye, they produce a different overall look and are a clear marker of modern design. So finding one here was like being slapped Monty Python style, with a flounder.
I shared the observation with our group leader, who I am sure is now on the lookout for other knight’s move examples. Until there’s a whole vocabulary of them though, I will view this fill as the exception that proves the rule, and continue to eschew anything but 45- 90- and 180- degree angles in my own design work.
Once all of the fills and their black outlines were done, I added the gold. First I couched down the doubled gold of the flower’s petal lines. Then doubled gold for the leaf veins/stems. I affix them all with small stitches of gold color faux silk. Leaf veins that meet up with stems are done as one length, with that center line being laid down first. I add the “crossbars” by teasing them underneath the centerline using a tiny thread crochet hook, then couching down their arms. Once all he double-strand work is done I add the single-strand gold curls. The final step is to whip JUST the stem portions of the sprig with two strands of the same Soie Surfine I am using single stranded for the fills. Those black stitches are not structural. They are just for effect, binding the flowers and leaves together and uniting the sprig and make it stand out from the ever encroaching flood of paillettes/spangles.
And yes, I will go back and add the gold curl at the tip of the paisley. But it encroaches too closely on neighboring design elements, and I don’t want to catch it as I stitch those. So it will be added later.
I hope this answers the questions about my “bungee jump” approach to this large and complex project. As with any such banquet, taking lots of small bites is a fun way to graze across the entire spread.

Thank you for sharing this journey! It’s fascinating. I love hearing your thought process — and of course seeing the results.
It’s always a relief to feel confident that the supplies will last out!
There’s always a moment when the ancestors surprise us, too. One of the reasons I am becoming less and less confident about definite pronouncements, the older I get!
Poor little bird, I hope its other half is on the other side of the seam(?). But I bet that would be a Right Royal Pain to get it in the right spot so it lined up if it ever were sewn up.
This is going to be gorgeous when finished.
Sad to say, this will probably never be sewn into a wearable hat. The round-up display of all of the participants’ pieces will be shown flat. The logistics of 140 three-dimensional pieces being too daunting. And although I’ve had reason to sport historical dress in the past, and might again in the future, the up-front time and investment needed to make the rest of the outfit worthy of this coif is beyond me. It’s destined for wall display, not wearing.
Can you explain the six segments more?
The line about six segments is a generalized observation to introduce the concept of dividing a motif with separately outlined sub components into component groups, rather than using a different fill for each individual area. It is not specific to the follow on detailed discussion of the specific borage flower, in which I demonstrate application of that concept. I could just as easily have said “a moth with four segments…”. Hope this helps.