I’m working happily away on what will become my replacement cushion cover. I decided that rather than cutting shapes and then stitching them, it would be easier to stitch on a larger piece of reclaimed denim, and then cut it into haphazard shapes bearing the stitching later. The denim is particularly thick and heavy, which has posed some problems.

The traditional Japanese method of working this style of running stitch embroidery is to use a relatively long needle, stitch in hand without a frame or hoop, and pleat the fabric onto it, such that the visible stitches on the front are roughly twice as long as the gaps between them.
This type of stitching isn’t easy because the denim resists the tiny folds and scoops needed for evenly placed and correctly sized stitches. I’ve tried, and would probably “get it” on a different ground. Eventually I will do another project in this technique with proper materials, but for now this is what I am committed to, and my goal is more important than the way I get there.
So in the long tradition here at String, Here’s a run down of what I am supposed to be doing, or what would make this a truly traditionally produced piece, along with my confessed heresies.
Needles
I am not using traditional Japanese-made needles, specific to hand sewing, and especially Sashiko.
I have a long steel needle, sharp and stout enough to pierce the denim, with a small eye. I found a paper of five of them in a box of miscellaneous threads and notions I picked up at a yard sale. No name, brand or date is associated with them, and they are not quite uniform. The eyes are very smooth, but there’s a bit of variation on eye placement and point taper. It’s remotely possible they are antique and hand-made. I use another of these as my plunging needle because the small eye retains the loop of strong carpet thread I need to capture goldwork ends and pull them to the back. In any case, these needles are almost two inches long, certainly long enough and easy enough to maneuver for the technique. It’s the stiff denim that’s the problem.
Thread
I looked at various thread options. The threads marketed specific for Sashiko are imported and not exactly inexpensive. From what I gathered, they are unmercerized cotton, nicely twisted, and not as “hard finished” as commercial threads sold for crochet. So I went hunting.
I cast about and eventually ordered a big spool of weaving cotton from Webs. It’s their Valley Yarns “Valley Cotton 10/2.” It was a risky purchase because it’s a large quantity, but I happened to hit a weaving yarn sale. And if the stuff didn’t work for my cushion project, I would be happy to knit lace with it.


I’ve got roughly 4,200 yards. Plenty. On the right above is a comparison shot of some threads next to a metric ruler. Apologies for the lousy photography. From top to bottom we have
- Valley Cotton 10/2 – a two ply matte finish cottom
- Coats & Clarks Knit Cro Sheen – a four ply shiny finish yarn. Much rounder and heavier that the Valley Cotton.
- Standard DMC 6 ply cotton embroidery floss. I didn’t have white to hand, so this is yellow. Six two-ply strands. The Valley is equivalent to about four plies of the DMC.
- Long discontinued DMC 6 ply linen embroidery floss. This I did have in white. It’s a mite heavier than the cotton floss, and the Valley Cotton is equivalent to about 3 plies of this.
I’m pleased with the Valley Cotton’s usability, its proportion in relation to the stitch length I’m using, and it’s appearance against the denim. It also coordinates well with the remaining Haitian cotton upholstery fabric used on the parts of the chair I do not intend on recovering.
Pattern Sources and Preparation
I tried to use straight drafting – laying out the geometry and drawing directly on the fabric. I also tried printed paper designs, employing tracing paper and pouncing to move them from paper to the cloth. Neither was satisfactory. Then I stumbled across some commercially sold plastic templates, and decided to take the short-cut.


Stencils opened up another experimentation hole. What writing instrument to use with them. I tried all of the standard pens and pencils intended for fabric marking. Some were too crumbly to achieve the fine point needed to use the stencils. A highly regarded pen drew clear, with the ink “blooming” into visibility over a 15 minute period. That was better, but it was difficult to see when ink was poorly laid down and needed retracing, or what had and had not been marked. It was even more difficult to realign the stencil to do a repeating pattern because of the wait and imperfections due to poor ink flow. (In fact I haven’t succeeded doing that yet, but I am still trying).
I settled on an unorthodox inking approach AND a non-traditional marking method. I am using these easily found Crayola wash-out fine point markers with the stencils.

I am also marking on the back, stitching the piece from the back, with starts and terminations on that side, but taking care that the reverse when I am working (which is the public side) shows the longer stitch length as opposed to gap length. Running stitch is running stitch. If you are careful in working, either side can be manipulated to be the public display side. Even in this style where the public side is characterized by longer stitches than there are gaps between them. And that’s why the photo at the top of the page shows the public side of the denim leg I’m stitching, but you see the twill tape wrapped inside unit of my hoop.
Heresies
So to sum up – my heresies are:
- Using a hoop and not stitching in hand
- Stabbing vertically rather than pleating the fabric onto my needle
- Using weaving cotton instead of Sashiko thread
- Using some unidentified vintage needle instead of the recommended long sharps
- Using stencils instead of drafting out the designs by hand
- Stenciling on the BACK rather than the front of the piece
- Stitching from the back, with the reverse side of my work actually being the side on public display
I pause now so the traditionalists can catch their breath, take a sip of tea or coffee and revive themselves.
With luck all hyperventilation and shock have passed.
More unorthodoxy
To add another dimension of complication, I am also hoping to use Western linear stitching on this piece. I plan to use standard double running stitch, and some of the fills or strapwork patterns that are oh so familiar to anyone who has followed this blog. But there is no grid on this denim, and it’s not countable.
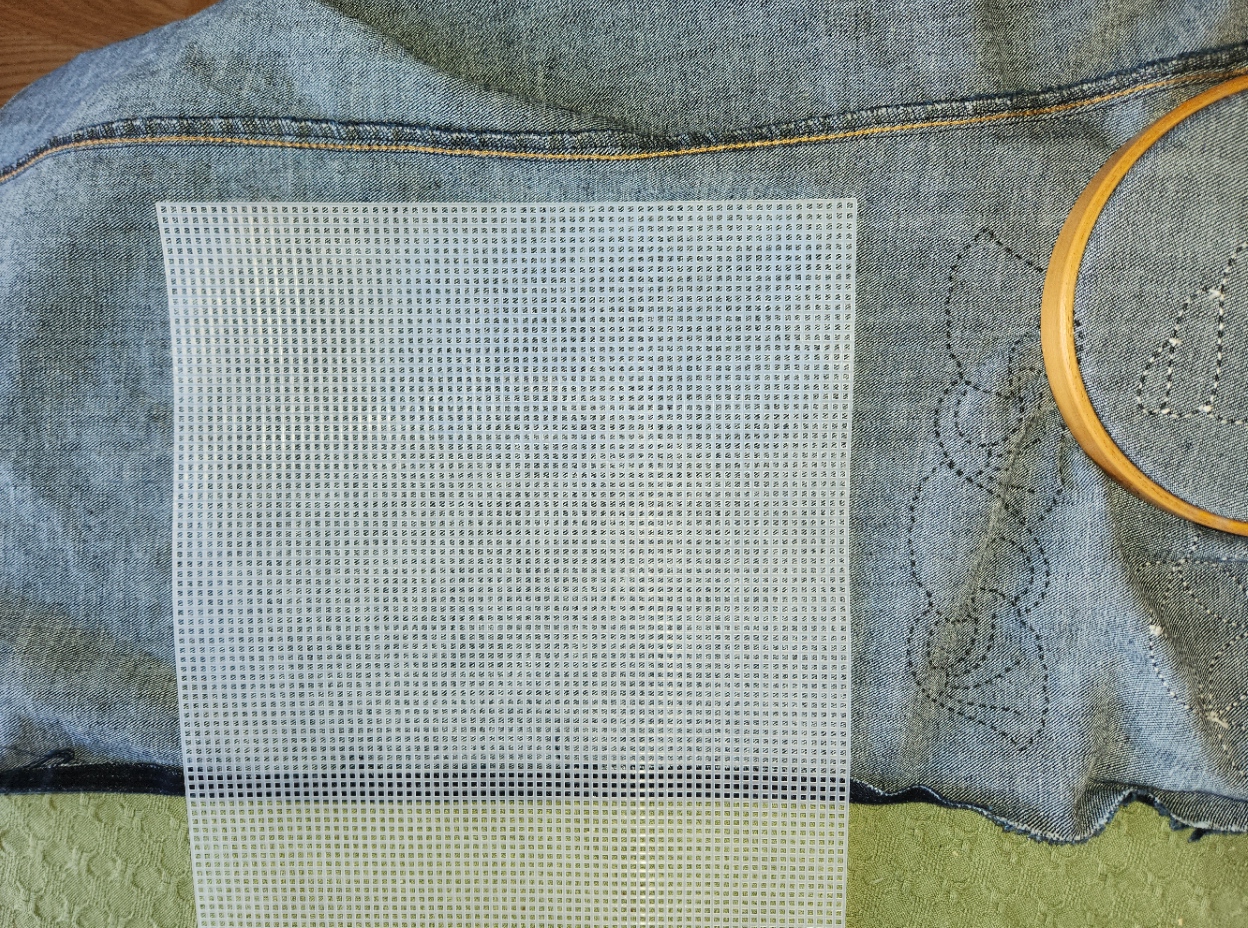
Again I am going to cheat, and stitch on the reverse. I am going to use my markers and this piece of plastic canvas to make a dot grid, and then use that dot grid to place my stitches. Double running is the same on front and back. If I stitch with care and make no skips, there should be no telltales in front to betray my working method.
Cheaters may never prosper, but on rare occasion a shortcut or labor-saving method is warranted.

The Valley Cotton 10/2 (I buy from Webs too) is very similar to imported Sashiko thread – I think your choice was spot on
The plastic canvas and marker grid idea is GENIUS.
interesting that you see your technique are heretical
as far as i am aware, shasiko evolved from the need to repair and strengthen precious cotton, in the “boro” make-do-and-mend tradtion – this would not have been precise but functional, using whatever materials and basic sewing equipment were available in a household
like so many other forms of decorative stitch it has had layers of “tradition and lore” attatched, rather like the neatness and perfection fettish of our victorian predecessors and their rules on the back of an embroidery!
my approach to stitch is to do what is necessary to achieve the desired result – does that make me a perpetual Heretic? ??? suits me!
Use of the term “heresy” is hyperbole, and slightly sarcastic hyperbole at that. I use it to poke gentle fun at the mindset that sees Only One Correct Way to do anything. And I explain myself at this level of detail in order to help others over that hurdle, as well. There are many paths to project success, and success is defined by the stitchers themselves, and not by their critics.
I spent tons of money on getting the right pen/pencil/chalk to do my sashiko with stencils.
Fons and Porter Mechanical white pencil. Comes with refills. Fits the holes in the stencil. Brushes off! I have now used it for 3 years. 10/2 cotton, also my go to for sashiko. I will never run out. It dyes well with tea to make it a different color of white. I have indigo dyed this stuff, as well as weld dye. It’s great. (Also good for weaving!).
I’ve had decent luck with the Sewline white ceramic pencils on dark fabrics. Instead of buying the whole pencil from the quilting section of a store, buy any .7mm pencil from the school supply section – much cheaper! I think Fons & Porter are also .7mm.
The Crayola Washable Markers (not the Washable Fabric Markers – they be permanent!!!!) have won many fans in the garment sewing community.
As to committing heresy with your method – Carry on! Make it work! Get it done! Rules are made to be broken. Whatever works. In other words – your modifications to the normal methods to get the results you need are fine. I’m sure those “rules” had lots of experimentation while they were being developed.