I continue my quest for distraction, working on the impromptu doodle sampler I mentioned in my last post. I still haven’t decided what it will bear, but right now I’m leaning towards the single word “RESIST.” Time will tell, but I’m already looking at typefaces. Warm and fuzzy/ultratraditional/edgy and threatening? All nuance the message and are under consideration.
In the mean time I go back to my mail and comment inboxes and note that there are a few notes that claim envy of my work because I “never make a mistake.” Few things could be further from the truth.
I make mistakes ALL the time. In spite of how well I try to idiot-proof my methods, I consistently prove that I am beyond idiot-proofing. I could throw out excuses – I stitch mostly with divided attention, while watching TV, armchair kibbitzing/team playing video or console adventure games, listening to podcasts or books on tape, or sitting in a conversation with family or friends. I also confess to “stitching under the influence” – often our evening TV hour is accompanied by a glass of wine. I pick patterns on whim, and don’t always hit the right contrast/compliment point I was after. And I suffer from Memory Hubris. Once I’ve established two or three repeats of a design (in any orientation), I go “off paper” and attempt all future iterations from memory and by copying the initial segments, even if the newly stitched bits are mirrored or rotated from the prior work. I also fall prey to the common double-running flaw of trying to get away with using a too-long strand of thread. Needless to say all of these contribute to a healthy stream of problems.
These problems include:
- Missing the correct start point or alignment line, so that the work doesn’t meet up with or is uncentered against established stitching;
- Stitching off grid (not hitting the exact over-2 or over-3 spot) so lines and angles are off by a thread or two;
- Losing my place in a design and repeating an element where it was not supposed to go, or skipping one altogether;
- Veering off into hyperspace – getting totally lost on the number of stitches I need and their proper placement, especially on long diagonal runs with nothing to steady me nearby; and
- Deciding that I don’t like my bungee-jump pattern choice, and would prefer something else instead;
- Confronting errors in thread management – for example, twisting, knotting, snagging, catching the tail, disrupting the spots of prior starts/finishes.
What do I do about them? In rare instances if the problem is just an errant single stitch that doesn’t upset placement of the rest of the design, I might leave it in. This however is rare. That single stitch will glare at me with dragon eyes every time I look at the piece, even if no one else can spot it. Mostly I pick the errant work out and start again.
There are comparatively few descriptions of how to rip back safely, without danger to the ground or surrounding stitching. I’ll try to outline my method for doing so in double running. Cross stitch, back stitch and the like would follow most of the same process, with a little accommodation for stitch structure and working protocols.
OK. Here’s the latest sin on the latest sampler. I made a very big alignment error on the unfinished bit at the bottom. The top of the hearts and arrows design as stitched here may look good, but it’s only half of the pattern. There’s a vertical flip that I had barely begun, with arrows that point up. As stitched, that second half won’t fit. (Oh, and I’ll be reworking the previously released chart to make the logic easier to stitch. )

I also felt that I wanted another narrower band here before working a wider one. So, since I would have to rip back 90% of the hearts and arrows band anyway, I decided to eliminate it totally.
Here’s my frogging kit – a laying tool, my best embroidery scissors – sharp all the way to the tip, with a rounded safety end on one blade, a pair of precision tweezers – the kind sold for electronics assembly, and Silly Putty, which I’ve written about before. Note the absence of a seam ripper or any other cutting implement. (Yes, I remembered to take this photo after I had already begun the Big Rip).

I could “unstitch” the piece, slowly drawing out each stitch in turn, reversing the direction in which the double running stitch was created. I will do this if I’ve got just a few stitches to remove because of an alignment misadventure, and then I’ll keep stitching with the same thread. But it’s not optimal for a big removal. For one, drawing the stitching thread through the ground that many times will degrade it and make it unsuitable for re-use. Long lengths of thread drawn through the ground also run a higher chance of crocking (depositing dye on the cloth), or leaving fuzz behind. When the errant bit is this big, better to snip and remove.
But you can’t just snip willy-nilly. Each snip is a chance to wound the ground cloth, and the condition of the cloth and the soon-to-be sacrificed thread must be taken into consideration. For example, if the thread is very soft and fuzzy or prone to shredding or crocking (think wool and most commercial cotton 6-ply flosses), I might make my snips in the front, but pick the work out from the back. If the thread is long-staple, structurally sound and unlikely to crock I will both cut and pick from the front.
The first thing to go is the long stitching tail. Snip. Gone. Then I start at one end of the work and snip two stitches side by side, preferably diagonals because they are longer and easier to grab. I usually do several of these pairs at a time. But I don’t rush in with my scissors. First I use the laying tool to gently “pry up” each stitch to be cut. Not enough to deform the ground, just enough so I have slack into which to insert the lower blade of the scissors. Here you see the laying tool making room under a stitch for scissor blade placement.
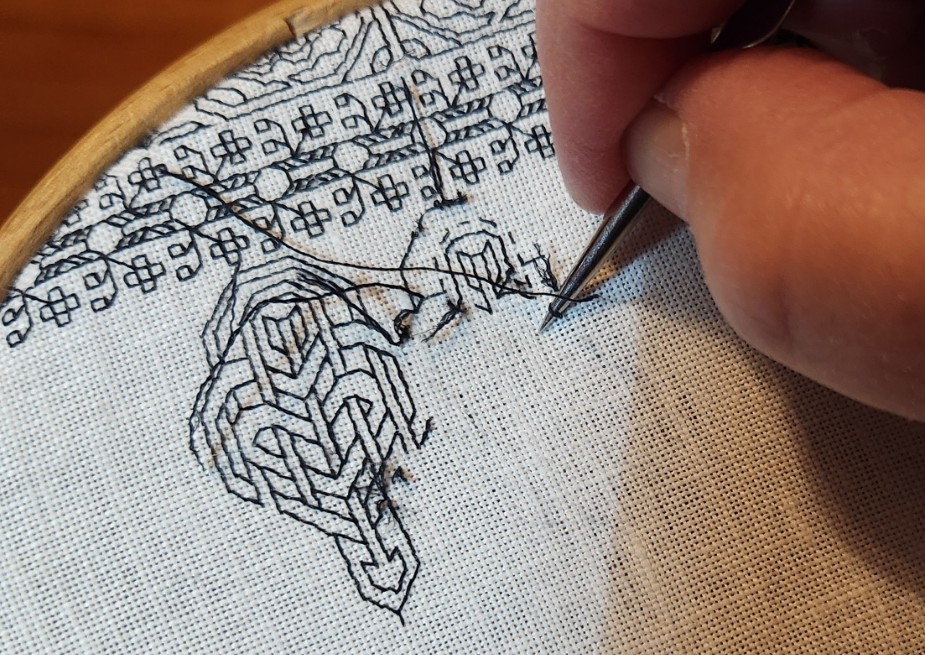
That lower blade is the one with the rounded bump NOT the thin and wickedly pointy other blade. This safety end helps guard against inadvertently catching and cutting the ground.
Once two stitches are cut I tease them back an inch or so, stitch by stitch, using my laying tool, and occasionally the tweezers. I work two at a time because of the every-other stitch construction of lines laid down in double running. One of those dashed lines will have been stitched after the other, and by cutting two adjacent stitches I can tease out both of them, quickly determined which path is newer and then do that one first, followed by the other. It’s always easer to remove the newer stitching first because it sometimes pierces the older stitching, which can cause snags as you rip. Once I’ve freed an inch or two I snip the freed bits off about a quarter inch from the surface. I’m about to remove that long thread seen in the piece above. I do this to minimize the length of thread pulled through (remember – crocking, fuzz).
Removal stitch by stitch, snip by snip, taking care not to hurt the rest of the piece is tedious. It takes me considerably longer to rip back than it does to lay down the stitching in the first place. One thing I was thankful for in this piece is my thread choice. Since I’m working in silk here there was very little residue left behind as I remove the stitching. That reside is where the Silly Putty comes in. I dab it on the surface to remove any remaining dye and fibers. No erasing or rubbing motions – I support the fabric from below with the plastic shell, and do a quick and light vertical press of the stuff. BEFORE you try this on your own precious work please check out the article I linked above. I am willing to accept risks for my work, but you might not want to. Know what they are before you attempt this.
Once everything is picked out, and surface fuzz/dye crocking has been Silly Puttied into oblivion, I have a blank canvas again. Some of the stitching holes are a little distended. I will use the tip of my laying tool and gently stroke the ground cloth at a 45-degree angle to the weave. That returns the threads to proper alignment. The result:
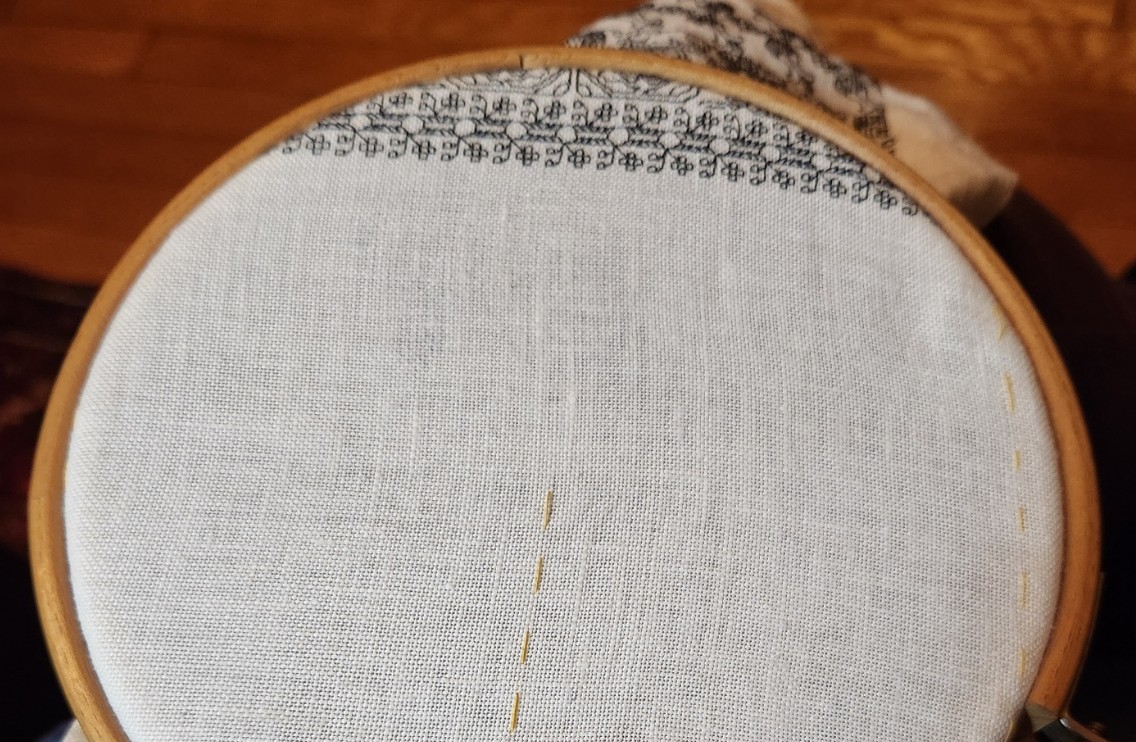
And what goes there? Bunnies.

And yes. There’s a mistake in the bunnies already. The rightmost finished bunny is looking at a partial leaf. I’ll go back and catch that “oops, I skipped over it” error when I’m done with the current thread.
Perfect? Not me. Never.

I’m getting ready to start your Persist sampler, so thanks. for the tips on unpicking!
Another tip!
When picking out stitches DON’T use the tip of your stitching needle. It’s tempting, but you will shred the thread less if you use a laying tool. It’s too easy to split the thread with the slender needle, but harder to do that with the tool. It doesn’t matter if its just a couple of stitches and you plan to re-use the thread, or if its a wholesale removal. In both cases reducing the annoyance of flying fiber bits is a benefit.
And a laying tool needn’t be an expensive purpose-made implement. For years I used a very large and heavy needle meant for sewing carpets. It was as fat as a yarn needle made for assembling knitted or crocheted pieces, but had a pointier tip. That worked quite well.
Thanks for the additional tip. I usually use a sewing stiletto for pulling out cross stitch but may try using the mellors I have for goldwork instead. Just basted the center lines on my fabric yesterday. When I finish the beadwork vessel, I’m on to the sampler.
Sewing stiletto works! I have no experience with the mellor, so your feedback here about it would help others. Please update us after you try that. 🙂
This is very timely for me — I only recently discovered blackwork (and subsequently your pattern books and blog), and I’ve been making plenty of mistakes on my first project. I hadn’t considered a lot of what you’ve covered here, so thank you!