BABY HAT TO MATCH ANN KRECKEL’S BABY BOOTIES
UPDATE: THIS PATTERN IS NOW AVAILABLE IN AN EASY-TO-PRINT PDF FORMAT, AT THE KNITTING PATTERNS LINK, ABOVE.
Yes, it’s been dark here longer than usual at String. My life has not been my own, with raging work-related deadlines consuming every inch of me. But in spite of those, I had a special commission from The Resident Male. He asked me to do some baby knitting for a workpal of his, whose wife is expecting. So I whipped out my needles and made up a pair of standard booties, from the Ann Kreckel pattern I favor, and improvised a matching hat. I’ve posted about the booties many times before, including an illustrated tutorial.

My matching hat is a simple beanie shape knit in the round, with three welts around the bottom edge to match the three welts that run around the sides of the stay-on bootie. I know that many other people enjoy making these booties, so I share the matching hat pattern here.
Baby Beanie to Match Jane’s Stay-On Booties
Materials:
50g fingering weight or sock yarn
1.5 mm (US #000) double pointed knitting needles (can be worked on 1 or two circs if preferred)
4 or 5 stitch markers
Tapestry needle for darning in ends
Gauge
9 stitches = 1 inch on 1.5mm needles
Finished dimensions
Measured across the opening, unstretched = approx. 7 inches
Notes
For the record, my hat is on the small side and should fit a petite newborn. I haven’t tried it yet, but using a 1.75mm (US #00) or a 2mm (US #0) at a slightly less extreme gauge should produce a hat for a larger newborn and 3 month size, respectively. If you want to work this at a standard gauge of 7 stitches per inch but end up with the same size hat as I made, cast on 100 stitches, and place your markers every 20 stitches. Follow the instructions as written EXCEPT that instead of following the (K23, K2tog), (K22, K2tog) or (K21,K2tog) directions instead ALWAYS knit until two stitches remain before your marker, then knit those two stitches together. I had plenty of yarn left over from my hat and booties from my one 50 gram skein of sock yarn, you shouldn’t run out even if you knit a larger hat or a hat at a less extreme gauge.
Directions
Using a very stretchy cast on (I used half-hitch) cast on 120 stitches and divide among your needles. If you are using one or more circs, mark the beginning of the row with a stitch marker for convenience.
Knit 12 rounds. Purl 4 rounds. Knit 4 rounds. Purl 4 rounds. At the end of this, counting the self-rolling bit of stockinette around the hat’s edge, you should have the appearance of three welts at the hat’s bottom edge.
Continue knitting until the hat measures 2.5 inches from the bottom. (Measure this with the curling edge curled. Don’t flatten it out.) On the next row knit 24 stitches, place a marker, then repeat. If you’re using DPNs, you’ll have 4 markers in your work, with the division point for the last one being the break between needles that aligns with the dangly cast-on end. If you’re using circs, you’ll have five markers in your work.
On the next round, (knit 23, K2tog). Do this five times total to complete out the round. Each decrease will occur JUST BEFORE a marker. Knit 4 rounds.
On the next round (knit 22, K2tog). Do this five times total to complete out the round. Knit 3 rounds.
On the next round (knit 21, K2tog). Do this five times total to complete out the round. Again each decrease will occur just before a marker. Knit 2 rounds.
On the next round knit to two stitches before the marker, then knit 2 tog. Do this five times total to complete out the round. Knit 1 round.
From here on in every round is the same – Knit until two stitches before a marker, knit those two stitches together. Repeat to complete out the round. Keep doing this until only five stitches remain on your needles. When only five stitches remain, work them I-Cord style for five rounds, then end off. Darn in both ends.
TARTS AND BERRY BIMBOS
Another descent into deadline hell for me so posts here have been/will be sparse again.
I did manage to squeeze in a strawberry tart. Made entirely from our own home-grown strawberries.

Three years ago I got one plant from a neighbor, and put it along with some lirope in the sunny side garden near our giant grass. I know that strawberries spread by runners, and between the two low, green, spreading plants, I hoping for a nice ground cover in between the roses, heather and blueberry bushes, sort of a green mulch.
The first year the strawberry plant established itself. The second year it conducted a savage land war with the lirope, which is now pushed to the edges of the area. There were a couple of berries, but the squirrels got them long before we did.
This year there are strawberries everywhere. My ground cover hopes have come true. The plants are thick enough to suppress all but the most insistent weeds. In addition we’ve got berries! LOTS of berries! So far we’ve picked about four pints. Not much by commercial standards, but enough for a nice fat tart and several breakfasts. And they’re GOOD. My girl-next-door berries are a far cry from the centerfold-bimbo ones trucked into the local market. True, mine are no where near as huge nor as pretty, but they’re intense and firm with a flavor the watery supermarket berries can’t match.
Slow going too on the Clarke’s Law sampler. I’m still working on the current voided strip. Again, filling in the background with long armed cross stitch takes longer than just working double running outlines. That and time compression are slowing me down:

And for Karen in California, who wanted to see the whole thing so far:

This is roughly 7 months of stitching, for between 30 and 90 minutes per day (my first post in this series was back on 7 December of last year).
Next will be a very wide strip, probably worked two tone using both the red and the black together. Slightly less dark than the narrow strip I’m working now, but denser than the motto bearing areas above it, to help anchor the bottom. I’ve got a couple of candidates but haven’t decided exactly which one to do. After that it’s probably between one and three strips to finish out the cloth, depending on width of the patterns chosen, filling in the area east of “Magic” with an author attribution in a smaller font (probably balanced with a narrow strip to take up any remaining space); and doing some end of line doodles to square out the ragged right in the other text strips. Then finishing and framing. Taa daah!
PS: Thanks to adnohr. Both the Ursa and XStitch Studio programs are on my list to review, once I return from the shadow of deadline doom.
BIRTHDAY PRESENT
My sampler continues to grow. Here’s the progress on my latest strip. Filling in the background with long armed cross stitch does take quite a bit more time than does just working the outlines in double running:

In other news, I celebrated yet another anniversary of my 21st birthday over the long weekend. The Resident Male helped me snag a copy of Lotz on eBay as my present (special thanks to Long Time Needlework Pal Kathryn, who pointed me to it).
What’s Lotz, you ask? One of the leading sources on historical pattern books. In 1933 he began the systematic categorization of all extant historical pattern books printed prior to around 1700 or so. His Bibliographie der Modelbucher is a compendium of his research and is considered to be the seminal work in the field. It’s in German, with over 100 plates of page reproductions at the back. I had used some of the Lotz pages when I graphed up patterns for TNCM, but now I have my own copy of the 1963 edition. Although I don’t read German, I’m looking forward to puzzling out the text with the help of OCR software and translation utilities, and learning more.
In the mean time, those of you who wish to see some 16th and 17th century modelbooks, I recommend Pal of Pal Mathilde’s on line linked bibliography as an excellent place to start. To be able to find some of the sources readily available on the ‘net is a wonderful thing, although doing in-person research in libraries does have the collateral benefit of seeing the book two over on the shelf from the one you were seeking. Mathilde has gathered together a selection of reproductions that are readily available (one may require retrieval of a dead link via Internet Archive).
I’m still investigating possible platforms for charting double running stitch. So far none of the commercial needlework specific packages have presented an overwhelming advantage. I’ll detail more of those trials at a later date (you can read reviews of several candidates in my posts from February 2010). I’m now looking at commercial general purpose graphics programs, including Visio, Open Office Draw, GIMP, ArtRage, ArtWeaver, Real-Draw, and others. Criteria for selection include:
-
Ability to graph VERY LARGE projects legibly on 8.5″ x 11″ paper
-
Visual breaks between consecutive individual stitches (as opposed to showing a series of many stitches as a solid unbroken line)
-
Ability to represent the background as dots rather than graph squares (to complement the visual break stitch illustration method)
-
Standard freeform capture/copy, rotate, mirror and flip tools
-
Ability to represent both line and solid unit patterns
-
Ability to vary the width of straight stitch units (to represent various thread thicknesses)
Most needlework packages handle #4 and #5. Several also do #6. The do however fall down on #1 because tend to present patterns at large scale for legibility and in deference to most modern stitchers gauge preference. It would be difficult to use those packages to graph out high stitch count repeats without the patterns overflowing onto multiple pages.
I’ve only found one package that does #2, but to achieve it I run afoul of #1, because the real estate required to represent the stitches as units is prohibitive. #3 is alien to everyone. I appear to have invented that method of presenting counted thread stitching when I doodled up TNCM. It worked, and I’d like to use it again (with edge notation on count), but it appears that the only way I’ll find it is to figure out how to do it again on my own.
PUBLISHING AGAIN?
The latest strip:

I’ve been alternating red patterned panels and lines of black lettering. I’ve run out of lettering, but I’m keeping the red-black-red alternation. This one is also from the V&A 14.931 sampler. I’m working the foreground double running stitch using a single thread of DMC 310 black, and the background in long armed cross stitch using two strands.
I’m having way too much fun with these patterns to stop. I’ve been talking about a sequel to TNCM for years, but now I’m engaged in doing it. I’ll be resuming my search for a decent charting program (or general purpose graphics program) specific to the needs of legible presentation for double running stitch. And given my horrible experience with the publisher of The New Carolingian Modelbook, I’m looking into other options, in specific – the feasibility of self-publishing, but I know very little about the various web-based micropublishing alternatives, but I’m open to all concepts. I do know that for this type of book paper copies are still valued by most. I don’t believe that there’s a critical mass of stitchers out there yet who would make use of an ebook stitch reference when hard copy sits so quietly in one’s workbasket without consuming batteries.
I’m also considering different formats. The last book was a 200+ page compendium of patterns, with lots of appendices of various sorts. I don’t think that’s necessary this time out. Other options exist. Shorter booklets or broadside sheets for example lend themselves more easily to web-based publishing both for the issuer and the downloader. Pricing is also problematic. The income stream this would represent is quite small, and the burden of record keeping as a small business for taxes is immense by comparison to any possible profit (discounting entirely the major effort involved in creating the work itself).
So I put these question to the few folk who visit this place and who I presume might be interested in such a thing:
1. Would you be interested in a sequel to TNCM?
2. Would you find ebook format (meaning to be read on a book reader or iPad) useful?
3. Would you be open to receiving a print-your-own PDF rather than bound paper?
4. What length book would you consider worthwhile – a leaflet of 20 pages or fewer? A booklet of 21-50 pages? A small book of 50-100 pages? 100+? (Bearing in mind that content for a 100+ page book would take a while to compile).
5. Any suggestions for publishing options aside from self-created PDF download via wiseNeedle, or commercial services like Lulu, iUniverse, or Etsy? Any cautions on the commercial service route?
6. Would you object to a higher proportion of original and adapted patterns mixed in with exact stitch recreations, so long as all patterns were documented as to origin and modifications (if any)?
7. Anything else you want to see in a book of patterns of this type?
A PATTERN’S PEDIGREE
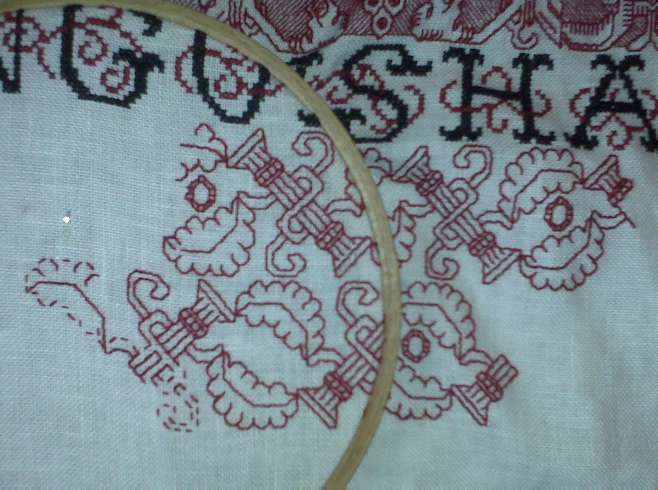
The latest strip. As you can see, a relatively un-normal quiet week allowed me to finish up the last lettered strip and begin the next. This one is done in standard double running stitch (aka Spanish stitch, Holbein stitch) using one strand of plain old DMC cotton embroidery floss. I was thinking of working the background, but I think I’ll leave it plain. I don’t want to overwhelm the delicate scrollings.

I graphed this from the same photo of a Victoria and Albert Museum sampler that many of the other strips here and in TNCM came from. If the link above doesn’t work, search for item #T.14-1931 (it’s also pictured in Drysdale’s Art of Blackwork Embroidery). It’s listed as Italian, 16th Century in the museum records, but Drysdale lists it as later. Another source lists it as Spanish, which is where the attribution in TNCM came from, but that’s wrong and if I were to re-issue the book, would be corrected. If you squint at the photo you’ll see the sources for my tilting columns, grapes, and the hops flowers and plume flower strips.
But this pattern doesn’t appear only on this one source (right edge, lower four up from the bottom, and just below a red pattern, also see the snippet below). The unknown keeper of the www.drakt.org website took some photos of other samplers at the V&A among them is a page of showing shots of two cases of voided work. Thank you Unknown Keeper! If you look at the centermost of those three photos, you’ll see a pattern very much like the one on 14.931, but instead of outline only like that sampler’s (and my) rendition, this one has a filled in background. Here are the three versions of my current pattern side by side:


The 14.931’s version is on the left. The unnumbered V&A bit from the Drakt site is in the center, and mine is at the right. I charted mine from 14.931, as best I could. Thankfully I have a better photo from which to work, provided by long time stitchpal Kathryn. For the record, I have not seen this exact base pattern with its distinctive frilled/curvy leaves in my amateur’s wanderings through historical modelbooks, although there are quite a few designs in them that are vaguely similar to it.
Let’s look at the two historical pieces. The V&A calls out 14.931 as possibly being a professional’s work sheet – a sampler in the truest sense of the word, collected by a stitcher of high proficiency as a record, as a reference. The stitcher did just enough of each pattern to set the repeat. The Drakt photo is of a finished band, tricked out with accompanying side flourishes. I’m not sure what the finished band would have adorned. Possibly a pillow or bedcovering, or some table linen. It’s not impossible that it came from clothing, but linens are more likely.
Discounting the worked background, the similarities between the two outweigh the differences. Those are minor – the treatment of the center binding band and stems/bodies of the central flowers, and the treatment of the diagonal arm that links each up-down motif. 14.931 uses a more architectural binding in the center, with more delicate center stems. Its diagonal arm is adorned with an S-shaped squiggle rather than chained solid fill diamonds. But even with the differences between the two historical renditions, it’s clear to me that the two stitchers involved were cribbing from the same source, with minor changes creeping in much like the modern game of telephone, in which a comment whispered to one end of a line and then passed up along the chain often turns out different than the original message. I happen to prefer 14.931’s lines and proportions, so that’s the pattern version I started with.
My amendations are mostly in the treatment of the two terminal flowers in the pattern’s center, a minor elaboration of the binding bars in the center, and the filling in the diagonal arms that connect each central motif. I didn’t like the sponge like “down flower” at the center of 14.931, and I had trouble seeing exactly what was going on with the “up flower.” Plus I didn’t like the smashed tulip look of the comparable center bloom in the Drakt photo. I tried several variations on the S-squiggle in the diagonal arm, but didn’t like any of them. I ended up with th ladder shape in order to make the airy and open terminal acanthus-like leaves look lighter by comparison. And then I added the second narrow binding bar to correct proportions in the motif’s center. I could have raised the original bar two stitches, but I liked the way that it lined up with the separation between the leaves, so instead of moving it I increased its depth and intensified 14.931’s horizontal lines.
I consider my own changes very much in the spirit of the original, and well within the range of variation presented by the two historical samples. I’ve preserved the look and feel of the pattern without debasing the delicacy or detail of the original, and left it a totally identifiable scion of its parents while tweaking it just a bit to my own taste. Your mileage may vary.
UPDATE (2 June 2023):
I have found another example of this design. This snippet is in the collection of the Rhode Island School of Design, Accession 47.292. They do not assign it a geographic or temporal attribution. Because of the way the detail has eroded, it does look a bit shopworn to me, like a copy of a copy of a copy.

ACTUAL PROGRESS!
Thanks to a relatively quiet week with only two late nights and one day of weekend work, I managed to make significant progress on my sampler.

I finally finished the band of tilting columns and started on the final line of lettering.

After the lettering I have room for several more patterned strips, the exact number depending on how wide each one is. I’d like to include a row of strawberries, but I haven’t found a historical pattern for them that I really like, so I’ll probably doodle up one myself. I’m also considering several inhabited bands, with dragons, lions or mythological creatures, not unlike the mermaid strip I included in TNCM.

Another possibility would be a series of two-tone patterns, using both black and red in the same strip; or another long armed cross stitch band of a pattern similar in style to the one at the top, but worked voided. That would be very heavy though, and if done at all, should probably be relatively narrow. Maybe I’ll save that for the last one, to give weight to the bottom of the composition.
(SOFT) BOOK OF AGES
Obviously I bored most of the reading audience here totally to tears with the last post. How about something simpler today?
Quite a while ago I tried my hand at submitting patterns to print and on-line magazines. I quickly found out that it’s impossible to arrange creativity on a schedule, and that because my career is 100% hard-stop deadline driven, adding deadlines to my hobbies sucked all the fun out of them faster than teenage vampires exsanguinate each other. Be that as it may, I had limited success – some of my designs were published. See Saw Socks in an early edition of KnitNet, a pattern that helped launch the popularity of self-striping yarns:

I had some pieces published by Classic Elite, a few of which remain in their print collections, and one small item – also published by KnitNet – that I thought had disappeared entirely.
But nothing in my house disappears forever. It might become entombed in a box somewhere, but forgotten in this case is not the same as gone. I was doing some spring cleaning and de-cluttering this weekend and found the soft book baby toy that I knit long before the arrival of Younger Daughter (now in middle school).
This piece does not photograph well, and for my limited camera skills poses an additional challenge. It was knit in a long strip, with “pages” each framed by garter stitch. There are three of them, each with a different motif:


After the strip was knit, it was folded accordion style, and the tops and bottoms of each page were seamed together. Finally the leftmost edge of the front page and the rightmost edge of the last were sewn up to make the spine (I’d left the garter stitch edging on those two ends longer to compensate for the bulk of the book).
I used Bernat Handicrafter cotton at about 5 stitches per inch. The pages are each approximately 5 inches square. The two number-bearing squares each sport bobbles, one on the 1 page, two on the 2 page. The whiskers on the cat face are solidly knotted bits of the same yarn. The idea being that nothing on the book should come loose if it was mauled by the target recipient.
I had plans to offer up a whole bunch of additional simple graphed motifs in concert with the knit sample, but KnitNet was only interested in the original six. I have no idea if anyone else ever made this, but the original book was well loved (and chewed) by Younger Daughter when she was in the toy-ingestion phase. As you can see, the Handicrafter held up well, surviving lots of hot washes, although the yellow triangle and pink 2 pages both are no where near as vibrant as they once were.
OCULAR PROOF?
The latest strip. Unusual because of the columns:
Angelique asks when this type of needlework was popular. I respond that double running stitch came into vogue in the early 1500s, and continued to be worn for the next 130 years or so, although the actual designs worked in the stitch changed over that period. The strips I’m doing now are late, mostly adapted from a photo of a sampler, and that sampler is dated to the late 1500s, early 1600s. Which would put it at Shakespeare’s time and just after.
So. Does my favorite style of needlework appear in Shakespeare? Possibly. People have looked to his texts and found all manner of things that might or might not be there, but I have a feeling that double-sided counted work of this type did make an important cameo.
My case? Othello.
As those of you who know the play remember, Othello is swayed to believe in his wife’s supposed infidelity by scheming Iago, who points to a particular handkerchief as proof. Othello had given the piece to Desdemona. It was filched by her lady in waiting (Iago’s wife) and planted as manufactured evidence that Desdemona was having an affair with Cassio, Othello’s trusted favorite whom Iago envies and despises. The play’s central tragedy results.
The handkerchief is mentioned in a couple of places. It’s in Act 3, Scene 3:
IAGO
Nay, but be wise: yet we see nothing done;
She may be honest yet. Tell me but this,
Have you not sometimes seen a handkerchief
Spotted with strawberries in your wife’s hand?
OTHELLO
I gave her such a one; ’twas my first gift.
IAGO
I know not that; but such a handkerchief –
I am sure it was your wife’s–did I to-day
See Cassio wipe his beard with.
And is described further in Act 3, Scene 4:
OTHELLO
That is a fault.
That handkerchief
Did an Egyptian to my mother give;
She was a charmer, and could almost read
The thoughts of people: she told her, while
she kept it,
‘Twould make her amiable and subdue my father
Entirely to her love, but if she lost it
Or made gift of it, my father’s eye
Should hold her loathed and his spirits should hunt
After new fancies: she, dying, gave it me;
And bid me, when my fate would have me wive,
To give it her. I did so: and take heed on’t;
Make it a darling like your precious eye;
To lose’t or give’t away were such perdition
As nothing else could match.
DESDEMONA
Is’t possible?
OTHELLO
‘Tis true: there’s magic in the web of it:
A sibyl, that had number’d in the world
The sun to course two hundred compasses,
In her prophetic fury sew’d the work;
The worms were hallow’d that did breed the silk;
And it was dyed in mummy which the skilful
Conserved of maidens’ hearts.
Later in the same Act: Cassio comes upon the handkerchief and gives it to his doxy Bianca:
CASSIO
Pardon me, Bianca:
I have this while with leaden thoughts been press’d:
But I shall, in a more continuate time,
Strike off this score of absence. Sweet Bianca,
Giving her DESDEMONA’s handkerchief
Take me this work out.
BIANCA
O Cassio, whence came this?
This is some token from a newer friend:
To the felt absence now I feel a cause:
Is’t come to this? Well, well.
CASSIO
Go to, woman!
Throw your vile guesses in the devil’s teeth,
From whence you have them. You are jealous now
That this is from some mistress, some remembrance:
No, in good troth, Bianca.
BIANCA
Why, whose is it?
CASSIO
I know not, sweet: I found it in my chamber.
I like the work well: ere it be demanded–
As like enough it will–I’d have it copied:
Take it, and do’t; and leave me for this time.
So allowing me the license used by many Shakespeare pretenders, what we’ve got here is a handkerchief – essentially a two-sided piece work, embroidered with strawberries. There’s an allusion to the embroidery being a deep crimson silk (“the dyed with mummyconserved of maidens’ hearts”), although Lord alone knows whether or not mummy was actually used as a dyestuff, and if it was, what color it might have produced or abetted. We’ve got a link between the work and a mysterious Egyptian/Moorish origin. It’s worth noting that the name for double running stitch at the time of the plays debut was “Spanish Stitch,” and it was wildly fashionable and popular. Plus it’s clear that whatever type of embroidery it was, it was easily copied.
Taken together – reversible, red (along with black, one of the most fashionable colors for Spanish Stitch), stitched in silk, easily copied, link with Moorish origins – that’s my style!
If the local amateur troop ever decides to stage Othello, I think I’ll volunteer to stitch the handkerchief. And I plan on doing a strawberry panel on the current sampler, for good measure.
BRIAR ROSE BISCORNU
Work continues to gnaw on my life and spit out the bones, but I do have something to share. Caroline, a regular reader of the blackwork discussion group on Yahoo, used a line unit pattern from TNCM to make a sweet biscornu:

The pattern she chose is the Brier Rose Twining Border (Plate 51:1). It’s one of my own as opposed to a pattern with a specific period source, and it’s one of my faves. I really like the way she’s taken the corner and adapted it to fill the top of her pincushion with a chaplet of roses. I’ve used the rose pattern several times, but always as a longer border run either with or without the corner; and I’ve never played with working the flowers and stems in different colors.
What’s a biscornu? It’s a little eight sided pillow-type pincushion, made up from two squares of fabric of the same size. They often have a bead, button or stitch dimpling the center to accentuate the shape. Some are stitched on both side, some on one. Biscornus have become more popular recently, with the enthusiasm for them starting in Europe a couple of years ago. Their popularity has blossomed because they’re a charming little project, ideal for showing off counted or freehand embroidery. They’ve been featured in recent issues of both print and on-line stitching magazines and blogs, with lots of free patterns on line. There’s a nice article about making biscornus here.
To get the odd shape (which is the origin of the name, from the French for “quirky,” or “odd shape”), the two squares are sewn so that the points of one square align with the center of the sides of the other (think about taking the two and matching them exactly, then give one of the squares an eighth of a turn clockwise or counterclockwise). Caroline has finished hers especially nicely, with neatly done stitching along the seam. You can see the point of her bottom square matching up with the center of the stitching on her top, ornamented one.
In any case, great job Caroline! A lovely (and useful) little project. I’m delighted that she thought to share the joy of her needle with me, and that she consented to give permission for me to share it with you.
If you’ve stitched, knit or otherwise worked something from one of my patterns and would like to see it posted in String’s gallery, please let me know.
FROM THE BACK
Suzie asks to see the back of my Clarke’s Law sampler. Here it is in the dawn light:

I’ve not been very assiduous about making it 100% two sided, but double running stitch does lend itself to highest efficiency if one follows that logic. I’m also using knots, for which I am wildly unapologetic. Also, I’m not one of the back-is-perfection nazis. Neat, yes. Long jumps and stringy bits can be shadow-visible from the front of the work. Plus work should have a logical progression that uses thread efficiently. Rabid about it though – no. Historical works weren’t perfect.
If you notice, both the plume and hops flower patterns contain elements that cannot be worked 100% double sided – isolated lines or units not attached to the main work area. For example, in the hops flowers those are the little detached diamonds that inhabit the central motif. If I were to work this pattern double sided I’d modify it slightly, adding a vertical connecting each of those diamonds to the lozenge that surrounds it. That way front and back could be completely alike. But since the back on this won’t be visible once it’s mounted, I’m not making an extreme effort. Still, you can see that with the exception of the voided backgrounds, I’m pretty close:

Plus as you can see from the back of the piece at the top, I’m on the letters that follow the hops band. What to do next? I haven’t decided yet.
