QUESTIONS AGAIN
More from the inbox.
Stitch marker in the middle of decreases
Stinkyknitter is also working on the Paisley Shawl. She noted thatsome of therepeats in the second chart begin or end with a decrease, and asks how I manage stitch markers that end up in the middle of two stitches that are supposed to be worked together.
I move ’em.
Being a Continental style knitter, I’m loathe to remove my hands from my needles while I’m working. I usually use my "third hand," grabbing the offending stitch marker in my teeth and holding it for the one or two stitches required. One of the reasons I started using broken earring fobs and making fancy stitch markers a gazillion years ago was that the hanging ornaments made them easy to grab this way.
On my Paisley, the only markers that need to be moved are the plain split rings. They’re pretty small – small enough in fact to be slid through stitches if need be, but they’re also wide enough to stay put unless otherwise "encouraged." When I get to a SSK that’s bisected by a stitch marker I use my needle tip to pop it through the leading stitch, then transfer it to the right hand needle, and work the SSK on the appropriate (far) side of the marker. On K2togs, it’s the third hand method.
Yes it can be a pain to stop and shuffle them around. When I graph up repeats for my own use, I often finagle the beginning and end points so that my markers don’t end up splitting the difference in the decreases.
Re-knitting tension
A couple of people wrote to ask about gauge tension in the re-knitted repairs. They asked if the new replacement work looked different from the rest of the piece, or if the stitches at the edges of the new work where it bordered the old were distorted in any way.
To be truthful, a bit of care is needed when you’re re-knitting the ladders after ripping down. There is great temptation to start out each row working rather loosely, then wrestle to eke out the remaining stitches from the remaining length of the ladder strand. I make a conscious effort to avoid this, and try to form all my stitches with the same tension as the original knitting.
A couple of times I’ve had to re-knit a cable, and that cable was centered in the section being re-knit. I tried working the crossing several times, but always ended up not having enough of the ladder strand available to finish the couple stitches that came after it. So I worked that particular row from both ends, picking up the stitches to the left and right of the cable and then sliding them onto the needles that held the "good" knitting on either side of the section undergoing repair. After they were rescued, the only stitches that remained on my fix-it DPN were those of the cable crossing itself. I did those last, absorbing the tightness into the natural tightness of the crossing.
As far as appearance, after my usual post-knitting wash and dry prior to assembly, any unevenness is smoothed out. I’ve never needed to do anything else to a re-knit repair, nor have any of them been recognizable as such after garment completion. (If I had time instead of rushing out the door to work right now, I’d dig up some pieces that were fixed mid-stream and take some pix to prove it.)
Pattern source
A couple of people missed my first post on the Paisley Shawl earlier this week, and wanted to know where they could find the pattern. It’s in the Spring 2005 edition of Interweave Knits – page 96. Not the Summer edition that (most) subscribers received last week, but the one before that.

Writing
Thank you to everyone who sent in kind words about the tech articles at String. To be truthful, this blog is a busman’s holiday for me. In Real Life I’m a proposal writer, mostly working in/with engineering or high-tech firms. Compared to communicating concepts in nuclear engineering or high-end routing, writing about knitting is easier and lots more fun. Plus winging my way through this has reinforced my appreciation for editors. I’m embarrassed to admit the number of spelling, grammar, or punctuation mistakes I fly past without noticing while I’m writing,but find later. To quote a former boss, "Only fools proof their own work."
REMEMBER ME? ALSO PAISLEY SHAWL
Here I am!
The life that intruded last week was a spring break visit to Florida, featuring an official Dual Grandparent Visitation. We left last Friday morning, spent several days in the Aventura area with my family, then zipped up to West Palm Beach to visit my in-laws; then returned south for a splendiferous Passover seder. We flew home this morning.
Aside from making the standard "arms tired" jokes, I can say it was an enjoyable whirlwind of a week. The kids are suitably viewed, the grandparents accordingly pleased and proud, the weather was wonderful, and we had lots of fun doing tourist-type things. More on them later this week.
On the knitting end, I can report zero progress on Rogue. I didn’t take it. It was too big, with too many adjunct parts (magnet board, multi-page pattern, extra yarn, pouch of vital knitting doodads). Instead I took the Birds Eye Shawl to finish. But it is Birds Eye no longer. I like the gauge and needle size for the pattern. I adore the pattern itself. I love the yarn I used. But not all together. The more I got into the piece, the more I realized that the hand-dyed multicolor was fighting for attention with the graceful eyelet pattern. So I ripped back the entire thing – roughly two feet measured from the triangle’s tip. Instead I’m working the Paisley Lace Shawl from the Spring issue of Interweave Knits. Scroll down almost to the bottom of this page for IK’s photo of the thing.
I had worked on the Birds Eye shawl on the flight down, but grew increasingly unhappy with it as I knit. By the time I got to our destination, I was looking for an excuse to do something else. In a classic example of good deeds coming home to roost, I’d given my mother a gift subscription to IK this past holiday season. She pulled it out to show me a project she was contemplating, and I riffled past the Paisley. It would work. The pattern is mostly solid garter stitch on large (for lace) needles. The garter stitch is worked in a square from the center out, and is pierced by little flower-like quads of eyelets. The solid area shows off the colors of the hand-dyed quite nicely, and the eyelets provide just a hint of interest instead of major league competition. The flower eyelet center is ringed by a band of motifs that give the piece its name. The effect is sort of reminiscent of the pattern placement in a bandanna, but done in lace.
So far ‘m almost to the end of Paisley’s center section. I’ve got one more repeat of the flower eyelet chart to do. Then it’s on to the namesake pattern around the edge of the piece. I may have enough yarn in my Lorna’s Laces Helen’s Lace to work an additional bit of trim around the outside of the paisley section. Lord knows, I can’t just do a pattern as written – dire things might happen.
Pictures as soon as I find the digital camera. I packed it and took it with us.
ROGUE – PROGRESS; ALSO WHILE THE CAT’S AWAY
More progress to report on Rogue. I’m well into the fronts now, about 26 rows or so into Chart B. As you can see, the hood yoke pattern is working out nicely:
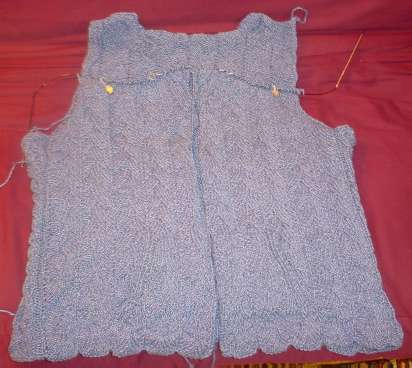
My next worry will be whether or not the shoulder areas meet up properly, but I’m assuming that if not, I can wing it. I’m also assuming that I’ll be able to tinker with the hood depth a bit if I need to compensate for my different gauge. I’ve already started the hood motif a bit later than called for in the pattern to balance out my smaller row gauge.
What’s happening to String or Nothing?
My guess is that you’ll be popping back a couple of times over the next week or so to see what I’m up to. But you’ll find this page still current. Life is going to intrude in my life big time over the next two weeks. I will try to provide updates, but I can’t guarantee them. In the mean time, feel free to browse the archives. To be immodest, here are some of the more interesting bits here:
Reference shelf – articles that contain knitting advice that I hope is useful. Of particular note under this category:
- Yarn Labels 101 – a basic round-up of what’s on yarn label and how to read them.
- Yarn Labels 102 – a continuation of yarn label info deciphering
- Skeins 101– What are the common ways yarn is sold. How to prepare them for actual knitting.
- Skeins 102 – a continuation of the previous, with more on how to get started
- Gauge 101 – Basic hints on making and measuring gauge
- Why Toe-Ups? – The case for toe-up socks
- One Circ/Two Circ Sock Knitting – Using the one giant circ (aka Magic Loop) and two-circ methods for knitting in the round
- Self striping sock yarn repeats – Lengths of pattern cycle repeats for some common self-stripers
- Twisted stitches – What is stitch mounting and why does it make a difference?
- Attaching I-Cord – A couple of ways to knit the stuff onto the edge of your piece
Gadgets – tools used by knitters. Most useful posts include:
- World’s cheapest magnetic board
- Making your own stitch holders
- Strickfingerhuts – Those twisted wire and plastic molded yarn holding gizmos used by Continental style knitters for stranding.
- Stupid Stitch Marker Tricks – They’re useful for lots more besides skittering behind the sofa.
- Strickmuhles – I-cord mills – waste of money or nifty gizmos?
- Needle gauges
- WPI tool
Knitting Patterns – Mostly quick and easy stuff I haven’t gotten around to adding to wiseNeedle yet:
- Simple fingering weight wrist warmers/fingerless mittens
- Fingerless Whatevers – fingering weight wristlet/fingerless mitten with shaped thumb gusset
- Lacy scarf in Berroco Zen or other medium-weight ribbony yarn
- Center-out poncho
- Teeny sock for Red Sox fans
- Paw Warmers – Ultra-easy kids’ bulky yarn wristlets/fingerless mittens
- Lemonade hooded shawl with pockets schematic
Stitch or color pattern graphs:
- Interlace repeat
- Bunny from TNCM
- Dragonflies from TNCM
- Texture patterns – 16 stitch wide mock cable, lace panel
- Texture pattern – Serpentine Rib
- Texture pattern – Broken Rib Check
- Texture pattern – ultrasimple six row feather and fan variant
- Texture pattern – points
- Texture patterns – Dragon Skin and variant
- Fleur de Lys
Embroidery – My other life. This stuff is mostly show and tell.
- Forever coif – blackwork coif in progress. Still.
- Underskirt – what the coif is supposed to go with
- Blackwork sampler – doodling with the patterns from TNCM
- Counted thread dress yoke
- Heretical modern multicolor sampler, plus reverse of the yoke, above
- How to drive your roomates nuts with stitching
Food – Man and woman do not live by needlework alone:
- Cassoulet
- Latkes
- Buffalo Rum Ball Cookies
- Oysters – a chocolate hazelnut cookie
- Cinnamon nut elephant ears for the cookie-challenged
- Nadia’s Yassa Chicken
There are more categories over on the side. Happy browsing!
ROGUE – GOT IT!
As predicted, in those half-sentient moments between putting down the book, taking off the glasses, turning off the light and finally falling asleep all became crystal clear. I am not really sure what my problem was with the first few rows of the hood surround, but it’s fixed now. I’m busily bumbling along, about two inches into the chart. Perhaps was brain dearth brought about by lingering flu. Perhaps it was too much stress-itis. Or perhaps it was a touch of seasonal stupidity. Whatever it was, all is humming now, although I might rip back one last time because I’m not too happy with the look of some of the earliest increases. But that’s another story of another disorder.
While I await enough Rogue progress to make an interesting photograph, I present an odd little chance acquisition. I’ve written about Balich’s before. It’s an artifact from another time – an old fashioned general merchandise store several blocks from my house. They stock piles of inexpensive things you didn’t know you could live without, all tumbled together with minimal regard for organization. They happen to have a stock of Boye knitting needles and crochet hooks, plus Red Heart yarn, some crochet thread and vintage 1960s pattern leaflets. (Want a truly authentic ’60s era crocheted poncho? This is the place to find the original instructions.)
I went in to get some keys made, and while I was there I leafed through the pile of dusty patterns. There in the middle of the stack I found one and only one of these:

What is this?
It’s a 78-page yarn yardage/gauge comparison chart in purse-size format, put out by Northern Needlecraft, copyright 1980. It’s divided by yarn weight, and presents info for about 1,000+ or so yarns current in (and discontinued by) 1980. While some of the more widely distributed products by still extant or recently deceased/merged/otherwise gone yarn makers are also present in Valuable Yarn Guide, many of the yarns and makers in this little booklet aren’t. Even more interesting, for some yarns it offers up multiple gauges. Already it has come in handy, helping me decipher a vintage pattern calling for Columbia Minerva Calibar. Which turns out to be a 100% wool bulky, knitting at 16 st = 4 inches on US #10s, 2 oz., 75 yards.
A fantastic find! Especially for the princely sum of $1.25.
WEBS REPORT
As I mentioned yesterday, today I was part of a Grand Road Trip to Webs, the yarn mega-store in Northampton, Massachusetts. It’s pretty much at the other end of the state from where I live, but this being one of the small Eastern states (as opposed to large rectangular Western states) that translates to only a two-hour car trip each way.
I will say that the entire group had fun and spent some money, but not as much as we feared we might. Webs is quite large, with both a front room laid out in yarn shop fashion, and a warren of warehouse aisles and side rooms full of industrial shelving and shipping boxes full of extra stock. It’s easy to browse for hours, and especially if you’re looking for deep discount bargains in the warehouse, it’s easy to become overwhelmed by the volume of choices.
There are some hints I’d suggest to anyone planning a trip of this type either to Webs or another discount yarn venue. They all fall along the line of "be prepared."
- Bring the tools you may need to make your purchases. Depending on the individual, these can include a calculator, pencil and paper, a PDA, and a yardage consumption card or chart. In Webs case, a small flashlight is also a good idea because in places the warehouse area is very dark. If you’re a card-carrying knitting guild member, bring your card or other proof of affiliation. Some stores (including Webs) offer special discounts to guilds, but don’t be obnoxious about it if the shop doesn’t have a standing policy about extending such discounts.
- Look through your patterns and decide if there’s something special you wish to shop for. If so, bring either the pattern or some notation of gauge, fiber and yardage required.
- Look through your stashed yarns. You may want to buy something to coordinate with, eke out, complement or knit along with a yarn you have on hand at home. If so – bring a snippet for color matching, plus notation on the quantity you have stashed away.
- Familiarize yourself with the various numbering systems used to describe yarn weights. Webs (and other stores of its type) cater to both knitters and weavers. Many yarns can be used for both crafts, and cones are not always marked with yardage or suggested gauge. For example, if you’re looking at a wool or mostly wool blend, something marked 2/10 is likely to be DK to worsted in weight, knitting at 5.5 to 5 stitches per inch.
- Educate yourself about fibers. You’ll see yarns marked as "Shetland," "Merino," or other fiber types. If you’ve done your reading you’ll realize that Merino wool is softer in general than many other wools, but in certain spins and finishes can pill more than other types of wool.
- Be flexible. You will probably not be able to find the **exact** yarn your pattern calls for (although there is considerable stock of current labels) – but you can probably find a workable substitute. Look for matches in fiber type, yarn finish, and of course – gauge. If you can’t find a marked gauge but the fiber composition is close to that specified in your pattern, do the math to check the yards per pound (or ounce, or gram). If that’s close you’ll probably be o.k., especially if you buy 10-15% extra yardage as "insurance."
- Many yarns in places like Webs are significantly thinner than most hand knitters usually use. But remember, they can be doubled or tripled to bring them up to fingering, sport or heavier weights. Two strands of lace weight (2 ply in the UK ply system of yarn weight descriptors) = one strand of fingering weight (4 ply). Two strands of fingering weight (4 ply, usually 7 spi) = DK (8 ply) 5.5 spi. Two strands of gansey weight (5 ply, hard to find in the US, around 6.5-6.25 spi) = 10 ply or worsted weight (5 spi). Two strands of sport weight (6 ply, usually 6 spi) = 12-ply or Aran weight (4.5 spi). Two strands of DK (8 ply, 5.5 spi) = 16 ply or Bulky weight (3.75 spi).
- You will have questions. The staff is used to dealing with them, but try to make the staff’s life easier. Cluster your questions to make most efficient use of their time. Try to remember where you found something, and make every effort to find tags or other descriptors and gather as much info as possible before grabbing a shop clerk. You’ll find a question like "This yarn is labeled at 1500 yards per pound, could please you tell me how much it weighs?" followed by some quick calculations on your part, and the follow up question "Would 1900 yards be enough for a long-sleeve cardigan in size 36," will give you a more useful answer than handing the clerk a cone of something with the question "Can I make a sweater out of this?"
- Be considerate of other shoppers, many of whom have trekked as far as you to get to the target destination. Don’t push; put things back where you found them if you decide not to make the purchase; avoid rooting through displays and leaving them sadly pawed; have patience at the check out (especially if you’re behind a large purchase of unmarked coned yarn); try not to block access to the shelves or aisles; and in general – shrieks of discovery are not a good idea.
- Leave ample time to make decisions. Arriving before lunch, making some choices, parking the selections and heading out to eat, then returning for a final cull and/or addition is a good plan. (If you do go to Webs, I recommend Sylvester’s for lunch. It’s a short stroll from the shop, the fresh air does wonders for the brain cells after the dusty, dark yarn warehouse room, the food was quite good and very reasonably priced.)
What did I buy? Just a couple of things. First, I finally got myself a McMorran Yarn Balance. That will come in handy to calculate yardage for the various yarns I have on hand. I bought a queen-size bed’s quantity sport weight cotton flake, destined for my re-do of my North Truro Counterpane. It was amazingly inexpensive, especially for the vast amount I need. And on a whim, I bought a cone of shrieking cranberry color lace-weight silk-look rayon which will (eventually) become a Hazel Carter Alcazar shawl, or maybe something else equally as dramatic.

PERSEVERE!
My older daughter is new to knitting. She just began at the Boston Knit Out this past fall. So far she’s done several foofy garter scarves for herself and her friends (first lesson in casting on and the knit stitch); a 42-stitch hat (using DPNs to knit in the round, decreases); and a felted bag (more reinforcement of knitting in the round, plus making a larger project, and I-cord, and picking up along an edge).
You’ll notice that all of her finished items were all-knit/big yarn projects. She wanted to “graduate” from all-knit and learn purling. She also wanted to use smaller needles. So we talked it over, and she suggested doing a pair of ribbed fingerless mitts. In fingering weight yarn. On US #0s. Without a pattern.
Now, did I tell her that many adults break out in prickly heat at the thought of using DPNs, let alone size #0s? Or that a 56-stitch around wristlet can contain as many stitches as an entire big-needle sweater? Or that I’ve seen grown women cry when someone suggests they knit (gasp) without a pattern?
Naah. What she didn’t know couldn’t daunt her.
So she cast on and began knitting. And knitting. And knitting. She plugged away at her mitts every evening after homework, while we (as a family) played video games. At first, being new to purling, her stitches were loose and wobbly, with ladders in the corners between the DPNs. But practice soon took care of that:
For everyone who has ever said to me, “I tried DPNs but I couldn’t manage them,” or “It takes too long to learn something new,” I present her learning progression. She worked the bottom one first, then the top one, both using the same yaran, stitch count and needles. You can see how her gauge, stitch accuracy and general neatness improved steadily throughout the project.

Sure, one’s bigger than the other, but both are wearable, and she does wear them proudly.
Knitting takes time to learn – there’s no getting out of that fact. Some people DO learn faster than others, but everyone who wants to learn IS capable of doing so. The key is practice. Unfortunately practice is a dirty word in today’s instant-dissolve, short attention span world.
Not satisfied with how something is turning out? Keep at it. Do something small and inconsequential that uses the same skills. Work out the kinks and bugs on the practice piece rather than the luxe yarn you chose for your “real” project. But keep going. You CAN do it. As the Target Child says “No stinking piece of string was going to defeat me!”
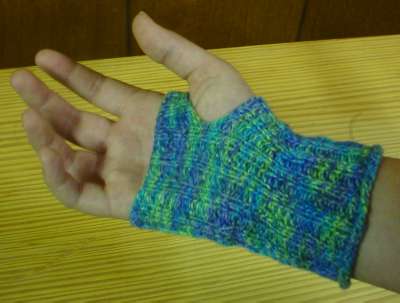
Here’s her pattern. (She?thinks her fingerless mitts look like the disc-shooting zapper gauntlets worn by a character in one of her favorite PS2 games).
Zapper Gauntlets
About 150 yards or so of a smooth non-itchy fingering weight sock yarn. This pair was knit in some remnants of On Line Linie 6 Supersocke 100 Cotton, but any sock yarn will do.
5 DPNs, Size US #0 (2mm)
Gauge: Approximately 9 stitches = 1 inch (2.5cm), measured over K2, P2 ribbing.
Cast on 56 stitches (14 stitches per needle). Join to continue working in the round. Knit six rows. Change to K2, P2 rib and work until piece measures approximately 4 inches long (10cm).
At the beginning of the next round, bind off 10 stitches. Continue working around wristlet. You should have one needle with 4 stitches on it, then three needles each with 14 stitches. When you get to the hole created by the bind-off, flip the work over and head back in the other direction. Work five more rows of K2, P2 rib this way – flat, ending at the right side of the growing thumb hole.
On the next row we return to knitting in the round. Start Needle #1 by casting on 10 stitches (all needles should have 14 stitches again). Continue in established K2, P2 ribbing pattern, working in the round until piece measures approximately 1 inch (2.5cm) measured from cast-on row above thumb opening. Bind off loosely in pattern, and darn in all ends.
That’s it!
(More in the cast-on series next week, I promise. Looking up all those links is more work than I have time for right now mid-deadline.)
DEMO SOCKS; STITCH FACTORY – MAKE ONES
I’m split among several different knitting foci right now. First, there’s the upcoming class. I’ve finished the hand-outs I’ll be distributing covering both two circ and one giant circ production;? the practice pair of socks; and the sample mini-sock we’ll be making during the workshop. I’m as ready as I’ll ever be. I’ve also gotten word of a potential design commission. If and when that occurs and I’m permitted to bruit about the details, I’ll report them here. In the mean time, here are my practice socks, dutifully completed one with the one giant circular technique, and the other using the two-circ method:

Nothing special. Just plain old Regia 6-ply Crazy Color stockinette socks, with Dutch heels, and standard toes grafted to finish. On the pair with the turquoise toe I took care to finish out the color repeat such that the line of grafting ended up being a contrasting color, so the class can see where it is.
Having put the class socks to be, I’ve picked up Rogue again. A couple of people have asked if I’m doing mirror image Make Ones on either side of the verticals that run up the design. The answer is "Yes."? I don’t usually stoop to this level of ultra-refinement, but for this project because the two Make Ones are separated by only one stitch, using them does make a visual difference. Here’s how I do them:
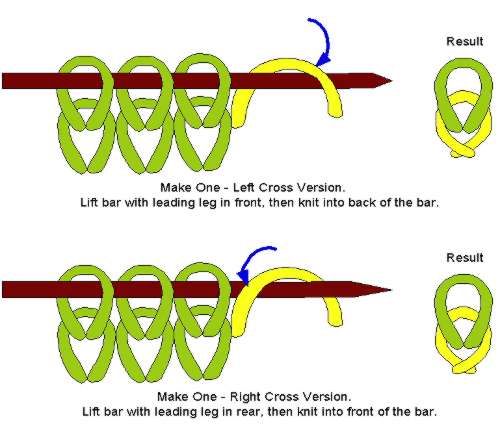
To get a make one with a top leg that crosses lower right to upper left (S-style), I lift the running bar between two stitches, mounting it such that the leading leg of the bar is in the front of the needle (standard stitch orientation). Then I knit into the
back of that bar.
To produce a make one with a top leg that crosses lower left to upper right (Z-style), I lift the running bar between two stitches, mounting it such that the leading leg of the bar is in the back of the needle (opposite of standard stitch orientation). Then I knit into the FRONT of that bar.
As to which to deploy in what situation – most of the time I doesn’t matter. My standard issue default Make One is S-style. If a pattern just calls for one, that’s the one I do. In cases where mirrored ones are needed, I’ll experiment. Sometimes the final result looks better if the S-style Make One is deployed on the left of a visual unit, with its sister Z-style deployed on the right. Sometimes it’s the other way around. On my Little Dragon Skin I’m working the Z-style on the left of the center spine, and the S-unit on the right.
Rogue photos later this week. I promise.
WOOLY FOOD
An adorable link, found courtesy of someone who posted it in a LiveJournal knitting community. The thing is in Japanese, but you can enjoy the pictures and objects without reading along.
From what I can gather using the Google language tools, while most of these items are crocheted, the strawberry shortcake (minus the berries) is machine knit. The fruit trifle tart is a box that opens up. The pear purse is trimmed with metallic beads. The chocolates are fridge magnets, and the artist suggests using the cherry topped ice cream bon-bons, the cup of cocoa and the hamburger as pincushions. The moon pie looking thing (two cookies with white filling) hides a tape measure, and the component pieces of the hamburger can be used as coasters – except for the sunny side up egg, which the author notes is too bumpy in the center for stability.
Very clever.
CLASS SOCK; kNITTING TWO ITEMS SIDE BY SIDE
No Rogue progress. My knitting time is consumed with class-related experimentation. Here’s the surviving result:

No surprise. It’s a sock knit from leftovers of the same DK-weight Regia 6-Ply Crazy Color yarn I used for The Small One’s Crazy Raglan. It’s on a single US #3 size 40-inch circ. I’m working these socks at this (for me) giant gauge so I can get in as much experimentation as possible before the actual class.
I’ve been experimenting with various heels, trying to decide which will be the easiest "classic heel" to use in the workshop for our knit-together project. I’m doing this because I’ve been told that the majority of people who have signed up have never made socks before. Some have never even knit in the round. I want the class to get through the danger spots of sock construction – cast on, a heel and a toe.
What you see above is a simple Dutch heel. It’s not as form-fitting as a round or other more finely shaped heel, but of all the turned heels (as opposed to short-row heels), I think it will be the simplest to both describe and work.
I’m still waffling between showing the heel worked entirely on one side of the sock, with the cable needle looping out done at the left and right of the piece, or re-assorting the stitches after completion of picking up along the sides of the gusset, then working the rest of the sock with the looping out at the center top and bottom of the foot. And as you can see, I’ve not yet experimented with toes. That’s next. Toes may be the kicker on stitch reapportionment. If I’m getting too much laddering with the split on the sides as established, I might re-engineer my thought and move the stitches around either immediately after completion of the final gusset row, just before the toe itself, or back before the gusset decreases are started. And that means that the poor sock you see above will cease to exist in the current form, and be sacrificed to the minor gods of ripping back.
Two items side by side on two circs
An anonymous person asked if I could show or explain how to do two things side by side on two circs.
I have to admit, I cheat somewhat because casting two items on side by side can make for confusion and twisted cast-on rows. I begin each item individually and work the first row before mounting my two items side by side. After I’ve got a scrap of knitting, i divide the stitches in half. I thread the first half of Item A onto a circ, followed by the first half of item B. Then I take a second circ and thread the other half of item B onto it, followed by the second half of Item A’s stitches.

I now have a piece that should look (more or less) like the drawing above. I work across the front side of item A, knitting from it’s own ball of yarn. Then I drop that strand, pick up the other and work across the front side of item B. When I finish the last stitch of this side of B, I flip the whole thing over, and using the same B yarn, work back along the reverse of B. Then I drop that strand, pick up the A yarn and work the back side of Item A. At the conclusion of this cycle, I will have completed a full round on both A and B, and have both strands of yarn back in the positions shown in the illustration.
KNITTING FROM GRAPHS; ROGUE; SOCK CLASS
Answer to a quick question:
Can the Fleur de Lys motif shown yesterday be used for knitting?
Sure. Like anything graphed, the fleur can be knit, but with a caveat. In cross stitch, the individual units that build a motif are square. They have a 1:1 aspect ratio, as wide as they are tall. Likewise, needlepoint units are (mostly) square. They’re worked on a square grid, but if they’re in tent stitch the stitches themselves are a diagonal spanning that square. Therefore the edges of color areas don’t always appear as neat and trim as in cross stitch. This graph is composed of square units, and is intended mostly (but not exclusively) for stitchers.
Knitting presents a different challenge. It’s rare for a knitting stitch to have a 1:1 aspect ratio. Knitting stitches are usually wider than they are tall. It’s not uncommon to have a stitch gauge of 22 stitches = 4 inches, but a row gauge of 30 rows = 4 inches (that’s the standard for a classic DK weight yarn). That works out to an aspect ratio of 22:30 or 5.5/7.5 if you simplify the representation. That’s NOT square. If you knit up a graph that’s been drawn out on a square ratio grid in this aspect ratio, you’ll end up with a motif that’s somewhat squished looking north/south direction.
There are several ways around this. First is to choose designs that have a bit of north/south spread in them to begin with. They’ll look different when compressed, but if they’re elongated enough to begin with, they’ll end up with a reasonable set of visual proportions. My lion graph, shared eons ago for people who wanted to do lion sweaters as described in the Harry Potter books is this kind of design. It’s got enough "natural" height so that it looks o.k. if worked verbatim in a somewhat squashed aspect ratio.
The second is to graph out your design on a grid that has an aspect ratio that matches your knitted gauge. If you want to do this, the English language Japanese website ABCs of Knitting features a very nice graph paper generator. It’s listed among the tools on the page’s lower right.
A third way to get around this problem is to blow up the design. Very simple motifs can sometimes be made quite dramatic by reading a unit of two knit stitches by three rows for every square on the grid. Not practical for larger gauge knits, as even a small motif could outgrow the area intended for display, but occasionally useful none the less.
A fourth fix is more of a fudge. Depending on the complexity of the motif you want to knit, you can take a plain old square unit graph and by repeating every third or fourth row (depending on your gauge), you can stretch it out to compensate for aspect ratio squish. Obviously, this works best for simple motifs rather than complex ones, and at finer gauges. I’ve done it in sport weight yarn or finer, and it has worked well enough, with the duplication fading into the overall look and not being evident. This method can be problematic though for things like graphed letters adopted from cross stitch samplers, and for ultra-small geometrics whose motifs are built on single square units. For the latter, I might be tempted to use the third method, above.
Of course one can always ignore the problem all together, placing the borrowed motif so that the stretched dimension becomes a design feature and not a bug. This is what I did with last year’s crocheted dragon curtain. I worked across the narrow dimension of the curtain rather than starting along the bottom edge, in part because the non-square nature of my filet crochet blocks would distort the motif too much if worked in the latter direction. You can see the original proportions of the graph, and the finished piece.

If you look the knight, you’ll see that in my crochet he’s taller and a bit squashed east/west compared to the original. But if I hadn’t called out the difference, I’d bet you’d not have noticed.
Rogue
Rogue progresses. I’m another two inches or so into the body. Not much more to show beyond yet another blurry photo of a slightly larger blue object, so I’ll hold off until I can post pix with more content. I can say that in spite of competing demands on my time reducing the total amount I can spend on the thing, now that I’m past the pockets and my multiple mistakes, it is fairly flying along. I am looking ahead to the next set of complications – alterations to the armhole area and beginning of the hood’s frame that might be necessary due to my gauge re-computation.
Sock Class
I’m beginning my prep for my upcoming sock knitting class, reading up on and trying out the Magic Loop technique. It may be heresy to admit, especially for someone who is going to be teaching a workshop on this method, but I find it to be fiddly and (for me) much slower than using DPNs. But I realize that there is a legion of DPN-haters out there who view this method as being their ticket to finally making socks. So I’ll persevere for their sake.
The plan is for a three-hour workshop, during which I’ll hand out an original pattern for a very abbreviated small cuff-down sock – roughly baby size, but with sadly truncated ankle and foot parts to save time. The idea is to walk the class through that ENTIRE sock in the given time, from the cast on, through the heel, and finally down to the toe. A normal size sock would be too time-consuming to get far enough for a meaningful experience, especially around the heel, so I’ll cut back on the plain old stockinette areas, leaving in just enough to get familiar with the manipulations of the needle(s). I’ll also hand out an original pattern for a normal size sock that the class can take home and use for practice.
One further complication – I prefer to teach on socks knit at DK or worsted gauge – again, fewer yet larger and easier to see stitches. But the extra-long circs for the Magic Loop method are in short supply, and are quite expensive. Likewise for the two circs needed for that method. I don’t think it’s fair to ask the class to come equipped with needles in a size that they (probably) won’t be using for their regular sock knitting, so I’m going to do the thing using standard issue sock weight yarn.
I’ve taught knitting classes before, mostly on toe-up socks, basic crochet, and on beginning knitting. I’ve been told I pack too much detail into the time alloted. In this case I will have to agree. Ideally I’d do either single oversized circ or two circ socks, not both. I do intend the choice to be either-or, as the methods are largely compatible. Learners will get their choice of working one or the other, and except for needle manipulation the basic sock-making steps should be the same for both. Obviously more thought on this is in order. If any blinding insights of clarity and nuance suggest themselves to me, I’ll post them here. Otherwise, it’s just more socks.
