NEW CAROLINGIAN MODELBOOK
I know there are folks who are looking for my book on embroidery. Every now and again a copy or two surfaces in Albuquerque, where the fly-by-night publisher was. Always at the same bookseller. It looks like that same bookseller has "found" a couple more copies. I get nothing from these sales, but I do know that people are rabid to lay hands on the thing. Even if this sale is closed by the time you get there, keep an eye on these people because if more copies resurface anywhere, it will probably be with them.
Please note that I have no affiliation with the seller. In fact on my previous attempts to contact them, they told me that I was dead (which was news to me); and rebuffed my request for the publisher’s last known address.
My thanks to embroidery pal Mistress Karen Larsdatter for spotting the sale notice!
SOMETHING DIFFERENT
The Kureopatora snake scarf continues. It’s longer, but otherwise
looks the same. I will probably finish it up tonight and post my
how-to thereafter.
In the mean time, here’s another of the embroideries that litter my
house. This one is another doodle – a sampler in the true sense,
done to try out patterns that ended up in my book. It’s done in a
single strand red linen on a linen ground, at about 15 stitches per
inch on linen that’s about 30 threads per inch. The long dark
band at the bottom was done in long-armed cross stitch. The lion,
the knot at upper left, the narrow diagonal band next to it, and the
dark band at the left edge were in more standard regular cross
stitch. THINK was stitched on the count using chain. The
rest of the patterns were worked in double running (aka Spanish Stitch,
Holbein Stitch).

The dense rose corner surrounding the lion is original, the rest
(except for THINK) all have historical precedent, and are all graphed
out in The New Carolingian Modelbook. In general I’m not that
fond of this one. Done as a true sampler as it was, placement of
the motifs was very haphazard. I stitched whatever I felt like
trying out, and if the pattern didn’t fit – I didn’t care (the leggy
grapes are truncated at the bottom edge). I didn’t plan anything,
and the imbalance of the whole thing reflects that.
THINK ended up hanging in my husband’s office for a time. That
company he was working for in ’89 used the heraldic lion as a logo element, which is why
THINK and the lion both ended up on the thing. He’s no longer there and has another,
better embroidery at work now. THINK along with its obsolete logo
has been exiled to the upstairs hallway.
BLACKWORK MERMAIDS
In the absence of any knitting progress, I offer up another embroidered tidbit.
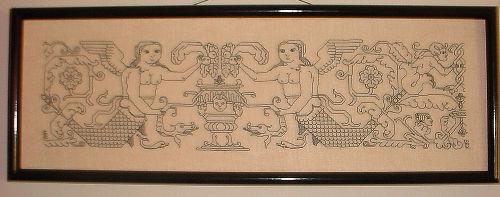
This is the last pattern in my New Carolingian Modelbook. It’s the same one that the SCA Lady Lakshmi used to make a hat for her friend Mistress Morwenna.
As you can see (in spite of my lousy camera work), my panel isn’t centered on the middle of the repeat. Instead I’ve skewed it a bit to focus on one mermaid, and to show the second bounce center – the twist at the panel’s extreme right. This is in part because I wanted to work one full cycle, but was limited by the size of the piece of linen I had available. For the record, this is done on 30 count linen (about 15 spi) using one strand of standard DMC embroidery floss.
This is one of the pieces I entered in the Woodlawn Plantation embroidery exhibition over the years. It won an honorable mention prize (feedback was that the judges didn’t like the skewing of the repeat). Amusingly enough, my brazen, bare-breasted mermaids must have offended some sensibilities. The piece was displayed at the very top of the wall in a room with 15-foot ceilings. The prize ribbon was clipped athwart the bosom of one mermaid, and a yellow sticky note was affixed to her sister’s.
QUESTION GRAB-BAG
A few knitting and non-knitting related questions from the inbox:
How did Killer Bunnies go?
Tons of fun. We played as a mixed-age group, with the youngest
being 7. We had hoped to get the Red Expansion Pack at Puzzle Me This
in Provincetown, but they were out. We settled for Violet, the
next one in sequence. The game plays more smoothly if you add
them in order because each pack builds on the last, but we were able to
use most of the Violet cards anyway.
What size needles did you use for the two versions of your counterpane?
The old version in the heavier cotton was knit on one of my odd size
needles, it’s a set of old long steel DPNs, they’re probably antique 9s
– and just a bit larger than standard US #4s (3.5mm), but closer to #4s
than #5s (3.75mm). The new piece is knit on 3mm needles, which in
some makers’ lines is a US #2, and in some is somewhere between a US#2
and a US #3.
Did you finish that embroidery doodle while you were away?

Are you planning on assembling the counterpane in the same way as the last try?
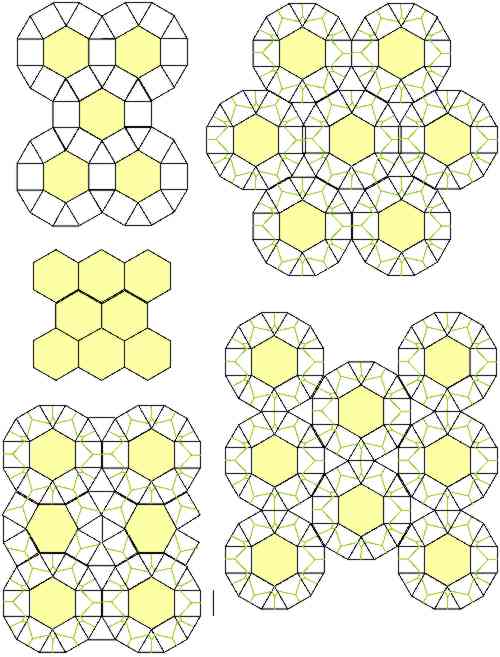
No. These units can be joined in many ways. Last time I
butted the triangles together. This time I plan to join
squares. My goal is to do the layout shown at the upper
right. Last time I used the one at the lower right. Both
use some plain solid triangles in addition to the pattern bearing units.
Where did you buy the counterpane pattern?
I didn’t. I made it up, starting with a standard spiraled
star. I added the outline-like bars to emphasize the motif, and
played with several treatments for the ground behind the star.
This one like my Mountain Laurel counterpane plays with a textured
ground and smooth star, but unlike that piece, plays a bit more with
the ground. I also wanted to do a counterpane that was an
tessellation of more interest than a flat tiled hex or a plain octagon
and hex. That’s why there are four units – the center hex, a
patterned square, a patterned triangle, and a plain triangle. The
layout above is actually an early draft showing how I played with the
concept, looking at ways in which I could use the patterned units to
extend the lines of the center hexes.
Can you send me the pattern?
Be patient. I plan on posting it to wiseNeedle this year –
probably after I’ve gotten considerably more done on the thing and have
a decent representation of the piece’s final look. I’d also like
to noodle up a complementing half hex and border.
EMBROIDERY QUESTIONS
From the inbox:
How did you draw the pattern on the cloth?
I
didn’t. I have the design drawn out on a piece of graph paper. I’m
copying that design onto the fabric, using the weave of the linen as
the equivalent of graph paper. Each unit on my ground cloth is a two
thread by two thread square. I worked from the graph to establish the
outlines in the center motif, then "colored in" the long armed cross
stitch background. I worked the first repeat of the lettuce around the
edges from the graph, but subsequent iterations of it from the piece I
embroidered (much less cumbersome than toting around a book).
Was this stuff actually done on the count in the 1600s?
A
vast amount was. There are a couple of caveats though. Some people
assert that a minority of counted thread pieces worked on very fine
linens used some other method to establish the evenly spaced graph-like
appearance. In particular, they suggest that some sort of evenly woven
but easily unraveled fabric was placed over the ground cloth, and used
as a stitching guide. The stitching was done over the placement aid,
and its threads were later removed from the work. Other people suggest
that pouncing, either over paper or another fabric was used to produce
evenly spaced dots, which were then employed as the spacing mechanism
for the ground. I’m kind of skeptical on the pounced dots thing. That’s
a ton of very smearable dots in a very small space.
Another
exception is theorized for other forms of voided foreground stitching.
(Yesterday’s piece is voided foreground). Some of the panels look more
like someone drew the foreground motifs freehand, then filled in the
background with the covering stitch. Again I can’t confirm or deny
this. Some panels (especially those with repeats) look quite precise to
me – too stitch-precise and weave-aligned to have been freehand
sketches. To my eye, the few pieces that might have been done this way
are pictorial panels that have almost a folk-art type naivety of line
and motif placement. One of these panels is pictured in Bath’s Embroidery Masterworks. While it’s not a probability that all voided foreground works were done this way, it’s not a impossibility that some were.
I’m
sure the total state of research into the origins of voided foreground
styles and Assisi embroidery has gnawed into this problem. I haven’t
kept up my reading in it of late. My long time pal and needlework buddy
Kathryn Goodwyn has an excellent article
on voided foreground stitching on line (this group of styles is her
specialty). She mentions the hand drawn outline variant as a curious
offshoot.
Are the colors accurate?
Green
wasn’t the most popular but it was used. However the natural color, brownish unbleached linen I had on hand wouldn’t have been used. A historical stitcher would have preferred a much lighter ground. The accompanying black
outlines in this piece are also open for debate. Few pre-1700 pieces
employ contrasting color outlining, although most later examples of the
style do. The original of this design clearly employs two different colors in the work. Even in the black and white photo of the original (dated
1560-1625), the background is clearly a different color from the
outlines. The original also shoed background area behind the lettuce
north and south of the main panel as being worked in long-armed cross stitch – something I don’t intend to do.
(Lettuce isn’t a technical term for the extra borders framing the main
panel, it’s just my own term of reference).
Linen thread?
It
is out there. DMC has some. There are linen threads made by other
makers, too. But sometimes expedience wins. I’m not doing this piece as
a totally accurate historical study. It really is a doodle. I’m
playing. I happened to have the Flower Thread on hand, and it worked
nicely with the weave size of my ground cloth.
I’m offended. My 11-spi stitching isn’t "coarse!"
For
me, 11 stitches per inch on 22 count linen is much less fine than the
gauges I usually pursue. I prefer the look of stitching on a really
buttery thick 50-count linen (that’s 25 stitches per inch). Compared to
that work, 11 stitches per inch is as large as logs. My doodle is a
quick study, again not intended for any purpose other than to let me do
some stitching at events, and for the fun of it.
What does the back look like?/Do you use knots?
My
backs are relatively neat, not because I’m a fanatic about making them
so and not because I believe that that’s the way they should be. My
backs are neat because that’s the way I stitch (historical pieces often
have absolutely chaotic backs that would make most modern needlework
judges recoil in horror). And yes – heresy of heresy – unless I’m
working something that’s intended to be totally two-sided, I do use
knots. No – if done carefully they don’t pull out or show through to
the front. Savage me if you must, but I reserve the right to ignore you.
What stitches did you use?
Double running (aka Spanish Stitch, Holbein Stitch, Vorstitch) for the outlines. Here’s a double running stitch mini-lesson
from the Skinner Sisters website. I could also have used back stitch, a
less represented but also historically accurate way to do them on
voided foreground works. Long armed cross stitch is less well known
than it’s X-like cousin with equal length arms, but it’s a very useful
thing. There’s a research article about it here
by Christian de Holcombe (another needlework pen pal), but a short
example of how to (along with quite a few related stitches) at this site.
Doodle?/What’s it going to be?
I
haven’t thought that far ahead. I’ll probably end up mounting this
piece for wall display. I called it a doodle because it’s an offhand
and trivial effort, a time-filler, and bit of life’s marginalia. It’s
not a Big Project, nor a planned project. It’s just… a doodle.
Your book is out of print, it’s o.k. for me to copy it, right?
No.
Absolutely not. Copyright doesn’t last until the publisher decides to
skip town, or drop the item from current inventory. US copyright lasts
75 years. Even if I get hit by a truck, that copyright is part of my
estate and would be owned by my heirs until 2070. Anyone who respects
authors, living or dead, should respect copyright.
I’m not an
ogre, hoarding rights and royalties (lord knows I’ve seen almost none
of the latter). I AM trying to get the thing back into print. One
publisher has turned me down flat in part because his research
indicated that illegal copies were being made.
So don’t do it,
as tempting as it might be. There’s more about copyright – in specific
your rights as a purchaser, as well as the author’s intellectual
property rights at Girl From Auntie and Yarnaholic Confessions.
DOODLES IN STRING
This weekend past we went to a local SCA event. We’re not very active
in the organization any more, but every now and again it’s fun to show
up and partake of the day. This particular day was quite warm, and we
arrived late – missing the most strenuous part of the planned
activities. We mostly sat in the shade and enjoyed various song and
story performances. In the evening a very ambitious dinner was served,
consisting of dozens of dishes from a recently translated 16th century
Italian cookbook.
I
keep a small sampler I work on when I go to events like this. Now that
I’m up to the easily replicated borders, I rarely stitch on it in
between events.
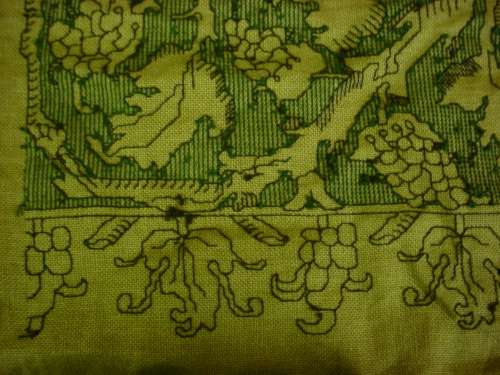
My doodle is worked on even weave unbleached linen, using DMC’s Danish Flower Thread. The
Flower Thread is a matte finish cotton. In construction this thread is a single
strand, as opposed to the more commonly seen multstrand
embroidery floss. Having used both, I find that for small pieces, this
thread mimics the look (but not the stiffness) of linen thread. I’m
working at at the extremely coarse gauge of 11 stitches per inch, on 22
thread count ground. It’s quick and easy to see.
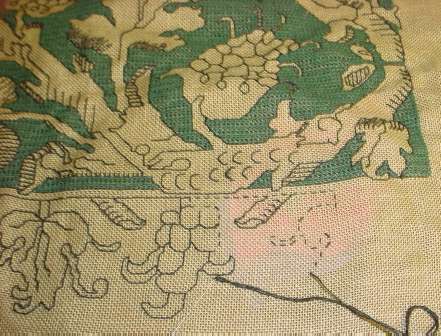
All
of the black lines in the piece are done in double running stitch (aka
Holbein Stitch, Spanish Stitch). You can see the bit in process, where
I’ve established a baseline. All of the "growths" from that baseline
are traced out and filled in again as I go along. The background is
done in long-armed cross stitch, worked back and forth across the piece
to heighten the illusion of a plaited ground. Since I’ve already done a
full repeat of the border, I no longer need to refer to my original
printed pattern. Also, because the whole goal of this piece is "quick
and portable," I’m not working it in a large rectangular frame. Instead
I’m using a plain old 7-inch diameter round tambour-style embroidery
frame. My matte finish single construction thread stands up to the
hoop’s abuse much better than does silk or even cotton floss.
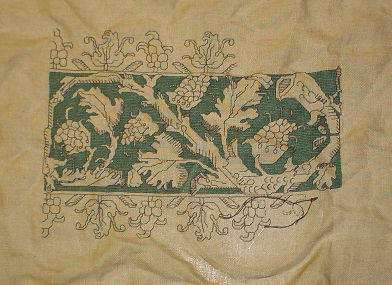
The design is another one from my New Carolingian Modelbook. It’s on Plate 74:1. I graphed it from a photo of a late 16th or early 17th century artifact, appearing in Adolph Cavallo’s Needlework.
(New York: Cooper Hewitt Museum, 1974). What I like about this design
in particular is the way the edges of the work pop past the internal
border. The meaty branches have an almost palpable vitality, as if they
can’t be contained by the formal constraints of the stitching. Working
a solid background (as was done in the original) heightens the effect.
I’ve
only tried out one repeat of the central design. The historical piece
repeated the S-shaped flourish, mirroring it at either end. Since this
is a self-contained unit, it can be either mirrored or it can be
repeated in the same orientation to make a longer length of patterning.
Period embroiders used both methods of composition to construct longer
decorative bands.
GALLERY – DRAGONFLIES AND FLOWERS
I am so flattered!?
My friend Nancy has done an amazing thing with some graphs from The New Carolingian Modelbook. She took the tulip repeat from Plate 5:1, and the dragonflies from Plate 12:2, some snappy color choices, a good eye for placement, a comfy garment shape, and a true talent for stranded knitting and came up with this:
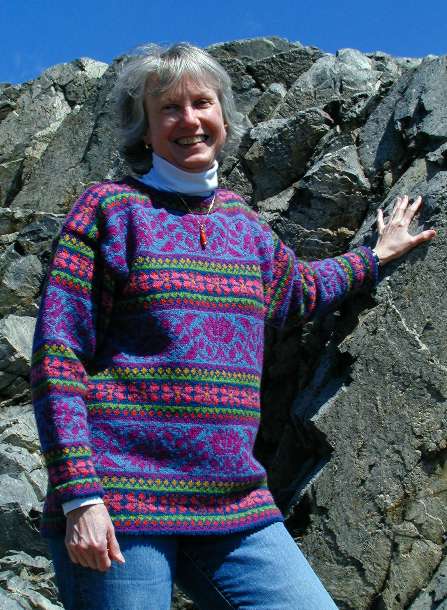
I’m tickled pink (and blue, and green, and yellow…)
Details on the graphed patterns
Tulip – This pattern was published at least?three times?prior to 1600 (early pattern book publishers freely copied off each other.)? The first appearance of it I’ve found is a book entitled Furm Oder Model Buchlein, put out in Augsburg, Germany, 1524.That makes it from?one of the earliest extant books of graphed patterns. (It’s theorized that broadside sheets were sold prior to entire books of collected patterns, but none of those leaflets survive.) The?other appearances of the tulip pattern?I’ve stumbled on were in Matteo Pagano’s Trionfo Di Virtu, Venice, 1559; and Sessa’s I Frutti, also Venice, 1564.
Dragonflies – This one is my own, inspired by insects appearing in a series of Italian pattern books from the 1530s.

The excellent photo was taken by Nancy’s friend Terri (credit where credit is due). Nancy didn’t tell me the yarn she used, but she’s a frequent visitor – perhaps she’ll see her masterpiece and leave a comment.
For those looking for a copy of TNCM, it’s hard to come by. The publisher did a disappearing act shortly after the book came on the market. Copies continue to trickle out for sale, and it sometimes shows up used or on eBay. Both Amazon.com and abebooks.com list used copies as being available, although some of them are at grasp-the-chest-and-stagger high demand/collector prices.
THE DRAGON’S VALUES
Elissa wrote to me to ask how I could tell what graphed patterns might go together well as I was looking for more borders to eke out the edges of the dragon panel. I am not quite sure I can answer, in part because I’m not quite sure I’ve made successful picks yet. I do a fair bit of this type of composing in the course of stitching up monochrome embroideries. The best way I can discuss this is to show a blackwork sampler I did a while ago:

I stitched this upwhile I was working on my book of embroidery patterns. Some of the patterns on this piece made it into the book, others didn’t. The ones I left out were ones that turned out to be too late in origin for inclusion in the book, or whose documentation and provenanceweren’t complete or accurate as the rest.
You can see several things on this mostly-blackwork piece. First, even though I was working exclusively in double running stitch (aka Spanish Stitch, Holbein Stitch) and cross stitch, there is a tremendous variation in density and the depth of tonal values among the various patterns. There is also variation in the delicacy of line, even comparing the airy double running stitch patterns. The highly geometric bit in a similar style to Jane Seymour’s cuffs (center top) presents a very different look than the curled plume-like leaves in the bottommost left.
Now this piece is far from entirely successful for several reasons, design by accretion being the leading one. Like my dragon curtain it was done "bungee jump" style. I took my ground cloth and just began stitching, picking my patterns one by one as I finished the last. The first bit I did was the sorrel leaf stripin the upper left (looks like clovers). I worked more or less across and then down from there, leaving the center blank until I hit upon something to put there. That happened to be my father’s favorite saying, and a large yale, but I certainly didn’t plan on them being there when I started. (A yaleis a heraldic goat with skewed horns, although someheraldicspecialistswill debate whether this is a goat or a yale.) The last bit to be filled in was the small rectangular area just below the yale, which I patched in with several smaller scale fillings commonly used in inhabited blackwork, finishing up with my sig strip at the center bottom (KBS ’83). I used a couple of these in my blackwork underskirt and Forever Coif, too.
Had I actually sat down and planned the piece, I would have better balanced the placement of light and dark areas, and the apportionment of delicate curved lines with harsher block geometrics would have been more pleasing. Those sorrel leaves for example are way out of place. They’re too light and too leggy sitting as they are on top of the darker knot strip. The large double star motif beneath the yale’s back hoof is also out of place. While it balances nicely with the English acorns on top of "Worth Doing" and the star and fleur de lyse at the center right edge, in combo with the Chinese peonies just above it theheavyvisual densityweighs down thecomposition along the left edge.
All this is a long way to go to answer Elissa’s question. In a piece as small as the dragon curtain, with a limited number of patterns, I wanted to call attention first to the center panel. To that end, I framed it with a strip repeat lighter in value than the average tone of the dragon and knight unit. I tried not to "fight" with the center panel, picking a repeat that was rather delicate in line rather than a heavier one to avoid the the overpowering effect demonstrated on my Anything sampler. However, once that frame was completed and I wanted to add more width, I decided to usestrips of aheavier, more geometric border around the whole piece. With luck, now that the lighter inner area has been established (sort of like matting a painting), the denser second border will serve the same purpose as a dark carved wood frame on a painting – defining the inner space inside the frame and accenting the center, by contrasting with both the mat and the piece’s focus.
FUN WITH ODONATA
UPDATE: THIS DESIGN IS NOW AVAILABLE AS AN EASY TO PRINT PDF DOWNLOAD UNDER THE EMBROIDERY PATTERNS LINK, ABOVE.
A short post today on a time-stressed weekend day.
Buzzing in on the hopping heels of last week’s bunny, here’s another small graph from my embroidery book. This super-simple one is original. One dragonfly can be spot-placed, or they can be done in series using stranding. A strip of dragonflies can bealigned either katywumpus as I show here, or all facing the in same direction. In knitting, I think that these would be particularly fun to accent with shiny beads or duplicate stitching on the body or wings. They’d also be a killer trim if done in bead knitting.
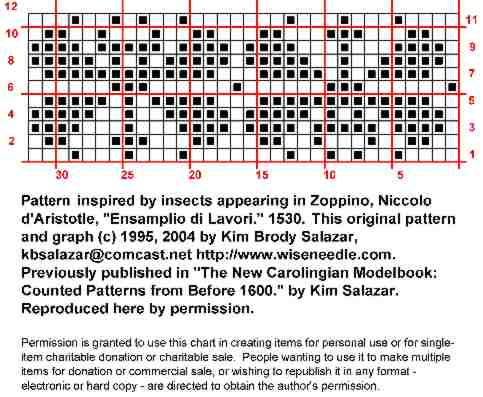
Other uses for simple graphs include filet crochet (Mary Thomas’ Knitting Book describes filet knitting, too); all types of cross stitching; needlepoint; and lacis or pattern darning. I’ve even heard from people using TNCM patterns for wood marquetry and tile mosaics!
FUN WITH LAGOMORPHS
UPDATE: THIS DESIGN IS AVAILABLE ON THE EMBROIDERY PATTERNS LINK ABOVE, IN EASY-TO-PRINT PDF FORMAT.
SECOND UPDATE:
The source for this is under re-evaluation. I’ve found it in Bernhard Jobin’s New kuenstlichs Modelbuch von allerhand artlichen und gerechten Moedeln auff der Laden zuwircken oder mit der Zopffnot Creutz und Judenstich und anderer gewonlicher weisz zumachen, published in 1596. I believe that when I first transcribed this from microfiche in the early ’70s there was a mixup in the labeling of the fiches I consulted. If TNCM gets reissued, I will insert the correction.
I was re-graphing this rabbit from my book of embroidery patterns, and I thought angora-fanciers might like to work it into a headband or sweater front.
The original plate from 1597 showed a large group of animal motifs clustered together to save space. It included this one, two coursing dogs (possibly greyhounds) a squirrel, an owl, a stag, a unicorn,a parrot, a yale, and the lion I previously shared for Gryffindor pullovers.
