THE BEHINDER I GET
I can’t say I’m going any faster, but I’m in the swim of things with my gift knitting. I have to admit a tinge of guilt this year. In years past, I’d done a fair bit of it far in advance, sometimes using especially mindless gift knitting (like socks or scarves) as bliss-out-on-the-beach pieces during our summer vacation. Or I’ve doodled up little projects between larger ones, while I was waiting for my ideas to set. By this time I’ve usually got a basket of goodies ready for holiday giving. Unfortunately, this year nothing got done ahead of time, and I’ve been forced to do something I detest – knit to deadline.
I hate knitting to deadline because in my professional life, all I do is march to deadlines. I’m a proposal manager, and I’ve lived my career in 30-day increments. Other people will say things like, “Dear, remember ’91 – that was the year little Brunhilde was born,” or “Yeah, 91. Cousin Ildefonse was in Desert Storm.” I say, “Fall ’91. That was that big military IT/hardware support proposal, we had an extension that got eaten up by the sheer bulk of the revised reporting schedule requirements.” From this you can well deduce the heart-stopping excitement of my daily life.
Knitting has always been a blissful interlude, a no-deadline finish-it-whenever sort of pursuit. That’s one of the reasons why I’ve shied away from pursuing commercial publication for my patterns. Squeezing my knitting life into a tight deadline sucks all the joy out of it.
So here I am. Doing frantic knitting on a couple of Hannukah presents (it’s early this year, adding further complications). The Kombu scarf, four hats, and two pairs of socks are done. That leaves three scarves, two more pairs of socks, and possibly couple of kid’s size earwarmer bands to go.
Today I plan on casting on for a very simple scarf done in Sandnes Lime (a mostly cotton, very soft yarn) for a friend who is wool-sensitive. I’ve used and reviewed the stuff before and not been wildly pleased with it, but for a scarf it should work out fine. Although most of the detail will be obscured by the textured yarn, I’ll probably work it in this simple knit/purl pattern – just to give it a bit more interest:

I like this one for scarves because it adds a bit of loft and like all patterns with near equal amounts of knits and purls on each row – it lies nice and flat without curling.
TEENY RED SOCK – PATTERN
UPDATE: A REVISED, EASY TO PRINT VERSION OF THIS PATTERN IS AVAILABLE AT THE KNITTING PATTERNS LINK, ABOVE.
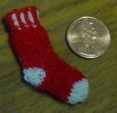
Several people have written to ask for the pattern for the teeny Red Sox sock.
It’s pretty much the same as the sock patterns on wiseNeedle. If you’ve done a toe-up sock with a Figure-8 no-sew toe and a short rowed heel, you’ve got it. I don’t want to re-write the entire thing with detailed instructions here. For that you can go to any of the sock patterns on wiseNeedle:
http://www.wiseneedle.com/knitpatterns.asp#socks
But here’s an abbreviated version. For any how-tos or further details, refer to the comparable section of any of these other sock patterns.
Teeny Red Sox Sock
(c) 2004, Kim Brody Salazar
Permission granted to link to this pattern and make socks for personal
consumption, but not to reproducethepattern or make socks for sale
without the author’s consent
1 card Special Blauband darning yarn, bright red
1 card Special Blauband darning yarn, white
1 set of five double pointed needles in any teeny size you have, preferably #000 or smaller
Gauge: Pretty much unimportant, although the darning yarn looks best at 12 stitches per inch or smaller.
Using the white yarn, work a figure-8 cast on starting with two needles and four loops on each needle. Knit the first row as usual, taking care to untwist the stitches that will be mounted wrong on one of your needles.
Toe and Foot:
Row 1: k1, M1, k1. Using another dpn, k1, M1, k1. Using a third dpn, k1, M1, K1. Using the fourth dpn – K1, M1, K1. You should now have 4 live needles in your work, each with3 stitches on it.
Row 2: Knit all stitches.
Row 3: *k1, M1, k2. K2, M1, K1* repeat. Each needle should now have four stitches on it. Your toe is done.
Row 4: Switch to red and continue knitting until sock measures approximately 3/4 of an inch measured from the tip of the toe.
Heel:
Determine where the bottom of your foot will be. With white yarn, work the following on the two needles that hold the stitches for the bottom of the foot. Think of the two needles that hold those stitches as being one unit:
Row 1 of decrease: K7, yf, slip next stitch purlwise onto right needle. Turn work.
Row 2: Yf (wrapping the yarn around the slipped stitch that was just slipped and return it to the right hand needle – it should look like it has been lassoed by a noose), p6, slip the next stitch purlwise (keeping the yarn in front of the work). Turn work.
Row 3: Yf (wrapping the yarn around the stitch you just slipped and returning it to the right hand needle), K5, yf, slip the next stitch knitwise onto the right needle. Turn work.
Row 4: Yf (wrapping the yarn around the stitch you just slipped and returning it to the right hand needle), p4, slip the next stitch purlwise (keeping the yarn in front of the work). Turn work.
Row5 (first increase row:) K4, knit the next stitch through the back along with the wrapped loop around its base. (I do this by picking up the loop on the point of my right hand needle, then knitting the loop and the stitch together), yf, slip next stitch knitwise onto the right needle. Turn work.
Row 6: Yf, (wrapping the yarn around the slipped stitch so that there are now TWO wraps at its base and returning it to the other needle), p5, purl the next stitch along with the loop wrapped around its base, slip next stitch purlwise (keeping the yarn in the front of the work). Turn work.
Row 7: Yf (wrapping the yarn around the base of the slipped stitch and returning it to the other needle), k6, knit the next stitch through the back of the loop along with the two loops wrapped around its base, yf, slip next stitch knitwise onto right needle, DO NOT TURN WORK.
Ankle and Ribbing:
Switch back to red, and continue knitting entirely around the ankle of the sock. On the first row of the ankle when you get around to the white stitch at the right hand edge of the heel, knit it along with the wraps around its base. Continue to work in stockinette until it is approximately 3/4 of an inch measured from the top of the heel
Ribbing Row 1: *K1 red, K1 white* repeat
Ribbing Row 2 and 3: *K1 red, P1 white* repeat
Bind off all stitches using red. Darn in ends.
WORKING REPORT – BLUE PONCHO
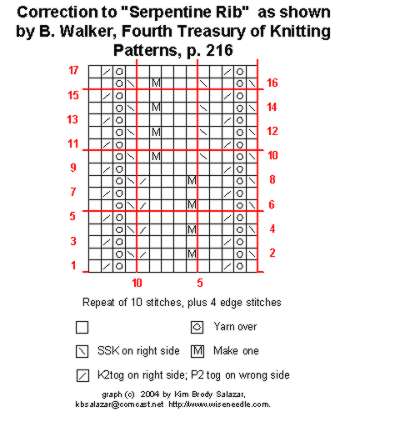
Well, teens are known for being fickle and changing their minds. My just-barely-teen is typical. She’s decided she didn’t like the patterns I’d been swatching, and picked out another from my stitch dictionary library. It’s “Serpentine Rib” from Barbara Walker’s FourthTreasury of Knitting Patterns, p. 216. The kid hasgood instincts, though. I have to agree with her. The stuff I’d been playing with looked way too clunky in the scale yarn I was using. We’re both happy now, and I’m off an running.
One very minor glitch – I have to say that I’ve caught the sainted Barbara in a rare mistake. Her graph presents even numbered rows (right side rows) of the pattern. The direction for the set-up and subsequent wrong side odd-numbered rows is given in prose.It’s given as “*P2tog, YO, P8: rep from *, end last repeat p2.It’s off by one stitch (not a big mistake), and it’s pretty obvious if you’ve ever worked faggotting in lace knitting. If you start thewrong side row at that point Walker does, you won’t produce theneat wavy lines of openwork as shown in her illustration.
Here’s my own graph of the corrected pattern, showing both odd and even numbered rows. If you try this one, be sure to remember that it does start on an odd numbered, wrong side row:
In the mean time, I’ve cast on for the poncho and have knit about 2 inches, the first of which is in seed stitch so that the edge doesn’t curl too badly. I don’t like the width though. I may end up ripping back and working one fewer repeats, narrowing the body somewhat. Otherwise I have the sneaking suspicion that I’ll run out of yarn. Not a good sign if I’m unsure this early in the project…
WORKING REPORT – BLUE PONCHO
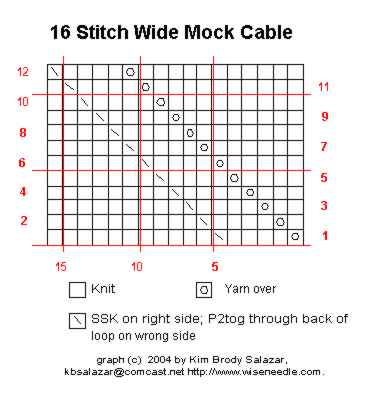
Now with Dragon put to bed, I can turn to my daughter’s blue lacy poncho. Over the weekend we went paging through pattern books and looking at old projects. She lit upon a couple of lacy looking stitches that she liked.
The first is the mock cable I used as the edging for Justin’s Blanket on wiseNeedle. The thing didn’t photograph well there, and the instructions for that counterpane are in prose, so here’s a wider version of the same idea. (Apologies for the lousy quality of these charts. For some reason my standard Visio to Fireworks graphics prep cycle is spitting out oddlynon-uniform results today.)
The second is a lacy panel adapted from a wider pattern appearing in B. Walker’s Second Treasury of Knitting Patterns. The original isn’t graphed, starts in a different place of the repeat, and is set up for multiple iterations of the ribbon. I pared it down to just one repeat to make a self-contained panel:
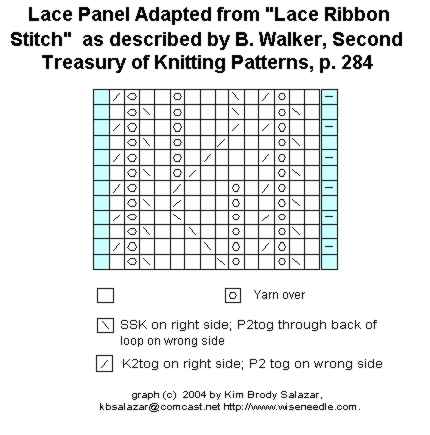
Both are lace knitting patterns in that they have something happening on every row. If one is knitting in the flat (back and forth on two needles) you can see that maneuvering to do a P2tog tbl (purl two together through the back of the loop) on a wrong-side row might be awkward. Whichever panel is chosen, it will probably alternate between sections of K2 P2 or K3 P3 rib.
As far as swatching goes, I’ve been playing with my de-plyed Paternayan. Thinking that the 2-ply result of my pains was rather thicker than sport, but thinner than DK, and that I wanted a lacy effect, I started swatching on US #9s (5.5mm), and worked my way up through needle sizes to #13s (9mm). I’m wavering between #11s (8mm) and the #13s. More swatching is in order, especially swatching to see if the 11 or 13 looks best with the plain old ribbed part, and to make a nice, even piece to determine gauge over both textures.
In the mean time, I’ve decided to run the color stripes on the vertical rather than the horizontal. That means I’ll figure out how wide the rectangles will need to be for this poncho, figure out some pleasing alternation/panel widths for the chosen lacy part and ribbed sections, then decide which panels need to be in which of my three available colors (blue variegated, plus wedgewood and slate blue). Once that’s decided it’s cast-on time, working the color stripes with Intarsia joins between them – each from its own ball.
Did I mention “Figure out if I’ve got enough yarn?” Gotta do that to, especially because seven skeins (3 variegated blue, 2 each of my two blues) de-plyed into 10.5 skeins (4.5 variegated, 3 of each blue)equals 1,764 yards That’s 756 yards of variegated blue, plus 504 yards each of the two blues. In total it should be enough, but I may need to get very clever with color placements to make sure I don’t run out of anything.
FUN WITH ODONATA
UPDATE: THIS DESIGN IS NOW AVAILABLE AS AN EASY TO PRINT PDF DOWNLOAD UNDER THE EMBROIDERY PATTERNS LINK, ABOVE.
A short post today on a time-stressed weekend day.
Buzzing in on the hopping heels of last week’s bunny, here’s another small graph from my embroidery book. This super-simple one is original. One dragonfly can be spot-placed, or they can be done in series using stranding. A strip of dragonflies can bealigned either katywumpus as I show here, or all facing the in same direction. In knitting, I think that these would be particularly fun to accent with shiny beads or duplicate stitching on the body or wings. They’d also be a killer trim if done in bead knitting.
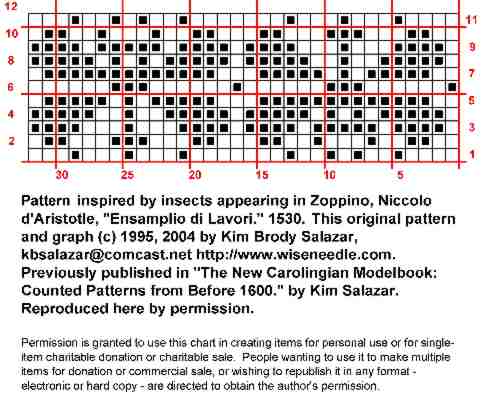
Other uses for simple graphs include filet crochet (Mary Thomas’ Knitting Book describes filet knitting, too); all types of cross stitching; needlepoint; and lacis or pattern darning. I’ve even heard from people using TNCM patterns for wood marquetry and tile mosaics!
CHARTING SOFTWARE – ARAN PAINT
A couple of weeks ago when I wrote about charting knitted texture patterns, a couple of people were curious about Aran Paint, one of the lesser-known programs I mentioned. Here’s an example of what it does.
I’m starting with a twisted stitch texture pattern in Baulerches Stricken 1 by Lisa Fanderl. This is the first volume in a set of three German language knitting books that present traditional knitting patterns gathered from various regions of the country. This series is certainly interesting, but as with many stitch treasuries, presents the patterns using its own rather ideosyncratic notation and symbol set. In this case, the pattern is shown using plain old typeset characters, some linked with bars to indicate the direction of the twisted or cabled stitches. I’ve played with some of thetextured and lacy patternsfrom this series, but to work with a minimum of fuss, I usually had to re-graph them first.
This particular pattern is shown on p. 129 It’s a simple 10-stitch wide panel, and features some twisted knit stitch ribbing manipulated to look like a series of bells connected by chain links. I’m afraid I don’t have my swatch or a knitted sample, but this did look quite nice run as panels up the front of a baby sweater, close together in the upper bodice area, and set progressively further apart by an increasing number of stockinette stitches towards the lower edge.
Here are the results of graphing with Aran Paint:
|
|
 Final Graph |
The program also produced this set of prose instructions as a text file (it also outputs the same material in HTML):
AranPaint-BS1-129a.ara (10 Stitches x 26 Rows)
Repeat these 26 rows for the length required.
Row 1: K1, T2F, P1, K2, P1, T2B, K1.
Row 2: P1, K1, P1, K1, P2, K1, P1, K1, P1.
Row 3: K1, P1, T2F, K2, T2B, P1, K1.
Row 4: P1, K2, P4, K2, P1.
Row 5: K1, P2, K4, P2, K1.
Row 6: P1, K2, P4, K2, P1.
Row 7: K1, P2, K4, P2, K1.
Row 8: P1, K2, P4, K2, P1.
Row 9: K1, P2, K4, P2, K1.
Row 10: P1, K2, P4, K2, P1.
Row 11: K1, P2, K4, P2, K1.
Row 12: P1, K2, P4, K2, P1.
Row 13: K1, P2, T2F, T2B, P2, K1.
Row 14: P1, K3, P2, K3, P1.
Row 15: K1, P3, C2F, P3, K1.
Row 16: P1, K3, P2, K3, P1.
Row 17: K1, P2, T2B, T2F, P2, K1.
Row 18: P1, K2, P1, K2, P1, K2, P1.
Row 19: K1, P2, K1, P2, K1, P2, K1.
Row 20: P1, K2, P1, K2, P1, K2, P1.
Row 21: K1, P2, K1, P2, K1, P2, K1.
Row 22: P1, K2, P1, K2, P1, K2, P1.
Row 23: K1, P2, T2F, T2B, P2, K1.
Row 24: P1, K3, P2, K3, P1.
Row 25: K1, P3, C2F, P3, K1.
You can see that the thing is certainly useful, but that it has its limitations.
-
The program doesn’t include twisted stitches (like knit one through back of the loop). All of the original pattern’s knits are twisted, but I couldn’t show that on my version. YOs and eccentric cable crossings also aren’t included.
-
AranPaint includes its own “artificial intelligence” that prevents one from graphing only every other row, or from placing a cable unit such that it commences on an even numbered row. For example, if you’re working in the round and want to move one stitch over on two succeeding rounds without a plain round between them, you can’t graph it in AranPaint.
-
Symbol keys or glossaries don’t print at the same time as the pattern. While that’s not a big deal, and you can retrieve the keys from the publisher’s website, doing so is a pain and means an extra trip through cut-and-paste land.
-
You can’t easily get output for the mock-up I show at left above. To do this, I had to open AranPaint, take a screen capture, edit the capture down for size in Visio, save it as a *.jpg, then use Macromedia Fireworks to trim the resulting *.jpg down to something that is web-manageable.
-
There’s no undo function beyond “remove last stitch.”
-
Moving elements can be a pain, as there is no drag and drop.
All of these limitations being said, the program is still quite handy. Although I usually use my Visio template system for most “hard core” graphing, I do enjoy doodling with AranPaint, then having the resulting piece turned into an editable texture pattern. Here’s one of my doodles:
 |
 |
and the prose version:
AranPaint-doodle.ara (9 Stitches x 36 Rows)
Repeat these 36 rows for the length required.
Row 1: P2, C5R, P2.
Row 2: K2, P5, K2.
Row 3: P2, K1, C3B, K1, P2.
Row 4: K2, P5, K2.
Row 5: P2, K1, C3B, K1, P2.
Row 6: K2, P5, K2.
Row 7: P2, C5R, P2.
Row 8: K2, P5, K2.
Row 9: P1, T2B, K3, T2F, P1.
Row 10: K1, P1, K1, P3, K1, P1, K1.
Row 11: T2B, P1, C3R, P1, T2F.
Row 12: P1, K2, P3, K2, P1.
Row 13: T2F, T2B, K1, T2F, T2B.
Row 14: K1, P2, K1, P1, K1, P2, K1.
Row 15: P1, C2B, P1, K1, P1, C2F, P1.
Row 16: K1, P2, K1, P1, K1, P2, K1.
Row 17: P1, T3F, K1, T3B, P1.
Row 18: K2, P5, K2.
Row 19: P2, C5R, P2.
Row 20: K2, P5, K2.
Row 21: P2, K1, C3B, K1, P2.
Row 22: K2, P5, K2.
Row 23: P2, K1, C3B, K1, P2.
Row 24: K2, P5, K2.
Row 25: P2, C5R, P2.
Row 26: K2, P5, K2.
Row 27: P1, T2B, K3, T2F, P1.
Row 28: K1, P1, K1, P3, K1, P1, K1.
Row 29: T2B, P1, C3R, P1, T2F.
Row 30: P1, K2, P3, K2, P1.
Row 31: T2F, T2B, K1, T2F, T2B.
Row 32: K1, P2, K1, P1, K1, P2, K1.
Row 33: P1, C2B, P1, K1, P1, C2F, P1.
Row 34: K1, P2, K1, P1, K1, P2, K1.
Row 35: P1, T3F, K1, T3B, P1.
Row 36: K2, P5, K2.
Before you write and ask, remember – symbols and abbreviation setsused in AranPaint write-ups and graphs can be found here.
FUN WITH LAGOMORPHS
UPDATE: THIS DESIGN IS AVAILABLE ON THE EMBROIDERY PATTERNS LINK ABOVE, IN EASY-TO-PRINT PDF FORMAT.
SECOND UPDATE:
The source for this is under re-evaluation. I’ve found it in Bernhard Jobin’s New kuenstlichs Modelbuch von allerhand artlichen und gerechten Moedeln auff der Laden zuwircken oder mit der Zopffnot Creutz und Judenstich und anderer gewonlicher weisz zumachen, published in 1596. I believe that when I first transcribed this from microfiche in the early ’70s there was a mixup in the labeling of the fiches I consulted. If TNCM gets reissued, I will insert the correction.
I was re-graphing this rabbit from my book of embroidery patterns, and I thought angora-fanciers might like to work it into a headband or sweater front.
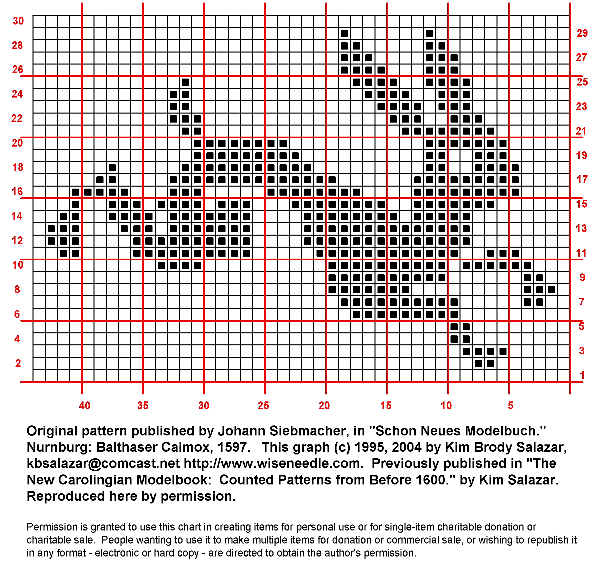
The original plate from 1597 showed a large group of animal motifs clustered together to save space. It included this one, two coursing dogs (possibly greyhounds) a squirrel, an owl, a stag, a unicorn,a parrot, a yale, and the lion I previously shared for Gryffindor pullovers.
WORKING REPORT – WATERSPUN PONCHO
UPDATE: THIS WORKING DISCUSSION (INCLUDING HINTS FROM PRIOR PROJECT POSTS) IS NOW AVAILABLE AS AN EASY DOWNLOAD AT THE KNITTING PATTERNS LINK, ABOVE.
My Classic Elite Waterspun poncho isdone! Here it is mid-block:
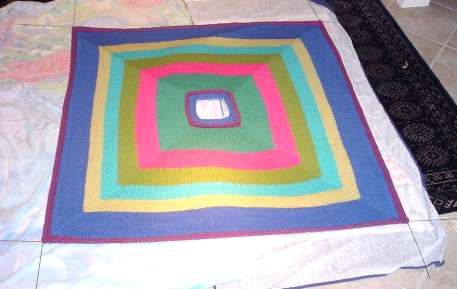
I am really loving the improvised blocking wires I got to finish my Forest Path stole. I threaded them through the I-cord edges, two per side, then spread the poncho out on some towels to dry. The edges are straight, the corners are perfect, and dreaded curl-up has been eliminated. And I didn’t even need pins!
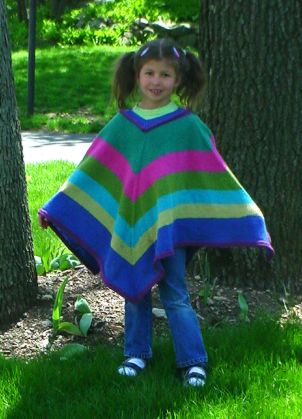
And here’s a shot of it on the happy recipient:
For those of you who wrote to ask for the pattern, here it is.
- Make swatches until you get a fabric that you like.
- Figure out your gauge.
- Measure how big a neckline you need to go over your head.
- Multiply that measurement by your gauge, and round it up to the next multiple of four.
- Cast on that number of stitches, placing 4 markers evenly spaced.
- Knit 6 rounds.
- On the 7th round, K1,make one, knit to one stitch before the next marker,make one, K1. Repeat this three times.
- On the 8th round – knit
- Repeat steps 7 and 8 until your poncho is as long/wide as you like it.
- Bind off, or work one or more rounds of attached I-cord to finish.
- If the neck is too wide, pick up purl bump stitches at the base of the rolled collar. You should have the same number as you cast on. Put 4 markers in your work evenly spaced. Then work one round starting with k2 tog, (k1, p1) until you have two stitches left before the next marker, ssk. Repeat between the other markers. Then work a K1, P1 round continuig ribbing as established. Continue this way, alternating decrease rounds and plain ribbed rounds for about 6-8 rows. Bind off VERY LOOSELY, making sure you can still get your head through the hole.
As to what yarns are suitable, what number to cast on given a particular gauge, what size needles to use, how much yarn you’ll need – this is all up to you. Experiment! Here are some thoughts to keep in mind:
What yarn is suitable? Look at it. Will it feel good when worn? Is it hand-wash only, otherwise hard to clean, or a light color? If so – are you prepared to care for it when it gets dirty? Is it loosely or tightly spun? Loosely spun yarns are more prone to pilling, catching and looking “used.” On the other hand, they’re often softer with a more luxurious drape and sheen. Is it heavy? A poncho is a big thing – larger than a lap blanket. Lift about 10 skeins worth. Can you envision yourself dragging around that much weight (or more)? Will the yarn stretch under its own weight when used in a large quantity? Cottons are heavy yard for yard and are infamous for this. Wool is less weighty per yard or meter. Wool/acrylic blends are lighter still. Is the color/texturenot only attractiveon its own, but will it look good on you? A puffy or furry yarn will add bulk andincrease the size of your sillouhette. A giant-gauge or shiny yarn willmake a garment look larger than it really is. Some colors and textureslook fantastic as accents, but applied over an entire garmentmay not be as appealing on every wearer.Decide what’s important to you and choose accordingly. Remember, you can always buy one skein to try out before you commit for the whole project. If that yarndoesn’t work out for a poncho,one skeinmight make a nifty hat or scarf.
What needle size to use? When swatching with a new yarn, start with the needle size recommended by the yarn maker. Do up a good size swatch in your chosen texture stitch or colorwork design. Do you like the feel and drape? If so, measure your gauge – you’re good to go. Swatch feel too stiff and tight? Try again on a size larger needle. Swatch too drapey and holey? Go down a needle size and try again. You’ll know when you’ve hit the best combo. If you’re combining several yarns of different weights or textures, be sure to swatch them as you will use them, using the stitch and needles you intend for the final project, even if that means making a VERY large swatch with multiple stripes. Once you do get the look/feel you like, make a note of your needle size and FINISH YOUR SWATCH. You’ll need it to do both gauge measurements and yarn consumption estimates. (I’m not good at keeping paper notes, so Imake knots in my dangling tail end to help me remember what needle size I used to makemyswatch. For example, four knots = US #4 needles.)
How many to cast on? Simple math. If your gauge is 4.5 stitches per inch, and you’ve decided that a 24 inch neckline is big enough, you start with 4.5 x 24 = 108 stitches. That lucks out because 108 is a multiple of 4, and you don’t need to round up.
How much yarn will you need? You can figure out roughly how much yarn your gauge square took for that number of square inches or centimeters. Draw out a diagram of your project (in this case – a big square), and estimate how big you want the thing to be when it’s done. Figure out its total area and divide that area by the area of your swatch. Got a 6-inch square swatch? Want to make a peice that’s 4 feet on a side? 4 feet x 4 feet = 48 inches x 48 inches = 2304 square inches. 6 inches x 6 inches = 36 square inches. 2304/36 = 64. It will take you about 64 times as much yarn to knit your 4-foot square piece than it took to knit your six inch square. Ravel back your swatch and measure, or weigh itto determine the amout of yarn you used. Now do the math.
Shortcut: If you like a slimmer poncho than this super-easy square one, there’s a poncho pattern generation utility available elsewhere on-line.
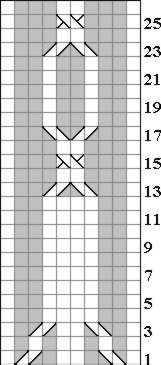
PROJECT – DOUBLE KNIT HAT GRAPH
Again apologies to those on the updates mailing list. I did a bit more maintenance, adding categories to all the existing posts so it’s easier to page through this ever-growing mound.
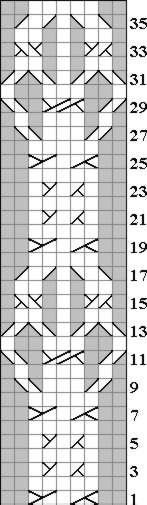
A couple of people have asked for the graph I used to knit the interlace shown on my overly warm teal and black alpaca hat. Here it is.
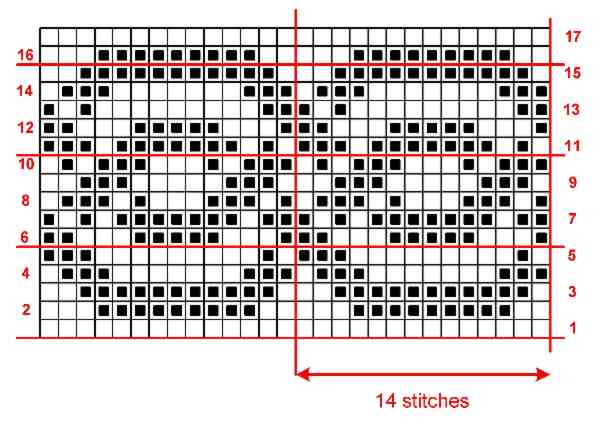
This one didn’t make the cut for my book because it’s one of the designs for which I lost my notes. A long time ago I had a miserable move between apartments. Several boxes were stolen off the back of my truck. Among the things that went missing was a notebook full of source notations for counted embroidery patterns. I had been researching them casually for more than ten years, and had hundreds compiled. The sketches for most of them had already been redone on my ancient Macintosh, but all associated notes remained solely on paper.
When I was composing The New Carolingian Modelbook I had to go back and confirm the exact origins for all the counted patterns I wanted to include. I managed to find the sources for about 200 of them, but a third as many more have eluded me. This particular interlace is from my collection of the lost. It is similar to designs by Matteo Pagano as published in his 1546 book Il Specio di Penfieri Dell Berlle et Virtuoise Donne, but I can’t swear that it came from that or one of his other works. Given the relatively clumsy, heavy spacing and short repeat it might even have been something I doodled up myself after a day of research.
Many of these early Modelbook designs got there by way of Islamic influences (especially patterns cribbed from woven carpets and embroidered textiles). Over the years the patterns drifted away from work worn by the elite to work worn by middle and then lower social classes, eventually ending up in folk embroidery where they never quite died out. Counted thread needlework styles were revived big-time among the fashionable in the mid 1800s. Researchers found and reproduced surviving older pattern books, and began collecting motifs from traditional regional costumes and house linen. Some of the later and folk uses of counted patterns include standard cross-stitch, Hedebo, Assisi-style voided ground stitching, and various types of pattern darning or straight stitch embroidery done on the count.
This pattern can be interpreted in many crafts. Historically accurate uses contemporary with first publication include cross stitch panels (the long-armed style of cross stitch is overwhelmingly represented in historical samples compared to the more familiar x-style cross stitch); weaving, or lacis and burato (types of darned needle lace).
Counted patterns are a natural for knitting. The first book of general purpose graphed designs that listed knitting as a specific use came out in 1676 in Nurnberg, Germany and was published by a woman: Rosina Helena Furst’s Model-Buchs Dritter Theil. (the title is actually much longer). There may be others that predate this book, but I haven’t seen mention of them, and I haven’t seen the Furst book in person. It’s in the Danske Kuntsindustrimuseum in Copenhagen, a tad far for a day trip from Boston, Massachusetts. The entire group of graphed designs displayed in the early Modelbooks shows a straight continuity with the geometric strip patterns found in modern northern European stranded knitting.
The short 14-stitch/17 row repeat of this graph does work well at knitting gauges. I’ve always meant to use this one again on socks -either as-is or stretching it a bit by repeating the centermost column so that it better fits my sock repeat, or doing eight full repeats at an absurdly tiny gauge. As is, you’d need a multiple of 14 stitches around. A standard 56-stitch sock could accommodate 4 full iterations of the design without adding any columns.
Some people have asked how to get a hold of my book. The answer is, aside from the used market where it is going for quite a premium, I haven’t a clue. Sadly all I can report is that the publishers absconded shortly after publication. I have no idea where they went, and have had no replies from them to any queries since 1996. I received only about a year of royalties on the first 100 or so copies, in spite of the fact that the book went through at least two printings with an estimated total run of 3,000. New copies continue to trickle onto the market even today (they’re sold as used but mint). The new-copy seller has rebuffed my attempts to find the ultimate source.
Moral of the story – don’t enter into publication contracts without a literary agent, and if the company has a name like “Outlaw Press” there’s probably a reason.
PROJECT – ZEN SCARF, HOUSECLEANING
First apologies to the few of you who subscribed to receive notification of site updates. You must have been going nuts since last night because I gave up on Picserver, and ported all of the photos here to a new server. It wasn’t my intent to pepper you with update notes, but I couldn’t turn off the notifications from here. I promise the housecleaning is now over.
Rick-Rack Mesh Scarf in Berroco Zen
If you’ve ever met me you know I’m absolutely delighted at the prospect of the New Knitter Invasion, but at the same time my eyes are glazing over at all those novelty yarn scarves. I’ve done a few on special request, or as gifts for family and friends – but by and large, I find them pretty but intensely boring (hence my Kombu Scarf pattern).
Still, my pal Pat shop managerat Wild & Woolly in Lexington, MA (my local yarn store) asked me to help her come up with something fun to do with Berroco Zen, a ribbon yarn that’s been overlooked in favor of flashier novelty yarns. I couldn’t say no. (For some reason, Zen is in the yarn review collection twice, so until I get that fixed,there’s another set of reviews here).
Here’s what I came up with:
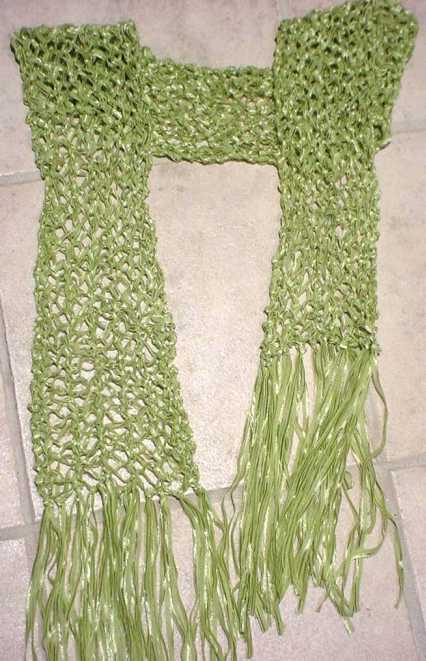
Here’s the pattern. Eventually I’ll add it to the free pattern pages at wiseNeedle.
<p
Rick-Rack Mesh Scarf in Berroco Zen
Materials:
1 Skein Berroco Zen or approx. 110 yards (102m) of a similar ribbon yarn
US #10.5 needles
Gauge:
Gauge is difficult to measure, but finished scarf will be about 5 inches wide by about 56 inches long (exclusive of fringe).
Instructions:
Using half-hitch cast on or other stretchy cast-on, cast on 14 stitches. Knit one row.
Follow Rick-Rack stitch pattern until scarf measures approximately 56 inches long.
Rick Rack Stitch:
Row 1: K1 (YO, slip one stitch as if to knit, K1, pass slipped stitch over)6x, K1
Row 2: K1 (YO, slip one stitch as if to purl, P1, pass slipped stitch over)6x, K1
Bind off VERY LOOSELY.
Cut remaining yarn into 18-inch lengths, and attach to ends of scarf as fringe.
2004, Kim Brody Salazar, http://www.wiseneedle.com. Not to be duplicated on other websites or in print without permission of the author. Pattern for personal use only. Please contact the author if you wish to make this item up in quantity, even if it is for charitable sale or donation.
