WORKING REPORT – FILET OF DRAGON
Returning from our sojurn at the Nature Channel, I pick up where I left off on Filet of Dragon. I’ve finished the center panel, and have decided to eke out the width with an additional panel of the same edging I used top and bottom.
I’m putting a strip of it at each end, centered on the best looking?curlique in the repeat. I’ve also decided to put plain quaternary stars in the corners, rather than butting the new strips up along the edge of the old ones. I still haven’t decided on what frame to use on the entire piece, but by the time these strips are done, I’ll have a clue. Or so I hope.
Here’s progress to date:

You can see the beginning of the side frame at the right. Here’s the layout logic:

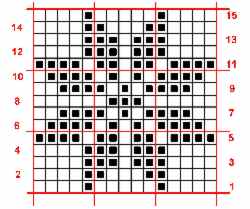
What’s a quaternary star?? It’s the standard eight-pointed star/snowflake so often seen in Scandanavian and Fair Isle knitting. This sample’s branches are four units long, but the one I’ll use in this project will have shorter three-unit arms, and will fit into the 13 unit square corners.
WORKING SUMMARY – FILET OF DRAGON
Filet of Dragon
Thank you for all the complements!? Filet crochet isn’t difficult if you’re comfortable following a chart. It flollows the same logic as knitting a colorwork pattern in the flat from a chart – back and forth row by row. The hardest part is making the correct number of chain stitches to form the foundation on which the first row is worked. I did the math, then used safety pins to mark off every 25 stitches as a counting aid. I did end up being one short, so I cheated, and added a mesh at the end. If you look VERY closely to the first mesh at the cast-on tail, you’ll see it’s a bit heavier on one side where I slip stitched back up after making my cheat mesh?in preparation for the next row.
Once the count of the first couple of rows was established, the thing became a simple mantra of counting. Begin, A, B, 1, A, B, 2, A, B, 3 and so on, with “Begin” standing in for “make initial double crochet of the mesh,” “A, B” being either work two chains for open meshes, or two more DCs for filled ones; and the number being the count of the open or filled meshes for that particular run.(UK crocheters read trebles for the doubles cited here.)
I used the improvised magnet board system I wrote about earlier. Since each row was “proofed” by the row that followed, my mistakes became almost immediately apparent. The two I did most often (and each only a couple of times) was skip over a mesh when making a long run of open meshes, reducing the count on the new row by one;?or substituing an open box for a filled one – in effect forgetting that the design on the new row was shifting up or down by one box to make a visual diagonal. Since I was both confirming the raw count of each segment as I worked it as well as doing the “work even/one more” system, I never had to rip back more than one row.
So to sum up, filet crochet is much easier than the complexity of the finished piece would lead one to believe. The style I used employs only chain stitches and double crochets, and once one is used to making even stitches,?is an excercise in chart-following more than anything else.
Some people asked me to repeat the photo of my book (The New Carolingian Modelbook), showing the dragon pattern page, so they could do a quick compare for the distortion effect. Here it is:

IN ABSENTIA – FILET OF DRAGON; CROCHET
Another in-absentia post. This one reports progress as of 1 July. Again sorry to be not here.
Crochet in General
Crochet is not a dirty word. I know there’s an ongoing friendly rivalry between knitters and crocheters, but I think the two crafts aren’t mutually exclusive. In fact, I teach a one-day workshop entitled "Crochet for Knitters" offered sporadically at my LYS and to local guilds (when scheduling allows). It covers basic crochet techniques, then veers off to cover techniques of special use:
- Crocheted chain cast-on, both free and done onto a knitting needle
- Crocheted buttons and button loops
- Simple crocheted edge treatments, including the dreaded Shrimp Stitch (reverse single crochet)
Crochet and knitting do produce fabrics with very different properties. Knitting by nature makes the thinnest, most flexible non-woven textile possible from a strand of yarn – loops are single-thickness, and lie as flat as possible. Given yarn and needles of equivalent size, crochet produces a much thicker, heavier, denser fabric – multiple loops drawn through each other form the basic stitch unit. Knitting has an elasticity and drape that no crochet can equal (again given equivalent weight yarn and needles).
On the other hand, crochet has its own set of advantages. For the most part, it lies flat compared to knitting – especially to stockinette knitting. It produces a very durable, stable fabric. It’s also less constrained to "typewriter" row-based production (back and forth or round and round on a single plain of work). This makes things like relief work (think Irish Crocheted Lace), and 3-D freeform production possible. The learning curve for basic technique is also less steep. Crochet has only one basic movement – hooking a loop and pulling through another loop. Knitting has several?- forming knits, forming purls, and their several variants.
I learned to crochet long, long?before I learned how to knit. Like knitting, I taught myself from a book.I was around 7 when I?began making odd little squares with no particular use in mind, ?but I was a strange kid who read early and liked sitting quietly and making things.Knitting by contrast I didn’t pick up seriously until after college graduation. ?One of the reasons I found Continental style knitting easy and natural was that I was already well schooled in holding and tensioning thread or?yarn with my left hand, an artifact of this previous experience. In fact, I believe that people having problems learning Continental style might benefit from a brief side-trip to crochet because doing so would acustom them to this skill.
Crochet has many forms. The ones I favor are the finer styles of cotton crochet, done with threads of various thicknesses. Although I did quite a bit of it before learning how to knit, I no longer do much large-gauge crochet with yarn heavier than fingering weight. I find the resulting fabric too thick and stiff for most uses. Afghans, hats and bags are the exception, although I much prefer the airy drape of knitted blankets to the heft of crocheted ones. Hats and bags however can benefit from the additional?weight and structure. Note that I do not recommend fulling or felting crochet. I’ve never had a good result doing so, probably because I’ve never hit upon the right ratio of working looseness that would give the yarn enough room to shrink evenly.
A final note on crochet – I get lots of questions at wiseNeedle on how to go about converting a knitted pattern to a crocheted one. Although books have been written on the subject, my answer is usually "with difficulty, and probably not successfully with the original yarn specified in the pattern."? This goes back to basic stitch structure. For a piece of crochet to have anything like the same drape as a piece of knitting, it has to be made from a much thinner yarn. A knitting pattern written for worsted weight yarn cannot be crocheted in worsted weight yarn with the same result. I’d use a fingering weight yarn, light sport at the absolute heaviest. Then I’d draft out a pattern schematic from the original design, do a crocheted swatch, and re-draft all of the required pieces based on the gauge of that swatch. There are no short-cuts or magic formulae, just plain old trial and error and calculation.
Filet of Dragon
For all of crochet’s free-form possibilities, filet crochet is the most row-oriented form of the craft. Filet takes a graphed design, and interprets it in open mesh and worked mesh squares – sort of like net with some of the holes filled in. As I think I mentioned before, this is an aesthetic that dates back a long time, with several different crafts called into service to do it over the years. There are forms of darned netting and grounds, withdrawn thread work, and freeform needle lace that all produce roughly similar filled/unfilled box-based patterns. Crochet is the most recent, and (having tried most of the others), I can say?the fastest method developed so far.
Filet crochet production marches across a graph row by row. Reading charts for filet production is very much like reading a chart for stranded knitting done in the flat. You begin at the lower right hand corner, work across the first row right to left, then on the next row, return by reading across in the opposite direction. Filet crochet though exacting is a very easy technique. There are several excellent on-line tutorials. This one is my favorite. There are also quite a few filet pattens on line, but any design that can be graphed up on a grid using two values (open and filled squares) can be used.
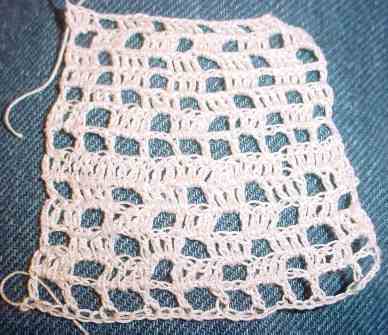
All this being said, here’s the progress on my filet curtain panel:

The 4.3 rows shown represent about three hours of work. I’m a much slower crocheter than I am a knitter, as unlike knitting, I have to actually watch my fingers to ensure the stitches are formed correctly and are in the right spot. The piece is about 17 inches across. The dragon panel will happen in the center, with mirrored strips of a vine-like edging at top and bottom. The safety pins mark the transition point between the dragon panel and the framing vines.
I’m getting?a bit more than 5?meshes per inch using a 1.15mm Bates hook and Size 30 thread (thicker than sewing thread, but not as thick as perle cotton or bakery string). Each open mesh is formed by a double crochet followed by two chains (the next mesh forms the other leg of the box); each filled mesh is formed by three double crochets (again the first DC of the next mesh completes the box). For UK visitors, read treble instead of double crochet here, as for some reason terminology differs on the two sides of the pond.
My intent during this blogging hiatus is to keep plugging away on this thing. My curtain panel is about 30 inches wide x 17 inches tall. I’m working across the shorter dimension to save sanity. Once the panel is done, I need to go back and add another couple of rows top and bottom with larger holes through which the curtain rods will be inserted. I want to block out the piece before I do so, as the width between my curtain rods is fixed. Adding on these strips after the main motifs are completed will allow me to do any late course corrections to ensure a snug and proper final fit.
A final word – as I was starting out on this project I received some very valuable advice on filet crochet from a good friend and needlework buddy?of long acquaintence. Kathryn Goodwyn may or may not be reading this blog, but if she is – ten thousand thanks!? My dragon would not be crawling out from under his rock without you. (Kathryn is an exacting?researcher and needlework/historical clothing?re-creator. Her?favorite sig line "Too many centuries, too little time," which says?quite a bit?about the breadth of her interests and expertise.)
IN ABSENTIA – FILET OF DRAGON
I’m here but I’m not. Cut off from Real Communications, I’ve stored a couple of advance-dated posts. If you see this it’s because I’m running on autopilot, and have not had time to revisit these pages and do a proper write-up. In the mean time, here’s entertainment.
Filet of Dragon
This one is munching along, too. I’ve done some gauge squares with Size 30 cotton, and crochet hooks of various sizes that I could obtain locally and quickly. The two smallest are:
- Marked "Susan Bates US #10/1.15mm
- Marked "Boye US #11/1.10mm
Now the Bates needle, though marked as being larger has a shaft and hook that is noticeably smaller than the Boye. I’m using that one, and with #30 cotton am now getting about 10 meshes across the row = 2.25", 10 rows = 2.1". The stuff still looks leggy to me, but I doubt I’ll be able to find a smaller hook before I head out on vacation (did I mention that mid-move complication?)
Here’s my swatch, taken over no particular pattern of voided and filled meshes. I was practicing technique, deciding how I want to work into the stitches of the rows below, and whether or not I liked the look of crocheting into the open mesh instead of into the chain for filled meshes that appear on top of voided ones.
The lower, leggier, looser?part was worked on the Boye faux #11; the upper?tighter part?on the Bates #10. My working method was the same, I made no effort to work more or less loosely, and the difference is VERY evident. Go figure…
