WORKING REPORT – DRAGON’S KNOTTY PROBLEM
Fits and starts, but back on track. Here’s the beginning of the top strip:
I’m not quite sure where I got this pattern from. It’s in one of my sketchbooks, but the accompanying notes only?say "Dover," so I may have gotten it from one of the Dover collections of graphed patterns, possibly their booklet of Celtic-inspired designs. I know it has no absolute historical citation in any one artifact or early book. In any case, it’s four meshes narrower than my original choice. That’s eight meshes for the whole piece (top and bottom strips both).Eight meshes would have been enough to make the thing too big to fit on the stretcher bars at the top and bottom of the door’s window. The beaded looking bit between the solid edge and the knotwork strip is produced by leaving a double-wide mesh every five rows. Those double-wides are going to be the holes through which the stretcher bar style brass curtain rods?will be threaded.
On whether or not motif strip"goes" with the rest of the piece – I’m not quite decided yet. I picked this pattern because the knotwork was interesting, because the knotwork picked up the curves in the dragon piece and the floral border, and the interlaces echoed the knots in the side panel. Plus, I thought the solid-strip negative-space nature of this design might be a nice contrast with the rest of the piece, in which the filled meshes present the design rather than the empty ones. I do like the solid strip nature of this one as a framing device, but I’m not entirely sure that the negative-space interlace is easily discerned. I’ll do a bit more to see if more repeats aid in visual interpretation. If not, it’s rip out and start again. Again.
One thing of which I’m quite proud – look at the bottommost row of solid meshes that makes up the new top strip. That’s the one that fastens the new work to the old. Not bad for an afterthought join.
WORKING REPORT – DRAGON
Grrr. Apparently no effort of woman nor beast can nail down an exact reference to an item in the V&A database because linking is dynamic and is recalculated for each new session. Therefore if you really want to dig through and find the items I mentioned yesterday, you’ll have to search on their accession numbers yourself. Open any V&A search page, and enter these numbers:
CT55633 – to see the crocheted purse
CT59053 – to see the knitted purses
CT57667 – to see the sampler
Apologies for all wild goose chases that ensued.
Filet of Dragon
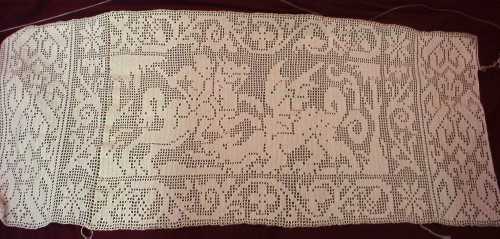
Progress on Dragon is both positive and retrograde:

?The good news is that thanks to advice so graciously shared by Vaire and Kathryn, attaching the side strips as I work them looks much better and more even than I hoped. I’m not using the exact method I posited in my last post. Instead, I’m doing a scrumbly combo of techniques. If the joining mesh is empty, I’m doing Vaire’s method of horizontal DC as bride. If the joining mesh is solid, I’m doing a combo of a technique Kathryn sent plus more advice from Vaire. I’m working that join mesh up to the point of the join (first leg, plus first "inside" dc), then on the second "inside" dc, I’m doing a slip stitch to mate it to the mesh leg of the existing work. After that I’m chaining up three, doing another slip stitch to mate the little chain to the old work, then working one "inside" dc plus another as the next mesh leg. The little chain up serves as the first dc of the "inside" pair. And there’s more good news in that the double-height empty blocks I am leaving for the curtain rods fit well and work great.
But all news is not good. See that little strip sticking up in today’s photo?? It’s gone. I’ve ripped it completely back and started again. It turns out that the original pattern I had selected for the horizontal strips is too wide (again the gauge problem). I am going to use an entirely different strip pattern, plus finish the entire thing around with two rows of solid DC to ensure a stable edge.
So there you have it. Dramatic progress, and dramatic failure. All in one day.
GALLERY
Remember two days agoI said I’d be delighted to show off any projects that other people did either from or inspired by my designs? I’ve started the blog category "Gallery" for just this purpose. First off, here’s a nifty example of a piece adapted from a stitching design in my book:
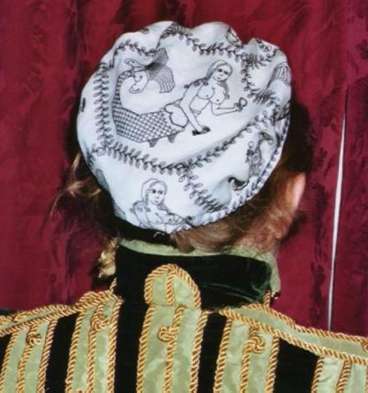
This hat is part of an Elizabethan costume made by a fellow participant in greater Boston, MA area SCA activiites. The stitcher’s SCA name is Lady Lakshmi Amman, and the recipient (and model) is Mistress Morwenna Westerne. Click on the photo for more detail shots ofLakshmi’s work, including graphs forher adaptations ofmy winged undine from Plate 75:1 of The New Carolingian Modelbook. (Lakshmi’s photo appears here by permission.) Because the piece was made to celebrate the artistic accomplishments of Mistress Morwenna, Lakshmi’s undines each carry something associated with Morwenna’s favorite pursuits. There’s an embroidering mermaid, a cooking mermaid, a performing mermaid, and several others. Very clever!
More on Crochet
I’ve gotten some more feedback and help on ways to attach edging and borders to pre-existing filet pieces; and advice on how to better keep 1:1 true square proportionality when forming meshes.
First, advice from Vaire, the Innocent Abroad onmaking my squares square. She says that try as she might, she was never able to achieve true squareness using the base-4 style mesh I’m using. Instead she switched to base-3. That’s one double crochet between the legs of the mesh to form a filled square, and one chain stitch between the legs of the mesh to form an open one (I do two of each right now). She said that this reduced the width spread of her squares.Vaire went on to suggest another method of increasing mesh size: using 3 ch betwen trebles, instead of 2 ch between doubles. This makes a larger, more airy mesh, and opens opportunities for partially as opposed to solidly filled squares (tr, ch, tr, ch, tr). Thank you, Vaire! Both are intriguing ideas, well worth experimentation.
My pal Kathryn also continues to ply me with great ideas too numerous to all list here. Several have been for methods of joining filet sections. There’s been a step-style join that makes a mitered corner. I need to try that one out before I can explain it better. At first I was afraid that my not-square squares would throw the miter off, but used in combo with Vaire’s base-3 idea, it sounds like it would work quite well. She’s also sent me quotations from pre-1920 books that discuss methods like overhand basting to hold sections together; and picking up and working an edging in another style of crochet.
Finally Vaire also suggests using double crochets as horizontal "brides" (reseau) to attach the new bit to the old. This is also a nifty idea, and one I considered, but I was doomed by a poorly planned design choice. I want a two-mesh strip of empty meshes all the way around the piece. I’ve already made that. To do the bride method, I’d have to have done only one, as the row of attachment would provide the second. Since I want most of the joining row to be solidly worked, were I to do it with horizontal double crochets I’d run afoul of the proportionality problem again. Again, thank you! A good idea for a future project, but I’ve pretty much painted myself into a corner on this one.
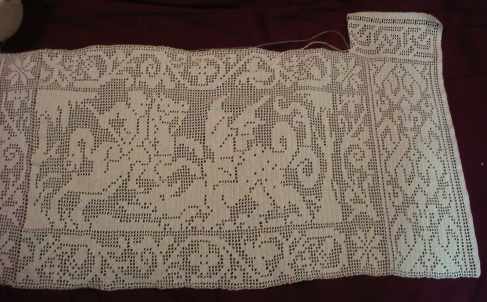
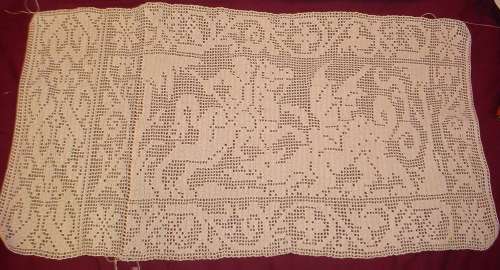
WORKING REPORT – FILET OF DRAGON
More progress.
I’m only three rows from being done with this side panel, so I turned my attention to figuring out how to join the top and bottom strips. I think I’ll end up doing something like this:

I’ll be working this strip the long-narrow direction, joining it to the side of the existing piece. I think the joins will be visible if you know to look for them, but they shouldn’t be too distracting because except for the first two and last two rows of the piece, the column of meshes thatis being attached are all filled in, and any additional heaviness should be visually lost in that solid line.
In the mailbag I had a couple of questions on why I thought that filet crochet is clunky and heavy looking. The people whowrote thought my piece was anything but. However, to me filet isheavy by comparison to Lacis – the style it emulates.
Lacis is worked by darning in the meshes on a hand-knotted net background. You start with a netted ground, then with needle and thread, weave in the meshes that need to be worked solidly. There’s a wonderfully arcane logic to designing one’s path of stitching so as to minimize ends. If you like themental excerciseof working double-sided blackwork or cross stitch, you’d really enjoy Lacis. For delicacy though, filet crochet just can’t compare:
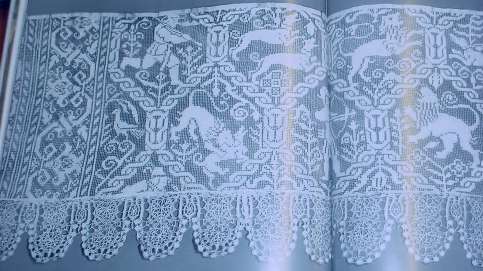
This photo is froma photo catalog of household and decorative arts held by the Hermitage Museum in St. Petersburg, Russia. The book is in Russian and French, published in 1974. It identifies this piece as being Italian, 16th century, but says very little beyond that.
To my amateur eyes, it looks like this piece of lace was cut down for re-use, because not only are motif roundels rudely interrupted, both the tape at the top and the applied needle lace lappet edge at the bottom are sewn on to roughly cut edges that in some places slash meshes in half. Even so, look at the extreme contrast between the darned solid bits and the spiderlike open areas formed by ever-so-thin single thread mesh ground. Now THAT’S delicate! You can also see yet that the use of the borders and centralpanel areais yet another bit of inspiration that stewed around beforethe idea for mydragon curtain was birthed.
This designs in this particular pieceare on my "to-do" list to graph up for Ensamplio Atlantaea. My postulated but not yet realized sequel to The New Carolingian Modelbook. Little things are holding up that production – like the lack of a good graphing platform, not having a publisher, that so many other people are now plowing the same turf and I don’t want to repeat material others have issued.
How did I lay hands on the Russian decorative arts catalog? It’s amazing what you can findin the damaged goods deep-discount boxes at some Cambridge, Massachusetts used book stores.
WORKING REPORT – MORE FILET
Still plugging away on the dragon:
Thanks to my friend Kathryn Goodwyn (who many of you may know from historical needlework mailing lists as Kathryn Newell) I’ve got a couple of ideas on how to do a surrounding border in filet. Unfortunately several of the methods can’t be backwards engineered at this point, but the core concepts are very strong.
One very promising method she sent to me involves working stepwise at the corners, forming a piece mitered more or less on the diagonal. I played with it a bit last night, and found that my rather squished ratio of height to width for my meshes doesn’t behave nicely with the concept. Plus I’d need to rip back the end bits and start them again. More tinkering is in order because this technique has real potential, but I think I’ll settle for butted strips on the top and bottom.
I have to admit, when I started this piece it seemed like a long slog was ahead. While it has taken longer than I anticipated, I’ve enjoyed the processmore than I thought I would (I was rather product-centered at the outcome). I’m definately thinking of doing more with filet – perhaps combining it with knitting into garments.
General Questions:
I know there are knitting purists out there that recoil in horror at the thought of knitting patterns/mags including crochet, let alone combining the two crafts in the same piece. I’m less parochial in my views. Would you be interested in wearable pieces that combine both? I’m talking delicate and fine gauge stuff, as opposed to some granny-square travesties I’ve seen lately.
With all the blather about quick-to-knit and one weekend pieces, is there interest infiner gauge, greater effort projects? Or is everyone interested in producinghats, scarves,or felted bags that can be finished before the credit card bill carrying the yarn charge arrives? Is thecohort of new and returning knittersthat started with those projects ready to "graduate" to larger efforts?
WORKING REPORT – DRAGON’S RETURN
It seems like I can’t please everyone. Either people write and ask to ask why I’m ignoring knitting, or people write to ask if I’m still working on the crocheted dragon panel. I am – and here are my results to date:
I’m chugging along through the right hand border, still not quite sure how I’m going to manage attaching the top and bottom strip. I have however gotten several notes of encouragement, not the least of which was from my old friend (and crochet expert) Kathryn Goodwyn. I’ll keep plugging along and report what tangled thought processes I encounter along the way.
Ugly Ducks and Eye Candy Avalanche
Other questions have come in about my needlework and my duck confit. A couple of people have asked when I get all of this done. I point out that I’ve got the advantage of being able to dig up stuff I’ve done over many years. You see it all tossed up here now, but much of what I’ve shown isn’t recent production. The red yoke is from the mid-70s. The strip sampler is about 10 years younger than that. The blackwork sampler is from 1983. The putter cover is from the late ’80s. The lobster sweater is three years old now. Eventually I’ll run out of this type of stuff and things to write about it all, but for now I’m still armed and dangerous.
On the duck, we’ve done it several times now. Usually some time in the spring or summer we’ll stumble across a special on fresh ducks. We’ll bring two home and plan our Ugly Duck Dinner. Why Ugly? Because we take the brace of ducks and remove the thighs and legs, leaving ugly, partially hacked carcasses. We heavily salt and pepper the lower extremities and put them in the fridge for a day or two. Meanwhile, we cook the rest of the duck. Depending on the season and what we feel like doing, we either leave the hacked carcasses whole, steam them then roast them tofinish; or we split them, steam them, then barbeque them. The steaming serves two purposes – first, it’s a great way to melt off tons of fat. If you didn’t steam them first, barbequeing would end up as a general invitation for the fire department because all that fat would lead to severe flare-ups and burned meat. Second, it makes the ducks – usually not as tender as chicken – meltingly soft.
Once the fat is steamed off the ducks, we save it for the confit. To do this right, we usually end up using all the fat from the two ducks, plus a bit renderedfrom previous ducks or geese that we’ve stored in clean jars at the back of the fridge. We take the legs and thighs and pat off some of the salt. Then we put a little bit of fat in a cast-iron Dutch oven, and lightly brown them in a single layer, skin side down. After that we completelycover them with the reserved fat, turn down the heat and let them simmer in the barely bubbling fat for about an hour and a half, until they are soft. While they’re still warm, we put the legs and thighs into scalded jars (dried off, off course), then pour in the fat to cover.
The resulting jars of duck and fat then sit in the back of the fridge (or freezer) until mid-winter. Some time in the cold months we get a yen for cassoulet, which is nothing more than a fancy version of beans and hot dogs. In our case it’s small white beans, tasty smoked sausage, and some of our preserved duck. Add friends, a crusty crumb topping, some crunchy bread, and several bottles of wine and I guarantee you’ll find the effort well worth the trouble. This year we’ll be toasting to Julia, without whom we would never have attempted such nonsense, nor have learned how much fun it can all be.
ANOTHER HELPING OF DRAGON
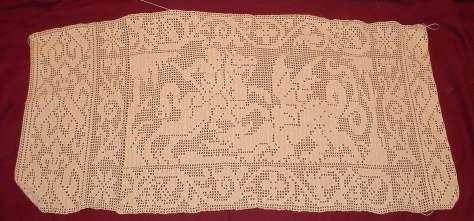
A quick post today as I dash from errand to errand. More progress:
I’ve finished the border panel on the left, and am starting its companion on the right. I’m still nooding out the logistics of attaching the top and bottom borders. I’m still favoring the crochet-on-as-you-go method, but I admit it would have been easier hadI not decided early on to leave a two open mesh divide between all pattern elements. I’ve got my two empty rows top and bottom. Now to do the attach-as-I-go top and bottom strips, I’ll have to do my slip stitch on a filled rather than empty mesh. That may turn out to be a bit more noticeable. Tinkering is called for…
And in response to still more requests – tune in tomorrow to see what the back of the red embroidery looks like. Off to get my car (belatedly) inspected.
FILET OF DRAGON – MORE QUESTIONS
More questions from my inbox:
Can you use the same type ofchartedpattern for knitting?
Why not? It’s a plain graph. You can use anycharted pattern for knitting, darned net, embroidery, colorwork or filet crochet so long as you understand the proportions of the units your chosen craft employs. Even though the original was graphed in square units, my units are rectangles. As a result, my piece is a bit squashed left to right because my units are wider than they are tall, and I worked across the piece’s short dimension. Had I worked the long way across, my dragon and George would have been squashed top to bottom instead.
By carefully choosing the direction of one’s work one can either minimize the effect of non-square units, or employ it as a design feature. Here’s a cross-stitch embroidery I did on white muslin. The original graph was square. The muslin’s weave wasn’t. The flower units end up being squashed top to bottom, but that turned into a design feature.

There are some ways around the problem if you want to work a square graph on a non-square medium but want to preserve the original height:width ratio. Depending on their gauge, some knitters replicate every third or fourth row when working from a square unit chart. This practice is built on the premise that knitting stitches are usually wider than they are tall (more rows than stitches per inch). Others use drafting software with layering capabilities, importing the original chart, then overlaying a custom grid built to their stitch height:width ratio, finally knitting or crocheting off the new gridding. Finally, some people manipulate their craft to produce units that are more square. For example, I’ve seen some knitters take graphs and translate each box unit into a unit of 2 stitches x 3 rows. While that "blows up" the design, making it a much larger piece than would working one stitch per one charted square, it usually does produce a result that is more visually true to the original.
Me? I don’t bother regraphing. I play with the ratios and pattern placement instead. For example, the Knot A Hat headband on wiseNeedle is worked from a square unit graph (available as a *.pdf via link on the pattern page).

My knitted version is elongated along the length because my stitches are like most stockinette – wider than they are tall. But I don’t care. I think the design’s stretch isn’t out of place and until I pointed it out, you probably wouldn’t have noticed.
How did you get your mesh to look so even?
The same way you get to Carnagie Hall – practice, practice, practice. [grin] Seriously, in crochet just like inknitting one gets used to the hand motions of making a stitch, and providing the optimal tension on the thread becomes second nature. I find if I concentrate on keeping things even, they go all to hell, but if I relax and just do the work – my stitches are all the same size. Some crochet beginnersstrangle the hook, pulling the loops way too tight and making the formation of stitches more difficult than it should be. Others make their stitches waaaay up the needle’s shaft where the shank gets wider to accommodate gripping. Those folks often end up with loose, irregularstitches as their too-big loops are distorted by the actions of making a stitch. Again, not to be a smart-ass – but practice and patience are key.
Filet looks nifty. I didn’t know crochet did more than granny square blankets. What other types are there? Where can I learn more?
There are all sorts of crochet books out there. Not as many as there are knitting books, it’s true, but there are quite a few. Some are pattern collections, some are technique instruction books, and some are toss-the-rules and be creative sources of general inspiration and encouragement. Crochet history however is harder to come by.
The best source of info on crochet history and styles I’ve got is Lis Paludan’s Crochet: History and Technique. It’s a fair size tome that details not only crochet’s murky historical beginnings, also covers how the craft developed over time. It gives copious illustrations of various styles, mostly fromengravings and other period sources,and even has a nifty how-to section in the back. Unfortunately it appears to be in rather limited supply, although I still see copies at the original retail price on bookstore and needlework specialty store shelves. It’s also pretty well represented on library shelves. [Reminder to self: Add rider to homeowner’s insurance to cover out of print needlework book collection!]
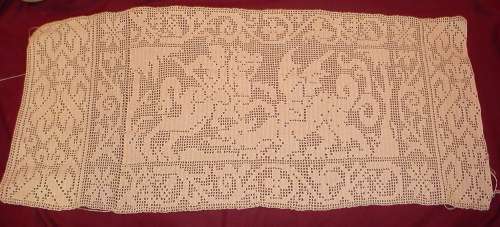
WORKING REPORT – EVEN MORE DRAGON
Progress continues. Here’s the latest:
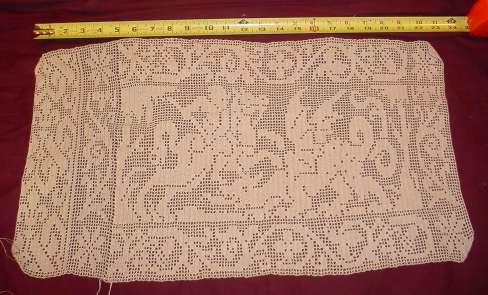
I’ve included the tape measure because a couple of people who have seen the thing in person thought it was much larger, and were surprised by how small the individual meshes were. It’s not exactly teeny, but at around 8×6 meshes per inch, it’s not exatly honking huge, either.
You can see the edge frame, now well developed along the left. In the original (and in my book) it appears as a single-wide. Here I’ve mirrored it along the long side. There will be another block of the same at the right edge,but the top and bottom (right now) look like they’re going to be single-wide. I have to say I like the piece, and I’m quite pleased. It will be killer on the door.
Inhouse-related news, String Central is mostly put back together. We’ve completed the network wiring on the basement and first floor, and I’ve been able to unpack and set up my base station machine and comfy chair. Goodbye laptop! Goodbye typing on top of the oil tank! Slowly but surely I’m making a dent in the Continental Divide of boxes that separates room from room. Yesterday’s find was the long-lost lid to my spaghetti pot. At this point I’m truly thankful for similar small points of progress.
Other questions that have come in via eMail:
How is crochet to do for long periods compared to knitting?
I find crochet slightly more tiring. The way I hold my hook and thread involves a good deal of wrist rotation to form stitches. By contrast, my knitting requires almost no wrist movement. Also at the small gauge I’m working, my overripe eyes need a fair bit of light, otherwise I end up squinting and workng by feel. Stab. Ouch. Got it? Nope. Re-stab. Ouch. Got it! Grab loop, loop, loop. Repeat. That’s hard on both the eyes and fingertips. As a result, I can knit happily with no ill effects for long stretches of time, but I can only crochet for a couple of hours before eyes, fingers, and wrists all demand stopping for a glass of wine.
What thread and hook size are you using again?
I’m using Coats & Clark Royale, size 30; and a recently made Bates US #10/1.5mm. I posted a short discussion of hook sizes several digests back. So far I’ve used 1.8 balls, but don’t anticipate using more than three total.
Where did you buy the pattern for your curtain/please send me the pattern.
If you’ve been reading along, you’ll know there is no pattern. I’m feeling this one out as I go along. As for sending out the graph for the dragon or the edgings I’ve used, I might consider posting one or more of them on wiseNeedle some time in the future, but other than that, I am not sending any of them out. If you’ve got access to my book on embroidery, all three are in there. If you’ve got access to other needlework resources, including microfilm and other repro collections of early pattern books, here are the citations:
- Dragon panel – Siebmacher, Johann. Schon Neues Modelbuch von allerly lustigen Modeln naczunehen Zuqurcken un Zusticke. Nurnburg, 1597(?), 1602/3/4. (Plate 30:1 in my book)
- Acorn, Leaf, and Flower Meandering Repeat – Pagano, Matteo. Honesto Essemplo del Vertuoso desiderio che hanno le donne di nobil ingegno, cira lo imparare i punti tagliati a fogliami. Venice, 1550. (Plate 27:3 in my book).
- Framed Twist and Flower Border or All-Over Repeat – Troveon, Jean. Patrons de diverse manieres inventez tressubtilement Duysans a brodeurs et lingieres et a ceulx lequelz vrayment veullent par bon entendement User Dantique et Roboesque frize et moderne proprement en comprenant aussi Moresque. Lyons, 1533. (Plate 28:4 in my book).
Of course, looking these up in a research library will entail actual work. It’s been my experience that people who idly ask for free patterns are rarely disposed to bestirring themselves to expend the effort. However if there is sufficient interest, I’ll considerpublishing my graphs on-line.
THE DRAGON’S VALUES
Elissa wrote to me to ask how I could tell what graphed patterns might go together well as I was looking for more borders to eke out the edges of the dragon panel. I am not quite sure I can answer, in part because I’m not quite sure I’ve made successful picks yet. I do a fair bit of this type of composing in the course of stitching up monochrome embroideries. The best way I can discuss this is to show a blackwork sampler I did a while ago:

I stitched this upwhile I was working on my book of embroidery patterns. Some of the patterns on this piece made it into the book, others didn’t. The ones I left out were ones that turned out to be too late in origin for inclusion in the book, or whose documentation and provenanceweren’t complete or accurate as the rest.
You can see several things on this mostly-blackwork piece. First, even though I was working exclusively in double running stitch (aka Spanish Stitch, Holbein Stitch) and cross stitch, there is a tremendous variation in density and the depth of tonal values among the various patterns. There is also variation in the delicacy of line, even comparing the airy double running stitch patterns. The highly geometric bit in a similar style to Jane Seymour’s cuffs (center top) presents a very different look than the curled plume-like leaves in the bottommost left.
Now this piece is far from entirely successful for several reasons, design by accretion being the leading one. Like my dragon curtain it was done "bungee jump" style. I took my ground cloth and just began stitching, picking my patterns one by one as I finished the last. The first bit I did was the sorrel leaf stripin the upper left (looks like clovers). I worked more or less across and then down from there, leaving the center blank until I hit upon something to put there. That happened to be my father’s favorite saying, and a large yale, but I certainly didn’t plan on them being there when I started. (A yaleis a heraldic goat with skewed horns, although someheraldicspecialistswill debate whether this is a goat or a yale.) The last bit to be filled in was the small rectangular area just below the yale, which I patched in with several smaller scale fillings commonly used in inhabited blackwork, finishing up with my sig strip at the center bottom (KBS ’83). I used a couple of these in my blackwork underskirt and Forever Coif, too.
Had I actually sat down and planned the piece, I would have better balanced the placement of light and dark areas, and the apportionment of delicate curved lines with harsher block geometrics would have been more pleasing. Those sorrel leaves for example are way out of place. They’re too light and too leggy sitting as they are on top of the darker knot strip. The large double star motif beneath the yale’s back hoof is also out of place. While it balances nicely with the English acorns on top of "Worth Doing" and the star and fleur de lyse at the center right edge, in combo with the Chinese peonies just above it theheavyvisual densityweighs down thecomposition along the left edge.
All this is a long way to go to answer Elissa’s question. In a piece as small as the dragon curtain, with a limited number of patterns, I wanted to call attention first to the center panel. To that end, I framed it with a strip repeat lighter in value than the average tone of the dragon and knight unit. I tried not to "fight" with the center panel, picking a repeat that was rather delicate in line rather than a heavier one to avoid the the overpowering effect demonstrated on my Anything sampler. However, once that frame was completed and I wanted to add more width, I decided to usestrips of aheavier, more geometric border around the whole piece. With luck, now that the lighter inner area has been established (sort of like matting a painting), the denser second border will serve the same purpose as a dark carved wood frame on a painting – defining the inner space inside the frame and accenting the center, by contrasting with both the mat and the piece’s focus.
