EPIC FANDOM STITCHALONG – BAND 8
To continue our slither through North American winter I present Band 8 – Snakes! And They’re Plain!
OK. So, this one is a bit more creepy-crawly than it is classic-blackwork-floral-ordinary. My excuse is that I drew it in the run-up to the 2019 Halloween season, adapting it from a design in Ensamplario Atlantio II, one of my free books of blackwork fills and borders. Plus, we should only ignore those who adore campy horror movies at our own peril.
Time Factor 1 for height and the ultra-simple straight repeat. Our scaly friends are all identical, with the second row flipped and travelling the opposite direction. Feel free to work all the right-bound crawlies in one pass, and then all the left bound ones, or hop back and forth as you please. Use one color, multiple colors, or variegated threads, as you prefer. There are no rules or must-do approaches here. One of the beta testers used beads for the eyes – a charming enhancement.
134 stitches wide x 16 stitches tall. 2 blank rows left between this and the following strip. If worked as a continuous band, one full repeat in 23 units.
| Samples | Fabric Used | Stitch | Thread Consumption/ Notes |
 | 28 count evenweave | Back stitch, 1 ply | |
 | 18 count Aida | Back stitch, 1 ply | |
 | 28 count evenweave | Back stitch, 1 ply | About 2 yards Plus 20 beads (See below) |
 | 28 count evenweave | Double running, 2 plies | About 1.5 yards each of light red and light green, about 0.75 yards of light blue and yellow each |
As usual this band plus working notes and hints has been appended to the bottom of the write-up on the SAL page, accessible via this link or via the tab at the top of every page here on String-or-Nothing.
If you are working our Epic Fandom SAL either as a whole or as a strip excerpt, please let me know. It gives me great joy to see how my “pattern children” fare out in the wide, wide world, especially when they meet up with creative, playful people. And if you give permission, I’d be happy to share your pix of this developing sampler, it in its finished state, or derivative projects including one or more of the Epic bands here on String, in a gallery post, with full credit to you as interpretive artist.
Band 9 debuted on the Facebook Enablers group today, and will invade here on or about 1 February 2022. I’m betting you’ll be long finished with Snakes before then.
EPIC FANDOM STITCHALONG – BAND 7
We roar back with Band 7 – So Sue Me! What can possibly be more anachronistic than this?
Every movie with a ravenous T-Rex in it looms in front of us now. Let’s see, aside from the obvious, there’s the original King Kong, Lost World, Fantasia, Prehistoric Beast, Land Before Time, Night at the Museum, Land Before Time, Dino Riders, several Dr. Who episodes, and many, many more. How could we continue without including an iconic dinosaur?
And the title? Named after Sue, a very famous Tyrannosaurus Rex specimen now on display at the Field Museum in Chicago, Illinois.
If desired this band, like the Pirates band can be worked voided – with the background filled in using long-armed cross stitch or plain old cross stitch, squared or stepped filling, diagonal filling, or another fill as desired. This is highly optional – no pressure here because the T-Rex strip would look good either way.
If voiding is chosen I think the design would show to best advantage if the background fill was done in a different color than the outlining, because if both were worked in the same thread the slender stems of the flowers curled in the tail would disappear. Remember – voiding eats both time and floss in direct proportion.
Time Factor 3 for height and flip/mirror complexity if only the outline is worked, but Time Factor 4 if voiding is chosen.
134 stitches wide x 30 stitches tall. 2 blank rows left between this and the following strip. If worked as a continuous band, one full repeat in 57 units.
| Samples | Fabric Used | Stitch | Thread Consumption/ Notes |
 | 28 count evenweave | Back stitch, 1 ply | |
 | 18 count Aida | Back stitch, 1 ply | |
 | 28 count evenweave | Back stitch, 1 ply | About 8 yards for outlines, 6.5 yards for voiding |
 | 26 count evenweave | Double running, 1 ply | |
 | 28 count evenweave | Double running, 2 plies | 1.5 yards blue, 1 yard, green, 0.25 yard red, 2 yards of light red for voiding |
The second from the bottom, by guest Beta Tester Robert (known to some of you as Master Geoffrey d’Ayr of Montalban) is actually part of a strip of the design he worked as cuff and collar trim for a shirt – proving the point that many of these designs can be worked as long band repeats.
As usual this band plus working notes and hints has been appended to the write-up on the SAL page, accessible via this link or via the tab at the top of every page here on String-or-Nothing.
If you are working our Epic Fandom SAL either as a whole or as a strip excerpt, please let me know. It gives me great joy to see how my “pattern children” fare out in the wide, wide world, especially when they meet up with creative, playful people.
Band 8 will be released here on or about 18 January 2022, giving you ample time to romp with this one.
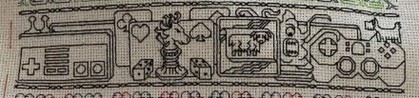
EPIC STITCHALONG – BAND 6
A breather after the last rather involved and challenging to count Gameroom panel!
Grape Balloons is another original, loosely based on a historical pattern family. Bands or horizontal columns with lozenges and/or striations are pretty common in strapwork of the late 1500s to 1600s, as are grape clusters. But sprigging them together this way is something I doodled up.
This one should be comparatively easy to stitch, especially after the last no-repeat panel. All you need to do is remember that the slanting bands on the center rod mirror – everything else is a simple flip, either up/down or left/right – no tricky half-drops, or meanders.
134 stitches wide x 16 stitches tall. 2 blank rows left between this and the following strip. If worked as a stand-alone continuous band, one full repeat in 17 units.
| Samples | Fabric Used | Stitch | Thread Consumption/ Notes |
 | 28 count evenweave | Back stitch, 1 ply | About 2 yards of floss |
 | 18 count Aida | Back stitch, 1 ply | About 3 yards of variegated thread (not floss) |
 | 28 count evenweave | Back stitch, 1 ply | |
 | 28 count evenweave | Double running, 2 plies | About 1.25 yards of light blue, 0.5 yards of light red, scraps of red. |
As usual this band plus working notes and hints has been appended to the write-up on the SAL page, accessible via this link or via the tab at the top of every page here on String-or-Nothing.
If you are working our Epic Fandom SAL either as a whole or as a strip excerpt, please let me know. It gives me great joy to see how my “pattern children” fare out in the wide, wide world, especially when they meet up with creative, playful people.
Band 7 was released today in the Enablers Facebook group feed, and will be echoed here on or about 21 December.
#epicfandomsal
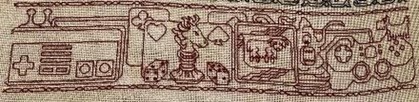
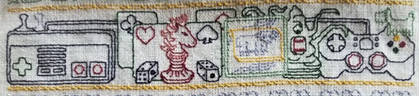
EPIC STITCHALONG – BAND 5
The world is starting to open up again, but among us there are folk who felt the lockdown most keenly during convention season.
They missed meeting friends, swimming in a sea of fellow fans – regardless of fandom; reveling in the costumes either as a cosplayer or just an appreciative passer-by; viewing films, trailers, and shorts; listening to authors, famous actors or other community celebrities as they reminisce, lecture, or engage in open panel banter; shopping for that special Something that sings to the inner nerd; and more. Like the Game Room. There’s almost always at least one, where folk compete for the sheer fun of it, or sometimes for prizes.
I know many people who live for game rooms, then bring home their favorite games and introduce them to their circle of local friends. This strip is for them, the gamers, be they lovers of electronic formats, the classic card and board games, multiplayer role playing games like Dungeons and Dragons, or the new set of tabletop/parlor games, like Settlers of Catan.
This strip is 134 stitches wide x 28 stitches tall, including the narrow companion border at top and bottom. 2 blank rows are left between this and the following strip.
| Samples | Fabric Used | Stitch | Thread Consumption/ Notes |
 | 28 count evenweave | Back stitch, 1 ply | Pips are French knots |
 | 18 count Aida | Back stitch, 1 ply | About 3 yards. Pips are French knots |
 | 28 count evenweave | Back stitch, 1 ply | Pips are French knots |
 | 28 count evenweave | Double running, 2 plies | About 1 yard of blue, 1/2 yard of yellow, 1/4 yard of red, 1/4 yard of light blue. The snake eyes pips are each 2mm paillettes. Other pips are tiny 1×1 cross stitches |
As usual this band plus working notes and hints has been appended to the write-up on the SAL page, accessible via this link or via the tab at the top of every page here on String-or-Nothing.
If you are working our Epic Fandom SAL either as a whole or as a strip excerpt, please let me know. It gives me great joy to see how my “pattern children” fare out in the wide, wide world, especially when they meet up with creative, playful people.
Band 6 be released on 23 November in the Enablers Facebook group feed, then echoed here on or about 7 December.
EPIC STITCHALONG – BAND FOUR
The latest band! A narrow one to provide a bit rest and relaxation following on the heels of the ravaging pirates. This is a quickie and should take most folk less than the two weeks allotted for its completion.
Palm Cluster is based on a visual family of historical designs, but is my own, and does not directly replicate any single one of them. Feel free to work it in monochrome, using variegated floss, or in multicolor.
 |
 |
 |
 |
I’ve had some questions from folk who find themselves unable to make the commitment to work the entire Epic Fandom sampler, but are in love with specific strips and have asked about working them up separately.
I answer if it’s for your own personal pleasure, please go ahead. Put these on cuffs, collars, napkins, tote bags, small pouches, or add them to your own samplers. I just ask that you contact me if you are considering the distribution of any pattern that includes my strips (or any of my other charts or designs) either for free or for sale. And as always, a link back to String-or-Nothing if you post about your piece would be deeply appreciated. I derive great joy from seeing what mischief the pattern-children are up to in the company of the creative.
Full info on stitch count and thread consumption plus downloadable PDFs for the charts released to date are provided on the StitchAlong page here (also reachable via the tab at the top of every page on String). I’m stacking all of the SAL info on that page, so scroll down to the newest info at the bottom.
Band 5 was released on The Enablers group on Facebook today, and will be echoed here for posterity on 9 November. Happy stitching!
EPIC STITCHALONG – BAND THREE
I present the third band of our Epic Fandom StitchAlong. It doesn’t matter if the pirates are from Never-Never Land, Penzance or the Caribbean – it’s always good to be a Pirate King. Or Queen. Or Monarch.
Here are our finished samples, courtesy of the flashing needles of our Beta Testers, Heather, Danielle and Callie, plus my own finish. Note that the band looks equally good stitched up just in outline or voided. Working that background is totally optional.
 |
 |
 |
 |
Full info on stitch count and thread consumption, plus descriptions of some voiding methods are provided on the StitchAlong page here (also reachable via the tab at the top of every page on String). I’m stacking all of the SAL info on that page, so scroll down to the newest info at the bottom.
Band 4 will be released on The Enablers group on Facebook on 12 October, and echoed here for posterity on 26 October. Happy stitching!
EPIC STITCHALONG – BAND TWO
As promised, we proceed with the second band of the Epic Fandom Stitch Along.
Although the overall theme of this piece is fandom unification in a time when face to face interactions among those who celebrate the nerdier side of life can be difficult, every other band will be more traditional in style. I’ve drawn inspiration from historical pieces for the even-numbered pattern strips, but they are my originals, with no one specific source.
This week’s release is Tulips and Raspberries. Here are four finishes.

Above bits, top to bottom, stitched by beta testers Heather, Danielle, Callie and me.
Full info for the Stitch Along is at the SAL tab at the top of this page, or click here to hop direct. Scroll down to the big yellow BAND TWO subhead to find a downloadable PDF containing Tulips and Raspberries. Background info for the project as a whole can be found in the downloadable for BAND ONE
Feel free to post questions – I’d suggest doing it on the SAL page rather than here, so that any info helpful to future stitchers is easy to find. Feel free to send along progress pix or tag them with ##EpicFandomSAL on social media. With your permission (and proper credit), I’d love to post them in a gallery, so we can fulfill our mission goal of community celebration.
EPIC STITCHALONG – BAND ONE
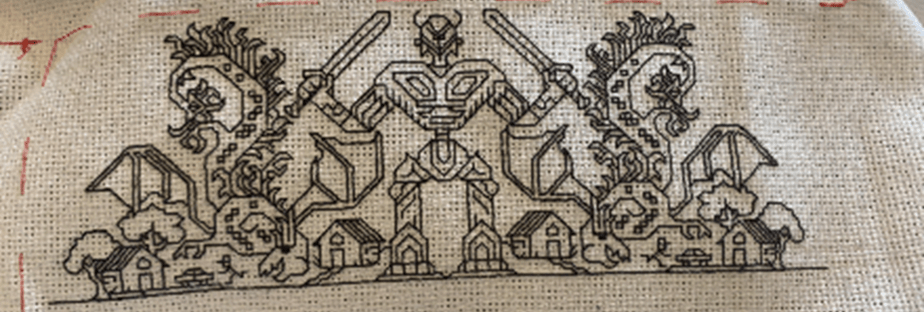
It’s here! Today is the release of the first band of the Epic Fandom Stitch-Along.
I’ve mentioned this before – it’s my original free band sampler celebrating multiple fandoms, offered up as a way for the nerdy at heart (and those who stitch for them) to come together. This isn’t a mystery stitch-along. You will be able to see what you’re getting into. I encourage experimentation with color and technique. and I will share as many examples of different approaches to the individual bands as I have on hand at time of release (with special thanks to our group of intrepid Beta Stitchers!).
We start off with a giant robot and Kaiju, which should delight fans of multiple Anime and Anime-derived Mecha animations/ live action movies/videos – pretty much everything from Transformers, Giant Robo and Voltron to Pacific Rim, and blissfully inclusive all the way through the spectrum from Gundam to Power Rangers.
Here are four finishes:


(Above bits, top to bottom, stitched by Danielle, Heather, Callie and me)
Full info for the Stitch Along is at the SAL tab at the top of this page, or click here to hop direct. Scroll down to the big yellow BAND ONE subhead to find a downloadable PDF containing Giant Robot and Kaiju, plus background info for the project as a whole.
Feel free to post questions – I’d suggest doing it on the SAL page rather than here, so any info that can help other stitchers will be in one central spot. And feel free to send progress pix or tag them with #EpicFandomSAL on social media. With your permission (and proper credit), I’d like to post them in a gallery, so we can all celebrate together.
THE EPIC FANDOM BLACKWORK SAMPLER STITCH-ALONG INVADES!
Well, having been encouraged and enabled by The Enablers group on Facebook, I’ve finally released the secret project I’ve been working on, and can now post my progress to date.
The Epic Fandom Blackwork Sampler is a very large piece, intended to be stitched by and/or for Epic Fans. It includes strips close to the hearts of many niche interest groups, and will please those who love giant robots, dinosaurs, Dr. Who, Star Trek, Star Wars, retrofuturism, classic bug-eyed monster invasion flicks, snakes, and much more. These theme bands alternate (more or less) with bands that are more traditional in composition, although everything in this project is original.
I have NOT made this a mystery stitch-along because it’s a bit more complex than most, and folk should know what they’re getting into before they commit time and resources. I’ve established a page here on String just for this stitch-along (SAL). Project components will be posted to The Enablers, and will be echoed here on time delay, at intervals over the coming year. Four weeks will be allotted for the larger, more complex strips, and two weeks for the narrower/less complex ones. I am also posting intro material on estimating fabric sizes and thread requirements, so folks can prepare. The first half of that information is on the SAL page, too as of today. More will join it tomorrow. The first pattern band (Giant Robots and Kaiju) will debut on 3 August on The Enablers, and on 18 august will appear on my SAL page, here on String-or-Nothing. The entire project will continue well into 2022.
Not only is this NOT a mystery stitch-along, I want to foster creativity, and am SO looking forward to what mischief can be accomplished based on this offering.
- There are panels that are designed to accommodate voiding – filling in the background behind the motifs, although those panels can stand alone and read well without it. The optional voiding can be done after the foreground stitching is complete, so no decisions to commit to it need be made when the stitcher starts a band with the voiding option. More info on voiding and the many ways to do it will be provided before those strips break.
- There’s no requirement to do the entire thing in a single color, even though monochrome is far more common in traditional blackwork than polychrome. Color choice and placement are entirely up to the individual stitcher. Some options include but are not limited to:
- Each strip in its own color
- Alternating colors between strips
- Using variegated (with back stitch) for one or more strips
- Picking out design features for color highlights (like I did below).
- Working one repeat of a multi-repeat in a contrasting color, so it stands out.
- There’s also a strip intended for customization, to allow signing, dedication, dates, a motto, or inclusion of optional motifs. A design worksheet with alphabets and measured areas will be provided when we get to that one.
- If side borders are desired, go for it, but I am not furnishing those (top and bottom borders would be more difficult to add because my composition isn’t a clean rectangle).
- And last of all, if someone wants to skip a particular panel, or wait until their favorite arrives and work only that one – that’s ok, too. But I won’t be releasing anything ahead of schedule or to special request. If you want a future band, you’ll have to wait breathlessly along with everyone else.
Here’s my own rendition of the thing, to date. This is just the first nine out of the total nineteen strips and some of those are partial. I went for polychrome because I rarely get a chance to do that. I’m using six colors, although you are seeing only five right now. There are light and dark shades of red, green, blue, and yellow. The light yellow will be used in the future for voiding and detail, but I haven’t stitched those parts in yet. You can also see partial voiding in the Pirates strip (#3). I will go back and finish that for the entire band, and eventually fill in the dice on the gaming band and add their pips, but I wanted to lay down as much of the rest of the piece as quickly as possible because I got a late start on it.

Depending on the reception of this piece, there may be follow-ons. So if your favorite fandom isn’t included, there’s always hope.
Oh, and if you are worried that you’ll make mistakes because it looks complicated – don’t worry. I have left mine in, including a quite massive one on the pirate strip. I bet that unless you hunt for it, you’d never notice.
Joining in? Please do. I so adore leading folk astray. 🙂
BAGGED UP AND READY TO GO!
A finish! The mini-bag kit I savaged and repurposed to feature my own choice of stitching is now complete, and can be sent to the recipient.


To recap, in order to have better access for my hoop I unpicked the side seams of the evenweave decorative layer, and of the heavy cotton twill lining. The evenweave had no seam at the bottom. The twill lining was left with the bottom unseamed. Earlier in the process the bag could be splayed out flat, with only the bit of seaming at the top surviving – where the lining and evenweave were sewn together with the red handles. Here you see it draped out and in the hoop.

When I finished both sides, I sewed it back together by hand – my sewing room and machine being off limits due to the big basement rehab project. First I sewed the lining using back stitch. Then I attempted a fancy decorative openwork seam in black to reunite the two sides of the evenweave.
It didn’t work.
It looked rather Frankenstein-like. Of the stuff of nightmares. So I covered up the buttonhole stitch based seam with three rows of reverse chain, done with a whole 6-ply strand of my linen floss. The first row of reverse chain went down the openwork bit at the center of my former decorative seam, and the other two courses went left and right of that, hiding the bits that encroached into the body of the bag. Which is why there’s now a thick black stripe along both sides of the thing. Not an optimal solution but the best I could do right now.
And on to the next project.
This one I have to admit I am posting as a tease. I used time over the past pandemic year to design a free stitch-along. It’s a rather large and complex stitch-along, with a distinctly nerd-world/fandom theme. It will be released on The Enablers Facebook group, and also here on String, on a two-week delay, starting sometime in August. I will be creating a new page here on String to host it. Beta-test stitchers from that group have been working on their pieces to proof the design and confirm the directions, and their efforts have been much appreciated. The thing will NOT be a mystery stitch-along (folk should know what they’re in for before they commit), but it will be released one panel at a time, with periods between releases pegged to the complexity of the individual panels.
However, until now I haven’t started my own rendition. I won’t spoil the surprise, but as I warned – I will tease here.

Obviously not a historical redaction (for a change), and that’s going to be part of the fun.
