ONE FOOT IN FRONT OF ANOTHER
Just because things are a bit in the air here at String Central right now, doesn’t mean that our dedication to Relentless Forward Progress has been put aside. There are things to do, things to make, and accomplishments waiting to be notched and acknowledged.
First, we did have a wonderful weekend of low key celebration here. The Resident Male (and Executive Chef) outdid himself. He did homemade gravlax (the Jacques Pepin overnight cure version); grilled boneless lamb with garlic and rosemary; and roasted cauliflower and red onions. I pulled my weight by baking four small chocolate pound cakes, one of which we split for dessert, stowing the other three in the freezer for future treats. But I have promised to detail my adventures in low carb baking, so I will elaborate here a bit.
Low Carb Chocolate Pound Cake
I started with this recipe – Keto Chocolate Pound Cake, from the All Day I Dream About Food blog site. The thing was pretty straightforward if you happen to have the ingredients in the house, which we did. Note that this recipe uses almond flour, monkfruit-based brown sugar substitute, butter, baking powder, eggs and sour cream in addition to the items mentioned below in my summary of deviations.
First change, instead of one standard size loaf pan, I used this one – a four mini-loaf thing I got years ago when I was a regular contributor to school-based fundraising bake sales. It takes a standard size loaf cake recipe and turns it into four more saleable and storage friendly smaller units.
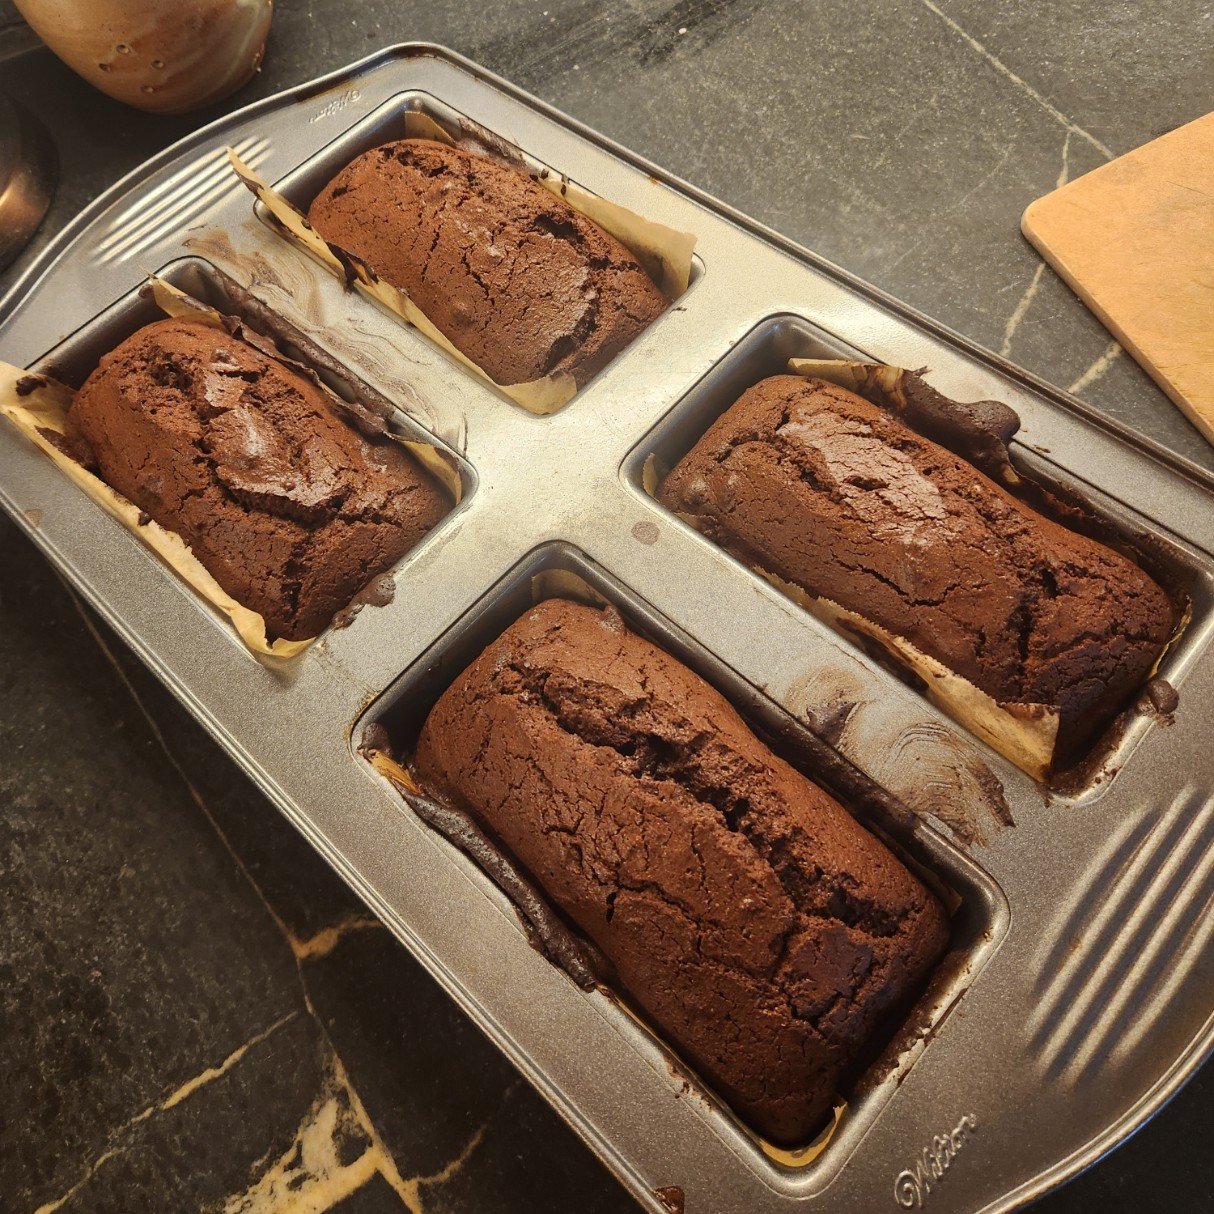
I am pretty sure I found this pan in a yard sale, but I do see them sold in cooking supply and on line sources. And yes, I buttered each little loaf hole and lined it with a piece of buttered baking parchment to make removal easier. From prior experience I know that this pan in my convection oven bakes faster than a full depth loaf pan. To compensate I did my bake at the recommended temperature, but only for 50 minutes – not the 60 to 75 cited in the recipe. I tested the cake with a skewer for doneness.
Second, and this is a personal preference – I detest coffee flavor in my chocolate. The recipe calls for two kinds of cocoa – regular and “black”, chocolate flavor whey protein powder, plus espresso powder and a quarter cup of room temperature, strong coffee. We had the whey powder on hand, no problem. I used just one kind of cocoa, combining the specified quantities for both together – a Dutch Process, known for its deeper/stronger chocolate flavor, and the only one on my pantry shelf right now. I skipped the espresso powder, and in place of the coffee (clearly needed to hydrate the rather thick batter) I used the same quantity of very strongly brewed unsweetened black Assam tea, also cooled to room temperature.
Third, I tossed two large handfuls of coarsely chopped toasted pecans into the batter before spooning it into the pan.
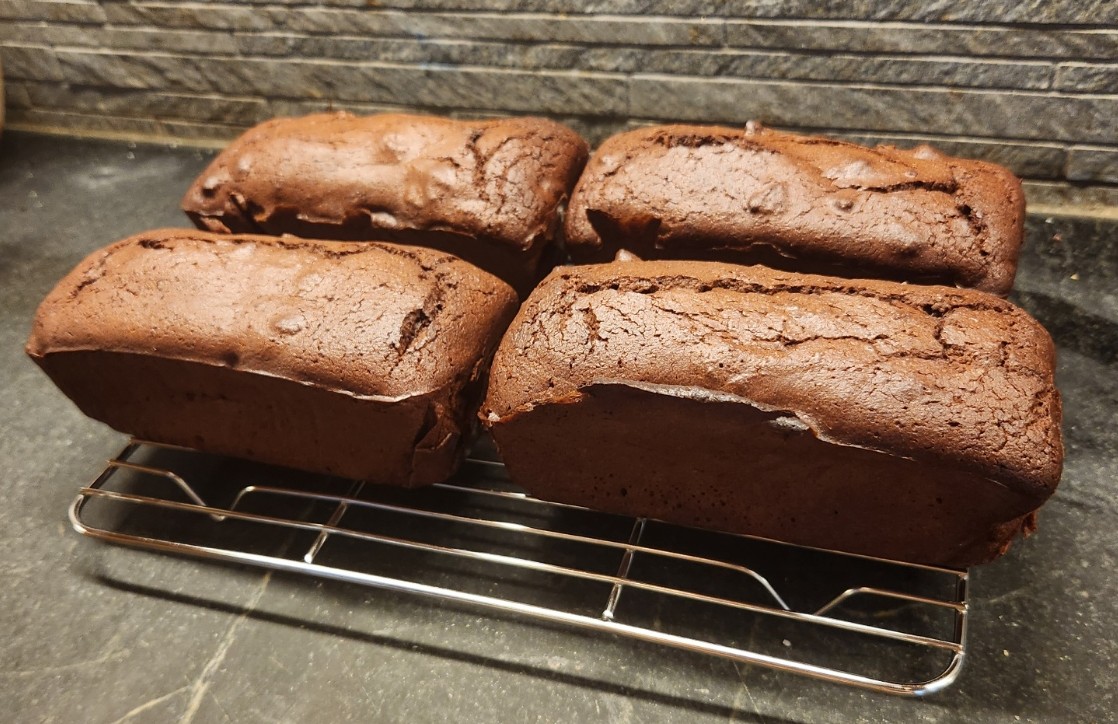
Fourth, I omitted the chocolate ganache glaze entirely. I knew I would be freezing the three extra cakes, and I know from experience that ganache can get chalky when that happens. Given that the four little loafs were moist and tender, and we would be eating one right away, I didn’t see the need. I can always whip up a little bit of glaze when we defrost a survivor if I think the extra moisture is needed.
Here is the end result. A definite do-again. Moist, dense without being heavy, with a deep cocoa flavor. The toasted pecan bits were a welcome addition for both flavor and texture. Each little cake makes two very generous portions. Perhaps next time I will also add a handful of zero-sugar chocolate chips. But that would be truly decadent. Based on this result as opposed to many truly dismal Keto baking experiences I have had, I may explore the site of origin to see what else is up there.
Booties
I had a special request to knit some booties for a the sister of a friend of a family member – the first of that particular friend circle to have a baby. My favorite bootie pattern is a quick knit. I can do a pair in about four hours, so why not.
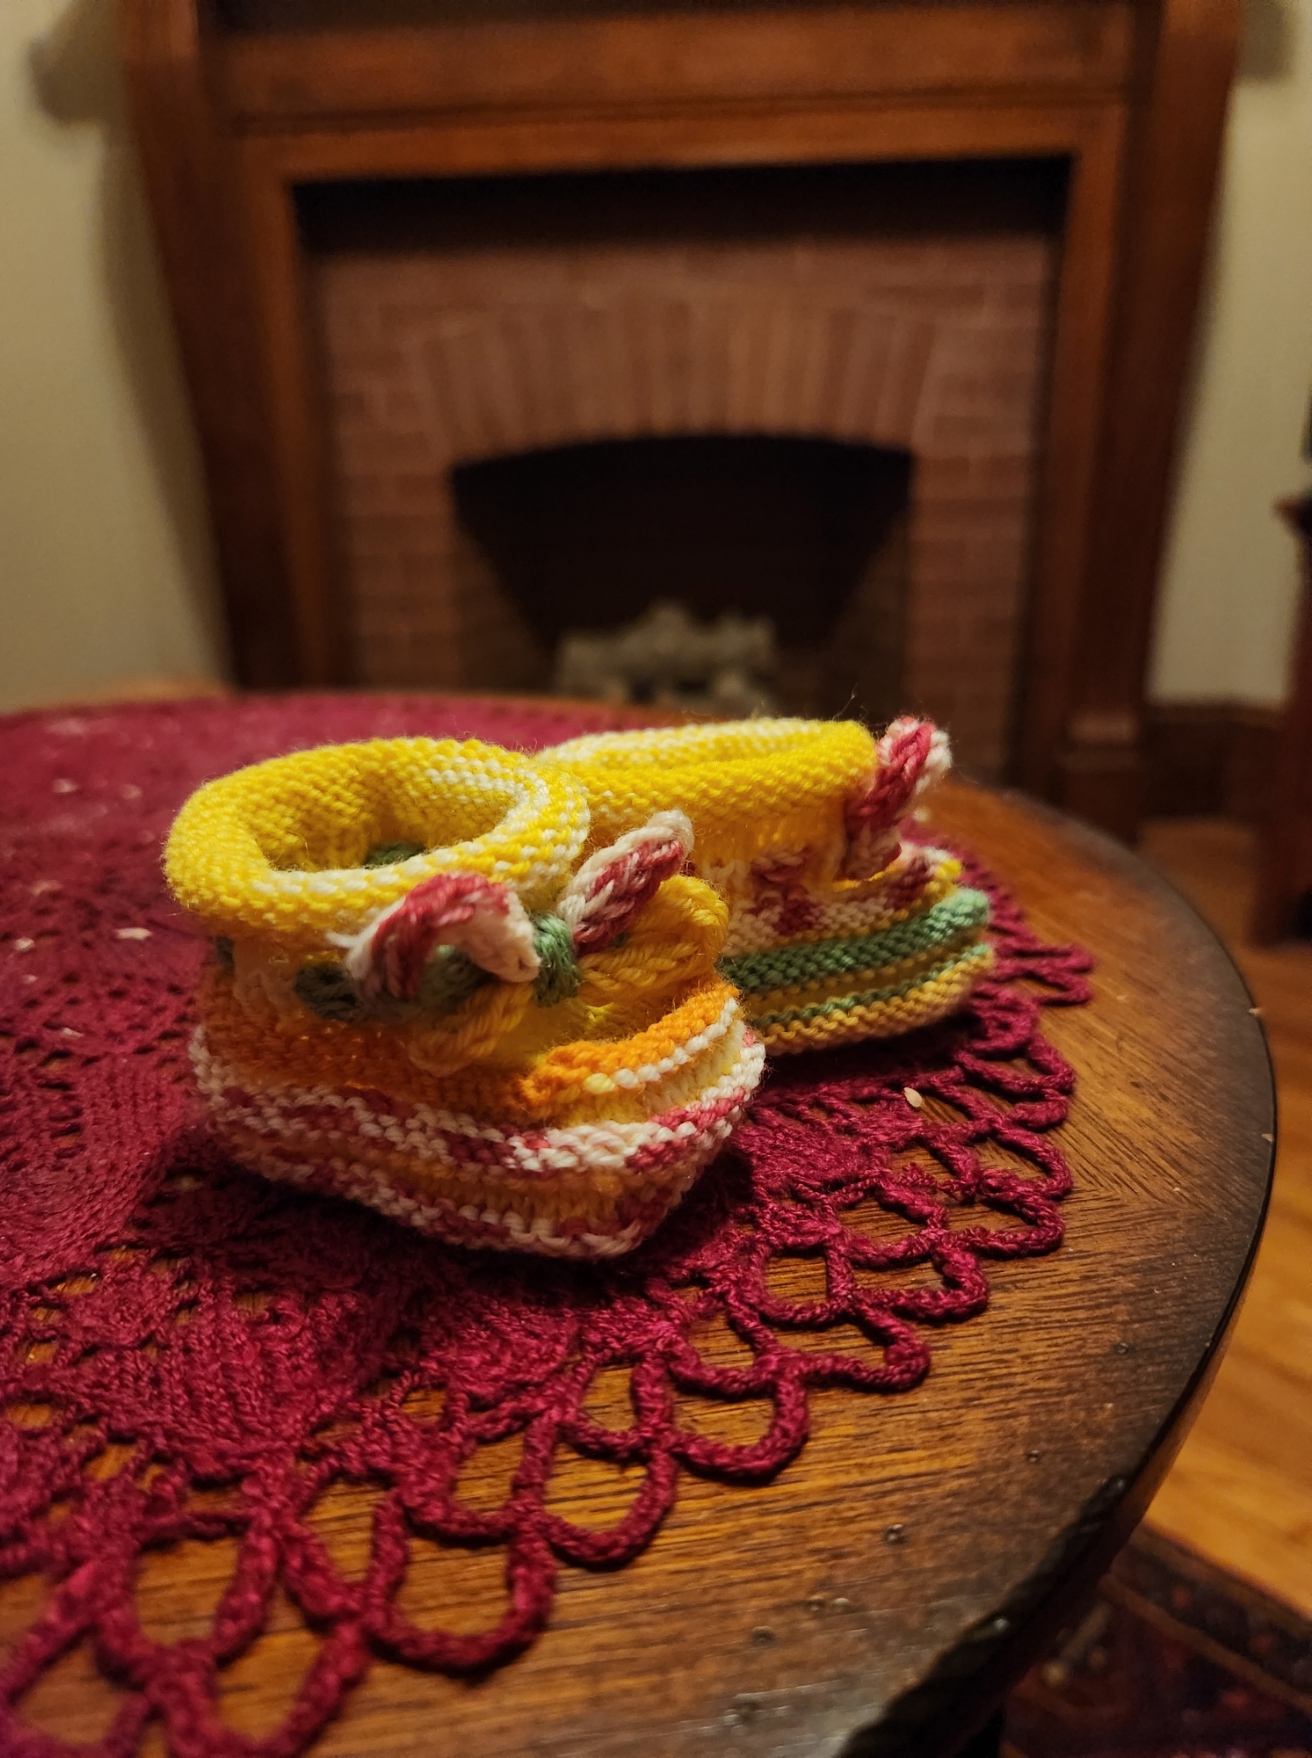
These are from the same pattern I used easily thirty times over a few decades to make items for my own spawn, plus baby gifts for friends, family, and co-workers. The original pattern was posted by Ann Kreckel in 1995, to the ancient email based KnitList mailing list back in the days when the Internet was still climbing out of primordial seas. It can still be found via the Internet Archive’s Wayback Machine utility – Click here to retrieve it.
In the past I’ve posted a mini-tutorial on making these, and invented and shared a hat to match.
Reading over the instructions it occurs to me that even with my mini-tutorial many knitters today might have a problem following the pattern as Ann originally shared it. Not that there are mistakes, but I do note that the level of comfort with written instructions in the general knitting community has declined sharply in the video era; and the terms and logic of the thing might challenge a newer knitter. I think I could make the pattern more accessible with a simple re-write and merge with my mini-tutorial. But it’s not my design, so I am not comfortable just doing so.
I have tried tracking down Ann to ask about updating and hosting her pattern as a free offering, but so far I haven’t gotten a response. If any of the old KnitList gang reads this and knows how to find her, please pass along my sincere wishes for happiness and health, and my request for pattern editing and republication permission.
Socks
Hating to just sit there, no matter where I am, over the past two weeks at home, waiting in doctors’ offices, and after my last procedure I kept busy knitting a pair of socks. They are going to be a present for someone who went above and beyond during a regional emergency – not to aid me, but to help someone near and dear. I won’t spill the beans because there is a remote chance that they might see this post. But I did do a whole pair, start to finish, and will be casting on for another before the coming hospital sojourn. Sanity before all other things, and keeping busy keeps me sane.
Stitching – Playing with Faux Buratto
Another bit of sanity-preservation. I wanted a stitching project to bring with me, too. Something small, easy to see, and easy both to follow and to stitch. Something I can slap in a small hoop and support with minimal kit. Yet something that holds interest, and would be enough of a challenge to tempt me to curious activity. I have teased this on Facebook, but here is the full story.
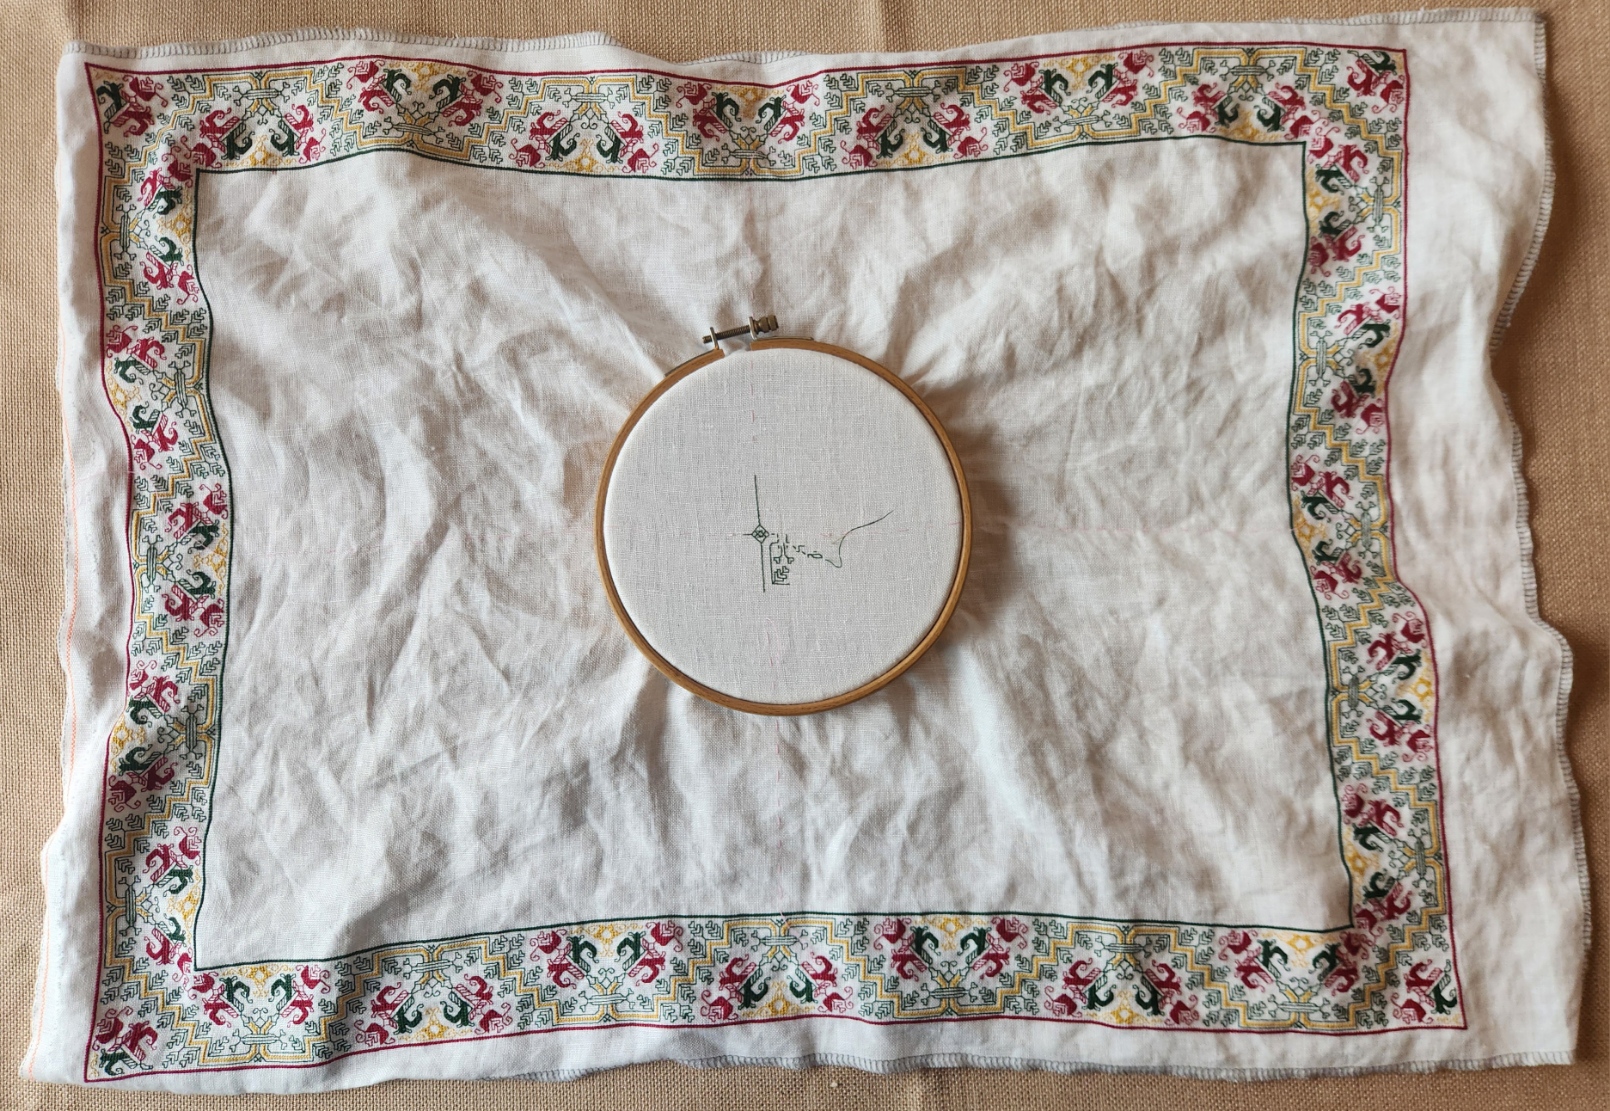
A while back I -lucked into a curious bit of textile. A sieving/bundling cloth used in traditional Korean kitchens as part of food preparation. HMart had it on a rack in the housewares section, and I noticed the weave immediately. I did a blog post on the discovery a while back,
I want to try out a few designs on this cloth. The first step of course was to establish a normed edge. Like most textiles the retail cut rarely aligns with the weave structure, so I basted the largest possible rectangle I could, and added guidelines for vertical and horizontal centers. Then I just started in on an outline. I’m keying off the use of deep red and yellow-gold in a couple of museum artifacts. I’m going to try out establishing my outline for this strip and then do one of several possible fill methods. This style is later 1500s into the 1600s. Then I will try one of the monochrome type designs. from the earlier half of the 1500s. After that probably another multicolor but using a different scale and fill style. It’s a small cloth and there isn’t room for a ton of strips on it, but I will use the available real estate to best advantage, picking on the fly as I usually do.
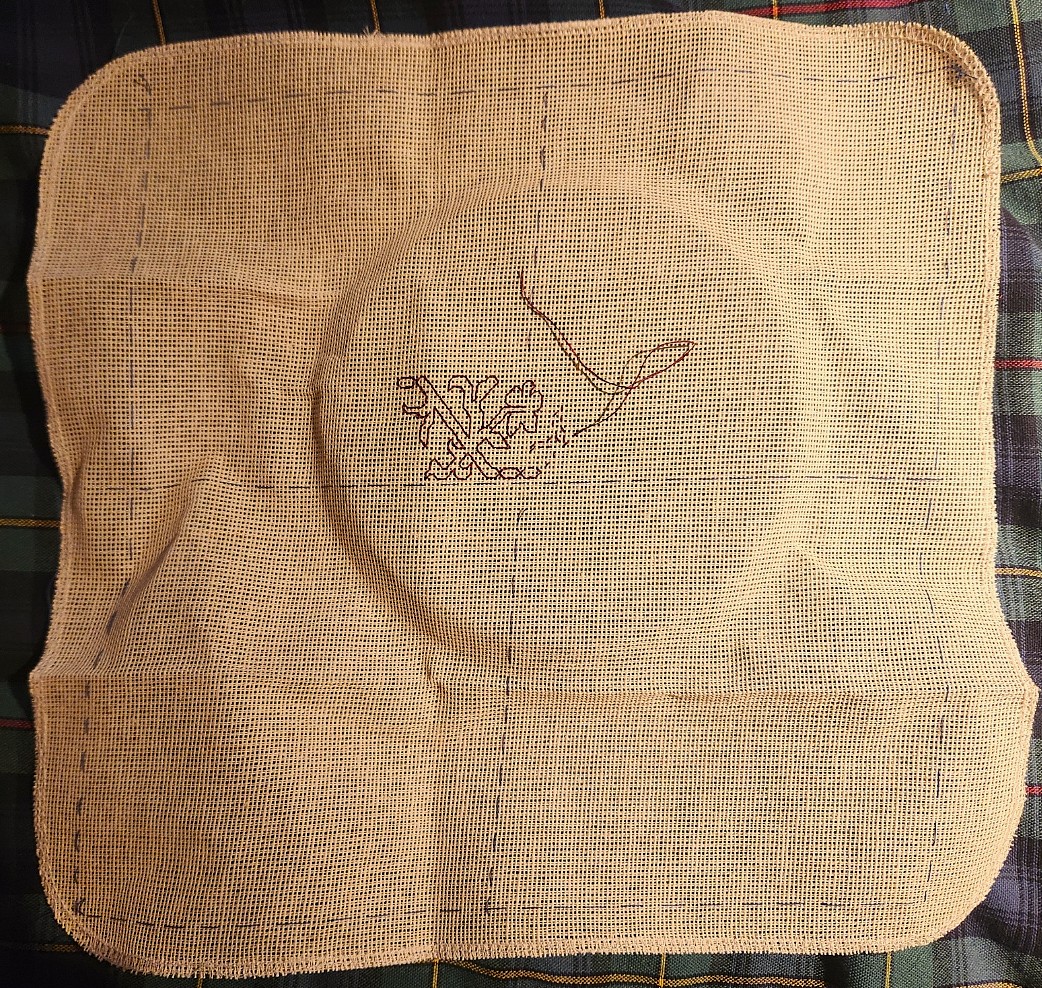
What you see here so far is simple uncounted basting in blue, marking out margins and centers. Those skew cut edges and the amount of area wasted does annoy me a bit, but this piece of cloth was never intended for the purpose to which I am putting it. Just above the center line you can see my start – double running in crimson faux silk (rayon). The design is already 100% established and from this point I can go left and right “off book” just by copying what I’ve already laid down. And I will have T2CM with me, electronically, just in case.
General Health Status Update
Yes, I know I alarmed a lot of you yesterday, for which I deeply apologize. But obfuscation has never been my strong suit. To clarify at this moment, aside from the facial numbness that triggered the hunt for the Danger Lentil, I feel pretty good. I have bounced back from the prior biopsy with no ill effects. I am back to my regular exercise routine. I am pretty much day-to-day advancing the new normal as I have been for many months now. Stamina is excellent, and I have no problems sleeping or eating. I have no headaches, nor blurred vision, auditory or balance problems. In general given my past year’s journey I am in excellent health.
I have every confidence that the team will figure out what’s going on, and that a treatment plan will be devised AND that I will weather that, too. So I do thank you for your words of support and comfort. I have both battle fury and the strength to put it to best employ. Know I keep all of you in my thoughts, and I do appreciate that you are thinking of me, too.
AND PROGRESS ON OTHER FRONTS
The holidays being party over, our latke party, Christmas Eve feast, present exchanges being done, the luxury of time is creeping back into our daily routine. So I can post about my other two big end of year projects.
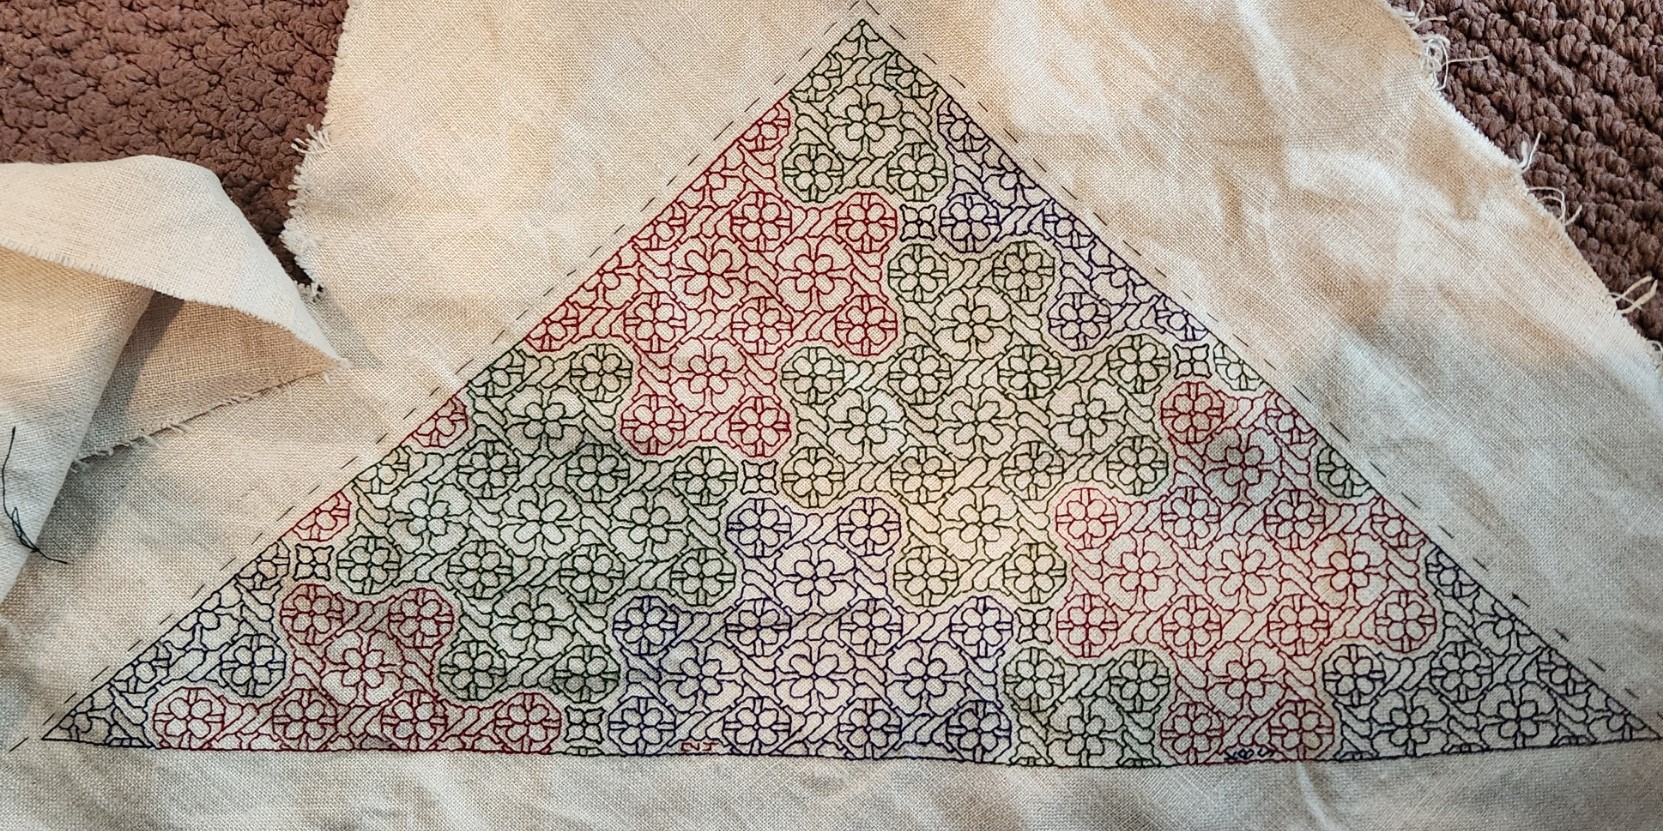
First is my Italian-inspired cloth. Still not sure what I will do with it, although it’s looking likely that it will end up as a piece of honor on a credenza here in the house. I have finished the outer frame. I started this one on 19 September, at the center of the left hand edge, as seen in the photo below. I marched around the perimeter, opting to go a bit shy on the right hand side to preserve use of the “perfect” corner I charted out. I joined up with the starting spot last week via an extended tendril just to confirm the count and that no fudging would be needed. Spot on, no alignment problems at all. I finished out the join and all of the panel detail last night.
And surprise! I’m not done!
I am working a doubled variant of the edge pattern across the center. Possibly flanked by two single panels. I haven’t decided on those yet. I want to capture the spirit of the original, a towel done in Punto Scritto and Punto a Spina Pesce MFA Accession 83.242, Italian, 16th century, silks on linen. The original is quite large, more than four times the size of my rendition.

More on the developing center panel as it grows, of course.
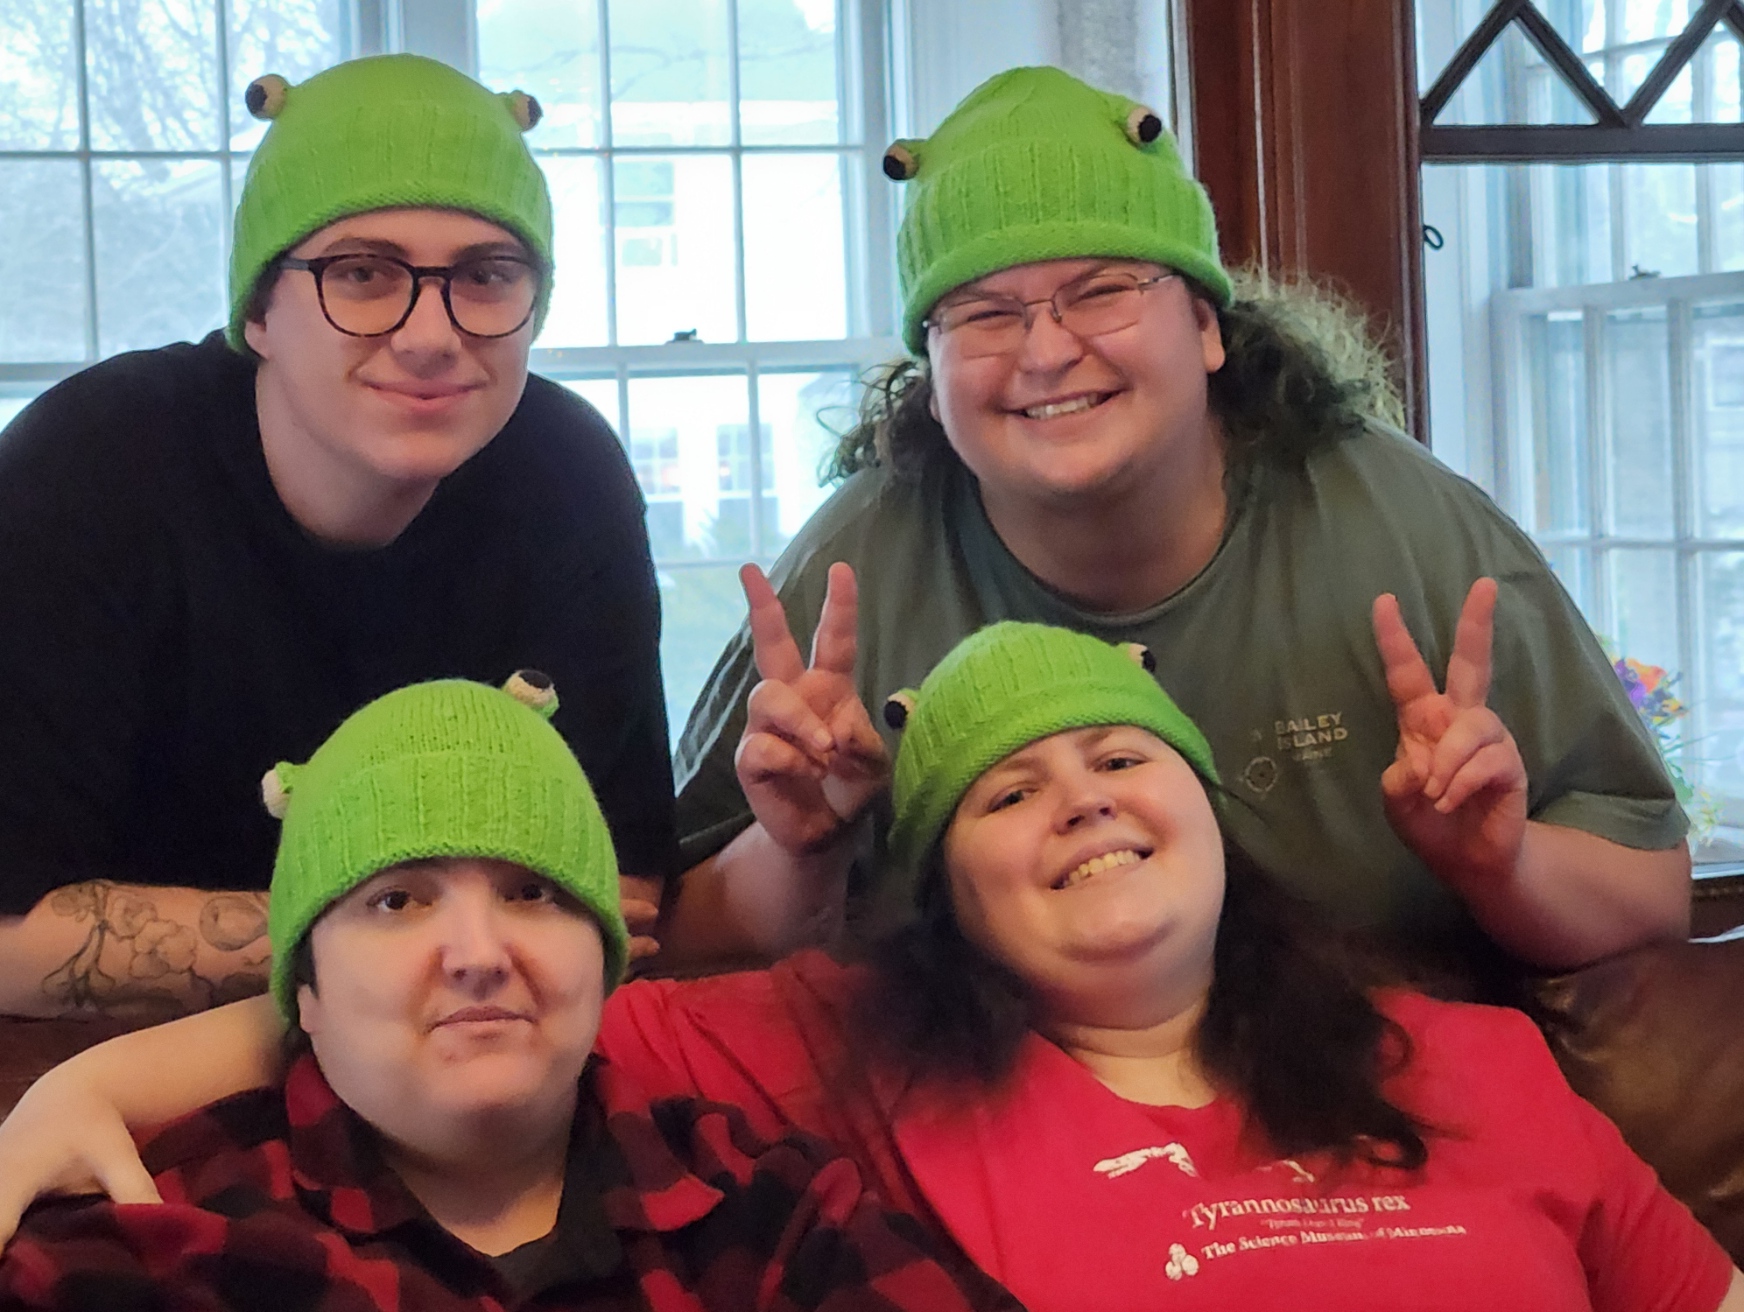
The other big project was my set of frog hats. Five of them have been given to the recipients, all received with delight and enthusiasm. Four shown below, on consenting adults.
I’ll be finishing up the eyes on the last two this week. I am not sure if I can put out a full method description because it’s a bit complex to explain exactly what I did. But here goes…
First, I knit up seven hats, working in the round on two circular needles, roughly following the general pattern I am using as my source. I’ve used a different cast-on, swapped in K2P2 ribbing for the original K1P1, and arranged the thing so that when the brim is folded, the more attractive side of my cast-on is on the outside of the hat.
Then I took inspiration from a free published pattern for eyeballs, changing the color progression slightly. I used much smaller DPNs for the eyeballs than I used for the hat body, largely to contain the stuffing. Seven hats meant 14 eyes. In retrospect I think I should have made them bigger, but the hat is still true to the concept.
Once the little eyeball spheres were knit, stuffed, and ended off, I had to add eyelids. To do that I used a threaded needle and embroidered backstitch. I looped my backstitches over my DPNs to set up the foundation for a row of knit-on I-Cord. Three needles’ worth, five stitches each. I did this via sewing because picking up stitches across the surface of the eyeball was difficult to do without disturbing the stuffing.
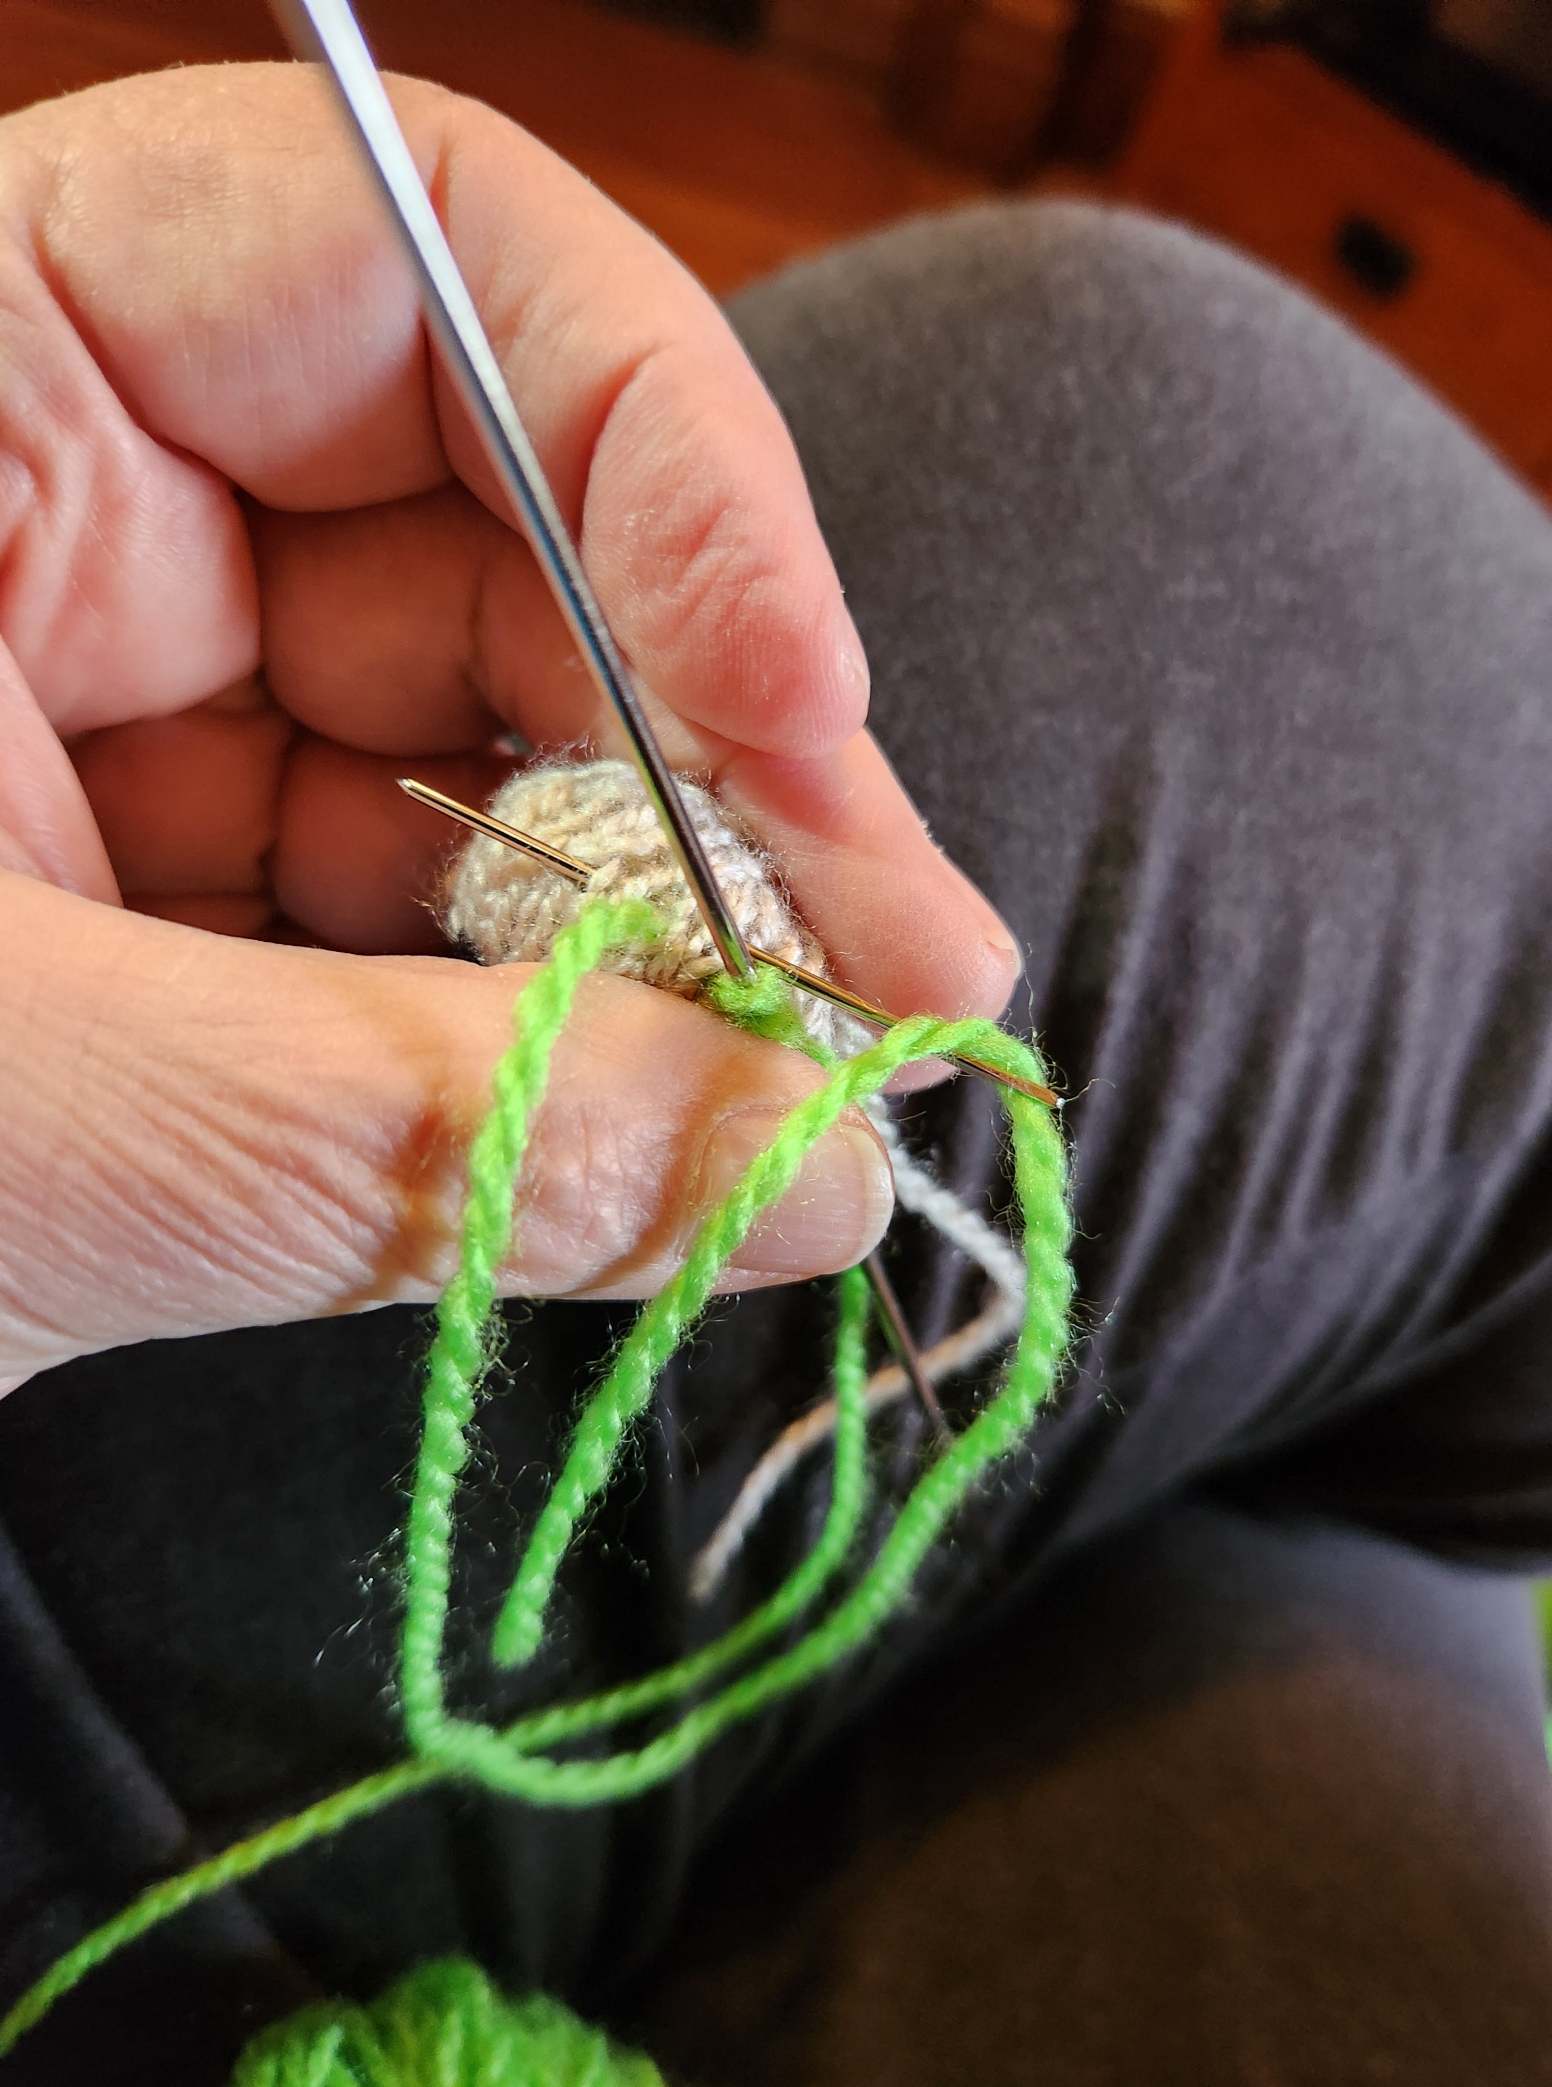
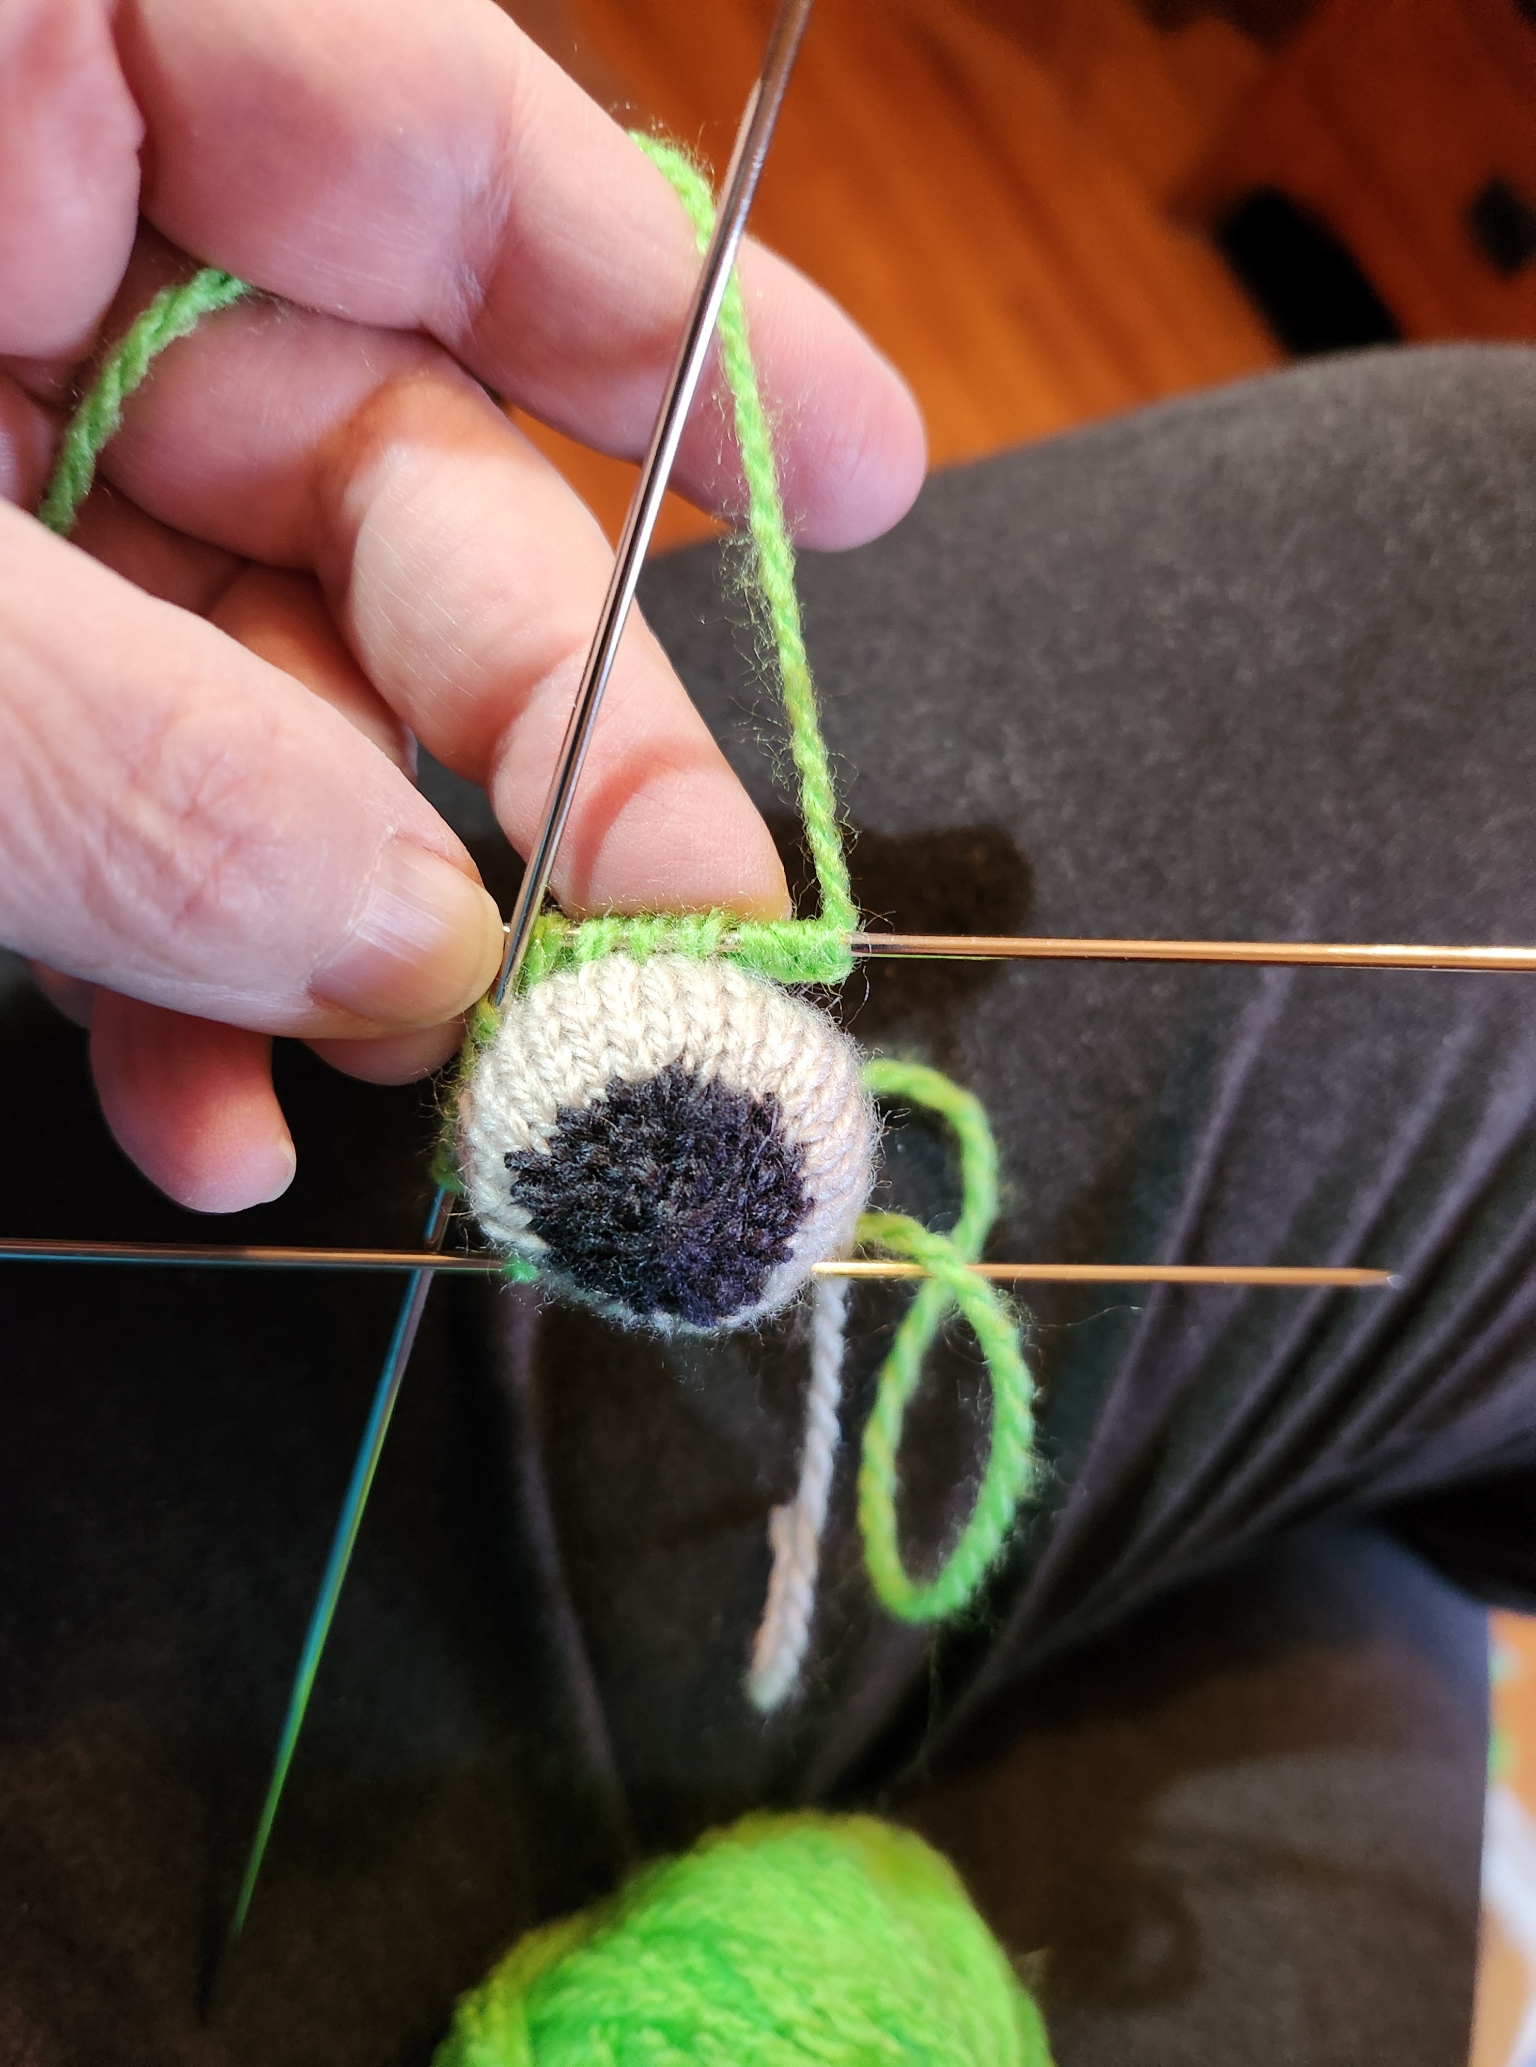
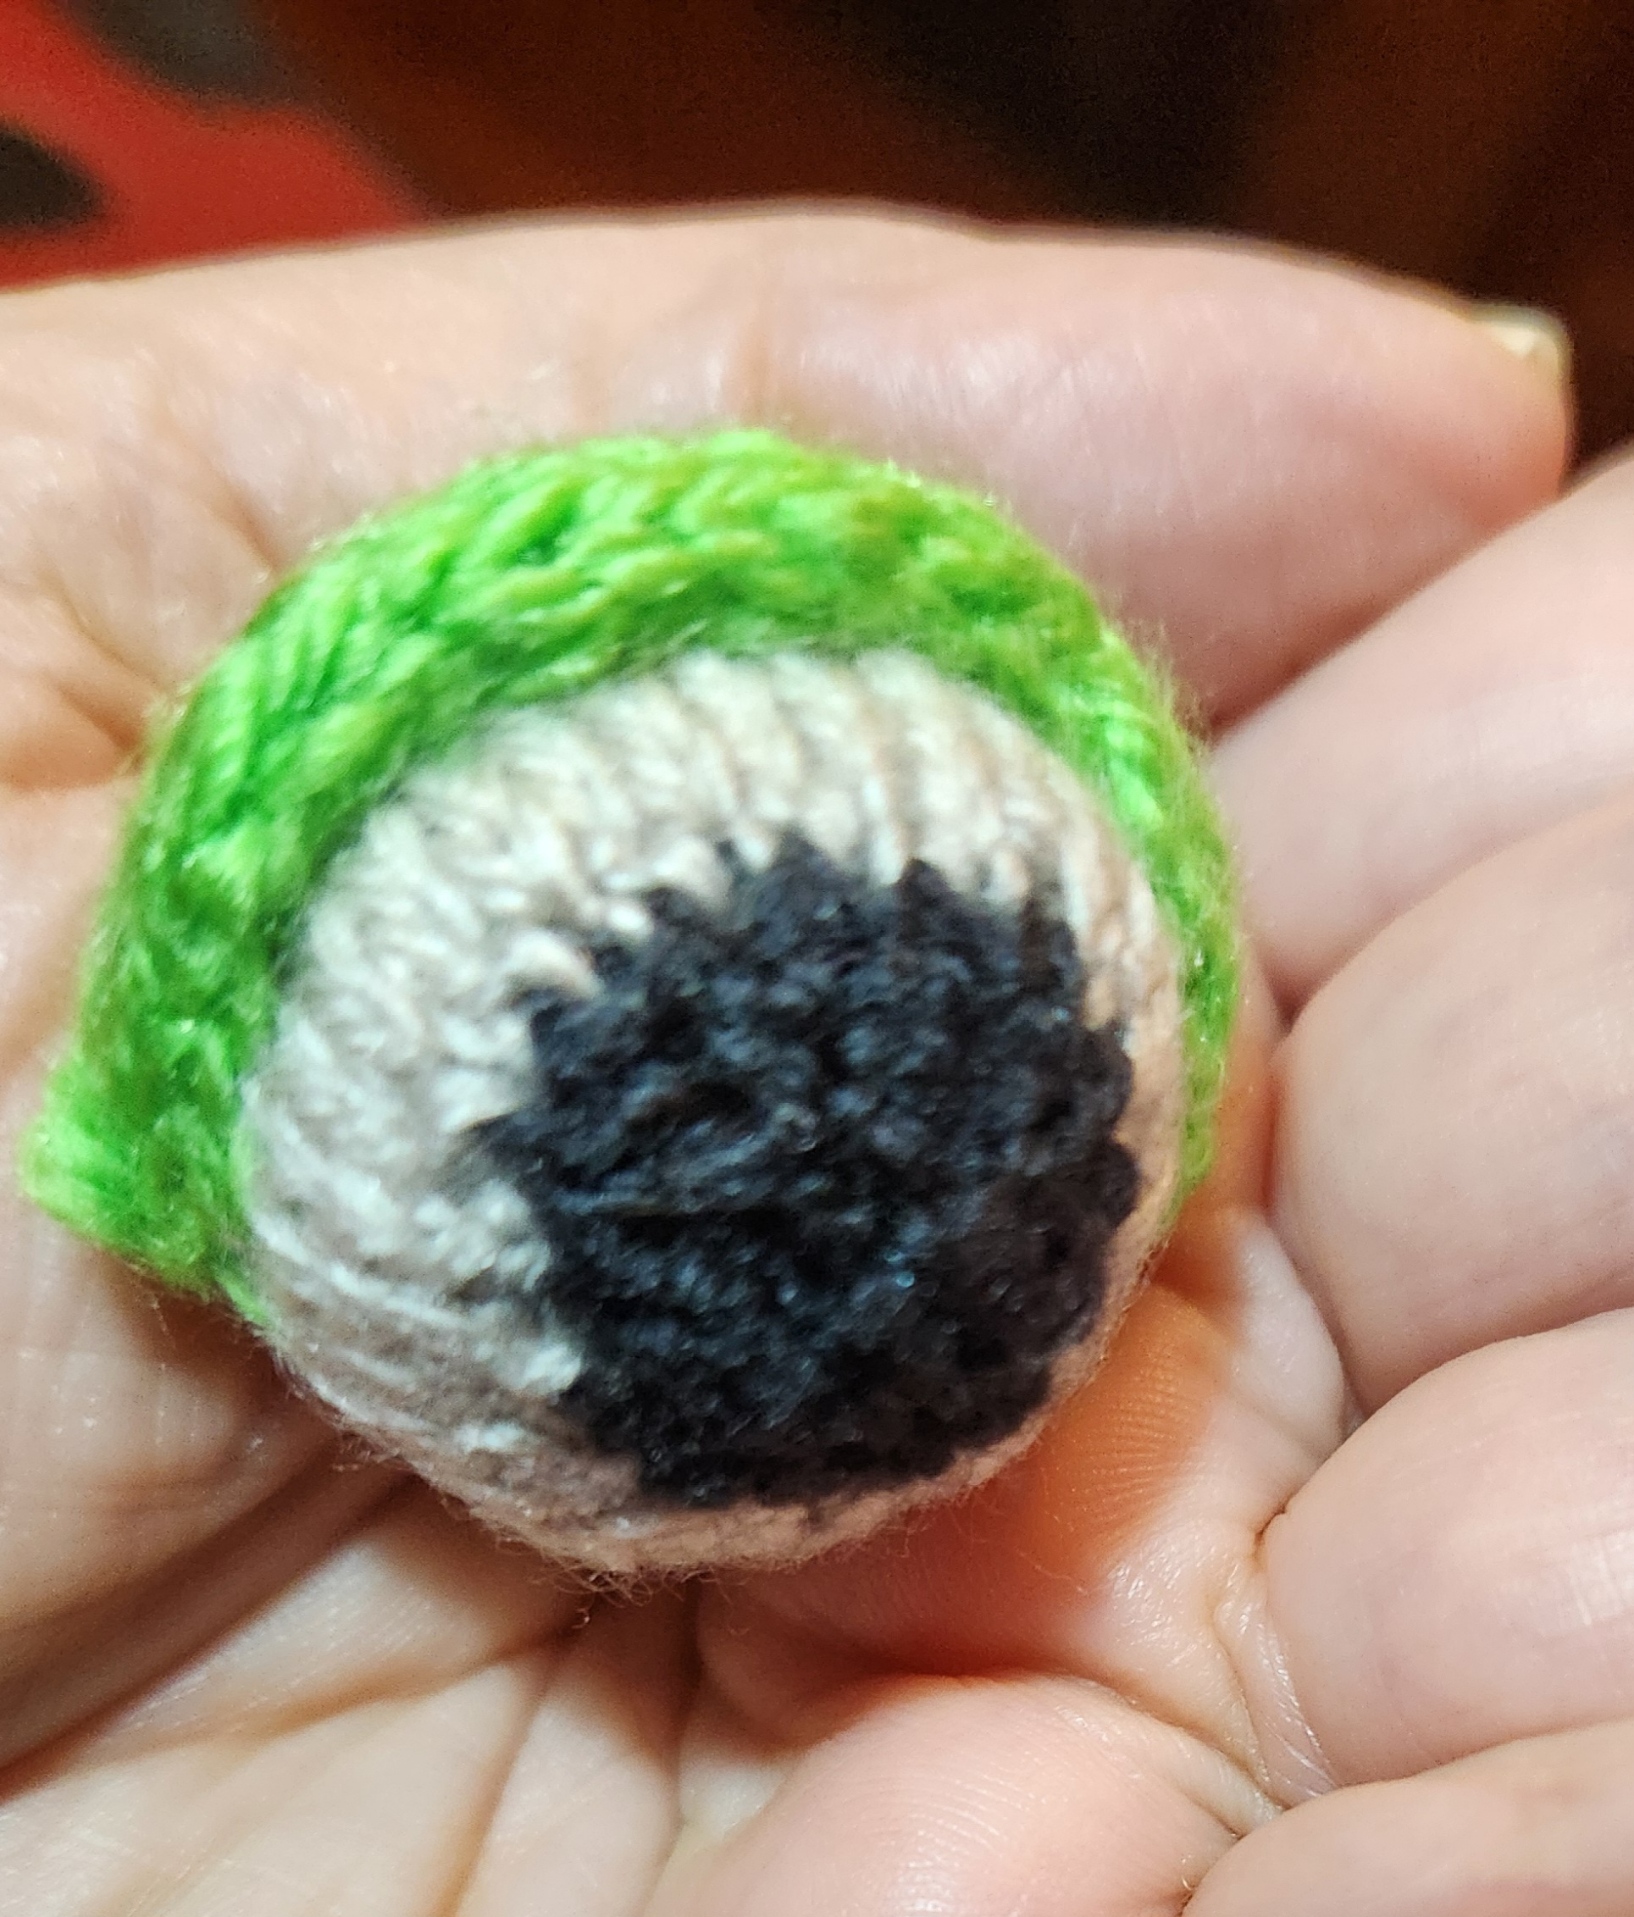
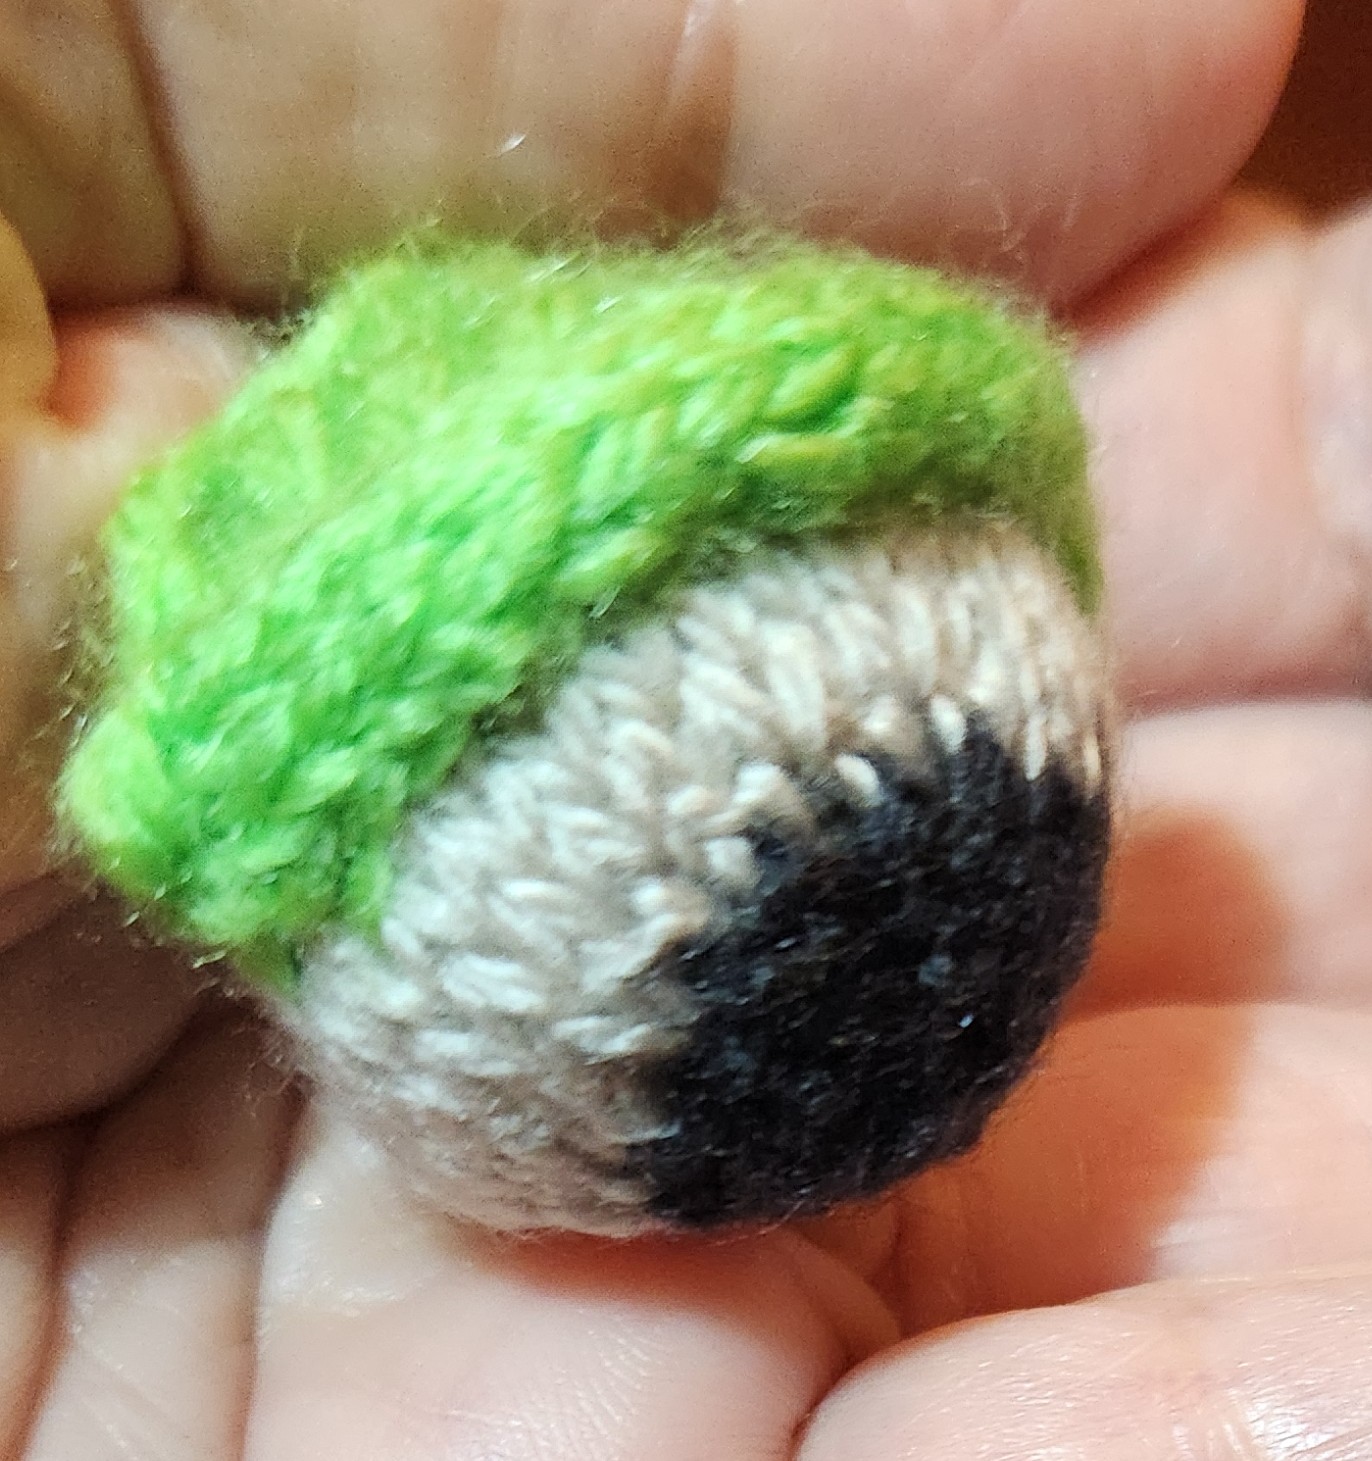
Once the eyelid was done, I went back and using a small crochet hook, picked up a line of knit stitches across the base of the I-Cord on the back, where it joined the eyeball. Those I knit into a triangle to make a dormer-window style cowling. I have to admit that I don’t think I did any two of them exactly the same way, because no two of the eyeballs themselves were exactly alike. That alone would make any specific write-up extremely difficult.
After the eyeball/eyelid, connectors were completed I sewed those units onto the hats, using mattress stitch.
I still have to finish the eyelids and final assembly on two more hats by the end of this week. I’ll stroll towards that completion. No hurry.
TEN DAYS OF PROGRESS – KNIT METHOD COMPARISON
Coming to the end of our recuperative sojourn out in North Truro. I had hoped to post pix of the aurora from here, but sadly last night was heavily clouded, and windy. So I maintain my record of weather-related disappointment in relation to notable sky events.
But that doesn’t mean that nothing has been accomplished in the past week and a half. I’ve been knitting, stitching, and working on various book-related projects.

That’s four of the hat bodies for the frog hats done, with another about 40% done. That leaves only a couple more to go, then I will begin the army of eyeballs for them all.
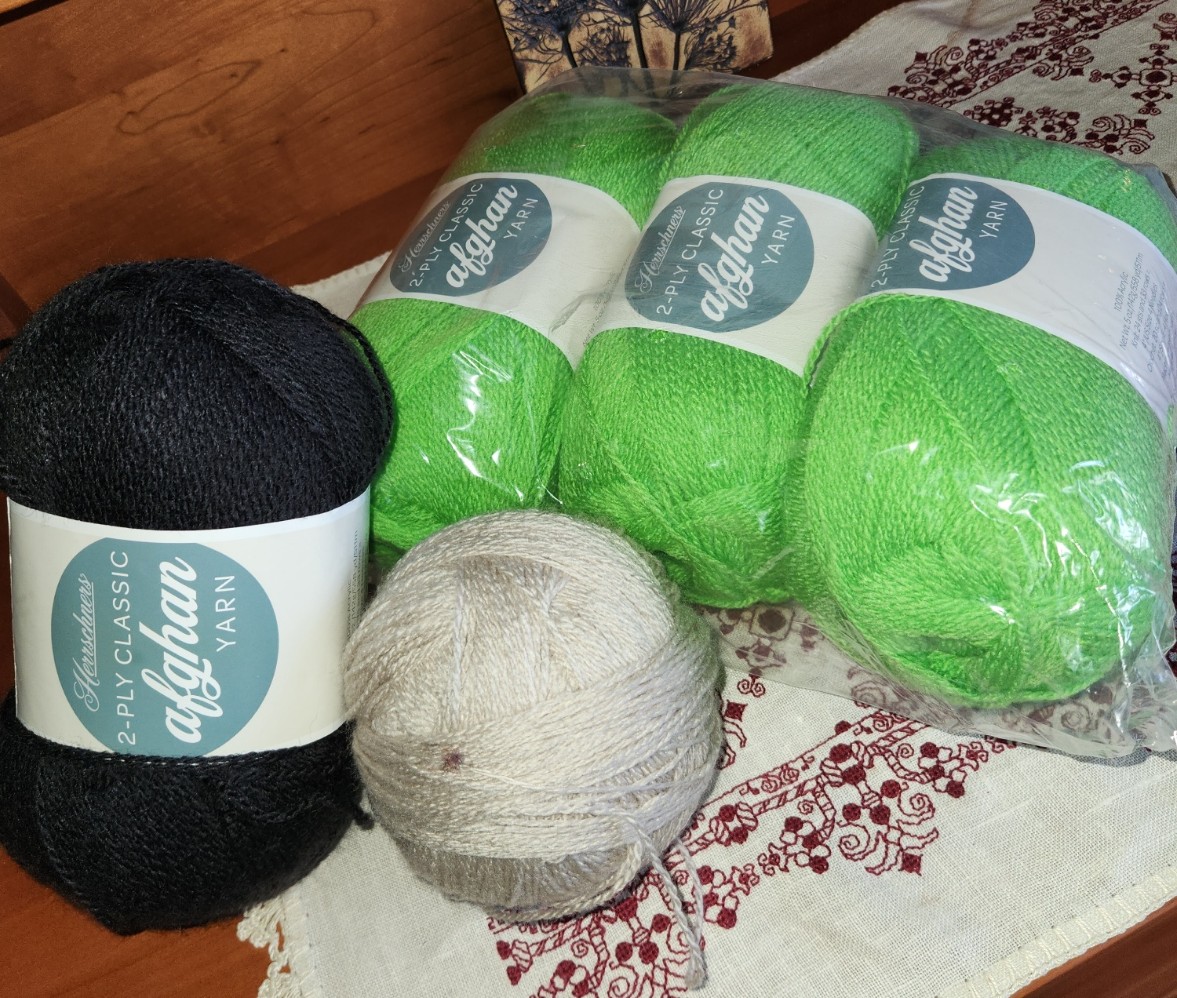
One large skein of THE Herschnerr’s afghan yarn makes about four hats. I am not any more pleased with it for knitting than I was with it for crocheting (it’s leftover from the Eyeball Bolster). It squeaks and splits. And being mid-range acrylic, is not “heirloom quality.” But for a topical hat whose topicality won’t last long, and being on hand rather than a new purchase, it is good enough.
One thing I’ve done is to check my speed and uniformity across a range of knit-in-the-round methods. Counting from the upper right, Hat #1 was done using the Magic Loop method. That employs one overly long circular needle. The excess cable length is drawn out into a loop between two stitches roughly on the opposite side of the piece from the point where one is knitting. One works to that loop, then pulls the excess out to make a new loop 180-degrees from the loop that has just been encountered. For the record, I find it quite awkward, an annoying break in the rhythm of production, and prone to distending stitches.
Hat #2 was done using just one circular needle of as close a size to the circumference of the hat as I had in my collection. Round and round, yanking the stitches across the joins as I went. I didn’t enjoy this one either. I find that circs of that small size have needle parts that are not long enough for my overly large paws. My fingers might not be pianist long, but my hands are quite wide. I wear men’s size golf gloves because women’s gloves are too narrow. Hand size plus the way I hold my needles for Continental style work means that my ring and pinky fingers support the weight of the needles and the piece. Using a circular this short makes me grasp cable, not the sturdy needle parts. Harder to hold, harder to maintain unform stitches, and harder to form them at speed.
Hat #3 was worked entirely on DPNs. Now I’m more in my comfort zone. But being out here on the Cape I only brought my set of mismatched but brightly colored Boye aluminum DPNs. They are seven inches long (about 17.78cm). I much prefer my vintage European DPNs from Inox, which were 8 inches long (20cm). I should have grabbed them, but didn’t. The short Boyes worked well enough for the K2P2 ribbing, and I flew through that section, but when I changed to stockinette, the extra width of the knit fabric without the draw-in of the ribbing made keeping all the stitches on the needles a bit difficult. I had to stop to retrieve dropped stitches more often than I anticipated. That slowed me down and affected uniformity of stitches, even though I’m a proven DPN warrior.
Hat #4 was worked with two circulars. This is a hybrid method. Each circular holds half of the stitches. Using both ends of the first needle, you work the stitches across the front of the piece, then you switch to the other circular, and use both ends of it to work the stitches of the back. Unlike with DPNs where the needles travel around the work, with each DPN advancing to the next position as it is freed then employed for the next segment, the two circulars in this method NEVER change places. Yes, there is a bit of awkwardness as one fishes for the correct end to use and then moves stitches up into working position, but it is not as fiddly as Magic Loop. And unlike Magic Loop, there is no distortion between stitches because there is no spot where the cable loop has to be drawn out. I also found that the in between needle bits did not ladder, but that may be because as an experienced DPN jockey, I tensioned across the gap in the same way that I do where two DPNs meet. All in all this worked quite nicely, especially for the stockinette part.
Hat #5 (in process) will be the “best of both worlds” piece. I started it on DPNs for the ribbing – proven faster for me than the other methods, and moved to two circulars for the stockinette tube section – the best for maintaining sanity and uniformity given the needle assortment I have with me here on the road. I will probably continue on two circs for a while and then when it’s convenient, switch back to the DPNs for at least half of the crown. That will minimize the needle ends flailing around part when the decreases begin to make a major dent in total stitch count. In all probability I’ll keep working this mixed method way for the remaining few hats.
For the record, the eyeballs will all be done on DPNs in a smaller size than the hat bodies. I want them to be nice, tight spheres, suitable for stuffing. So instead of these 3.5mm needles I’ll be moving down to 2mms, or possibly even smaller. Much experimentation is anticipated.
Also in the photo is the latest progress on my Italian multicolor stitched piece. I’m well into the third corner, having done the math correctly (thank goodness). No need to improvise a new corner. I know the museum original had four different corners, but in this case I’m glad to have to do only one.
The long stretch across is next. I have confidence that I am not off in count, so everything should align when I get to corner #4 and the the shorter march to rejoin my point of origin, but in case it doesn’t that last corner is where any fudging will occur. In the mean time I will work with my usual mix of confidence and suspenseful apprehension, plotting out just-in-case strategies so I have them if needed.
And they say that needlework as a hobby has no drama… If only folk knew.
CHARGING AHEAD ON MULTIPLE FRONTS
We are making headway here!
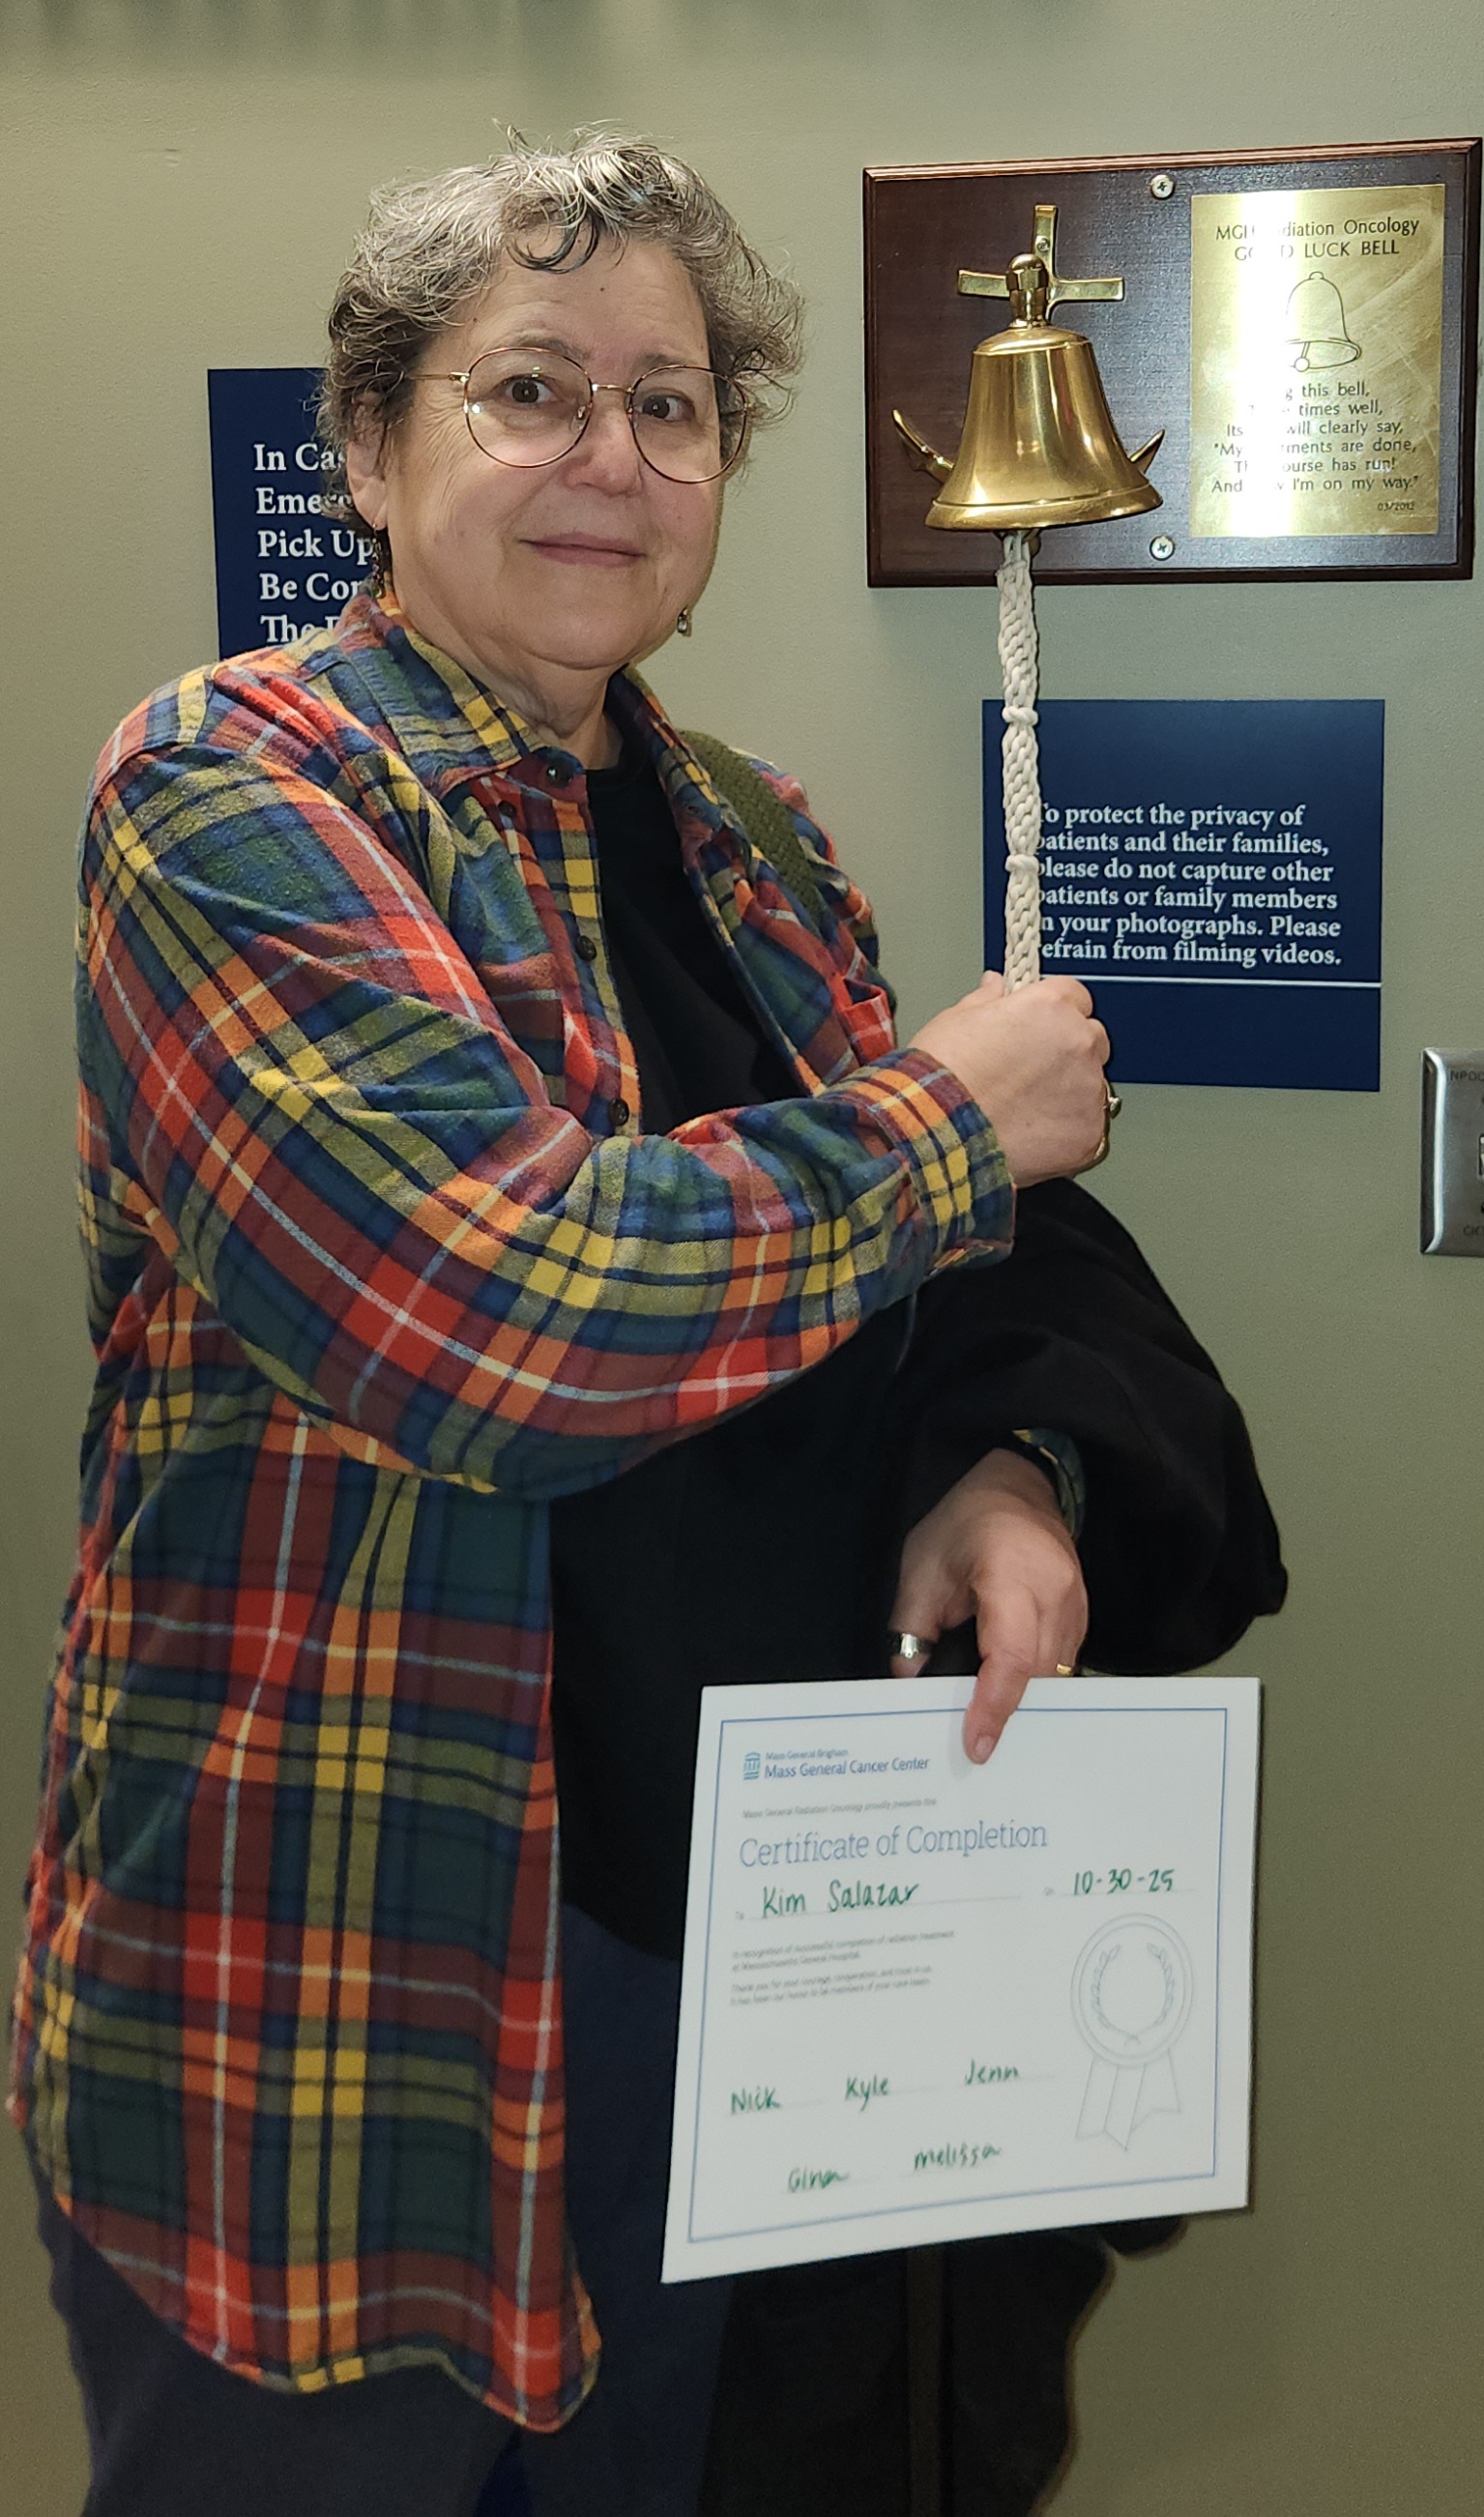
First, as I announced on FaceBook, I have completed radiation therapy. Minimal side effects to report even at conclusion of the course. We are now taking a bit of ease to recuperate both from the therapy itself, and having to drive out in the pre-dawn hours for 6:45 am appointments. 40 days of that doesn’t sound too bad when compared to the decades over which we left early as commuters, but once you are no longer used to being part of the Dawn Patrol, it becomes a lot harder.
Special thanks to the radiation crew Mass General Hospital, who greeted me every morning with good humor, efficiency, and a steady tolerance for my unorthodox music requests. I suspect that at least one of them has signed on to read here at String because of a mutual interest in knitting. If so, please pass the word back to the whole gang.
Second, my Italian multicolor piece is zipping along. I’m almost at the halfway point for the outer rim.

I’m 99% sure I will meet my horizontal centerline spot on in terms of thread count. I adjusted the total width to ensure that my corners are identical. There is one tiny mistake I need to go back and fix, but it is not something that has an effect on band width or repeat cycle. I could leave it, but I won’t.
And as you can see I am also making rapid progress on the frog hats – my third front of advance. Frog Hat #1 is now well underway. I admit that aside from the initial cast-on number I have not paid much attention to the general pattern I am using as my source. I’ve used a different cast-on, swapped in K2P2 ribbing for the original K1P1, and arranged the thing so that when the brim is folded, the more attractive side of my cast-on is on the outside of the hat. And yes, I’m working in the round on two circular needles.
Next comes hat depth and the decreases. I want the hat to fit rather sleekly rather than being full and floppy, so I will probably go short on the total depth compared to the written instructions. We’ll see if I follow the pattern’s decrease or if I end up opting for something more rounded.
My goal is to work the boring hat portion of at least four of the batch of hats I intend to make. Once those are complete I will make the eyeballs and eyelids, then finish off by sewing the eye units onto the hat bodies. Given quick progress on first hat (and that done while I still carved out time to embroider), I do hope to complete the minimum of the hard-promised four by the new year. The others are optional and will depend on available yarn, time, and my own rather spotty attention span.
I leave you with a repeat of the somewhat disheveled, early morning bell-ringing photo I posted on FB to celebrate my liberation from therapy. And yes – my last day’s music request was the 1812 Overture. You can’t celebrate an Independence Day in Boston without it. Especially because the MGH hospital complex is close by the river, and on upper floors commands a lovely view of the Esplanade where the annual 4 July celebration takes place.
HOPPING OFF ON A DETOUR!
Yes, I’m still working on the Italian multicolor strapwork cloth. But the holidays approach, and a topical whimsey presents itself. I am going to take a quick detour to kludge together a hat, then knit several for my various Offspring and Honorary Offspring.
In specific, I’m going to knit topical event relevant frog hats, in egregious green. Complete with bulging Muppet like ping-pong ball size eyeballs. Here’s my concept drawing:

I’m using leftovers from the bolster cover I did two years ago. The shocking green, the oatmeal white, and black, to be specific. It’s acrylic, and sport weight (24 stitches = 4 inches or 10 cm in stockinette) from Herschnerr’s. As you can see, I’ve got plenty.
I will be adapting a very basic free hat pattern I found on Ravelry, the Drover and Classer Plain Beanie. It’s plain stockinette with a turned back, ribbed brim, and a simple seven-spoke set of decreases at top. For the eyeballs I plan to play with the knit sphere design from Lisa Benden. Her free Knit Hacky Sack is written for a larger yarn than mine, but I don’t need a ball as big as hers, and I’m pretty sure I could fiddle with stitch count until I get the proportions I want. Plus, if I do one end in black, I won’t need to embroider the pupils onto the finished ball.
The only part of this that I will have to create from scratch are the green eye sockets into which the bulging eyes are affixed. For those I’m planning on doing a wrapped short row heel, but very small, with a rolled stockinette edge. The plan is to stitch each eye into its socket, then stitch those assemblies onto each hat. We’ll see how this sock heel-turned eye socket plan turns out.
These shouldn’t take too long. I’ll be working up the plain hats first. Worse comes to worse, even if the eyes don’t exactly to to plan, I will at least have screaming green beanies for my intended recipients.
Oh, and progress on the Italian cloth? Rounded the corner and headed for the center of the short side.

PERSISTING THROUGH BUSY WORK
It has been a week that was. A couple of them in fact. But I’ve tried to maintain equipoise by keeping hands and mind occupied as much as possible. To that end I have several bits of progress to report.
First is the start of yet another sampler. I’m not sure if this one will be adapted as another tribute to The Resident Male’s literary output, it will remain un-themed and completed with patterns picked at random, or if it will end up bearing a motto. I didn’t even decide which direction was up or down until the latest band was begun. The yarn-crazed kittens, being directional, made that determination for me. For now, I can only present progress. Two bands finished. The kittens are the third.


Keep an eye on those cats. They will resurface by the end of this post.
I also embarked on a project to send a holiday preparation care package to Elder Offspring and Companion, who have moved cross country, and are not going to be able to make it back here to share the family celebration. To that end, I’m selecting some of the tree ornaments we have made over the years, and am augmenting that with some additional crocheted snowflakes, including the holiday stocking for Companion I knit in late summer that matches the one I did about 28 years ago for Offspring, and making a really silly scrap fabric garland.


The crochet snowflake patterns came from a variety of sources, and to be truthful, I didn’t take notes. About half came from the book below, the rest were free patterns I found via Internet search. I had aimed for 12 but there are 13 here. One of these was especially wonky, so I felt guilty and made an extra to compensate. As for the oddnesses among them (yes, there are lots of errors), I plead distraction. I did these (and the garland) entirely while team-playing Skyrim with the Resident Male. He mans the controller, we cooperatively navigate the puzzles. Occasionally I appear to have lost my place in the pattern, but kept going anyway.

The no-sew garland consisted of taking strips of scrap low-fray fabric – in this case fleece remnants left over from a charitable project at a former workplace – and knotting them onto a sturdy cotton cord. Lots of scissor work reducing the scrap squares to strips, and a bit tedious to do, but there was no waste. The fabric odds and ends I saved from the dumpster have a new and decorative life.
I’ve also re-upped to serve as a volunteer indexer for the Antique Pattern Library. No pix for that, just lots of paging through and taking notes. It’s going slowly due to too many other things in process, plus overcoming the deep ennui brought on by the current political climate. But it is moving along.
Last but not least is fulfilling a promise. Several people were interested in working up their own version of the Persist mini-sampler I did back in 2017, and that I recently salvaged for re-use as an on-line avatar image. Since I had never charted it up in the first place, it took a bit of work to retro-engineer. Here is the thing in its original form:

Those kittens? They now run across the bottom of the sampler, below the tumbling voided flower panel, inside the snail border. It seemed a fitting tribute to current events, and the piece really needed better vertical balance. There are other tweaks made to the alphabet, spacing and other bits. I consider the new version to be vastly improved over the 2017 version.
As usual, I share this for your personal use only. And I request it be Good-Deed-Ware. If you download it consider me paid back if you do something nice for someone else. A work of small kindness or empathy. Reach out to someone who needs cheering up or companionship. Volunteer to do something to aid your community. Every little bit counts, and right now counts more than ever.

In any case, click here to download a PDF containing the three-part chart above plus commentary.
I have also added this chart to the Embroidery Patterns tab elsewhere on this site.
A START, A FINISH, AND POSSIBLE DESTRUCTION
And of course we are off and running on another small sampler honoring another of The Resident Male’s fiction books. The Fangirl Army of One is on a roll here. At this point I have only a few more to do before my production catches up to his.
This sampler celebrates Treyavir, a fantasy novel, relating the adventures of Reignal Maigntar, Falcon Knight. It’s a shorter read than most of his others, but no less engaging. There are mysteries, monsters, magic, epic truths and deceptions, love and loss, all presented in a tone echoic of Jack Vance’s Dying Earth fantasies, as a tribute to their blend of light banter, irony, and deeper issues. But on to the stitching…
First, the ground. I rarely work on grounds with counts below 36 threads per inch, but this well aged stash piece is roughly 26 or 27 threads per inch, and is a true evenweave, 100% linen. Penny method count, below – the penny obscures about 20 threads both north/south and east west (or close enough due to thick/thin threads not to matter). A US penny by definition is 3/4 of an inch in diameter. 20 x 1.33 = 26.6 threads per inch.

I think it may have come to me in a bag of remnants provided by Long Term Needlework Pal Kathryn Goodwyn, but I’m not sure. It’s evident that whomever had it before began a project using it, marking centers and edges in blue thread, but ended up cutting this narrow piece off from the larger whole after those bastings were complete. My remnant is about 10 x 20 inches (25.4 x 50.8 cm). It will be a long and skinny band sampler, and look all the more so due to the scale of the bands when stitched on this coarser weave.
I’ve started work on it but I am not entirely pleased with the linen thread I picked out and packed. It’s a long discontinued DMC product – one that was only briefly available in the US circa 2017, and is now gone. I bought a handful each of black and white from my local independent craft shop, pretty much all they had.
Here are the first couple of bands.

The thread has too much thick/thin texture and is too “hard” for optimal display in double running on this ground. One strand looks skimpy, and it doesn’t do corners well. I previously tried out two strands with the squirrel band, but found that since the thread ranges from slubby to skinny the appearance was very haphazard, with some bits being too dense to see the design, and others very thin by comparison. It was especially jarring in double running, where one pass might be a run of very thick stitches, but the second pass that completes the line might interpose skinny ones between them.
For the Destruction part – I am thinking about ripping back the 1.25 bands you see here and beginning the piece again from scratch. But I am away from stash and alternate thread options are severely limited. My immediate option is the black Sulky I used on Stone by Stone. That’s still in my traveling stitching box. Two strands of that would probably work better than two strands of this stuff. I am not near a retail source for old reliable DMC 310 cotton, and mail order doesn’t work well where I am right now.
Even if I rip back, I will redo the squirrels as is. They will be in Ensamplario Atlantio III. I’m not sure I particularly like the geometric band below it. It’s from The Second Carolingian Modelbook, but I think given chance of a total re-do I will work something else in its place, and save this one for another piece.
The linen DMC thread I will save for something else. Perhaps pattern darning, surface embroidery, or a delicate needle lace edging. I might use the white stuff for cutwork or pulled work, But neither will be deployed for double running again.
And of course just NOT having this project to work on until better options present is an unacceptable course of action. If you are like me you would understand. So instead of actually ripping back, I just whine about it here.
And more happily, I do have a finish. The holiday stocking I previewed in my last post is complete. A quick finish, too. Only four days from cast on to darning in the ends.
The stocking on the left in the photo is the new one. It’s a copy of one I’ve done twice before. The first one (photo, right) was a stocking kit purchased at now long gone yarn shop, Wild & Woolly, in Lexington, MA, circa 1996. In a minor miracle, I was able to find my copy.
The pattern was part of a kit was put out by SM Designs of York Maine. It contained worsted weight (5 stitches per inch) rustic Maine style spun wool in three colors. The kit came in several flavors, including one with Xmas trees. I bought the last one in stock. It had a simple graph of little paper dolls holding hands, in silhouette around the cuff. I did up the kit for the Alex stocking below, but being unable to do anything verbatim, I added in the panel at the top to duplicate stitch the name, subbed in my own holly berry leaf design for the paper dolls, did French knots in embroidery for the berries, and whipped the purl welt “folding line” row with leftover red and green yarn.
Eventually I knit up a second sock for sibling Morgan. I used the same pattern, but couldn’t find a true worsted weight rustic Maine style yarn for it. I adapted the design for a slightly heavier weight yarn of similar texture, but used the same holly leaf pattern, in with a different green and red. Also bearing a top strip for a name. To save packing space, I didn’t bring it with me, so it’s not in this shot.
Elder Spawn Alex and partner just moved out of state, and return to the home nest for the holidays is unlikely. So to make the first holiday off and away a bit more home-like, I volunteered to knit up a matching stocking for Spawn Partner. They requested a wolf instead of the holly leaves. I doodled one up in the same scale as the original graphed bit. He got a bit elongated in the knitting (knit stitches are not 1:1 height to width like cross stitches), but I think he’s vaguely recognizable as not being a horse or reindeer.

Comparing the three stockings, the types of rustic Maine style minimally processed 100% two-strand wool are harder to come by, and what is out there continues to get heavier and thicker. The best match I could achieve was even thicker than what I used for Stocking #2. If that one was worked from yarn knitting to 4.5 spi, this stocking was done from yarn with a native gauge of 4 spi. Since I wanted all three to be the same size, I had to play with the pattern a bit (again) and experiment with needle sizes until I achieved the original gauge. More or less. Side by side though I think I did well enough.
Now I bounce back from the world of knitting, and return to embroidery. I am off to contemplate my (stitching) life choices. At least I have my Silly Putty with me. This linen thread crocks and sheds fibers onto the ground, too. If only there was a retail source for DMC thread nearby… Sigh.
A BUSY JUNE SO FAR
Who said that retirement would be boring? Wrong, wrong, wrong.
We’ve spent the last month quite busy, buzzing back and forth to the Cape to escape the heat and enjoy the late pre-season quiet of the beach. We’ve kept at the garden I detailed in the last post. So far everything is surviving. Bushes and flowers bloomed and my tiny raised bed garden is beginning to offer up a small, but appreciated harvest of peppers and herbs. The eggplant will catch up eventually. And of course I’ve been doing needlework projects. The chair recover is in hiatus until the fall – too much infrastructure to schlep around, but smaller, portable projects have been thriving.
First up, a stitching finish on a WIP that’s been bopping around since before the Unstitched Coif. This is a forehead cloth, in more modern terms – a kerchief. I had made two some years back, and have loved them to pieces. The stitched body of each is still in perfect shape, but the ties on them have died. Here is the new one, not yet assembled into final, wearable form.
This is a doodle of a pattern that will be in Ensamplario Atlantio Volume III. I’ve been working on that, too and have about 20 plates of new fills. I’m planning on including several pages of larger patterns, strips, and even yokes, too. I am still dithering about including the free patterns that make up my Epic Fandom Stitch Along in it, too. It’s already a wildly anachronistic work, and it might be handy to have all that content in one place. In any case, EnsAtl III is very much a work in progress, and will be out as soon as I can manage it.
Back to this piece. It’s an experiment. I wanted to try out Sulky 30, a spooled thread sold for hand and machine embroidery. I’m working on 32 count linen, and two strands of the Sulky work nicely in terms of coverage and line depth. There are four colors here – an almost-cranberry red, a forest green, a navy blue, and (hard to see) small motifs filling problem spaces, worked in black. There are LOTS of mistakes in this. Places I missed a stitch, or substituted the wrong twist or size center flower, but since this is a quick stitch, meant to be worn to death and not a future heirloom of my house, I didn’t bother to go back and pick them out. I did fix mistakes that would have thrown off the design as a whole, though.
My thoughts on the Sulky? Not my favorite. It’s very hard twist and dense. While that makes a nice, clean line, it does make intersections a bit more difficult to keep even. Plus when picked out, both the blue and the green crock a bit – leaving color residue on the cloth independent of fiber crumbs. I’ll probably use up what I have on things I intend to wash savagely, but I won’t be buying more. The Unstitched Coif project spoiled me. Silk over cotton, any day.
I can’t report on the origin of the ground. It’s a scrap left over from something else. A garment has been cut from it. I did get a pile of linen scraps from someone here in town, via one of the local waste-nothing exchange groups. I’m pretty sure this was one of the pieces. So my guess is that it was yard goods, not custom-sold for needlework. Even so, the count is remarkably even. There’s some slubbing but not overly much, and the thread count is something like 32×33 threads. No selvedge left so I can’t guess about warp vs weft counts.
I am going to investigate narrow twill tape for the ties this time – both for this forehead cloth and to replace the now frayed and ruined ties of the older two. I had used the ground itself, double folded and seamed for the ties on the old one. Better I should use something more densely woven and robust, and that can be easily replaced.
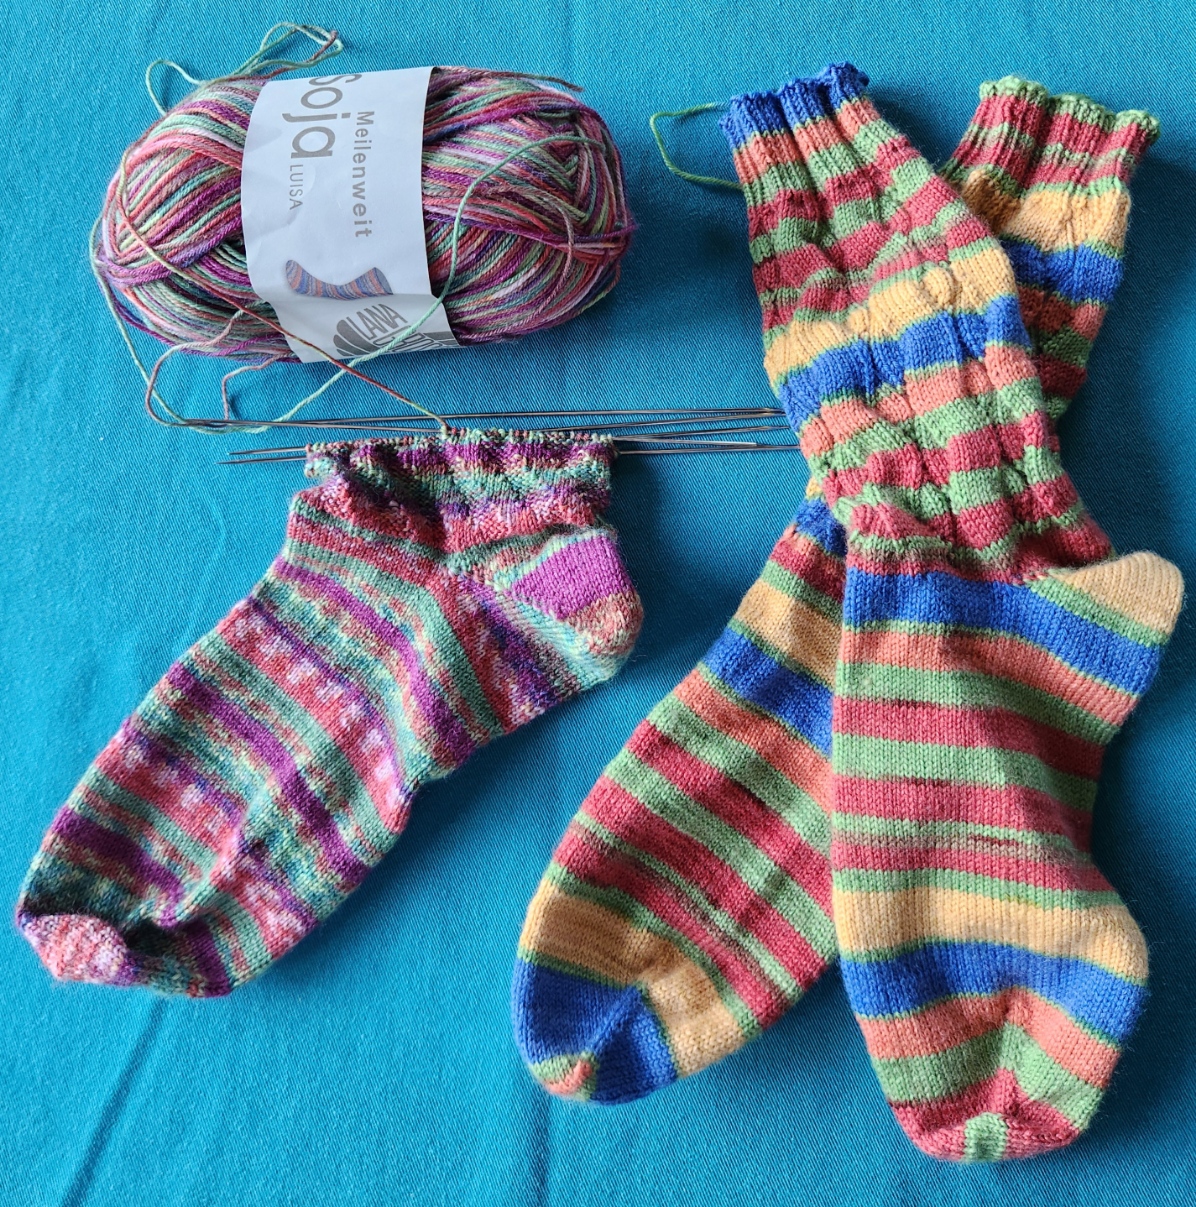
I’ve also been knitting and crocheting. Here are July’s socks. Not sure what made me knit the wide-stripe pair so tightly, but I did. They are the same stitch count around as the other pair, but are significantly narrower. I can wear them (just), but not all of my target audience can. So they will either stay home with me or find a narrow footed new friend with whom to play.
And I’ve been crocheting snowflakes. Not to keep cool but as a probably-the-case present for Elder Spawn, who has moved cross-country. It’s unlikely that we will be able to enjoy the family tree together this year come holiday time. A first for Casa Magnifica. So I have promised to make new snowflakes for what is now Casa Magnifica del Oeste, and ship them plus some of the family ornament stash, to furnish the new tree. I’ve got a half dozen complete. Six more to go, plus pin blocking and stiffening them for best display. Here are the first three, still looking sad and crumpled, right off the hook.
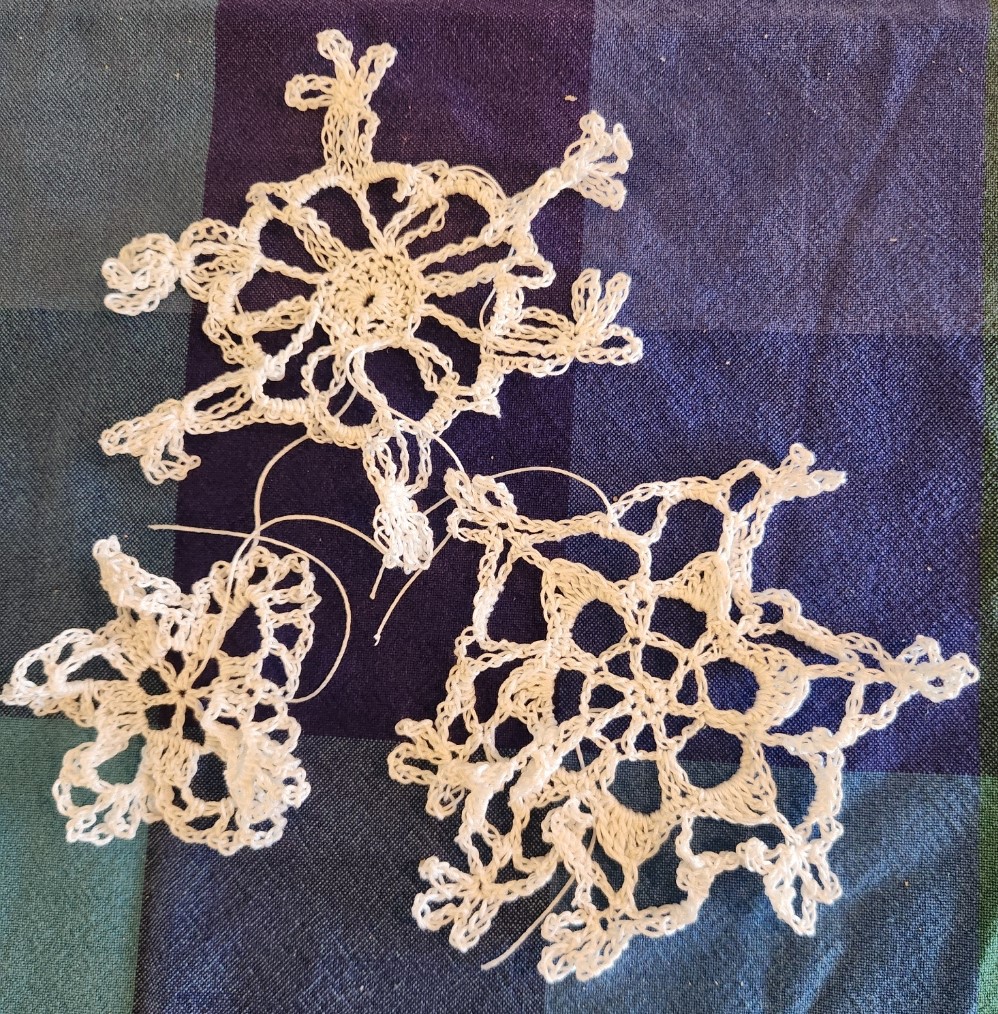
All of these are from this book. I have another one with better patterns. Someplace…
What’s next? Another stitched doodle on a thrifted linen rectangle, possibly to use up some of that black Sulky on a higher count ground. But more on that later this week.
SAVAGE BLOCKING
The merino/possum wool shoulder shawl turned out to be one of the quickest completing projects I’ve done in a while. It took only four evenings to knit.
For the record again, I used a wonderful luxury yarn – a gift from a pal. It’s Happy-Go-Knitty’s Ahuru 8, labeled as DK, but I like it as a worsted weight. It’s airier and less compressed at a stockinette gauge of 20 stitches for 4 inches/10 cm than at the DK gauge of 22. I started with a Knitty pattern from almost 10 years ago – Wavedeck, by Kate Atherley.
I made a couple of minor departures from Kate’s original. In the feather detail motif that constitutes the bottom round of the design, I worked the feathering for 15 odd number rows, not 12. Being a bit taller I thought a bit of extra length would be nice. I might have done at least three more because I had enough yarn to do so, but I was worried that blocking might not work out if I added too much depth.
Also, on the final round of bind-off, at each natural point formed by the feather border, I added a small cast-on/cast-off picot, both to accentuate those points, and to make a nice, sturdy spot for extra tugging during blocking. (To do this as I bound off according to directions, when I got to the centermost stich of each feather’s middle rib I cast on three extra stitches using the cable cast on, then immediately cast them off as per the method specified in the pattern. This made a little triangular nub at the base of each feather.
All in all, I used 1.75 skeins worth of yarn (estimate). I think I have enough left over for a pair of small wristlets, which will be a nice, comfy use for this super soft and super warm yarn.
Now for the blocking, savage or otherwise – you be the judge.
First we start with the completed, unstretched knit. Measuring with more precision but without stretch, it’s about 23 inches deep from center neck to center bottom, and about 46 inches across the wingspan (58.42cm x 116.84cm). You can see the little nubbins I added to each feather spine.

The first step is to get it nice and wet. I didn’t bother washing it with Eucalan or Kookaburra. It wasn’t dragged around enough in four days to get it grimy. Wetting was enough. Once wet, I gently squeezed out some of the water weight (no wringing, or rubbing, just a couple of compressions. Then I laid the piece folded in half on a bath towel, and rolled it up into a big jellyroll.

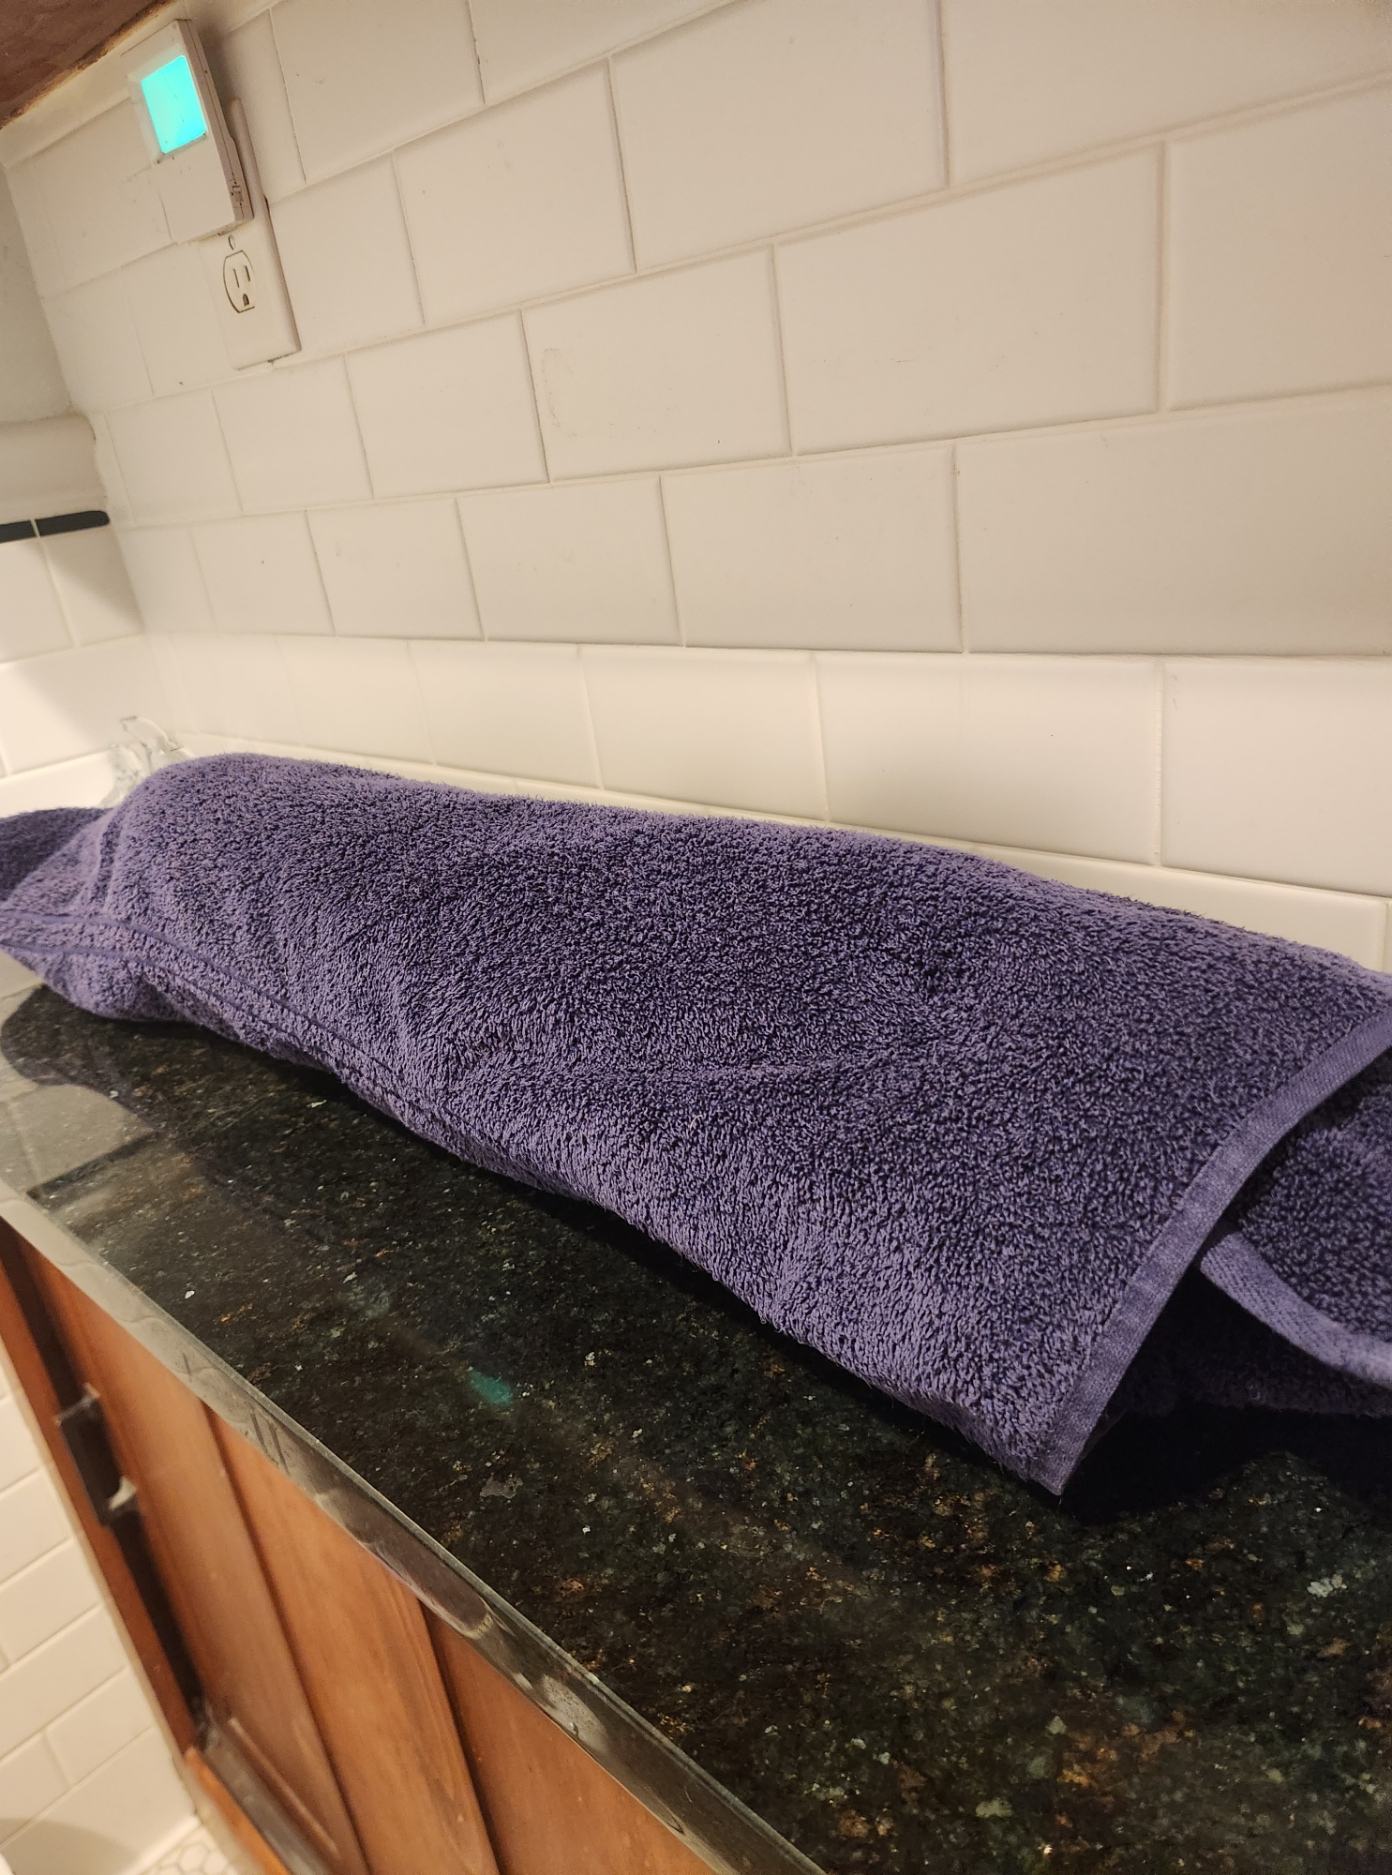
I leaned on the jellyroll to squeeze water into the towel, rotating it several times to get as much out as I could, but without subjecting the shawl to any undue stress.
Then I prepared my blocking area. First I laid out my usual blocking sheet – a rally checked flat twin sheet I found years ago at a yard sale, spread over a sturdy braided wool throw rug. Then I assembled my other blocking tools – blocking wires (some hand-me-downs from long time stitching and knitting pal Kathryn), and my long pins.
I began on the long side, threading every garter stitch edge bump along the straight edge onto blocking wires. Note that I used three of them. I deliberately left about a third of each wire bare, doubling up for about six stitches when I changed from one wire to the next. The reason I did this to leave room for stretching during blocking. If I filled up each wire completely, then stretched the thing during pin-out, stitches would fall of the end of the wires. Better to have lots of extra room and overlap. Bump threading below.

After wires were placed along the straight edge, I pinned them out following one of the horizontals of my checked sheet. I started at the center and tried to place pins and stretch evenly both to the left and right. The blocks of the sheet’s print helped me keep that stretch even.
Once the straight edge was laid out, again starting in the center I began pulling the points. There is no feather point at the center of this piece, so using the two points to the left and right of the center line, I used the sheet’s checks to make sure that the visual center line of the piece was perpendicular to the straight edge, and began pinning the points out from there. Now I’m not the best blocker. Were I so I would have calculated the angular difference at my chosen circumference, and marked it, pinning each to the exact spot on the indicated, scribed half circle. But that’s not me. I just winged it by eyeball. Good enough for home consumption.

Pinned out like this it’s about 30 inches deep, and 60 inches across (76.2cm x 152.4cm) roughly a gain of 7.6% in the stretching. It will probably relax a little bit once it’s released from savagery.
The next steps include letting it dry completely, unpinning and unthreading it from the blocking wires, and darning in a few ends. But at this point, it’s done. Four days of knitting, and 45 minutes of blocking, and fewer individual stitches than a single sock at my usual gauge. And one super cozy shoulder shawl, soft as whispers, to wear come autumn.
PLAYING (WITH) POSSUM
Fueled by Friend Kim who surprised me with a yarn gift, I dawdle a bit more in the Land of Knitting. I’ve done a ton of socks since finishing my Unstitched Coif submission – 14 pairs to be precise. But charmed by this super soft yarn I decided to do up a larger project – a shawl.
First the yarn. It’s an exotic fiber – a blend of possum and merino – the yarn on the right in the photo below. It’s Happy-Go-Knitty’s Ahuru 8, labeled as DK, but knitting up more like a true worsted. It’s soft as butter; very warm; extremely light, airy and compressible; and adaptable to being knit down possibly as far as sport (24 stitches for 10 cm/4 inches) and up to worsted (20 stitches for 10cm/4 inches). The color name of my skeins is Caramel, possibly the undyed color of the possums themselves. The mixed color sock weight (red supplement with a brown to ecru main skein) from Prosper Yarns will decide what it wants to be later. That one is a luscious merino/nylon blend. I think the red accent skein is intended for toes and heels.
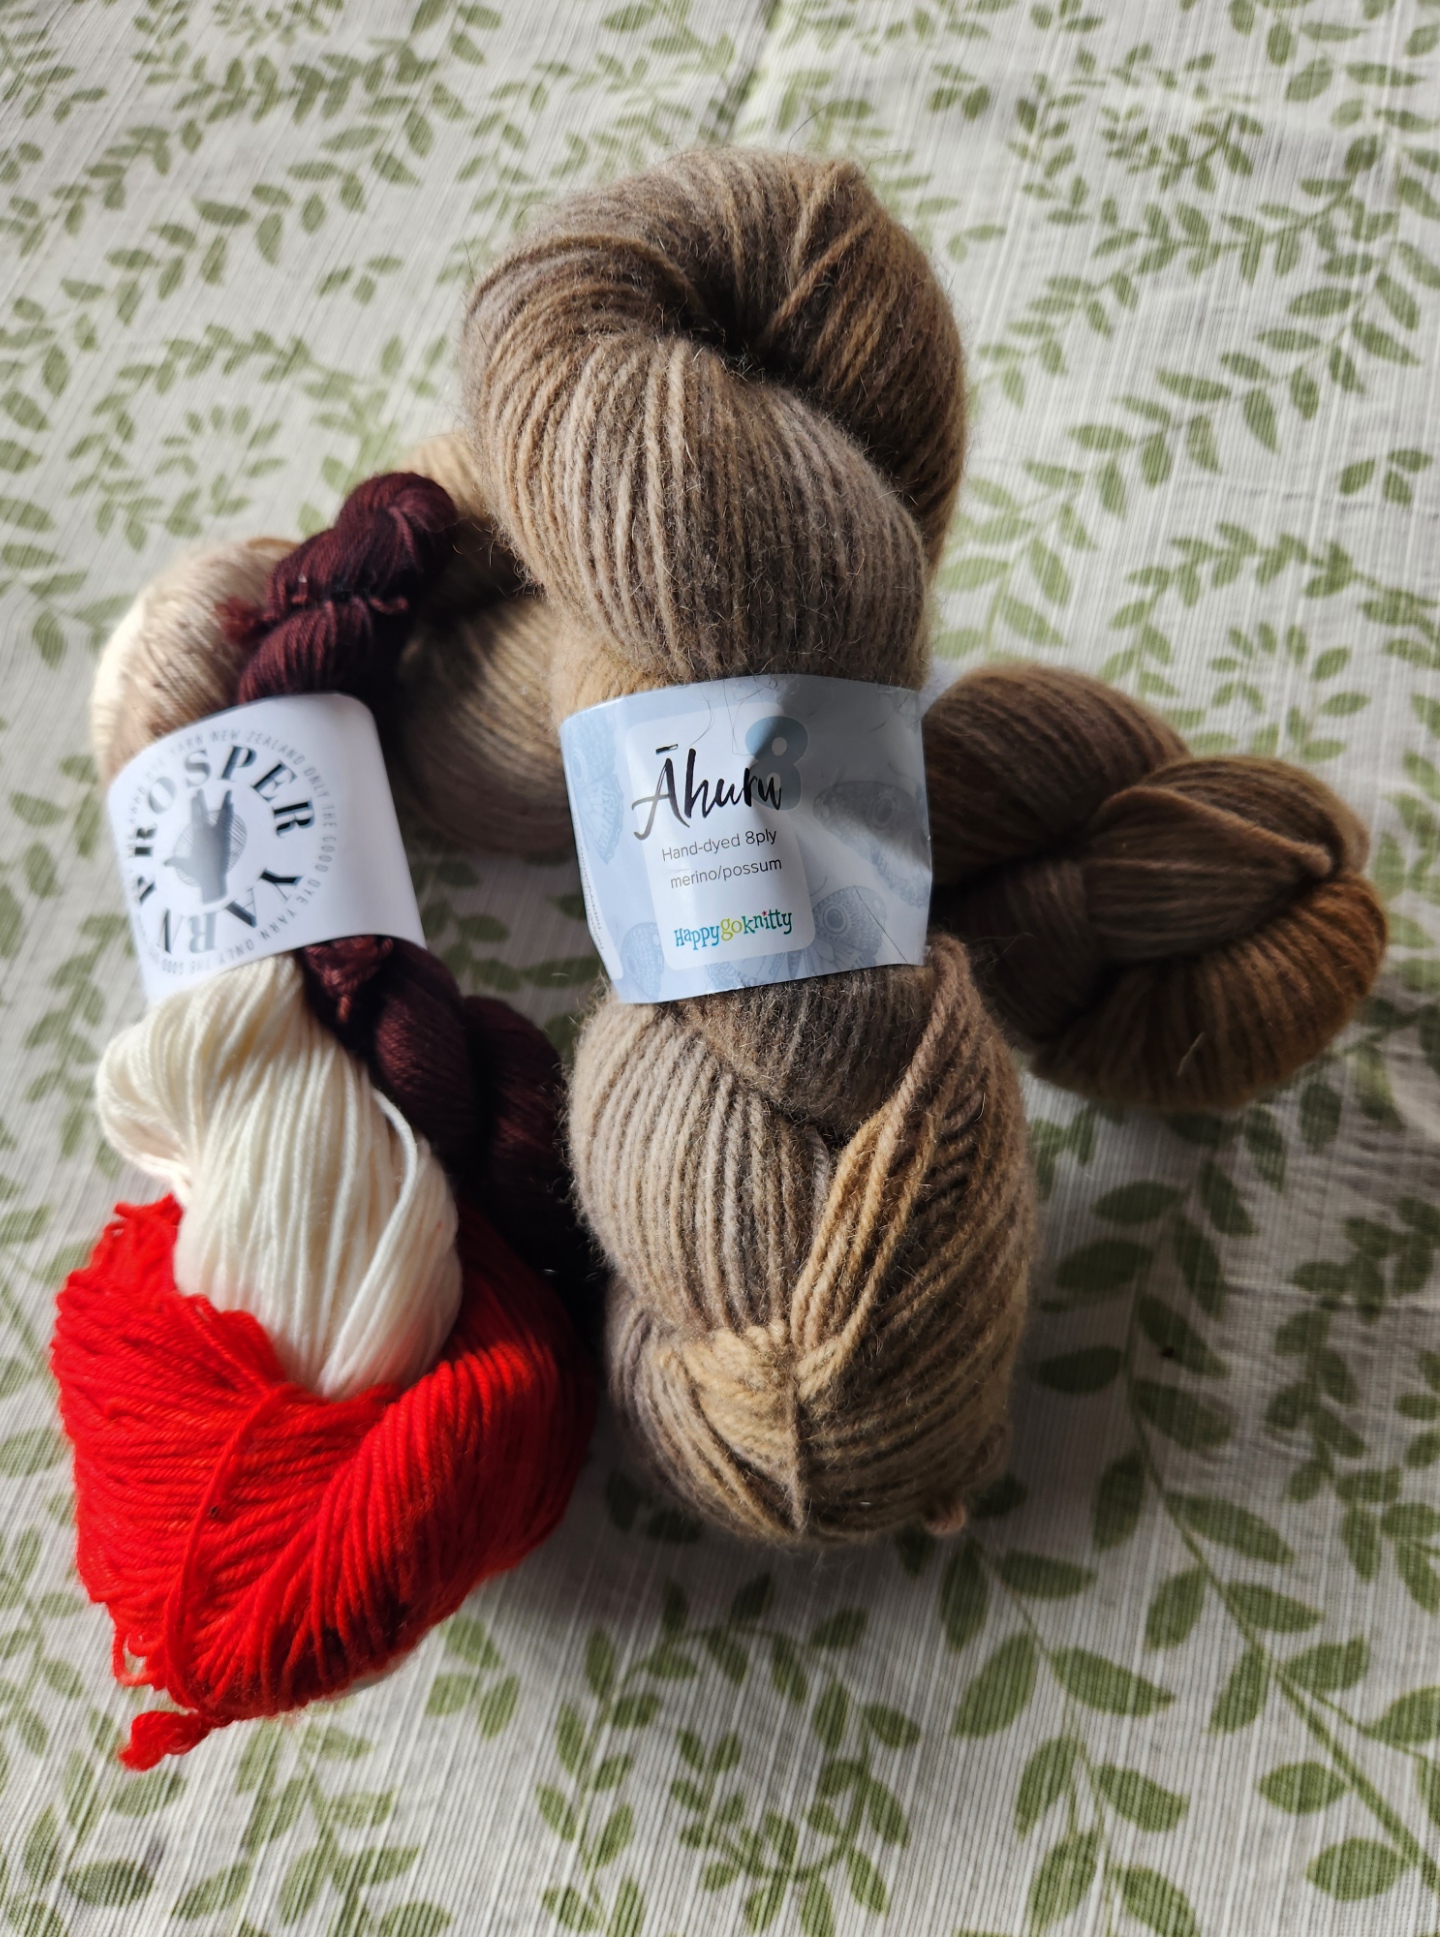
Back to the Ahuru. Now possum isn’t North American Opossum, it’s a New Zealand beast. It was introduced there from Australia and became an uncontrolled and invasive nuisance. But folk in New Zealand appear to be quite practical – there is now an entire yarn industry based on the controlled harvest of these creatures, limiting the ecological disruption they cause and furnishing some lovely fiber and (so I’ve heard) pet food.
Now the project. I have about 476 meters, roughly 520 yards. I initially thought of using it in combo with another yarn to make a yoke style pullover, but I decided that this stuff needed to shine on its own merits. So I went looking for something else. I hit upon Wavedeck, a Knitty project from 2014. It’s a half circle shawl based on the Pi Shawl principle, heavily textured with YO/decrease pairs, directionally arranged to create flower petals, with feather edging that can keep going until the yarn runs out. If it ends up a few rounds longer or shorter than the official count, it won’t matter.
Although this one looks complicated, with massive charts, it’s nowhere near as difficult as first glance would make out. The patterns are extremely logical, requiring mostly that one keep track of the current row number (odd rows only – all the even rows are the same). My only deviation so far is to use a US size 8 needle (5mm) instead of the pattern’s recommended size 7 (4.5mm). I liked the slightly looser drape of the produced fabric better with the larger size.
Here’s two evenings’ progress. I had forgotten how quickly knitting at this gauge goes. I’m up to Row 25 of the largest chart, and halfway through it.
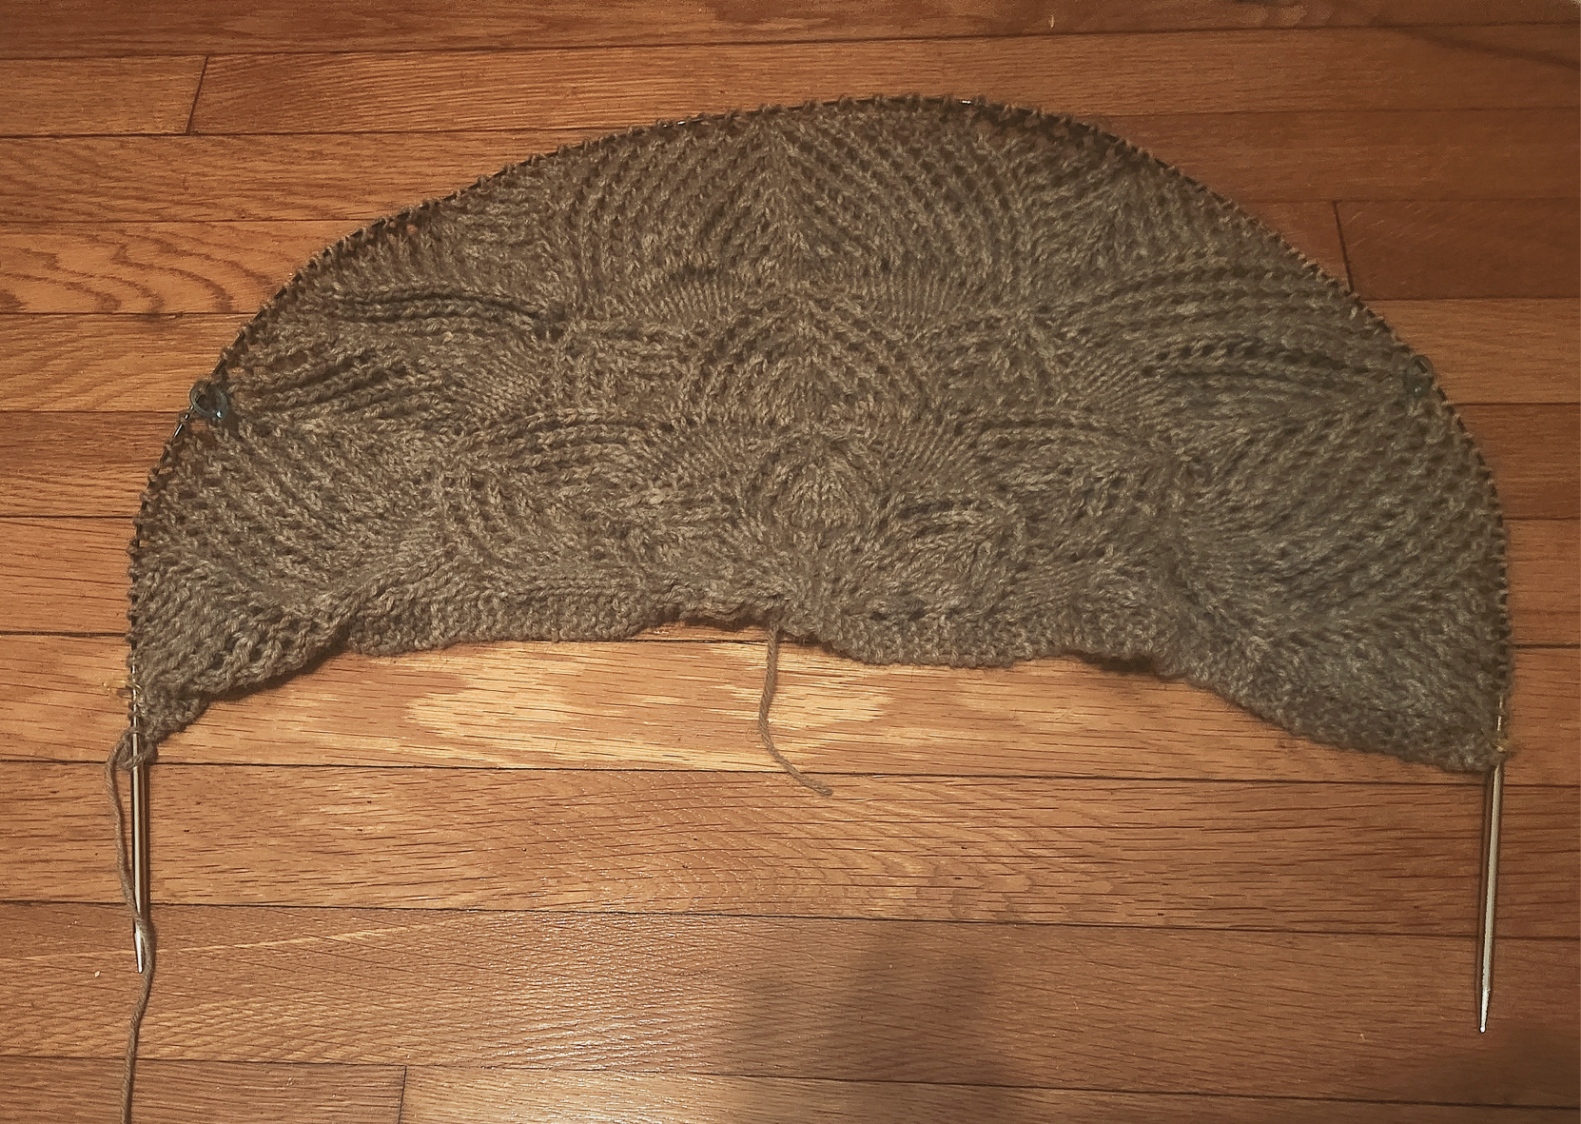
I really like the stitch definition I am getting with the Ahuru. The mottled colors come across a bit more orange than they are in the late night indoor illumination, but in person the color spread is grey to a tannish smoke brown, with spots of ecru and occasional bits of a darker chocolate, all with a tiny hint of mustard. Sounds like a mishmash, but in person it looks very Vintage Camouflage.
Knitty tags this one as “tangy” – their euphemism for “slightly challenging.” It’s one step up their four-step scale from beginner to complex. So far I’ve found it very easy to follow. If you are comfortable with yarn overs, left and right leaning decreases (K2tog and SSK), and can manage a center double decrease (three stitches merged into one, with the centermost presenting on top), and can pick up along an edge, you can do this one. Use sticky notes or a magnet board to focus on the current row, and go for it.
I’ll post back when I’ve run out of yarn and declare the project complete. After this, I’m not sure what will be next. Always a pair of socks as a guard against waiting room boredom. But I itch to stitch. Something…
