ONE CIRC/TWO CIRC METHODS FOR SOCKS
I’m well into my learning sock now, and I have to say that like any method, the one oversize circ technique for knitting in the round (popularized by Bev Galeskas under the name "Magic Loop") has its plusses and minuses. But so do both the two circ method and using traditional DPNs.
Advantages will be mostly felt by newer sock knitters who aren’t used to working on DPNs. They include not having all those DPNs in the work, and not having to worry about them falling out in one’s knitting bag, or having stitches drop off the ends. Also, because there’s a moment where one can pull the yarn of the last stitch on the other side of the needle tight around the circ’s cable, it’s easier to avoid those corner ladders that can form if tension isn’t just right.
Deviating from the Galeskas method a bit, I found standard (round, Dutch, Vee) heels are a bit easier to visualize if?the flap is worked back and forth on one side of the piece, and picking up to form both gusset edge is done so that all heel-forming stitches end up on?one side of the circ. Depending on the depth of the heel and heel style chosen some reapportionment of stitches may be needed just before the heel is started, so that one side of the?circ carries only the stitches needed for the heel flap, and the other carries the rest of them destined to become the top of the foot. After the heel flap is done and the gusset stitches are picked up, the gusset decreases are worked until the foot’s stitch count around?has been reached. At that point if there are unequal numbers of stitches on the two sides of the circ they can be re-divided into equal parts so that toe formation is easier. Short-row heel production is pretty close to the same compared to DPNs, except that the heel unit is worked entirely on one circ half as opposed to being done on a unit composed to two DPNs.
For me however, the method presents a couple of disadvantages. First, I’m taking a severe cut in production speed compared to using five DPNs, as after each half-round I have to stop and thread the circ through the stitches on the needle so that the points are correctly placed for the next half. I am not particularly fond of the bit of wrestling needed to move the stitches back and forth over the cable joins at the base of the needles, and I find the first row to be particularly annoying, especially with the stretchy half-hitch cast on I favor for sock tops. Also very short circumference rows are more of a pain than wider circumference rows. I’m going to be sorely tempted to move my knitting to DPNs when I get down to the toe, rather than finishing out the piece entirely on the giant circ.
I can also see that extended use of a circ in this fashion is more stressful on the needle than conventional knitting in the round. I’d be wary of using a needle from a multisize kit in this fashion, were they to come in a suitably long enough length. I also note that most people are using very long circs (36" or 40") to knit relatively small circumference things like socks (although if only one sock was being made at a time, some knitters might be able to get away with one size shorter needle). These are expensive and can be difficult to find. Items wider than say hats would be difficult to do using the one oversized circ method unless a really long needle could be found.

The giant circ method is very close to the two-circ method in terms of execution. Both divide the stitches in half. In the giant loop method, the halves are separated by the teased out cable loop. In the two circ method, each half of the sock is on its own needle. Working methods are the same, except there is no teasing the needle back through the work each half row with two circs. To be fair, there is a moment of drop and hunt as the needle end needed for the next half row must be selected from the three danglers. Heels are worked in the same manner, with the heel unit being contained entirely on one circ. And both methods can be used for side-by-side sock production, in which both socks of the pair can be knit at the same time, each from its own ball of yarn.
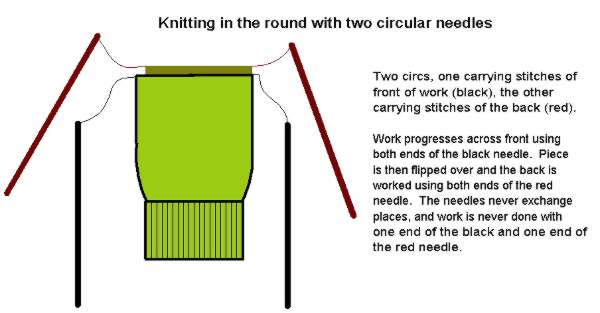
To my mind, there’s one more clear advantage of the two-circ method over the one-circ method – while you do need to shell out for two needles, they needn’t be extra long. Many people may have two circs of sufficient matching diameter already in their collections. The two-circ method can be done even using two circs of unequal length (if the difference in length is very large, stitches may have to be divided in a smaller and larger group rather than evenly). Even using shorter or mis-matched circs there is less limitation on how large in circumference an item can be done than there is using the one-circ method. In fact, if one WERE to use two 40-inch long circs in the two needle method, one could knit a tube of around 75- 80 inches around (or bigger if the yarn/stitches were squishable). Of course, at the lower end of the range, the two-circ method has the same weakness as the one-circ method – smaller circumferences and fewer stitches are more of a pain than larger ones because there is more stop and grab or needle shifting compared to knitting time as a whole.
Finally, any sock pattern knit in the round – toe up or cuff down – can be used with both methods. Patterns written for five DPNs (four in the work, one to knit with) translate the easiest, as each side of the sock is equivalent to one of the circs in two-circ; or half of the stitches placed on one side of the giant circ in the one-circ method. Patterns written for three needles just need a tiny bit of tinkering to divide the available stitches between two needles. For sanity, I’d suggest dividing the stitch groups at the point between the ones that will form the top of the foot (the instep stitches that are not worked during heel production); and all others. In some cases this should be evenly in half, in others, there may be one needle at the sock’s outset that carries a few more than the other.
I’ll continue and finish out this pair of socks using the one-circ method. I’ll probably do another using two-circ just to keep parity. But being DPN-handy, I won’t be switching over to use either method for routine sock production. However both methods ARE handy tools to keep in one’s knitting toolbox. I DO use two-circ now quite often for knitting sweater bodies in the round, and find it a godsend for working two in-the-round sleeves side by side (no more "is the second sleeve long enough yet?" guesswork). I might use the giant circ method for hats or leg-warmers, but for something as narrow as a sock, mitten, or wristlet, it’s just too much needle manipulation for me.
To sum up – both methods are nice additions to one’s knitting tool set. Both have advantages and limitations. While both are useful (especially for the DPN-shy), neither is an absolute substitute for DPN skill for everybody, nor for every instance in which DPNs are commonly used. I encourage everyone to expand their skill sets. You never know when a left-handed wratchet-ended sawtooth crimper is required, and it’s nice to have one available when faced with that need.
If you want to learn more about these techniques I’d suggest Galeskas’ The Magic Loop: working Around on One Needle (Fiber Trends, 2002) for the one-circ method; and Cat Bordi’s Socks Soar on Two Circular Needles (Passing Paws Press, 2001) for the two needle method. Both books present these methods in well-explained detail, accompanied by patterns and sample projects. Both are widely available through general merchandise and needlework/knitting specialty booksellers.
KNITTING FROM GRAPHS; ROGUE; SOCK CLASS
Answer to a quick question:
Can the Fleur de Lys motif shown yesterday be used for knitting?
Sure. Like anything graphed, the fleur can be knit, but with a caveat. In cross stitch, the individual units that build a motif are square. They have a 1:1 aspect ratio, as wide as they are tall. Likewise, needlepoint units are (mostly) square. They’re worked on a square grid, but if they’re in tent stitch the stitches themselves are a diagonal spanning that square. Therefore the edges of color areas don’t always appear as neat and trim as in cross stitch. This graph is composed of square units, and is intended mostly (but not exclusively) for stitchers.
Knitting presents a different challenge. It’s rare for a knitting stitch to have a 1:1 aspect ratio. Knitting stitches are usually wider than they are tall. It’s not uncommon to have a stitch gauge of 22 stitches = 4 inches, but a row gauge of 30 rows = 4 inches (that’s the standard for a classic DK weight yarn). That works out to an aspect ratio of 22:30 or 5.5/7.5 if you simplify the representation. That’s NOT square. If you knit up a graph that’s been drawn out on a square ratio grid in this aspect ratio, you’ll end up with a motif that’s somewhat squished looking north/south direction.
There are several ways around this. First is to choose designs that have a bit of north/south spread in them to begin with. They’ll look different when compressed, but if they’re elongated enough to begin with, they’ll end up with a reasonable set of visual proportions. My lion graph, shared eons ago for people who wanted to do lion sweaters as described in the Harry Potter books is this kind of design. It’s got enough "natural" height so that it looks o.k. if worked verbatim in a somewhat squashed aspect ratio.
The second is to graph out your design on a grid that has an aspect ratio that matches your knitted gauge. If you want to do this, the English language Japanese website ABCs of Knitting features a very nice graph paper generator. It’s listed among the tools on the page’s lower right.
A third way to get around this problem is to blow up the design. Very simple motifs can sometimes be made quite dramatic by reading a unit of two knit stitches by three rows for every square on the grid. Not practical for larger gauge knits, as even a small motif could outgrow the area intended for display, but occasionally useful none the less.
A fourth fix is more of a fudge. Depending on the complexity of the motif you want to knit, you can take a plain old square unit graph and by repeating every third or fourth row (depending on your gauge), you can stretch it out to compensate for aspect ratio squish. Obviously, this works best for simple motifs rather than complex ones, and at finer gauges. I’ve done it in sport weight yarn or finer, and it has worked well enough, with the duplication fading into the overall look and not being evident. This method can be problematic though for things like graphed letters adopted from cross stitch samplers, and for ultra-small geometrics whose motifs are built on single square units. For the latter, I might be tempted to use the third method, above.
Of course one can always ignore the problem all together, placing the borrowed motif so that the stretched dimension becomes a design feature and not a bug. This is what I did with last year’s crocheted dragon curtain. I worked across the narrow dimension of the curtain rather than starting along the bottom edge, in part because the non-square nature of my filet crochet blocks would distort the motif too much if worked in the latter direction. You can see the original proportions of the graph, and the finished piece.

If you look the knight, you’ll see that in my crochet he’s taller and a bit squashed east/west compared to the original. But if I hadn’t called out the difference, I’d bet you’d not have noticed.
Rogue
Rogue progresses. I’m another two inches or so into the body. Not much more to show beyond yet another blurry photo of a slightly larger blue object, so I’ll hold off until I can post pix with more content. I can say that in spite of competing demands on my time reducing the total amount I can spend on the thing, now that I’m past the pockets and my multiple mistakes, it is fairly flying along. I am looking ahead to the next set of complications – alterations to the armhole area and beginning of the hood’s frame that might be necessary due to my gauge re-computation.
Sock Class
I’m beginning my prep for my upcoming sock knitting class, reading up on and trying out the Magic Loop technique. It may be heresy to admit, especially for someone who is going to be teaching a workshop on this method, but I find it to be fiddly and (for me) much slower than using DPNs. But I realize that there is a legion of DPN-haters out there who view this method as being their ticket to finally making socks. So I’ll persevere for their sake.
The plan is for a three-hour workshop, during which I’ll hand out an original pattern for a very abbreviated small cuff-down sock – roughly baby size, but with sadly truncated ankle and foot parts to save time. The idea is to walk the class through that ENTIRE sock in the given time, from the cast on, through the heel, and finally down to the toe. A normal size sock would be too time-consuming to get far enough for a meaningful experience, especially around the heel, so I’ll cut back on the plain old stockinette areas, leaving in just enough to get familiar with the manipulations of the needle(s). I’ll also hand out an original pattern for a normal size sock that the class can take home and use for practice.
One further complication – I prefer to teach on socks knit at DK or worsted gauge – again, fewer yet larger and easier to see stitches. But the extra-long circs for the Magic Loop method are in short supply, and are quite expensive. Likewise for the two circs needed for that method. I don’t think it’s fair to ask the class to come equipped with needles in a size that they (probably) won’t be using for their regular sock knitting, so I’m going to do the thing using standard issue sock weight yarn.
I’ve taught knitting classes before, mostly on toe-up socks, basic crochet, and on beginning knitting. I’ve been told I pack too much detail into the time alloted. In this case I will have to agree. Ideally I’d do either single oversized circ or two circ socks, not both. I do intend the choice to be either-or, as the methods are largely compatible. Learners will get their choice of working one or the other, and except for needle manipulation the basic sock-making steps should be the same for both. Obviously more thought on this is in order. If any blinding insights of clarity and nuance suggest themselves to me, I’ll post them here. Otherwise, it’s just more socks.
ROGUE AND CENTRAL DOUBLE INCREASE
I admit it. I’m wrong. Not that it happens all that infrequently. Yesterday I answered a question on the KnitList about the central double increase used in the side panel cables of Rogue. I didn’t have my knitting with me, nor was I at my base station, surrounded by my reference library. So of course, I messed up.
Because confusion persists, and I still think there might be a typo in the directions for this stitch as written, I present a walk-through.
The bottoms of the closed loops in the side panel cables are formed by central double increases. The Rogue pattern directions say:
I think the "knit into front and back" should be reversed. The all-knowing Barbara Walker in both her Charted Knitting Designs (aka Walker III) and Fourth Treasury of Knitting Stitches (aka Walker IV), says this (paraphrased from page xxiv of Walker III):
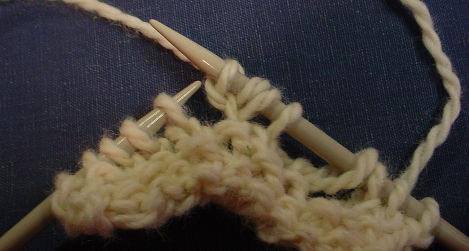
Like a dingbat I also reversed the front/back first step. Here’s how it should go:
First, knit into the back of the stitch (needle shown inserted into back of next stitch, ready to knit):

Then knit into the front of THE SAME stitch (needle shown inserted in the right place, ready to knit):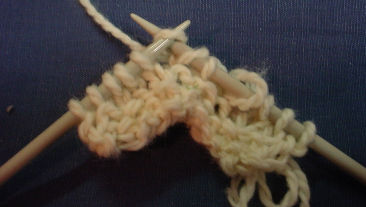
Here’s the result after doing the two knits described above: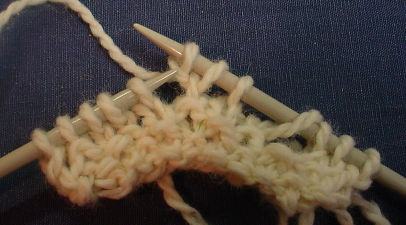
If you look carefully, you can see the vertical bar both sets of directions describe. I’ve called it out with an arrow:
I take my left hand needle tip and grab that bar, then knit into the back of it as well. Bar shown on the left hand needle tip, ready to be knit as a twisted stitch:
The end result: three stitches where there was one before:
The beatings may commence at sundown. Thanks to Rosemary who took me to task on this one.
Edge Scallops
I also received an interesting observation from Melanie, who said she’d tinkered with Dragon Skin and noticed that it made a very pronounced scalloped edge. She wants to know if Little Dragon Skin does this too, and whether or not it will be a problem.
Little Dragon Skin also scallops. (It would make a very nice scarf stitch for this reason). I am hoping that the two-inch hem facing, knit on smaller needles will help tame the scallops. I can’t say for sure that it will. This may end up being one of those bugs that lives on as a design feature.
I’m almost up to the point where I will be unzipping the provisional cast on, putting those stitches on another needle and working them along with my main body stitches. In effect I’ll be fusing my hem facing to eliminate the need for sewing it down later. I should be able to tell at that point if I like the effect.
Should I have taken the time to work all this out in the swatch before casting on for the main piece? Sure. Absolutely. Most sane people would have thought to do so. But I find knitting to be more exciting when you live dangerously, and I don’t mind ripping back.
VINTAGE YARNS
More goodies from the mailbag. Laura wrote:
I recently came across the Mary Francis Knitting and Crocheting Book. It is darling! Even though the credits don’t specify, I assume it’s a reprint of a book originally written around 1920. Woven within the story are quite extensive photo demos of knitting and crochet, along with many patterns for doll clothes, and even Red Cross knitting patterns. The text of the book describes yarns as 2-fold, 3-fold or 4-fold, and appear to be referring to what we would call ‘ply’ today–though perhaps more in the UK style. The book then goes on to say that yarns are named Germantown Zephyr or Germantown Wool (4-fold or 8-fold), Knitting Worsted, Saxony Wool, Woolen Knitting Floss, Teazle Yarn, or Angora Wool. Would you have any info on what the modern equivalents of these might be? Any references to point me toward? I did a google search, but mostly came up with “Bear Brand Germantown Yarns,” a few skeins of which have retired in my stash….It would seem that Germantown could refer to worsted weight or heavier (about a 3 or 4 in the modern number scheme trying to standardize the industry), Saxony might be more of a baby or sport weight (2ish, I suppose) and Knitting Floss might be more like Shetland yarns–lace or baby/fingering weight (1 or 2ish, I’m thinking).
I know there are lots of people now interested in older knitting patterns – everything from ponchos published in the 1970s through the truly vintage stuff going back to the late 1800s. The older the book, the harder it can be to figure out how to make the garment using today’s materials. Laura’s problem is a very common one for anyone looking at these older patterns.
I can’t claim to be an expert on this on this, but I have had a little bit of experience with legacy/historical patterns. From my limited exposure, Laura’s guesses are spot on.
For the yarns described in her book, Germantown’s closest equivalent is true worsted (not just something within the group system 3 or 4 designation; (the group system being a lousy method yarn classification – 2021 update and elaboration of my 2004 rant here). The closest modern yarn is Cascade 220 – a 100% wool that knits at 5 stitches per inch. Many patterns call for that size yarn to be doubled. I’ve had good results using either a true worsted, or even a lofty DK when the pattern calls for knitting with two strands.
Saxony was often used for baby items, knit on 15s or 16s. The modern needle size equivalent would be 00s or an size in between 00 and 000. I’ve had success substituting modern three-ply fingering or baby yarn. (4-ply fingering is standard sock weight, knitting at 28 stitches = 4 inches, 3-ply is lighter, usually knitting at 32 stitches = 4 inches.) Perhaps Jamieson Shetland Spindrift might work, being lofty and able to be knit down to that gauge. Brown Sheep WildFoote is one of the lightest sock yarns around now that Kroy 3 Ply is discontinued. Froelich Wolle Special Blauband is also on the thin end of the fingering spectrum. Much thicker and denser but machine washable is Dale Baby Ull. Knit tightly it might work, but I think that the Spindrift or Wildfoote would have a more historically accurate look.
I also suspect that Knitting Floss is lace weight. Skacel Merino Lace might make a good substitute.
Teazle, and Angora Wool are tougher. My suggestion would be to look at the needle size and gauge. Since most historical patterns don’t give gauge, are sized fairly small and fit FAR tighter than modern ones, the best way to figure out gauge is to look at the stitch count around the wrist or cuff rather than around the chest. Fit on wrists don’t change much, nor is ease generally a big factor there. Compare whatever you get to the wrist measurement of a modern piece – women’s small, men’s small, or children’s about size 6 for post-baby garments. Using that measurement roughly estimate how many stitches per inch the piece had just above the ribbing.
I’ve been working on this chart for a while, collecting historical yarn names and modern gauge/needle size equivalents. Also some suggestions on possible modern yarns. I started with some needle size data abstracted from Lois Baker’s highly useful comparative needle chart. Most of the historical yarn types I cite are from patterns before the 1930s. Note that these are not hard and fast categorizations, many yarns/needle sizes can slip up or down a peg. Also note that texture is difficult to match. I have no way of knowing if one yarn type was say, closer in feel to Spindrift than it is to Regia. Feel free to attach corrections/additions in the comments. I’ll update the chart body and put a link to it under ‘Reference’ at right.
For yarns from the 1950s through 1970s, VintageKnits maintained a very useful guide to fiber content and actual gauges of specific yarn brand names. It’s divided roughly by weight into several pages.
|
Historical Needle Size |
Modern Needle Size |
Expected Gauge |
Typical Historical Yarn Names |
Possible Modern Substitutes |
| 0.25mm | 1 ply Cobweb wool Cotton thread |
|||
| UK 24 | 0.5mm
US #00000000 (8/0) |
1 ply Cobweb wool Cotton thread |
Size 80 cotton | |
| UK 22 | 0.75mm
US #000000 (6/0) |
1 ply Cobweb wool Cotton thread |
Wool Floss Spool Cotton Knitting cotton |
|
| UK 19 US 18 Steel |
1.0mm US #00000 (5/0) |
1 ply Cobweb wool Cotton thread |
Size 50-80 cotton Jamieson 1-Ply Cobweb Wool |
|
| US 17 Steel | 1.125mm | 1 ply Cobweb wool Cotton thread |
||
| UK 18 US 16 Steel |
1.25mm US #0000 |
2 ply Lace weight Cotton thread |
Berlin Wool Briggs Knitting Silk |
Size 50 cotton Skacel Merino Lace |
| UK 17 US 15 Steel |
1.5mm US #000 |
2 ply Lace weight Cotton thread |
Berlin Wool, Andalusian Wool | Size 30 cotton Skacel Merino Lace Lorna’s Laces Helen’s Lace |
| UK 15 US 14 Steel |
1.75mm US #00 |
3 ply Fingering Light Fingering 30-32 st = 4 in |
Saxony, Shetland, Pompador, German Fingering, Alliance |
Jamieson Shetland Spindrift, Brown Sheep Wildfoote, Dale Baby Ull (knit very tightly), Kroy 3-Ply Most of |
| UK 14 US 13 Steel US 0 Standard |
2mm US #0 |
3 ply Fingering Light Fingering 30-32 st = 4 in 4 ply Fingering |
Saxony, Zephyr, | Jamieson Shetland Spindrift; Kroy 3-Ply
Most of the lighter weight sock yarns |
| UK 13 US 12 Steel |
2.25mm
US #1 (some) |
3 ply Fingering Light Fingering 30-32 st = 4 in 4 ply Fingering |
Saxony, Zephyr, Cocoon | Jamieson Shetland Spindrift; Kroy 3-Ply Dale Baby Ull (knit very tightly) Most of the lighter weight sock yarns Most standard sock yarns; Rowan 4 ply yarns |
| US 1 Standard | 2.5mm
US #1 (most) |
4 ply Fingering 28-30 st = 4in |
Saxony, Beehive, Penelope | Most standard sock yarns; Rowan 4 ply yarns |
| UK 12 US 11 Steel US 2 Standard |
2.75 mm US #2 |
4 ply Fingering 28-30 st = 4 in |
Beehive, Peacock, Penelope | Most standard sock yarns; Rowan 4 ply yarns |
| UK 11 US 10 Steel US 3 Standard |
3mm
US #3 (some) |
4 ply Fingering 28-30 st = 4 in Lighter sport weights |
Koigu; GGH Marathon; Zitron Libero |
|
| UK 10 | 3.25mm US #3 (most) |
Sport weight 24 st = 4 inches |
Louet Gems Opal Merino; Jaeger Matchmaker |
|
| US 9 Steel
US 4 Standard |
3.5mm
US #4 |
Sport weight 24 st = 4 in |
Louet Gems Opal Merin; Jaeger Matchmaker |
|
| UK 9 US 8 Steel US 5Standard |
3.75mm US #5 |
Gansey weight, 5-ply 23 st = 4 in |
Jumper wool | Wendy Guernsey 5 Ply |
| UK 8 | 4mm US #6 |
DK weight 22 st = 4 in |
Germantown, Zephyr, Saxony doubled |
Jaeger Matchmaker DK; Jo Sharp DK Wool; Most standard DK weight yarns; Most 4 ply fingering weights, doubled |
| US 6 Standard | 4.25mm | DK weight 22-21 st = 4 in |
Lighter airy worsteds, heavy cable spun DKs, most 4 ply fingering weights doubled Whatever can be knit to just under regulation worsted weight |
|
| UK 7 | 4.5mm US #7 |
Worsted 20 st = 4 in |
Germantown | Cascade 220 |
| US 7 Standard | 4. 75mm | Worsted 20 st = 4 in |
||
| UK 6 US 8 Standard |
5mm US #8 |
Heavy worsted
19 st = 4 inches Aran |
Most standard Aran weight yarns; Most standard sport weight yarn, doubled; Most standard mass market yarns labeled “Worsted” with on-label gauges of 19-18 stitches over 4 inches (10cm) |
|
| UK 5 (some) US 9 Standard |
5.25mm | Aran 18 st = 4 inches |
||
| UK 5 | 5.5mm US #9 |
Light bulky 17-16 st = 4 in |
||
| US 10 Standard (some) | 5.75mm | Light bulky 17-16 st = 4 in |
||
| UK 4
US 10 Standard |
6mm
US #10 |
Light bulky 17-16 st = 4 in |
||
| UK 3
US 10 1/2 Standard |
6.5mm US #10 1/2 (some) |
Bulky 15-13 st = 4 in |
Germantown doubled | Two strands of Cascade 220; Most standard worsteds, doubled |
| UK 2 | 7mm
US #10 1/2 (some) |
11Bulky 15-13 st = 4 in |
||
| UK 1 | 7.5mm | 11Bulky 15-13 st = 4 in |
||
| UK 0 | 8mm
US #11 |
Bulky 15-13 st = 4 in |
||
| UK 00 | 9mm US #13 |
Super bulky 12 or fewer st = 4 in |
||
| UK 000 | 10mm US #15 |
Super bulky 12 or fewer st = 4 in |
||
| 12.5mm US #17 |
Ultra 10 or fewer st = 4 in |
|||
| 14mm US #18 |
Ultra 10 or fewer st = 4 in |
|||
| 15.5mm
US #19 |
Ultra 8 or fewer st = 4 in |
|||
| 19mm US #35 |
Ultra 8 or fewer st = 4 in |
|||
| 25mm US #50 |
6 or fewer st = 4 in |
QUESTIONS – BOTH INTERESTING AND ANNOYING
Interesting Question
Yesterday Marcia asked about the K2P2 rib I posted about. She wants to use it on a hat where the brim is worn folded up. She’d like to have the pattern visible on the flipped up part, and wants to have the twists on the hat body and brim oriented with the same leg on top.
I haven’t tried this, but I think that if this stitch were worked two-sided – with crossings on both sides, Marcia’s effect would be achieved. To do this you need to make it a six-row rather than a five row pattern. Marcia was also concerned with the leg direction, but if the thing is worked two-sided this way, when flipped up the reverse will display the cable twist crossings going in the same direction as the front. (Try it by making slash marks on both sides of a piece of paper, then folding it.)
To do it flat, I’d work:
Cast on a multiple of 4 stitches
Round 1: (K2, P2), repeat
Round 2: (K2, P2), repeat
Round 3: (Right twist using this method: [K2tog, leaving unit on left hand needle. Re-insert right hand needle tip into stitch closest to end of left hand needle. Knit this stitch. Slip entire now-twisted two-stitch unit to right hand needle], p2), repeat
Round 4: (K2, P2), repeat
Round 5: (K2, P2), repeat
Round 6: (Right twist using this method: [K2tog, leaving unit on left hand needle. Re-insert right hand needle tip into stitch closest to end of left hand needle. Knit this stitch. Slip entire now-twisted two-stitch unit to right hand needle], p2), repeat
In the round I’d work:
Round 1: (K2, P2), repeat
Round 2: (K2, P2), repeat
Round 3: (Right twist using this method: [K2tog, leaving unit on left hand needle. Re-insert right hand needle tip into stitch closest to end of left hand needle. Knit this stitch. Slip entire now-twisted two-stitch unit to right hand needle], p2), repeat
Round 4: (K2, P2), repeat
Round 5: (K2, P2), repeat
Round 6: K2, (Right purl twist using this method: [Skip the first stitch but retain it on the left needle and purl the second one, also retaining it on the left hand needle. Then purl together both the skipped stitch and the second stitch and move the resulting two-stitch unit to the right hand needle], repeat
Of course another way to deal with the problem is to knit the cuff area using the pattern as described yesterday. When it was deep enough, you’d add three rows of purls to make a welt (the fold line); then reverse direction and knit the cap part, using the opposite twist stitch wherever the original called to use one. That would put the right side of the cuff showing when folded up against the hat body.
Another Interesting Question
FeliciaSix says “Wow. Eyes. Monitor. Bright. Hurt. Why did you pick that most unsubtle of color combos for the Fingerless Whatevers?”
Because it’s cold, dark and dreary in the winter and I wanted to wear the opposite.
Annoying Questions
None of them are worth repeating. Some days I wish every computer came equipped to display this error message:
You can build your own error messages, too.
TOE-UP SOCKS, FROM HEEL TO TOE
Something must be in the air, because several people have written to me this week asking if toe-up socks are more difficult than standard cuff-down socks, or if I could venture an opinion on how they fit and wore compared to cuff-down socks. Perhaps this is a product of all the people hoping to knit up one last holiday present before the end of the year. In any case, I’ll try to answer.
Why Toe-Ups?
1. I detest doing that last boring slog from heel to toe, especially because I find all on-foot patterning to be uncomfortable inside my shoes, so my feet are always done in plain old stockinette. If I leave the feet for last I’ll NEVER finish the socks. So I do them first, get them over with, and then have the fun of the patterned ankle part.
2. I’m not particularly fond of grafting. I can do it, but it’s a pain. Toe-ups let me avoid that step.
3. I like being able to pause and slip the growing socks on to make sure the fit is perfect. That’s easy with toe-ups.
4. I like not having to worry about yarn consumption. If I’m using 50g skeins, I knit the ankle part until I run out of yarn. If I’m using a 100g skein, I knit to the same length as another pair of socks, or if I want to eke out every inch, I put Sock #1 aside without binding it off, then knit Sock #2 on another set of needles. Once both are the same length, I’ll finish off the ribbings side by side, one from either end of the ball, making sure that I use every scrap.
5. If I feel like using the two-circ method, my toe-ups with their short-rowed heels adapt with no fuss at all to that method.
Toe-Up Fit
Toe-ups with short rowed heels are narrower at the point where the ankle joins the foot than are standard heel flap/box heel socks. Some people, especially those with high insteps find them confining. I don’t, even though I have BIG feet for a fem (recently remeasured to Euro 42/US 10.5EEE). If you feel this might be a problem, look for a toe-up pattern with an inverted standard heel rather than a short-rowed heel.
Ease of Working
I don’t find toe-ups to be any more difficult than heel flap socks. In fact, I find them easier. Using the short-row heel and five needles, once I’m past the initial toe I ALWAYS have the same number of stitches on each needle – even during heel production. That makes it easy to put down and restart my socks. That’s a good thing because socks are usually my briefcase project and get done in tiny spurts.
Many people complain about my favorite cast-on for toe-ups – the no-sew figure-8 toe. (It’s Judy Gibson’s, I’m just one of her sock disciples). They say it’s too fiddly, or they can’t get it to work, or it’s too loose. To be fair, it IS fiddly, but it’s worth it. The secret is letting that first row be miserably ugly and loose, but taking care not to split the yarn as it is worked. Once a couple of rounds have been established, it’s very easy to go back and use a needle tip to snick up the looseness. A little care will work the looseness past the knot that forms at the base of the tail, and out from the sock to become part of the dangling end.
If you give up or just don’t want to bother with the no-sew figure-8 toe, there are tons of other toe-up sock patterns out there that use different starting methods. Wendy has one. Or you can start with a provisional cast on, then go back and Kitchener darn the toe up later.
Look of Short Rowed Heels
Knitzanknitzanknitz asked about how short-rowed heels in self stripers look. Here are a couple of mine:

With a little care and willingness to make the sock a row or two longer/shorter you can plan your heels to miter on the breaks between the striper’s color changes.
Sources for Toe Up Patterns
To be immodest – there are mine. wiseNeedle has toe up patterns for several gauges.
The toe-up pattern that started me off and running is by no-sew toe guru Judy Gibson. Wendy Johnson has a popular toe-up pattern, and there’s another at Needletrax. There’s a toe up tutorial at the Socknitters website, and Flor’s got one as well. One of the oldest toe up patterns on the web was done by Manny Olds. Google on "toe up socks" for zillions more.
OOP BOOK REVIEW – THIS IS KNITTING
Still unplying. Nothing much to report that’s interesting on that front, so I turn to an old stand-by. Yet another review of A Knitting Book that Time ForgotTM.
This one is This is Knitting by Ethel Evans. It was published inNew York by Macmillan, and bears a copyright date of 1948. Here’s a typical page.

Evans book is clearly different from the Teenage Knitting book I wrote about earlier this week. For starters, it’s aimed at a general knitting audience, not one that’s mostly high school and college aged. It’s divided more or less in half. The first half presents about 40 knitting patterns for women, plus 20 each for babies, and men. The second half of the book is a stitch dictionary, giving photos and directions for about 80 or so knitting standards, including knit/purl textures, simple cables, basic lace stitches, and even some tweedy linen stitchstyle colorwork. There are no stitches in this collection that aren’t also in either Walker ‘s First or Second Treasury.
Directions are entirely in prose and like the other book, avoid confusing shorthand but are incomplete by modern standards. Finishing directions are rudimentary at best "Press pieces, sew up." Shaping isn’t dealt with well. Some photos of the adult garmentsclearly show more shaping than the pattern pieces as written will yield (perhaps judicious tailoring was done during sewing up, but that isn’t mentioned). Buttonhole placement isn’t described at all, although directions for buttonholes follow some patterns. I-cord trim used on some adult jackets is only hinted at, although it is clearly shown on the photos.
Some other odd things stand out about this book. First, there are no patterns for kids garments between about two years of age and late adolescence (when they can wear grown-up stuff). Second, the rudimentary how-to section is illustrated by flat photos of knitting on knitting needles – no hands holding them or in-process shots. It’s tough to see what is supposed to be happening in those photos. My guess is that the how to section is just preaching to the choir. I don’t think the author ever intended for anyone to actually learn knitting from this book. Maybe to use it as a refresher to remember skills learned long ago, but certainly not as a prime source of knowledge.
That being said, patterns here are more of the classics. Simple cardigans, pullovers, jackets and vests, almost all with shoulder pads. There are a couple of patterns written at worsted gauge (5spi); but most hover around 8spi. Mens patterns are restricted to very conservative vests. Even so, if you like fine gauge retro classic, you’ll find several wide-ribbed, body hugging women’s (and men’s) pieces that might pique your interest.
The two more valuable sections of the book are the baby patterns and the accessory patterns. All of the baby knits are very simple, classic shapes that are wonderfully wearable today.There are several layette sets withmatching hats, sweaters, booties and mittens abound. There is a surplice sweater plus several baby blankets that are particularly nice – the blankets being mostly the center panel in a texture stitch/wide garter or seed stitch border type. All of the baby things are very simple in design, but again like the adult patterns, the write-upsaren’t as detailed as new knitters might like. Still, shapesand techniques arebasic enough for an adventurous newbie to use this book, provided he or she is of the plunge-on-through mindset. Sadly the copy I borrowed had several pages torn from the center of the baby pattern section, including the instructions for both the sweater and blanket I liked best. (Death to the mutilators of library books!)
Accessories can be found throughout the thing. There’s a triangular head scarf that my daughter tells me would pass muster in her high school today. Gloves, socks and mittens are here, too. The glove patterns look especially nice. There’s one pair with triplecabled back I especially like. One shortcoming – the argyle sockpattern in this book is severely simplified, and doesn’t sport those nifty cross-hatchings that distinguish a true argyle from a plain olddiamond pattern – probably because NO charts are used anywhere in the directions and the write-up on where to put all those single-stitch wide lines (or to position them using duplicate stitch) would have driven the copy editor mad.
Like most of these older books anyone trying to duplicate patterns will probably run into yarn substitution problems. Looking at the list of yarns used in the book, my starting (and unswatched)swappingsuggestions would be:
| Yarn/typical gauge in book |
Modern Substitute |
| Knitting Worsted/5-6spi | Modern DK weight wool, like Heirloom Easy Care 8-ply |
| Germantown yarn/5spi | True worsted, like Cascade 220 |
| Sport Yarn/7-8spi | Fingering weight wool (too many different styles of item use this in the book to peg it down to just one) |
| Shetland Floss | Light fingering weight wool, like Jamiesons Shetland Spindrift |
| 3-ply Saxony/8spi | Easy care fingering weight baby wool. Dale Baby Ull would work. |
| 2-ply Saxony/10spi | Lighter weight fingering. Patons Kroy 3-ply? Brown Sheep Wildfoot? Regia 3-Ply? |
| 2-Ply Angora/8spi | Fingering weight angora. Austermann Angora Wolle? |
| Sock yarn/8spi | Most modern sock yarns, Regia, Socka, Fortissima |
| Crochet cotton/9 spi knit |
Modern cotton sock yarns. Fortissima Cotton, Regia Cotton |
To sum up – not asuseful nor as easy to follow as the Teenage Knitting Book. This is Knitting has some items of note, especially in the baby section and for glove knitters, but other than those, the book is interesting more as a historical document than as a still-living instruction book.
Side question: Do people find these reviews interesting or useful? Does anyone else care about old books found in musty library stacks, or about knitting’s recent history?
REFERENCE – PREPARING NEW SKEINS FOR KNITTING I
I’ve noticed a spate of questions from newer knitters of late – via eMail, on wiseNeedle, in the mailing lists and in Live Journal forums – all asking about how to wind balls, or start skeins, or asking about the different yarn put-ups. I thought I’d help.
Part I – Shapes of the Beast
Knitting yarn is sold in many different configurations. Here are a few of the more common.

1. Large amorphous glob. Actually this is a hank or skein, similar to #6 and #7, but it’s massive and rather shop-worn. Like all hanks or skeins, it has to be rolled up into one or more balls before knitting can begin. Examples: Rainbow Mills Pebbles (shown); Schaefer Elaine and Miss Priss.
2. A spool-like ball, with the yarn rolled around an inner form. In this case, there’s a large cardboard tube inside. I’ve also seen yarns rolled around spongy centers and plastic foam cylinders. I would not recommend long-term storage of yarn wound on cardboard for long periods (read 7+ years) because cardboard is acidic, and the yarn in the center might discolor or become brittle over time. Spooled yarn can be knit as-is, without rewinding by finding the end and just starting. The spools will skitter around a bit, so keeping them in a bag while you’re working can be a good idea. Some of the ribbon yarns sold on spools benefit from being unreeled toilet-paper-roll style instead of being pulled off the top while the spool sits on its flat end. Doing so can minimize the number of twists as you work. I sometimes use an improvised axle type arrangement for unreeling (more on this in another post). Example: Plymouth Colorlash (shown); Berroco Suede
3. Cones. The thinner machine knitting yarns are often sold on cones. Sometimes you can find heavier yarns on cones, too – especially from mill-end shops. Coned yarn can be a great buy because the maker didn’t need to pay for the machines or labor to wind it off into balls or skeins. Coned yarn can be knit as-is, although just pulling it off the top of the cone can also introduce twisting. Some people prefer to unreel coned yarn using an axle set-up, or to wind the yarn into balls. While coned yarn also has a cardboard core, the high yardage on a cone means that relatively little of it is in direct contact with the yarn compared to the short yardage spool style balls. If I thought a coned yarn (especially a white or light color yarn)might languish in my stash for a decade or more I might be tempted to wind it off into balls. Example: Classic Elite Believe – bought at the CE outlet in Lowell, MA (shown)
4. Mushroom style puffballs, usually speared in the center by an arrow-ended tag. I hate these. They’re always 50g, short yardage, and they appear to be among the most favored put-ups used by high end makers of expensive yarns. They behave especially poorly on the shelf or in the stash, losing their tags and falling into floppy messes at the drop of a hat. They can however be knit directly from the ball without rewinding. Sometimes if your fingers are clever they can fish the tail end out of the center, and they can be used either as center-pull balls or from both ends at once. Example: Grignasco Top Print (shown): Debbie Bliss yarns; On Line Linie 157 – Tessa.
5.Log-style wound skeins. These come in many sizes and price ranges. The giant format here is most common among lower cost mass-market yarns. The same format (but much smaller) is often found for more expensive yarns – notably European import cottons. These log skeins do not need any preparation. Most have both ends accessible on the outside, and can be knit from either end. Examples: Red Heart Super Saver (shown); Marks and Kattens Indigo Jeansgarn; Southmaid Cotton 8
6. and 7. These are standard issue hank style skeins. They are the most economical put-up for makers to use, and the most common among small producers and hand-dyers, although they exist across the entire spectrum of yarns. Typically they’re made from yarn that’s been wound into a large diameter circle, then twisted a bit with one end inserted into the other. It’s easy to reduce them back to a single big circle. While some people claim they can untie the little strands holding a hank together, place it on the floor and knit directly from it – I wouldn’t recommend the practice. It sounds like an excellent opportunity to make a tangled mess. Save your sanity. Wind hanked yarn into balls before knitting from it. [More on this in another post]. Examples: Bartlett 2-Ply Worsted, Rowan Rowanspun 4-Ply (both shown)
8. Wound cheeses without center cores. Some yarn shops take coned or hanked yarn and wind it into these machine-assisted balls before selling it, often marketing the result as an in-store house brand. If you buy an inexpensive ball winder you can make these, too. Cheeses can be knit from either end and do not require rewinding before use. Example: Ball I made myself from Paternayan 3-ply
9. Small logs. These skeins are cousins of #5. They can be used as-is from the outside end. Very clever fingers can feel around the inside and pull out a glob to retrieve the inside end. That way these logs can be used as center pull balls, too. Example: Lana Grossa Melienweit Fantasy; Schoeller/Stahl Socka/Fortissima
There are other put-ups out there, this is not the full roster of what’s out there, but it’s pretty representative.
Why are there so many forms? Why isn’t everything sold knit-ready? Mostly it boils down to economics. Industry pals tell me that the machinery to make nice, neat ready-to-knit balls is expensive and hard to find. It just isn’t being made any more. For example, I’ve heard tell that Classic Elite uses some winding machines that are upwards of75 years old. If one of those machines breaks beyond repair, it can’t be replaced. They’ve had to reformat several of their yarns because of this problem.
On top of the machinery issue, winding is labor-intensive. Again, older machines require constant attention by operators, and using them is a multi-step process. For the most part, the industry just doesn’t have the volume of say a soda bottling plant. Except for the very largest producers (Caron, Coats & Clark), all knitting yarn makers/distributors rely on a level of labor that’s uncommon today. Labor is expensive. In an effort to minimize these costs, some makers have turned to less labor intensive put-ups, most notably selling in skein rather than in ball.
The sticker shock factor is another force contributing to the multitude of different forms – especially the prevalence of 50g sales units. Yarn is expensive. I’ve seen people shy away from larger 4 ounce skeins with hefty price tags, yet buy the equivalent dollar amount of yarn marked at $5.50 per 50gball. That lower per-ball price is a very seductive thing, even if the same total purchase price was expended. People also hate having to buy extra. If yarn came in 200g skeins and the typical project required 275g, a knitter would end up having to buy 400g to complete it. That’s 125g more yarn than needed. If the yarn came in 50g balls he or she would only have to buy 300 g – only 25g more than necessary. That overage translates to added cost and decreases the chance that the purchase will be made.
Does form factor influence purchase choices in general? I’d have to say yes. It does influence some people. I know several knitters who flat out refuse to wind hanks. They won’t buy any yarn that’s not ready to knit. On the other hand, I also know several that won’t touch a balled yarn, preferring to knit from yarns that come in hanks (I think there’s a snob factor here – they believe that all hanked yarn is superior to all balled yarn, although we all know that blanket statement “alls” are rarely true).
I can also point to one yarn that’s a business-case poster child for the psychology of put-up influencing yarn purchase. That’s Classic Elite Wings. Although there are no reviews yet, it’s a nice yarn – a classic finish alpaca/silk/wool blend that’s soft and comes in attractive colors. It’s relatively pricey, but no more so than other soft alpaca blends of similar weight. I saw it on the shelf at my LYS but noticed that people would pick it up yet buy other yarns instead. So I asked why. It turns out that the new format CE was trying out – sort of a hank folded in thirds and wrapped around the middle with a paper ball band -looked floppy and small compared to other yarns of the same weight/fiber/yardage. Those yarns came in happy little fat balls. They may have been the same 50g and within a yard or two of the Wings, but that wasn’t evident from the put-up. The balls plain old LOOKED bigger, even though they weren’t. Buyers were choosing the other yarn not because of color or price, but because they thought the balls were better buys.
Does form factor influence my own purchases? Generally not. I detest the mushroom ball, but if the yarn is attractive enough and priced right, I’ll buy it and use it. I do admit non-rationality in that I always feel rooked when a big, beautiful, squishy ball ends up being a thin veneer of yarn on a big, fat, sponge center, even if I’ve studied the per-ball yardage and know exactly how much I’m getting. I don’t mind winding hanks into balls. I figure that having to do so myself is saving me around 75 cents per skein; or is part of the entrance price for getting to use a custom-dyed or artisanal yarn.
STITCH PATTERN NAMES
I’ve noticed a few posts on the various lists, blogs and forums all asking about stitches by name, either requesting help in finding a particular one, or discussing how sometimes multiple patterns share a name, or one pattern is known by many. I ramble on as the dilettante I am – with nothing to back up these theories other than noting certain similarities of name and pattern in dozens of stitch guides and publications going back to the 1800s.
Knitting texture pattern names are far from standard. Yes, it’s true that some stitches have more than one name, and that some names are associated with more than one stitch. There’s little point in arguing about which is the “true” Old Shale stitch. In one part of the world the exact size of the repeat, proportion of garter to openwork, and depth of the scallops is clearly defined and agreed to by the knitting community. In another, the name is loosely attached to a family of stitches. And in other areas there’s no differentiation made between Old Shale and Feather and Fan.
The same thing goes for the seed stitch/moss stitch debate. I’ve seen all three graphs below called variants of seed or moss stitch (empty squares are knits, dashed squares are purls).

Most commonly, #1 is seed and #2 is moss. But others identify #1 as seed, and #2 as double seed. Some people call #1 seed, but call #3 double seed. In still others #2 is double moss, and #1 is moss, and #3 is broken rib. Confusing, isn’t it? Get 10 knitters in a room and I’m sure you’ll come up with multiple names for these three.
And there’s also the Shaker Rib/Fisherman Rib/English Rib naming overlap used to confound people who want to work one of these deeply textured but simple stitches (all employ knitting into a stitch in the row below).
Why is this?
Well, as close as I can figure, in part it’s because knitting is a relatively new craft. Crochet even more so (more on this tomorrow). Written patterns or guides for doing it are even newer. Exhaustive books on how to embroider were written in the 1700s; modelbooks describing how to stitch and offering up designs date back to the dawn of publishing in the early 1500s. But the earliest pattern books that specifically mention knitting don’t cover texture variations in specific. They offer up simple graphed repeats that can be used for colorwork or knit/purl textures. It isn’t until much later that anyone began trying to describe the creation of a manipulated texture in a manner that others could reproduce it (early-mid 1800s). So until that point, without a written record to nail terminology flat and make sharing those terms across wide areas, regional/cultural variations in naming remained regional. It wasn’t until knitters began running into knitters from other regions either in person or through published works that they began to notice that terminologies differed.
Although knitting possesses a vast amount of possibilities for texture formation, some patterns appear to have been either invented or popularized in multiple areas. We can’t say for sure where many particular textures/stitches first developed, or what name should have the right of primogeniture. Perhaps dissemination was by chance – some adventurous traveler wore a pair of socks featuring a particular design, and that design was admired in the area he or she ended up in. Local knitters loved the novelty and reproduced it. In a generation an introduced pattern could easily loose its association with the ultimate origin and become “Grandma’s Clock” and be considered native.
Most of our modern names for stitches come from three (now four) stitch dictionaries compiled by Barbara Walker. She collected stitch directions, corrected them, classified them, and named them. Although there had been stitch pattern collections published before, no one had ever attempted to undertake the task in such a comprehensive manner. Remember though that even though she was a pioneer, Walker wasn’t working in a vacuum. She did invent many patterns (notably in slip stitch knitting and lace), but she also mined earlier works including 19th century ladies’ magazines, books and needlework leaflets put out prior to the 1960s. She even gathered up submissions sent to her after the publication of her first book.
Walker’s format required that each stitch have a name. Sometimes she adopted the name of a pattern in an earlier source, or used the name by which the stitch was known to her. Sometimes if more than one name was current she noted that fact. In other places she supplied a name where one was lacking or was misleading (you can’t have fifteen textures all named Chevron Stitch in the same book).
Walker’s treasuries are so influential that her names are becoming increasingly ubiquitous. In many cases though, they conflict with names steeped in local traditions. Therefore alternative names and confusion still persist. Plus although four massive encyclopedias of stitches contain lots and lots of individual patterns – there are whole areas of knitting they touch only very lightly. The lace patterns used in Shetland knitting are sparsely covered compared to the in-depth treatment they get in specialty books. Those specialty books offer up the texture/lace pattern names used by people with a direct heritage of Shetland knitting.
Then there’s a further layer of complication. There are no Knitting Police. No one enforces use of any common set of terms. We barely have concurrence on things a simple as increase/decrease (narrow/widen); cast off (bind off); and gauge (tension). Anyone can publish a pattern or stitch guidebook that uses an entirely unique set of names. L. Stanfield sidestepped this issue by using only numbers to identify the original texture patterns in her book. And marketers, especially those writing clothing catalogs ?often pick names out of thin air because 1) they don’t know knitting or crochet (or many times the difference between the two); and 2) they use what they thing will sell, not what might be an accurate descriptor.
So there’s one person’s over-long ramble. Stitch names aren’t standard. They spring from many sources, and have only recently been codified, classified and named. Names are moving towards a greater degree of standardization, but they’re not there yet and will probably never be. Live with it.
THINKING – UNPLYING FOR NEW PONCHO
Several people asked how I was going to go about un-plying my three-strand Paternayan yarn. Siince I need to do it to swatch, here’s how I plan on doing it.
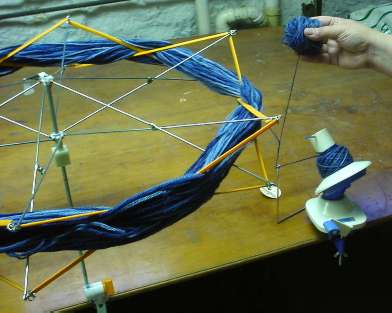
You can see the skein as the maker intended, set up on my swift. I’ve got my ball winder out, too. I usually don’t bother with it unless I’m?dealing with?lace or fingering weight yarn (that’s more yardage than I’ve got stamina for hand-winding). This time however I need it as an extra pair of hands. In fact, ideally I’d have an extra-extra pair of hands.
The plan is to let the skein of yarn spin freely on the swift, while I?take up two plies on the ball winder, and ball up the remaining ply by hand. Now you can see why a friend or biddable child to turn the crank on the ball winder would be a great convenience. As it is, I have to advance a bit on the machine-aided ball, then catch up to myself on the hand-wound single ply ball. All the while, I have to go gently, untwisting and untangling whenever things get too bound up. This is why I’d only attempt this foolhardy maneuver with a yarn as loosely constructed as this one. Even so the sharp-eyed can spot the stuff twisting back on itself just a bit at the point where the one ply is split off the main strand.
O.K. Now when I’ve finished, I’ll have a neat machine-wound little core sample of two-ply yarn, plus a hand-wound ball of one-ply. How to turn the one-ply back into a two-ply?? Simple. I repeat the paring down process on the other skein of yarn, then I place both skeins on the floor or in a box (I’ve heard that cutting the bottom of soda bottles and threading the strand through the neck works wonders). Then I use my ball winder to draw on both at the same time. Minor complication – the variegated won’t match up in color across both plies. I’ll just treat it as another color of variegated, and isolate it in its own stripes or other pattern segment.
Since my original yarn was really just paired rather than twisted together, I don’t think I really need to do a proper twisted plying on my newly formed composite. Of course there may be spinners out there recoiling in horror at this process and half-assed advice. I can envision them ready to leap forward with?sage interjections to save us all and teach us proper plying. I stand open to their suggestions.
