WORKING REPORT – WATERSPUN PONCHO
UPDATE: THIS WORKING DISCUSSION (INCLUDING HINTS FROM PRIOR PROJECT POSTS) IS NOW AVAILABLE AS AN EASY DOWNLOAD AT THE KNITTING PATTERNS LINK, ABOVE.
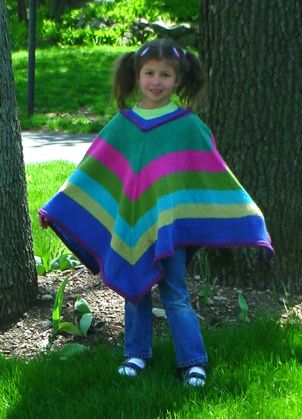
My Classic Elite Waterspun poncho isdone! Here it is mid-block:

I am really loving the improvised blocking wires I got to finish my Forest Path stole. I threaded them through the I-cord edges, two per side, then spread the poncho out on some towels to dry. The edges are straight, the corners are perfect, and dreaded curl-up has been eliminated. And I didn’t even need pins!
And here’s a shot of it on the happy recipient:
For those of you who wrote to ask for the pattern, here it is.
- Make swatches until you get a fabric that you like.
- Figure out your gauge.
- Measure how big a neckline you need to go over your head.
- Multiply that measurement by your gauge, and round it up to the next multiple of four.
- Cast on that number of stitches, placing 4 markers evenly spaced.
- Knit 6 rounds.
- On the 7th round, K1,make one, knit to one stitch before the next marker,make one, K1. Repeat this three times.
- On the 8th round – knit
- Repeat steps 7 and 8 until your poncho is as long/wide as you like it.
- Bind off, or work one or more rounds of attached I-cord to finish.
- If the neck is too wide, pick up purl bump stitches at the base of the rolled collar. You should have the same number as you cast on. Put 4 markers in your work evenly spaced. Then work one round starting with k2 tog, (k1, p1) until you have two stitches left before the next marker, ssk. Repeat between the other markers. Then work a K1, P1 round continuig ribbing as established. Continue this way, alternating decrease rounds and plain ribbed rounds for about 6-8 rows. Bind off VERY LOOSELY, making sure you can still get your head through the hole.
As to what yarns are suitable, what number to cast on given a particular gauge, what size needles to use, how much yarn you’ll need – this is all up to you. Experiment! Here are some thoughts to keep in mind:
What yarn is suitable? Look at it. Will it feel good when worn? Is it hand-wash only, otherwise hard to clean, or a light color? If so – are you prepared to care for it when it gets dirty? Is it loosely or tightly spun? Loosely spun yarns are more prone to pilling, catching and looking “used.” On the other hand, they’re often softer with a more luxurious drape and sheen. Is it heavy? A poncho is a big thing – larger than a lap blanket. Lift about 10 skeins worth. Can you envision yourself dragging around that much weight (or more)? Will the yarn stretch under its own weight when used in a large quantity? Cottons are heavy yard for yard and are infamous for this. Wool is less weighty per yard or meter. Wool/acrylic blends are lighter still. Is the color/texturenot only attractiveon its own, but will it look good on you? A puffy or furry yarn will add bulk andincrease the size of your sillouhette. A giant-gauge or shiny yarn willmake a garment look larger than it really is. Some colors and textureslook fantastic as accents, but applied over an entire garmentmay not be as appealing on every wearer.Decide what’s important to you and choose accordingly. Remember, you can always buy one skein to try out before you commit for the whole project. If that yarndoesn’t work out for a poncho,one skeinmight make a nifty hat or scarf.
What needle size to use? When swatching with a new yarn, start with the needle size recommended by the yarn maker. Do up a good size swatch in your chosen texture stitch or colorwork design. Do you like the feel and drape? If so, measure your gauge – you’re good to go. Swatch feel too stiff and tight? Try again on a size larger needle. Swatch too drapey and holey? Go down a needle size and try again. You’ll know when you’ve hit the best combo. If you’re combining several yarns of different weights or textures, be sure to swatch them as you will use them, using the stitch and needles you intend for the final project, even if that means making a VERY large swatch with multiple stripes. Once you do get the look/feel you like, make a note of your needle size and FINISH YOUR SWATCH. You’ll need it to do both gauge measurements and yarn consumption estimates. (I’m not good at keeping paper notes, so Imake knots in my dangling tail end to help me remember what needle size I used to makemyswatch. For example, four knots = US #4 needles.)
How many to cast on? Simple math. If your gauge is 4.5 stitches per inch, and you’ve decided that a 24 inch neckline is big enough, you start with 4.5 x 24 = 108 stitches. That lucks out because 108 is a multiple of 4, and you don’t need to round up.
How much yarn will you need? You can figure out roughly how much yarn your gauge square took for that number of square inches or centimeters. Draw out a diagram of your project (in this case – a big square), and estimate how big you want the thing to be when it’s done. Figure out its total area and divide that area by the area of your swatch. Got a 6-inch square swatch? Want to make a peice that’s 4 feet on a side? 4 feet x 4 feet = 48 inches x 48 inches = 2304 square inches. 6 inches x 6 inches = 36 square inches. 2304/36 = 64. It will take you about 64 times as much yarn to knit your 4-foot square piece than it took to knit your six inch square. Ravel back your swatch and measure, or weigh itto determine the amout of yarn you used. Now do the math.
Shortcut: If you like a slimmer poncho than this super-easy square one, there’s a poncho pattern generation utility available elsewhere on-line.
PROJECT – SAMPLER SOFA PILLOWS
There are lots of stitch patterns that look tempting in the various stitch dictionaries on my shelves. Some I’ve been able to place on garments, but others just haven’t worked out – mostly because they were too wide or presented composition problems if used over the topography of a person’s body.
About 8 years ago, right after we moved into the house we’re on the cusp of leaving, I decided to take some of these difficult-to-place patterns and do up two sofa pillows. Anticipating severe pillow-abuse that only homes with small children face, I decided not to spend a lot making them. I got three large skeins of Lion Fisherman Wool from a discount crafts store; and pulled out a pair of US #8 needles and some of my stitch treasuries. I started right in, not worrying much about absolute size.
I chose a bunch of patterns from the treasuries, planning out my pillows around an average gauge of 4.5 spi and a target size of around 15 inches, square. If I was off a bit I didn’t worry, knowing my knit pillow tops would stretch to compensate. Just for kicks, I decided to use different patterns for each side:


If you’re a texture pattern junkie like me, in the top picture you’ll recognize Rocking Cable (Walker 3, p. 130) and Medallions with Cherries (Walker 2, p. 141) framed by Bulky Double Cable (Walker 1, p. 243). The simple lacy edging is adapted from #57 in Classic Knitted Cotton Edgings by Hewitt and Daly (p. 44), but I narrowed it a bit by eliminating the openwork along the top edge.
On the other side of these pillows I used Wheat Sheaves (Walker 2, p. 138); and a combo of Patchwork Cable II (Walker 3, p. 93) and Grand Swinging Cable (Walker 3, p. 91). Note that the Patchwork Cable and Grand Swinging Cable match up exactly in row count. I was able to tuck them in together side by side in a playful combo I intend on using someday for a kid’s pullover. That pillow is also framed with #89 from Stanfield’s New Knitting Stitch Library (p. 59).
Once I had my four sides knit and blocked, assembly was easy – even considering that Iput a zipper in each so I could remove the covers for washing. In fact, if you’ve never sewn a zipper into a piece of hand-knitting pillows are excellent practice pieces. To make life easier, I sewed in my zippers first:

I laid the two squares side by side, and pinned the zipper between them. Then I hand-stitched the zipper to each square. Once the zipper was set, I folded the two squares along it, so that the wrong sides were sandwiched between. Then starting at the foot of the zipper, I worked either I-cord or an edging up along the outer edge of my two matched squares, effectively joining them together at the same time as the edging or I-cord was created and skipping the sew-up-the-pillow step. I went around the three open ends of the pillow, joining as I went. When I got to the zippered side, I worked the edging along only ONE of the squares taking care not to foul the path zipper pull with yarn. My (now camouflaged) zipper nestles along that side at the base of the edging. “Zip open, shove in store-bought pillow form, zip shut” were the final steps of assembly.
To fasten the pillow sides together I used the second of the two I-cord attachment methods I described yesterday. The I-cord edged pillow worked exactly the same way, but instead of picking up both legs of the stitches running down the length of the previous round of I-cord, I held the two sides together and picked up the innermost leg of the edge stitch from each one. This turned the outermost legs inside as a selvedge, and made a nice, neat join without gappy holes.
The pillow with the lacy edging was done in a similar manner. Unlike the I-cord however, I had wrong-side rows on the lace. I did my lace trim, using three plain knits on the straight side as my point of attachment. I ended every right-side row of the lace with SSK, pick up one stitch, just like the I-cord. Then I flipped my work over, slipped the first stitch purlwise, knit 1, and continued with rest of my wrong-side row.
Just like in joining the first round of I-cord to my poncho, for both the I-cord and lacy edgings I had to adjust the ratio of stitches picked up to rows or stitches on the piece’s body. I believe I used needles two or three sizes smaller for both the I-cord and lacy edgings. I also ended up working 4:3 on the sides of the piece and 2:3 along the top and bottom. Experimentation at the outset and a willingness to rip back a few rows and try again are both always required when you’re adding a knit-on edging.
I’m pleased with the way these turn out, and surprised at how well the inexpensive wool I used has held up. The pieces were a bit stiff and slightly real-wool itchy when first knit, but softened up quite nicely when washed and blocked. Sure, there’s some pilling, but these pillows have survived 8 years of slumber party pillow fights, general abuse and spills of all sorts. They’ve resisted stains, and freshen up quite well after a general pill-pluck and washing with Eucalan. My only cautions on the Lion Fisherman yarn are that even washed it isn’t Merino-soft; and that my gauge of 4.5 spi worked but is a bit loose for it in garments. I think it would look better knit a tad more firmly as a true worsted.
WORKING REPORT – PONCHO WITH ATTACHED I-CORD
Messing around with the edging on the Waterspun poncho, I realized that I was using two different methods of attaching I-cord, and that "How do I work attached I-cord?" is a common question.
Recap: The first round of I-cord edging was applied to live stitches. Instead of binding off my last row of the poncho body, I left its stitches on the circs. Using a DPN and a half-hitch cast on, I cast on four stitches and knit one row of I-cord. On the second row, I knit three stitches, then did an SSK, working the last stitch of the I-cord together with one stitch of the poncho body. I worked this way, doing three rows of attached I-cord, followed by one round of "free" I-cord. This 3:4 ratio of attached rows:total rows kept the edging from being either gathered or ruffled. When I got all the way around my piece and had incorporated all of the body stitches, I grafted the live stitches at the end of my I-cord to its beginning.
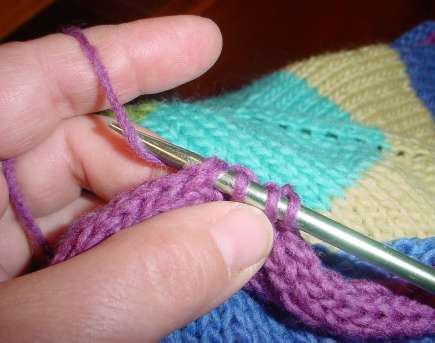
On the second round of I-cord I was not working with live stitches. Instead, I was picking up stitches along the outer edge of an established row of 4-stitch I-cord. On the previous round of cord one stitch was "eaten" by the attachment row. That left three to form the rounded edge. I used the centermost of these three as my line of attachment. To do this round of edging, I again cast on four stitches using half-hitches, and knit one row of unattached I-cord. Then I began working it onto the established round of edging. On the next row I knit two stitches, then did a SSK and picked up a stitch under both legs of the designated spot on the previouslyfinished I-cord. In this shot you can see the knit two, the SSK (under my thumb), and the needle thrust under the stitch of the existing I-cord, ready to do the pick-up.
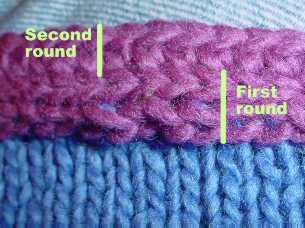
The reason why I didn’t use this method to attach the first round of I-cord is that theattachment rows of each method look different. Pre-block waviness aside, you can see that the first round of I-cord has a smooth chain-stitch like appearance to its bottom edge. The secondmethod produces an attachment row thatlooks rather like crochet, although you can’t see the non-crochet look rounded multi-stitch upper edge from this angle:
I prefer the speed of the second round’s style of attachment (less fumbling and shifting stitches between needles), but I like the look of the first round’s style of attachment. Note that the reverse of the second round’s style is a bit smoother and less leggy. Sometimes I work it around something clockwise instead of counterclockwise, so that the I-cord’s other side presents itself on the public side of my piece.
There’s another nifty use for this second method of attachment. You can use it along with I-cord or a lace edging to make a decorative seam, or you can use it for counterpanes or pieced blankets,multi-directional or domino-style knitting to joinmotifs or sectionstogether without sewing. More on using this for decorative seaming tomorrow.
GADGETS – STUPID STITCH MARKER TRICKS
I love stitch markers. I use them for just about everything – the more the better! I buy them like popcorn, and make or improvise as many as I buy. They infest my house and are always found while sweeping up, in between cushions, and in the dryer’s lint trap. In fact, I’ve got two little dishes – one next to the washer and one on my dresser, both there for the sole purpose of catching stitch markers at convenient points in the laundry process.
I prefer rigid markers to bits of string or contrasting color yarn. I find for me they transfer from needle to needle faster, and because I often knit without watching my fingers, are easier to spot by feel.
Here are some of the things I use as stitch markers from the catch-all on my dresser:

Clockwisearound the outside and spiraling in, there’s a beaded lizard made for me by my Tween-ager; several split rings and jump rings bought by the bagful at the jewelry findings counter of my local crafts store; some flat gold-tone beads with large holes, and a heart charm intended for use on keychains (same source as split rings); a paper clip; three home-made beaded markers; a yellow flat split ring marker; three more home-made beaded markers (small size); two Susan Bates white plastic rings; an ancient Susan Bates split ring; red and blue Susan Bates flat rings; two coil-less safety pins, and two small turquoise rings “liberated” from my kids’K’Nex building toy set.
I tend to ue the larger decorated markers as row end or abacus markers; and the plainer ones as repeat dividers, or to denote other spots whereI need to pay attention. I don’t have any problem using the stitch markers with the dangling bobs. I let them hang on the side of my work that faces me. Since I sometimes need to use my “third hand” when doing maneuvers like decreasing across a marker, the beads make convenient grabbing tabs for my teeth. (Confession:I feel sort of responsible for foisting the beaded marker fad on the rest of you. Back in ’94 or so I wrote a post to the ancient KnitList that described how I used broken earring bobs and necklace pendants as stitch markers, and was beginning to make singlets expressly for that purpose.)
I used to use the coiled split rings (shiny red, above) to mark individual stitches – usually to help count decreases or spots that needed to line up when a garment was assembled. It has been a long time since I’ve seen these coiled guys in the stores, so I’ve switched to using either jewelry split rings or the safety pins instead.
The one type of marker I absolutely detest is the pig-tailed yellow split ring. I bought them only once and don’t remember the brand name. Those cursed pig-tails seemed to look for an excuse to snap off. They also dug into my fingers as I was working.
Marker Use #1 – Decrease/increase counters
I’m a counting disaster. I detest counting rows. I’m forever losing those little barrel-shaped counter devices that sit on the needle or hang below it. I am also a Wandering Knitter, so I don’t always have a nice settled place to put a pad and paper nearby, nor am I reliable enough to remember to click off the rows on a katchaa-katchaa counter.For the same reason pegboards or counting stones aren’t for me (I’ve got a sweater that ended up with a sleeve eight inches too long because someone kept eating the M&Ms I was relying on as counting stones). I’ve even tried the flipping the string over every ten rows gambit, but ended up pulling out my string. I need to have a tangible reminder to do something, placed directly in my work so that I can feel it. Everything else gets lost, or forgotten. Therefore being the only idiot working on my knitting, I have used markers to idiot-proof my knitting world.
In addition to just sitting prettily between pattern repeats, or marking where one switches attention from chart to chart, I use markers to help me keep track of those pesky directions that say things like “increase every fourth row six times.” If that was my direction, and I’d decided to add my stitch by use a make one (lifted bar) increase after the first stitch of my row, I’d proceed this way. On the first row of my increase section I’d work my first stitch, then place a thin marker and after the marker was set – work my first M1. Then I’d place another thin marker and work to the end of my row. The next time I needed to add a stitch, I’d again work the first stitch of the row, move my marker over, do a M1, then work across the row I’d work along, only having to keep track of how many plain right-side rows were between increase points because ALL of my increases accumulate between the markers. When there are six new stitches between the markers, I’d know I’d done enough.
I handle decreases in much the same way. The first row of the decrease section I place markers before the first stitch that I’ll be decreasing away, and after the last stitch that will be decreased away. Then I work my rows, decreasing at the rate specified until my markers touch.
I’ve got another little gizmo that I’ve used to keep track of the how-many-rows between problem. I’ve made two over the years, but I can’t lay hands upon either one right now. They’re probably packed away in the storage cubby with the rest of my knitting stash, but here’s an illustration:

This is a length of chain links with two different color beads at each end. Red and green are nice mnemonics to set up start and finish, but any color will do. The links are large enough to admit the needle size being used. I made one of these with eight links and one with six. I prefer the one with six because I can use it to count up to 12 rows by using each link to represent two rows. There are VERY few patterns that ask you do do something every 12 or more rows.
The way I use my counting-chain is to substitute it for the first marker in my string of decreases or increases, right in line on my working row. The first row of the six-row decrease set, I put my needle tip into the ring closest to the green bead. On the second row, when I get up to the counting chain, I slip my needle tip into the second ring away from the green bead. Third row, third ring, and so on. In this case, when I got up to the sixth ring I’d know that it would be time to do my increase again, and I’d return my needle tip to the first ring after the green bead.
Now if you see someone selling these after today, know that you saw it here first; and remember I was foolish enough to repeat my mistake of writing about an idea beforepatenting it. [grin]
Marker Use #2 – In-Line Abacus
As I said before: I’m hopeless at keeping track of rows. I’m a lousy and lazy row counter, and manage to muck up every row-counting aid – including placing safety pins every ten rows or slipping a strand of contrasting color string back and forth every ten rows. Instead I use stitch markers as an in-work abacus.
This technique uses two or three stitch markers – preferably ones that are unavoidably different both from those put to other purposes in the work, and from each other. It works best for straight pieces of knitting without edge increases or decreases, or texture patterns that alter the number of stitches on the needle. It can be used in a piece with any of these, but you have to remember to compensate, or you have to place the markers in a relatively unperturbed area.
Let’s say I have a straight run of plain old stockinette worked flat, and I want to keep track of the number of rows I have knit. I decide which of my distinctive stitch markers designates ones and which designates tens. I knit my first stitch, place my ones-marker and keep working. On the next right-side row I advance my ones-marker two stitches to show that I’m in the middle of the third row. I keep going until I’m finishing the tenth row (it’s a wrong side row). At that point I remove my ones marker. On the next row (my eleventh), I work one stitch, place my ones-marker, then place my tens-marker and work to the end of the row. On the next right-side row, I work one stitch, keep my tens marker in place and advance my ones-marker two stitches. That shows I’m on the 13th row.
I can keep doing this for as long as required. Sometimes I need to introduce a hundreds-marker. Other times I move the counting markers in from the edge – mostly to avoid shaping increases or decreases, marking my point of origin with another distinctive marker that never moves. Using a point of origin marker I can even use my stitch marker abacus to keep track of rounds in circular knitting.
Of course there are disadvantages. Fiddling with the markers often involves use of that “third hand.” I haven’t swallowed a marker yet, but some have spun off to add to the feral herd of markers swarming in my house. I do find however that I am FAR less likely to forget to move a counting marker than I am to forget to spin a barrel counter, or make a notation on a pad. And unlike M&Ms – other people can’t eat my tracking device as I knit.
PROJECT – NO-MATH PULLOVER
A couple of failed start-ups ago, I was sitting in the cafeteria withthe company’sresident theoretical mathemetician. I was penciling out a new knitting project, and he was watching me shape the pieces and place repeats. I did a few simple calculations, ratios, slopes, division – nothing terribly complex, but he was impressed at the amount of math that was going into the design. So impressed in fact that he scoffed at the idea of pre-numerate people (meaning people who had no formal math education) coming up with complex patterns.
Now you and I both know that some prettyinvolved knitting went on for quite a while before modern math education took hold.Dr. Math and Igot into a discussion on the subject, and the outcome was I bet him that I could come up with a complex knitted pattern that was constructed using only simple counting. He took the bet. With a bottle of good single-malt Scotch on the line, I was off and running.
I decided to go further. I’d make a sweater that required no swatching, or gauge measurement to boot. I remembered an idea I had seen in a vintage Anna magazine, put out some time in the 1960s. I decided to give the method a try.
I fished some rustic Maine style wool out of my stash (Have Ewe Any Wool – I’d bought it at a Gore Place Sheep Festival the previous year). I knew from prior experience I’d be using a US #9 on this wool. I happened to have a set of 18-inch European 5.5mm DPNs, but I could have worked this on circs. Here’s the logic of my project.
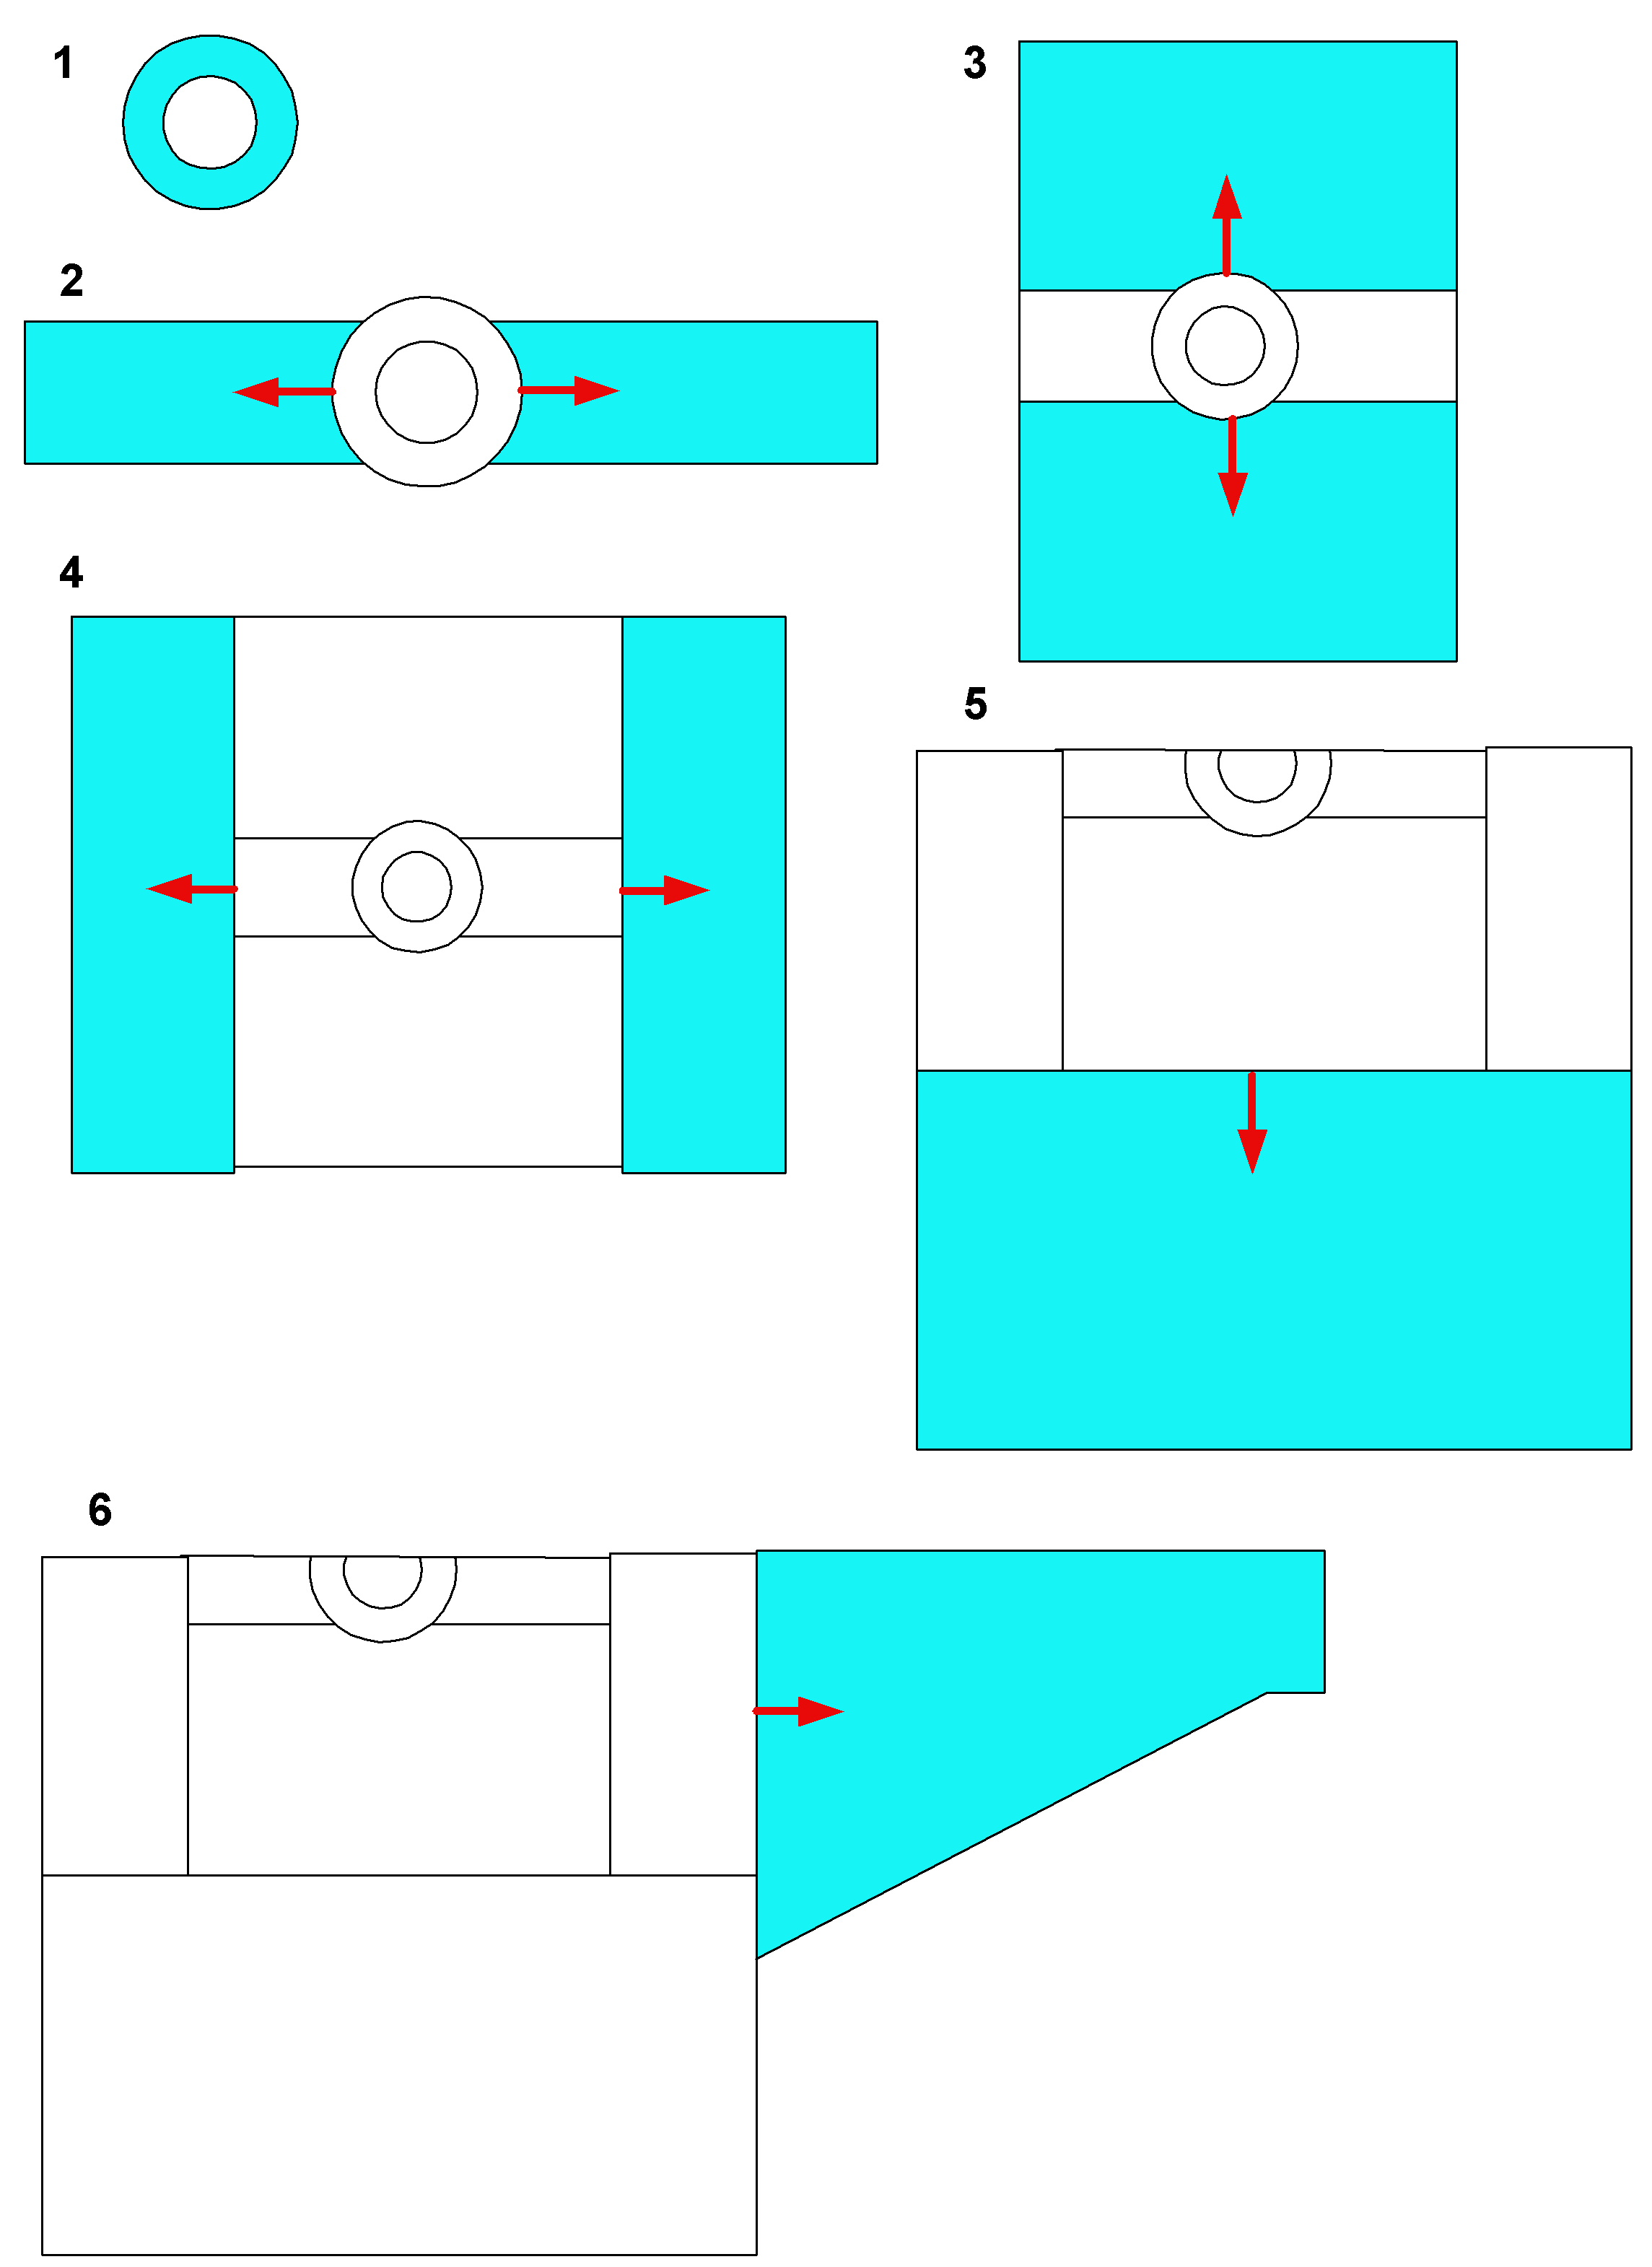
Apologies that some lines have been lost in the above diagram due to file re-sizing, but they aren’t dead-vital.
First in the round I cast on enough stitches to make the neck ribbing (Step 1). I worked them for about an inch and a half. Then counting from the point where I cast on as center front, I determined and marked the center back. Once that was marked, I counted out the center ofeach shoulder. I eyeballed the number of stitches I should use for the shoulder strip and knit out two epaulette-shaped pieces (Step 2), leaving the rest of the stitches on holders. I kept going,trying on the piece until I had a strip that was as wide as my shoulders. I now had something that looked like a bell-pull with a hole in the middle.
I put the live stitches at the ends of the epaulettes onto holders, and began the center front bib area. Starting around a hand-span’s worth of stitches in from the end of the epaulette, I picked up stitches along the sides of my strips until I got to the collar. There I knit across the stitches I had reserved, and picked up the same number of stitches on the other side of the collar. I knit down until I had a hanging piece that was about2 inches below my arm, placing the stitches on a holder instead of binding them off. I repeated the process for the back (Step 3).
Once the bib areas were done, I added width so that the upper body was wide enough to fit me shoulder to shoulder. I picked up the first “wing” along the side of the bib area, then worked across the live shoulder strip stitches, and picking up along the side of the second bib piece. I put these stitches on holders instead of binding off (Step 4).
After the upper body was done, I folded the piece along the shoulder line. I picked up stitches along the side of the first wing, worked across the live center bib panel stitches, then picked up along the side of the second wing. At this point I decided I needed to add more length, so I knit about another three inches in the flat before joining the front and back and switching over to working in the round. I continued to knit the body down in the round, working until it was the desired length, ending with a ribbing (Step 5).
I now had a sweater body with two holes for arms. I picked up along the edge of the arm opening along the little bit of body I just added before joining, then worked across the live wing stitches, finishing by picking up the remaining few stitches along the side of the other bit of late-added body. I worked the sleeve out to the cuff, doing double decreases at the bottom edge every other row until the sleeve looked narrow enough for comfort. I continued working it out as a tube until it was long enough (yes, I know the diagram shows decreases evenly to the cuff. Shoot me.). I ended off with some cuff ribbing. (Step 6)
Here’s the result:

I admit on beyond the method described above, I tarted the thing up a bit with some cables and texture stitches:

I used the Twin Leaf Panel from Walker’s Second Treasury (p. 235) for the centermost panel in the bib area. I framed it with an unusual eccentric chain link cable that featured an openwork detail. I thought I got that one from Stanfield’s New Knitting Stitch Library, but I can’t find it in there right now. I also used the same cable on the epaulette strip, continuing the design down the sleeve to the cuff. Plain 2×2 cables (mirrored left and right) frames the fancy-work areas on both the bib and sleeves. I did like the openwork detail of the eccentric cable, so I decided to introduce more openwork into the piece by using YO K2tog or SSK YO combos instead of the more traditional purl ground on which most cables float. That’s what makes the curious spines between the patterned panels. The rest of the piece is done in seed stitch.
So there you have it. I produced a visually complex piece using only simple counting. To determine centers, I counted in from the ends rather than divide. To place cables knowing their stitch count widths, I counted out from my center markers, and placed additional markers to indicate where they went. I did no other math of any sort, and did no swatching or gauge measurements either.
Did I win my bet? Of course. To be fair, it WAS a sucker’s bet.
The Scotch is now long gone and the sweater is now a bit stretched out, but the Bowmore canister lives on as a trophy, happily holding needles here on my desk at wiseNeedle Central.
YARN LABELS 101
A couple of people have written to me saying they also have problems with yarn labels. Here in the US, they’re not very standardized – especially compared to labels made for the European market. Here are some examples.
First, here’s a label for Harlekin, a yarn imported from Germany:
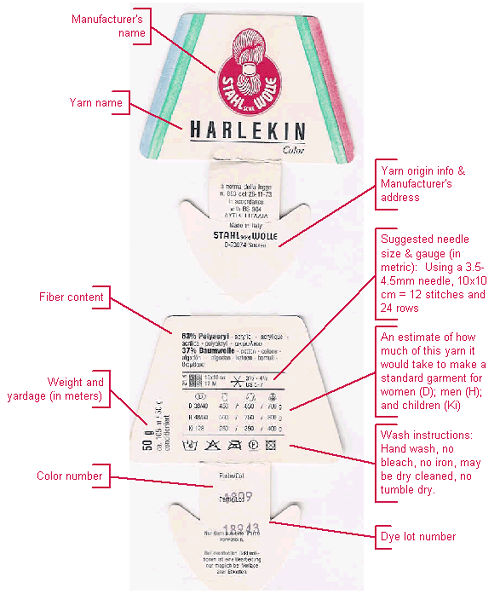
You can see not only a recommended needle size, but also a rough consumption guide for how much yarn it might take to make several different garments for average size men, women and children. Note the littlesquare shape with numbers above, below andaside it – that’s the gauge square, andshows how many stitches and rowsthe maker recommends for this yarn. It also has complete care instructions. This is pretty much the Cadillac standard of yarn labels in terms of the amount of information on it.
By contrast, here’s a label for a US yarn, made by a small producer (to be fair, it’s an old label, and current ones from the same maker might have more info on them):
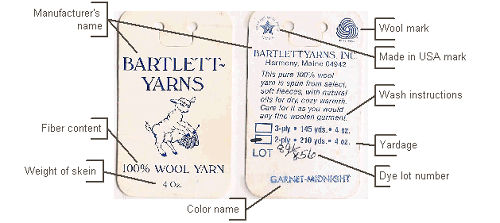
You’ll see that this label has yardage, but no gauge info; and wash directions are rudimentary at best.
Most yarns fall somwhere between these two. Here’s one that’s typical:
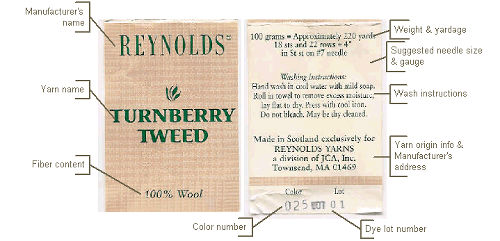
No little gauge square, but the info is there in prose. Good care information. Yardage and skein weight are also there.
There is a move afoot led by the Craft Yarn Council (mostly made up of mass-market yarn distributors and makers, plus some magazine publishers) to standardize on a new set of yarn descriptors for weight, and for those descriptors to appear on future yarn labels.
You might see markings like these:

While there is considerable weight behind implementaton of these symbols, frankly I think they are not worth the paper they’re printed on. The effort is a laudable one – to simplify the system of yarn designations, removing confusion from terms like worsted, DK, sport and the rest. But what they do is substitute a set of imprecise descriptors for the admittedly arcane but specific existing terms.
Here’s the chart of what each symbol means:
|
Gr. 1 |
Gr. 2 |
Gr. 3 |
Gr. 4 |
Gr. 5 |
Gr. 6 |
|
| Type of Yarns in Category |
Sock,
Fingering, Baby |
Sport,
Baby |
DK,
Light Worsted |
Worsted,
Afghan, Aran |
Chunky,
Craft, Rug |
Bulky,
Roving |
| Knit Gauge Range* in Stockinette Stitch to 4 inches |
27?32
sts |
23?26
sts |
21?24
st |
16?20
sts |
12?15
sts |
6?11
sts |
| Recommended Needle in Metric Size Range |
2.25?
3.25 mm |
3.25?
3.75 mm |
3.75?
4.5 mm |
4.5?
5.5 mm |
5.5?
8 mm |
8 mm
and larger |
| Recommended Needle U.S. Size Range |
1 to 3
|
3 to 5
|
5 to 7
|
7 to 9
|
9 to 11
|
11
and larger |
| Crochet Gauge Ranges in Single Crochet to 4 inch |
21?32
sts |
16?20
sts |
12?17
sts |
11?14
sts |
8?11
sts |
5?9
sts |
| Recommended Hook in Metric Size Range |
2.25?
3.5 mm |
3.5?
4.5 mm |
4.5?
5.5 mm |
5.5?
6.5 mm |
6.5?
9 mm |
9
mm and larger |
| Recommended Hook U.S. Size Range |
B?1
to E?4 |
E?4
to 7 |
7
to I?9 |
I?9
to K?10 1⁄2 |
K?10 1⁄2 to
M?13 |
M?13
and larger |
(source: Craft Yarn Council’s http://www.yarnstandards.com/weight.html)
For example, you’ll note that the old standard of DK – a pretty precise designation meaning 5.5 stitches per inch is now lumped into a broaderguideline that covers everything from 21-24 spi. That’s a TREMENDOUS difference, as true sport weight yarns cannot be successfully substituted for the heavier DKs. But magazines are printing patterns as being made from a Group 3 yarn. The way this symbol is so prominently featured leads beginners to believe that ANY Group 3 yarn can be used.
"Oh" you say, "they can’t be that naiive." Well they are. I’m not a yarn shop owner, but just in my visits to my LYS I’ve seen a good half dozen projects ruined by exactly this error. My heart really goes out to the folks who buy yarns sight-unseen on line, or people who shop in crafts stores for their knitting supplies. Neither venue offers hands-on help or the sanity check of dealing with another knitter face to face. Who knows how many people are abandoning projects (and knitting) in disgust because they picked out yarn with only the symbols for guidance andhave been disappointed.
My advice? If you’re a designer or yarn maker, tryresist the pressure to use this ill-conceived system. If you’re a knitter – ignore it. Look at the gauge listed (provided there is a gauge listed) NOT the yarn group. If you’re doing substitutions, plan on swatching. Lots. Start with the maker’s recommended gauge. Some yarns may perform well over a range of gauges, but not every yarn is guaranteed to achieve the full range of gauges listed in its newly assigned group.
