A couple of failed start-ups ago, I was sitting in the cafeteria withthe company’sresident theoretical mathemetician. I was penciling out a new knitting project, and he was watching me shape the pieces and place repeats. I did a few simple calculations, ratios, slopes, division – nothing terribly complex, but he was impressed at the amount of math that was going into the design. So impressed in fact that he scoffed at the idea of pre-numerate people (meaning people who had no formal math education) coming up with complex patterns.
Now you and I both know that some prettyinvolved knitting went on for quite a while before modern math education took hold.Dr. Math and Igot into a discussion on the subject, and the outcome was I bet him that I could come up with a complex knitted pattern that was constructed using only simple counting. He took the bet. With a bottle of good single-malt Scotch on the line, I was off and running.
I decided to go further. I’d make a sweater that required no swatching, or gauge measurement to boot. I remembered an idea I had seen in a vintage Anna magazine, put out some time in the 1960s. I decided to give the method a try.
I fished some rustic Maine style wool out of my stash (Have Ewe Any Wool – I’d bought it at a Gore Place Sheep Festival the previous year). I knew from prior experience I’d be using a US #9 on this wool. I happened to have a set of 18-inch European 5.5mm DPNs, but I could have worked this on circs. Here’s the logic of my project.
Apologies that some lines have been lost in the above diagram due to file re-sizing, but they aren’t dead-vital.
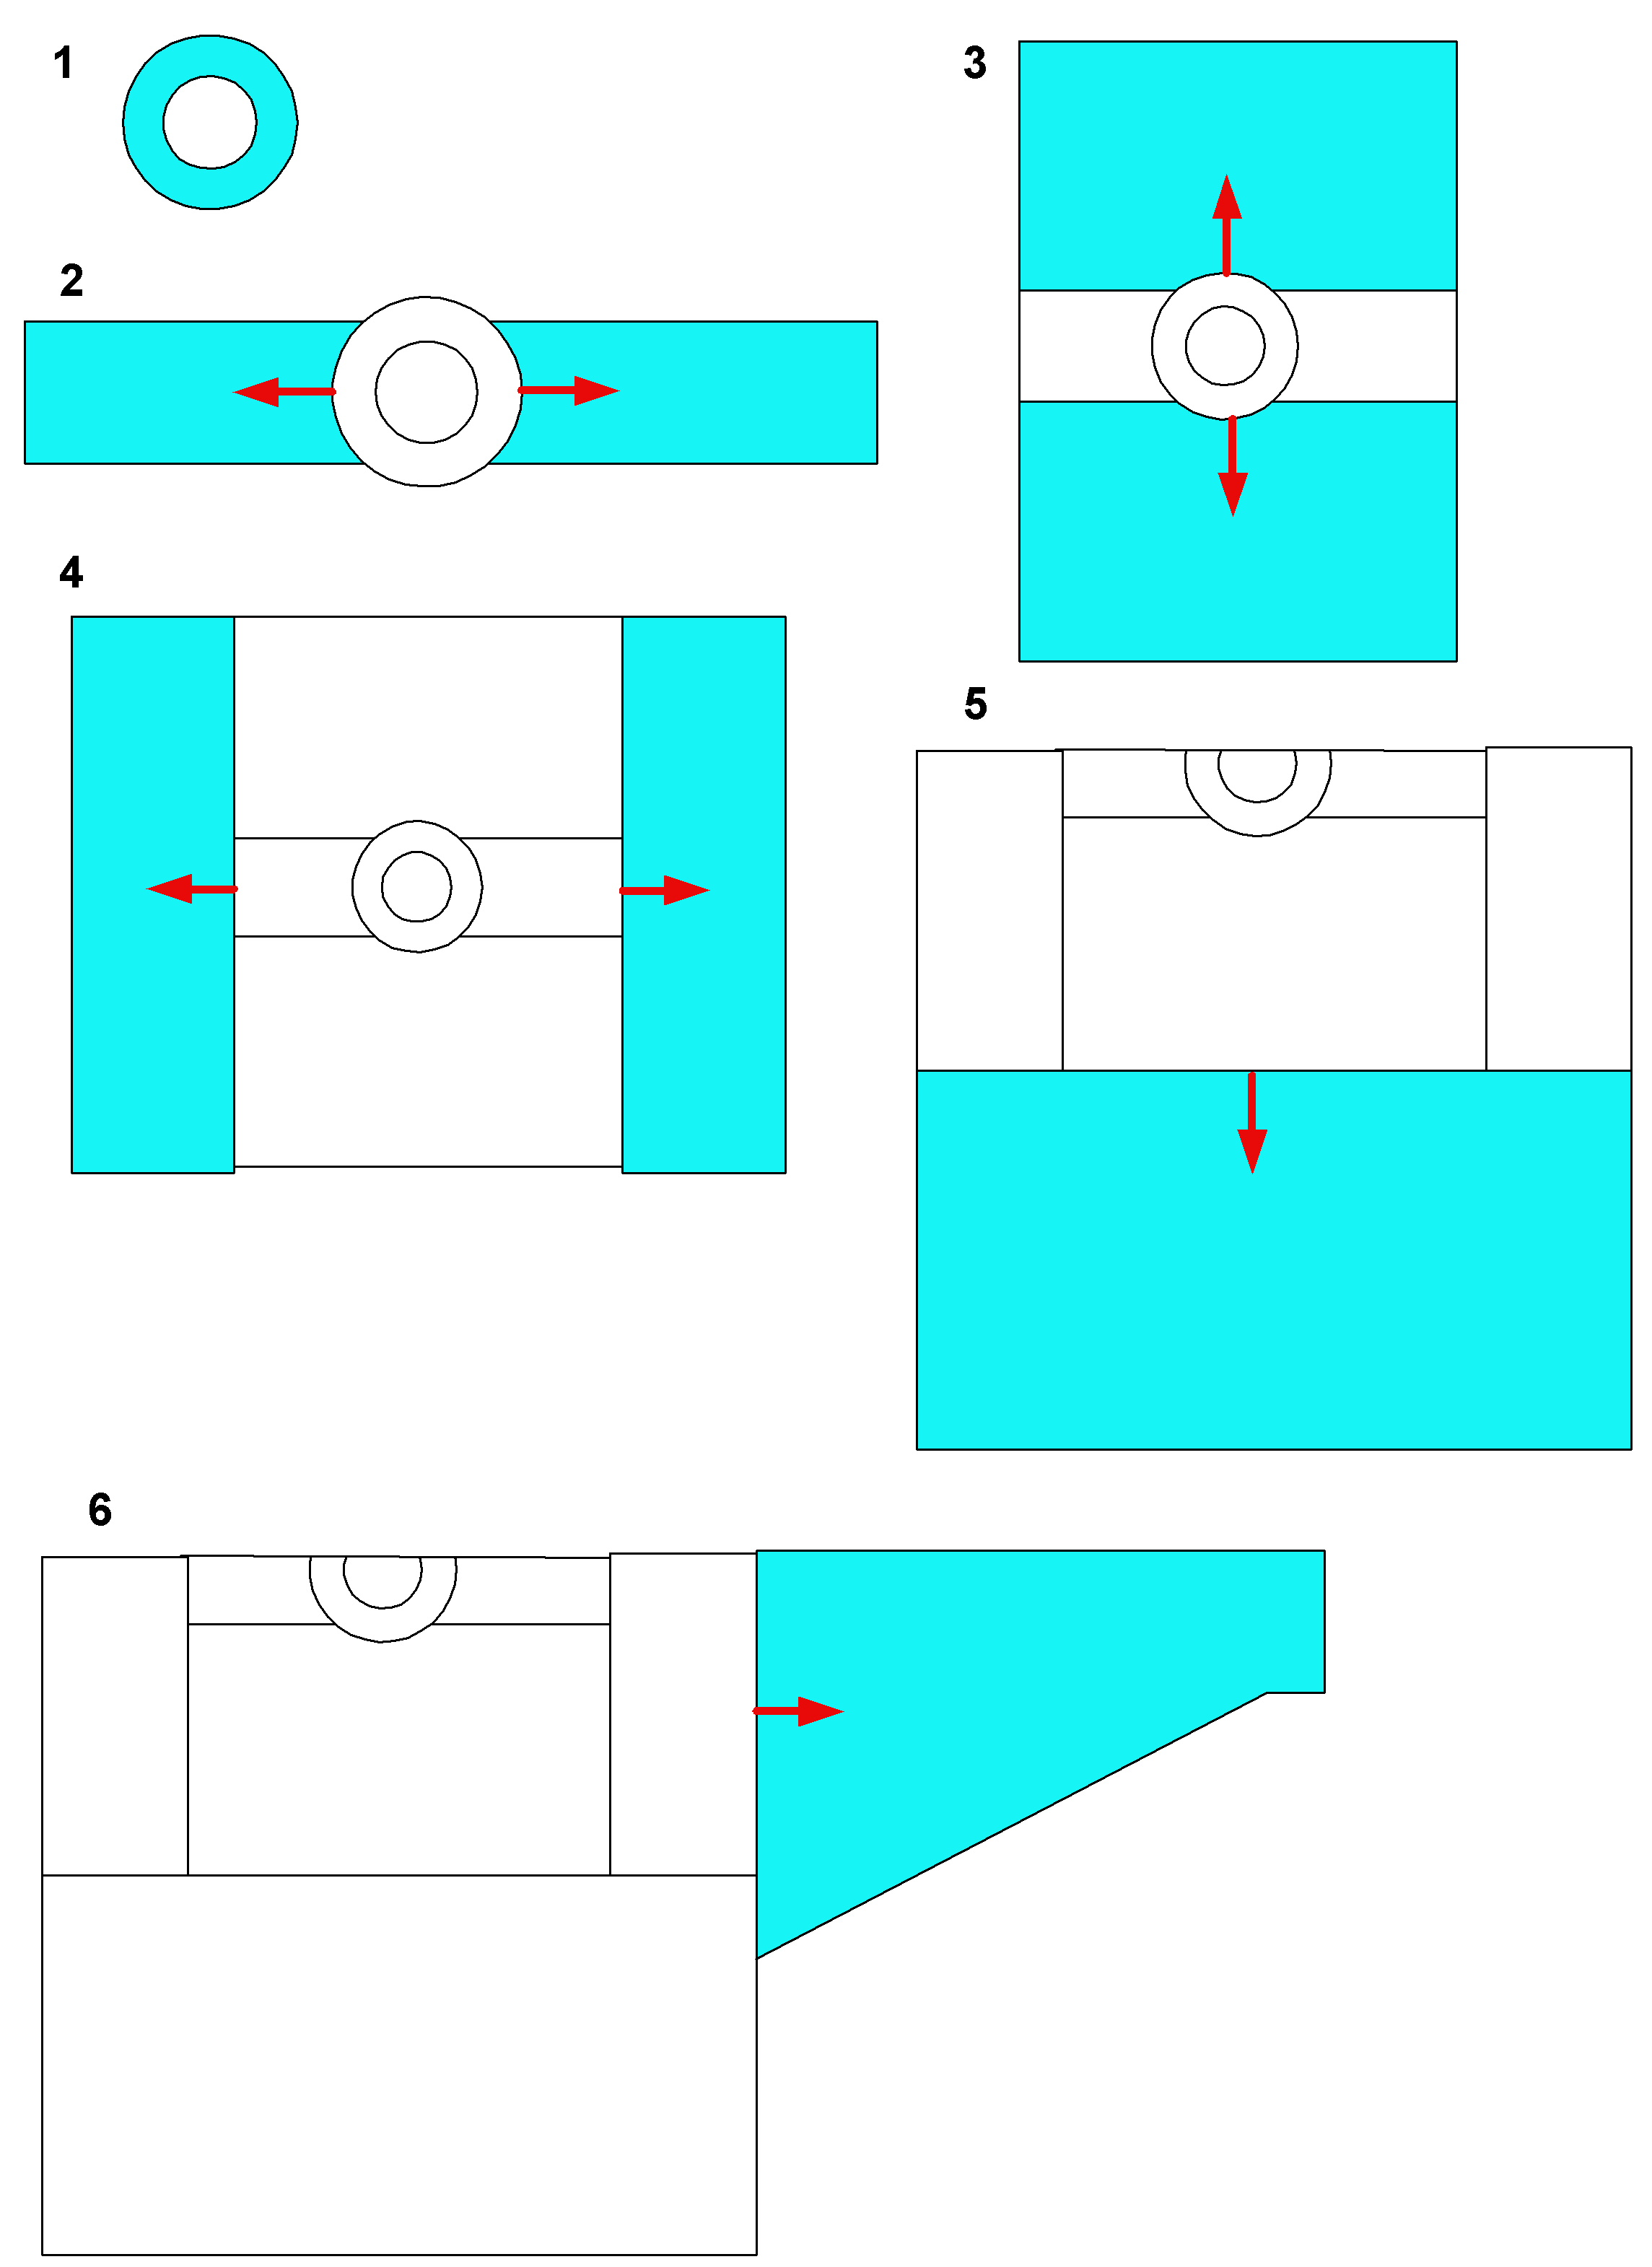
First in the round I cast on enough stitches to make the neck ribbing (Step 1). I worked them for about an inch and a half. Then counting from the point where I cast on as center front, I determined and marked the center back. Once that was marked, I counted out the center ofeach shoulder. I eyeballed the number of stitches I should use for the shoulder strip and knit out two epaulette-shaped pieces (Step 2), leaving the rest of the stitches on holders. I kept going,trying on the piece until I had a strip that was as wide as my shoulders. I now had something that looked like a bell-pull with a hole in the middle.
I put the live stitches at the ends of the epaulettes onto holders, and began the center front bib area. Starting around a hand-span’s worth of stitches in from the end of the epaulette, I picked up stitches along the sides of my strips until I got to the collar. There I knit across the stitches I had reserved, and picked up the same number of stitches on the other side of the collar. I knit down until I had a hanging piece that was about2 inches below my arm, placing the stitches on a holder instead of binding them off. I repeated the process for the back (Step 3).
Once the bib areas were done, I added width so that the upper body was wide enough to fit me shoulder to shoulder. I picked up the first “wing” along the side of the bib area, then worked across the live shoulder strip stitches, and picking up along the side of the second bib piece. I put these stitches on holders instead of binding off (Step 4).
After the upper body was done, I folded the piece along the shoulder line. I picked up stitches along the side of the first wing, worked across the live center bib panel stitches, then picked up along the side of the second wing. At this point I decided I needed to add more length, so I knit about another three inches in the flat before joining the front and back and switching over to working in the round. I continued to knit the body down in the round, working until it was the desired length, ending with a ribbing (Step 5).
I now had a sweater body with two holes for arms. I picked up along the edge of the arm opening along the little bit of body I just added before joining, then worked across the live wing stitches, finishing by picking up the remaining few stitches along the side of the other bit of late-added body. I worked the sleeve out to the cuff, doing double decreases at the bottom edge every other row until the sleeve looked narrow enough for comfort. I continued working it out as a tube until it was long enough (yes, I know the diagram shows decreases evenly to the cuff. Shoot me.). I ended off with some cuff ribbing. (Step 6)
Here’s the result:

I admit on beyond the method described above, I tarted the thing up a bit with some cables and texture stitches:

I used the Twin Leaf Panel from Walker’s Second Treasury (p. 235) for the centermost panel in the bib area. I framed it with an unusual eccentric chain link cable that featured an openwork detail. I thought I got that one from Stanfield’s New Knitting Stitch Library, but I can’t find it in there right now. I also used the same cable on the epaulette strip, continuing the design down the sleeve to the cuff. Plain 2×2 cables (mirrored left and right) frames the fancy-work areas on both the bib and sleeves. I did like the openwork detail of the eccentric cable, so I decided to introduce more openwork into the piece by using YO K2tog or SSK YO combos instead of the more traditional purl ground on which most cables float. That’s what makes the curious spines between the patterned panels. The rest of the piece is done in seed stitch.
So there you have it. I produced a visually complex piece using only simple counting. To determine centers, I counted in from the ends rather than divide. To place cables knowing their stitch count widths, I counted out from my center markers, and placed additional markers to indicate where they went. I did no other math of any sort, and did no swatching or gauge measurements either.
Did I win my bet? Of course. To be fair, it WAS a sucker’s bet.
The Scotch is now long gone and the sweater is now a bit stretched out, but the Bowmore canister lives on as a trophy, happily holding needles here on my desk at wiseNeedle Central.
