ALCAZAR – ROLLING ALONG
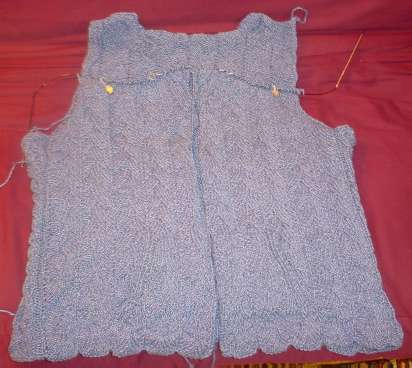
As you can see from this photo, Alcazar is on a roll. I’m almost done with the center square. If you’ve ever knit a shawl of this type, you’ll know that the center square usually goes quite quickly in comparison to the wave upon wave of outer design elements as they present themselves across an ever-increasing circumference.
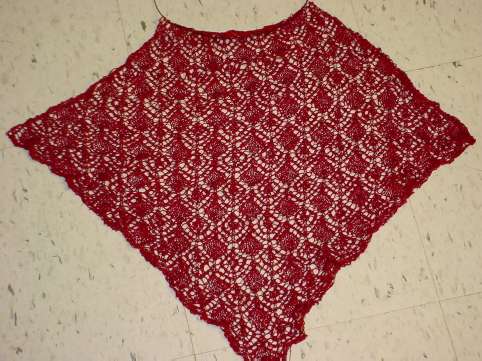
Unblocked and unstretched, my center is about 17 inches (43.2cm) square. Although the stuff I’m using isn’t very stretchy, I think it will block out to between 19 and 20 inches (48.2 to 50.8cm) square. A rough eyeballing of the pattern’s finished item photo gives me the estimate that the width of the finished center is approximately a third of the width of the entire finished piece. That makes me more or less on target to make a shawl that’s about 60 inches (152.4cm) across, tops. The pattern specifies a finished dimension of about 56 inches (142.3cm), so I’m in the ballpark, even though I’m using a very different yarn and a needle three sizes smaller than the one specified.
I did find one minor typo in the pivot format half-charts. On row 155, there’s a stitch marked as a SSK the first time you encounter it in the row’s repeat, S1-K2tog-PSSO through most of the rest of the row, and a K2tog the last time it appears on that row. It should be just S1-K2-tog-PSSO EVERY time it’s hit on that row. The full format chart doesn’t have this mistake. (I can’t comment on the rest of the full format chart, as I haven’t been following it.)?
ALCAZAR KICK-OFF; PIVOTS
Alcazar progress:
Hazel Carter’s Alcazar is another of her multi-page lace patterns that looks incredibly complex, but with a bit of care and attention, is not that hard to follow. It’s worked slightly differently than the Spider Queen, but follows the same sort of general logic. First a center panel is knit – in this case, from corner to corner on the diagonal; then stitches are picked up around the edges and the secondary layer is knit center-out. Finally an edging is knit onto the live stitches of the outer layer. One small difference – Spider Queen’s outer layer was knit one side at a time, and the four resulting trapezoids were seamed together at the corners. Alcazar’s pattern says that the sides may be knit separately like the Spider Queen’s, or they may be worked all at once by knitting in the round, thereby eliminating the corner seams. I suppose I could have done SQ that way, too, but it was my first large bit of rectangular lace, and I was deeply into beginners’ mode – following directions verbatim – because my understanding of the piece as a whole was so limited.
Also unlike the all-pivot format Spider Queen, some (but not all) of Alcazar’s charts are provided in full format in addition to her standard pivot format. The pivot format is sort of a shorthand notation very useful for symmetrical designs and multiple repeats. This idea isn’t unique to Hazel Carter. Embroidery modelbooks dating back to the dawn of publishing showed graphed repeats that could be mirrored along two axes to produce infinite strips of patterning. It’s a very useful trick that hasn’t caught on as widely as it might for knitting charts.
The picture below shows a single pattern row (of my own invention, not taken from Alcazar). You can see it has edge stitches plus several iterations of the main pattern. I could have graphed it up to show one full iteration of that center pattern, plus the edge stitches. That’s pretty condensed compared to the original. But it takes even less space to show it in pivot format – the tiny row below the long one.
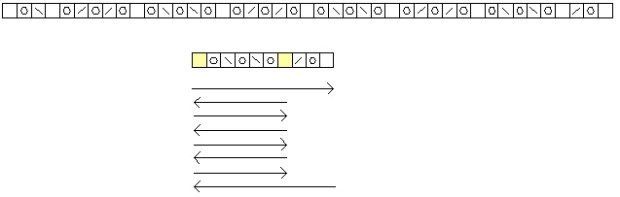
To follow the shorter row you’d start at the lower right, and work across to the leftmost stitch. That’s the first pivot point. I like to mark my pivot columns with a highlighter so that they’re easy to spot. When I get to that first pivot point, I pretend that stitch is a mirror, and begin to follow the chart back in the direction from which I just came. Work to pivot stitch. Work pivot stitch once. I keep knitting in the same direction, without flipping my actual piece over or making a short row, BUT I begin to follow the chart back in the direction from which I came.
Now, those among you who noticed that there were decreases in the first trip will wonder what to do about them on the "return." Mirror them. If they was a SSK on the march from right to left, THE SAME BOX will be worked as a K2tog on the march from left to right, and vice versa. This sounds like quite a bit of mental gymnastics, but it’s no more difficult to do than it is doing the conceptual flip to interpret the even numbered rows of a chart when knitting in the flat.
Another challenge – on my minichart below, on the first pass from right to left I sailed over a highlighted stitch. That’s a secondary pivot point. After I make my turn at the chart’s leftmost edge, I work back to the second pivot stitch, work it, then begin following the chart from right to left again – starting at the secondary pivot point.
I continue zinging back and forth between my two pivot points like an ant trapped in a demonic game of Pong until I have only the final few edge stitches remaining. At that point I "go through" the secondary pivot point and finish out my row.
Now. Why would anyone want to do this?
- Many people find it much easier to keep track of their place on a smaller chart.
- Charts for large lace projects can be unwieldy, this cuts down the bulk somewhat.
- Pivot charts highlight the logic of a piece, and make memorizing a complex row easier.
Your mileage may vary – you may find this all terribly confusing, and wonder why anyone would subject his or herself to such conceptual convolutions, but I like having yet another tool in my toolkit, ready to pull out when the need for it presents itself. If you’re lace-minded, you never know when you’ll need to graph a 300-stitch row, and here’s a way to do it if you don’t have access to a drafting program and a D-size plotter.
MARKING TIME (AS IF I HAD ANY)
Just a quick post today. I’m running around shepherding my kid to an awards ceremony (her poster was singled out in a competition run by the regional water authority); and getting ready for The Other Daughter’s birthday party this weekend. May is birthday dense in this house, with both girls and I all inhabiting the last couple of weeks of the month. It’s hectic to say the least.
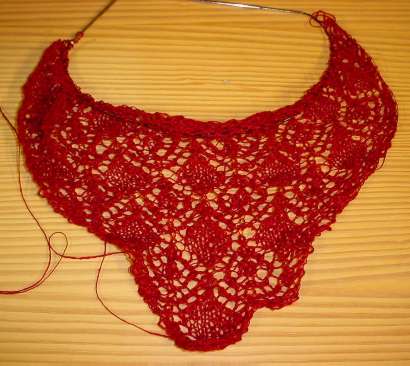
I’m surprised that there hasn’t been more written about Alcazar on the Web. I suspect it’s because its photo doesn’t display as well in small format. For example, the outer edging on the sample piece is done in a darker color yarn. It’s difficult to see. As a result it hasn’t attracted as much attention as its showier sisters. While I’m sure that lots of other people have knit it, I suspect that I might be among the first to blog about it. So far it’s quick. I’m another iteration of the base pattern into the thing. I suspect that mine will be considerably smaller than the five-foot diameter piece one gets by using the recommended yarn and needle size. But no matter…
No progress today on Rogue. I’m still waiting for those golden moments needed to decipher where the heck I am. Sigh.
IT’S A SICKNESS…
Yes, I know I have to finish my Dragon Skin Rogue. If nothing else, the cow eyes staring at me each night it remains undone are enough of a goad (and today’s her birthday, too.) But I’ve got to find a nice, quiet slash of time to re-mount all those wounded stitches, and then figure out where I am on each side of the cardigan front so I can bring them back into sync. It’s not something that I can do in stolen ten minutes here and there as other things twirl around me.
But I CAN follow a chart in bits of looted time. Even complex charts. So to keep my hands busy while I’m waiting to unravel the mess that’s become of Rogue, I’ve started something else. My little, inconsequential time waster?
Hazel Carter’s Alcazar.
I bought the pattern a while ago, at the same time as Spider Queen, so I could decide which one to do first. I’m using the red rayon faux-silk I got at Webs:

While it has sheen, it’s hand is more like unwashed linen. A bit stiffer and less springy than silk. No where near as drapey as wool, but less spongy and heavy than cotton. There’s also a bit of an imitation raw Thai silk thick/thin thing going on, too. Enough to give the piece a less formal look than would a smooth finish thread.
I’ll do up a bit more and see how I like it. Possibly binding off what I’ve completed so far as a swatch so I can do some wash testing. I can say so far that I’m using a smaller needle than the pattern calls for. The rayon has no halo, and is very compact, so it looked too sparse on a US #8. I’m down to a US #4, and it looks good. It will probably end up being smaller than specified, but I really don’t mind.
So far the knitting’s easy. Carter’s charts are exceptionally well done and (provided you’re chart-minded) not difficult to follow. I prefer her pivot charts to full graphs. I take a highlighter and hit the pivot column, stick the thing on a magnet board, and I’m off and running.
New pix tomorrow of both the larval Alcazar and of the pivot concept, when Blog City has finished their hardware and systems upgrade.
QUESTIONS – WORKING NOTES AND BLOCKING THE SHAWL
?People are asking me for the Paisley Shawl’s pattern source, why/how I blocked it and final dimensions.
As I’ve mentioned before, the center part of the shawl up to and including the wide paisley border is Evelyn A. Clark’s?"Paisley Shawl" from the Spring 2005 edition of Interweave Knits. The outer border, including the double column of eyelets joining it to the shawl’s body is original. I’ve shared both the process I used to noodle it out and the final pattern here on String. The yarn I used was Helen’s Lace from Lorna’s Laces. My shawl, including my additional edging took about 80% of my skein. There’s enough left over for (perhaps) a small lacy ascot or scarflet.
I used US #5 needles, starting on DPNs, but quickly moving to first two circs employing standard two-circ methods, then one circ when I had enough stitches to go around the circumference of one. I could have kept on going using the two-circ method, but I’m not a big fan of multiple dangling needle ends, and the fine lace yarn was easy to manage even after the shawl grew larger than the circumference of the one needle. I worked the edging on one DPN and one point of the same circ that was holding the bulk of the shawl’s stitches. It took me less than a month to make the entire thing, including designing the companion edging. I’d say I did about two weeks of casual knitting of about an hour a day, plus five days of intensive vacation knitting (three or four hours per day).
Blocking
I did a quick and dirty block. I didn’t even use any pins. Instead of running the wires at the base of the edge triangles then pinning each one out separately (the thorough way), I opted for a less labor intensive method.
First, I gently hand-washed the shawl. While there was some minor bleeding of magenta into the wash water, the piece’s colors didn’t muddy or change, and there was no bleeding onto the blocking towels. Then I laid out my towels and threaded the points of the damp piece onto the blocking wires. I made sure never to run the wires under just one thread. Instead I was careful to pick up the entire point-end stitch. Then I teased the wires into a square, using the friction of the wet wool on the terrycloth towels to hold the wires in place. The whole thing took maybe two hours to dry, tops.
The down side to my quick and dirty method is that my basic saw-tooth edging was distorted a bit, and the points ended up (mid-block, anyway) looking a bit more like equilateral triangles than the shark-fin shape they’re supposed to have. For the record, I do note that as the points relaxed post-block, they reverted a bit to their native shape.
Yes, if this were a more important piece I’d have done a more meticulous job of blocking. But for the purposes of this project, my approach was good enough. The final (relaxed, post-block) dimensions are about 40"x40" (120cm square).
Lessons Learned
This started as a special request gift – a lace shawl of a size practical for regular winter wear with a jacket, preferably in purples and blues. I found the yarn and tried to force it around a pattern I had wanted to do for a while. While the pattern looked great and the yarn looked great, they didn’t work together. ?Conclusion – If I want to use it for some sort of lace, unless a hand-dyed or multicolor yarn has extremely short or extremely long color runs, I’m better off sticking to a texture pattern that’s mostly solid ground pierced by eyelets.
The two-circ method can be used for flat pieces knit around their circumference in addition to being used to knit tube-based items. Absolutely. Worked great. This wasn’t the first time I’d tried this. My Waterspun Kids’ Poncho also used two circs, but as I was working that – even though it was mesa-land flat – my mind was thinking "poncho = tapered tube," and not "poncho = tablecloth with hole in center." One caveat – the corner where the needles meet is just as stressed as a corner where two DPNs meet. Perhaps more, as the long lengths of the two stitch-loaded circs can lever themselves into all sorts of odd configurations and apply more force to that juncture than can two short DPNs. Care needs to be taken that the stitches at the needle junctions aren’t distorted. This is especially true if there are YOs involved.
Not every project needs to be executed with the fanaticism of a full-bore perfectionist. You may disagree or you may scoff, but for me – this was a valuable lesson. I tend to over-agonize about my knitting. Sometimes I end up squeezing all the fun out along the way. I decided that this project was for pure relaxation. The pattern was very simple, and required very little thought on my part to execute. Even the edging wasn’t that hard to noodle out. In fact, writing it up for String took more time and thought than did working it. There are some mistakes in the thing that I didn’t catch until much later, but I didn’t rip back and start again. I didn’t agonize over blocking either. All in all this one was easy, fast, and very relaxing. So I repeat the most valuable thing I learned from the whole thing: Not everything is an heirloom. Just have fun.
PAISLEY SHAWL -TAA-DAAAH!
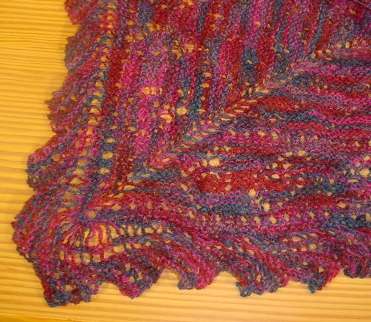
Thanks to the sixth (seventh?) cool, rainy weekend in a row, the paisley shawl has been blocked. Here it is on the blocking wires atop a pile of towels on my bedroom rug::
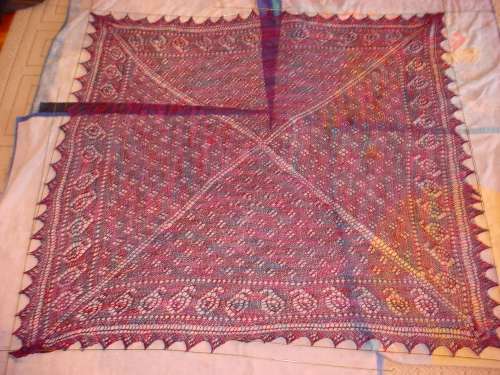
The strange blue triangles behind it are the printed sides of my beach towels. I wasn’t as neat about putting them down as I should have been. This flash shot also kills the colors somewhat. They’re brighter and more varied than this washed out photo shows.
You can see the paiselys, the quad-flower eyelts in teh piece’s center, and that each pint bears the same quad-flower. I also like the way the diagonals from the center are echoed by the edging’s join. I think it worked, even if my photography skills are too lame to document it well:
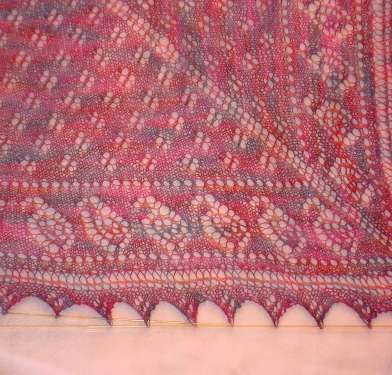
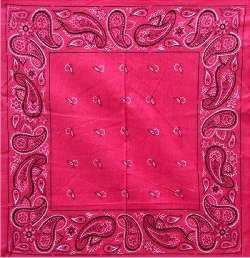
Now you can see why the thing reminded me of a bandanna. It’s got the same sort of all-over patterned center, with a bold paisley border all around the edges:
DON’T FENCE ME IN
Finally. A sunny morning. As you can see below, last weekend we ripped out the offending white picket fence and weedy, rotten bushes that marched along the front of the house.
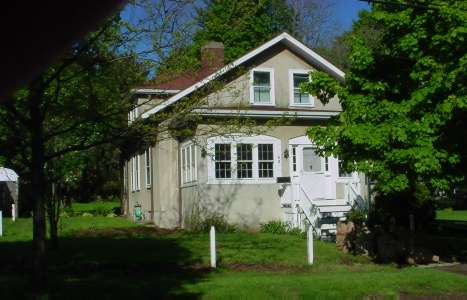
You can see the little perennial garden at the side now. The tree in that garden is the infamous Kamikaze Robin ash. Compare with:
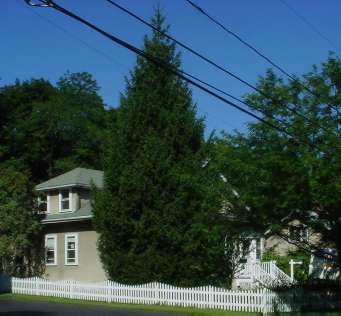
We also had the big spruce leaning on the house taken down, the roof redone and the copper downspouts replaced. Plus I spent a month last summer fighting stucco-destroying ivy. (It’s back. Time for round two.)
Why anyone would have wanted to fence this house in is a mystery to me. Although the property looks large, it’s actually pretty small for a house of this size. The fence – in addition for being just plain architecturally wrong for the place – made it look smaller. It also cut the house off from the neighborhood and made it look like a withdrawn dowager, the kind of place the looney lady up the block lives in, that no kid would dare visit for trick or treat. I may BE a looney lady up the street, but I don’t want to be a scary one.
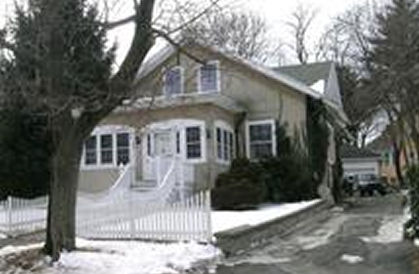
Now here’s a photo the real estate agent would have died to have been able to present:
(The lawn in the foreground actually belongs to the neighbor, my line is at the edge of the driveway.) Compare this one to the best they could manage. Granted, it was taken in February, not the best time of year for Massachusetts house photography:
We dig out the remaining fence posts this weekend. Next is to paint the trim. Perhaps echo the roof’s red in some of it in combo with the white window frames. And turn some of the semicircular scar where the spruce was into a little garden, perhaps with blueberry bushes up against the house, and lower perennials in front. Also, I’m still not sure what to do with the built-in signpost by the front door. Half of me says build a custom hanging flower box for it. The other half thinks that’s too kitschy cute and wants to cut it down to match the newel post on the other side of the steps. We’ll see which half wins.
PASSION AND GUSHING; KID REPORT
O.K. I’ve gotten quite a few notes disagreeing with the opinion I posted on Friday. That’s fine.
Don’t mistake me though. I’m not against passion or enthusiasm. Both are part of falling in love with a hobby, craft, or other pursuit. Passion is great. It’s the fire in the furnace that feeds us all. To torture the metaphor, mindless gushing is the annoying component of the fire’s smoke that hurts one’s eyes. Sure, tell the world how much fun you’re having. But if you want people to 1) read your comments; and 2) take you seriously, try to limit the LOLs, the "me-too-ism" and group-think, the over-use of "!!!," all caps, the run-on sentences, and mindless statements like, "I love it SOOOOO much, I’m dying." A blush of enthusiasm is like spice; too much is overpowering and swamps any content you may wish to convey.
Kid Report – Learn to Knit Afghan
The Larger Daughter has just started a new knitting project. She’s already done several foofy scarves, a felted bag, and a pair of fingering weight wristlets. She wants to learn a bit about things beyond basic knits and purls. To do this, she’s going to march through Barbara Walker’s Lean to Knit Afghan Book.

Walker presents a series of patterns for squares that can be assembled into a blanket. Each square is for a different texture or colorwork pattern. They’re (more or less) arranged in a sequence, with each new square introducing a new skill or technique. If you work your way through the entire set you’ll have experienced a wealth of styles and stitches, and will have gained valuable experience in following knitting directions.
Yes, one could compose a project like this on one’s own – taking stitch dictionaries and selecting interesting patterns from them. In fact all of the stitches in the Walker book are in either her own stitch treasuries, or in her other books. The advantages of having them in this one volume are portability of the directions (no lugging around a suitcase of books to choose the next square); having the repeats and cast-on numbers pre-calculated to produce a set of (mostly) same size squares; and having the lessons presented in a logical order, with new skills building on previously learned skills. There are other people who have or are writing about this project on the Web. /p[eu]rls of wisdom?/ has been blogging the project, and has a particularly nice set of finished squares up for the enjoyment of all.
The Larger Daughter is going to make her blanket from many shades of green, accented by cream and possibly another framing color to be chosen later. She’s using Cascade 220, 100% wool, and is knitting on US #6 needles. She’s on Square #1 right now – plain striped garter stitch, and is breezing through it. My role in this is to stay on the shelf as a benign source of last-resort help, not interfering unless she’s got a specific question. That and buying the yarn, of course.
MUSINGS
Again sorry there are no pix of the mid-block Paisley Shawl. Last night was a blur of my own take-home assignments, kid homework, and general domesticity. I didn’t have time to pin the thing out.
I did however have time to take up the Rogue again. I’m several rows further along, but not enough to merit a new photo. But it’s been about a month since I showed it, so here’s the last picture:
It continues to be a satisfying piece on which to work. Aided by my bargain basement improvised magnet board, I was able to pick up exactly where I left off. Which is a good thing because one of the leading causes of projects languishing un-done around here is that I put them down to work on another more pressing need, and forget what I was doing when I have time to resume work on them again.
In a way, this blog has been very helpful, too. I never thought to keep a knitting journal – too much work and too much time that could be spend actually knitting. But I’ve found myself going back a couple of times to look at previously posted entries on String, in an effort to figure out where my logic went wrong, or to see details of a past effort.
On the new project – you guys are a pack of evil enablers. I received quite a few notes telling me to toss rationality and obligation to the winds, and knit whatever would be fun. I might do that, or I might advance the "two summer tops for me" line item up the must-do list.
I’m finding myself in need of some wardrobe augmentations for my new job. A couple of three-season tops would be A Good Thing right now. Plus, I just received the Sweater Wizard 3.0 upgrade. I think it needs to be stress-tested. I’m thinking 3/4 sleeve pullovers, with something interesting going on, but not too lacy to wear without a camisole; maybe some waist shaping or bust darts in there somewhere to make them less boxy. Just the sort of thing to wear with chinos or black slacks in the back room cubes of a relaxed dress, high-tech company, in the work pod underneath the air conditioning vents. (Aren’t all cubes underneath air conditioning vents?)? My Taco Coat – The Sweater That Thinks It’s an Afghan – is already there, helping to fight this year’s unseasonal Spring chill.
As for yarns, I’ve got a couple of lots sitting in stash waiting patiently for attention. Among them are some particularly vibrant deep burgundy worsted weight cotton, and some light violet hand-dyed beaded cotton – also a worsted, leaning towards Aran weight. I wish I had more sport-weight cottons as I find them more comfy for multi-season layering, but not enough to make me go out and buy some.
CORNERING
I did the first corner last night. It worked out more or less as I expected. My last motif ended within a stitch or two of the corner (I think I overlooked a couple of the K2tog-psso spots, otherwise it would have ended up exact). I then worked an extra repeat squashed into the three cornermost stitches, fudging the attachment points. You can see that the base of that repeat is slightly thickened, but that’s not very obvious.
The squish-stretch around the corner accounts for the oddly leggy appearance of the double yarn over column. Most of that should even out in blocking. Now all that’s left to do is to carry on and finish the remaining 2.75 sides. Maybe on the next lacy project I knit I’ll work out how to do mitered corners. That sounds like fun, too.
More questions:
Why do you do the K2tog-psso bit when joining?
Because the stitches are wider than the rows are tall, and I’m working my edging perpendicular to the direction in which the body was knit (that was done center-out). I need to even out that ratio just a tad as I go along. If I were to join my edging with K2s only (remember, that means one edging stitch joined to one body stitch) the edging would be more stretched around the perimeter and I’d get more cupping of the interior piece. Another way to even everything out is to knit the functional equivalent of short-rows in the edging, making free rows every now and again that aren’t attached to the body. I do this if the edging is VERY wide or unstretchy compared to the body, but it wasn’t necessary for this little bit.
What makes a hand-dyed multicolor yarn work in a lace project?
I wish I could say that I know a flat-out answer to this one. All I can do is report on what I look for. First, the color set should be tonally close, like an impressionist’s palette. Big contrast makes it much more difficult. Second, (surveying my scars from the Birds Eye experiment), the color has to take the center stage, not the lacy pattern. I now look for something that has acres of ground punctuated by lacy bits if I’m using a multicolor. And third, the more broken the color patterning or shorter the repeat, the more it fights with the texture pattern. This particular skein sort of pooled a bit. Stripers pool even more so. Too much pooling however can overwhelm any pattern. But even those yarns can be tamed. The feather and fan or old shale variants are especially forgiving, and can often be used for savagely aggressive multicolors that fight with any other texture.
Finally for hand-dyeds of all gauges, skeins with very short color splotches that make a tweedy appearance when knit up are the most difficult to use in combo with a texture pattern. Those I prefer to use either in plain stockinette, or in combo with an coordinating or accent color.
Do you like garter stitch based lacy patterns?
To be truthful, I prefer the look of a stockinette ground for solid color lacy work. But garter works well for this particular pattern and with this multicolor yarn. Garter stitch breaks up pooling colors and tames hand-dyed yarns because the garter ridges introduce the color of a later row into a previous one, blurring the boundaries between hues.
