WORKING REPORT – FILET OF DRAGON
Back on line after a hectic day yesterday, I report my progress to date:
I’ve finished the panels right and left, and have come to an embarrasing moment. It’s STILL not wide enough. I mis-measured the window opening. I need to add about four more inches left and right, plus about an inch top and bottom (I knew about the inch top and bottom). You can see the beginnings of the frame or additional width at the leftmost edge.
Now for an exercise in logic. I can’t just continue by crocheting a solid band all the way around the edge, then working the filet mesh out from there. The proportions of the individual blocks are not square. They’re sort of squat – wider than they are tall (remember I worked side to side). If I were to proceed in the perpendicular direction for the top and bottom, I’d end up with ruffles because I’d be trying to stack the wide edge of the new blocks aong the narrow edge of the old ones.
I’ve gone through all my filet references, plus what I’ve been able to find on-line an din the library. So far while many cover adding on open or filled meshes to make non-rectangular edges, describe adding filetaround four edges ofother stuff as an edging (think handkerchiefs), or briefly discuss adding a plain rim of DCs to frame the piece as a whole, none mention adding filet as an edging onto OTHER non-square filet.
So. What’s to do? Right now I’m in hard think mode. I’ve got a couple of strategies:
- Add my left/right width, but do so without allowing for a framing motif (make the left/right additions equal to the entire width I’m short). Work the top and bottom as two narrow vertical strips attached to the body of the piece by sideways doubles, in effect, fudging a row of mesh.
- Add left/right width, minus width of frame. Figure out a frame on the exact count of the piece, working the top and bottom as strips, above.
- Find even smaller hooks and experiment until I find one that gives me the right width stitch, then experiment with doubles, half-trebles and trebles to see if I can approximate the proportions of the body mesh. This last option brings further complications. How do I handle the corners if I travel around the entire piece, row by row? I experimented a bit with mitered corners using a diagonal bar. It looked sloppy. Stair steps? Hmmm.
So far it looks like #1 or #2 will be the way to go. Advice from Filet Experts is eagerly sought.
STRAKER PATTERNS, TORONTO STAR
Straker Patterns
Catching up on some blog reading I noticed that Knitting Curmudgeon mentioned cutting her teeth on Penny Straker patterns. Add me to the list! Strakers were what I learned on, too.
They were among the first "yarn independent" patterns published. Even the black and white cover pix went a long way to encouraging knitters to make the things up in their own choice of colors. Like KC, as a new knitter I found the Straker patterns to be great learning aids, because most of them had little fold-down knitting tips and tricks panels on the side. One I especially remember was a how-to on tubular cast-on. I use that technique as described on the Straker panel to this day. That’s not to say the patterns are spelled out completely -instructions like "make left side to correspond to right, reversing shaping" were used, but as a beginner, I found them to beclear and easy to follow.
My first complete sweater was a Straker. I don’t see it in her new on-line catalogthough. It was sort of a collared baseball jacket shape, done entirely in a bumpy raspberry texture (trinity stitch?). My reasoning went that even if my stitches were uneven, no one would notice in that bumpy surface. It worked. I wore my raspberry sweater (knit in a mulberry purple) for years and no one ever noticed it as being a first attempt. After that I went on to make a couple Eye of the Partridge sweaters, a couple of Fair Isle yoke sweaters (there used to be a pullover in addition to this cardigan. (I did the first chart as-is, then created my own chart for the second). Over the years I’ve also done her Shalor Aran, Gretel, Innisfree, but none recently until the Inverness Gansey I did last year.That project was the most fun I’ve had with a commercial sweater pattern in a long, long, time.
If you’ve never tried a Straker, I’d encourage you to take a look at the line. You can still find the older editions lurking in local yarn shops, including patterns that are not in the current line of updated reprints. My only caution on the older editions is that armholes fit far more tightly when these patterns first came out, and the earlier editions only range in size up to about a 12/14. I’m delighted to see the new website, and hope that in addition to rehashed older (but timeless) patterns, we’ll see some new designs as well.
Toronto Star from 1945
In other Web-walking I zipped through Boing-Boing. You never know what will turn up there. I found a link to the Toronto Star’s 1945 edition. The entire year’srun is now full-text searchable: http://www.pagesofthepast.ca/Default.asp.
Being an insomniac by nature, I decided to search on "knitting."
Page loading is very slow, but hits abound. I had hoped to find detailed descriptions of war-related knitting efforts, perhaps even some patterns. Instead I found lots of ads for imitation leather knitting bags and yarn (Angora, 59 cents per ball); classfied employment ads (apparently there were several knitting mills in and around Toronto at this time); and many, many passing mentions of knitting in other articles. The Star also had its own needlework department(!), and many of the ads were for patterns that were available for a fee by mail from the paper’s own offices.
The most frequent mention was of course troop knitting, mostly in a recurring column entitled "Women’s War Work." Every ethnic-membership service club, religious or church/synagoguegroup, civic association, recreational club and school had at least one charitable knitting and sewing circle. Sometimes more. Meeting notices included reports on shipment schedules, places where yarn and/or instruction could be obtained, and kudos to specific chapters or groups that had sent off exceptionally large donations. Women’s obituaries were another leading source of knitting mentions, with many mentioning exceptional skill or prolific generousity even in the face of lingering illnesses or extreme age.
In the news pages, I noticed thatknitting was used as a metaphor for domesticity. I came across mention of a woman elected to office. She was shown knitting as she waited for the election returns (early May?), perhaps to show that she was still a real woman in spite of her political ambitions.Grating in toneto be sure, but itwas 1945. There was also a human interest story on a returning wounded soldier – an unmarried manwho adopted an orphaned baby he rescued. Again to illustrate his commitment to hearth and home, he was shown awkwardly knitting booties for the little guy. (some time in April)
I did find one letter to the editor around April that bemoaned the fact that for all the effort expended by women on the home front covering home and work responsibilities, and doing tremendous volunteer work (especially knitting and sewing for troops and refugees), that very little recognition of that effort was taking place. Looking over the paper as a whole, I’d have to agree. Mentions outside the group reports are rare, and even the Women’s War Work column has a distinctly patronizing tone.
Other mini-articles include reports that the former Vichy Chief of Government, Pierre Laval fled to Spain after the fall of Germany’s occupation of France, and a depressed and broken man was spending his time knitting to quiet his nerves (7/24); the wife Clement Attlee,the newBritish Prime Minister whiling away her time waiting to meet the King by knitting (and worrying about how to run 10 Downing Street)(7/27); andcustoms of a local Hutterite community that forewent use of modern conveniences, citing their women’s quaint custom of knitting socks in any idle moment, using tin pails suspended from the wrist to hold their yarn (8/20).
I have to admit I bottomed out around the end of August and didn’t go any further. So if you’re interested in combing through for more bits, that’s a good place to start. The most interesting mentions are listed as News or Editorial. Local News is mostly reports of group meetings, Life/Fashion/Family mentions are almost always ads for mail order patterns. Business mentions are the goings on at the local knitting mills.
The most touching mention to me? Not the obits or the other reports of group efforts. The many small classified ads for lost knitting were the most immediate to me. Stuff like "Lost near [insert street] paper bag containing knitting, a brown sock half-finished;" "Near [another street] basket with baby’s jumper in white, both fronts done and back on the needles." Were those projects ever found and returned? I wonder.
FILET OF DRAGON AND BASEMENT SPACE
Not much inspiration yet on the basement spare room. Aside from a general cleaning that can’t happen until the electricians are done with the wires in the ceiling, and the ceiling tiles can go back up, all progress on that project is mental. A chair, a place to put the sewing machine up, and more storage are all great ideas. It’s a bit damp in the basement, so I’m leaning to well-ventilated storage options. I noticed Target has some open wire mesh cubes on special this week.
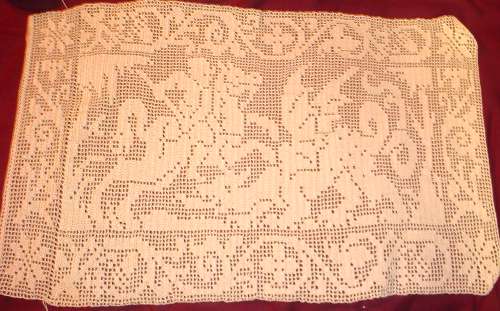
On Filet of Dragon, here’s the latest progress shot:

Going back and working in the other direction from my cast-on row has created a bit of a fold. You can see it at the left hand edge of the tree behind the knight. It won’t be so evident when the piece is blocked out and stretched on the curtain rods. Other than that – I’m quite pleased with the way my experiment in filet is turning out. Thread consumption to date is in between 1.3 and 1.5 balls of the Coats & Clark Royale 30-weight. At around $3.00 per ball and $1.25 for the crochet hook, this is also turning out to be one of the least expensive projects I’ve done.
On the frame – I’ve got to do a bit of measuring. I think I’m still a bit shy left and right, then I need something to set off the central design and that allows me about a half inch top and bottom for curtain rod space, followed by another half-inch to make sure the curtain rods don’t pull out. Options include some simple geometrics, some text either all the way around, or at the left and right edges (I’d work a sig and date into the text), or another still narrower scrolling pattern that spreads out into a wider one at the sides. More think time is needed…
WORKSPACE
Another quiet day here at String Central. Yesterday we had no power in the house because the electricans were installing the new whole-house panel. Today power is up and down, as they do punchlist things around the place.
Progress proceeds on Filet of Dragon. I’ve started the left hand edge panel, but have not yet decided on the whole-piece frame. There’s not enough yet to make an interesting picture, so I’ll spare you.
Instead I post this:
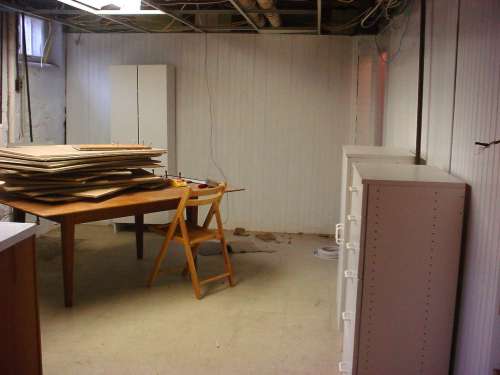
This is the spare room in the basement. It’s a former summer kitchen/laundry room. There’s a plastic?tub sink just to the left of the work table. There’s also a recycled kitchen countertop?with a?shallow dish sink, the corner of which you can see just peeking out on the right. The three white storage cabinets are Home Depot $19.99 specials that (miracle of miracles) managed to survive our move. The table is a legacy from the former occupants. There are two gas lines – one on each wall. Plus some dismal dropped ceiling panels (stacked on the table but shortly to go back up), grungy linoleum flooring, and ancient beadboard paneling, painted sloppy white to cover pea green some time during the Eisenhower administration.
This utopia, this palace, this vast expanse will be my sewing/knitting studio and the family’s laundry room. Eventually. Once we’re done re-wiring, I’ll be able to clean it out. Then I get to relocate my stash of six Rubbermaid storage tubs. Some time when we can afford it we’ll be redoing the room completely, moving the washer/dryer back downstairs from the kitchen (I hate listening to?them upstairs). ETA on the greater rehab plan:? plus or minus 6-8 years from now.Until then, we have to make do with what we’ve got.
I know there are all sorts of great re-do suggestions on HGTV. Ellyn’s studio transformation was incredibly nifty, but way beyond my price range. Plus it seems so wasteful when we’re planning on gutting the entire basement in the future. So my question is – given the space at hand; the three cabinets and the table, plus six Rubbermaid containers; and a budget of as close to $0.00 as possible – ?does anyone have suggestions for making this a useful, creative space?
WORKING REPORT – FILET OF DRAGON
Thanks to everyone for their outpouring of support!? I’ll take you who wrote at your words, and continue posting about the dragon.
A couple of people asked how filet crochet differs from other forms of crochet. "Filet" in this case means net. It’s meant to emulate darned net lace. Filet crochet typically uses only a couple of the various crochet stitches – chain and double crochet?(yes, there are exceptions to this,?notably when working a pattern with shaped as opposed to rectangular edges). It marches along row by row, not unlike an old-fashioned line printer, or a the way a stranded pattern builds in colorwork knitting. Other forms of crochet are less "row bound," often incorporate many different length stitches (singles, doubles, trebles, etc.), or grow in more than two dimensions (the heavily embossed Irish crochet styles spring to mind.)? In terms of technical skill in forming stitches, it’s very easy compared to many other forms of crochet, and produces tremendous effect for the level of effort invested. Following the chart is the only hard part. I’ve already described my mantra to help me keep count.
One minor complication?- there are usually no detailed instructions given for filet crochet designs. Patterns at most offer instructions on how to do a filled mesh and an open mesh, give a chart and (if you’re lucky) tell you how many stitches to cast on. Since most (but not all) filet patterns are for home decorative items rather than clothing, it’s unusual for gauge to matter much beyond dictating the final overall size of the piece. Some patterns omit gauge entirely.Others give a range of gauges and final dimensions based on thread and hook size. Vintage patterns can be especially difficult to interpret as both the hook and thread sizes they cite may or may not correspond to modern sizes.
Which brings me to another oddity. For all the complaining we knitters do about lack of standardization in needle sizes, pattern format and yarn descriptors, crocheters face considerably more variation in both their materials and their written directions. There are a few contemporary standards. Size 30 cotton is more or less the same maker to maker, but not always so. Yardage for a given weight does vary enough to make it important enough to buy by crochet threads by yardage and not weight, just as one does for knitting yarn.
Hook sizes however are all over the map. I try to go by metric measurement rather than letter or number size, but I’ve found that even then – and especially in the smaller sizes – there is considerable variation between brand names. For this project I got finer, tighter results and a smaller gauge with a Bates #10 1.15mm hook than I could acheive with a Boye #10 1.10mm hook. One side effect of this sizing problem is that dedicated crocheters collect and hoard hooks of as many different makers as they can find, even more than dedicated knitters squirrel away needles. There are quite a few charts available on line that compare hook sizes both historical and modern, and among makers. Here’s a good one at Norns.
The best on-line how-tos on filet crochet I found were at Hass,?SmartCrochet,?and StitchGuide. The lattermost has some Quicktime video clips illustrating some key points.
Which brings me to today’s report on progress. I’m not posting photos every day because compared to knitting (and allowing for time pressure), my production rate is so slow:
Don’t worry. the foreshortening on the right is an artifact of a sloping futon sofa seat and my inferior skills as a photographer. Still, you can see my corner stars and the repeat of the scrolling bit from the top/bottom border. I’m almost done with the right hand edge.I chose NOT to use the big flower underneath the dragon’s foot because it’s not quite centered in the top and bottom strips. Centering it in the side strips would call attention to that fact. If I don’t like the way it looks when this strip is done, I’ll rip it back and try again.
While I’m working on the left edge, I’ll be?thinking about the final frame. That will incorporate some "long meshes" to make double wide, possibly double high holes through which the thin curtain rod/stretchers will be threaded, top and bottom.
OOP BOOK REVIEW – COMPLETE BOOK OF PROGRESSIVE KNITTING
Here’s the second entry in a sporadic series on Knitting Books that Time Forgot. Many of these are long out of print (OOP), far from glossy, and have the shelf appeal of a trodden trout. But these older decidedly “unsexy” knitting books are sources of surprisingly good info, and can be found hidden on dusty public library shelves. Just because a book isn’t new or written by a contemporary Knitting Diva doesn’t mean it isn’t worthwhile.
Today’s poster child is The Complete Book of Progressive Knitting by Ida Riley Duncan. The edition I borrowed from the local library is the Liveright Publishing 1964 edition (the original was put out in 1941). ISBN 61-12134.

This book went through seven printings, and in its day must have been quite popular, judging from the large number of used copies available from various on-line sources. It’s sparsely illustrated with faded black and white photos, but is mostly text and accompanying hand-drafted line drawings.
The author’s premise is that knitting pattern design is mostly an exercise in drafting to gauge, and that a careful explanation of the math involved will make even complex pattern shaping and design more accessible to the average knitter. There are materials description and how-to sections, even a section of simple knit texture patterns, but they are cursory. Duncan wasn’t really writing for people totally unfamiliar with knitting, even though she included basics. She was writing for advanced beginners or intermediate level knitters who wanted to expand their skills.
Now, five years ago this book was less relevant than it is today. The fitted silhouettes common in the ’40s, ’50s, and early ’60s are making a comeback, and are sparking a change of shape in formerly boxy hand-knits (think of all the recent patterns with nipped waists). This book is a clear, step by step description of designing those waist-defining, shorter shapes, and in designing fitted/set-in sleeves. There are quite a few books and software packages out now as pattern drafting aids, but they rarely go into detail on these more tailored lines.
Duncan gives directions for taking body measurements and designing a sloper (though she doesn’t use the term); then translating the measurements into a pattern. Of course she stresses the importance of gauge as she explores pullovers, cardigans, raglans, blouses (as distinct from sweaters) and skirts. She even touches on socks, hats, and mittens – again from a mathematical base. Several different neckline and sleeve treatments are described. Interestingly enough, she advocates knitting raglans in the round, top down, and skirts in the round bottom up, offering up circle diagrams that look similar to some of the ones in Knitting Without Tears.
On the down side, garment sizes and gauges are small (5 spi is the largest gauge used, with most of the examples shown illustrated in 7 or 8 spi), but they are appropriate to the garments described and the principles they embody can be scaled up. The tone is a bit “my way or the highway” patronizing (especially the vocations in knitting section at the end) and exclusionary of divergent methods or alternative techniques/approaches. Sort of what you’d expect from a prissy and dictatorial home economics teacher in the early 1960s; but I find tone easy to ignore. The hand drawn diagrams look a bit primitive, but they’re clear, useful, and quite plentiful.
To sum up – this might be a useful book if you’re into design, especially designs informed by the aesthetics of past decades. It’s not the best exemplar of its type, but it does cover ground sparsely traversed by more recent publications. If you can find it in your local library it’s worth a look-see; perhaps a used book purchase if you need a leg up on drafting more tailored options.
WORKING REPORT – FILET OF DRAGON
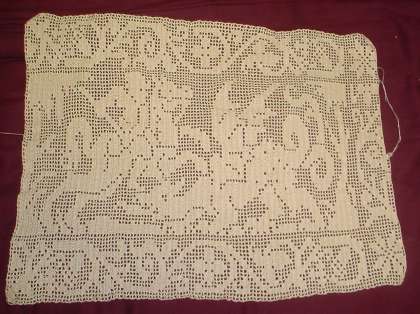
Returning from our sojurn at the Nature Channel, I pick up where I left off on Filet of Dragon. I’ve finished the center panel, and have decided to eke out the width with an additional panel of the same edging I used top and bottom.
I’m putting a strip of it at each end, centered on the best looking?curlique in the repeat. I’ve also decided to put plain quaternary stars in the corners, rather than butting the new strips up along the edge of the old ones. I still haven’t decided on what frame to use on the entire piece, but by the time these strips are done, I’ll have a clue. Or so I hope.
Here’s progress to date:

You can see the beginning of the side frame at the right. Here’s the layout logic:

What’s a quaternary star?? It’s the standard eight-pointed star/snowflake so often seen in Scandanavian and Fair Isle knitting. This sample’s branches are four units long, but the one I’ll use in this project will have shorter three-unit arms, and will fit into the 13 unit square corners.
BEE VEWY, VEWY QUIET…
Some of you asked about my de-beeing. Here’s a photo summary of what happened.
The problem – an active honeybee hive of unknown age, in the walls and floor of a stucco-finish sleeping porch:
The solution – Jeff from Bee Busters – a company in Acton, MA. Jeff is seen here about to cut a one-foot square hole in the porch floor to get to the hive’s probable location:

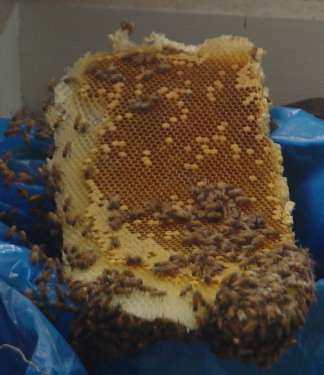
It turns out we were lucky in most respects. The hive was relatively new (in a 95-year old house anything is possible). It was mostly in the wall as opposed to being in the floor. While that was unlucky in that it required knocking an additional three foot square hole in the stucco, the hive was easy to remove. Here’s one large piece. The queen is under the scrum of bees at the bottom corner:
The overwhelming majority of the bees were captured, including the queen. Some of the stragglers?were caught using a bee-vac, a juryrigged crate fitted out with a dust-buster engine and a three-inch wide flexible hose. The hummers are now?off to quarrantine to make sure they harbor no parastites, then after that – to work as productive little droners working away in local orchards and fields.
I’m delighted that no giant comb system existed. If it had, we’d have to go through a ton more demolition and restoration to get at the hive. The down side of it being a young colony is that I didn’t end up with honey. Honeycombs are two-sided. If a comb has honey stored on both sides it can be harvested for extraction. These combs had bee larvae on one side and honey on the other, typical for newer hives but not suitable for people-use.
The gaping holes in my porch now sit open for several days to dry out. A few foragers out shopping when the hive was removed remain, but Bee Jeff assures me that they’ll load up with pollen and follow another bee home to a new hive. He said that if they arrive "with groceries" they’ll be accpeted by their new foster family.
All in all the experience was interesting, highly educational, but expensive. Now of course we have to repair those gaping holes…
WORKING SUMMARY – FILET OF DRAGON
Filet of Dragon
Thank you for all the complements!? Filet crochet isn’t difficult if you’re comfortable following a chart. It flollows the same logic as knitting a colorwork pattern in the flat from a chart – back and forth row by row. The hardest part is making the correct number of chain stitches to form the foundation on which the first row is worked. I did the math, then used safety pins to mark off every 25 stitches as a counting aid. I did end up being one short, so I cheated, and added a mesh at the end. If you look VERY closely to the first mesh at the cast-on tail, you’ll see it’s a bit heavier on one side where I slip stitched back up after making my cheat mesh?in preparation for the next row.
Once the count of the first couple of rows was established, the thing became a simple mantra of counting. Begin, A, B, 1, A, B, 2, A, B, 3 and so on, with “Begin” standing in for “make initial double crochet of the mesh,” “A, B” being either work two chains for open meshes, or two more DCs for filled ones; and the number being the count of the open or filled meshes for that particular run.(UK crocheters read trebles for the doubles cited here.)
I used the improvised magnet board system I wrote about earlier. Since each row was “proofed” by the row that followed, my mistakes became almost immediately apparent. The two I did most often (and each only a couple of times) was skip over a mesh when making a long run of open meshes, reducing the count on the new row by one;?or substituing an open box for a filled one – in effect forgetting that the design on the new row was shifting up or down by one box to make a visual diagonal. Since I was both confirming the raw count of each segment as I worked it as well as doing the “work even/one more” system, I never had to rip back more than one row.
So to sum up, filet crochet is much easier than the complexity of the finished piece would lead one to believe. The style I used employs only chain stitches and double crochets, and once one is used to making even stitches,?is an excercise in chart-following more than anything else.
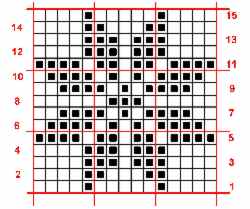
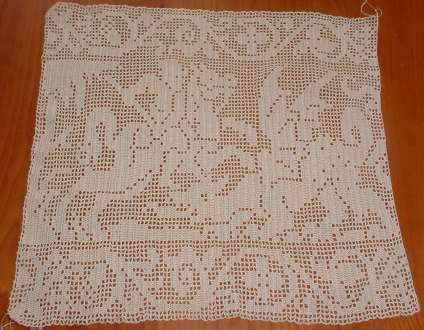
Some people asked me to repeat the photo of my book (The New Carolingian Modelbook), showing the dragon pattern page, so they could do a quick compare for the distortion effect. Here it is:

FILET OF DRAGON
The camera has surfaced!? The ‘net connection (briefly knocked out by overzealous electricians) is now up again!? I can finally post my progress on the Filet of Dragon curtain panel:
You can see the foreshortening effect I mentiond yesterday. I’ll be adding additional panels of the scrollwork at the top and bottom to either end, then another framing of some sort around the entire thing.
Rushing off to check up on yet another contractor…
