GADGET – IMPROVISED STITCH HOLDERS; GADGET POUCH CONTENTS
We’ve all heard the one about the parentage of invention. More than once, I’ve found myself knitting late at night without the stitch holder I needed, or on the other side of a trip involving air travel, having neglected to pack all the doodads I needed. For some reason stitch holders seem to be the things I most often forget.
Yes, I know I could always just cut a length of my working yarn to serve as a stitch holder, but I prefer not to do that. I either don’t want to crack into another skein, or I don’t want the hassle of figuring out which is the stitch and which is the fastening yarn when time comes to transfer the stitches over. I could also just employ a bit of string, but that would mean that I’d had the forethought to remember some in the first place (and if I had done so, I probably would have remembered the stitch holders, too).
As a result, I’ve pressed all sorts of things into service.
Spare needles are a natural first grab. Stitches can be slipped onto a DPN and secured with a rubber band looped around both ends. Circs can be used as long, dangly stitch holders. But again – if I don’t have my full knitting bag I might not have these to hand. For larger yarns, chopsticks and pencils can also be used instead of DPNs.
Sneaker and shoelaces are good stitch holdersfor large numbers of stitches. The the skinny kind made for kids shoes that still have the reinforcement on the lacing end works especially well. Thread the stitches you need onto the lace, and tie the ends. Plastic lanyard string is also good because it is stiff and easily threaded through stitches, although shoelaces hold knots better.
Safety pins are a natural for small numbers of stitches. The coil-less ones work best, but if I’m without my knittinggadget bag, I’ll use the standard kind. I’ve also used paper clips, twist-ties from plastic bags, and once in a moment of absolute desperation – a hoop-type earring.
But the ultimate improvised solution is making one’s own stitch holders. Store bought holders will always be prettier, and will have nicer ends, but in a pinch late at night when the yarn shop isn’t open, these are viable substitutes. In fact I still have and use some of these I made when I was just starting to knit and had more time than money.
Tomaketwo stitch holdersyou need a wire clothes hanger and a pair of wire snips or cutting pliers (the kind with a cutting jaw), plus a pair of some kind ofbending pliers (the kind with either asmooth end or a ridged end for gripping and bending). The hangers that are too skinny to hold anything heavier than a dress shirt are the ones that cut the easiest. The snipping part might leave a bit of a burr on the cut ends of the wire. Nibbling away at the end with the snips will take off most of it, a file or rasp might be needed if you’ve got a really big burr that bodes to catch on the yarn. Wire hangers being so plentiful, and with each hanger supplying raw material for two holders, if my cuts are rough, I toss the snipped part and just try again. Cut one end a bit longer than the other so that you have ample length to fold over to make the hook that secures the holder. The last sketch below shows the stitch holder seen in perspective, so you can see how that end is bent:

Again, these aren’t perfect, but they’re cheap.
And what’s in the knitting gadgetpouch I (almost) always keep in my knitting bag? Here arethe contents of my best-equipped one:

The mid-size stitch holder next to the needles and pins is one I made myself from a coat hanger.
Airline travel is the main reason for not having this or a similar pouch of goodies in my knitting bag. Rather than poking through the thing and removing the banned pieces, I tossa spare calculator,tape measure, a couple of stitch markers and whatever else I rememberin the bottom of my knitting bag, but leave the tool pouch at home.
Have you other must-have tools you wouldn’t be without on a daily basis? Let us know!
WORKING REPORT – WATERSPUN PONCHO + SHEEPSHEARING DAY
In an effort to use up leftovers, reduce the stash, and find something mindless to do, I’ve hit upon doing a quick poncho for The Tiny One (age two below, but now in Kindergarten):

TheClassic Elite Waterspun I’m using is left over from a swatching/pattern design exercise I did earlier this year. I’ve got seven colors, but onlyabout 80% of a skein of each. It should be enough for a little kid’s poncho. If not, I’ll pick up an additional skein in another color and add another stripe. Before starting thisproject I swatched out my remnantson a US#9 (5.5mm) at 18 st/26rounds = 4 inches (10cm).
I decided to minimize thinking, so I cast on around 100 stitches in the round, did eight rows of stockinette to make a rolled collar, then placed four markers evenly spaced around the piece. I did a M1 increase just after the first stitch and just before the last stitch in each marked group, alternating these increase rounds with plain stockinette rounds. I’m planning on doing just plain old stockinette, using up each color in turn, saving out the plum for last. I’m not taking special care to always end my colors at an increase corner, I’m just knitting until I run out of the old color, then starting a new one. Depending on how big the thing gets, I’ll use the remaining plum to do some kind of simple edging, one or more rows of applied I-cord, or maybe just some rounds of seed stitch to finish. Any of those treatments should tame the bottom edge enough to minimize rolling. No fringes though. Small children, woolen fringes, twigs and leaves can meld themselves into an inseparable glob that I’d rather not deal with come wash day.

I’m doing this poncho using the two-circs method popularized recently for socks. In the photo above, you are seeing the thing sideways, because the needles meet at the shoulders, not the center front and back. The poncho is identical in all dimensions though, so these points are arbitrary, and don’t really matter. Here’s the logic of the thing:
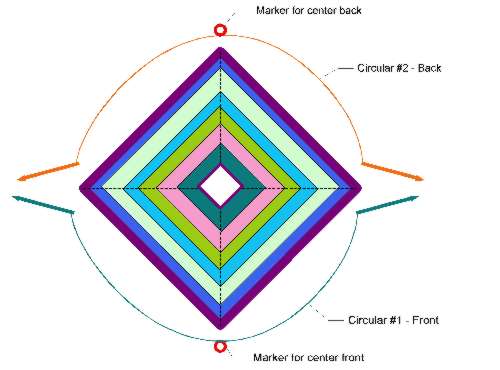
The two ends of Circular #1, shown in teal above,are used to knit the front. #1 **always** stays on the front of the work. The two ends of Circular #2, shown in orange above,are used to knit the back. #2 **always** stays on the back. At no time does the entire piece end up on one circular needle, nor at any time am I working with an end of Circ #1 in one hand andan end of Circ #2 in the other.
One advantage of this method is that the stitches are nice and spread out instead of being jammed onto one needle. I can call the Target Kid over and try the piece on without having to transfer stitches to a piece of string. I can also add another needle or two if the poncho grows too wide to handle with only two needles. While I don’t find this method of special advantage for socks (immodestly, I’d say I’m wicked fast with standard DPNs), I do like it for large pieces knit in the round, and for sleeves.
I’m still not sure if the neck hole is too big or not. It looks o.k. for now, and fits well over my daughter’s head, but I’ve seen ponchos stretch out due to their weight. When the piece is done I’ll check back. I might haveadd a few rounds of K1, P1 rib (with mitered decreases) to tighten up the neckline. If I decide to do so I’ll pick up stitches on the inside at the base of the rolled collar and knit them up from there, leaving the rolled outer edge as a trim detail.
GORE PLACE SHEEPSHEARING FESTIVAL
Hello to everyone I bumped into yesterday at the Sheepshearing festival in Waltham, Massachusetts. Please excuse me for not naming everyone I met, but I am afraid if I try todo so I’ll leave someone out. The sun was bright,andthe air was cool – perfectwool weather. My daughters and I were there from around 10:15 or so to 3:00. If you saw someone in a crayon-bright flash sweater, followed around by a little girl in vertical orange/yellow stripes and a larger pre-teen in blue, that was us. Also apologies that there will be nophotos of the eventhere. I’m not of the pix-as-part-of-the-experience crowd. I never quite remember to stop what I’m doing at the time in order to document it. I had the camera in the backpack, but somehow it never tunneled out from under my day’s purchases, and never saw the light of day.
In spite of the perfect sweater weatherI was disappointed (as usual) to see how greatly Polarfleece wearers outnumbered wool wearers, there were quite a few notable hand knits in the crowd. I saw a couple of really nice mosaic knit cardigans and coats, several hand-done Arans, a couple of Fair Isle style stranded sweaters plus twoScandanavian-style sweaters(one was a Dale Nagano, the otherpossibly from Norsk Strikkedesign), a whole flock of little kid cardigans, hats and pullovers,several very nicely done Intarsia pieces,a long-length coat done entirely in cables, a Surprise-style vest. I also ran into someone buying yarn for a Rogue at one of the yarn booths. There were other great looking hand-knits around (including quite a few pairs of socks). Please forgive me if I neglected to mention yours.
As far as yarn/fiber vendors – there were about eight, including some animal-to-skein outfits outside the main fiber tent and a booth from Minds Eye Yarns, a local Cambridge, MA store catering to spinners, dyers and knitters in with the sheep and llama farm yarn people. One outfit was selling whole fleeces (apparently you could also bid on the fleeces from the Gore Place sheep if you were there at the right time). I got a couple of skeins of rustic styleAran-weight from the At Nick’s Meadow Farm booth. They’ll end up as a felted pillow, similar to the one I described before. I’ve used their wool before, and found it an excellent value for the type. Joie de Vivre Farm,was there too, with some of their Mostly Merino, in fingering, sport, worsted and chunky weights. I did get a little bit of hand-spun fingering weight Merino from the Greenwood Hill booth. I’ve just added the basic info for their yarns to the collection, no reviews yet, though. I’m thinking it may be enough for a couple of simple lace scarves to be lagered away as future gifts.
Verdict? A grand day out in the only glorious day of spring weather we’ll probably get here this year (we don’t usually have many). Meet me there next year!
NEEDLING AND NOODLING
Lo and behold! Yesterday I write about needle gauges, and today I receive a huge package in the mail from a friend of 20 years ago with whom I have recently reconnected.She sent me a stash of needles, collected over the years by a knitting friend of hers:
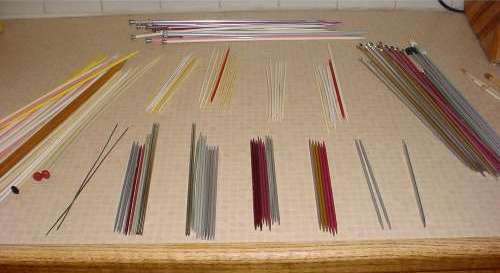
As you can see, I’ve used the gauge to sort them. On the right are metal needles in pairs. On the left are plastic, wood, Boye Balene andBakelite(?) straights. The center bottom are metal DPNs, and above are Balene and plastic DPNs. At the top are singlets – still useful but not in official pairs. About half of these needles aren’t of modern regulation size, but instead sit between sizes. I’mdelighted to have these, and intend on bestowing most of the plastic ones to local knitting groups that work with people in elder care homes, and giving away some of the metal ones to people I teach. Please don’t write to me in pursuit of the Bakelite or old Balene needles. Iintend on keeping those. (Hi, Ellen! And thanks again!)
Like QueerJoe, I’m in the What’s-Next doldrums. I’ve also got some Chest of Knitting HorrorsTM abandoned projects to revive, but they’re mostly in the storage cubby. I’m fragmented and unfocused on knitting right now because of the attendant hoopla surrounding the house acquisition/move. Starting the project from the blue Wool Crepe is just too much think-work for me to countenance at the moment.
I do have a quantity of Waterspun in assorted colors. There might be enough of it to do a small poncho for the Kindergartener. Maybe a doodle poncho, inspired by QJ’s Rosemary’s Baby blanket. Or maybe something else in concentric garter stripes, but using some narrow mosaic knitting patterns where the stripes meet.
Oops. I’m back into think mode again….
GADGETS – NEEDLE GAUGES
More observations on little things that make a difference.
This time it’s plain old needle gauges. Why would I need a needle gauge when every needle has its size printed on the side? Well, some needles do and some don’t. Most of my double pointed needles aren’t marked. While many of my circular needles ARE marked, the labels are teeny, difficult to read, and in some cases, pretty much illegible.
I also have a collection of needles accumulated by regular retail purchase, from yard sales, and that have been given to me by friends and relatives. Not all of them are labeled with accurate sizes (the needles, not the friends or relatives). The older needles in particular can vary quite a bit from their imprints. I’ve got 7s,big 7s, and little 7s. All are labeled 7, but some are spot on to the modern definition of 7 as 4.5mm, and some are closer to modern 6s(4mm), and some are closer to modern 8s (5mm). I find the differences useful, as sometimes to get perfect gauge I can slide over to one of my in-between needles instead of going down a full modern size. Sometimes the difference isn’t readily perceptible if I’m grabbing needles and just moving along, but using a small 7 DPNs to start off a cuff but following that up by a large 7 circular when the project’s circumference warrants can lead to all sorts of mismatched gauge problems. But in order toeither take advantage of minute gauge differences or avoid them, I need to know how my needles stack up against a set of standardized sizes. That’s where a needle gauge comes in, and why anyone who has accumulated more than a few pairs of DPNs or needles of specious size should consider buying one.
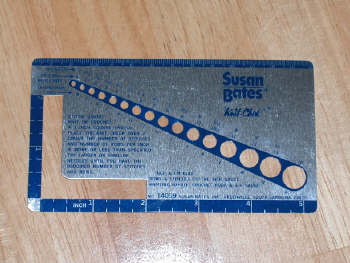
Here’s the most common needle size gauge.The Susan Bates KnitCheckis about 5.5 inches x 3 inches,made from aluminium, and in the US is sold just about everywhere that sells yarn. The little two-inch L-shapedslit for measuring stitch and row gauge is very handy.The KnitCheck isalso very inexpensive:
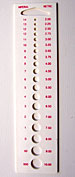
And here are both sides of my favorite one. One side lists the metric sizes, and the other shows the US and the old BWG (British Wire Gauge) sizes. It’s plastic, is about 2.5 x 3.5 inches and is slighty more expensive, but still only a couple of bucks:

Why do I prefer the European gauge from Inox? Because it’s more accurate and more complete. The Bates gauge rates their own needles, and is US-centric. There isn’t as much difference among different companies’gaugestoday as there was in gauges of10 or more years ago, but some small differences still exist. For example, Bates US #6s measure 4.25mm. Other companies’ #6s measure 4mm.
Bates gauges also skip all the interstitial metric sizes that have no corresponding US size.Those extra holes on the Inox aregreatfor measuring my in-between vintange needles and European-origin needles that don’t exist in the modern US scheme of things.For example 2.5mm is between a US #1 and US #2 (2.25 and 2.75mm respectively). The Inox gauge can parse it correctly, but the Bates gauge can’t. The Inox gauge is also smaller, and fits in the box I keep my DPNs. Of course since most of you probably aren’tusing a Glenfiddich Scotch Whiskey box like I do as prime needle storage, this may not be as much of an consideration. Of course ,the Inox model doesn’t have that stitch/row gauge measurement slit or a nifty little ruler down one edge, but I carry a measuring tape in my knitting gadget bag, soneither absence is a big loss.
My only wish is that both of these needlesizers went down smaller than US #0/2mm. I’ve got a stack of DPNs ranging down to 000000 (.75mm) and a gauge that went down that small would be very helpful (of course Bates needles don’t come that small, so they really have no motivation to do so, but Inox needles do). I know there are a couple of brass gauges available on the Web for around $15 US that go down to 0000, but that seems rather pricey. I keep hoping I’ll find a metric wire gauge in a hardware store that’s a bit more reasonable.
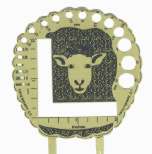
While I’m at it, here are some other pix of needle gauges that I found while web-wandering today. The first two are available mostly in Canada and the UK. The Braille gauge is from anAustralian site that specializes in tools for the visually impaired. And the brass sheep gaugeappears to be a specialty product in limited circulation(Google searching for "knitting needle gauge" sheep should turn up the source).
|
|
|
|
|


WORKING REPORT – SUEDE T DONE!
A few zillion ends later, here’s the result. My Shapely T done from Berroco Suede.
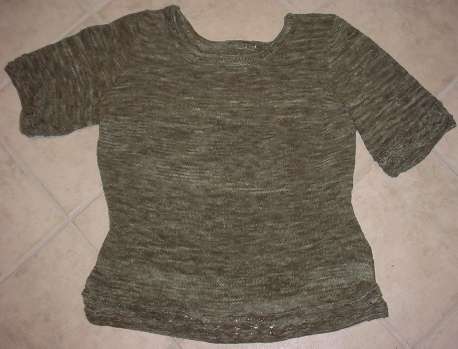
Overall summary – a @*)% to knit, nice effect though. A bit spongy andheavy (meaning weighty) for a summer T, but living in Massachusetts that shouldn’t pose a problem. I sewed up using the yarn itself, in mattress stitch, so the seams are invisible. I used this method to sew on the sleeves (page down the PDF for the English text). Because the yarn is all nylon, I didn’t bother blocking it first. I’ve been warned thatSuededoes stretch a bit in the wash, so I will probably stick to dry cleaning for this piece.
The pattern was excellent. I had no problems using it as a point of departure, tarting it up with additional trim at hems and neckline. I like the lay of the body, the shaping makes it quite comfortable and flattering, but I’m less pleased with the way mysleeves turned out. I did make them longer than the directions specified, but they seem baggy inthis rather un-drapey yarn. Perhaps if I use this pattern again I’ll use one size smaller sleeves. For the record, I knit this following the size 44 directions, so there’s plenty of scope for people who wear larger sizes to use the Shapely T pattern.
What am I going to do next? I’m not sure. I’ve got the Cursed Socks to tuck away, but that’s only a couple of evenings of work. I did indulge myself last week and get some Mountain Mohair Wool Crepein the color "Alpine". It’s listed in the yarn review collection as being a bulky, at 2 stitches per inch for the manufacturer’s gauge, but that seems wildly off. Although my label stats match the entry in the collection, the stuff I havelooks quite fine. Allowing for the boucle texture, it looks like it would knit up at sport or DK weight.
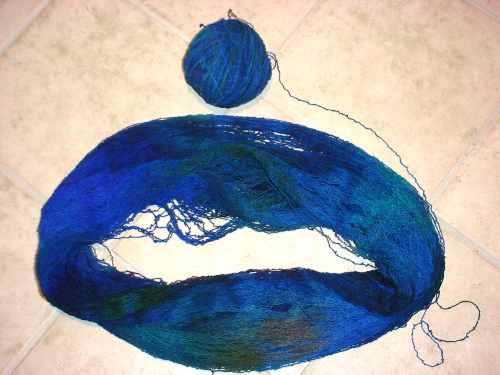
Perhaps the 2spi is a recommendation for lace, as this yarn is most often used for lacy shawls. I plan on making another short-sleeve pullover (I should have just enough if I’m frugal with the drape and keep the sleeves short. I want a more opaque look. I’ll be swatching over the next several days. One thing I want to do is to play with the hand dyed color. (Yes, the blues are as intense as the photo shows.) I’m thinking of knitting something where the colors bounce back and forth in narrow strips, perhaps body-wrapping diagonals or straights.Here are some sources of inspiration from one of my all-time favorite knitting sites (no patterns available):
- Vertical narrow strips
- Another vertical strip, but slightly wider
- Nothing to do with the strip idea, but I love the lines
Off to swatch and stew.
On the house front? We’ve accepted an offer on our place, and have signed the purchase and sale agreement on the new house. We’re on track to move come early summer. And here’s proof that for one brief and shining moment in my life, my desk (wiseNeedle Central) was clean.

EVENT – GORE PLACE SHEEPSHEARING FESTIVAL
I kick myself for not mentioning this earlier, but if you’re in the greater Boston, Massachusetts area tomorrow there’s a mini fiber-festival in Waltham. It’s an annual event that celebrates spring, or as we in this state like to think of it "mud season."
There’s no doubt that in the world of sheep and wool festivals, this one is a speck, a microscopic dot, a merest taste, but it’s local and a fun time out. You can expect a large tent staffed by spinners and dyers from the Boston Area Spinners and Dyers Guild, doing demos for adults and hands-on activities for kids. There’s usually one or two large tents housing various fiber-related retailers, mostly local sheep-to-skein outfits selling their own yarns. Sometimes there are vendors selling fleeces and roving, or dealers taking orders for wheels, looms or other spinning and weaving equipment. Again, in total there are usually fewer than a dozen fiber-related vendors, but that’s enough for me.
There are also live demos of sheep shearing, both with snips and electric clippers; a sheep dog/herding demo; live music and dance performances; wandering puppet players or minstrels; food vendors; historical crafts demos including lacemaking; and a general crafts type fair of around 50 booths selling everything from fudge to picture frames. Inpast festivalsthere have been llama rides for the littlest kids, a rope walk, and as many as 20 yarn sellers, but not every yearfeatures those goodies.
I’ll be there with both kids in tow. I’ll be wearing the loudest parrot-colored flash sweater ever knitted. If you see me (and if you’re there that sweater will be hard to miss) stop and say hello. It’s always nice to put a face to an email address.
One word of warning. It’s been rainy today. If you’re thinking ofstrollers or wheelchairs, be advised that the site is quite hilly, and being unpaved can live up to the "mud season" designation.
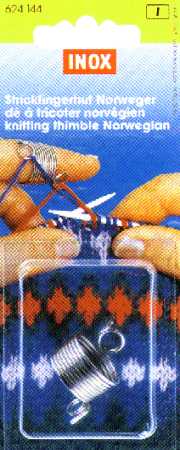
GADGETS – STRICKFINGERHUT
Some people have been curious about the coiled wire Strickfingerhut I mentioned in my post on the Cursed Socks. Here’s a shot of the two most common kinds:
 |
 |
I’veseen mostly these two Inox models, but there are also a couple of others on the market. They are both intended for the same purpose – to assist Continental knitters doing stranded colorwork. Strickfingerhuts hold two (or more) strands of yarn at the same time, allowing the knitterto reach in with his or her needle tip and select the desired color.
I’ve been using one for about six years now, and I can nowknit stranded work in the round at about 90% of the speed at which I can knit single-color stockinette. Before I found my gadget I used to do my stranded work two-fisted, with the dominant or background color being held in my left hand and knit Contiental/picking style, and my contrasting color held in my right hand and beingintroduced in English/American/throwing style.With practice the two-fisted methodwas faster than drop-and-grope, but I never was entirely pleased with my tensioning. I always ended up with puckering as I could never quite get the contrast color yarn to knit as loosely as the main color – especially across the "corners" between DPNs. With this gadget my tensioning is perfect, and even unblocked, my stranded pieces are smooth and unpuckered. I **love** my Strickfingerhut and at this point, detest stranding without it.
After extensive experimentation, I’ve found I the coiled wire version to be better for the particular way I knit. It’s also more comfortable to use. The coiled wire type shapes itself to one’s finger over time. Brand new, it tends to ride a bit further out on the finger than after it has been "broken in." With use the the coils nearer my knuckle expand just a tad and the thing develops an in-out directionality. Although it has a slit in it, the plastic type does not expand overly much, and is too tightfor comfort. The closed end limits the location of the thing on my finger, and makes it feel hot and sweaty.
Comfort aside, in terms of working utility, the way I hold my yarn and needles makes the coiled wire type a clear winner. The coil can be set at any angle. I get the most efficiency by letting the eyelets ride on the front of my left index finger, angled forward so that they’re almost underneath. The two eyelets are offset and separated, giving lots of room for strand selection, and for finagling with the two colors if long floats need to be twisted in. By contrast, the channels of the plastic model must be positioned so that they ride on top of the finger because the little bar that secures them isn’t strong enough to resist bending if the yarn is pulling against it. It holds the yarns flat in the same plane. I find it much harder to both select a strand and to do the weaving in motion over long floats.
Here’s how I hold my yarn and work a normal stitchusing a Strickfingerhut :

In the photo, I’m about to make a stitch with the multicolor yarn. I do admit that in normal knitting my index finger isn’t waving out there so much. I’m holding it further away from the work than normal so that ou can see the separation of the strands.
Now if I were to want to make a stitch with the multicolor yarn but I wanted to strand the black yarn in because otherwise it would be carried over a very long float this is what I’d do:

Instead of just grabbing the multicolor yarn in the most straighforward way, this time I reached up and under the black yarn to retrieve it. Similarly, if I wanted to strand in the multicolor while knitting a black stitch, I’d reach down and under the yellow to grab the black. LATE BREAKING ADDITION: The stitch that’s holding the contrasting color I’ve stranded in will be seated the wrong way. Its leading leg will be in the back of the working needle. I correct the problem and avoid leaving a twisted stitch by knitting into the back of that stitch on the next round.
About the only drawback of these thingies is that it is possible to bend the eyelets and stretch them out over time. The coiled wire ones aren’t as easily broken as the plastic ones with their swivel bars, but I have managed to go through a couple over the years. At this point I keep two. One relatively new one with nice, tight eyelets that I use for sock and sport weight yarns, and another older one with slightly larger eyelets I use for heavier yarns. My only other caution has to do with liking them so much you become dependent upon them. Loss is a big problem, and even though most yarn shops that stock Inox accessories can special-order them, very few keep the wire Strickfingerhuts as regular on-the-shelf stock. When I see one, I usually buy it (they’re very inexpensive, especially for something so totally useful).
What do I do when I can’t find my Strickfingerhut? I admit I’ve never mastered holding two yarns in the same hand without some sort of mechanical aid. If I’m up a creek without my paddle, Iuse a ring with a large stone bezel that I normally wear on my right ring-finger and jam it on that last knuckle of my left index finger. Then I hold my yarns as I usually do, but make sure one strand is on the left of the stone, and the other is on the right. This is much slower than using my Strickfingerhut because the two strands are closer together and aren’t separated by that little angle, but if it means the difference between knitting and not knitting, it will do.
Footnote: Standard disclaimer – no affiliation yadda, yadda…
PROJECT – ZEN SCARF, HOUSECLEANING
First apologies to the few of you who subscribed to receive notification of site updates. You must have been going nuts since last night because I gave up on Picserver, and ported all of the photos here to a new server. It wasn’t my intent to pepper you with update notes, but I couldn’t turn off the notifications from here. I promise the housecleaning is now over.
Rick-Rack Mesh Scarf in Berroco Zen
If you’ve ever met me you know I’m absolutely delighted at the prospect of the New Knitter Invasion, but at the same time my eyes are glazing over at all those novelty yarn scarves. I’ve done a few on special request, or as gifts for family and friends – but by and large, I find them pretty but intensely boring (hence my Kombu Scarf pattern).
Still, my pal Pat shop managerat Wild & Woolly in Lexington, MA (my local yarn store) asked me to help her come up with something fun to do with Berroco Zen, a ribbon yarn that’s been overlooked in favor of flashier novelty yarns. I couldn’t say no. (For some reason, Zen is in the yarn review collection twice, so until I get that fixed,there’s another set of reviews here).
Here’s what I came up with:
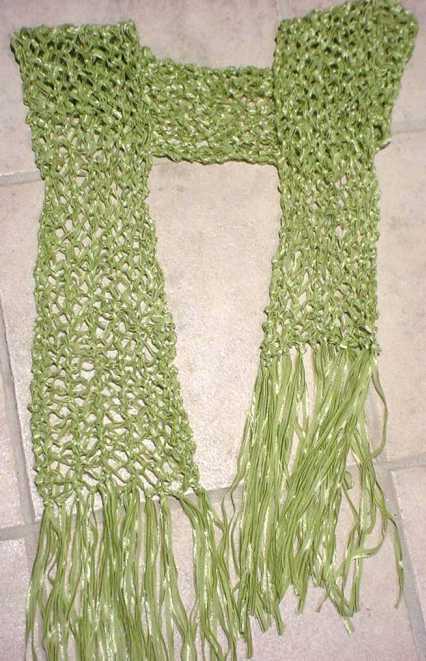
Here’s the pattern. Eventually I’ll add it to the free pattern pages at wiseNeedle.
<p
Rick-Rack Mesh Scarf in Berroco Zen
Materials:
1 Skein Berroco Zen or approx. 110 yards (102m) of a similar ribbon yarn
US #10.5 needles
Gauge:
Gauge is difficult to measure, but finished scarf will be about 5 inches wide by about 56 inches long (exclusive of fringe).
Instructions:
Using half-hitch cast on or other stretchy cast-on, cast on 14 stitches. Knit one row.
Follow Rick-Rack stitch pattern until scarf measures approximately 56 inches long.
Rick Rack Stitch:
Row 1: K1 (YO, slip one stitch as if to knit, K1, pass slipped stitch over)6x, K1
Row 2: K1 (YO, slip one stitch as if to purl, P1, pass slipped stitch over)6x, K1
Bind off VERY LOOSELY.
Cut remaining yarn into 18-inch lengths, and attach to ends of scarf as fringe.
2004, Kim Brody Salazar, http://www.wiseneedle.com. Not to be duplicated on other websites or in print without permission of the author. Pattern for personal use only. Please contact the author if you wish to make this item up in quantity, even if it is for charitable sale or donation.
PROJECT – FULLED MANOS PILLOW
Still in hurry-up-and-wait mode, I find myself with a bit of extra time so I extend today’s entry.
Here’s a past project that was quick, easy, and turned out quite nicely. It’s a pillow inspired by a similar one appearing in Shangold’s Design Source book of Home Decor. This pillow is sitting on my daughter’s bed. As you can see,my tween-ager hasgot a starry-night/dragons theme thing going in denim blues and raspberry/magenta.

I liked the idea of a tube pillow secured by six buttons as shown, and I happened to have six large mother of pearl buttons on hand. They looked rather lunar to me, so I thought they’d go nicely with therest of the celestial/mythical beast stuffalready in place. I stewed around on the idea for a couple of days before mentioning it to the Target Kid. She was thrilled so I went ahead. (Major hint: Never knit anything as a surprise for someone between the ages of 9 and 19).
In truth I only had a glimpse of the book and didn’t work my pillowfrom the directions, so I can’t speak to whether orthe inspiring object is also knit in the round, but this is how I went aboutmy pillow.I used two partial skeins of Manos left over from previous projects (the magenta and the pale blue), plus I bought one new skein of the indigo blue. I wanted to do symmetrical stripes, but I didn’t want toweigh my yarn and divide it into equal quantities and/or figure out how big each of the stripes should be, so I took the lazy person’s way out.
I don’t have any working notes, but I believe I used either a US #9 or #10 needle, and gotsomewhere in between 3.5 and 4spi in garter stitch before fulling the piece. (A figure of100 stitches around seems to stick in my mind, but I won’t swear to it.) I started with a provisional cast on, and knit a garter stitch tube using my entire skein of the darker blue. Then I wound my magenta and light blue into center pull balls. I "woke up" the stitches at the bottom of the dark blue stripe, placing them ona secondcircular needle. then using both the outside and inside ends of the contrasting color yarn, I worked the same number of garter stitch ridges of the light blue on both ends of the center, darker stripe, continuing until I ran out of yarn. I repeated this with the magenta.When I was doneI had no yarn left over at all, a dark blue stripe in the center, and equal size stripes of light blue and magenta framing it. Ready to full!
First I tossed the finished pillow in the washing machine and dryer, but my washer is too gentle. Even in a hot wash full of towels not much fulling action happened. I ended up beating the daylights out of the piece by hand, plus washing it at a friend’s house in a washer and dryer that arefar more vicious than mine. That finally worked.
The finished pillow is nice and dense, cushy even. It shrank about 40% in length (that’s the direction across the stripes), but only about 20% in width (the directionparallel tothe stripes themselves). Final post-fulling measurements are about 20 inches around the pillow’s belly, and about 15 inches end to end.
After my tube was as fulled as it was going to get, I bought a standard baby pillow form. That’s a pillow about the size of the small onesfound on airplanes. Most of the crafting websites list 12"x16" as being the standard, but I think mine was either a tad smaller, or was so squishy that it easily wadded up to fit.
I sewed on the first three buttons, taking my fastening stitches through both sides of the tube. This effectively closed off the first end. Then I sewed three oversized coat snaps to the inside of the pillow’s other end, taking care to locate them exactly underneath the spots where I would later sew the buttons. Once I had the second three buttons placed, I jammed the mini-pillow into the tube and snapped the open end closed. All done! One finished pillow; one delighted pre-teen, and something for the stuffed dragon to lean upon.
TRIUMPH + TRAGEDY
Just to underscore the point that the universe’s perversity prevents unalloyed joy, I report two positives and a negative.
TRIUMPH #1 – HOUSE SELLING: We were surprised to receive not only multiple offers on our current house, but an amazingly large number of multiple offers. Now naming base conditions, we go back to the herd and ask them to give us their best and final offer above those parameters. Apparently, all that cleaning was worth it.
TRIUMPH #2 – SUEDE T: I have completed all of the major pieces of my Suede T. Front, back and both sleeves are finished. I’ve sewn the shoulder seams and am now about to pick up the neckline stitches. I’d prefer to do the neckline in the round rather than as the pattern is written because I want to avoid a seam at one side of the neck. Again instead of the plain six rows of garter stitch, I’ll work eight rows that coordinate with the elongated stitch pattern I used at the body and sleeve hems. I’ll probably need to hide some scattered decreases in my in-the-round edging because it is wider than the original, and I want it to lay flat when worn.
Unfortunately, I couldn’t do this little bit over the weekend. Not only were we in exile from hearth, home, and computer in order to make way for the herd of house viewers; my stash including my needles is all still boxed up in the storage cubby. Providing traffic today isn’t too perturbed (I live in the greater Boston area, and the marathon has effects that ripple well past its rather limited corridor of location), I’m planning on raiding the cubby for supplies. Pictures will be posted as soon as I get the pieces put together. In the mean time, I’m helping out a friend by coming up with a pattern for a narrow novelty scarf knit from Berroco’s Zen, a ribbon yarn.
TRAGEDY – PET DEATH: Apparently the stress of molting was too much for poor little Crunchy/Fujitake. He’s gone to that Big Terrarium in the sky. The kids were upset to find the little critter out of his shell and sad to say – half eaten by his scavenging cage mate. We’re not sure if the other crab had an active part in the demise, or was just an opportunist. Stressed crabs sometimes do not survive molting, and it’s not unknown for a crab to attack another during that phase. We hadn’t removed the molter to an isolation cage because up until now, the two of them had happily co-existed through previous molts. So I’m feeling a little guilty about the whole thing. The remaining crab seems rather lonely now in spite of his snacking. They are social creatures (in a rather limited way). He’s nowwandering the cage turning over all the shells and cage furniture as if he was looking for his playmate. The kids are still sad but are recovering.
