WHY (ALMOST) NO KNITTING GOT DONE LAST NIGHT
Smaller Daughter and I had fun last night building her robot pumpkin. She’s named it “Seven of Patch”. Today it heads off to assimilate the third grade pumpkin parade.

It was also a sewing night. The same daughter has her heart set on being a pirate this year. Most of that costume can be scrounged up from things around the house. But she needed a puffy white pirate shirt, and it had to be done before Friday (more on that below). So I hauled out my ancient 1962-vintage Elna SU (bought used) and clanked away. Even so a small bit of knitting did get done after I was finished wrestling the jamming bobbin case into submission. I managed to do another five inches or so of edging on the Wave scarf. I’ve got about a foot more to go and then I have the joy of fixing that nasty skip and run waaay back at the beginning.
Not tonight however. My kid-friendly workplace has invited employees children in after school tomorrow for in-office trick-or-treat. Employees are encouraged to dress up. I have tonight to figure out something that’s either easy to put on quickly or is not so distracting as to negate any possibility of actual work getting done before the kids arrive.
INTERNATIONAL WELCOMES AND IRRATIONAL KNITTING
First, welcome to the new influx of visitors here from Japan. Apparently the Kureopatora Snake Scarf has attracted attention way over there. It’s fun to see it blogged about so far from home, and in a language I can only barely read with Google tools.
Where do visitors to wiseNeedle and String come from? It’s no surprise that they are overwhelmingly from the US and Canada. Japan, Australia, China, the Ukraine, Brazil, and the UK. Germany, France, and Sweden usually are in or not far from my the 10. There’s usually a good sprinkling of people wandering through from non English speaking countries aside from those on the top 10. (I think that most come to use the knitting terms glossary.) I have often been amused to see reports of visitors from some of the less frequently seen countries on my list. Sometimes there’s a small spike from an unlikely place. For example, in addition to the large number of visits from Japan last week (not uncommon at all), I had a small jump up each from Senegal and Mauritius. Whether that represents one person visiting multiple times, or one person sending links to friends, I haven’t a clue. But I do wonder what they’re knitting.
Second, some irrational musings…
There’s a lot of edging to knit when you make something like the Wave scarf. That affords ample time for a mix of boredom and the anticipation of finally finishing to set in. I don’t know about you, but when I knit something interminable I develop irrational likes and dislikes along the way. There are rows I look forward to, and rows I detest. While on some patterns the single row with a particularly awkward stitch combo (like a P2tog-back) can inspire discomfort, even dread of a tricky row, in other patterns the development of my preference makes no sense at all. For example, in this edging some rows have a bit more stockinette, but no row in particular stands out as being harder than the others, and all patterned rows have a semi-awkward K3tog. But I have a clear favorite – row 5, and a clear least favorite – row 9. I will go so far as to either get ready to do my favorite row or “get over the hump” and complete my least favorite row before setting the work down.
I have irrational preferences about other bits of knitting, too. I detest sleeves. I don’t care how large or small they are, whether they’re done first or last, or if I’m working them side by side, or one at a time. I flat out hate ’em. Also buttonhole bands – especially the kind that are cast on with the regular width of the front, then placed on holders to be knit separately using a smaller needle, then sewn to the cardigan body. I know why some designers choose to do this, and I acknowledge that doing it can make neater, less “loving hands at home” looking garments – but I resent doing it.
On the other hand, I don’t mind winding skeins into balls. Some of my knitpals hate that part. While I wouldn’t make wool-winding my only hobby, I don’t mind doing it in the least, and except for the largest skeins of lace weight, usually do it by hand (sometimes assisted by a swift). I rarely haul out the ball winder.
Then there’s the foot part of every sock. The ankle bears a pattern or something of interest. But I don’t like wearing patterned knitting inside my shoes, and invariably knit my foot parts totally unadorned. I hate that part enough that it has shaped the entire way I knit socks. I do toe ups not because I want to avoid grafting, or that I think they fit the best (the fit well enough on me), but because doing so puts the chore before the fun. If I didn’t do those boring feet first, I’d never finish a sock.
And I vastly prefer lacy knitting to lace knitting. It seems I need to decompress with a plain or low-featured row in between more intensively patterned ones. I get annoyed or quickly frustrated by patterns that include massive amounts of increases and decreases on every row.
Collars? Did I mention collars? For me they’ve always been a challenge. I melt with envy when I see something like the bottom right hand picture here. In this case, the dislike is more understandable. We all dread showing our weaknesses.
So. How irrational are you? Do you share my odd likes and dislikes, or are you bound by an entirely different set of your own?
WAVE SCARF PROGRESS
Back from a business trip, I exhibit productivity.
I was able to get work in during the plane rides and layovers. I’ve managed to get quite a bit further along on the Wave scarf’s edging: Overall, if I were to do this pattern again instead of following it verbatim, I’d change the ratio of attachment to make it a bit less ruffly, and I’d up the rate of attachment at the corners to diminish the cupping that occurs at the corners.
These things might have been less in evidence if I had chosen a wool yarn for my stole. I used linen, with very little stretch. When you use an unstretchy cotton, silk, or linen yarn for a pattern written out for wool, you need to be much more precise in the rate of attachment and in working the corners because you can’t rely on natural elasticity to even out tight or loose bits.


Obviously aggressive blocking is called for here, even though it will be only partly successful.
As to where I went and what I did – if you saw a tall gal with glasses and short dark hair knitting on this project in Logan, Chicago Midway or Dallas/Ft. Worth airports over the weekend – that was me.
WAVE SCARF – ROUNDING SECOND
Back to the Print o’ the Wave scarf/stole. I didn’t have enough time to sit down and noodle out a hat last night. Invention tends to happen over the weekends here at string. Instead I continued on with the knit-on edging. I’m within an hour or so of completing the second side and working the second corner. At that point I’ll be about half done, as I began my edging pretty close to the first corner.

The thing looks wing-shaped because I’ve got a zillion remaining live stitches picked up around the circumference all on a single circular.
Aside from the error in the chart described before, I’ve experienced no problems with the edging. It’s taking forever, but if you’re a process knitter like me, that’s a design feature, not a bug. The only remaining debate about this piece is to whom I will give it as a holiday present.
WRAPPED SPANISH HAT – EXPERIMENT 1
As promised, here is my experimental foray at the wrapping technique used on the 18th Century Spanish hat from the V&A’s photo collection.

I tried out three different methods of making the floats. First, this is the second swatch. My initial attempt was working this in the flat. It was a mess. So I switched to working in the round, on the principle that the inspiring hat was probably knit in the round.
The largest section on the bottom (green arrow in the photo) was done using Tamar’s suggested method – bringing the yarn to the front of the work, slipping the stitches to be wrapped purlwise, moving the yarn to the back of the work, returning the slipped stitches to the left hand needle and then knitting them off. You can see that it works nicely, but has a tendency to distort the stitch immediately preceding the wrapped segment. This is most evident in the columns of wraps, in which the same stitches are wrapped on several succeeding rows to produce a vertical column. It’s still there on the area where I shifted the wraps to produce a diagonal, but it is less evident.
The second section (red arrow) was done using the method I first posited – moving the yarn to the back of the work, slipping the stitches purlwise, bringing the yarn to the front of the work, returning the slipped stitches to the left hand needle, tucking the working yarn behind again, and then knitting off the formerly slipped stitches. It has slightly different weaknesses than Tamar’s method. In this case, I seem to be more prone to drawing the loop too tightly, and there is also a slight distortion of the stitch immediately preceding the wrapped section. It does however look just a little bit neater to me.
The third method (blue arrow) was one that came to me while I was fiddling with the other two. I worked those final two rows of wraps not as wraps, but in two passes. On the first pass I brought the yarn to the front, slipped the stitches that I wanted to “wrap”, returned the yarn to the back, slipped the plain stitches after them, brought the yarn to the front, slipped the “wrap” stitches, returned the yarn to the back, and slipped the plain all the way around. This laid one continuous thread in a single loop around my work. Then I knitted off the entire row. You can see I had time to do this twice. This does make a neater line than the wrapped methods, but has other drawbacks. First and foremost – it’s hard to keep an even tension on the continuous loop as it’s carried around the entire piece. Second, having a single continuous loop limits knitting’s natural elasticity. While this might be a useful technique to help maintain tightness in areas you don’t want to stretch out (like on the cuffs of an all-cotton sweater), I don’t think it is optimal for a hat.
Now going back and looking at the V&A picture again, it does look like there’s slight distortion of the stitches immediately before the wraps, and the wraps do look more like the slightly bowed ones produced by both Tamar’s and my posited methods. Without seeing the artifact itself, it’s hard to say which of the two was used. I lean to mine, just because I can control the distortion a little bit better with it than with hers, but both are functionally equivalent, and I’d say both are possible use case candidates that can’t be entirely ruled out without actually seeing the artifact’s front and back, both close-up.
MORE MUSINGS ON THAT SPANISH HAT
Back to that red Spanish hat. Several people wrote in with comments that deserve further testing.
First, Nancy and Jean suggested that it might have been done with two-end knitting or Tvndsstickning (also called Twined Knitting). I haven’t played with this technique yet, but from the appearance of the side sporting the standings in this Knitty article, I have my doubts on its application for this purpose. It looks like each individual stitch in this technique bears a wrap. The Spanish Hat clearly shows longer floats that wrap several stitches together. The twined/two-end knitting technique does look very interesting, and could clearly be used not only to make the double thick fabric for which it is justly famed, but might also have additional decorative implications if the twisting was shunted from back to front and vice versa, following a simple geometric pattern. But I don’t think it was employed on this hat.
Tamar (of the infinite needlework library) also wrote with another simpler suggestion. She was able to get a closer look at the bottom edge of the hat in the V&A’s picture. She says:
Especially at the bottom of the picture on the V&A site,
you can see the wrap yarn coming directly from the bottom
of the knit stitch to the right. So the wrap goes
immediately in front of a group of stitches.I haven’t tested it, but perhaps the wrap is done first
around the previous row’s stitches, and then they are
knitted.
This makes sense, and would probably be a bit less fiddly than knitting and then the wrapping in the same row method I posited on Friday. I’ll test out both wrapping methods, possibly tonight, to see. If all goes well, I’ll put down my lace shawl and do up a quick hat pattern using my findings. It would be highly cool to reverse engineer a knitting technique of the 1700s, and rescue it from historical obscurity!
WEB WALKING THROUGH RUSSIAN KNITTING AND CROCHET
UPDATE: It’s January 2022 now, and I note that this old post from 2006 is getting a lot of attention. Please be warned that the Internet landscape has changed in the years since I wrote this. Many Russian sites are rife with malware. Some has been introduced via on-site ads that autoplay, some has been planted by hackers, so even innocent informational/hobbyist sites can be compromised without the viewer’s knowledge. If you do go wandering through Russian hobby sites, please be sure you have robust, up-to-date virus protection, and avoid downloading material of any type.
——- Original post below —–
I am having a fascinating time this weekend noodling out Russian language pages on knitting and crochet, and trying to translate some terms. I started doing this because I had (dimly) remembered some Russian language stitch dictionary pages that offered up a slightly different collection of texture patterns from those that commonly seen in English language books. I remembered some that employed ornamental floats, so I wanted to find them again. Now bear in mind, I don’t speak or read a word of that language. My assumptions here are going to range from reasonable to laughable. But I’m having fun none the less.
I started my search with the one English character transliteration of a Russian word that I did know from prior searches. I have no idea how the original is pronounced, but in what looks to be a one for one letter swap, Latin alphabet for Cyrillic, uzor (plural uzori) appears to mean stitch or pattern.
I used that term to do a Google image search. When I found an image that was interesting, I clicked through to the parent page and followed some of the in-page links there. Along the way I kept a notepad file open, gluing in copied terms in both the original Russian, and the Latinized spellings frequently used in Web page URLs.
Here are some of them, along with my wild-ass guesses on what they might mean.
– uzori or uzory – patterns (possibly also stitch designs)
– stitches
– knitting, probably also crochet work
– Crochet
– socks
– hats or caps
– table linens, including doilies and runners, but also napkins and cloths
– chart or diagram
– motifs?
Along the way, I found a couple of interesting patterns. Here’s one for a lace doily. Its pattern page presents some useful visuals, including starting a doily center using the crocheted circle method, blocking hints, and (of course) the chart for the piece itself.
Now I had a second problem. I can knit from a chart in any language, provided I have the symbol key. What do the chart symbols mean? It’s hard to cut and paste the chart terms into on line Russian-English dictionaries (this was the best one for my purposes) because for the most part, the terms are there as images, not text. Sadly though Russian knitting symbol interpretation seems to be just as jumbled as Western charting, with different sources using either different symbols to mean the same thing, or using the same symbols but employing them differently. Looking over the lace chart for the doily above, I suspect that straight vertical lines are knits, the little arrows facing left are knit through the back of the loop (ktbl). U must be a YO (perhaps U with the 2 in it is a double yarn over), and downward facing Vs are decreases (numbers in the arms of the V indicate the number of stitches to be decreased). Obviously lots of experimentation is in order here to confirm (or disprove) these guesses.
Although I was hunting for knitting, most of what I found were charts for crochet. The crochet notation looks a bit more standard. Some of it seems to be similar to the notation found in Japanese crochet patterns. For the most part they look to be easily interpreted even if one doesn’t read Russian. Here are a few of the ones I liked best.
- A crocheted spiral doily
- An interesting crocheted stole or table runner
- A stole featuring a very mesh-like crocheted structure (click on the link to get the charts)
- A cushion pattern that could be adapted into a very nice lace scarf
- Yet another doily, this one that makes subtle use of some pineapple style features, but does so without being “yet another piece of pineapple crochet”
- Another small round piece. I like the contrast between the densely worked areas and the open net-line areas.
- A spectacular collection of small round, square, and other shape motifs. (I am not quite sure how Russian copyright law works but be aware that other pages on this site offer what look to be scans of full books)
And finally I found Russian language stitch patterns that do look like they exhibit some kind of wrapping.
- This one looks like the wrapping happens on the diagonal Perhaps this was done by reaching down a row or two and picking up a long loop, then knitting them off together with the current stitch.
- Photographed sideways, this one has a combo of horizontal wraps that gather the stitches enough to make a smocked effect.
- And this one clearly has stitches picked up several rows below. The chart is a bit confusing because it appears to be written for the flat, showing alternating rows of knitting and purling to produce the reverse stockinette texture. Most charts I’ve seen stick to “as seen from the front side” logic.
But I never found the dimly remembered patterns that set me off on this quest in the first place.
INTERESTING 18TH CENTURY CAP – ORNAMENTAL WRAPPING
A person posting on one of the historical knitting lists asked a question yesterday about this 18th century Spanish knitted cap. I’ve poked around the Victoria and Albert Museum’s on line photo collection, but I hadn’t taken the time to zoom in and look closely at this particular item.
At first glance the cap appears to be covered with knit-purl texture patterning, but if you zoom in (and especially if you have the ability to get an even closer look at the image) you’ll see that the texture isn’t formed by knits and purls. Instead, the design is made up of some sort of stranding that floats over a stockinette background. The question was about how this might have been done. Unfortunately, we can’t see the back of the work. So I got to thinking…
The most obvious way would be for someone to work up a plain stockinette cap, then hand-stitch the floats over counted stitches, to produce a diapered or pattern darned effect. This would certainly work, but lacks elegance. If I were making a hat like this, I’d much rather do the decoration at the same time as the base knitting, rather than going back later.
This leaves two methods – some sort of in-row wrapping, or slipping stitches with the yarn in front of the work.
Let’s look at slipping first. If you knit a row, then holding yarn in front, slip several stitches, and then resume knitting, you make a fabric that has a base row of normal height, then a distended area where stitches were slipped. If you continue to do this on subsequent rows without rows of intervening plain knit, you pull those stretched stitches up even further, creating a vertical column with a grossly distorted base structure. It doesn’t look like the knitter of this cap made the floats by slipping with yarn in front because if you zoom in and examine the long vertical bars of the ornamentation, a float seems to happens on every row, and there is no evidence of vertical distortion.
This leaves the wrap method. Wrapping stitches for ornamental effect isn’t widely practiced any more although it still survives almost as a curiosity in some cotton knitting. You can see an example of wrapped stitches in the cover pattern on the Lewis Knitting Counterpanes book published by Taunton Press. In this case the wrapping is pulled very tightly to magnify the gathered effect of the pattern. The wraps are peeking out beneath the bellies of the scallops:

I’ve also seen texture designs in European pattern collections that use wrapped stitches. There are a couple of the tight-wraps-as-gathers type at the end of Omas Strickgeheimnisse, a German-language knitting texture pattern dictionary. I thought there was at least one in the Bauerliches Stricken series (another 3-volume German stitch dictionary), but thumbing through, I can’t find it now. Some of the on-line Russian language stitch collections also show wrapped stitches I found these by searching for which may mean pattern or stitch in Russian. It also seems to transliterate to the letters “uzori or uzor” in Western alphabets, which are also good starting points for searches. (No I don’t speak or read Russian, I’ve stumbled across this bit of trivia while web-walking.) I don’t have time this morning to fish up the citations for these dimly remembered Russian texture patterns. I’ll have to leave that for tomorrow.
However, none of the contemporary sources for these wrapped stitches employ them in the way I envision that the Red Cap Knitter did.
I don’t think it would be difficult to do this, just a bit fiddly. I like fiddly. Remember that this is a thought experiment. I haven’t tried the method out yet. Perhaps over the weekend I’ll have time to do so. Here goes.
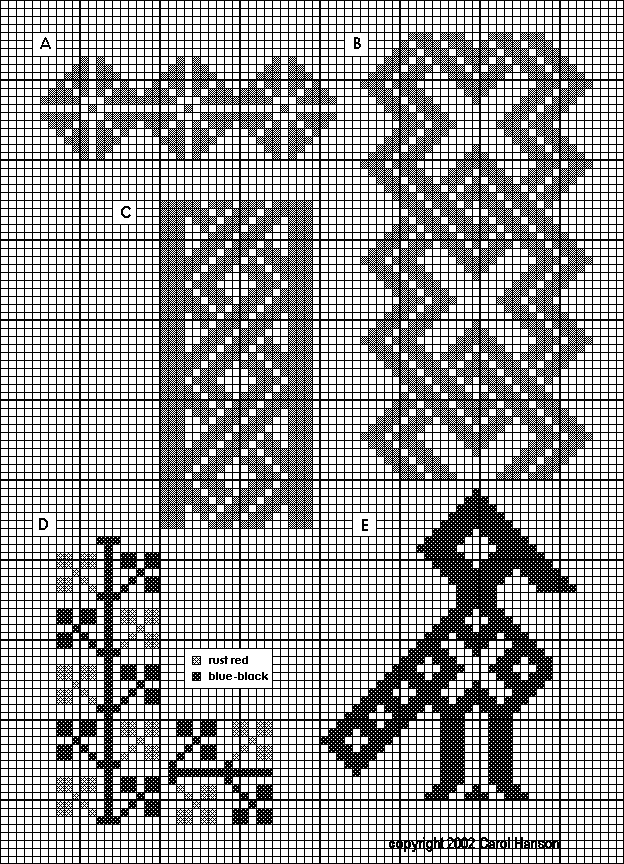
Let’s say you want to lay a ladder across four stitches. You knit the four as usual. Then you take your yarn and move it to the back of the work. You transfer four stitches from your right hand needle back to the left hand needle, then you move the yarn strand to the front of the work, laying it in the “ditch” between the first stitch to be wrapped and the ones that came before it. Then you slip those four stitches back to the right hand needle. You draw the yarn strand across the front of the work over the four, then return it to the back. You have now “lassoed” your four stitches. Give the thing a slight tug to maintain tension, and knit the next stitch as usual.
Now all you need is a suitable graph, and you’re set. (Credit: This particular graph has been researched by SCA pal Carol.)
PROGRESS REPORT – PRINT O’ THE WAVE SCARF
Back to the project in hand. I’m up to adding the edging to the Print o’ the Wave scarf, which in part sparked the past two days’ digression into general edge-affixing techniques.
I am sad to say I have errata for the pattern as available now. I wrote to the author over the weekend to report it. While the mistake is not something that will trip up people who are comfortable with lace construction, people doing this scarf as a first or second lace project will be a bit more frustrated.
In Chart B – the graph for the edging, the next to last stitch box on rows 9, 11, 13, and 15 should be a K2tog, not a plain knit.
A good way to “proof” graphed lace patterns is described in the Lewis Knitting Lace Book published by Taunton. It’s in several others, too but I think Lewis outlined it the most clearly. To paraphrase, special techniques and weird row-perturbers aside,, for most simple lace to remain at a constant width, with left and right edges parallel, the number of stitches increased must equal the number of stitches decreased. For lace to grow wider, there must be more increases than decreases. Conversely, for lace to narrow, there must be more decreases than increases.
On the edging in question, we know that rows 9, 11, 13, and 15 are the ones on which the pattern narrows, forming the “downhill” side of each repeat’s gentle pyramid point. But if you count up the increases and decreases on (for example) row 9, you end up with four stitches added (all YO increases), and four stitches decremented (two k2tog, and one k3tog double decrease); yet the pattern shows a net one-stitch loss on each odd numbered row. Since the visual lines established in the design are very strong, there’s only one logical place where that extra stitch can be lost – the next to last position on the row.
I have to admit that I was a bit tired when I first played with the edging pattern and kept messing up. But I muddled through, and then compared this variant of the Ocean edging to those in my other reference books (most notably the most excellent Heirloom Knitting by Sharon Miller). Those patterns do put an additional decrease in the penultimate position on each “downhill” row, so my guess has precedent.
I also have to moan about another minor lace tragedy, visible in the photo below:

All that muddling about at the beginning, starting the trim and ripping it back resulted in a dropped stitch over near the beginning of the edging (I’m working along the top edge of the stole first). Aaargh! I don’t want to rip back, so I’ll have to repair it tonight.
MORE ON ATTACHING AN EDGING – DRAWN LOOP METHOD
Yesterday I described two of the more usual methods for attaching edgings to project bodies – plain old mattress stitch seaming, and knitting onto a live stitch or finished edge. Today I continue with a third method. I’m not quite sure what it’s called, so I’ll call it the drawn loop method for now.
I learned this while doing the Forest Path Shawl (Interweave Knits, Summer 2003). If you plan on finding a copy of IK and working the Path, be aware that it appears to be sold out from the back issue collection on the IK website, and that there’s a correction posted in the magazine’s errata pages.

Drawn loop is intended for working a knitted trim onto a finished edge, and seems to be the least bulky of the three methods when used for that purpose. Like plain knitting on, the attachment is worked row by row as the knitting proceeds. Many patterns that use plain knitting on include directions to pick up an endless number of stitches prior to working the attached edging so that the trim is applied to live stitches rather than the original finished edge. The drawn loop method avoids that annoying exercise in endless counting although it does work best when done on a slip-stitch selvage. Unlike knitting on, there’s no column of double stitch thickness decreases formed where the edging meets the main body. As such, it’s particularly airy. It is however a bit fiddly to do, and works more easily with a smooth finish yarn than with a hairy mohairy type lace yarn.
To use drawn loop, you cast on much as for knitting on. If you use half-hitch, knitting on or a cable cast on to add your edging’s worth of stitches, you do so to your right hand needle, but instead of making a slip-knot for the first, you establish that first stitch by picking up a stitch in the edge-most loop of your main body, then work back a wrong side row to return the yarn strand to the rightmost side of your edging (and point of attachment). If you had the foresight to have incorporated a slip stitch edge in your main piece this will be easy. Otherwise you’ll have to eyeball where to pick up. Difficult (which is why many patterns want you to pick up stitches along finished sides) but with practice this is do-able.
If you use a provisional cast-on like a crocheted chain, you’ll put those new stitches onto the left hand needle, then work a wrong side row using your good yarn to return the rightmost side of the edging (and point of attachment).
Once you’re back at that rightmost edge, you use your needle tip to draw another stitch up through the next selvage loop of the main body. Here’s where it gets tricky. Enlarge that “stitch” until it’s a loop of about 18 inches or so diameter (how big to make it will become clear after you’ve done a couple of iterations). That loop will have two “ends” – one firmly attached to the knitting, the other sliding free trailing back to your yarn ball. Grab the fixed end and give it a gentle tug to make sure there’s no extra slack, then using the loop, work across the right side row of your edging. Flip the work over as usual, and work the wrong side row back, again using the giant loop. When you get back to the point of attachment, give another slight tug to the strand coming from the yarn ball to pull out any excess left over from your giant loop. Then repeat the process, drawing up another giant “stitch” in the next selvage loop and using it to knit a pair of edging rows. All of this sliding of the yarn back and forth as the large loops are made is the reason why this method works better with smooth rather than hairy finish yarns.
Again, like any attachment method that involves butting two pieces of perpendicular knitting, some adjustment of the ratio between rows worked to selvage stitches may be necessary. If the newly done edging is beginning to get too ruffly and fluttery, you may need to rip back a row or two and skip a selvage stitch. If the edging is drawing up and the body is beginning to gather, you may need to work an additional pair of edging rows without attachment.
Like I said, it’s fiddly but effective, creating the lightest possible line of attachment between an edging and a live-stitch-lacking main piece, and avoiding pain-in-the-neck sessions picking up a zillion stitches around a piece’s perimeter. I used drawn loop to good advantage on my Spring Lighting Lacy Scarf pattern, and plan on using it again on future designs.


