ANOTHER NEW TOY
If you’ve been reading here over the past month, you’ll have seen me working the current project in a hand held hoop. I love hoops, especially their portability and versatility. But I vastly prefer the “real estate,” tautness, and ability to use two hands that using a scrolling frame gives. I’ve had two sizes of the Needle Needs Millennium frame for quite a while. I tend to pull those out for the big projects, especially those with metal threads, or that feature easily crushed or disarranged stitches (satin stitch, knot stitches). I also have a sit-upon hoop. I do use that extensively for the smaller pieces with less fragile work on them. It has some of the advantages of the other two types, but as a compromise, with less ability to place the piece in exactly the optimal spot and angle for visual acuity and best lighting. The hands down most efficient way for me to stitch is the big Millennium on my Lowery stand.
After months of hoop-in-hand, I was yearning for the scroll frame experience. I heard that Needle Needs had a new junior size frame, and was also offering smaller roller bar and side extension pieces for the Millennium system. So I sat down and weighed price, stitched area size, and the fact that pieces from the new junior frame are not compatible with its larger brother, then splurged on a pair of new extenders and roller bars.

I have two sets of the older 8-10″ side stretchers. I got that relatively small size because I realized that the bigger ones would produce a stitching area that would be difficult to reach. That bore out when I was working the coif using the 24″ roller bars and the 8-10″ extenders. My behind-the-work left arm could reach only 60% of the available area with it set at full extension – barely making it to the top edge of my piece, and I had to flip the frame over to work the remaining spaces. But while I might have gotten the even smaller 5-7″ sides this time around, I had the feeling that a space that small in combo with the Lowery frame extender arm would be less than optimal.
Obviously the new components arrived yesterday and were immediately deployed:
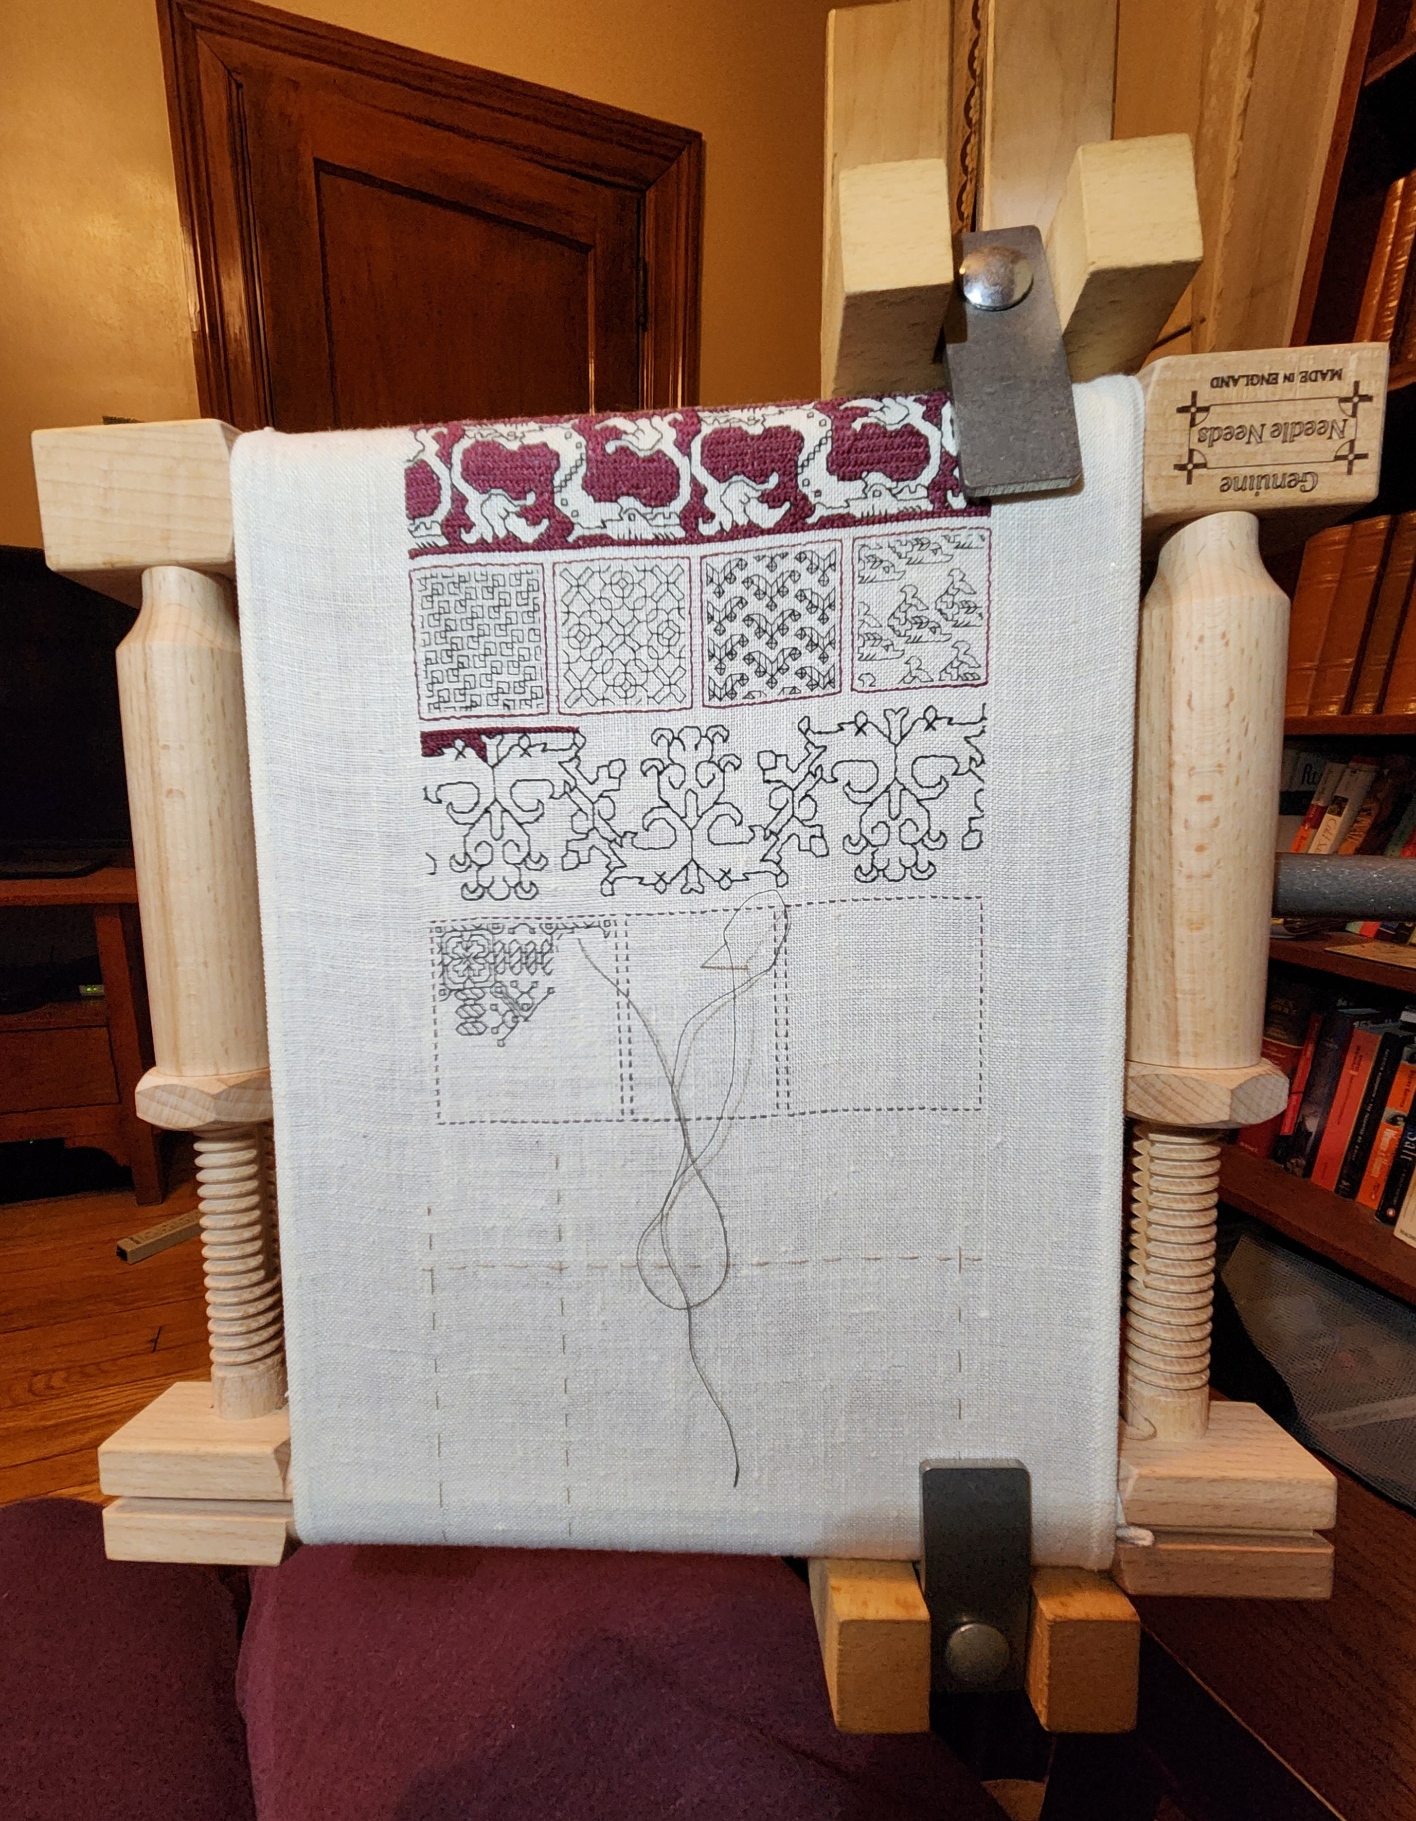
And I was right. You can see how much of the available area is “eaten” by the width of the gripping Large Frame Extender. Even if I position the frame so that the clamp is grasping the corners of the roller bars, it’s awkward to work right up against the Extender’s upright. But just like with the larger set-up for the Coif, I can flip the frame upside down to work that side of the piece.
I know that not all my new projects will be narrow band samplers, but between the new short roller, and the new short side stretchers, plus the pieces I have on hand used in new size mix combos, my toolkit has valuable extended capability.
As for more on the design on this sampler, the types of symmetry often seen in fills and how to best center them depending on the type of symmetry, that will have to wait until the next post. For some reason the blogging software is having indigestion, and I’ll have to cut today’s intended post into two. Will finish that one out and get it up by the end of the week.
TALKING HOOPS AROUND THE SUBJECT
Yesterday was a needlework housekeeping day. I put away the supplies from my last project, neatened up my stitching-on-the-go box, and cast an eye over my kit in advance of whatever project I will do next. And there WILL be a next – it’s just a matter of getting a couple of holiday obligations finished first.
Among the reassessments I made was an evaluation of my hoops. I have several. My best ones are three in-hand hoops, and one sit-upon hoop on a stick. All are hardwood wood and better quality, with sturdy brass hardware – not the bamboo ones with fragile clasps. Three of them are shown in the family photo below. The other one is an unwrapped duplicate of the smallest, shallowest hoop. I haven’t wrapped it because it happens to have much better tension than the one I did wrap, and there might be call for me to use an unwrapped hoop for a specific purpose. Since I don’t leave my projects hooped when dormant, there’s no call for me to have two absolutely identical ones, both prepped and ready.

The in-hand hoops are all 6 inches (15.24 cm) in diameter measured across the inner hoop. I find that the most convenient size both for maintaining tension and for use in tight places. The sit-upon is 8.75 inches (22.22 cm) across the inner hoop. I note that a 6 inch diameter hoop/stick part is now available from the maker. I might pop for that someday.
The ring of one of the in-hand hoops is 1/4 inch (0.63 cm) deep, and the other hand held one is 5/8 inch (1.59 cm) deep. The hoop on a stick is even wider – 7/8 inch (2.22 cm).

I also have a selection of both plastic and wooden quilting size hoops, a foot in diameter or more that I’ve gotten as hand-me-downs, or as part of “take the lot” yard sale/jumble sale needlework bundles. I rarely use them because I find they are cumbersome, and they don’t provide the drum-tight tension I prefer. None of those have been promoted to my on-deck group, and aren’t shown.
But why so many of the smaller diameter? Well, it happens I do have several larger scrolling frames, and use them when needed – mostly for things that have fragile threads, metallic threads, or other raised embellishments; or that employ crush-prone stitches that a hoop could injure when it is repositioned. But for smaller pieces, non-fragile pieces, and in some cases REALLY big projects like tablecloths, I prefer the hoops. These days I mostly use the sit-upon, but for sitting on the beach and stitching, the sit-upon is useless. You can’t sit upon a hard paddle seat in a soft fabric sling chair – so hand hoop it is.
Why both the deep and the shallow? The deep ones (including the hoop on the stick here) work better with thinner fabrics – the 38 and over count linens and blends I usually use. The shallower ones work better for thicker fabrics, especially heavy 28 to 36 count evenweave, denim, and other sturdier fabrics. If I used most Aida I’d probably employ the shallower hoop for that, too. Do you have a standard deeper hoop and you are struggling to get it over your Aida? Try a thinner wall hoop. It will be easier, even if you wrap the hoop.
Wrap the hoop?
Yup. Makes a world of difference. Wrapping the inner hoop with 100% cotton twill tape vastly improves the grip of the thing, and makes the fabric much easier to mount and to tension. It also cushions the work a bit, cutting down on stitches being crushed. I will probably wrap the outer hoops, too, to prevent those shiny areas that happen when densely packed stitching meets hoop tension. But so far I haven’t bothered.
How to do it. Note that the deeper hand-held hoop is wound with wider twill tape than the other two. That was the first one I wrapped. I have to say it was significantly harder to do it with the 3/4 inch (1.9 cm) tape than it was to do with the 3/8ths inch (0.95 cm) tape. The narrower stuff is easier to stretch to conform to the circle of the hoop, without lumping and gapping.
Lumping and gapping on the outer edge of the inner hoop is to be strenuously avoided. That leads to high and low spots with suboptimal tension. The inner surface can be less “policed” but it shouldn’t present gaps or kinks that might work their way around to the top, or catch needles during stitching.
I find the best way to achieve as uniform a contact surface as possible is to overlap the tape by 50%, row on row, and wrap as tightly as possible, maintaining the established angle and stretching the tape as I go. Yes, it can take me a couple of tries before I hit on the angle that produces the most even results.


I don’t use glue or tacks to hold the end, I just wrap, gripping the tape and hoop very tightly, placing each successive course with special attention. Here you see the start and the midway point. Eventually the origin end will work itself a tiny bit loose as I go, but I keep it folded flush against the inner surface of the ring, and take care to wrap over it. Eventually I get back to the start. I cut the tape, tuck the ends under to prevent fraying and firmly sew it to the inside surface of the ring, back where it meets the beginning. That spot is indicated by the arrow, below.

The only caveat on this whole thing is that wrapping may add so much diameter to the inside hoop that the little thumb screw holding the clasp together becomes too short. This happens mostly on the less expensive/mass market type hoops. If that happens, a quick stop at an old fashioned hardware store can help you land a longer replacement. And by that I mean a store with actual people who know the inventory, not a big box/self-serve hardware department store that sells everything in quantity, entombed in blister packs. Bring the hoop and screw in and explain the problem at a non-busy time. The staff will be able to size it and find **just** the right thing.
And that’s how it’s done. If done with proper care, wrapping a hoop of this size takes me about a half hour. And a half hour well spent.
Other Recent Projects
The multicolor headscarf I was stitching has finally been made up into its finished form – a lined triangle with ties. The ties are also 3/8 inch twill tape, but a heavier/denser and whiter one than that used on these hoops. I folded it in half longitudinally and stitched it to make robust tie strings. But I didn’t remember to take a finished item photo, and then decided to give it as a present to a dear old friend who married over the weekend past. I forgot to ask permission to use a photo of her wearing it. But I am happy that she loves it enough to tie it on immediately after the ceremony.
And the Fractured Symmetry sampler joins the rest of the to-be-framed or finished works on my Wall of Shame.

He is tucked in next to the underskirt panel at the far left, just below Stone by Stone. In addition to some of my perpetual unfinished objects (UFOs), there are now six pieces there, stitch complete, waiting for framing or other finishing. I suppose I should get on that.
BUT in the mean time I have seasonal obligations to meet. I promised a stocking with a wolf on it before the holidays hit. I’m on it. The recipient’s name with be duplicate stitched into the white band at the top. I’m afraid that the distortion inherent in translating squared graphs to rectangular knitted stitches (wider than they are tall) has stretched poor Wolfie a bit. I am hoping that additional embroidery – maybe an eye and some ornaments on that tree, will make him both more identifiable and more festive.

The pattern is one I’ve done twice before, once for each of the spawn. But the last time I knit it was 25 years ago. I found one of the pattern pages, but not the others. I’m extrapolating from the other two extant stockings. An interesting exercise, for sure.

ALL DRESSED AND READY TO GO
… Just waiting for my thread to arrive.
As I planned, after tracing the Unstitched Coif pattern onto my linen, I cut the cloth and hemmed the top and bottom of the piece (left below). Then I trimmed the left and right edges with a folded and ironed piece of wide cotton twill tape offset a bit from the linen itself, so that any side lacing would have something to bite into that would not distort the ground. That’s sewn on with simple running stitch.


Once the ground was prepped, I mounted it on my largest scrolling frame. Because the entire coif fits in the frame’s center, I don’t need to employ any scrolling functionality. That’s why I made advance accommodation for side lacing. I used plain old heavy cotton crochet string for the lacing. The ball of it lost its label long ago, but I think it’s Coats & Clark’s Speed-Cro-Sheen. Here’s the entire thing, set up on my stand using the large frame extender (the wooden arm with the metal tabs grasping the work), and laced tighter than most costume-drama heroines.
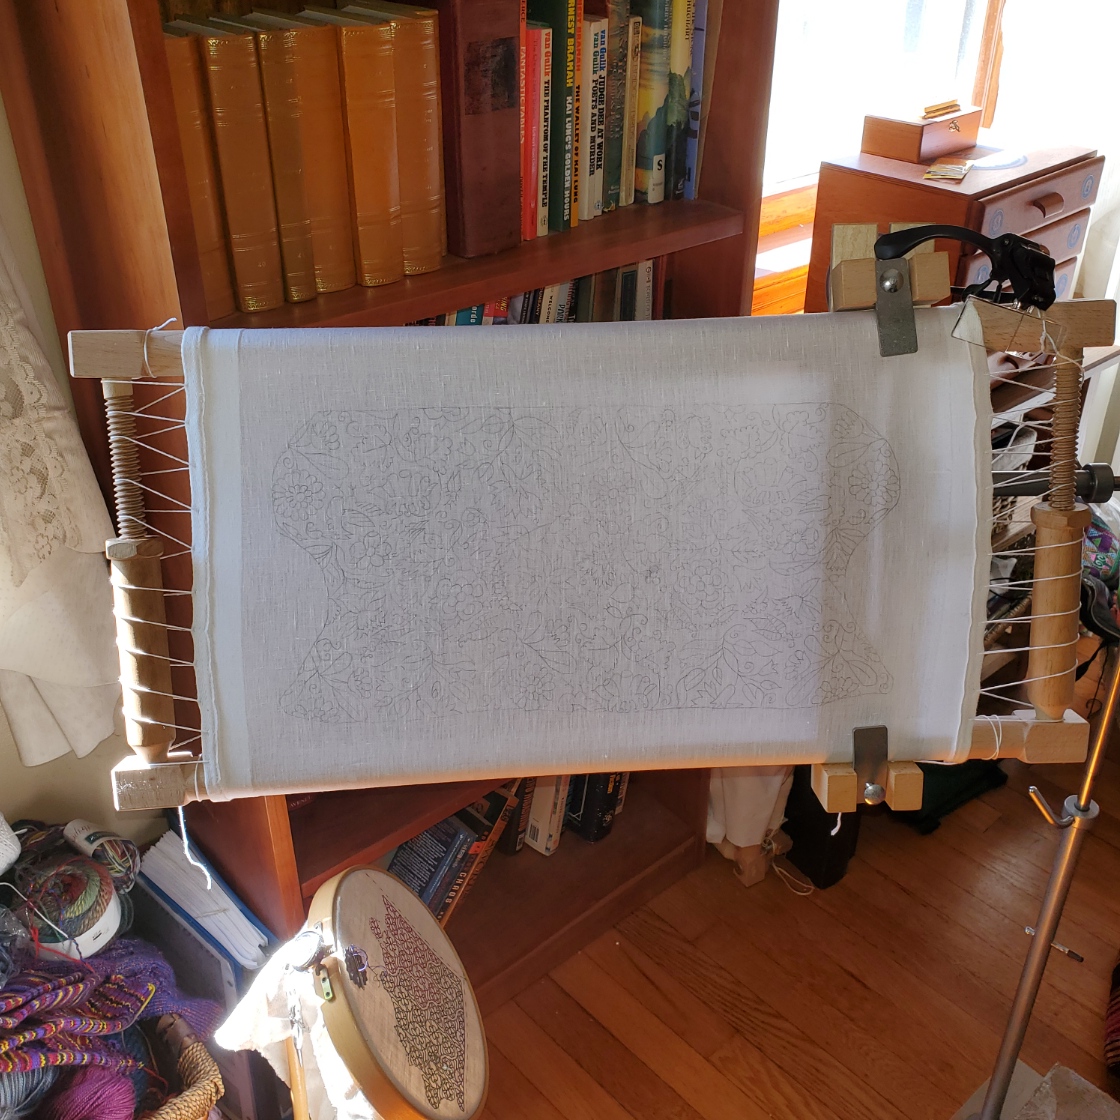
Note the brick just barely visible at the bottom right corner of the photo. Because I swing my frame out like a barn door to exit my knitting chair, two bricks of extra weight on the paddle foot of my stand are necessary to counterbalance the mass of this large frame when it is positioned perpendicular to the foot. Someday I’ll knit or crochet neat little covers for them as yet another household whimsey, but for now they’re kept tidy with plastic wrap.
Because so much of this is a trip into the unknown, I took the side slice of linen left over after I cut my project piece, and traced a couple of motifs onto it. That’s going to be my “sidecar” – an as-I-work sampler used to try out ideas before I trust them to the main project. I didn’t bother hemming this bit. You can see it on the arm of my stitching corner chair.

I’ve begun playtesting countwork on this linen on the sidecar, but I haven’t received my ultra-fine thread or needles yet. One ply of the Golden Schelle thread is almost fine enough for fills, but I want to see the others in comparison because my first efforts with it are wobbly enough to be unacceptable. Plus stitching on this stuff with a #28 tapestry needle is like passing a log through a window screen, and I am still adapting to the magnifier; both of which complicate matters somewhat.
I know one of the threads I ordered will be here later today, and hope the other two plus the blunt beading needles will arrive some time this week. For the record none are the Piper 30/2 that others are using – the cost of overseas sourcing plus the time to ship made me look for a domestic equivalent. More on all three when they arrive.
For journalistic veracity, I present the shameful and discreditably woebegone initial counted bits, and threaded #28 needle, plus a US penny (at 7:00), and UK penny (at 12:00) – both for scale. Be kind, I hope to work out the kinks before attacking the project, proper.

I will be testing out the Schelle silk, plus the Tied to History Allori and my other unnamed stash-aged silk in the mean time, trying out various treatments for the outlines and possibly the stems. I am still hoping to incorporate metal threads in the stems, but plain couched doubles of the #5 may be too stark.
Obviously for me at least having the sidecar is a total necessity on this one.
