In the last post we considered yarn choice and needle choice. Now on to pattern choice and rough dimensions.
The whole point of this small baby blanket (or lap blanket, or pet blanket) project is to try out some new technique or knitting approach in a low-stress project that produces a useful result, and that doesn’t take a ton of time to finish. Because both sides will be visible and the curling inherent in stockinette isn’t desirable, it’s a great place to try out texture patterns, provided there’s a suitable balance between knits and purls – especially in the edge-most two or so inches all the way around. Working a two or three inch border of garter stitch or moss stitch all the way around is a standard approach to fighting curl that results in a pleasing frame around whatever center patterning is chosen. But I’m in the mood to be a bit more adventurous, and to encourage folk to try some lacy knitting and a knit-on border, even if they’ve never done either before, so I’m going to use a lacy knitting pattern with a garter ground. The whole blanket will be in garter stitch, pierced by eyelets, so curling won’t be a problem and the thing will look (mostly) identical on both sides.
On to pattern selection. If we’re going to work the blanket back and forth as one unit, the easiest thing to incorporate is an insertion strip or pattern panel, rather than a large spot motif that needs to be centered north/south. An insertion strip can be begun and worked until the desired length is accomplished. Sometimes there may be a logical endpoint so that the insertion’s larger motifs display in whole units, but for the most part, strips are easy to place with minimal calculation.
There are tons of lacy strip and panel patterns out there. Some are right here on String and wiseNeedle (hit the Patterns link at the right), but there are lots of excellent choices out there in pattern treasury books and on line, written up as stand alone designs and as part of larger patterns to produce other finished objects. Feel free to pick something you like.
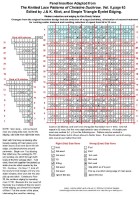
I’ve chosen a 33 stitch wide lace insertion panel – yet another design from Duchrow V. II. Here’s a simplified version of the design in modern notation (the original that I’m following is a 64 row repeat, and features two different treatments for the large center diamond area) plus some bobble-like nupps. I worked the original, so you’ll see some differences between my finished item and results from the chart below (caution – it’s a big file):
Now how to take a repeat and stuff it onto a blanket?
Easy. Even without doing a gauge swatch, we can make a rough guesstimate of project width. Remember – our blanket only has to hit a window of “usable size.” That gives us lots of wiggle room. I know that in plain garter stitch with lots of eyelets, I’m likely to get about 4 stitches per inch at the absolute most in a worsted yarn using size 8 needles. I know this because I know that using 7s, I usually hit 5 stitches per inch on the dot. Garter on bigger needles is likely to make a slightly looser fabric, so I estimate 4 spi just for the garter. But my chosen design has lots of eyelets. Because of the airy looseness that heavy use of eyelets produces, my end product will in all probability be a tad wider than this estimate. Since precision is optional here, I’m going to wing it but base my calculations on the 4 spi figure.
33 stitches at 4 spi works out to about 8.25 stitches across my panel. I could center one panel on my blanket, but I think that two panels might look nicer. Two repeats will cover 16.5 inches. (Any result over 21 inches before adding an edging would be workable.) Two repeats of my panel would eat 16.5, leaving 4.5 inches to eke out to hit my goal – about 18 stitches at my gauge. If I want to place two panels on a piece that’s roughly 21 inches across (before adding an edging), that means I’ll have to put some of these stitches in a band between the two panels, and some along the left and right sides:
I could put those extra stitches anywhere, on one edge to make an asymmetrical layout, all down the center, or I could distribute them differently, with fewer between the panels and more on the outside edge (or vice versa). I chose to divide them in half, placing half down the center, and splitting the remainder along the right and left edges. When you compose your blanket, you can do whatever you wish. And that includes using more than one texture or lacy pattern to make up your width.
So now we’ve leapt off the pier into the deep water of design and have violated most of knitting’s “must do” rules. We’re starting an original project with only the vaguest notion of yarn quantities, no precise grasp of gauge, and the barest nod to final dimension. But we are serene, none the less.
The next step is casting on and knitting. For this you’ll need yarn, needles, and enough markers to indicate the beginning and end of each section (see diagram above). I find it very useful to mark the first transition point on my right side row with a marker of special color, size or other easily recognizable appearance. It’s very easy to lose track of what side is being worked in garter stitch. Having the quick visual clue of “distinctive marker = beginning right side row” is a big help.

