GOODBYE, 1960s DUNGEON!
At long last, the basement rehab project kicks off tomorrow.
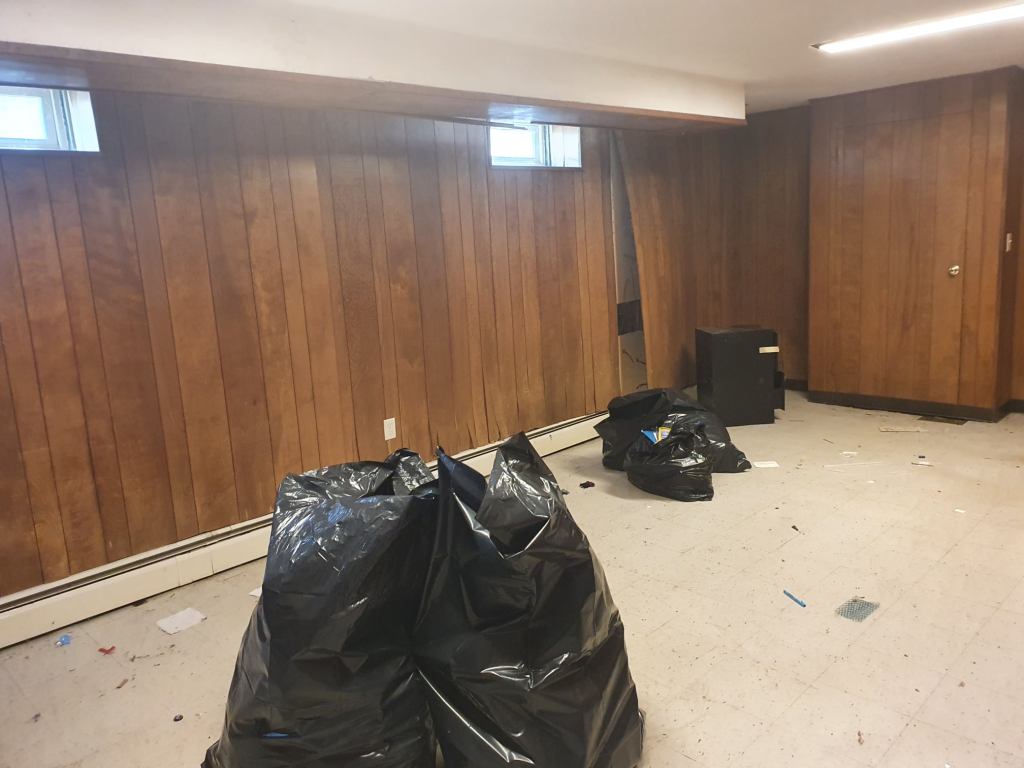
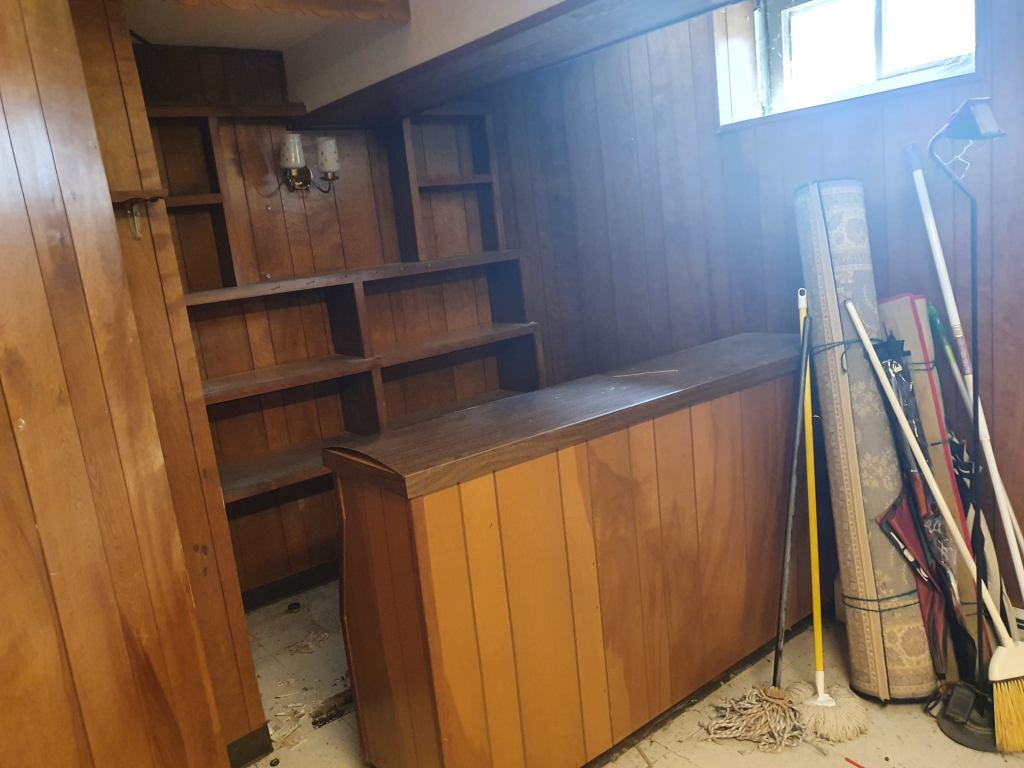
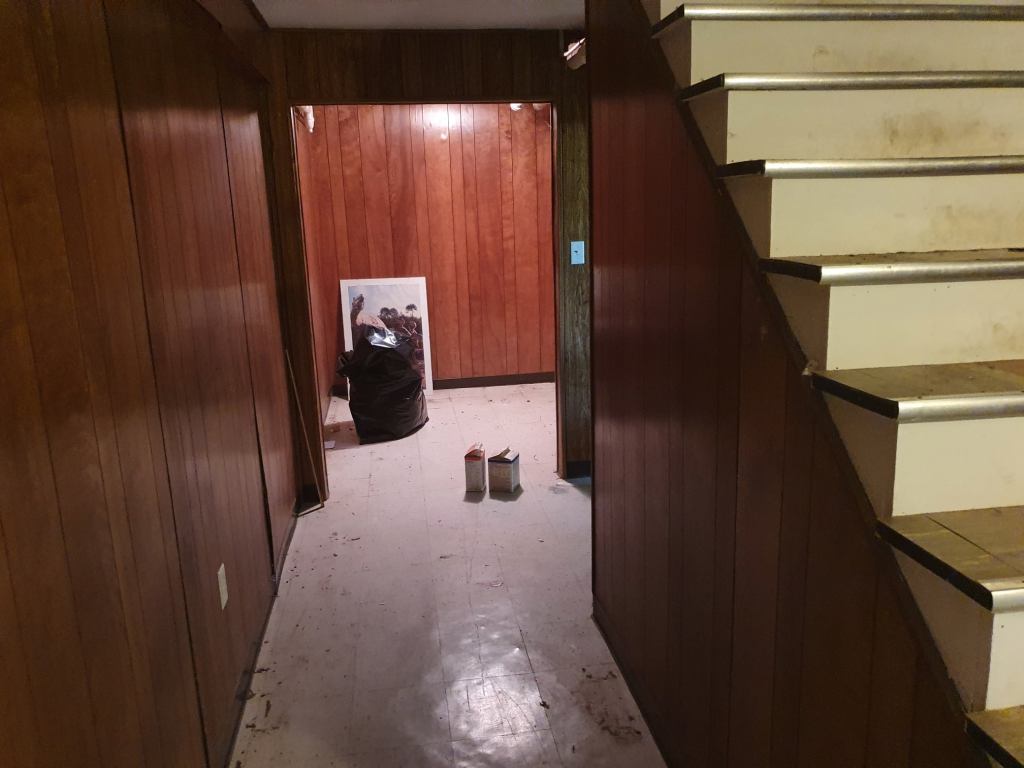
We have lots of room down there, but we haven’t done much to it beyond replacing the rotted-out windows since we moved here about 16 years ago. The kids had a rec-room/TV room down there. The ugly 1960s bar was repurposed as my needlework and knitting library, with books on all of its shelves. My desk was in the opposite corner of the room next to the bulkhead exit. And we used the former summer kitchen as the craft and sewing room, where projects could happen without occupation of the dining room table. However, we made do with the peeling paneling, the dampness, the loose/cracked floor tiles, scuttlebugs and the occasional mini-flood, and the precarious dropped ceiling. BUT NO MORE!
Here are the official before-pix, courtesy of The Resident Male.


And here’s the current layout and the plan, both in approximate proportion, but not dimensioned. Current on the left, plan on the right.
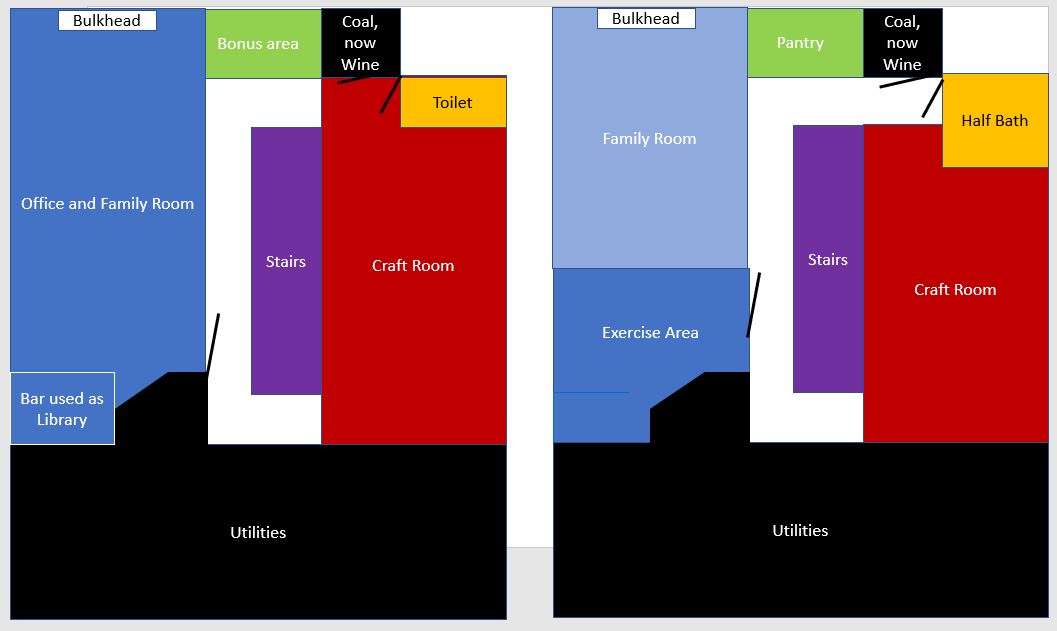
The utility room and the former coal cellar (now our wine room), both in black, are not going to be touched. And we are only changing the wall layout to enlarge the toilet-in-a-closet into a bona fide half bath, with a hand washing sink. The stairs will be rebuilt somewhat along with its railing.
The office/family room on the left will remain one large room, but the existing dismal bar will be ripped out and the entire area will be repurposed into an exercise area and a family room type area with a TV. The black shape that intrudes into it is the foundation for the two fireplace hearths on the first floor. That will stay. The walls in this room will be a wood-alike wainscoting to chair rail level, with wallboard above, probably in two shades of pale grey. Flooring throughout will be vinyl plank, in a darker grey. The door will also migrate a bit from its current location, just because it’s not very convenient right now.
The strange waste area behind the stairs (in green) will become an open pantry, with shelving. The freezer currently in the utility area will be moved there, too.
The craft room will lose its two non-functional sinks, and gain a working tub sink. There will still be plenty of room in there for my layout table, and for some storage units along the wall to hold my stitching and knitting supplies. The beadboard walls in here will be kept, but repainted. We’ll also lose the hideous and crumbling dropped ceiling. I’m not sure what replaces ceilings everywhere, but it will NOT be those.
Lighting will be updated throughout, as will the heat in the family room/exercise area (the craft room wasn’t heated before and I never noticed the lack). The bulkhead to the outside will be replaced. Its exterior wood hatchway is decades old, possibly as old as the house, and is thoroughly rotted out. A nice, weather/water-tight hatch would be a great benefit.
Where will my needlework library (the former tenant of the bar shelving) and my desk go? Upstairs to one of the kids’ bedrooms. A minor benefit of being an empty nester is the sheepish colonization of the former in-house territory of the now independent Client States.
I am so looking forward to having a clean, dry, and bright space to enjoy down there!
Now to await tomorrow’s delivery of the dumpster, and commencement of demolition! I will post updates as we go along. Be prepared to share our surprises. There is no such thing as updating a 110 year old house without unwelcome surprises…
EXPERIMENTS AND ADAPTATIONS
As an in-between, quick project, I’m working on the small tote bag – the piece on the bag body I salvaged from an old DMC cross stitch kit. I’m using yet another design from T2CM, but I’m playing with it a bit.

First, there is thread choice. Note how the black is thicker than the red, more matte, and a bit rustic-slubby. It doesn’t make factory-precise lines. It’s not cotton floss. It’s two strands of linen from a line of DMC six strand linen embroidery floss, discontinued about 7 or 8 years ago. My local independent crafts store had a small quantity left, and I bought it all out in 2016 or so. I don’t have very much of it, not enough for a large piece, for sure, and being discontinued, there is no more to be had.
Experimenting with it I have found that it needs to be used in much shorter lengths than cotton, needs a relatively thick needle compared to the ones I would use with cotton or silk on the same count ground, and performs best when very heavily waxed. That’s because the linen is surprisingly friable, and abrades heavily from the action of stitching. This is not stuff to be “sewed” – it has to be stabbed up and down. It is also stiffer than cotton or silk with a notable bend radius, and special care in tensioning stitches is needed to keep angles from distorting the weave.
The single-ply red by contrast is thinner, silkier, and easier to stitch. It’s plain old DMC six strand cotton floss, color 815 – the closest match I had to the color of the bag’s “built-in” cotton twill handles. Note though that there is minor thickness variation in the single red strand, but I bet you would not have seen it had I not pointed it out.
On to the design.
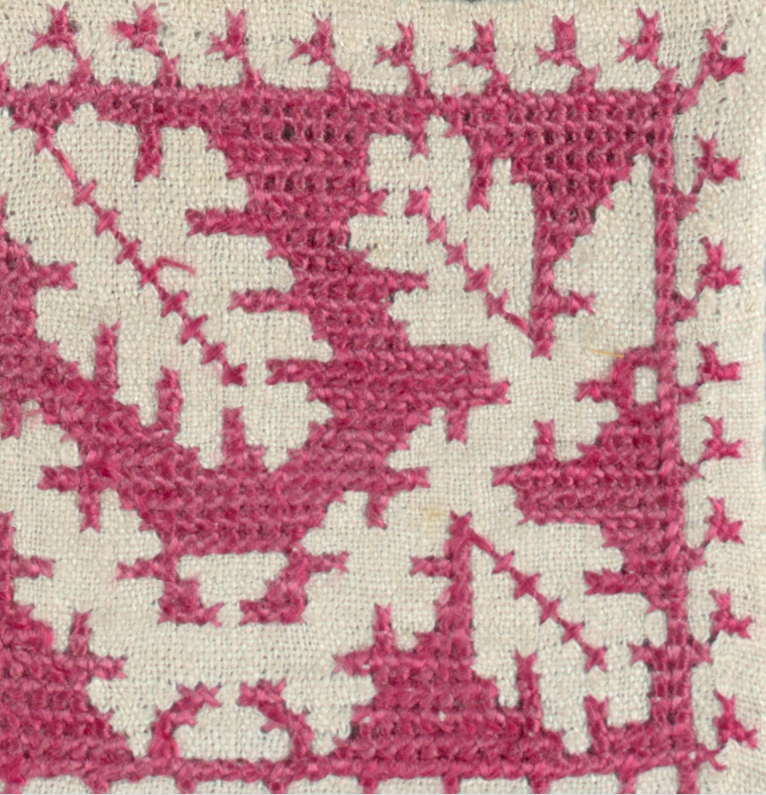
This particular zig-zag flower stripe is in my ever-forthcoming The Second Carolingian Modelbook. It’s adapted from the Museum of Fine Arts Boston holding, accession 99.178. It’s one of my favorites because the original artifact has a VERY evident mistake on it. Well, evident to me at least. Can you spot it?
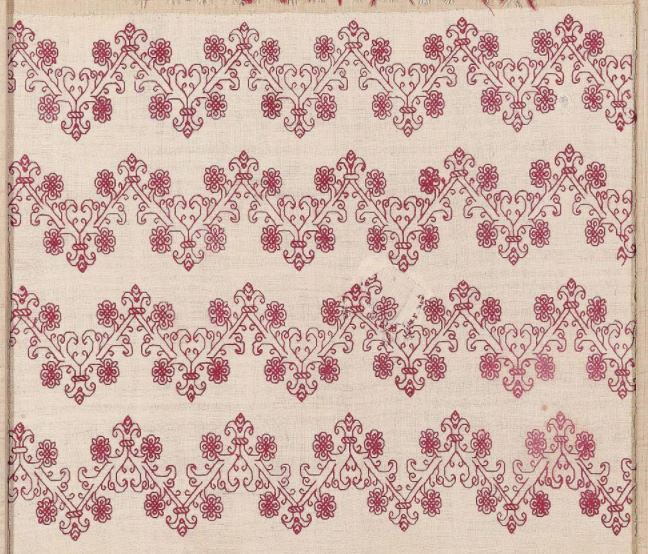
Good eyes if you have! The repeat is not quite symmetrical up and down. Look at the valleys – the V bits below the paired flowers. There are two different treatments for the foliate curls there. A “fat end ” one that curls back towards the zig-zag stem, and a “skinny end” one that curls back towards the center. The first three strips all are in the same orientation, with the “skinny end” curl on top. But that bottom one is upside down in comparison to the other three – in it the “fat end” curl is on top. It drove me nuts when I was trying to work out the pattern. Someday I want to use this ones on the sleeves and bodice of an 16th century Italian camica. I think It would be perfect for that….
Now on to my adaptation of the design for use on this specific piece.
I have moved the zig-zag stripes much closer together than the original because of the size of this very small carry bag. I’ve changed the direction of the striped “collar” around the terminal buds on the lower strip, just for fun. And I’ve introduced the step-fill between my strips. The heaviness of the double strand, rather rustic and slubby linen mates up well with the feel of the original; and the contrast between the step fill (mirrored along the center line for each up-down repeat) done in the smoother, more delicate thread adds interest.
Now. Is this a historically accurate use of the design? If I was to be totally textbook, have to say no, even after discounting its use on a contemporary tote-bag, worked in modern materials.
Yes, the flower zig-zag has a clear source. Yes, designs with voided grounds were worked at the time. Yes, designs with outlines in one color and the ground covered in another are not unknown. And Jack Robinson (the UK’s late and lamented blackwork master artisan) in his book noted the use of varying thread thicknesses on a single project.
However, I have not yet seen an artifact with a stepwise fill as a voided ground (square mesh yes; diagonal mesh, yes; diagonal zig-zags, yes). I have not yet seen a voided artifact with a ground that’s mirrored. And I have not yet seen an artifact with an all-over repeat of this type, worked with a voided background.
Do I care? Not particularly. I have no intention of entering this before any juried panel. It’s a doodle, for the sheer fun of playing around with the design. And it will eventually be a gift for someone special.
VOIDED PIECES AND OUTLINES
First, thanks to Callie of NotAnotherCostumingBlog for this question, which takes me tumbling down another chasm, dragging all of you along with me. Callie asks,
“…do you have any tips for converting patterns charted for LACS to charts for double running? I seem to have a bit of a mental block about it and the best idea I’ve got is to print them out, estimate where the lines would be instead of blocks, draw those on, and then transfer them to clean graph paper. I have a lot of patterns that I would really prefer to work linearly because it is so much faster but I’m not yet at the point where I can look at a block chart and just mentally convert it.”
I break down the answer into several parts, and try to respond to each.
Outlines in historical examples of voided stitching
Were historical voided pieces worked with or without outlines? The answer is “Yes.” There are some with stitched outlines and some without, and the presence of stitched outlines does not correlate neatly to the technique used to fill in the background. In addition, there look to have been voided pieces that used drawings as their “outlines” – working the fill right up to and sometimes over those markings, which seem to have (mostly) been stitched.
The one thing about outlines in these pieces that is different from their use in modern needle-painting style cross stitch is that in the historical works, close inspection shows the dense coverage stitching (of whatever type) encroaching on the linear stitching. This says to me that the lines were worked in one of two manners:
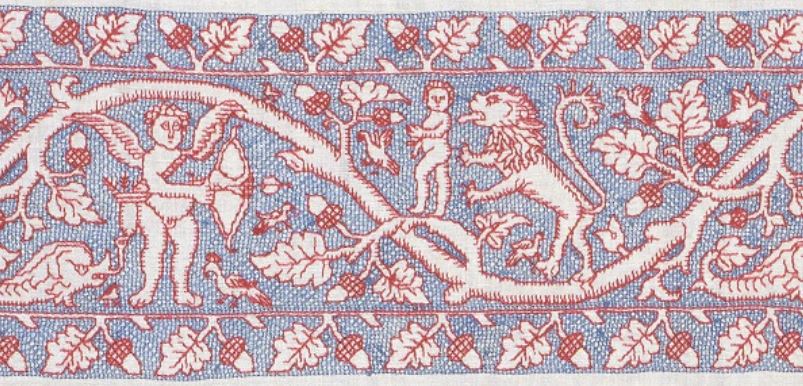
- laid down first, and the background filled in later (the most common approach, especially for meshy or long-arm cross stitch fills; also logically on the pieces where the fill leaves a unworked “halo” around the linear stitched foreground, as in the lowermost right example of the first group below)
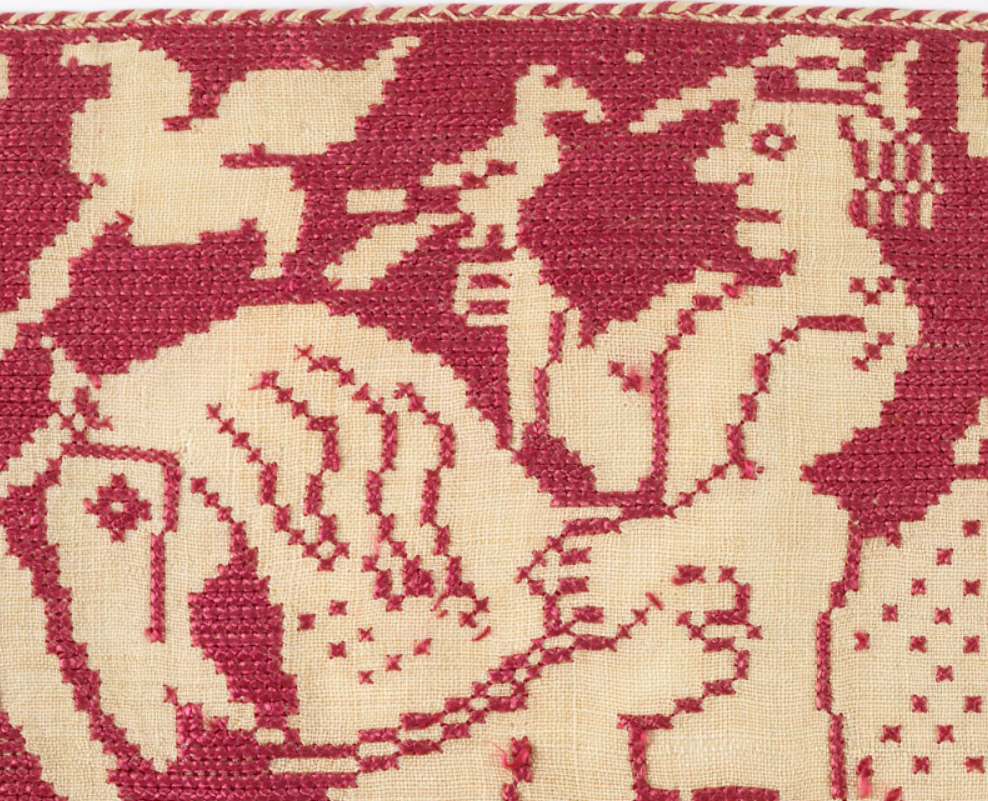
- Stitched at the same time as the ground behind (more usual for square fill as in the lowermost left example of the first group below)
Modern cross stitch pieces generally direct the stitcher to finish the ground areas, then go back and work the linear bits on top of them.
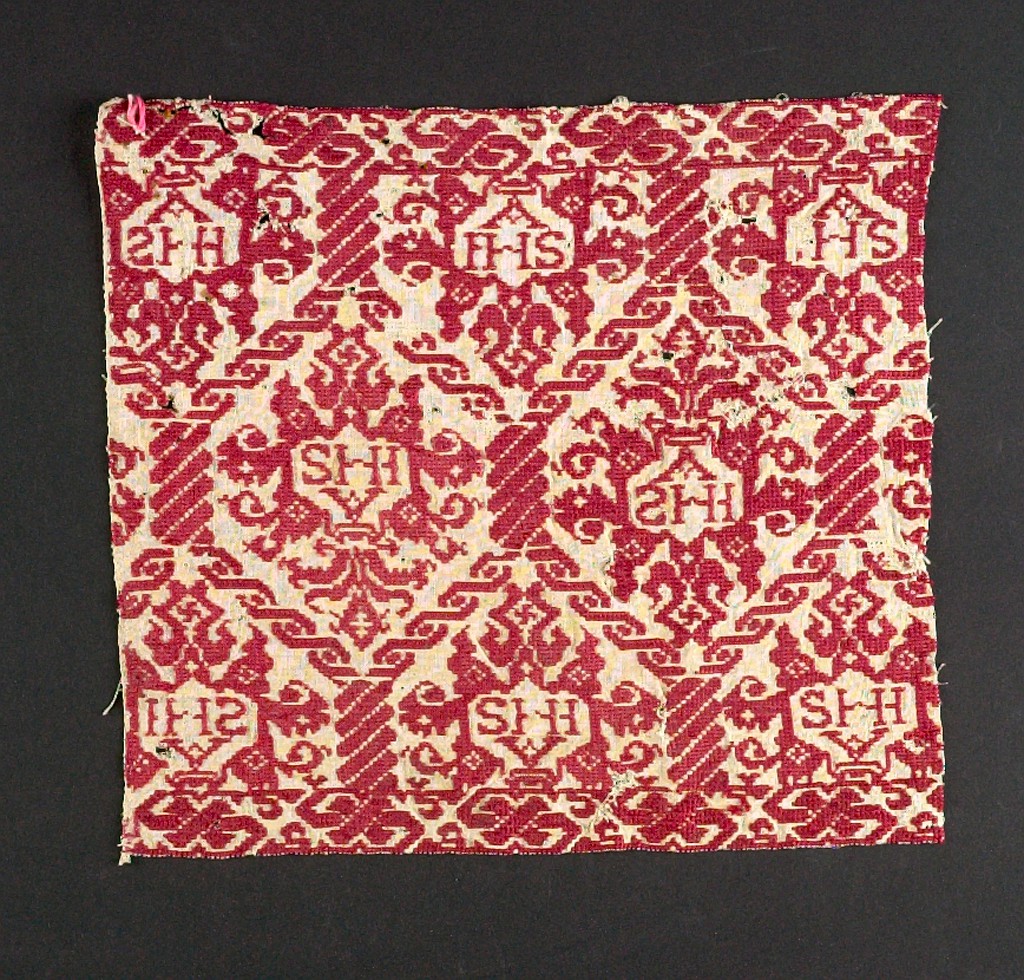
Historical examples of voided work with counted outlines:


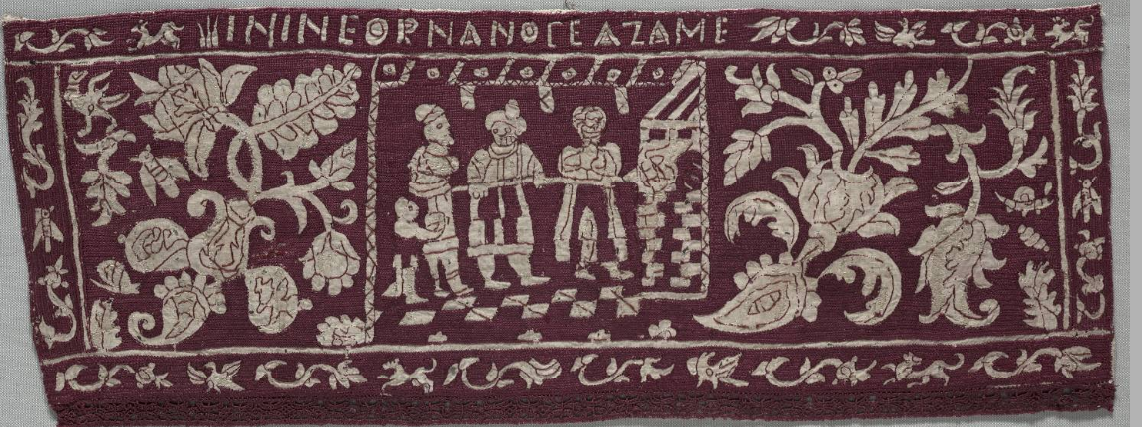
Historical examples of voided work without counted outlines:
Historical examples of voided work with (probable) outlines drawn freehand, then stitched.


Another thing that can’t be determined is whether the historical embroiderers finished ALL of the outlines first, then went back and did the fills; did them section by section; or if in fact the SAME stitcher did both. I can well envision a large group project like a set of bed hangings, where someone proficient in laying down the outlines did that, copying from a chart or a previously stitched piece; with a team following on behind filling in the voiding.
Being a team of one myself, I tend to work section by section, defining my outlines, proofing them, and filling in the voiding – then leapfrogging on to the next bit.
Representing outlines in modern charting
In my own work, if I’m redacting or adapting from a piece that has evident outlines, I use a specific convention for charting. I employ the same dot-and-line method I use for plain un-voided linear work, but flood-fill a portion of the background to indicate the areas to be filled in with stitching after the outlines are completed. The sample bit I worked up for a previous discussion on charting methods (derived Kathryn Goodwyn’s redaction) illustrates this method (left). If the piece had no outlines or was charted from a graphed original or a historical piece in a medium that did not show outlines (some lacis, buratto or other darned-mesh type pieces), then I use the standard square in box technique (right) although usually without the red line 5-unit notation and count, which I tend to do mostly for use for knitting. Both my The New Carolingian Modelbook and its forthcoming sequel The Second Carolingian Modelbook include linear unit and block unit sections.


There’s one other style I use on rare occasion, mostly for linear pieces that include large, dark areas, and whose edges are defined not by prior outlines, but by half cross stitches worked at the same time as the fully covered internal areas. This spider panel from Ensamplario Atlantio II is an example – note that the ultra-dense spider is done in boxed cross stitch (aka 4-sided cross stitch), with half cross stitches to smooth out the outlines.

Conversion from voided chart to a linear chart
This is something I hadn’t considered doing before. It presupposes a finished chart in the block unit style.
First, I have to apologize. I don’t use commercial charting software, relying instead on a homegrown solution based on the freeware drafting program, GIMP. (I offer a free tutorial and templates for my method elsewhere on this blog.) You could do this with a photocopying machine and a pencil, but please bear with me.
Let’s use the bunny seen above, which I previously charted and made available for free download as a PDF.
The approach is pretty straightforward, but there are no shortcuts. Take the chart you want to convert, photocopy it, and pencil in your adaptation over the established boxes. Or regraph it as I did, then use an outlining tool manually, box by box, to smooth the edges until you get a look you like. You will want to take liberties with the diagonals, instead of outlining every 90-degree intersection (although that’s a clear alternative). You may also wish to add details, like the toes, nose, eyeball, and ear openings. That’s also a design choice and up to you.

Finally, please note that I do not use “knight’s move” stitches (two units over, one unit up, to make a 30/60-degree angle). That’s a conscious design decision on my part. They are absent from 16th and 17th century artifacts with the rare exception of when they are used to form eyelets, or in later 18th century works – solid blocks of stitching radiating from a central point. I’ve not yet found a single 16th or 17th century voided or linear work artifact that employs knight’s move angles. They are a great addition to the charter’s tool set for sure and can be used to expand the stitcher’s design vocabulary. But they are also a clear indication of modern design aesthetic, so I leave them to other modern blackwork designers, and limit myself to 90 and 45-degree angles exclusively, even in my contemporary “nerd-culture” pieces.
So there’s the long answer for Callie. She is absolutely right. The solution is as she suggested in her question. If you need to draw it out before hand rather than adapt on the fly, you will need pencil and paper (or a charting design drafting solution) and I know of no shortcuts.
AT LONG LAST, LONG GREEN IS DONE
Not quite a record for the interval between commencement and completion, but close – but after years of languishing, my long green sampler is complete, signed and dated.
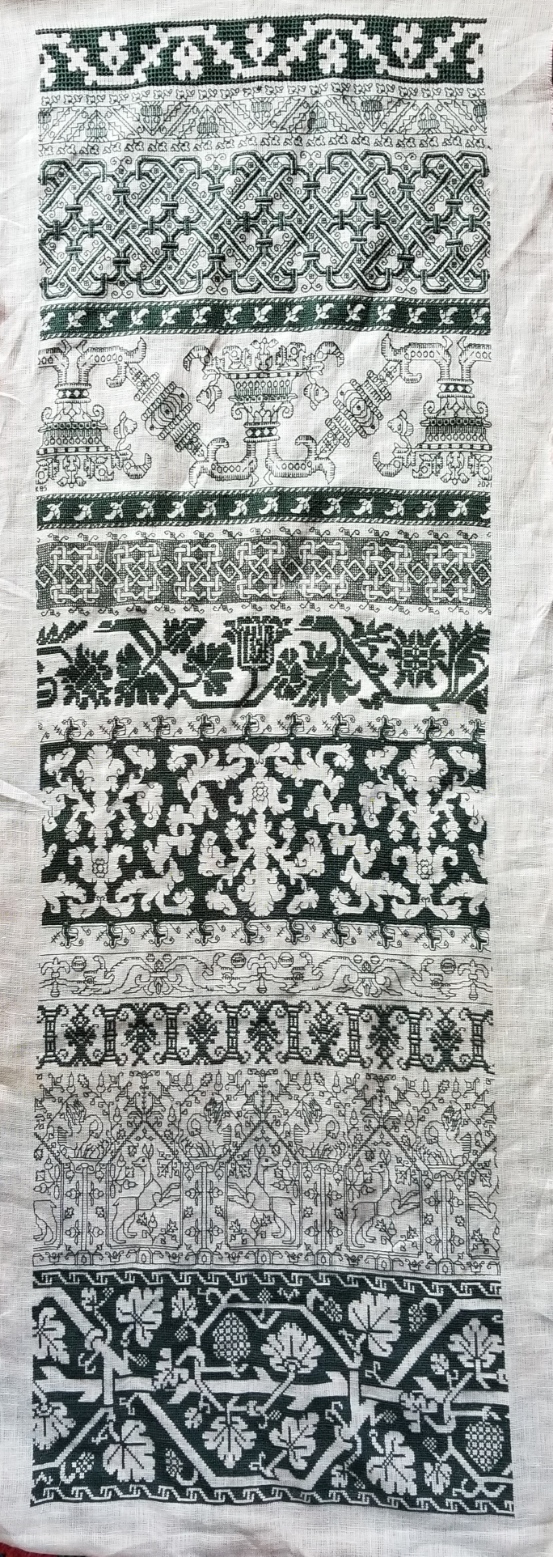
I used Au Ver a Soie’s Soie Alger silk thread, 40×42 count linen (you can see the slight distortion), and began it on 11 Feb 2012. I employed several stitching techniques including double running stitch, long armed cross stitch, plain old cross stitch, Montenegrin Stitch, and Italian four-sided cross stitch (pulled very tightly to achieve a meshy effect, and worked at two scales) . All of the designs here except the top one will be appearing in my ever forthcoming The Second Carolingian Modelbook. The top panel is from The New Carolingian Modelbook.
Long Green will languish again for a bit before I finish it off for display. Given that there is only about an inch of fabric at the bottom, due to the unfortunate destruction that happened over the years the thing sat waiting for me to resume stitching, I do not have enough fabric to frame it on a stretcher. And I really don’t want to frame it with a mat. With a stitched area of 10.5 x 34 inches (26.7 x 86.4 cm) that would be a very awkward and expensive piece. With the sewing machine out for the duration until our basement remodel is complete, I’m shelving this and moving on.
So. What to do next?
A couple of weeks ago I ran into a small DMC tote bag kit on our town’s freecycle/reuse/give-away exchange. I snatched it up. Although I didn’t want to stitch the rather boring roses intended, the kit with its big-as-logs 32 threads-per-inch evenweave was perfect for other counted work.

The bag itself was 90% assembled, and fully lined. There was an unfinished area at the bottom of the lining to allow access to the inside of the bag, to make working easier. But it was insufficient. I tried, but was unable to either hoop or work in hand as the kit stood. So I separated all of the side seams and laid the whole bag out flat:

I basted guide lines at the longitudinal center of the bag, and a half inch all the way around the edges. The total stitching area is two sides, each about 8.75 x 10 inches (21.6 x 25.4 cm). I am unsure if I will work just one design on this, front and back; or if I will do something different on each side. But the intent is to stitch, then use a decorative seam stitch on the visible parts, and a less fancy treatment on the heavier white twill lining, which won’t be very visible after the whole bag is put back to rights.
This being a rather small project, it doesn’t fit nicely in my sit-upon hoop, so I am working it in my hand held 6 inch (15.24 cm) hoop. Slow going compared to the two-handed approach I prefer, but even so this should be done quickly.

Here’s what I have so far. Two strands of standard DMC 310 black. I wanted the outlines heavy and prominent because I am considering working an open voided ground in a second color behind. At least for this all-over. And yes, it’s yet another T2CM pattern.
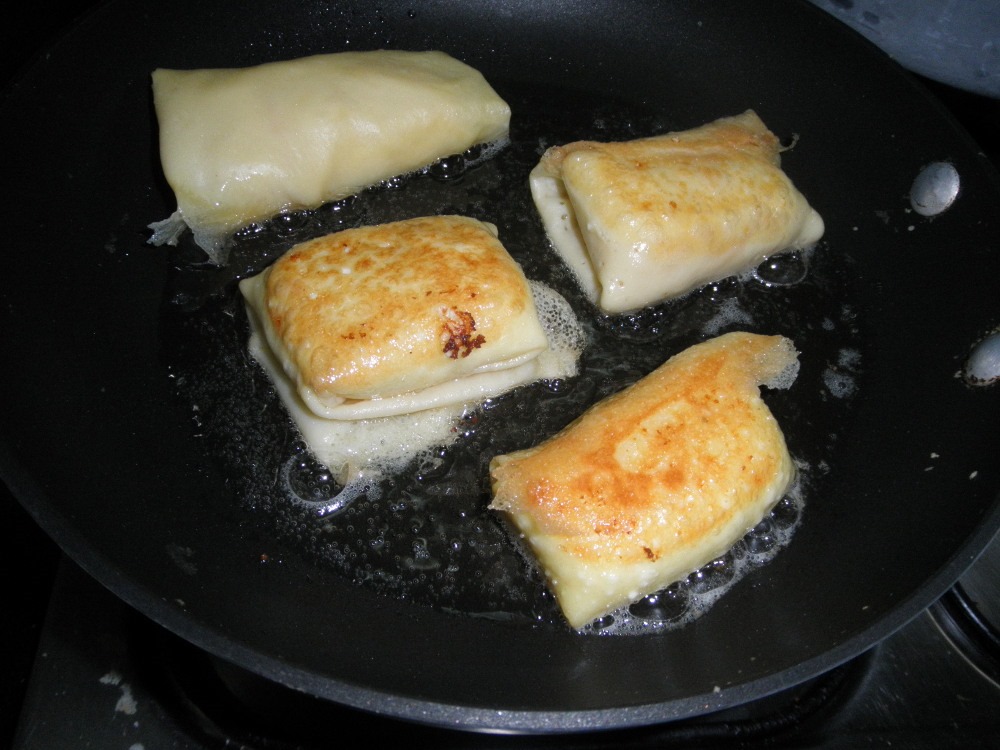
And finally it being eating season, both with first-run and leftover bounty, to celebrate the end of the Passover season, I transformed our leftover pot roast into a rather curious family specialty. Meat blintzes. It’s the standard blintz crepe outside, but with a mix of finely chopped leftover cooked pot roast, any remaining potatoes and carrots or onions that cooked with the roast, a handful of cooked rice, and just enough leftover gravy to keep the filling moist inside. I know of no one else who had this way of eking out an extra dinner in this manner. I suspect my grandmother or one of her sisters faced with hungry kids and a quarter pound of meat, made virtue of necessity, and passed their discovery down to me. There’s no real recipe here – it’s just doing the best with whatever leftover meat and sides are available.

So now I have about 3 dozen in the freezer, to be defrosted and pan-sauteed to finish prior to serving. Obviously these are not intended to be accompanied by sour cream. Instead, as a quick to fix/light dinner course they are usually preceded by a big bowl of chicken soup (also pre-made and stowed away against need), and are accompanied by a vegetable side dish.
If you are looking for the recipe for the blintz skins/crepes and a more traditional mixed cheese filling, it’s here. Just to be evil and make you extra hungry, I leave you with what they look like during the final sautee: