I apologize for frequent posts on the Unstitched Coif, but if there’s something to say it’s usually very hard to keep me from saying it.
I want to thank everyone on the outpouring of support and appreciation, hints, and suggestions. I’m delighted that you are enjoying these notes, and that magnifies my own enjoyment of the process. Many of your recommendations and hints have been quite valuable. I have gotten some suggestions though pointing out that in the writers’ opinions, I am going about this all wrong. My sequence of attack on the piece – the order and manner in which I am working the components doesn’t synch with those folks’ opinions.
I attempt to explain myself.
First, I am a self-taught stitcher. I’ve never taken a class or workshop in this or any embroidery style. I fumble along aided by books and personal observation of artifact photos (and actual artifacts on rare occasion when I’ve been lucky enough to see them). It’s very possible I’ve missed lots of clues on working methods. I don’t claim how I go about my stitching is the one canonical and correct way to do it, it’s just the way that works best for me.
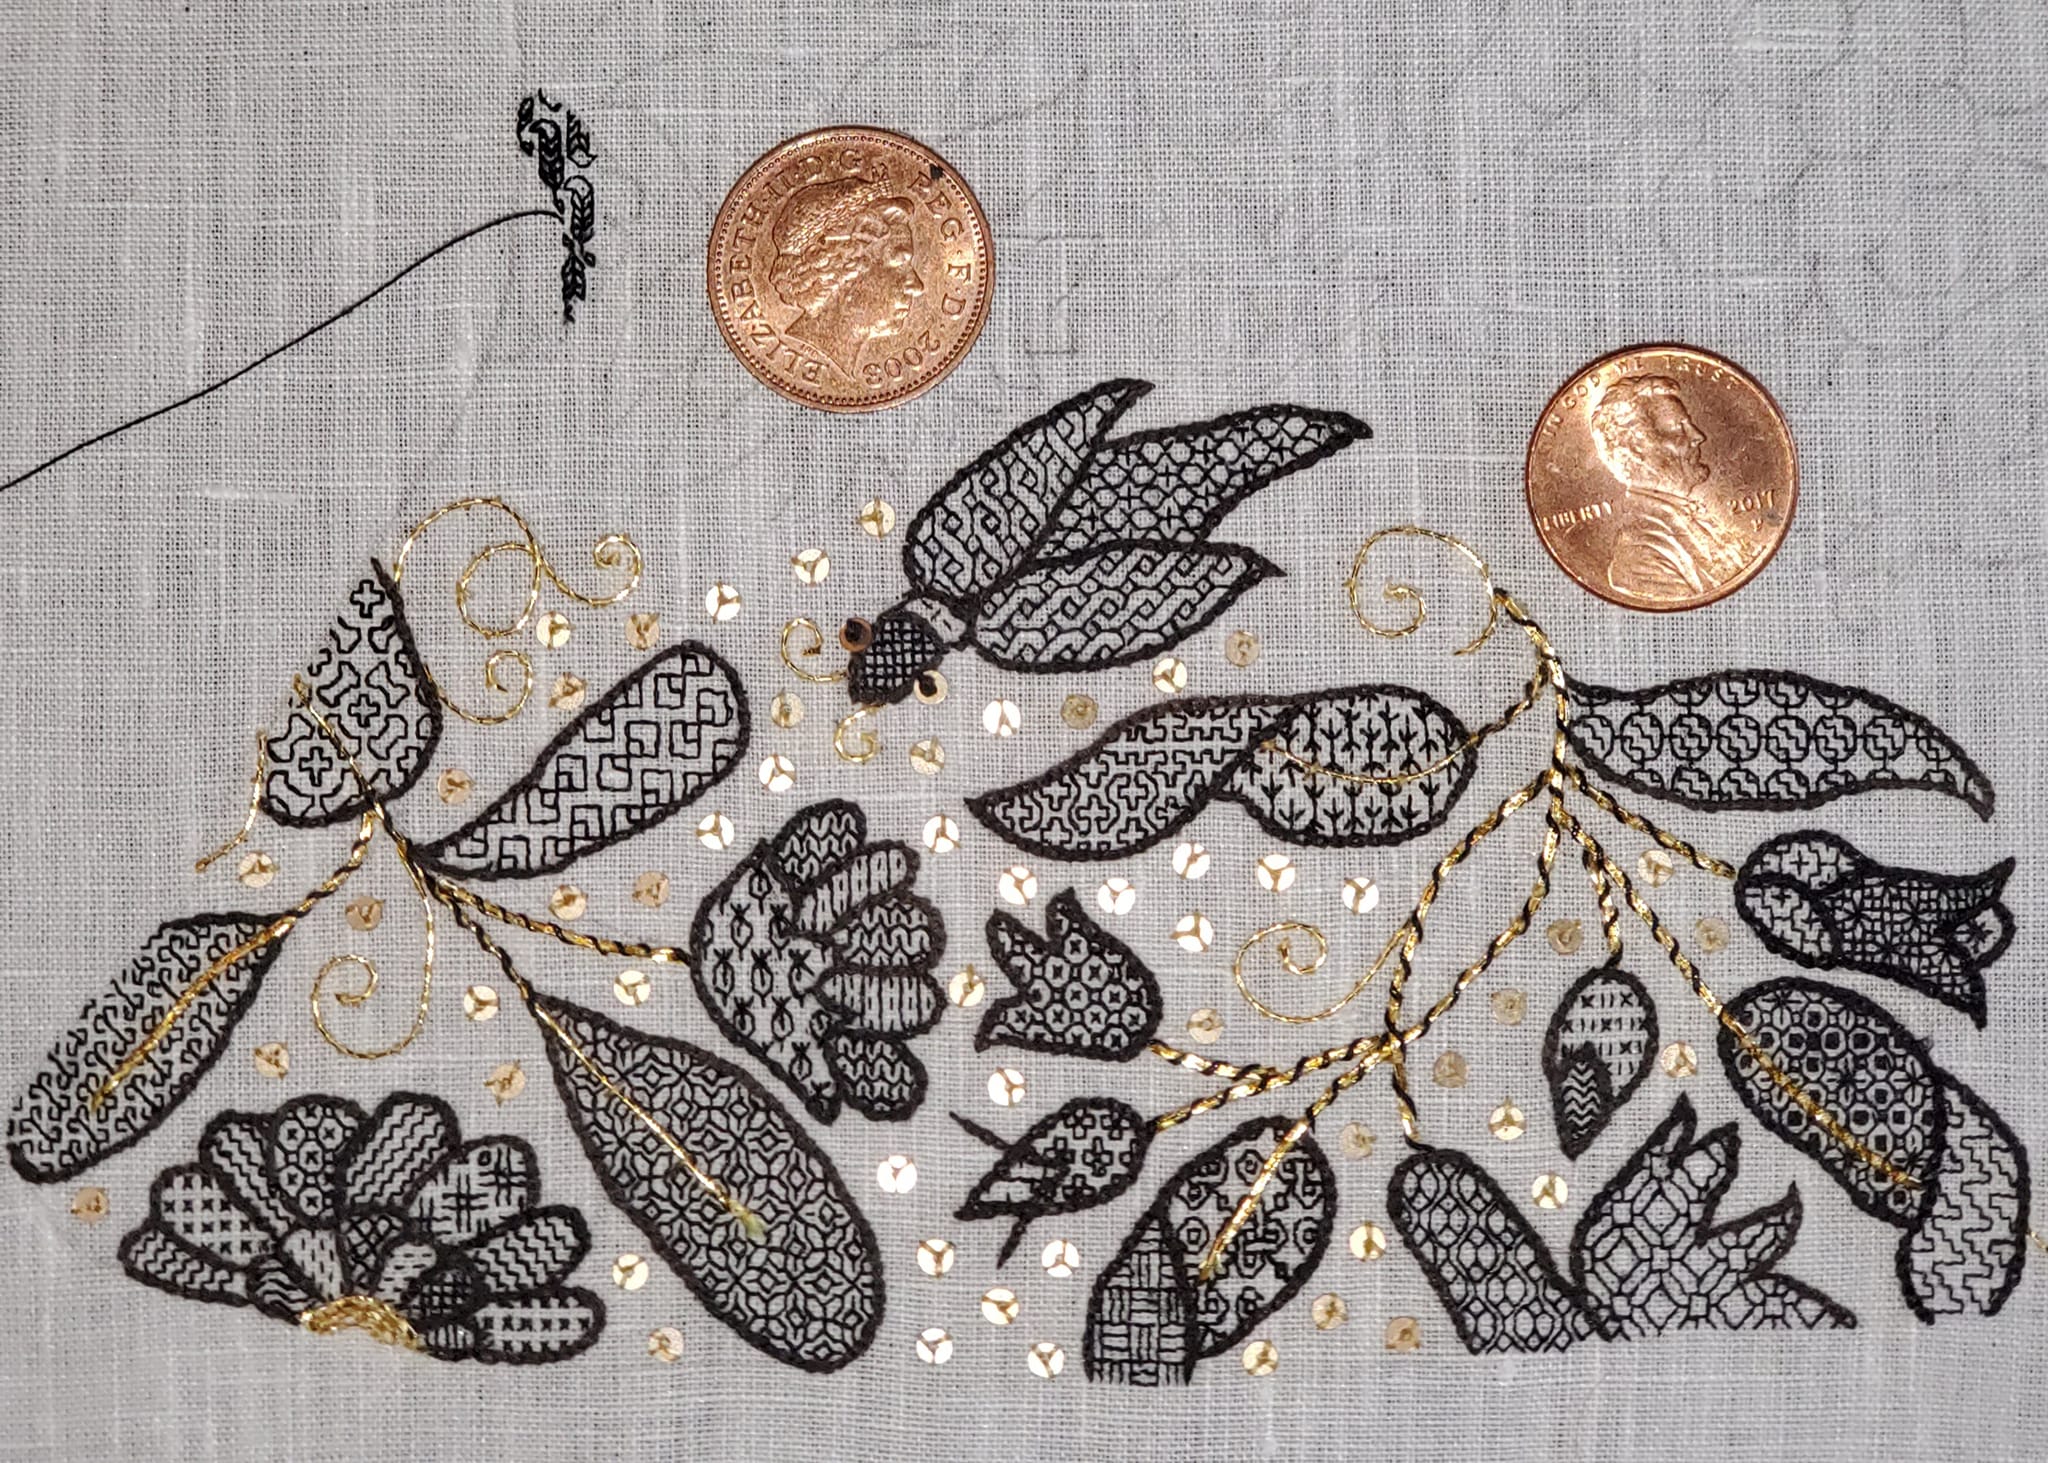
On lack of advance planning and charting – In general on an inhabited blackwork project (the type with outlined shapes and fills), I do very little planning ahead. Each flower or other motif is considered when I get to it, I pause, look at the new bit, decide if I want a dense/dark fill or something lighter; consider contrasts for any sub-components; and try to balance the types of fills used. Do I want the turned underside of a leaf to contrast with the rest of it? Should I put two fills that are angular and spiky next to each other, or should I try to maximize texture contrast in addition to density? Is the current space big enough to give play to one of the larger, more complex fills, or is it so small that a simple one would work better there; or should I abstract the “main motif” of a more complex fill to complete that space? Is a particular fill so stand-out that it will influence the choice of those around it? On that last one, the bead-like fill in the leaf just under the US penny is so striking that I would not want to use another rondel-based design nearby.
As you can see I’m still recalibrating for the tiny gauge. I have underestimated the display potential of these small spaces, and with judicious choice can begin using the larger, more dramatic fills both from my collection and from the ones provided by Ms. Buckby on the official project website.
Then there’s working order. One person who wrote a private note to me swears that the only way to work this type of piece is to complete all of the outlines first, then fill them in. Someone else says that I should be doing all of the fills for the entire piece first, and adding the outlines only after they are finished. Another person writes that I am a know-nothing for working the gold couching (and even worse the spangles) before finishing all of the black silk bits. And someone else chastises me for starting in a corner rather than the center of the work.
I reply that there are no Embroidery Police. I do what I do because it works for me, and because I have reasons for it – both as production procedure and as a bow to my personal temperament.
Here are yesterday’s additions – the finish of the little ruffled flower on the coif border, plus most but not all of the blackworked bits for the daffodil/narcissus like flower immediately to its right. I’ve used some medium-size fills from my notebooks for these bits, plus one of the fills cited on the website.

In general, I like to do the fills first, then go back and add the outlines. Note that along the edges of the fill areas there are half-stitches, eking the fill out up to the projected placement point of those outlines. Although they are a pain to do, they help avoid small gaps, and are much easier to stitch if you aren’t trying to bump up against heavier stitching. And when the outline stitching is finally done it neatly camouflages the ragged edges of the filled areas. Those little halfies barely peek out but do add to design completion (as seen in the “bone and cross” leaf in the lower left of the photo).
BUT there is a caveat. My traced pencil lines, especially in this area, are quite light and hard to see. I do my best to follow them, aided by an ever-present printout of the design for ready reference. I want to do the frill that marks the interior of the flower’s trumpet in a darker, denser stitch, but the edge of the frill separating the interior and the exterior of the trumpet is very hard to see. So before it was lost, I chose to do just that bit of outline, while I could still see it. I’ll go back and complete the rest of the outline on the flower as a whole once the interior dark part is worked.
Once the black silk is all laid down not only for this flower but for any other components touching its stems and sprigs, I will add the double line of gold couching for all of the leaf veins and stems in the group, and whip just the stem parts with black silk. Then I will work the single line couched gold curls, tendrils, and antennae (if any). And when most of the work surrounding a bit of “white space” is complete, I will add the spangles. Mr. Big Bug is missing the gold stripe embellishments on his body. I am still deciding on whether to do them in double or single thickness gold. Double stands out better, but there are so many that done heavily they might take over his look. I’ll get there, but not yet.
I am working each section to completion rather than doing all of the black silk work for the entire piece first, then adding the gold and adornments (or for that matter, working all of the fills or outlines first, then completing) because I need the variety to keep fresh. Each different component requires a different type of concentration and moves at a different pace. Mixing them up both gives me a better guide for the look I am trying to achieve, and keeps me mentally nimble as I go. This project would be stultifying for me if I were to break it down by type of stitching and work them singly to completion in sequence.
There are downsides to my mix-it-up approach. Those spangles and bits of bling catch threads, and can be abraded or otherwise damaged by clumsy fingers or needle tips as I go along. I will probably deploy pieces of well washed muslin or old, freshly washed handkerchiefs to cover previously stitched areas as the piece grows, taking them off only for progress photos.
And as for why I started in a corner – I point to visual focus and prominence. The center of a piece is the most scrutinized. By easing into the thing at one of the corners I commit my experiments in scale, pattern complexity, and density to the less ogled outer edge. Ripping out bits I don’t find totally successful is not an option at this gauge. Once I commit, that’s it. By the time I get to the center I should be better in command of the fill vocabulary on 70+ count, and the best of my work should mate up with the eventual viewers’ most exacting gaze. Note that if I had been stitching this coif with an eye to making it up into a hat and wearing it, I would have started at the center bit at the nape of the neck where the cap would have tucked under the wearer’s bun-bundled hair, that being the least viewed part.
The one thing I haven’t been doing reliably though is whipping down all of those plunged ends of the gold thread on the reverse, which already looks like a nightmare. I detest doing that and should be, but haven’t. For this sin I will go sit in a corner and contemplate my life choices, preferably while tending to those little monsters…
So that’s my working cadence, and my reasons for it. Should yours differ, that’s fine. What works best in the long run is what works best for each of us as individuals who understand the strengths and weaknesses of our materials and our own proclivities, instead of dogmatic compliance to an arbitrary set of rules.

Share away, dear. I rather enjoy the interlude. Don’t always comment as I’m usuall pressed for time.
I am really enjoying watching the progress you are making and hearing how you make your decisions.
In talking about the “embroidery police” I find in most types of handwork/fiberwork there are always people who say things have to be done in one particular way. I hear this mostly about spinning but know it comes up in all the other types of work. These people seem to think that everyone back in the beginning of time did the same things in the same way – as far as I know no one wrote down instructions on how to achieve a certain result, everyone knew where they wanted to go and did what they felt was necessary to get there. Scarcity of supply, right/left handedness, education levels, etc all had a say in how their trip went.
Of course there are things that change our final product from “blackwork” to “cross stitch” but if that is where we want to go it is up to us.
Oh ! I’m loving each and every one of your posts on this beautiful projects . Take no notice of “them” 💐 love Debbie x
I love your reasoning, makes sense to me! And thanks for the observation that if the coif were to be worn, you’d start at the lower center back. Again, perfect sense.
I can’t believe the messages you’re getting. People might as well say ‘You’re enjoying yourself all wrong!’.
It’s interesting to get insight into your processes and preferred ways of working though, thank you for sharing!
This is a delightful project, and I love your progress reports! Your work is always amazing. Thank you for sharing your journey.
I think that the bottom line is- if your finished project looks the way you want it to look, then you did it “correctly “. Who cares if you stitch from the sides in or the middle out? Embroidery is an art. I truly doubt that in the 15th century when blackwork was a brand new fad ladies had someone standing over them saying “No! You must stitch here first!”
Hi Kim, I thought the reason we were doing this was to find out how people stitched the way they do, and the results that it brings. It is what I am doing. GO you, looking absolutely lovely and when it’s all completed who’s got to know what you stitched first and where. Go where your heart and needle take you and most of all enjoy this iconic project xx
Kim, Ignore those fools who think they know better and have fun with the coif!
Keep posting as often as you like, I really enjoy seeing how the coif is coming along.
Thanks for the fascinating description of your process. All power to you!
This is a thrill to watch. Don’t apologize. If there is the toad that doesn’t look forward to your journey they can unsubscribe. For the rest of us? Post to your heart’s content.
This is absolutely stunningly beautiful. Your approach works, so what more is there to say? Lesser stitchers can only watch and learn.
Hi Kim, I am new to your blog, I “found” it through the unstitched coif project. I enjoyed the information about your decision-making (as Linda observed, I think that is a lot of what is project is about) but I am disappointed that you found it necessary to provide an explanation! I like to offer praise and positive feedback where I think it is due but refrain from giving “advice” except where the poster has asked for some input. I will make an exception on this occasion if you will indulge me … keep doing what works for you and ignore the naysayers! Thank you for sharing your progress with us. I enquired about this project but knew that I could not contribute in the required timeframe so bowed out. I am delighted to be able to follow those braver than me.
There are usually good reasons for suggested working order (those exasperating ends of gold, for example), but I very much doubt that the orginal stitchers adhered to anything so regimented, unless – and it’s quite a big unless – they were part of an atelier of craftsmen and women working on commissions. Working at home, I would imagine people have always done what suited them best.
I appreciate your explanation on why you do your stitching the way you do. Stinks on *why* you felt the need to explain though!
As to apologizing for frequent posts…stop that right now! In fact, I sort of wish you’d post more, but I also understand the time it takes to write a coherent post.