HOPPING OFF ON A DETOUR!
Yes, I’m still working on the Italian multicolor strapwork cloth. But the holidays approach, and a topical whimsey presents itself. I am going to take a quick detour to kludge together a hat, then knit several for my various Offspring and Honorary Offspring.
In specific, I’m going to knit topical event relevant frog hats, in egregious green. Complete with bulging Muppet like ping-pong ball size eyeballs. Here’s my concept drawing:

I’m using leftovers from the bolster cover I did two years ago. The shocking green, the oatmeal white, and black, to be specific. It’s acrylic, and sport weight (24 stitches = 4 inches or 10 cm in stockinette) from Herschnerr’s. As you can see, I’ve got plenty.
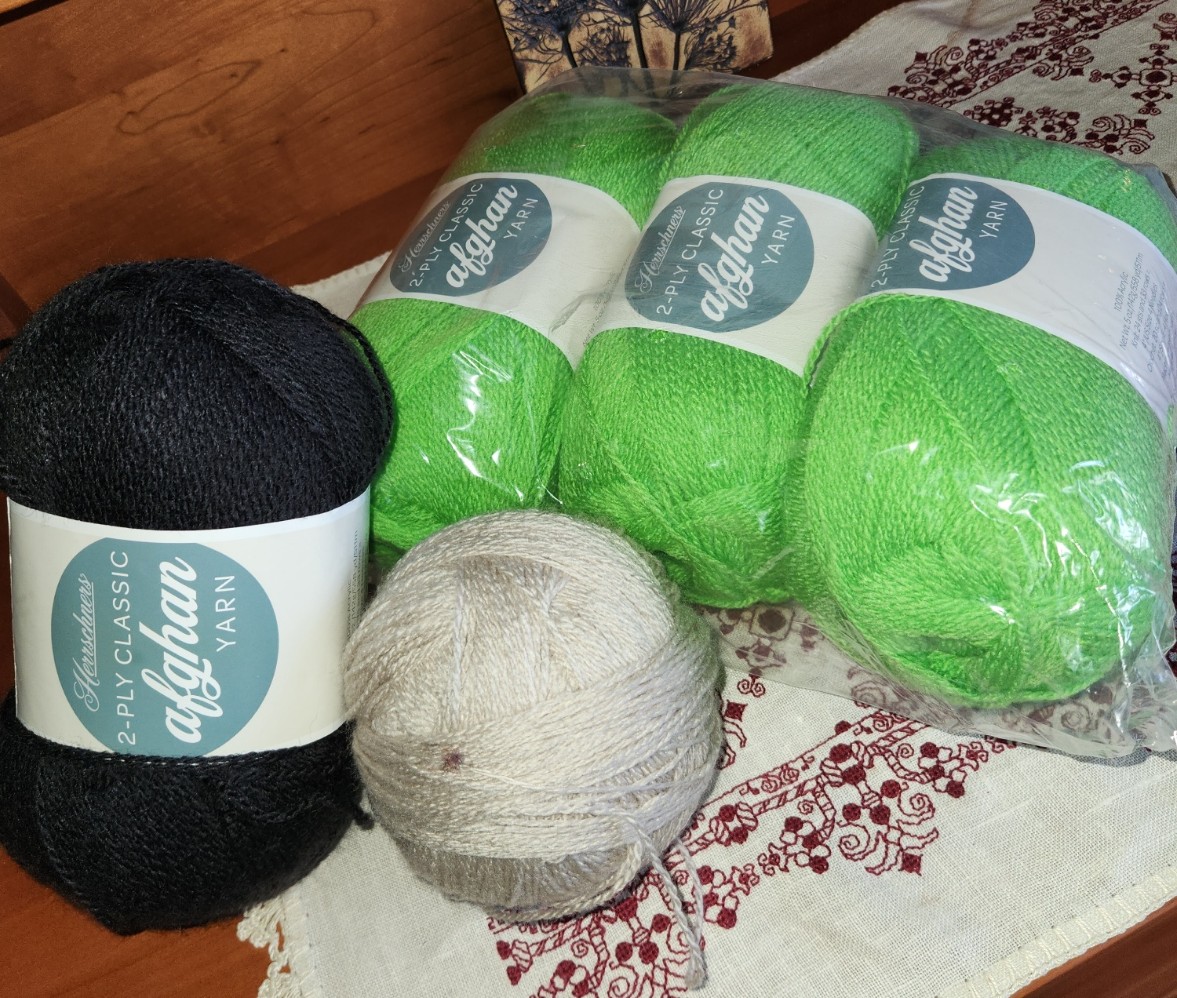
I will be adapting a very basic free hat pattern I found on Ravelry, the Drover and Classer Plain Beanie. It’s plain stockinette with a turned back, ribbed brim, and a simple seven-spoke set of decreases at top. For the eyeballs I plan to play with the knit sphere design from Lisa Benden. Her free Knit Hacky Sack is written for a larger yarn than mine, but I don’t need a ball as big as hers, and I’m pretty sure I could fiddle with stitch count until I get the proportions I want. Plus, if I do one end in black, I won’t need to embroider the pupils onto the finished ball.
The only part of this that I will have to create from scratch are the green eye sockets into which the bulging eyes are affixed. For those I’m planning on doing a wrapped short row heel, but very small, with a rolled stockinette edge. The plan is to stitch each eye into its socket, then stitch those assemblies onto each hat. We’ll see how this sock heel-turned eye socket plan turns out.
These shouldn’t take too long. I’ll be working up the plain hats first. Worse comes to worse, even if the eyes don’t exactly to to plan, I will at least have screaming green beanies for my intended recipients.
Oh, and progress on the Italian cloth? Rounded the corner and headed for the center of the short side.

NEARING SECOND!
Sorry for not posting many interim images this week past. The repeat has been established. Memorized, even. So progress is pretty much more-of-the-same. Not particularly visually interesting, just being repeat after repeat. But I’m now on the run up to the second corner.

That diagonal just beginning to appear in the right side of the hoop will be the one that spans the corner, just like the one in the first corner.
Because I was very conservative in picking my starting point on the left hand edge, centering my beginning to the center line of the narrow end, but not having a drafted corner, just winging it – my right hand edge will be a bit further from the fabric edge than that on the left. No worries. I’ll end up trimming off about an extra inch of fabric when I do the final hemming. That’s not enough to be worth improvising a new, partial corner. I prefer to replicate the one I’ve already done, since that one worked out so well. Here’s a closer photo of the bit currently in the hoop.

You can see the bottom of the stitching is so close to bottom of the fabric that getting a nice, firm hold and an efficient span is difficult. I still may mount this on a scroller once I get up to working the spans across the middle, but for now, since I’m sticking with the small hoop for portability and the ability to get as close to the hemmed edges as possible.
In terms of thread consumption, even though (in theory) the stitching on this is based on two-sided principles, the work itself is quite economical. I am using DMC standard floss, single stranded, and I’m still on the first skein of all three colors. I figure that to do the whole rim around I am looking at two skeins of each. Since I’m not quite sure how densely I’ll be working the center I might be looking at as many as four more of each, but probably closer to another two. And I have them all in stash. No worries.
I do admit that going on and on in the same repeat is a bit of a challenge in perseverance and diligence. One reason I do so many narrow band samplers is that I get to go on to the next Interesting Thing before I run out of patience with the current strip. Still, this is a good study in applied discipline over time. A skill I have always had in short supply. It’s training. Yup. Training. 🙂
As far as my other exercises in discipline, I have been Very Good about my physical therapy homework, walking, and other activities to increase strength and endurance. It’s slow going (not unlike the current stitching), but I am seeing results week on week. Horseback riding and quick step galliards may be in my past, but there are lots of other things I hope to resume over time if I keep at it.
QUARTER FOR YOUR THOUGHTS
No, not inflation – at least not overtly. I’m just about 25% done with the frame around the outer edge of my Italian multicolor piece. Closeup posts of the bit currently under the needle are going to be repetitive from here on in, so I present the full canvas of this “painting.”

If it looks to you like I’ve sped up production – I have. I had wanted to mount this piece on my big Millennium frame, but I had no extra wide twill tape on hand. In person shopping being a bit unwieldy right now and not wanting to rely on goods sight-unseen I’ve stuck with the hand hoop, the sit-upon hoop being an inch wider across and even less suited to close-edge work than this smaller one. But I decided to stick the little hoop into my Lowery floor stand. That lets me work two-handed, one above and one below. And working that way for me is about half again as speedy as holding the hoop in one hand and stitching with the other. So one “up” repeat including initial outlines, meshy fills, and Montenegrin lines took about an evening and a half to stitch using the floor stand, but took three+ evenings with the hoop in hand.
The sharp-eyed will note that the center of the repeat currently in the frame does NOT align with my basted line that marks the center of the cloth as a whole, while the center of the repeat along the short edge, where I began does line up with the horizontal center line.
This was on purpose.
I took pains to do the math for the short edge, hoping to get close enough to the final diagonal needed to make a graceful improvisation for the corner. At that time I hadn’t realized that the original stitcher fudged the corner that most resembles what I wanted to do. I made it without that fudging, but at the expense of stitching further towards the serged edge of the cloth than I would otherwise prefer. You can see how low in my hoop my stitching is – a very inefficient and precarious placement that barely grasps the lower end of the fabric as I try to achieve and maintain optimal tension.
Since I hadn’t graphed out the corner and had only a rough estimate of depth, and knowing that my plans for a neat turn might not fit, instead of beginning the piece along my original posited outer edge (the basted line at left), I skimped on the edge area there, too. Not quite as much as along the second edge, but enough to make a difference. My logic was that when I continue around, if I need extra width or some odd bit of kludging to get to a neat corner on the second turn, I’d have more options. And if I didn’t, I wouldn’t be inconvenienced by the extra unworked cloth, and could cut it off in my finish.
Having narrow margins around the stitching (however inconvenient) and removing any excess play into my plans. My intention to finish this piece is to imitate the original, with “poetic interpretation” of what little remains of that treatment – a narrow turned hem, with neatly spaced blanket or buttonhole stitch and corner tassels. The hem-covering stitch of the original is probably plain old blanket stitch due to the way it has deteriorated. I would think that the edge reinforcement of tightly twisted knot like bits along the free edge in buttonhole stitch would have been preserved better, resisting large runs if snagged. But little remains. It’s very hard to see in the photos I took and the museum’s own shots, but there might even be a very narrow, barely there strip of needle lace along the edges – not wild stuff with dags and picots – just a simple solid band. I’ll be squinting at the photos to see if I can learn more. I’ve done that type of edging before, on The Resident Male’s SCA fighting shirt, in black, long ages ago, so it would not be a stretch to do it again. In any case, plain stitched hem or fancified hem, there will be little reveal of plain cloth between it and the established stitching. There will be plenty of linen left for the hem, regardless of how wide or narrow the stitched part ends up being.
Now where the true vertical center point of the piece as a whole is will matter when I get to the wide bar I am planning to add. That will span the middle, across the short dimension. It may be aligned with the center of the pattern iteration I’m currently stitching. That’s about an inch left of the basted line. BUT if I get near the other end of this side and I decide to devise ANOTHER corner treatment, and that treatment needs additional width, it might move either closer to the cloth’s original centerline, or to another point in that general direction. No clue right now what I will be doing, so stay tuned!
….Isn’t the suspense of Bungee Jump Stitching furiously exciting?
NOT QUITE EXACT, BUT GOOD ANYWAY
So. More examinations of the corners of the big towel from the MFA, and my first corner. Here are the four corners of the original
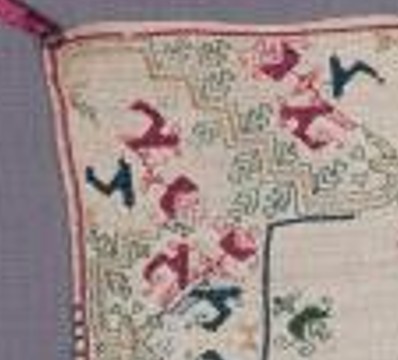
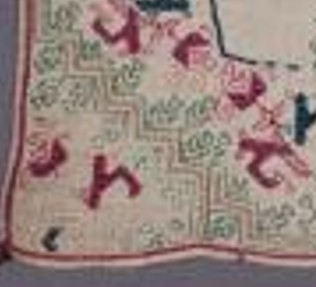


Not quite aligned but all there. Now my stitched corner as of this morning:

It’s closest to the one on the lower left, above. But not exactly. Look at this bit.
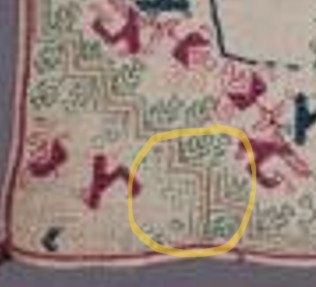
That’s a clear kludge. Not to brag, but my join is cleaner than this. I can’t deduce where the stitcher (or stitching team) began, but it’s clear that either the vertical bit on the left side of the photo, or the horizontal bit on the right was already laid down when that corner was rounded. The stitcher did their best, but the pattern doesn’t line up. For that matter, no two of the original corners ARE the same. But I bet you didn’t notice when you looked at the thing as a whole.
I will continue around on my mini-version. I haven’t decided yet if I will limit the width to multiples of the whole design, so I can replicate my corner exactly for the remaining three. Or if I will just make do, in a celebration of the heedless joy of the original.
And how far do I have to go to get to the next corner? Here’s my full cloth, so you can see the proportion of as-yet-not-done to the bit completed:
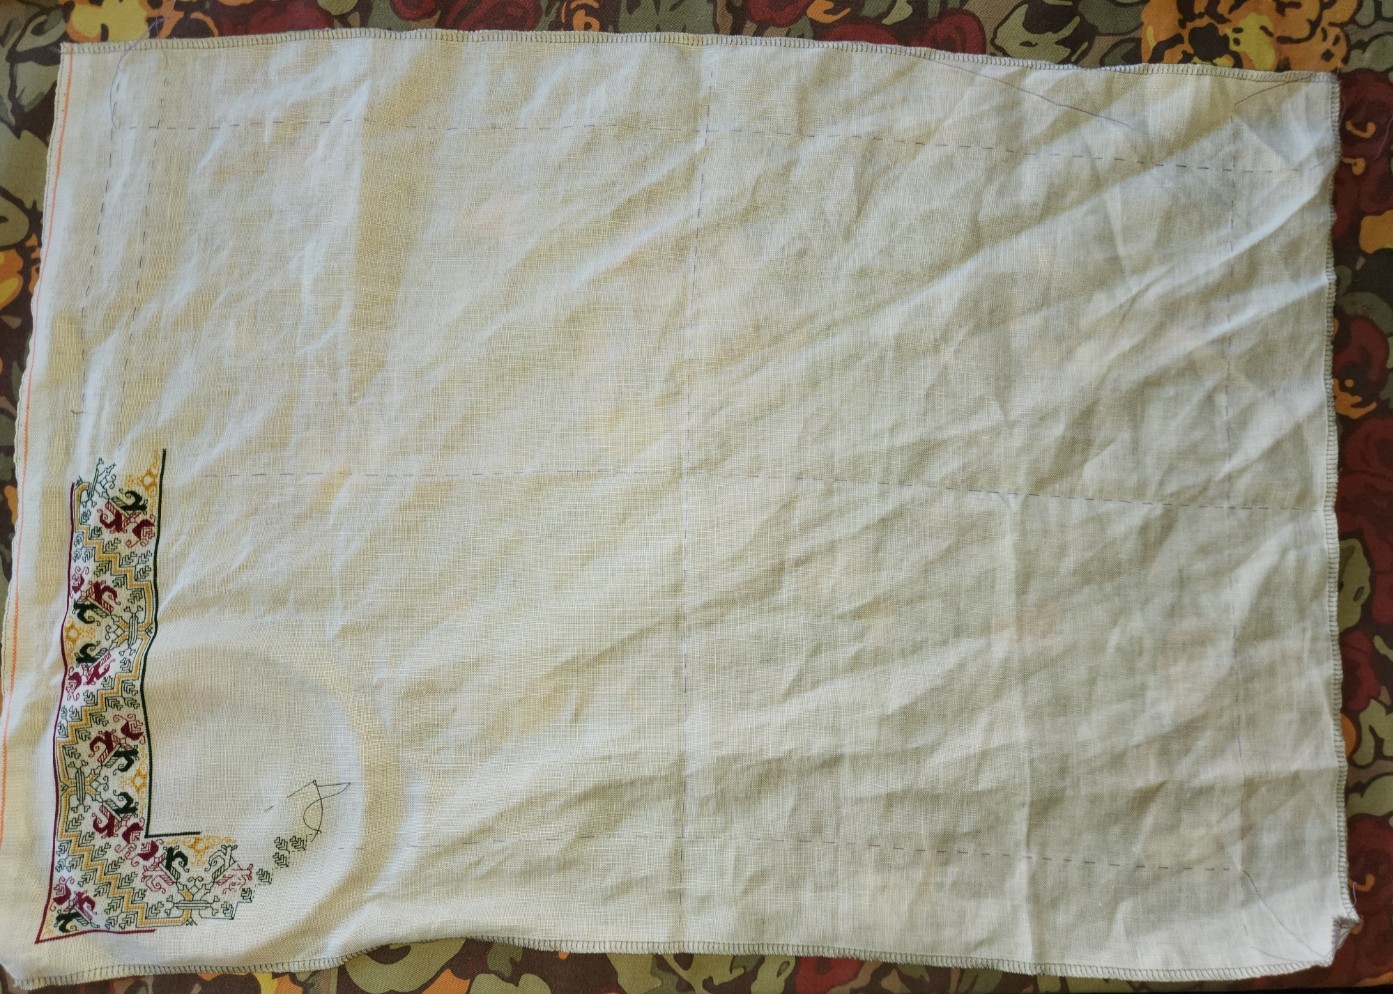
Quite a ways.
Aside from the corner challenge, upcoming decisions include a supplemental treatment spanning the center. Here’s the original again with two double width strips and two narrow single width ones across the center.

Examining those bars, I can conclude that they were done after the framing, and were aligned with the cloth’s horizontal centerpoint, because the band design is truncated (more or less) at the same point where it meets up with the frame, both north and south. But note that the centers of repeat along the long sides of the frame itself do NOT align with those bars, nor do they align with the measured center of the cloth. Again I bet you didn’t notice.
My smaller cloth may have enough room for one wide center bar; two narrow center bars; or one wide bar flanked with two narrow ones. Lots to think on there, but I won’t get to that part until after the frame around the edge is complete. And then there’s their alignment to consider. (I’m leaning towards filing them under Chaotic Neutral for the time being.)
On the healing front, I’ve completed Day 23 of radiation therapy. 17 more to go. No major perturbations, just the slog of rising before dawn to drive downtown and back before major traffic. Not that I’m counting or anything…
