MANY HAPPY RETURNS – NIGHT AND DAY SOCKS
Back from a business trip to Tucson, Arizona. No, I wasn’t there for the incredibly huge Gem and Mineral Show, but wandered by one of the show’s many pavilion complexes in the little bit of free time I had on Saturday.
In the knitting realm here’s what I got:
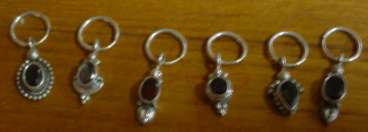
These are little silver mini-earrings – the kind some people line up by the half dozen along the edge of their ears. The dinglebobs (a technical term) hanging down are small faceted semiprecious stones – mostly garnets and pale amethysts, in small silver settings. They were incredibly inexpensive. (I’m sure somewhere in India there’s a whole village making these by the barrel full for next to nothing.)
While I was in Tucson, I happened to meet Dr. David Crawford, the Executive Director of the International Dark Sky Association. His group advocates for increased awareness of the problems caused by light pollution, and changes to local zoning/building regulations in favor of more efficient use of outdoor lighting. There are compelling reasons to improve outdoor lighting, including increased energy efficiency, reduced cost, and improved visibility where it is truly needed. There is also a growing body of research documenting how light affects people’s health and well-being, and the negative impacts that indiscriminant lighting can have on organisms of all types. When all of the other benefits are taken into consideration, the aesthetic and scientific benefits from preserving the dark night sky almost become secondary concerns.
In any case, Dr. Crawford’s impassioned (and sensible) ideas stuck with me on the over-long flight home. I turned out that the sock yarn I brought with me sort of fit the darkness and light theme, so I present Night and Day socks (still in process):

This particular yarn is Regia 4-Ply Ringel, Multi Effekt Color #5383. I’ve done a standard toe-up on US #00s, with 17 stitches on each needle (68 around). After the heel, I increased two stitches to a total count of 70. I did the increases where the corners of the short-rowed heel ends. Those two stitches help fill in the small hole that can form at that point. Normally I add a stitch on each side at that point anyway, then decrease it away on the next row. This time I just left them in.
The ankle pattern is a 10-stitch repeat I doodled up on the plane. I’m sure similar things exist in stitch dictionaries:

I hope that the the organization doesn’t mind having something as silly as a pair of socks dedicated to it. I’ll be writing up the pattern at greater length as I do Sock #2. If you decide to knit them, consider investigating (and making a donation to) Dark Skies.
Oh. The red jelly-bean looking things in the sock photo are lampwork glass ladybug beads, about to become a necklace for The Smallest Daughter. The other received earrings made from slices of a very small fossil ammonite, set in silver. My gift for myself was an unusual silver wire necklace thingy, meant to display large dinglebobs (see above). The ones I chose were rectangles of cobalt blue dichroic glass set in silver. (Dichroic glass is that iridescent stuff that looks like someone vitrified a peacock.) The Resident Male got an entire backpack full of various types of dried chili peppers – things that are hard to lay hands on here in this small corner of Massachusetts. He’s much happier with something edible.
HOODIE AND SOCKS
I’m still noodling on the hoodie project. Target child is waffling about her requirements. I’d rather wait until she settles into firm conviction before casting on. Some questions came in after Friday’s post:
Why start with Rogue instead of designing your own from scratch?
First, I really admire this particular pattern, its proportions and the way the cables are so cleverly used. Since it fits so closely with the original set of requirements and/or mods to it would not be difficult, why not start out with it? Cardigan-ization isn’t tough, nor would be knitting a smaller size to compensate for gauge differences. As for the rest – the texture pattern and saddle shoulders with a cable down the center of the arms, as Target Child looks over the photos of other people’s finished Rogues, she’s becoming less attached to those concepts.
You know you can use knitting design software to help.
Yup. I know that. I’ve got Sweater Wizard and the older Cochenille product. Hated the latter. I didn’t mind the non-standard format of the directions, better suited for knitting machines than for hand knitters, but I was totally turned off by the lack of technical insight provided by customer support. The thing wasn’t cheap, and I could never get it to run properly. Only one or two of the supplied templates produced any sort of output, and even they were unable to produce more than one or two of the available sizes. “Support” claimed that it was a problem unique to my set-up and there was nothing they or I could do about it aside from waiting for the next upgrade and seeing if that worked any better. Since we’ve got an average of six or seven working computers in this house at any one time (all with different processor/opsys/video card combos), and I tried the software on all of them and turned up exactly the same bugs, I rather doubted that one unique set-up was the problem.
Rather than throwing good money after bad, I decided not to spend close to $100 to upgrade Cochenille (with no guarantee that the new version would work any better. I switched over to Sweater Wizard. It’s got far fewer design templates and isn’t a full-size sloper drafting program, but what it has actually works, and is quite easy to use both during the design and knit-from phases. Which is refreshing compared to my previous experience. My only criticisms of the product have to do with personal preference and fit. I find the standard fit a bit tight for my taste, so I always add extra ease (which is verysimple to do).
My real desire though is to be able to produce the full-featured graphs of actual garment pieces, showing color or texture pattern placement like the ones in Rowan magazines. So far no knitting pattern design tools come close to that degree of integrated pattern shaping/motif placement. Yes, there are export features that allow customization of garment shapes for colorwork placement, but no total pattern maker that lets you tinker with all parameters in one interactive console. (If you gotta dream, dream big. [grin])
Meanwhile, Back at the Ranch
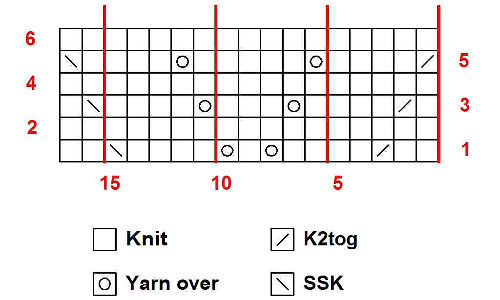
Although progress is slowly burbling along on the hoodie, there wasn’t enough to keep my fingers happy over the weekend. So I started a pair of quickie socks. Standard Figure-8 toe toe-ups with short-row heels. I’m using Lana Grossa Melienweit Fantasy, on US #00s, at the (for me) relatively large gauge of 9spi (68 stitches around). Ankle pattern is an impromptu feather and fan variant:

Here’s the graph for the ultra-simple six-row feather and fan variant used on the ankle. It’s 17 stitches wide and six rows long. I’m working my socks on five needles (four in the sock, one to knit with). Because each needle has 17 stitches on it, this graph is worked once per needle:
More info on knitting socks of this type, including basic how-tos for both the Figure-8 toe and short-rowed heel can be found in any of the sock patterns on wiseNeedle.
SUSAN’S IMPRESSIONIST BLUES ‘LEMONADE’
I managed to land in both a snow and knitting rich area. Many of my neighbors knit. One even holds an informal knitting circle that meets once a week. I’ve been going when I can, and have watched the creation of a really nifty project that happened as a late-course correction on what might have been a tragedy.
Susan The Architect has been knitting a magnificent impressionist blues/purples mohair stole to wear to a Very Important Event. She cast on plenty of stitches on a long circ because she was going to knit it the long way (rows running end to end) rather than across the narrow dimension. It was tough to get a fix on her gauge because so many stitches were on the circ, and she had forgotten that she had done her swatch on a smaller sized needle than the one she ended up using.
She knit happily away in K5, P5 rib until her stole was about 18 inches wide. Then she bound off and discovered that she’d made a strip 18 inches wide by 12 feet long!? Although she’s on the tall side, she’s not tall enough to carry off a 12-foot strip without constantly stopping to re-drape it or creating a tripping hazard for herself or those around her. Serious thought was needed, as ripping back mohair isn’t a pleasant experience.
Susan decided to keep what she had made, but engineer a new use for it. I apologize for not having a model photo of the final piece, but I didn’t have a camera with me. Here’s a schematic, though:

She folded roughly one foot up on each end of the piece, then stitched the resulting flaps down at the cast on and cast off edges. She also seamed about three quarters of the way along the top of the flaps. This made nice pocket ends. Then she folded the piece in half, and seamed down the cast-on edge approximately 18 inches from the center fold. This joined the back into a hood-like shape.
She wears the piece with the hood either draped down her back, or over her hair. The two ends hang down in front – each with a handy pocket end at her fingertips, or are worn with one end flipped up over the opposite shoulder. From the center back of the neck (the base of the hood) to the bottom edge is now about 3.5 feet (12 foot total length/2 = 6; 6-1 foot for pocket = 5. 5-1.5 feet for hood = 3.5 feet), a far cry from the dangling 6 foot from the collar length of the piece when worn as a plain stole. Very wearable, and if I might say so, very flattering, too. Here are directions if you want to make Susan’s Stole for yourself.
Susan’s Stole
4 skeins King Cole Luxury Mohair (110 meters each, approx 440 meters or 480 yards, total)
Size US #13 (9mm) circular needle, 36 inches long.
Tapestry Needle for sewing up.
Gauge = Approximately 8 stitches = 4 inches or 10cm
Cast on 285 stitches.
Row 1:? (K5, P5), repeat, end K5.
Row 2:? (P5, K5), repeat, end P5.
Repeat rows 1 and 2 until your piece measures approximately 18 inches across, or you run out of yarn. Cast off and darn in ends.
Fold left and right edges in towards center, making end flaps approximately one foot deep. Seam up cast on and cast off row edges. Seam approximately 2/3 of the top edge of the flap to form a pocket.
Fold piece in half so that pocket ends are opposite each other. Seam about 18 inches from fold towards free ends along cast-on edge (the opposite side from hand opening), to create a hood-like opening.
Final word:? Why ‘Lemonade?’? From the old adage that begins “If life gives you lemons…”
REPORT AND PATTERN – FINGERLESS WHATEVERS
UPDATE: REVISED PATTERN FOR FINGERLESS WHATEVERS IS NOW AVAILABLE AS AN EASY TO DOWNLOAD PDF AT THE KNITTING PATTERNS LINK, ABOVE.
On this 43rd day of the Great Monitor Dearth, and second day of post-blizzard digging out, I share these mitts:
Fingerless Whatevers
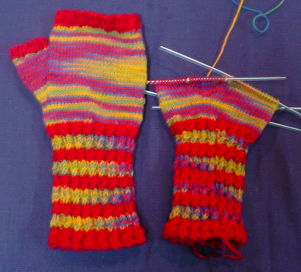
Approximately 200 yards of sock weight yarn – roughly one 50 gram skein. This pair looks to be using half a skein each of Lorna’s Laces Shepherd Sock and Dale Baby Ull. (I can’t guarantee that this is a spot on perfect quantity estimate as I am not yet done with the second mitt.) This would be a good project to use up odds and ends of several self-stripers, pairing them with one solid color common to them all. Five US #1 double pointed needles?(2.5mm). May be knit using the two circ method by considering each two-needle unit = 1 circ
Gauge in stockinette:? 9 st = 1 inch
Twisted cable ribbing:
Round 1: (K2, p2), repeat
Round 2: (K2, p2), repeat
Round 3: (Right twist using this method: [K2tog, leaving unit on left hand needle. Re-insert right hand needle tip into stitch closest to end of left hand needle. Knit this stitch. Slip entire now-twisted two-stitch unit to right hand needle], p2), repeat
Round 4 and 5: Repeat Rounds 1 and 2
Wristlet/Pulse Warmer or wrist part of Whatevers:
Cast on 64 stitches and knit one round, using the method described in yesterday’s post. You should have 4 dpns, each with 16 stitches (or two circs with 32 if using that method.) Work twisted stitch ribbing for 9 repeats (45 rounds). I alternated my two color yarns, switching colors after Row 5 and stranding up rather than breaking the yarn at every stripe. Note that you can end off right here and have a perfectly nifty pair of pulse warmers, instead of continuing on to make the thumb hole and palm part of these mitts.
Left Thumb Gusset and Palm (Mitt #1 only):
Knit 9 rounds in stockinette.
10th Round: Knit all the stitches from Needle #1. Knit 12 stitches from Needle #2. Place a marker. M1, K2, M1, place another marker. Knit remaining 2 stitches on Needle #2. Knit all stitches on Needles #3 and 4.
11th Round: Knit all stitches
12th Round: Knit to marker. Transfer marker to right hand needle. M1, Knit to marker, M1. Transfer marker to right hand needle. K2. ?Knit all remaining stitches on Needles #3 and 4.
13th Round: Knit all stitches.
Repeat rounds 12 and 13 until there are 24 stitches between the two markers.
Knit 2 tog at the beginning of Needle #1.Knit remaining stitches on Needle #1. You should have 15 stitches on Needle #1. Knit to marker. Slip the 24 thumb stitches onto a stitch holder or piece of string. Stranding very tightly to avoid gapping, knit the remaining two stitches of Needle #2 together. You should have 14 stitches on Needle #2. K2tog, knit remaining stitches on Needle #3. You should have 15 stitches on Needle #3. Knit all stitches on Needle #4. There will now be 60 stitches total.
Knit 10 rows. On 11th row begin working rounds 1-5 of Twisted Cable Ribbing (I chose to switch back to my solid color for this). You will find this easier to work if you slip the first stitch of Needle #2 to Needle #1 and the last stitch of Needle #2 to Needle #3 just prior to commencing this round. Bind off in pattern.
Right Thumb Gusset and Palm?(Mitt #2 only):
In theory you could just make two lefts, since there are no fingers in this piece to skew the fit one way or the other. But I think it’s more satisfying (and marginally better fitting) to do a mirror image. Plus it’s good practice for anyone planning on graduating from fingerless whatevers to real gloves.
Knit?9 rounds in stockinette.
10th Round: Knit 2. Place a marker. M1, K2, M1, place another marker. Knit remaining 12 stitches on Needle #1. Knit all stitches on Needles #2, 3 and 4.
12th Round:? Knit all stitches
13th Round:? Knit to marker. Transfer marker to right hand needle. M1, Knit to marker, M1. Transfer marker to right hand needle. K2. Knit all remaining stitches on Needles #2, 3 and 4.
14th Round: Knit all stitches.
Repeat rounds 13 and 14 until there are 24 stitches between the two markers.
Knit 2 tog at the beginning of Needle #1. Slip the 24 thumb stitches onto a stitch holder or piece of string. Stranding very tightly to avoid gapping, knit the remaining 12 stitches of Needle #1. You should have 14 stitches on Needle #1. Knit 14 stitches on Needle #2, K2tog, knit You should have 15 stitches on Needle #2. Knit all stitches on Needle #3, and 4. There will now be 60 stitches total.
Knit 12 rows. On 13th row begin working rounds 1-5 of Twisted Cable Ribbing (I chose to switch back to my solid color for this). You will find this easier to work if you slip the last stitch of Needle #1 to Needle #2 just prior to commencing this round. Bind off in pattern.
Thumb:
Evenly divide the 24 stitches of the thumb onto three DPNs. With a fourth work the following rounds of Twisted Cable Ribbing:
Round 1
Round 3
Round 5
I chose to work these in my solid color. Bind off in pattern. Darn in all ends, taking care to snick up the hole that has formed at the base of the thumb where the ribbing began.
Please note that this pattern is copyright 2005, by Kim Salazar, and may not be reproduced or distributed in any format without her permission. It is intended for private end-consumer use only. Please contact the author for permission if you intend to make up this item in quantity for sale or charitable donation.
Mailbag Questions
Michelene asks how I keep half hitch cast on stitches from loosening and turning into big loops. The answer is knitting them very slowly, firmly, and carefully. They will distend somewhat, but if your second row is neat and even, the cast-on row will snick itself back into reasonable shape. The long string gap between needles will also resolve itself; and the beginning/end round gap is addressed by the trading stitches trick also described.
Important note on this – If you try to work a normal purl on a half hitch cast on stitch, the cast on stitch will disintegrate because the motion of the purl undoes the twist that formed the stitch. That’s why the first round of the sock method described two days ago is all knits. If you MUST purl, do a twisted purl through the back of the loop. Awkward, yes – but it shouldn’t disintegrate.
On finding teeny size needles, I get most of mine at my LYS – Wild & Woolly, in Lexington, MA. They get them every now and again as part of their DPN order. When I see a set in a size I haven’t got yet, I buy it. I’ve also found some in yard sales and other yarn shops. If your local shop stocks Inox accessories they should be able to special order them for you. There are also lots of on-line sources for specialty needles. I’ve never dealt with either, but both Lacis and JKL Needles! both have quite extensive offerings.
QUESTIONS – BOTH INTERESTING AND ANNOYING
Interesting Question
Yesterday Marcia asked about the K2P2 rib I posted about. She wants to use it on a hat where the brim is worn folded up. She’d like to have the pattern visible on the flipped up part, and wants to have the twists on the hat body and brim oriented with the same leg on top.
I haven’t tried this, but I think that if this stitch were worked two-sided – with crossings on both sides, Marcia’s effect would be achieved. To do this you need to make it a six-row rather than a five row pattern. Marcia was also concerned with the leg direction, but if the thing is worked two-sided this way, when flipped up the reverse will display the cable twist crossings going in the same direction as the front. (Try it by making slash marks on both sides of a piece of paper, then folding it.)
To do it flat, I’d work:
Cast on a multiple of 4 stitches
Round 1: (K2, P2), repeat
Round 2: (K2, P2), repeat
Round 3: (Right twist using this method: [K2tog, leaving unit on left hand needle. Re-insert right hand needle tip into stitch closest to end of left hand needle. Knit this stitch. Slip entire now-twisted two-stitch unit to right hand needle], p2), repeat
Round 4: (K2, P2), repeat
Round 5: (K2, P2), repeat
Round 6: (Right twist using this method: [K2tog, leaving unit on left hand needle. Re-insert right hand needle tip into stitch closest to end of left hand needle. Knit this stitch. Slip entire now-twisted two-stitch unit to right hand needle], p2), repeat
In the round I’d work:
Round 1: (K2, P2), repeat
Round 2: (K2, P2), repeat
Round 3: (Right twist using this method: [K2tog, leaving unit on left hand needle. Re-insert right hand needle tip into stitch closest to end of left hand needle. Knit this stitch. Slip entire now-twisted two-stitch unit to right hand needle], p2), repeat
Round 4: (K2, P2), repeat
Round 5: (K2, P2), repeat
Round 6: K2, (Right purl twist using this method: [Skip the first stitch but retain it on the left needle and purl the second one, also retaining it on the left hand needle. Then purl together both the skipped stitch and the second stitch and move the resulting two-stitch unit to the right hand needle], repeat
Of course another way to deal with the problem is to knit the cuff area using the pattern as described yesterday. When it was deep enough, you’d add three rows of purls to make a welt (the fold line); then reverse direction and knit the cap part, using the opposite twist stitch wherever the original called to use one. That would put the right side of the cuff showing when folded up against the hat body.
Another Interesting Question
FeliciaSix says “Wow. Eyes. Monitor. Bright. Hurt. Why did you pick that most unsubtle of color combos for the Fingerless Whatevers?”
Because it’s cold, dark and dreary in the winter and I wanted to wear the opposite.
Annoying Questions
None of them are worth repeating. Some days I wish every computer came equipped to display this error message:

You can build your own error messages, too.
BY AND FOR, BY AND LARGE
UPDATE: THE PATTERN BELOW IS NOW AVAILABLE AS A QUICK DOWNLOAD PDF AT THE KNITTING PATTERNS LINK, ABOVE.
Sigh. Still no monitor. Perhaps today. At least today I’ve got Internet connectivity. Yesterday I experienced several hours of intermittent service interruptions (that’s why there was no Monday edition of String).
In the mean time, I’ve managed to get one of the other machines in this house to accept input from my bargain-basement digital camera. It’s blurry, but you get the idea:
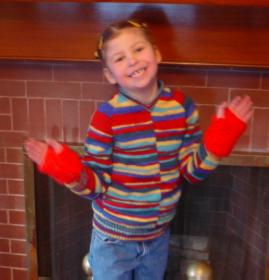
I finished the Crazy Raglan. Now it’s lurid and not my best effort, but it’s to the exact specifications of the target Small One, and she loves it. Perhaps this explains why:
She’s got one of these. It’s been her favorite toy since she was only a couple of months old. Her Squeaky is now much less pristine than this catalog shot, and (mercifully) no longer plays a music box rendition of “Born Free.”? She?picked out the self striping yarn because she wanted a “Squeaky Sweater,” and now she’s got one. But I?think you have to be six to truly appreciate such things.
In terms of technical?performance and lessons learned – there were several. First, going back to mid-summer, there were all sorts of things to be experienced?managing the repeat and?width of the area being knit so as to best manipulate the striping. Second, I used?Sweater Wizard software to devise the basic raglan shape. I really like having that shortcut available to me, but I have to say that for kids sizes at least,?the templates do?run a bit small.I added both copious width/ease and length to make a custom fit on my string-bean kidlet, and it still turned out to be snug.
I’m not entirely pleased with the raglan angle. I should have made the armholes deeper. That would have changed the angles and made the sweater a bit more proportional. I also bowed to kid-preference and made a very shallow V-neck instead of a crew or deeper V, trimming it with a very narrow band of ribbing. She likes it, but I don’t – again the proportions are a bit off. Finally, I did a slip stitch selvedge edge on all pieces. I’ve done that before on raglans and had no problems, but they were solid color raglans, sewn with yarn of the same color. The mattress stitch seaming in the space dyed yarn – especially on the raglan seams – was VERY evident. I ended up taking it out and redoing it as pierced double running stitch to tighten up those shoulder seams and make them gap less. I also selectively cut bits of the darkest green to use for my redone seams. That helped a bit, too.
One thing I did do right was to use provisional cast-ons for the body and sleeves. I also knit both back and front at the same time, and both sleeves at the same time. After I sewed the seams, I went back and picked up the bottom edge stitches at body hem and cuffs, and knit the ribbing in the round. I did the body ribbing first, and liked the contrast between the narrow one-row stripes in it, and the wider stripes in the body. When I did the cuff and neckline ribbing I used two balls of yarn starting at two different points in the color cycle to ensure that they matched the waist ribbing.
So I post an equivocal success. The target audience was pleased, but I’m not enirely so.
Why “By and For?” in the title?? Because those little hand-mitt wristlets The Small One is wearing are a knitting product entirely of her own manufacture. They’re lumpen, odd little superbulky yarn paw-warmers but she’s very, very proud of them. Here’s the pattern. Such as it is:
Morgan’s Paw Warmers
Will fit a small child, age 6-10.
Small quantity of?leftover superbulky yarn. I can’t say what we used. I bought it years ago for holiday present ties. My guess is that it’s 100% acrylic.
US #10.5 straight single pointed needles. Tapestry needle for sewing up.
Gauge – roughly 2 stitches = 1 inch in garter stitch.
Cast on 16 stitches. Knit in garter stitch until piece measures about 6 inches long. Bind off four stitches, and knit across remainder of row. Knit next row, casting on four stitches at the end. On the next row, (K3, K2tog), repeat across the row, ending K1. Knit three more rows on the remaining 13 stitches. Bind off. Sew side seam, taking care to leave the thumb slit open.
THE BEHINDER I GET
I can’t say I’m going any faster, but I’m in the swim of things with my gift knitting. I have to admit a tinge of guilt this year. In years past, I’d done a fair bit of it far in advance, sometimes using especially mindless gift knitting (like socks or scarves) as bliss-out-on-the-beach pieces during our summer vacation. Or I’ve doodled up little projects between larger ones, while I was waiting for my ideas to set. By this time I’ve usually got a basket of goodies ready for holiday giving. Unfortunately, this year nothing got done ahead of time, and I’ve been forced to do something I detest – knit to deadline.
I hate knitting to deadline because in my professional life, all I do is march to deadlines. I’m a proposal manager, and I’ve lived my career in 30-day increments. Other people will say things like, “Dear, remember ’91 – that was the year little Brunhilde was born,” or “Yeah, 91. Cousin Ildefonse was in Desert Storm.” I say, “Fall ’91. That was that big military IT/hardware support proposal, we had an extension that got eaten up by the sheer bulk of the revised reporting schedule requirements.” From this you can well deduce the heart-stopping excitement of my daily life.
Knitting has always been a blissful interlude, a no-deadline finish-it-whenever sort of pursuit. That’s one of the reasons why I’ve shied away from pursuing commercial publication for my patterns. Squeezing my knitting life into a tight deadline sucks all the joy out of it.
So here I am. Doing frantic knitting on a couple of Hannukah presents (it’s early this year, adding further complications). The Kombu scarf, four hats, and two pairs of socks are done. That leaves three scarves, two more pairs of socks, and possibly couple of kid’s size earwarmer bands to go.
Today I plan on casting on for a very simple scarf done in Sandnes Lime (a mostly cotton, very soft yarn) for a friend who is wool-sensitive. I’ve used and reviewed the stuff before and not been wildly pleased with it, but for a scarf it should work out fine. Although most of the detail will be obscured by the textured yarn, I’ll probably work it in this simple knit/purl pattern – just to give it a bit more interest:

I like this one for scarves because it adds a bit of loft and like all patterns with near equal amounts of knits and purls on each row – it lies nice and flat without curling.
TEENY RED SOCK – PATTERN
UPDATE: A REVISED, EASY TO PRINT VERSION OF THIS PATTERN IS AVAILABLE AT THE KNITTING PATTERNS LINK, ABOVE.
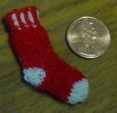
Several people have written to ask for the pattern for the teeny Red Sox sock.
It’s pretty much the same as the sock patterns on wiseNeedle. If you’ve done a toe-up sock with a Figure-8 no-sew toe and a short rowed heel, you’ve got it. I don’t want to re-write the entire thing with detailed instructions here. For that you can go to any of the sock patterns on wiseNeedle:
http://www.wiseneedle.com/knitpatterns.asp#socks
But here’s an abbreviated version. For any how-tos or further details, refer to the comparable section of any of these other sock patterns.
Teeny Red Sox Sock
(c) 2004, Kim Brody Salazar
Permission granted to link to this pattern and make socks for personal
consumption, but not to reproducethepattern or make socks for sale
without the author’s consent
1 card Special Blauband darning yarn, bright red
1 card Special Blauband darning yarn, white
1 set of five double pointed needles in any teeny size you have, preferably #000 or smaller
Gauge: Pretty much unimportant, although the darning yarn looks best at 12 stitches per inch or smaller.
Using the white yarn, work a figure-8 cast on starting with two needles and four loops on each needle. Knit the first row as usual, taking care to untwist the stitches that will be mounted wrong on one of your needles.
Toe and Foot:
Row 1: k1, M1, k1. Using another dpn, k1, M1, k1. Using a third dpn, k1, M1, K1. Using the fourth dpn – K1, M1, K1. You should now have 4 live needles in your work, each with3 stitches on it.
Row 2: Knit all stitches.
Row 3: *k1, M1, k2. K2, M1, K1* repeat. Each needle should now have four stitches on it. Your toe is done.
Row 4: Switch to red and continue knitting until sock measures approximately 3/4 of an inch measured from the tip of the toe.
Heel:
Determine where the bottom of your foot will be. With white yarn, work the following on the two needles that hold the stitches for the bottom of the foot. Think of the two needles that hold those stitches as being one unit:
Row 1 of decrease: K7, yf, slip next stitch purlwise onto right needle. Turn work.
Row 2: Yf (wrapping the yarn around the slipped stitch that was just slipped and return it to the right hand needle – it should look like it has been lassoed by a noose), p6, slip the next stitch purlwise (keeping the yarn in front of the work). Turn work.
Row 3: Yf (wrapping the yarn around the stitch you just slipped and returning it to the right hand needle), K5, yf, slip the next stitch knitwise onto the right needle. Turn work.
Row 4: Yf (wrapping the yarn around the stitch you just slipped and returning it to the right hand needle), p4, slip the next stitch purlwise (keeping the yarn in front of the work). Turn work.
Row5 (first increase row:) K4, knit the next stitch through the back along with the wrapped loop around its base. (I do this by picking up the loop on the point of my right hand needle, then knitting the loop and the stitch together), yf, slip next stitch knitwise onto the right needle. Turn work.
Row 6: Yf, (wrapping the yarn around the slipped stitch so that there are now TWO wraps at its base and returning it to the other needle), p5, purl the next stitch along with the loop wrapped around its base, slip next stitch purlwise (keeping the yarn in the front of the work). Turn work.
Row 7: Yf (wrapping the yarn around the base of the slipped stitch and returning it to the other needle), k6, knit the next stitch through the back of the loop along with the two loops wrapped around its base, yf, slip next stitch knitwise onto right needle, DO NOT TURN WORK.
Ankle and Ribbing:
Switch back to red, and continue knitting entirely around the ankle of the sock. On the first row of the ankle when you get around to the white stitch at the right hand edge of the heel, knit it along with the wraps around its base. Continue to work in stockinette until it is approximately 3/4 of an inch measured from the top of the heel
Ribbing Row 1: *K1 red, K1 white* repeat
Ribbing Row 2 and 3: *K1 red, P1 white* repeat
Bind off all stitches using red. Darn in ends.
WORKING REPORT – BLUE PONCHO
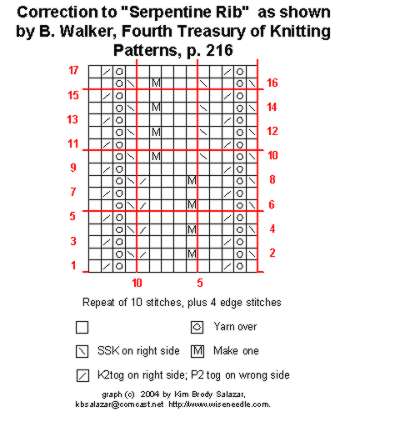
Well, teens are known for being fickle and changing their minds. My just-barely-teen is typical. She’s decided she didn’t like the patterns I’d been swatching, and picked out another from my stitch dictionary library. It’s “Serpentine Rib” from Barbara Walker’s FourthTreasury of Knitting Patterns, p. 216. The kid hasgood instincts, though. I have to agree with her. The stuff I’d been playing with looked way too clunky in the scale yarn I was using. We’re both happy now, and I’m off an running.
One very minor glitch – I have to say that I’ve caught the sainted Barbara in a rare mistake. Her graph presents even numbered rows (right side rows) of the pattern. The direction for the set-up and subsequent wrong side odd-numbered rows is given in prose.It’s given as “*P2tog, YO, P8: rep from *, end last repeat p2.It’s off by one stitch (not a big mistake), and it’s pretty obvious if you’ve ever worked faggotting in lace knitting. If you start thewrong side row at that point Walker does, you won’t produce theneat wavy lines of openwork as shown in her illustration.
Here’s my own graph of the corrected pattern, showing both odd and even numbered rows. If you try this one, be sure to remember that it does start on an odd numbered, wrong side row:
In the mean time, I’ve cast on for the poncho and have knit about 2 inches, the first of which is in seed stitch so that the edge doesn’t curl too badly. I don’t like the width though. I may end up ripping back and working one fewer repeats, narrowing the body somewhat. Otherwise I have the sneaking suspicion that I’ll run out of yarn. Not a good sign if I’m unsure this early in the project…
WORKING REPORT – BLUE PONCHO
Now with Dragon put to bed, I can turn to my daughter’s blue lacy poncho. Over the weekend we went paging through pattern books and looking at old projects. She lit upon a couple of lacy looking stitches that she liked.
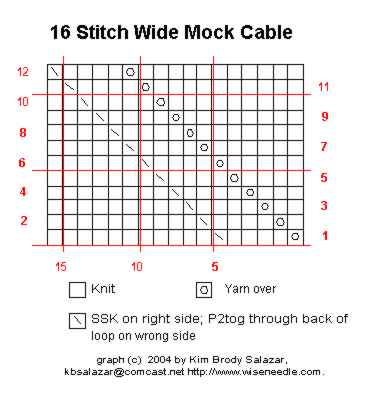
The first is the mock cable I used as the edging for Justin’s Blanket on wiseNeedle. The thing didn’t photograph well there, and the instructions for that counterpane are in prose, so here’s a wider version of the same idea. (Apologies for the lousy quality of these charts. For some reason my standard Visio to Fireworks graphics prep cycle is spitting out oddlynon-uniform results today.)
The second is a lacy panel adapted from a wider pattern appearing in B. Walker’s Second Treasury of Knitting Patterns. The original isn’t graphed, starts in a different place of the repeat, and is set up for multiple iterations of the ribbon. I pared it down to just one repeat to make a self-contained panel:
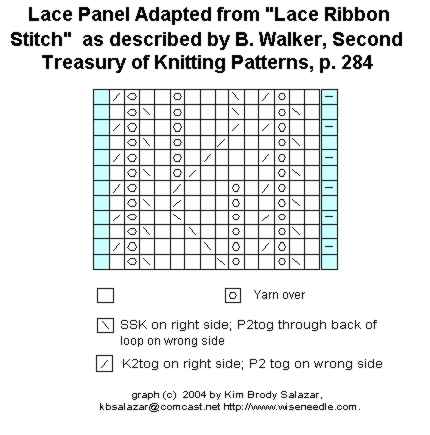
Both are lace knitting patterns in that they have something happening on every row. If one is knitting in the flat (back and forth on two needles) you can see that maneuvering to do a P2tog tbl (purl two together through the back of the loop) on a wrong-side row might be awkward. Whichever panel is chosen, it will probably alternate between sections of K2 P2 or K3 P3 rib.
As far as swatching goes, I’ve been playing with my de-plyed Paternayan. Thinking that the 2-ply result of my pains was rather thicker than sport, but thinner than DK, and that I wanted a lacy effect, I started swatching on US #9s (5.5mm), and worked my way up through needle sizes to #13s (9mm). I’m wavering between #11s (8mm) and the #13s. More swatching is in order, especially swatching to see if the 11 or 13 looks best with the plain old ribbed part, and to make a nice, even piece to determine gauge over both textures.
In the mean time, I’ve decided to run the color stripes on the vertical rather than the horizontal. That means I’ll figure out how wide the rectangles will need to be for this poncho, figure out some pleasing alternation/panel widths for the chosen lacy part and ribbed sections, then decide which panels need to be in which of my three available colors (blue variegated, plus wedgewood and slate blue). Once that’s decided it’s cast-on time, working the color stripes with Intarsia joins between them – each from its own ball.
Did I mention “Figure out if I’ve got enough yarn?” Gotta do that to, especially because seven skeins (3 variegated blue, 2 each of my two blues) de-plyed into 10.5 skeins (4.5 variegated, 3 of each blue)equals 1,764 yards That’s 756 yards of variegated blue, plus 504 yards each of the two blues. In total it should be enough, but I may need to get very clever with color placements to make sure I don’t run out of anything.
