UPDATE: REVISED PATTERN FOR FINGERLESS WHATEVERS IS NOW AVAILABLE AS AN EASY TO DOWNLOAD PDF AT THE KNITTING PATTERNS LINK, ABOVE.
On this 43rd day of the Great Monitor Dearth, and second day of post-blizzard digging out, I share these mitts:
Fingerless Whatevers
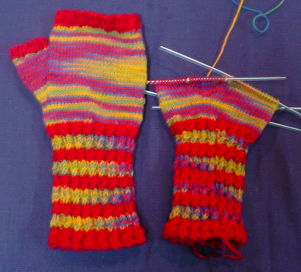
Approximately 200 yards of sock weight yarn – roughly one 50 gram skein. This pair looks to be using half a skein each of Lorna’s Laces Shepherd Sock and Dale Baby Ull. (I can’t guarantee that this is a spot on perfect quantity estimate as I am not yet done with the second mitt.) This would be a good project to use up odds and ends of several self-stripers, pairing them with one solid color common to them all. Five US #1 double pointed needles?(2.5mm). May be knit using the two circ method by considering each two-needle unit = 1 circ
Gauge in stockinette:? 9 st = 1 inch
Twisted cable ribbing:
Round 1: (K2, p2), repeat
Round 2: (K2, p2), repeat
Round 3: (Right twist using this method: [K2tog, leaving unit on left hand needle. Re-insert right hand needle tip into stitch closest to end of left hand needle. Knit this stitch. Slip entire now-twisted two-stitch unit to right hand needle], p2), repeat
Round 4 and 5: Repeat Rounds 1 and 2
Wristlet/Pulse Warmer or wrist part of Whatevers:
Cast on 64 stitches and knit one round, using the method described in yesterday’s post. You should have 4 dpns, each with 16 stitches (or two circs with 32 if using that method.) Work twisted stitch ribbing for 9 repeats (45 rounds). I alternated my two color yarns, switching colors after Row 5 and stranding up rather than breaking the yarn at every stripe. Note that you can end off right here and have a perfectly nifty pair of pulse warmers, instead of continuing on to make the thumb hole and palm part of these mitts.
Left Thumb Gusset and Palm (Mitt #1 only):
Knit 9 rounds in stockinette.
10th Round: Knit all the stitches from Needle #1. Knit 12 stitches from Needle #2. Place a marker. M1, K2, M1, place another marker. Knit remaining 2 stitches on Needle #2. Knit all stitches on Needles #3 and 4.
11th Round: Knit all stitches
12th Round: Knit to marker. Transfer marker to right hand needle. M1, Knit to marker, M1. Transfer marker to right hand needle. K2. ?Knit all remaining stitches on Needles #3 and 4.
13th Round: Knit all stitches.
Repeat rounds 12 and 13 until there are 24 stitches between the two markers.
Knit 2 tog at the beginning of Needle #1.Knit remaining stitches on Needle #1. You should have 15 stitches on Needle #1. Knit to marker. Slip the 24 thumb stitches onto a stitch holder or piece of string. Stranding very tightly to avoid gapping, knit the remaining two stitches of Needle #2 together. You should have 14 stitches on Needle #2. K2tog, knit remaining stitches on Needle #3. You should have 15 stitches on Needle #3. Knit all stitches on Needle #4. There will now be 60 stitches total.
Knit 10 rows. On 11th row begin working rounds 1-5 of Twisted Cable Ribbing (I chose to switch back to my solid color for this). You will find this easier to work if you slip the first stitch of Needle #2 to Needle #1 and the last stitch of Needle #2 to Needle #3 just prior to commencing this round. Bind off in pattern.
Right Thumb Gusset and Palm?(Mitt #2 only):
In theory you could just make two lefts, since there are no fingers in this piece to skew the fit one way or the other. But I think it’s more satisfying (and marginally better fitting) to do a mirror image. Plus it’s good practice for anyone planning on graduating from fingerless whatevers to real gloves.
Knit?9 rounds in stockinette.
10th Round: Knit 2. Place a marker. M1, K2, M1, place another marker. Knit remaining 12 stitches on Needle #1. Knit all stitches on Needles #2, 3 and 4.
12th Round:? Knit all stitches
13th Round:? Knit to marker. Transfer marker to right hand needle. M1, Knit to marker, M1. Transfer marker to right hand needle. K2. Knit all remaining stitches on Needles #2, 3 and 4.
14th Round: Knit all stitches.
Repeat rounds 13 and 14 until there are 24 stitches between the two markers.
Knit 2 tog at the beginning of Needle #1. Slip the 24 thumb stitches onto a stitch holder or piece of string. Stranding very tightly to avoid gapping, knit the remaining 12 stitches of Needle #1. You should have 14 stitches on Needle #1. Knit 14 stitches on Needle #2, K2tog, knit You should have 15 stitches on Needle #2. Knit all stitches on Needle #3, and 4. There will now be 60 stitches total.
Knit 12 rows. On 13th row begin working rounds 1-5 of Twisted Cable Ribbing (I chose to switch back to my solid color for this). You will find this easier to work if you slip the last stitch of Needle #1 to Needle #2 just prior to commencing this round. Bind off in pattern.
Thumb:
Evenly divide the 24 stitches of the thumb onto three DPNs. With a fourth work the following rounds of Twisted Cable Ribbing:
Round 1
Round 3
Round 5
I chose to work these in my solid color. Bind off in pattern. Darn in all ends, taking care to snick up the hole that has formed at the base of the thumb where the ribbing began.
Please note that this pattern is copyright 2005, by Kim Salazar, and may not be reproduced or distributed in any format without her permission. It is intended for private end-consumer use only. Please contact the author for permission if you intend to make up this item in quantity for sale or charitable donation.
Mailbag Questions
Michelene asks how I keep half hitch cast on stitches from loosening and turning into big loops. The answer is knitting them very slowly, firmly, and carefully. They will distend somewhat, but if your second row is neat and even, the cast-on row will snick itself back into reasonable shape. The long string gap between needles will also resolve itself; and the beginning/end round gap is addressed by the trading stitches trick also described.
Important note on this – If you try to work a normal purl on a half hitch cast on stitch, the cast on stitch will disintegrate because the motion of the purl undoes the twist that formed the stitch. That’s why the first round of the sock method described two days ago is all knits. If you MUST purl, do a twisted purl through the back of the loop. Awkward, yes – but it shouldn’t disintegrate.
On finding teeny size needles, I get most of mine at my LYS – Wild & Woolly, in Lexington, MA. They get them every now and again as part of their DPN order. When I see a set in a size I haven’t got yet, I buy it. I’ve also found some in yard sales and other yarn shops. If your local shop stocks Inox accessories they should be able to special order them for you. There are also lots of on-line sources for specialty needles. I’ve never dealt with either, but both Lacis and JKL Needles! both have quite extensive offerings.
