TALKING HOOPS AROUND THE SUBJECT
Yesterday was a needlework housekeeping day. I put away the supplies from my last project, neatened up my stitching-on-the-go box, and cast an eye over my kit in advance of whatever project I will do next. And there WILL be a next – it’s just a matter of getting a couple of holiday obligations finished first.
Among the reassessments I made was an evaluation of my hoops. I have several. My best ones are three in-hand hoops, and one sit-upon hoop on a stick. All are hardwood wood and better quality, with sturdy brass hardware – not the bamboo ones with fragile clasps. Three of them are shown in the family photo below. The other one is an unwrapped duplicate of the smallest, shallowest hoop. I haven’t wrapped it because it happens to have much better tension than the one I did wrap, and there might be call for me to use an unwrapped hoop for a specific purpose. Since I don’t leave my projects hooped when dormant, there’s no call for me to have two absolutely identical ones, both prepped and ready.

The in-hand hoops are all 6 inches (15.24 cm) in diameter measured across the inner hoop. I find that the most convenient size both for maintaining tension and for use in tight places. The sit-upon is 8.75 inches (22.22 cm) across the inner hoop. I note that a 6 inch diameter hoop/stick part is now available from the maker. I might pop for that someday.
The ring of one of the in-hand hoops is 1/4 inch (0.63 cm) deep, and the other hand held one is 5/8 inch (1.59 cm) deep. The hoop on a stick is even wider – 7/8 inch (2.22 cm).

I also have a selection of both plastic and wooden quilting size hoops, a foot in diameter or more that I’ve gotten as hand-me-downs, or as part of “take the lot” yard sale/jumble sale needlework bundles. I rarely use them because I find they are cumbersome, and they don’t provide the drum-tight tension I prefer. None of those have been promoted to my on-deck group, and aren’t shown.
But why so many of the smaller diameter? Well, it happens I do have several larger scrolling frames, and use them when needed – mostly for things that have fragile threads, metallic threads, or other raised embellishments; or that employ crush-prone stitches that a hoop could injure when it is repositioned. But for smaller pieces, non-fragile pieces, and in some cases REALLY big projects like tablecloths, I prefer the hoops. These days I mostly use the sit-upon, but for sitting on the beach and stitching, the sit-upon is useless. You can’t sit upon a hard paddle seat in a soft fabric sling chair – so hand hoop it is.
Why both the deep and the shallow? The deep ones (including the hoop on the stick here) work better with thinner fabrics – the 38 and over count linens and blends I usually use. The shallower ones work better for thicker fabrics, especially heavy 28 to 36 count evenweave, denim, and other sturdier fabrics. If I used most Aida I’d probably employ the shallower hoop for that, too. Do you have a standard deeper hoop and you are struggling to get it over your Aida? Try a thinner wall hoop. It will be easier, even if you wrap the hoop.
Wrap the hoop?
Yup. Makes a world of difference. Wrapping the inner hoop with 100% cotton twill tape vastly improves the grip of the thing, and makes the fabric much easier to mount and to tension. It also cushions the work a bit, cutting down on stitches being crushed. I will probably wrap the outer hoops, too, to prevent those shiny areas that happen when densely packed stitching meets hoop tension. But so far I haven’t bothered.
How to do it. Note that the deeper hand-held hoop is wound with wider twill tape than the other two. That was the first one I wrapped. I have to say it was significantly harder to do it with the 3/4 inch (1.9 cm) tape than it was to do with the 3/8ths inch (0.95 cm) tape. The narrower stuff is easier to stretch to conform to the circle of the hoop, without lumping and gapping.
Lumping and gapping on the outer edge of the inner hoop is to be strenuously avoided. That leads to high and low spots with suboptimal tension. The inner surface can be less “policed” but it shouldn’t present gaps or kinks that might work their way around to the top, or catch needles during stitching.
I find the best way to achieve as uniform a contact surface as possible is to overlap the tape by 50%, row on row, and wrap as tightly as possible, maintaining the established angle and stretching the tape as I go. Yes, it can take me a couple of tries before I hit on the angle that produces the most even results.


I don’t use glue or tacks to hold the end, I just wrap, gripping the tape and hoop very tightly, placing each successive course with special attention. Here you see the start and the midway point. Eventually the origin end will work itself a tiny bit loose as I go, but I keep it folded flush against the inner surface of the ring, and take care to wrap over it. Eventually I get back to the start. I cut the tape, tuck the ends under to prevent fraying and firmly sew it to the inside surface of the ring, back where it meets the beginning. That spot is indicated by the arrow, below.

The only caveat on this whole thing is that wrapping may add so much diameter to the inside hoop that the little thumb screw holding the clasp together becomes too short. This happens mostly on the less expensive/mass market type hoops. If that happens, a quick stop at an old fashioned hardware store can help you land a longer replacement. And by that I mean a store with actual people who know the inventory, not a big box/self-serve hardware department store that sells everything in quantity, entombed in blister packs. Bring the hoop and screw in and explain the problem at a non-busy time. The staff will be able to size it and find **just** the right thing.
And that’s how it’s done. If done with proper care, wrapping a hoop of this size takes me about a half hour. And a half hour well spent.
Other Recent Projects
The multicolor headscarf I was stitching has finally been made up into its finished form – a lined triangle with ties. The ties are also 3/8 inch twill tape, but a heavier/denser and whiter one than that used on these hoops. I folded it in half longitudinally and stitched it to make robust tie strings. But I didn’t remember to take a finished item photo, and then decided to give it as a present to a dear old friend who married over the weekend past. I forgot to ask permission to use a photo of her wearing it. But I am happy that she loves it enough to tie it on immediately after the ceremony.
And the Fractured Symmetry sampler joins the rest of the to-be-framed or finished works on my Wall of Shame.

He is tucked in next to the underskirt panel at the far left, just below Stone by Stone. In addition to some of my perpetual unfinished objects (UFOs), there are now six pieces there, stitch complete, waiting for framing or other finishing. I suppose I should get on that.
BUT in the mean time I have seasonal obligations to meet. I promised a stocking with a wolf on it before the holidays hit. I’m on it. The recipient’s name with be duplicate stitched into the white band at the top. I’m afraid that the distortion inherent in translating squared graphs to rectangular knitted stitches (wider than they are tall) has stretched poor Wolfie a bit. I am hoping that additional embroidery – maybe an eye and some ornaments on that tree, will make him both more identifiable and more festive.

The pattern is one I’ve done twice before, once for each of the spawn. But the last time I knit it was 25 years ago. I found one of the pattern pages, but not the others. I’m extrapolating from the other two extant stockings. An interesting exercise, for sure.

LONGEVITY UNDER HARD WEAR, AND MOVING FORWARD
Some of the long-time readers here may remember the forehead cloths I stitched back in the Pre-Plague Era. I used some linen that was approximately 32 count (a remnant of off the bolt, not a purpose-woven needlework ground), plus some stranded silk custom dyed by my Stealth Apprentice. The black used was a historically researched tannin/iron recipe, and the thread was a prototype of the threads that Stealth Apprentice sold through Golden Schelle. The Schelle retail effort is currently in hiatus, but I do hope it will restart in the future. In any case I now report on wear and tear.
As you can see, now about seven years later and after heavy wear and washing, the forehead cloths and their embroidery have both held up well. I didn’t do much special to launder them. I threw them in my regular cold water/cold rinse wash, but hung them on a rack to dry. I’m particularly impressed by the performance of the dyed silk. It’s as dark today as it was when I first stitched it. Now I understand why black silk was so ubiquitous on body linen. It survives frequent wear and harsh laundering unscathed.
What did suffer were the ties. I used the same ground cloth to make them, cutting strips, folding them in half the long way, then tucking both raw edges inside, seaming, and turning the tubes inside out – pretty much the standard way ties are made, although I had to do mine on grain and not on the bias because I had so little fabric available.

Three of the four have disintegrated. To to little more than fuzzy strands. You can see one of the less frayed tie cut from the cloth on the bottom near the spool of twill tape in the photo above.
I am in the process of replacing all of the ties with twill tape. The finished redo of the first is at the bottom of the photo above. I hand-stitched the edge of the tape to the edge of the cloth, then folded it over and hand-hemmed the other side down to the back. When I got to the ends of the triangle, I continued on with the folded twill, whipping the edge as I went. Next comes the darker, larger cloth at the left side of the photo. Then comes the cloth I just finished embroidering. I won’t bother with the fabric ties on that one, I’ll leap direct to the twill ties.
As for the current mini-sampler stitching project, I’m rolling along with that, too.

Since my last post about it I’ve completed the green twisted link strip, and the delicate black flower strip below it. Now I’m up to another band in green. Peacocks, or if you prefer, bling chickens – my rendition lacking much of the grace and nobility of the actual birds. Note that I am not using the silk for this one. I’m still experimenting with the Sulky threads. (Partial verdict – I MUCH prefer the silk.)
The peacock strip, like the others in this piece are of my own devising, and will be in Ensamplario Atlantio Volume III. Please don’t ask me when it will be released. It’s still in process. I’ve got about twenty pages of brand new fills, plus about eight pages of larger borders and all-over designs. I am toying with the idea of including the Epic Fandom strips in this one, too, just so that they are in one easy to thumb through collection. Opinions on that are solicited.
A BUSY JUNE SO FAR
Who said that retirement would be boring? Wrong, wrong, wrong.
We’ve spent the last month quite busy, buzzing back and forth to the Cape to escape the heat and enjoy the late pre-season quiet of the beach. We’ve kept at the garden I detailed in the last post. So far everything is surviving. Bushes and flowers bloomed and my tiny raised bed garden is beginning to offer up a small, but appreciated harvest of peppers and herbs. The eggplant will catch up eventually. And of course I’ve been doing needlework projects. The chair recover is in hiatus until the fall – too much infrastructure to schlep around, but smaller, portable projects have been thriving.
First up, a stitching finish on a WIP that’s been bopping around since before the Unstitched Coif. This is a forehead cloth, in more modern terms – a kerchief. I had made two some years back, and have loved them to pieces. The stitched body of each is still in perfect shape, but the ties on them have died. Here is the new one, not yet assembled into final, wearable form.
This is a doodle of a pattern that will be in Ensamplario Atlantio Volume III. I’ve been working on that, too and have about 20 plates of new fills. I’m planning on including several pages of larger patterns, strips, and even yokes, too. I am still dithering about including the free patterns that make up my Epic Fandom Stitch Along in it, too. It’s already a wildly anachronistic work, and it might be handy to have all that content in one place. In any case, EnsAtl III is very much a work in progress, and will be out as soon as I can manage it.
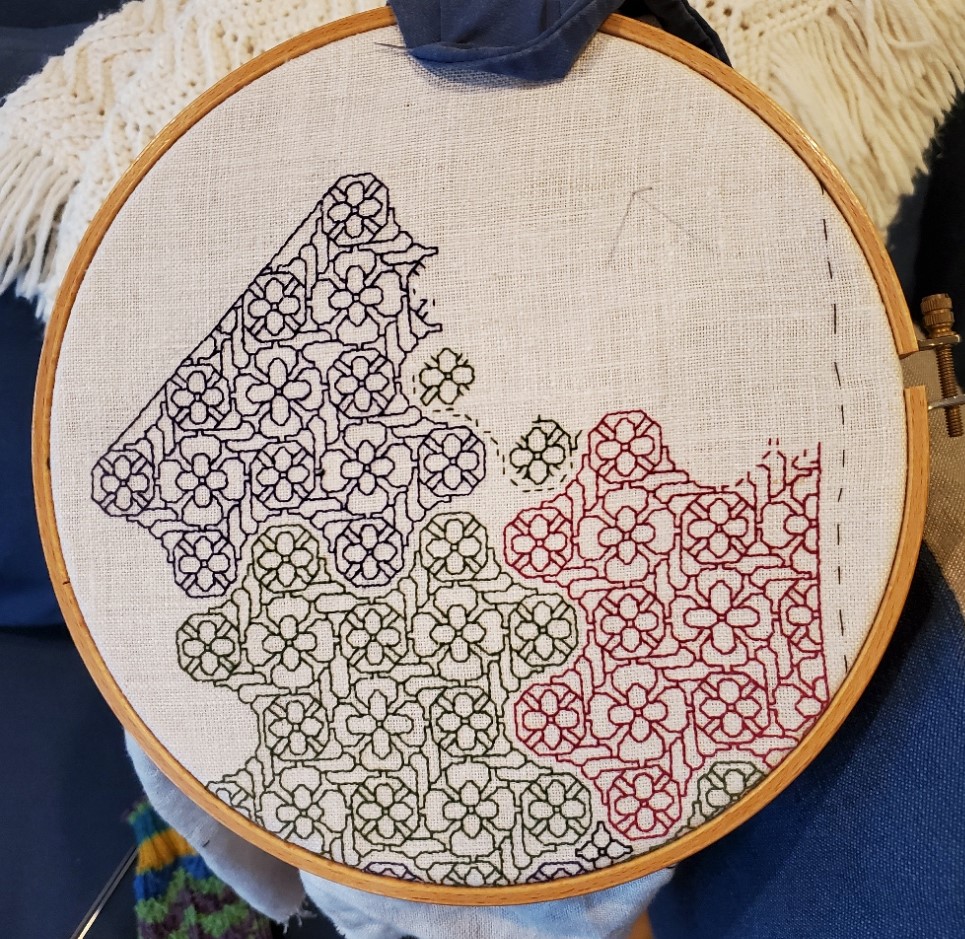
Back to this piece. It’s an experiment. I wanted to try out Sulky 30, a spooled thread sold for hand and machine embroidery. I’m working on 32 count linen, and two strands of the Sulky work nicely in terms of coverage and line depth. There are four colors here – an almost-cranberry red, a forest green, a navy blue, and (hard to see) small motifs filling problem spaces, worked in black. There are LOTS of mistakes in this. Places I missed a stitch, or substituted the wrong twist or size center flower, but since this is a quick stitch, meant to be worn to death and not a future heirloom of my house, I didn’t bother to go back and pick them out. I did fix mistakes that would have thrown off the design as a whole, though.
My thoughts on the Sulky? Not my favorite. It’s very hard twist and dense. While that makes a nice, clean line, it does make intersections a bit more difficult to keep even. Plus when picked out, both the blue and the green crock a bit – leaving color residue on the cloth independent of fiber crumbs. I’ll probably use up what I have on things I intend to wash savagely, but I won’t be buying more. The Unstitched Coif project spoiled me. Silk over cotton, any day.
I can’t report on the origin of the ground. It’s a scrap left over from something else. A garment has been cut from it. I did get a pile of linen scraps from someone here in town, via one of the local waste-nothing exchange groups. I’m pretty sure this was one of the pieces. So my guess is that it was yard goods, not custom-sold for needlework. Even so, the count is remarkably even. There’s some slubbing but not overly much, and the thread count is something like 32×33 threads. No selvedge left so I can’t guess about warp vs weft counts.
I am going to investigate narrow twill tape for the ties this time – both for this forehead cloth and to replace the now frayed and ruined ties of the older two. I had used the ground itself, double folded and seamed for the ties on the old one. Better I should use something more densely woven and robust, and that can be easily replaced.
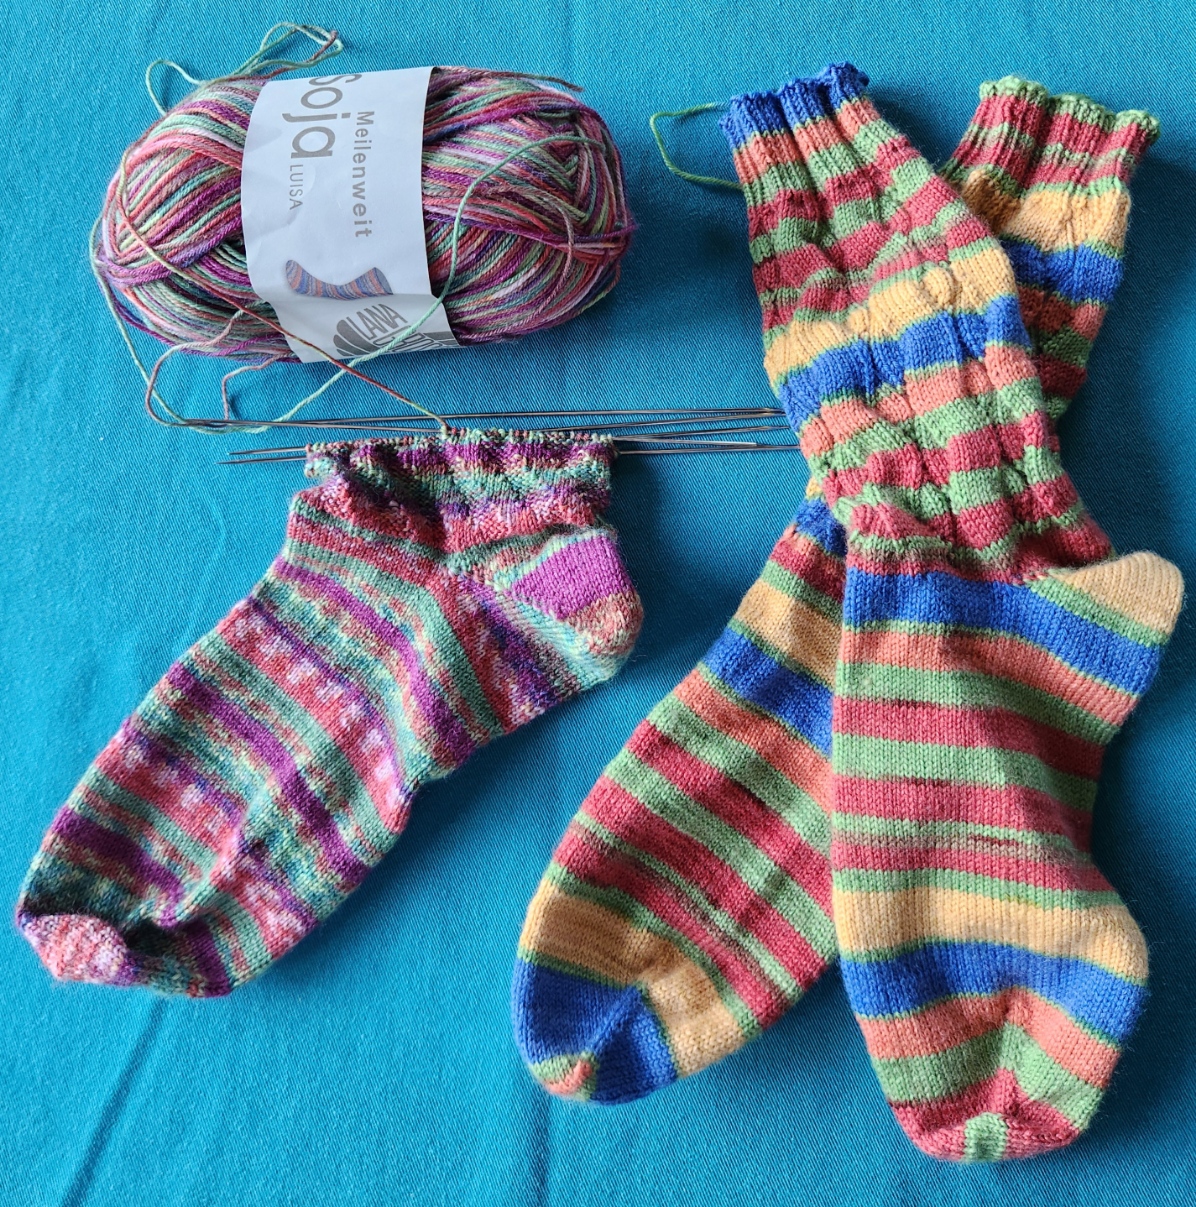
I’ve also been knitting and crocheting. Here are July’s socks. Not sure what made me knit the wide-stripe pair so tightly, but I did. They are the same stitch count around as the other pair, but are significantly narrower. I can wear them (just), but not all of my target audience can. So they will either stay home with me or find a narrow footed new friend with whom to play.
And I’ve been crocheting snowflakes. Not to keep cool but as a probably-the-case present for Elder Spawn, who has moved cross-country. It’s unlikely that we will be able to enjoy the family tree together this year come holiday time. A first for Casa Magnifica. So I have promised to make new snowflakes for what is now Casa Magnifica del Oeste, and ship them plus some of the family ornament stash, to furnish the new tree. I’ve got a half dozen complete. Six more to go, plus pin blocking and stiffening them for best display. Here are the first three, still looking sad and crumpled, right off the hook.
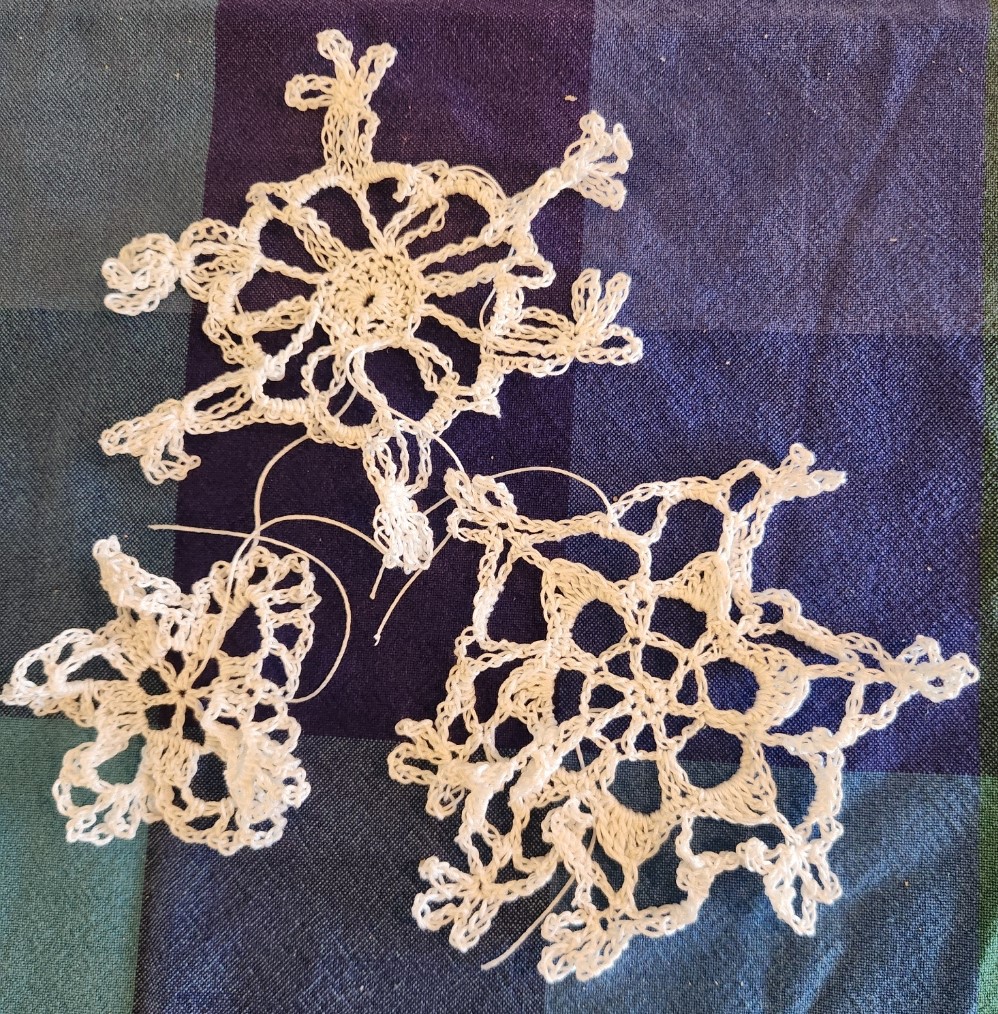
All of these are from this book. I have another one with better patterns. Someplace…

What’s next? Another stitched doodle on a thrifted linen rectangle, possibly to use up some of that black Sulky on a higher count ground. But more on that later this week.
THINKING, BUT KEEPING BUSY
A couple of people have asked if I’m taking a break from needlework in the aftermath of the great coif project.
Nope. To be truthful, I am filling my time with far less challenging pieces while I contemplate the next big project.
First, I’ve returned to the third forehead cloth. I’ve done two before and love wearing them instead of bandannas to contain my hair on windy days. I do a little bit on them in the afternoons, and in the evening catch up on my sock knitting.

The socks are my standard issue toe-ups on anything from 76 to 88 stitches around, depending on needle size; figure-8 toe (an technique unjustly despised by many), plain stockinette foot, German short row heel, then something interesting for the ankle. Mostly improvised. The only hard part is remembering what I did on that ankle so I can repeat it on the second sock.
The forehead cloth is fairly flying. It’s all one pattern, on cotton/linen yard goods that works out to about 32 threads per inch. That’s as big as logs compared to the coif’s linen. I’m trying out Sulky 30 thread (two strands). It’s ok, but I am not so fond of it I’d throw over softer, more fluid flosses. I am betting though that it will stand up to hard laundering better than standard cotton floss. The stitching on my other two forehead cloths, done in silk, has survived quite nicely. Unfortunately the ties – folded strips of the same ground – have totally shredded and been replaced twice on each. I may move to narrow store-bought twill tape for the ties, instead. Jury on that is still out. Oh, and yes, there are mistakes on this. Some I’ll fix, and some I won’t. Have fun hunting for them. 🙂
While I’m here, I’ll share a tiny blackwork hint.

I’m doing double running but this will be relevant to those who favor back stitch, too. See those “legs” sticking out in the photo above? As I passed those junction points I knew I would be coming back again, from a different direction. It is far more difficult to hit the exact right spot when joining a new stitch to an existing stitched line (both perpendicular as here, and diagonally) than it is to mate up to a stitch end. Those legs are there so when I come by again I have a clear and simple target for the point of attachment. This saves a lot of time, minimizes my errors and helps keep my junctions as neat as possible. Try it, I think you’ll find the trick useful.
What am I contemplating for my next project? Possibly a blackwork/sashiko hybrid. I have a barrel chair, a wreck salvaged from the trash, that I had recovered in Haitian Cotton back in the early 1980s. It has survived four house moves and two children, but although the back and sides are in good shape, the seat cover and the area just under the seat are both shot. I still adore the thing even though it doesn’t really fit in with the rest of the house’s style. So it’s going up into my office. I plan on recovering the shredded areas with patchwork denim overworked in white running stitch. The denim will be reclaimed from various outgrown and destroyed garments I’ve held onto against just such a future need. Since I do not plan on replacing the rest of the upholstery, I’m counting on those flashes of white to bring the seat and the rest of the piece together.

FIELD OF FLOWERS FOREHEAD CLOTH
My quick project gets off to a flying start. I’m about 20% done already. I started out with my hand-held 6 inch hoop to get close to the irregular corner of my linen scrap, but now have moved back to the larger 8 inch sit-upon.

The pattern itself is an original doodle destined for the next volume of Ensamplario Atlantio (as usual, no ETA on its release yet, but I’ve got the first 8 pages done). It requires a bit of attention, the diagonal columns connecting the saltire flowers carry twists in various directions, depending on where in the design they are, but overall the pattern itself is more repetitive than difficult. So to up the interest factor, I’ve transformed my original strip/border/edging layout into large, interlocking hashmark-shaped motifs, and am working each one in a different color. The final will have a patchwork meets jigsaw puzzle effect, kind of like a kid’s puzzle mat.
The other item of interest in this one is the thread. After reading about how others were using Sulky, a single ply hard twist thread intended for both hand and machine embroidery, I decided to give it a try. The ground is roughly 32 threads per inch linen, give or take. I am using a double strand of Sulky 30 weight.

First impressions are quite good. The 500 yard spool put-up is very convenient, as is not having to separate plies as with floss. It works up very quickly in linear stitching – the hard twist, firm nature of the thread eliminating the occasional snags and catches that can slow down softer, more friable floss and silk, when stitching with one hand above and one below. It also is amenable to being used in much longer lengths than regular embroidery floss. Longer thread length means fewer stops to end and begin new threads, so that speeds up stitching a bit. And it makes very crisp lines and corners. The hard twist paired with a blunt point needle makes the junctions where stitches cohabit easier to keep clean. There’s far less chance of a split stitch when stitching back up or down through a hole that is already used by a previous stitch, even when using (near) evenweave linen. I also like the way the dense, round thread keeps its “height,” with the stitches standing proud of the surface, rather than splaying out like floss strands do. Of course that means that floss strands provide better coverage for other types of stitches, but for linear work, clean lines and sharp corners take precedence. I try to capture the “depth” of the stitches below.

On the down side, I do note that colors do crock a bit onto the ground cloth even though the thread is not fuzzy. This is mostly evident when mistakes are picked out. Hints of the previously stitched color remain. To be fair, floss does this too, with the added annoyance of more stray fibers. My Silly Putty kludge works well enough on the color halo left when picking out Sulky, though.
So in my opinion Sulky 30 (double stranded) on 32 count linen is a good pairing. I will continue to explore its use, and report back on wash properties and durability. I would even go so far as to recommend it for folk who are interested in trying double running stitch on medium to high count evenweave. I think the properties outlined above would make it easier for those just starting out on their own blackwork journeys to achieve superior results.
Please note that I pay full retail for the materials I use. I do not accept freebies in exchange for reviews, nor does String participate in product placement schemes. Opinions here are entirely my own.
DIZZY GRAPES DONE!
A finish. I began at our Cape place around 14 July, and finished last night at the Cape place on 25 September, about 73 days of stitching, working an average of about 2 hours per day.

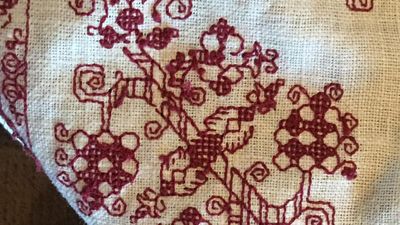
To recap, this was a vintage dresser scarf, clearly cut down and re-edged from some older piece of linen. It was very well washed, and although it had no broken warp or weft threads, there was a lot of blooming, where the linen breaks down a bit, with threads fused together and some slubs. The count wasn’t consistent, with some threads being much thicker than others, but spot measurements ranged from 28 to 34 threads per inch, mostly averaging out to between 30 and 32. It was ever so slightly skewed, but no where near as badly as other non-evenweave grounds I’ve worked lately.
The pattern has two parts – the main field which I redacted from a 17th century Italian cushion cover held in the Hermitage Museum, shown below (Accession T-2736 in case the link breaks). The companion border I doodled up myself.

Amusingly the skew count of the ground used in the original is greater than the skew of my vintage linen. You can see that clearly in the smaller motifs which chart out as squares, but appear taller than they are wide. Also my redaction norms the spacing of the motifs, which in the original does vary by quite a bit. But I preserve the “creep”. Look at the partials around the edge of my piece. They rise from/sink into the static edge line, each iteration of the swirl being offset from the previous one by a stitch or two in each direction. You can see the same thing on the original.
I stitched the design in garnet cotton (DMC #815). It took almost all of seven skeins. I worked the linear bits in double running, and the solid bits in a variant of Italian four sided cross stitch (basically cross stitch, but in a box). The version I chose is NOT double sided, instead it produces a grid on the reverse. The only reason why I chose that version is that I hadn’t attempted it before. I have no historical reason to pick it over the more usually done fully two-sided version. The full double sided version is more or less the same stitch that forms meshy totally overstitched grounds, but done “gently” as surface stitching, and not pulled to the max to both totally encase the ground threads and produce the characteristic mesh ground found in so many museum artifacts. Here’s my back showing the grid structure of my single-sided interpretation.
On the whole I am quite pleased. My goal of making a splendid runner for our sideboard has been achieved, and I can retire the old, ratty placemat that’s there now. It’s The Resident Male’s favorite spot for opening bottles of wine, and now he can do so in a style appropriate for a Renaissance princeling.
Things I would do differently. Hmmm…. I now wish I HAD done the solids in the reversible variant. Not because I want to have a true double-sided piece, but because I want to play with the challenge of that stitch some more. (Additional future experiments are warranted.) I’m also not entirely pleased with leaving the original dresser scarf edging on this. For one, the non-rectangular nature of the cloth is more evident with my on-grain, symmetrically sized stitched area. It bothers me. But consensus seems to be to leave it alone. So I will. For now at least.
And so I move on to an interim project. I have a wild departure queued up for my next big thing, but the materials to do it aren’t here yet, so I digress.
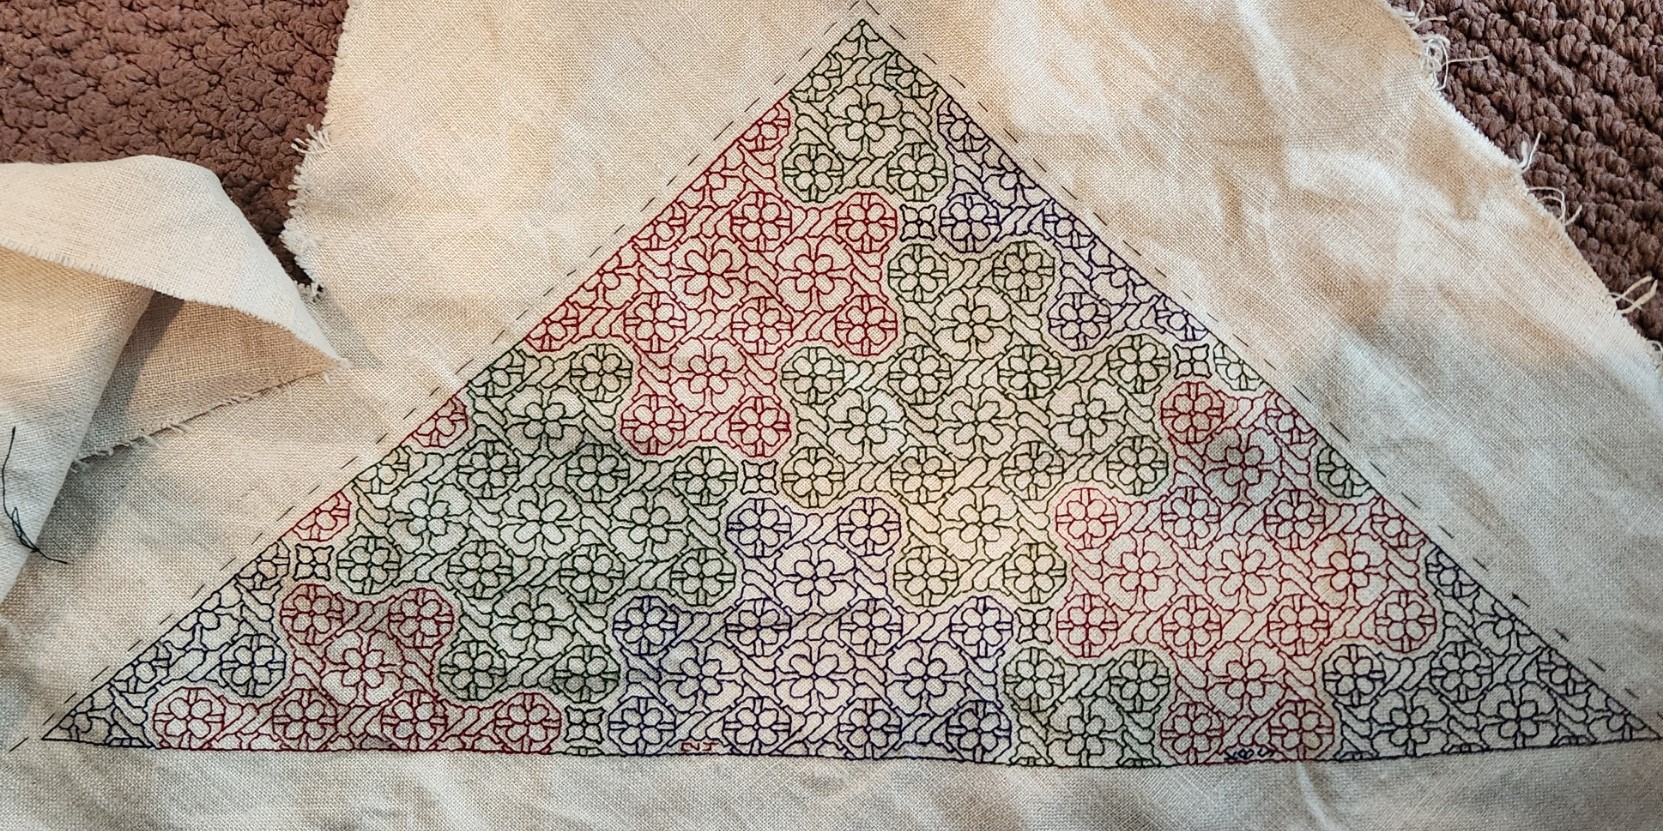
I want to make another forehead cloth. I really enjoy wearing the two I did a few years back. They are more fun than bandannas or scarves, and do a good job of keeping the hair out of my eyes. I have a piece of linen scrap I am considering. It’s very densely woven though at about 32 threads per inch, and I am not sure that it will show off my chosen design to good effect. (I do have an airier alternative, but I prefer the look of the scrap.) I don’t remember whose leftover this is, but send thanks again to The Anonymous Donor. As you can see I’ve plotted out the corner of my triangle.
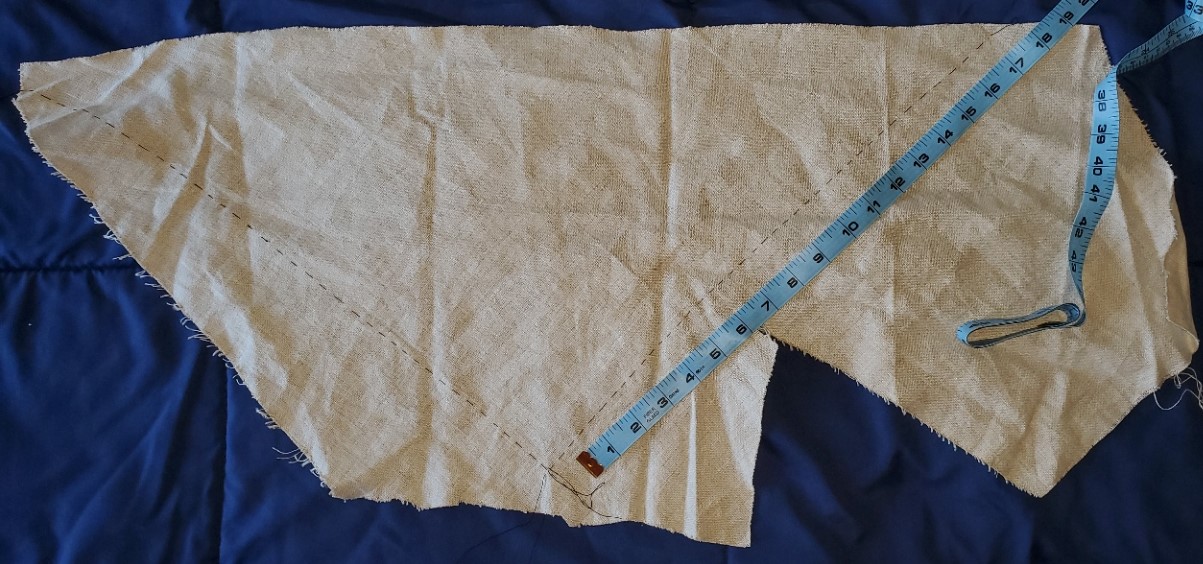
There is plenty of real estate on this piece of spill, left over from Anonymous Donor’s sewing project. I’m aiming to make something midway in size between the two forehead cloths I already have. Something in the range of 14 inches for the non-hypotenuse sides.

Shameless plug department: These two pieces have been worn heavily and washed without mercy for the past three years, as can be seen by the frayed ties. But look at the stitching, it’s as good as the day I finished. I did it in the stranded silk thread hand dyed by my apprentice using a historical recipe. NO fading, no breakage in spite of the ground’s distortion from being stretched in wear. No harm to the ground beneath the stitches from the dye used. It’s a small batch item, and not always available, but when it is, it’s worth it. Highly recommended.
Back to the project at hand. I will be stitching a rather dense design I recently doodled up. I’m working on Ensamplario Atlantio III, and that pattern will be part of it. And I will be trying out Sulky thread, a spooled mercerized single strand cotton sold for hand and machine stitching. Possibly in polychrome. I have black, red, blue, and green, so I have scope to play.
More on this one as it develops, of course…
