PROGRESS CONQUERED!
Finished. All that remains is to add my initials and date in the lower corner(s), frame it, and mail it to the recipients at Vanderbilt Rehab. I will be framing it myself.

I’ll figure out a stock size, get an acid free backing board, maybe a piece of black fabric to put behind the linen to camouflage any stray threads on the back, some short pins, possibly some carpet thread to keep the back neatly laced and tidy, and a simple metal frame. No glass, no mat. But this of course requires a trip to a crafts store like Michaels’, or ordering sight-unseen online. I prefer to select these materials in person. I haven’t tried driving yet, but I can now sit and my right foot is as spry as it ever was. This may be the impetus for the Next Great Step of Independence. Or the Resident Male may deign to give me a lift. We will see…
Lessons learned from this piece (so far) have largely been in silk fiber management. I’ve written before about stretching the vintage Pearsall’s silk by splitting its six from-the-maker plies in half. It worked, although handling the stuff was a challenge.
I had not finger-spun flying filaments before. When the two strands that made up the commercial ply were separated and gently stroked to release the commercial spin, so that they unkinked and straightened out, they were certainly long staple, with the silk fibers running the entire length of the strand and without short fiber fuzz, but they were disassociated into a slightly shredded longitudinal mass. I rotated the new, narrowed strand between thumb and forefinger gently, while holding the other end, to impart new twist. Not enough to make the thing kink up again and knot, but just enough to get it to resemble a single thread. Then I waxed lightly, very lightly, to help set the spin. I didn’t want to compromise the silk’s sheen, and it was too easy to shred the new thread if I held it tightly against the wax with my thumb as I drew it across.
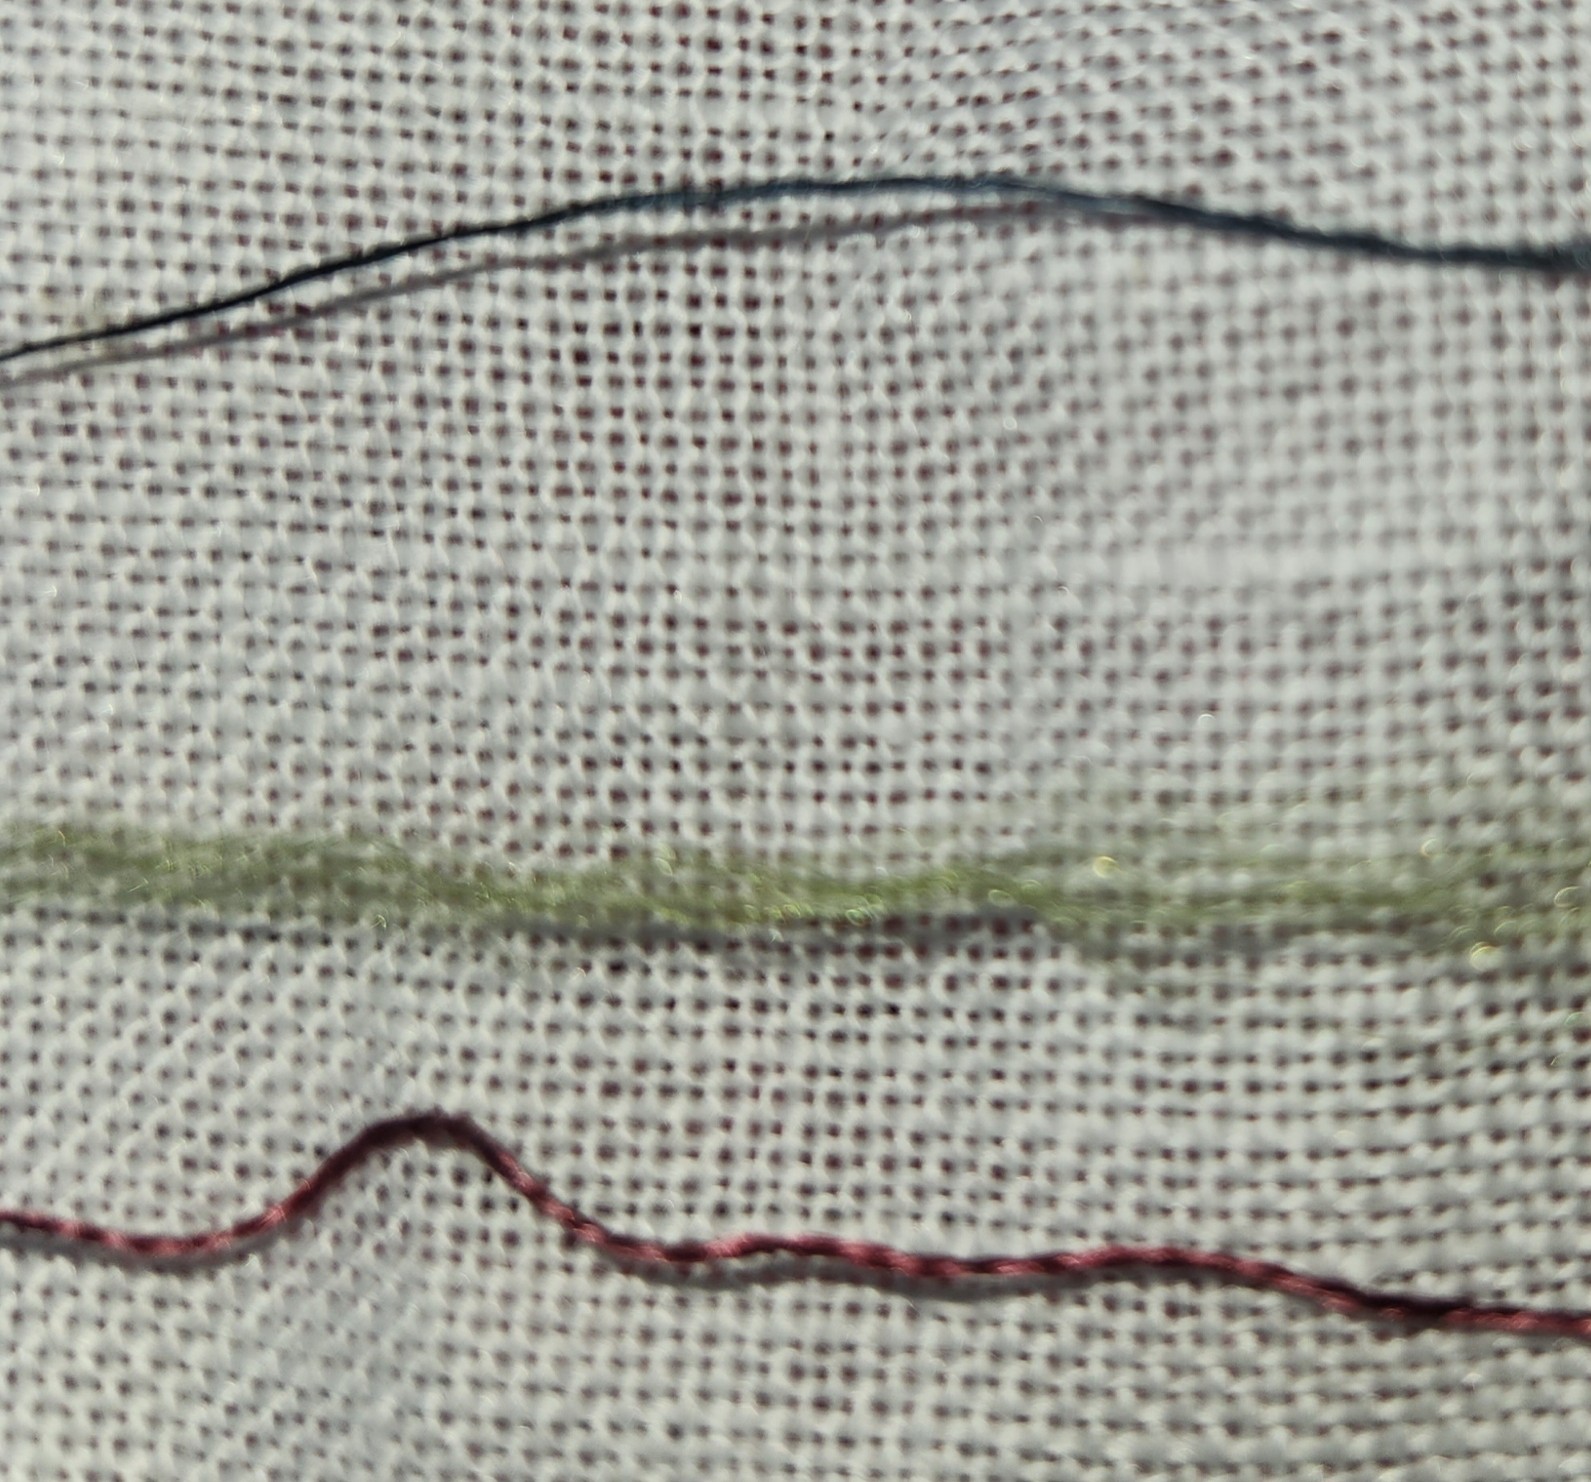
In the photo below the red thread at the bottom is a single “native” ply of my Pearsall’s six ply embroidery floss. Note that it’s structure is two-fold. This one strand is made of two plies of silk spun independently and twisted together. The green thread in the middle is what happened when I “unspun” those two plies. You can see the long staple filament fuzz that resulted. And the blue thread on top is what happens after I finger spun and lightly waxed the fluff. It’s a bit loftier than the original thread, but clearly half as bulky.
The re-spun thread was cohesive, and it handled well enough. It still needed attention and an additional spin or two as I stitched, to keep it as uniform as possible as I worked. Still, you can see spots, especially in the deep indigo that frames the outer border, where I was not entirely successful in maintaining thread spin/loft, and lines look a bit dashed, as thicker journeys completed previous lines laid down with a thinner, more tightly spun thread. But historical samplers have this look, too. Those stitchers, vastly younger than me, were learning to prepare their threads from reeled silk fibers and uniformity was a new skill to learn, and something that was a challenge even for them.
Picking out when I made the inevitable mistake was also a problem. It was too easy to latch onto only part of a strand, and shred the thread when a stitch needed to be removed. So I tried VERY hard not to make any mistakes. I was not always successful, and some waste did occur.
I still have the remainder of these colors, and more. I am not sure when I will get to use the rest of my vintage silk, but it will probably be on smaller, less densely stitched items; and again stretched to make use of every priceless inch.
Now. What’s up next?
I’m not sure. I will investigate my stash tomorrow. I just splurged on a pre-tariff large hank of antique red Au Ver a Soie silk. I want to do something with it. Possibly on leftover fabric from the coif, possibly on something less visually challenging. Maybe inhabited blackwork. Maybe strapwork. But no motto this time. Just a riot of pattern, with no lettering to center.
Or maybe I’ll finally do a faux Mexican style blouse in cottons. I have some well aged four inch wide finished edge cotton evenweave, sort of like the stuff sold for bookmarks but on steroids. It was last sold in the mid-1970s, and I got it in a stash trade a few years back. It would make a nifty base for a heavily stitched square shaped yoke, with a lighter cotton (perhaps muslin) full gathered blouse body below, and small cap sleeves. I might even have enough of the wide evenweave ribbon to edge the body hem, or to do a second blouse if the first one works out well. But instead of using traditional patterns, I might do something unexpected. Possibly one of my dinosaur strips, or the Pegasus strip – maybe even voided. Or something as-yet unseen. Suggestions welcome.
So many possibilities…
JOYOUS ENDING
I’ve finished the latest piece – the sampler in tribute to the Resident Male’s nascent book Forlorn Toys. He is still writing it, so I won’t give spoilers beyond what I have already cited: the motto, the very obvious panel of aforesaid toys, my attempt at spaceships, and the band with the curious feathery rabbit like creatures.

All in all, I am quite pleased with it. Joy now goes to join my Wall of Shame – the place where my completed but as yet unframed/not-ready-for-public-display pieces live side by side with my unfinished projects. As you know this one like so many others is stitched on reclaimed household linen. I did not notice a bleach-weakened bit along a patch of the edging at the lower left. When that was hooped over and tension applied, the neatly done hem stitching failed, leaving a hole. I will eventually mend that, but other priorities assert themselves.
First among those priorities is a piece I promised to the community of therapists and nurses that tended to me at Vanderbilt Rehab Center at Newport Hospital. It’s fueled by a gift of silk floss from Occupational Therapist Abbey. She admired the work I brought with me intending to stitch. She had an inherited stash of silk threads but no use for it, and asked if I would like it. Always happy to have such things, I agreed, and she sent me a wonderous assortment of Pearsall’s silk floss – long discontinued – in jewel tones.

A princely gift, indeed. And only fitting that I use it for a gift back to the caregivers who got me back on my feet and moving again.
I’ve selected a tinted linen to use as ground for this one. I am not sure who gave me this because I didn’t put a note into the package (possibly my spawn, so apologies if it was). It’s custom dyed Zwiegart 36 count linen (big as logs for me), from Hollis Hands Create – a frosty barely blue tint called Silver Moon.
The first step is to begin the design of the motto. In this case “RELENTLESS FORWARD PROGRESS,” furnished by the Vanderbilt Physical Therapy team. Done. And then to begin thinking about how the rest of the piece will be worked. Not a band sampler this time, it will be a “framed” piece, with one or more bands of design running around all four sides of the motto, complete with corners and any improvisations to make the bands’ designs work out correctly with minimal fudging. Therefore I will be doing a some on-screen work to prepare for this one. More than I would have needed had this been a simple band sampler. For example, those corners will have to be drafted out even if I chose band designs I’ve previously devised. And I will have to plan to use multiple colors effectively because while there are many hues in my bag of silks, there are no duplicates, and most of the skeins are partials. It will be fun to figure out how best to use my limited quantity treasures.
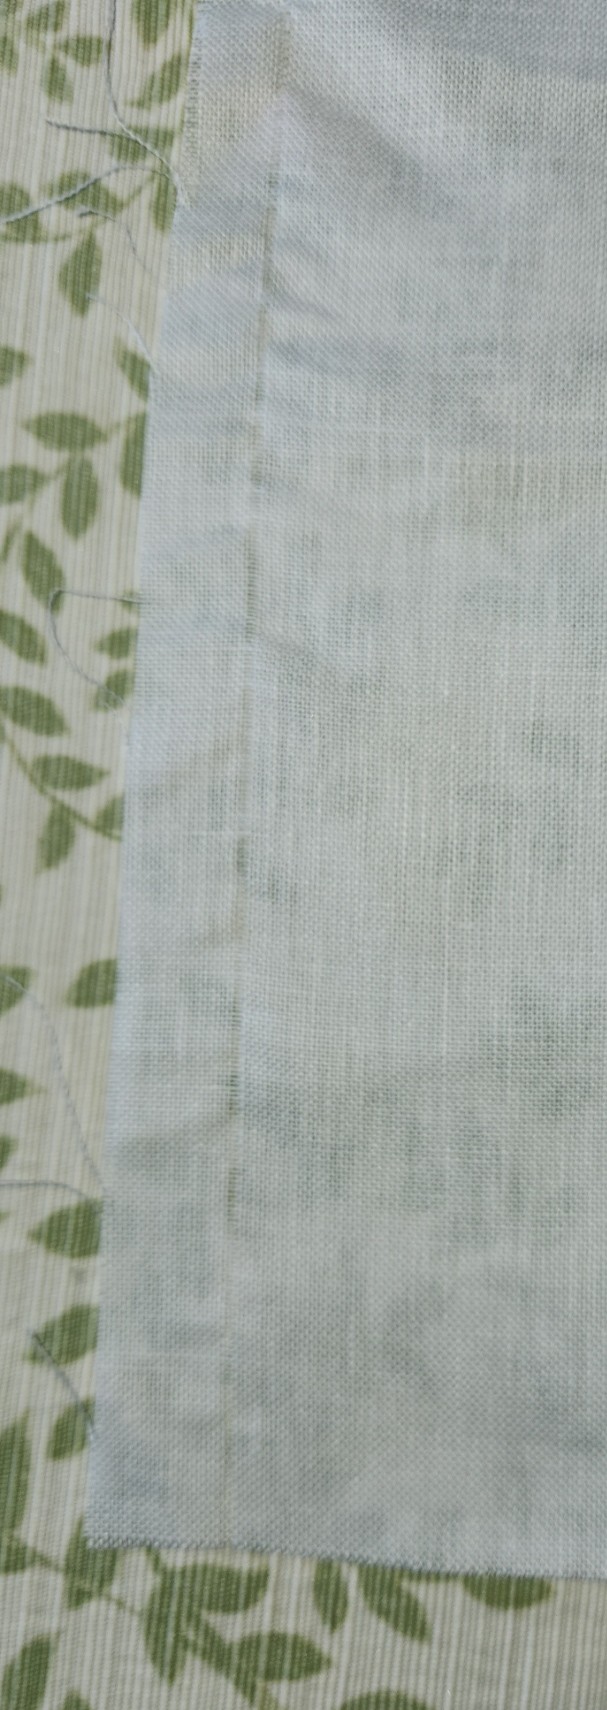
And then there’s selecting a size for the piece and preparing my ground. For that the first bit is to true the edges of the linen cut. To do that I find and pull the warp or weft thread at the narrowest point of the cut, withdrawing it entirely from narrow end across to the widest end. This gives me a clean line along which to cut, and ensures that my edges are parallel. On this piece of ground with one selvedge edge, you can see that the left and right sides perpendicular to the selvedge each are slightly skew, one by about an inch, and the other by about 3/4 of an inch.
Note that regardless of the retail source, or whether or not the edges are serged or otherwise finished, if I buy a cross bolt full width cut or a fat quarter I always inspect the edges and true them in this manner. I have yet to receive any cut that was done completely congruent with weave direction. Sometimes the deviation is minimal, and there is only an inch or so lost all the way around. Sometimes, especially with lower price precuts sold in big box crafts stores, up to four inches can be wasted all the way around
This is why if you purchase pre-cut yardage, even if you have added on extra width to allow for easy hoop use and framing, it doesn’t hurt to add an additional inch or two all the way around. You never know when you will get a cut so skew that after the cloth is trued parallel to the weave, the cloth ends up being much smaller than you thought you were buying. Charles Craft prepackaged cotton and cotton blend evenweave was notorious for skew cuts. Their products started me doing this “proofing” step, and I have not regretted it since.
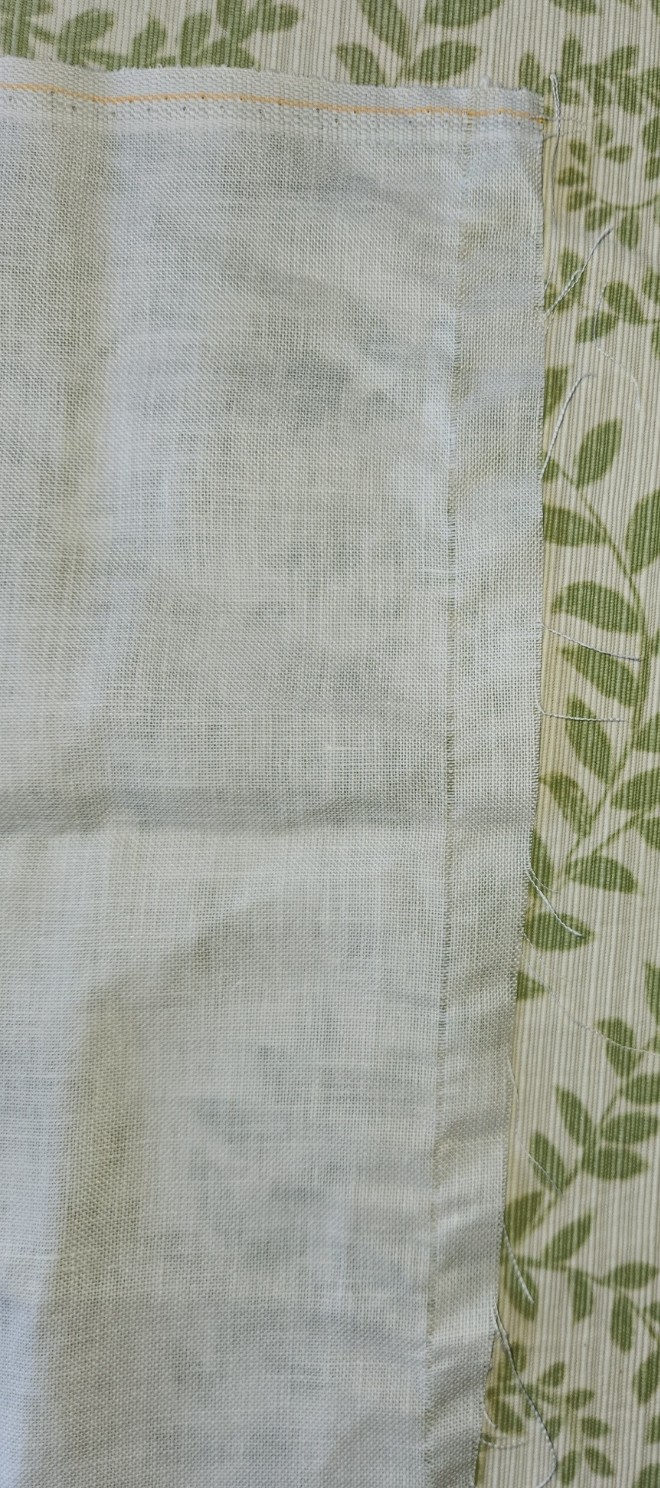
I won’t be using this entire fat quarter on this project. I will measure my ground cloth piece after it’s cut and the left and right edges are hemmed. I’ll decide then on the orientation of my sampler, cut my ground accordingly (also on a pulled thread line), and hem that last edge. The remaining bit will be returned to stash. And I will get a start on selecting my framing pattern(s) and drafting up my new corners.
On the non-computer work side, while the design work is going on but after I get my piece of cloth sized and hemmed, I will baste in guidelines: centers and stitching area edges. The final count of the available stitching real estate between the area edge marks will help inform final design tweaks.
I don’t think of all this pre-work as being very complex or onerous. The physical prep is mostly mindless and gives me plenty of headspace for the rest of the planning.
Now off to select my patterns… I toyed with using icons representing progress from sitting to walking, but I decided that was too limiting. The rehab therapies offered go far beyond simple sit to stand to walk, and I wanted the piece to be as inclusive (or non-specific) as possible. And the logos for the various institutions and professional certifications involved are too fussy to be easily charted at my scale. So it’s a mix of florals, geometrics, and possibly a pet or mythical beast or two thrown in. After all, who doesn’t identify with dragons or kittens?
PROGRESS ON A WEALTH OF FRONTS
It’s been half a month since the last post, and all sorts of things have happened.
First, I’ve finished the wildly intricate interlace panel on my current sampler.

Second, as I was doing so I found an error in my chart for it as it appeared in the original edition of The New Carolingian Modelbook. The error was a minor one, a copyists/flip and mirror problem with two side by side crossings. It’s my guess that no one has attempted this particular design before, otherwise they would have either contacted me about it, or trumpeted my incompetence on social media. So of course I had to correct the problem. For a legible copy of the correction, including the original TNCM source attribution, and two chart versions – one for the border as shown, and one for a wider border or all-over design, please click here download a PDF file.

I have also been able to draft out a couple of tribute specific bands for this sampler, referencing the in-process novel Forlorn Toys in specific. They will be coming up after I finish the latest leafy strip. So stay tuned!
In other news, at long last, the Victoria and Albert Museum has updated all of the pages for the individual contributors under the Unstitched Coif Project. Again thanks to Fearless Leader Toni Buckby! My page can be found here, and has both the essay I did to accompany my work, plus ultra high resolution ZOOMABLE photographs of the back and front of the piece. For some reason the museum chose to lead with the photo of the backs of all of the pieces.

And for those of you who have asked about my personal health odyssey – I am improving. I’m in the middle of graduating from walker to cane. I can get around well with the cane, but I am still shaky with it over uneven terrain, so I mostly stick to it indoors, and continue to rack up practice distance. I have also been able to sit longer, as my stitching and blogging progress demonstrate.
There are still some hurdles to go, including a stint of proactive/preventive radiation to minimize any chance of chordoma recurrence, but I will take that in stride like all the rest. In the mean time, I’m feeling further along to being my old self than I have in months. No doubt due to the incessant care, coaching, and excellent cooking of my Resident Male.
ASSIST FINISH AND TOYS KICK-OFF
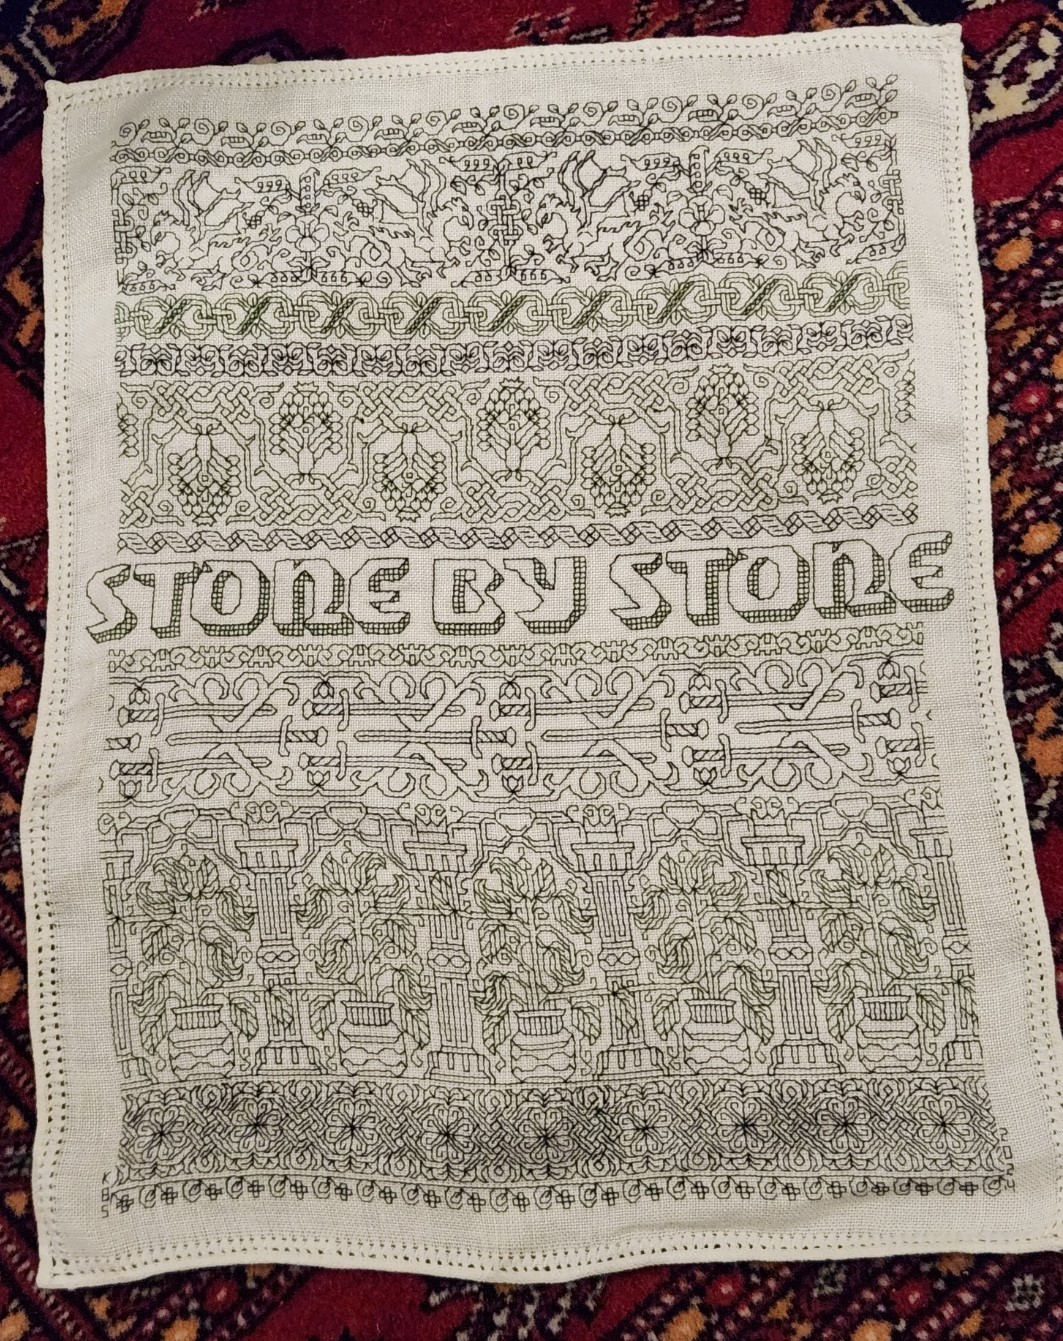
At long last, ASSIST is complete. It still needs to be ironed and framed or otherwise prepared for display, but the stitching is done.

The tumbled columns on the top are there because my life was pretty much tossed around the time I started that strip. I had just gotten the chordoma diagnosis, and was racing to get as much done as possible. At the same time I was working on an early release for Ensamplario Atlantio III, and the Epic Fandom Stitch-Along compilation. I ended up not completing ASSIST, opting to leave it unfinished, that I would get back to it as a sign of hope. Well, slowly over the past two weeks, I’ve made steady progress. I trained myself to recline at an angle. That freed 1.5 hands for embroidery employment, and with practice my speed increased.
But now on to the next one. The Resident Male is working on another book (his 7th counting both published and as yet unpublished works), and I having marked the presence of most of the others, I need to welcome Forlorn Toys, too.
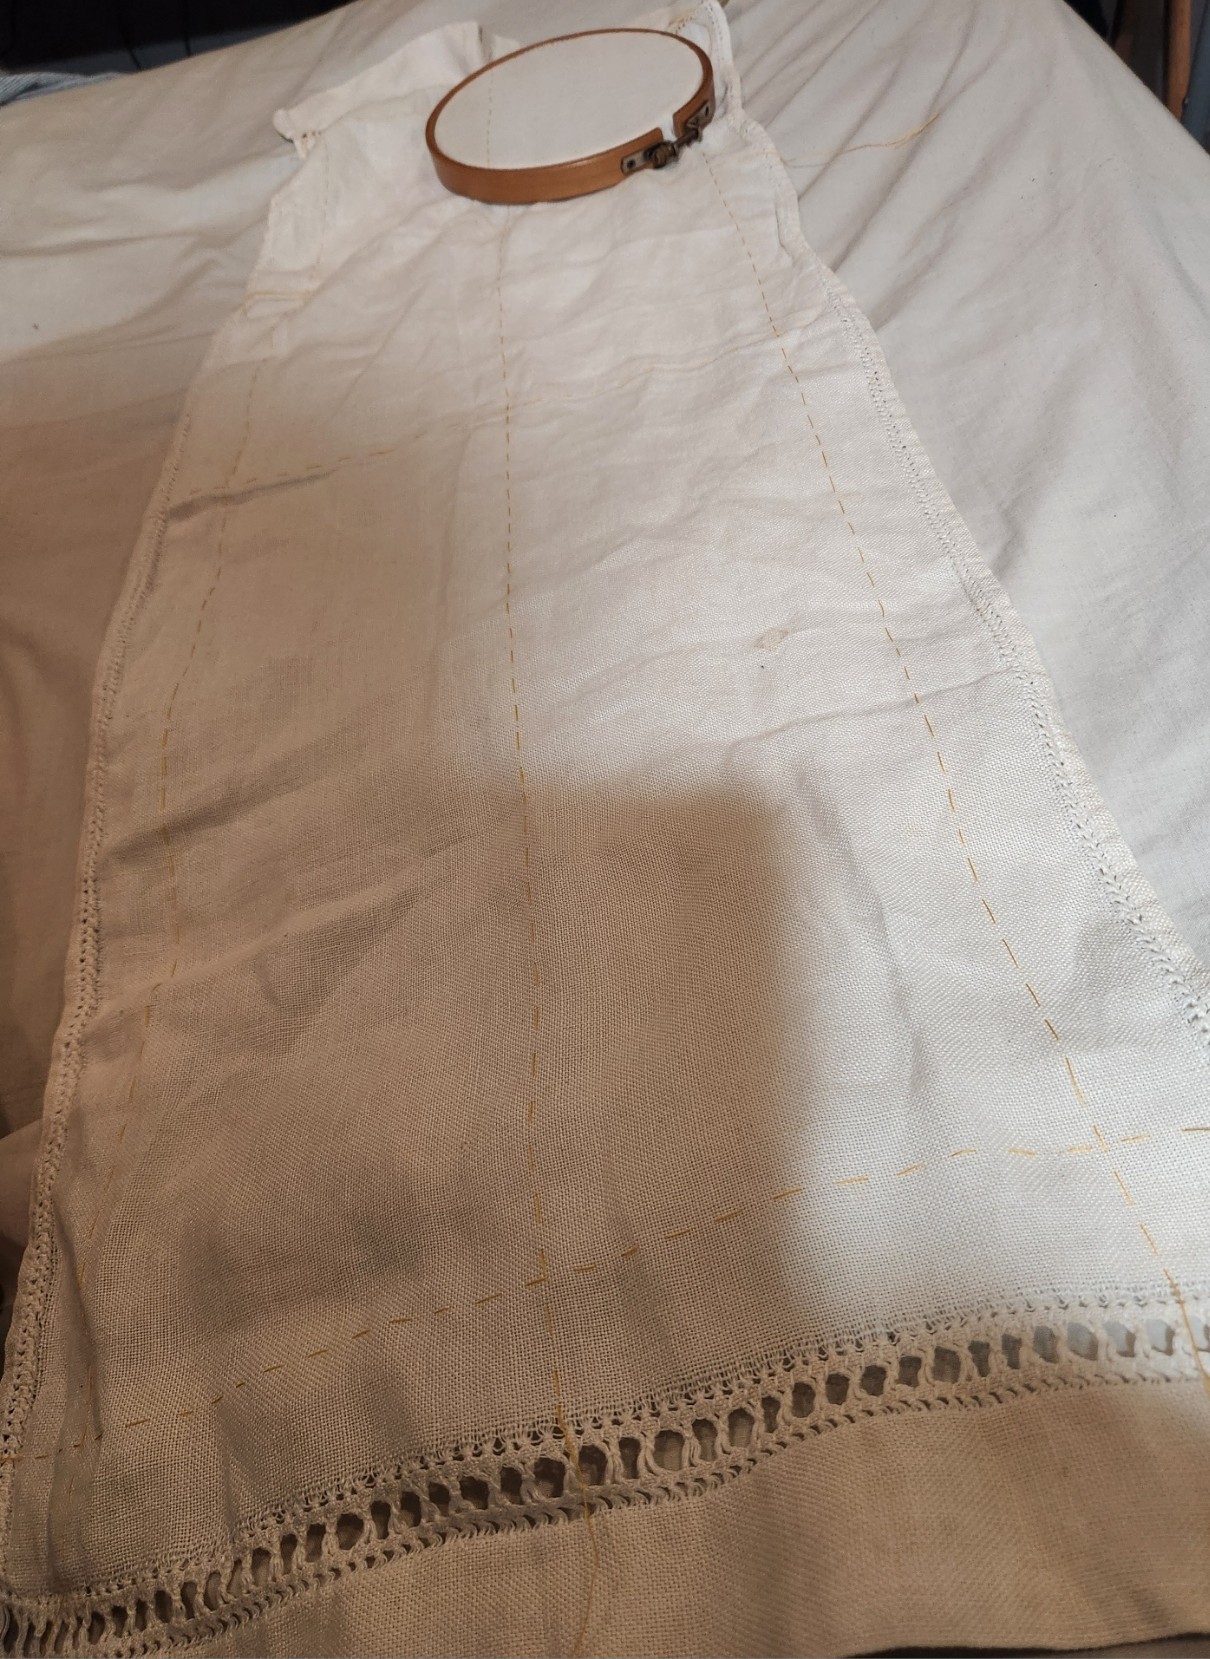
Again I pull out a battle-weary rescued bit of linen, yet another thrift store find. Yes, it has some flaws and stains. I don’t care (the title after all is Forlorn Toys). Most of that will be overstitched and very difficult to see. It happens that this piece is the longest yet, with the entire cloth (stitchable area plus margins) being 12 X 35 inches. And it sports nifty hand-done bits of Italian hemming done all the way around it. I’m leaving those intact. (Excuse the sickbed photo, I’m doing the best I can).
My penny method gives me a thread count of 37×39 threads per inch. Although this hemstitched cloth was done with a less than 100% adherence to accuracy have set my margins averaging out discrepancies, leaving a stitching area of 9.25 inches. That means that that after the margins are removed, the stitching area will accommodate roughly 171 stitches across ([smaller thread count x width/2]).
Armed with that info I can begin thumbing through my favorite reference site looking for a typeface in which the longest part of this one’s motto will fit. Minor complication here – GIMP, my workhorse solution for dash and dot pattern drafting is not working well with my templates since yesterday’s update. I will eventually get that sorted, but it will take a bit of effort. If you or someone you know is a GIMP Wizard with a little time to spare, please let me know.
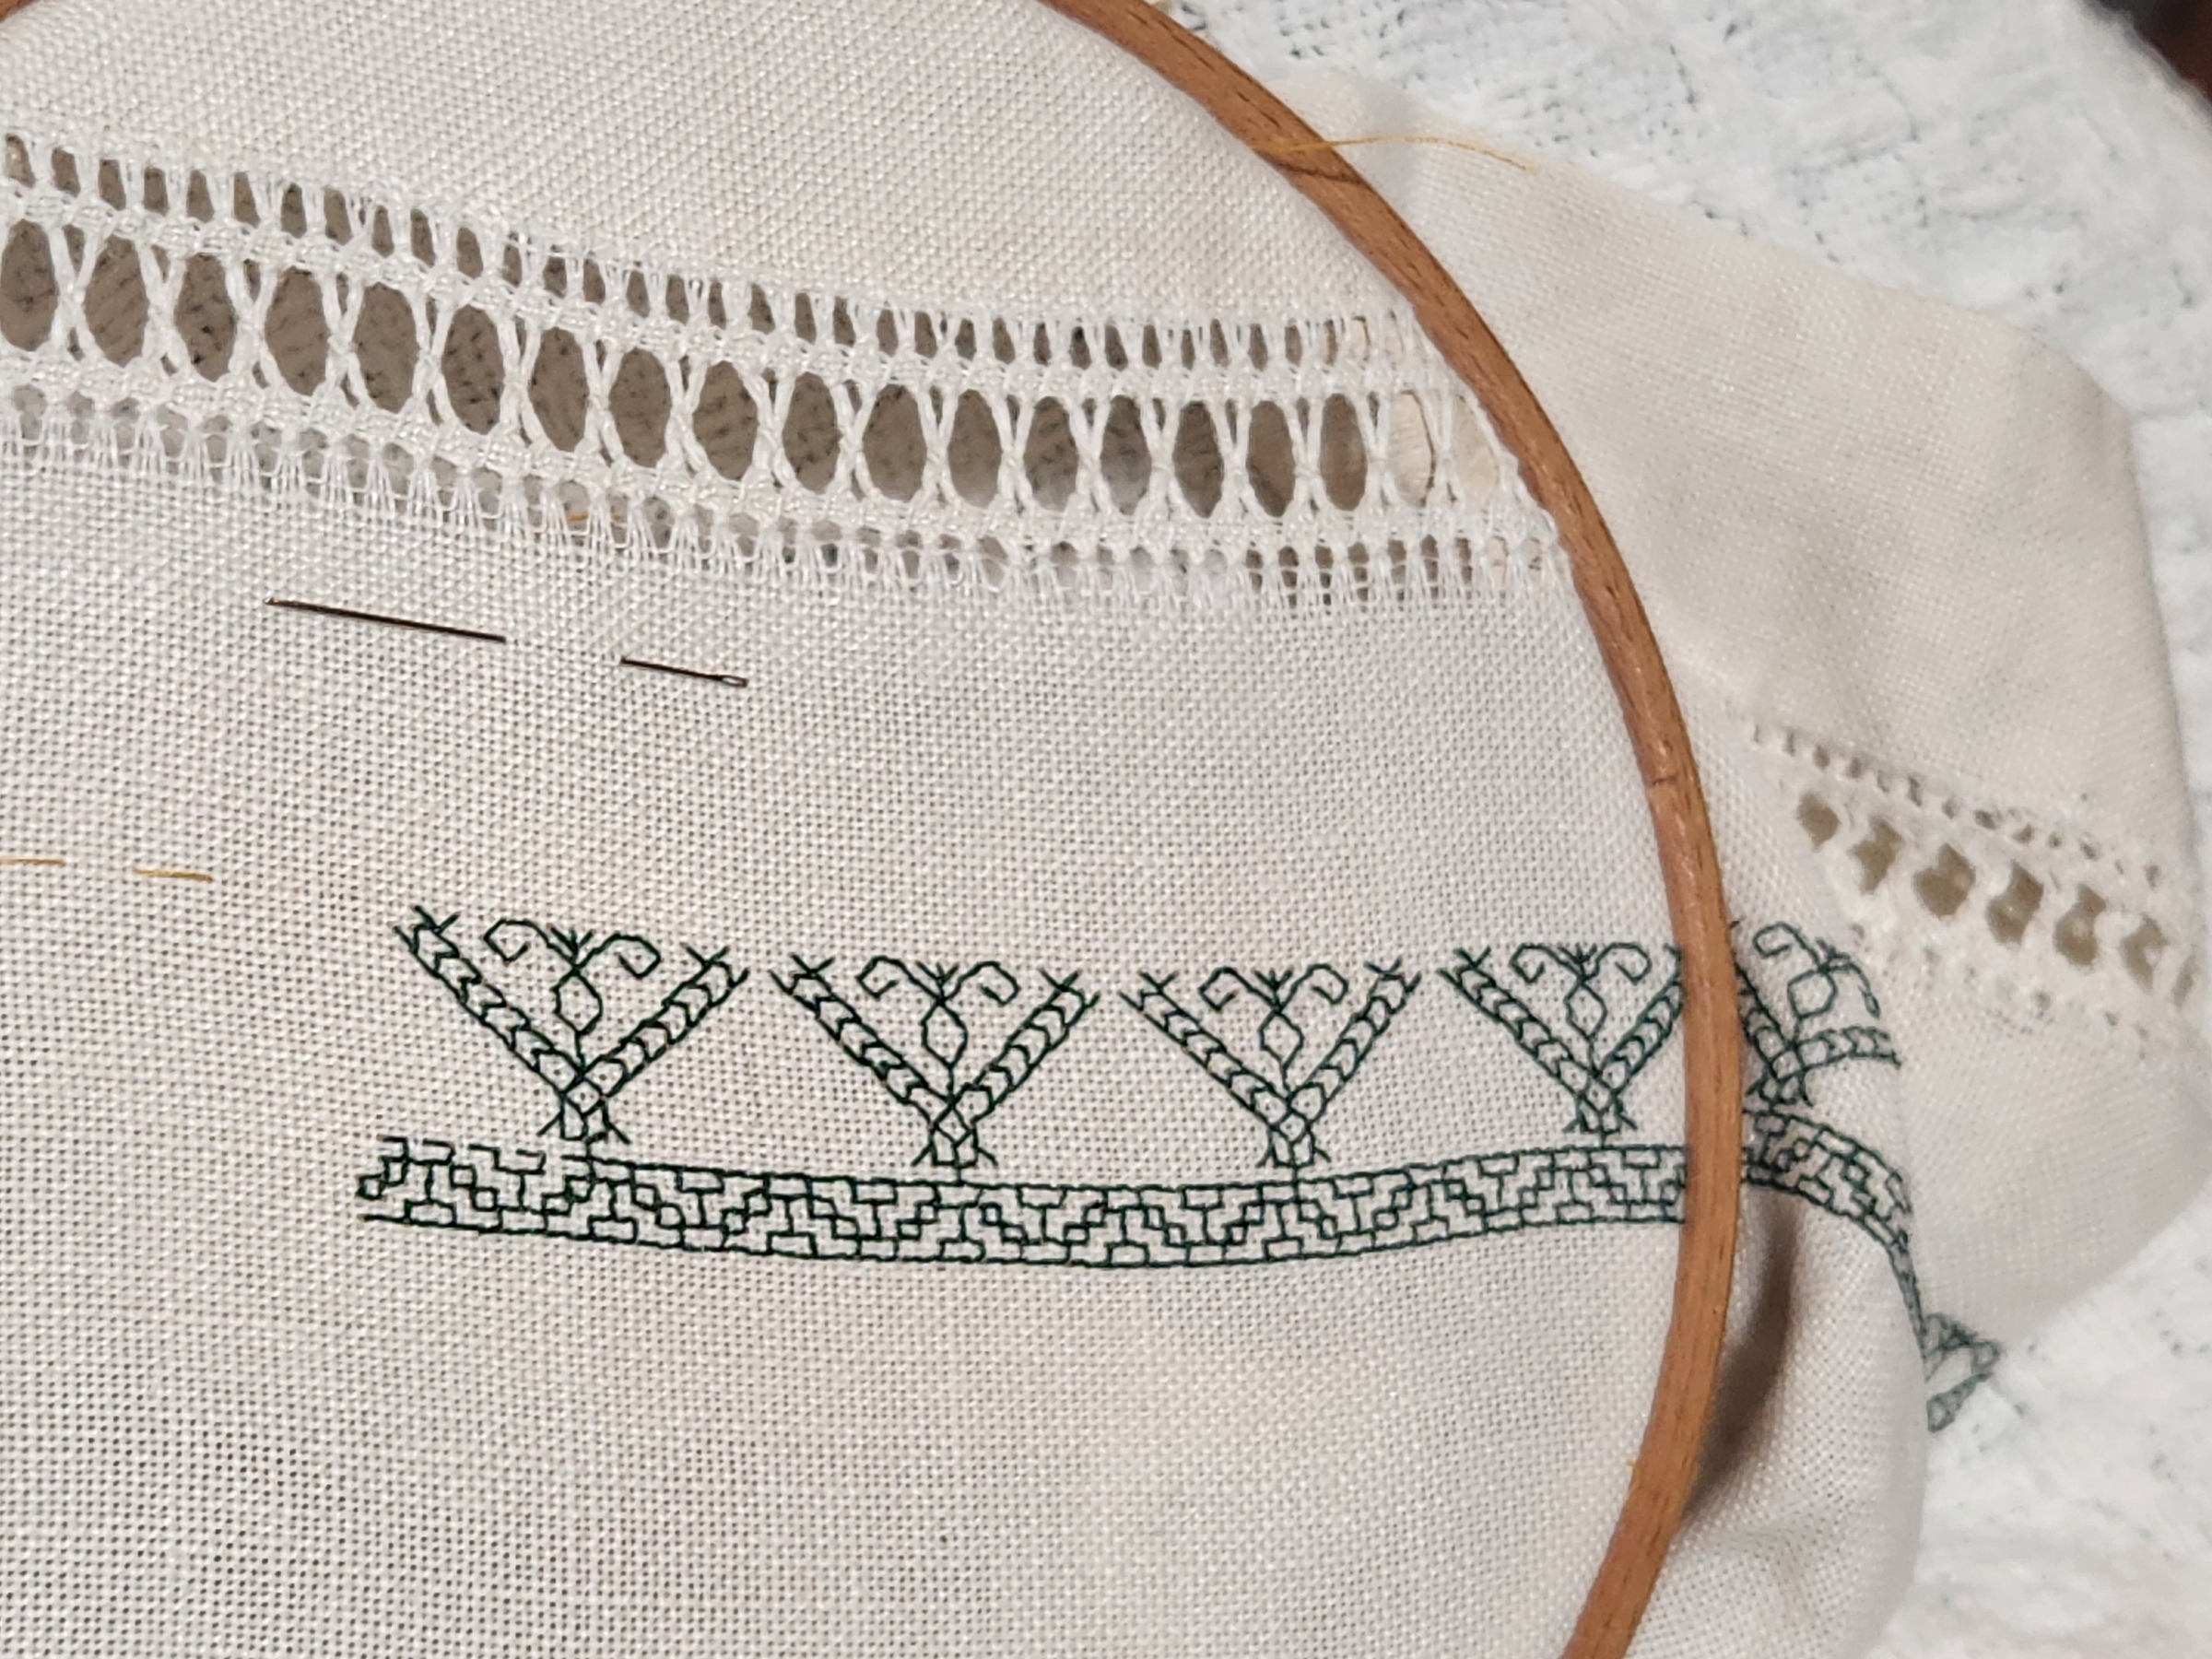
In the mean time I am well into the first band (an edge accompaniment from T2CM Plate 25), although the final style for the Toys sampler has not yet been set. All I can say is that it will be worked in green DMC #890 cotton, and mostly in linear stitching. Nice view of the hem stitching here, too.
Onward and upward. As my Resident Male has written before, Stone by Stone.
