PROJECT – NO-MATH PULLOVER
A couple of failed start-ups ago, I was sitting in the cafeteria withthe company’sresident theoretical mathemetician. I was penciling out a new knitting project, and he was watching me shape the pieces and place repeats. I did a few simple calculations, ratios, slopes, division – nothing terribly complex, but he was impressed at the amount of math that was going into the design. So impressed in fact that he scoffed at the idea of pre-numerate people (meaning people who had no formal math education) coming up with complex patterns.
Now you and I both know that some prettyinvolved knitting went on for quite a while before modern math education took hold.Dr. Math and Igot into a discussion on the subject, and the outcome was I bet him that I could come up with a complex knitted pattern that was constructed using only simple counting. He took the bet. With a bottle of good single-malt Scotch on the line, I was off and running.
I decided to go further. I’d make a sweater that required no swatching, or gauge measurement to boot. I remembered an idea I had seen in a vintage Anna magazine, put out some time in the 1960s. I decided to give the method a try.
I fished some rustic Maine style wool out of my stash (Have Ewe Any Wool – I’d bought it at a Gore Place Sheep Festival the previous year). I knew from prior experience I’d be using a US #9 on this wool. I happened to have a set of 18-inch European 5.5mm DPNs, but I could have worked this on circs. Here’s the logic of my project.
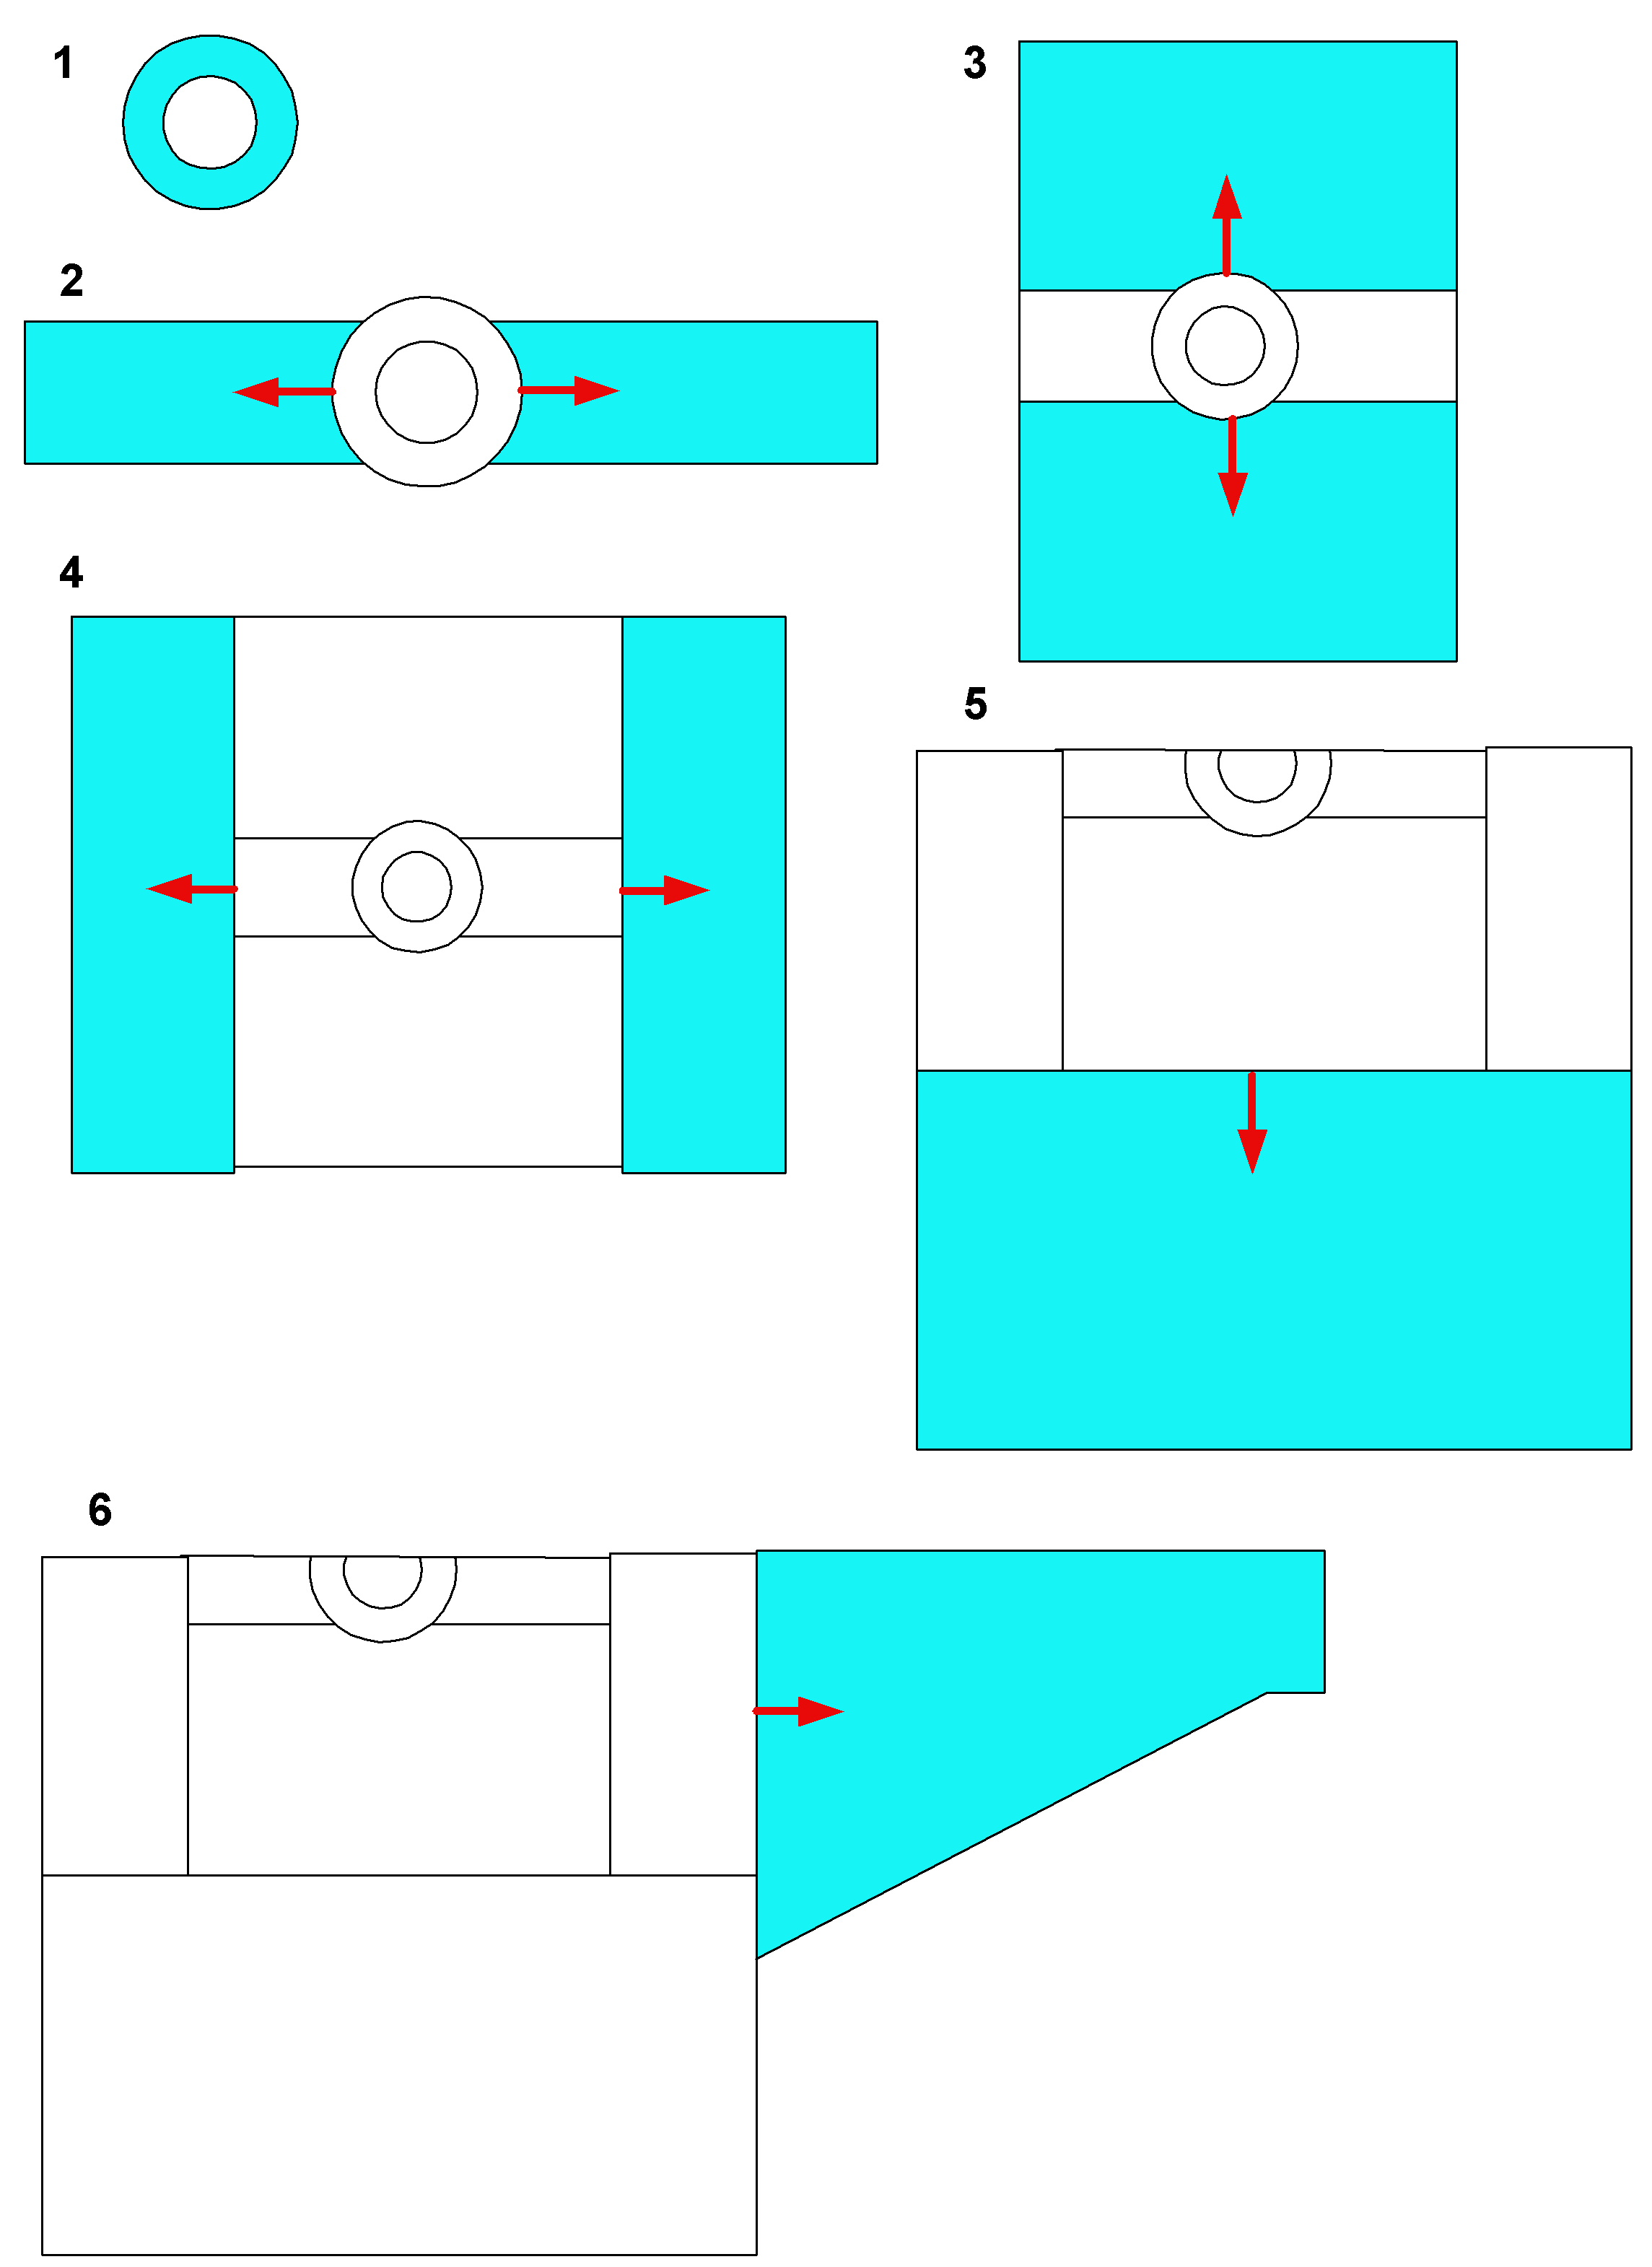
Apologies that some lines have been lost in the above diagram due to file re-sizing, but they aren’t dead-vital.
First in the round I cast on enough stitches to make the neck ribbing (Step 1). I worked them for about an inch and a half. Then counting from the point where I cast on as center front, I determined and marked the center back. Once that was marked, I counted out the center ofeach shoulder. I eyeballed the number of stitches I should use for the shoulder strip and knit out two epaulette-shaped pieces (Step 2), leaving the rest of the stitches on holders. I kept going,trying on the piece until I had a strip that was as wide as my shoulders. I now had something that looked like a bell-pull with a hole in the middle.
I put the live stitches at the ends of the epaulettes onto holders, and began the center front bib area. Starting around a hand-span’s worth of stitches in from the end of the epaulette, I picked up stitches along the sides of my strips until I got to the collar. There I knit across the stitches I had reserved, and picked up the same number of stitches on the other side of the collar. I knit down until I had a hanging piece that was about2 inches below my arm, placing the stitches on a holder instead of binding them off. I repeated the process for the back (Step 3).
Once the bib areas were done, I added width so that the upper body was wide enough to fit me shoulder to shoulder. I picked up the first “wing” along the side of the bib area, then worked across the live shoulder strip stitches, and picking up along the side of the second bib piece. I put these stitches on holders instead of binding off (Step 4).
After the upper body was done, I folded the piece along the shoulder line. I picked up stitches along the side of the first wing, worked across the live center bib panel stitches, then picked up along the side of the second wing. At this point I decided I needed to add more length, so I knit about another three inches in the flat before joining the front and back and switching over to working in the round. I continued to knit the body down in the round, working until it was the desired length, ending with a ribbing (Step 5).
I now had a sweater body with two holes for arms. I picked up along the edge of the arm opening along the little bit of body I just added before joining, then worked across the live wing stitches, finishing by picking up the remaining few stitches along the side of the other bit of late-added body. I worked the sleeve out to the cuff, doing double decreases at the bottom edge every other row until the sleeve looked narrow enough for comfort. I continued working it out as a tube until it was long enough (yes, I know the diagram shows decreases evenly to the cuff. Shoot me.). I ended off with some cuff ribbing. (Step 6)
Here’s the result:

I admit on beyond the method described above, I tarted the thing up a bit with some cables and texture stitches:

I used the Twin Leaf Panel from Walker’s Second Treasury (p. 235) for the centermost panel in the bib area. I framed it with an unusual eccentric chain link cable that featured an openwork detail. I thought I got that one from Stanfield’s New Knitting Stitch Library, but I can’t find it in there right now. I also used the same cable on the epaulette strip, continuing the design down the sleeve to the cuff. Plain 2×2 cables (mirrored left and right) frames the fancy-work areas on both the bib and sleeves. I did like the openwork detail of the eccentric cable, so I decided to introduce more openwork into the piece by using YO K2tog or SSK YO combos instead of the more traditional purl ground on which most cables float. That’s what makes the curious spines between the patterned panels. The rest of the piece is done in seed stitch.
So there you have it. I produced a visually complex piece using only simple counting. To determine centers, I counted in from the ends rather than divide. To place cables knowing their stitch count widths, I counted out from my center markers, and placed additional markers to indicate where they went. I did no other math of any sort, and did no swatching or gauge measurements either.
Did I win my bet? Of course. To be fair, it WAS a sucker’s bet.
The Scotch is now long gone and the sweater is now a bit stretched out, but the Bowmore canister lives on as a trophy, happily holding needles here on my desk at wiseNeedle Central.
GADGET – WPI TOOL; PARROT SWEATER
Private eMails brought three questions yesterday, which I answer in turn.
What’s "parrot-color"?
The easiest way to explain the parrot thing is to show you this pullover:

It’s a flash sweater knit from Rainbow Mills Matisse.Their "Navajo Panted Sky"kit included six 4-ounce skeins of Matisse, and produced a one-size-fits-many sweater that’s about 48 inches around.Mine is about as big as the materials provided allow, and I wear a tall 18. Note that thewidth of the piece isfixed so that thecolor repeats flash. Smaller peoplecan make thebody and sleevesshorter, but end up with a baggier fit than I get.
I foundthis10+-year oldkit for buried in a stack of other things at my local yarn store three years ago. Although I’ve seen Matisse listed on a couple of on-line sources lately, and know some of their other kits are still around, I hadn’t seenthis particular packagefor quite a while.I lusted after the thing because I’ve got a magpie’s taste in color, and because I’d done a couple of flash-type pieces before: the one worn by The Tiny One in yesterday’s post (Grandma’s Little Darling,a Rainbow Mills kit of unfortunate name), Flash (my own noodling); and my Typeset Tee (a modified flash piece, also original).
I enjoyed this piece immensely. At this giant gauge (well, giant for me, anyway) it went very quickly. I finished it in about a week. The single-ply construction Aran weightMerino is particularly soft. Even though I rarely wear even the softest of wools next to my skin I am comfortablewith only a cami or tee underneath. Of course the tradeoff for having such a soft wool spun as a single is a certain amount of pilling, but it’s actually quite moderate compared to the pilling I’ve experienced off of Manos.
What’s a WPI Tool?
I know that lots of people – especially spinners and weavers – employ the Wraps Per Inch (WPI) system to describe yarn thickness/weight. I’ve had people recommend that I include fields for it in the yarn review collection. I’ve held off doing so because of an experiment I conducted a while back.
Over the course of a week I took several yarns and a ruler into my local yarn store and asked about fifty people to determine the WPI count for each. I asked most participants to do the test twice. I used a fingering, a sport, a worsted and a bulky yarn. The results were quite disappointing. There was very little consistency among the readings with large variations from person to person, and in some cases from attempt to attempt. Bad data is worse than no data, so based on this lack of consistency and the limited familiarity of the knitting public with the WPI measurement, I decided not to include it in my standard data set. I did however continue to play with the system myself, trying to train my bumbling fingers in The Right Way.
I had absolutely no success at consistent WPI measurement until I found the WPI Tool put out by Nancy’s Knit Knacks. I bought mine within this past month. It’s shown in yesterday’s post – the little stick thing with the notched end. It also is marked off in 1-inch increments and comes with a laminated card that lists the WPI count for various yarn types. It provides a smooth, calibrated surface which is twirled to accumulate the wraps, in contrast toan edged ruler around which the yarn is wound (and apparently, stretched). Using this tool I can finally get consistent, accurate WPI measurements. I still don’t plan on adding WPI as a permanent field in the yarn review collection, but I’m going to add that figure to all future write-ups as part of what I write aboutin the yarn review Comments sections.
So what’s with the endorsements?
For the person who wrote toask if I’d been paid off to post thegadget articles here, please note that I maintain my full independence. On beyond the "no affiliation" disclaimer, I can say that I’veforked overfull retail for every item I’ve described, and have received no compensation or consideration from any pattern writer, yarn or gadget maker, retailer, or wholesaler in connection with anything I have ever said or published about a particular product.
In the interests of full disclosure, I have written patterns that I have sold to publishers including KnitNet, Schaefer Yarns, and Classic Elite, butI have recused myself from reviewing any yarn connected with those sales, and (with theexception of remindingpeople not to bug me for the Seesaw Socks)do not provide references or links to retailers selling them.
PROJECT – ZEN SCARF, HOUSECLEANING
First apologies to the few of you who subscribed to receive notification of site updates. You must have been going nuts since last night because I gave up on Picserver, and ported all of the photos here to a new server. It wasn’t my intent to pepper you with update notes, but I couldn’t turn off the notifications from here. I promise the housecleaning is now over.
Rick-Rack Mesh Scarf in Berroco Zen
If you’ve ever met me you know I’m absolutely delighted at the prospect of the New Knitter Invasion, but at the same time my eyes are glazing over at all those novelty yarn scarves. I’ve done a few on special request, or as gifts for family and friends – but by and large, I find them pretty but intensely boring (hence my Kombu Scarf pattern).
Still, my pal Pat shop managerat Wild & Woolly in Lexington, MA (my local yarn store) asked me to help her come up with something fun to do with Berroco Zen, a ribbon yarn that’s been overlooked in favor of flashier novelty yarns. I couldn’t say no. (For some reason, Zen is in the yarn review collection twice, so until I get that fixed,there’s another set of reviews here).
Here’s what I came up with:
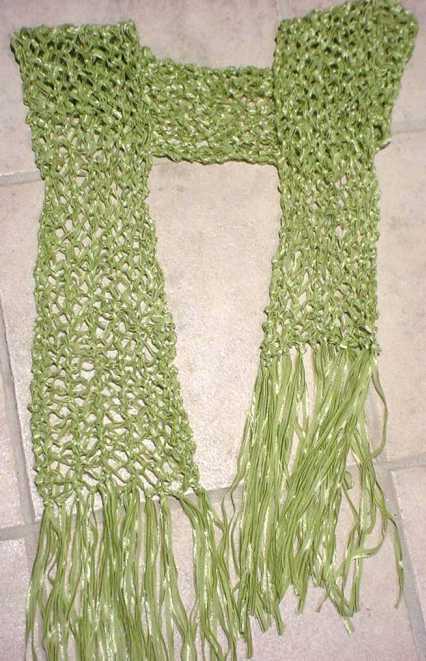
Here’s the pattern. Eventually I’ll add it to the free pattern pages at wiseNeedle.
<p
Rick-Rack Mesh Scarf in Berroco Zen
Materials:
1 Skein Berroco Zen or approx. 110 yards (102m) of a similar ribbon yarn
US #10.5 needles
Gauge:
Gauge is difficult to measure, but finished scarf will be about 5 inches wide by about 56 inches long (exclusive of fringe).
Instructions:
Using half-hitch cast on or other stretchy cast-on, cast on 14 stitches. Knit one row.
Follow Rick-Rack stitch pattern until scarf measures approximately 56 inches long.
Rick Rack Stitch:
Row 1: K1 (YO, slip one stitch as if to knit, K1, pass slipped stitch over)6x, K1
Row 2: K1 (YO, slip one stitch as if to purl, P1, pass slipped stitch over)6x, K1
Bind off VERY LOOSELY.
Cut remaining yarn into 18-inch lengths, and attach to ends of scarf as fringe.
2004, Kim Brody Salazar, http://www.wiseneedle.com. Not to be duplicated on other websites or in print without permission of the author. Pattern for personal use only. Please contact the author if you wish to make this item up in quantity, even if it is for charitable sale or donation.
PROJECT – FULLED MANOS PILLOW
Still in hurry-up-and-wait mode, I find myself with a bit of extra time so I extend today’s entry.
Here’s a past project that was quick, easy, and turned out quite nicely. It’s a pillow inspired by a similar one appearing in Shangold’s Design Source book of Home Decor. This pillow is sitting on my daughter’s bed. As you can see,my tween-ager hasgot a starry-night/dragons theme thing going in denim blues and raspberry/magenta.

I liked the idea of a tube pillow secured by six buttons as shown, and I happened to have six large mother of pearl buttons on hand. They looked rather lunar to me, so I thought they’d go nicely with therest of the celestial/mythical beast stuffalready in place. I stewed around on the idea for a couple of days before mentioning it to the Target Kid. She was thrilled so I went ahead. (Major hint: Never knit anything as a surprise for someone between the ages of 9 and 19).
In truth I only had a glimpse of the book and didn’t work my pillowfrom the directions, so I can’t speak to whether orthe inspiring object is also knit in the round, but this is how I went aboutmy pillow.I used two partial skeins of Manos left over from previous projects (the magenta and the pale blue), plus I bought one new skein of the indigo blue. I wanted to do symmetrical stripes, but I didn’t want toweigh my yarn and divide it into equal quantities and/or figure out how big each of the stripes should be, so I took the lazy person’s way out.
I don’t have any working notes, but I believe I used either a US #9 or #10 needle, and gotsomewhere in between 3.5 and 4spi in garter stitch before fulling the piece. (A figure of100 stitches around seems to stick in my mind, but I won’t swear to it.) I started with a provisional cast on, and knit a garter stitch tube using my entire skein of the darker blue. Then I wound my magenta and light blue into center pull balls. I "woke up" the stitches at the bottom of the dark blue stripe, placing them ona secondcircular needle. then using both the outside and inside ends of the contrasting color yarn, I worked the same number of garter stitch ridges of the light blue on both ends of the center, darker stripe, continuing until I ran out of yarn. I repeated this with the magenta.When I was doneI had no yarn left over at all, a dark blue stripe in the center, and equal size stripes of light blue and magenta framing it. Ready to full!
First I tossed the finished pillow in the washing machine and dryer, but my washer is too gentle. Even in a hot wash full of towels not much fulling action happened. I ended up beating the daylights out of the piece by hand, plus washing it at a friend’s house in a washer and dryer that arefar more vicious than mine. That finally worked.
The finished pillow is nice and dense, cushy even. It shrank about 40% in length (that’s the direction across the stripes), but only about 20% in width (the directionparallel tothe stripes themselves). Final post-fulling measurements are about 20 inches around the pillow’s belly, and about 15 inches end to end.
After my tube was as fulled as it was going to get, I bought a standard baby pillow form. That’s a pillow about the size of the small onesfound on airplanes. Most of the crafting websites list 12"x16" as being the standard, but I think mine was either a tad smaller, or was so squishy that it easily wadded up to fit.
I sewed on the first three buttons, taking my fastening stitches through both sides of the tube. This effectively closed off the first end. Then I sewed three oversized coat snaps to the inside of the pillow’s other end, taking care to locate them exactly underneath the spots where I would later sew the buttons. Once I had the second three buttons placed, I jammed the mini-pillow into the tube and snapped the open end closed. All done! One finished pillow; one delighted pre-teen, and something for the stuffed dragon to lean upon.
EYE OF THE CLEANING STORM
Well, the easy part is over. The house is now scrubbed to within an inch of its life.With so many familiar things stowed itlooks oddly sterile, almost hotel-like.
Amusingly enough the Real Estate Gal asked me if – being a knitter – I might put together a basket of yarn in suitable colors, and pose it invitingly next to the sofa. She said it was the visual equivalent of boiling a vanilla bean or baking bread before an open house. So it was off on a trek to the storage cubby to retrieve some yarn in order to tart up the family room. Today I expect a herd of real estate people to amble through, in preparation for this weekend’s official viewing. Now for the hard part – hurry up and wait for what we hope will be multiple offers.
In knitting, I’m still mid-sleeves on the Suede T- knitting time being at a premium through all of this. So instead of posting a boring snap of too many stitches of olivenylon squished on a too-small needle, here’s an oldie. I knit this for my older daughter back in ’92 or so, and I wish I were a better photographer. It’s in a DK weight cotton from Lane Borgosesia whose label drifted off into infinite space before the advent of the Yarn Review Collection. It features hearts and OXO cables, both from Walker’s treasuries; embellished with clusters of embroidered bullion knots.The knots weredonein scraps of a matte-finish sport weight cotton.
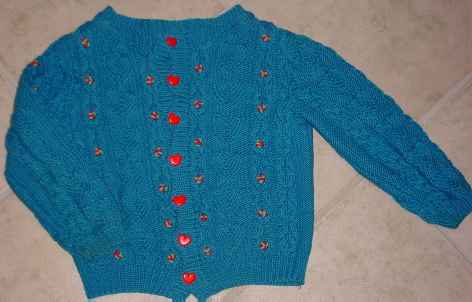
I was quite amused when two years later Knitters published a similar OXO/heart cardigan on the cover of its Aran issue. Mine however is unique – if for no other reason than for my inexperiencedbumbling around witth the button band when I was noodling it up.
- Note the odd number of heart-shaped buttons. There are seven because my spacing was off, and I was too lazy to go back and redo the button band for six.
- Note the fact that the button band is on the non-traditional side for a girl’s garment. When I was at this point I looked down at what I was wearing and did the same thing, never stopping to think that I was wearing a man’s chambray work shirt at the time.
- Note the less-than-effectively centeredhorizontal buttonholes. I didn’t know back then that during wear buttons "migrate" to the outside edge of the buttonhole slit. If I were to do this today, I’d not center my buttonholes in the band. Instead I’d skew them a bit to the inside edge, so that when buttoned, the buttons appear better aligned down the midpoint ofthe band.
Still for all these defects, this is a much-loved piece. Daughters #1 and #2 both wore it and enjoyed it. It lasted well, enduring grass stains, dripped ice cream, and a rather messy day of strawberry picking all followed by rather aggressive laundering. Now it’s at the cusp of being outgrown and is one of the things I intend on packing away rather than handing down to another wearer.
