STEP FORWARD, STEP BACK
As you can probably tell by the off-the-end-of-the pier style of my knitting and stitching projects here, not everything is fully swatched, graphed out, or perfectly planned before it’s realized. This may horrify some readers, but it’s the way I think. I prefer to learn on the fly, and don’t mind ripping back or starting again. For me, exploration is more fun than final product.
Case in point – the latest Wingspan. Let’s critique this thing to shreds:

Things I like:
- The basic Wingspan pattern
- The larger needle size/gauge for this particular yarn
- Using dice to determine hole size and placement
Things I don’t like:
- The color progression of this particular yarn
- This yarn in garter stitch
- The overall (near) finished look
- The combo of color, stitch and technique is too busy
One thing that made the last two Wingspans so dramatic was the long and gradual shading of the Zauberball Crazy. This was achieved by Zauberball’s dual strand ragg plies each cycling independently through their color ranges. In this full strand as opposed to ply-dyed yarn, color change is abrupt and the colors themselves are high-contrast. Speckles of the next color dot each block. (Now I remember starting socks with this ball, and not liking them either). The holes look less like airy bubbles, and more like the savaging of a demented moth army. And the eyelets, which work nicely in stockinette, look sloppy in garter stitch.
In total, I was Not Pleased. So this has been totally ripped back. I may play a bit with other stitches and this yarn, but in spite of it being a looonnnnngggg repeat, I am not confident that it’s right for a garter stitch Wingspan. However, the technique of placing eyelets in a fabric using a randomizing device to determine placement is still gnawing at me, as is thinking about other possible Wingspan variants. As a single project, this is a failure, but as a learning experience, it was valuable.
In other news, I’ve added to our house arsenal:

It’s a Korean-made sickle, sharp and sturdy. Similar ones have been used in Japan for centuries. They often figure in Anime, Samurai (and gangster) movies, both in their agricultural context and as weapons. We are close-in suburban here at String Central, and not out in the land of gentrified sprawl, so why do we need such a thing?
Giant grass:

I cut the patches on the side and front of the house each fall, just after they bloom but before they scatter seed. I don’t want to be responsible for colonizing the neighborhood with the stuff, and I don’t want it to sit looking forlorn and frowzy through the winter. To date I’ve been clipping each stalk with a pruner, but that’s painful and time consuming. I am hoping that this tool will allow a swifter handful by handful harvest.
For those concerned with possible waste – I strip the leaves off the stems and re-use the stalks to build my bean trellis each spring. The leaves go to town composting. I also post about availability of (free) plant stakes each year on the local mailing list, and put them out on the curb for other gardeners to take.
LIKE WATCHING PAINT DRY
Mid-blocking. Waiting for her new Wingspan scarf to dry:

Before blocking, and the op-art horror of pinning out on a checked ground:


The actual color of this Zauberball Crazy is more like the two pinned out than it is in the dawn-light picture on the wood background.
What fancy blocking set-up am I using? Four rubber jigsaw-edged floor cushion tiles, with a rally check sheet laid out on top of them – all on the dining room table. I’ve got two twin size flat sheets like this, bought for pennies at a local salvage store. The regular 2-inch square checkerboard pattern may make eye-blasting photographs, but it’s fantastic for blocking to dimensions. Large checks come around every so often, most often in kids’ bedding, intended for proto-race car drivers. Oversize gingham and Tattersall plaids are ultra-trendy right now. They would also work well as blocking backgrounds.
Talk Nerdy To Me
I haven’t worked this Wingspan pattern out of my system yet. I’ve got one more ball of long-repeat hand-dyed sock weight yarn. My new yarn is mixed neons – very circus balloon like. This one has lost its tag, but I’m certain I found it at Wild & Woolly about a year or so ago. I like the lattice work double eyelet texture I used for this second scarf, but I want to try something more… unexpected.
I want to play with eyelets and this design, using a multicolor. But I don’t want to do the same regular lattice that I just finished.

I want to make something more like Swiss cheese, with eyelets of random size and spacing, to pick up on the airy, light-hearted colors. You can just make out a couple large and small eyelets in the purple stripe.
How to achieve random size/placement? Remember these?

Stand proud, you knitting dungeon crawlers of the past! That same set of dice so often used for exploring graph paper on dorm room floors, armed only with friends, a bag of Doritos and a bottle of Diet Coke, can also be harnessed as a knitters’ tool.*
I’m using a d20 and a d4 to determine hole spacing and size. I roll the 20-sided die, and the number rolled determines how many stitches I knit before I make an eyelet. The d4 by landing on an odd or even number, determines whether I make a large or a small eyelet. (Yes I could use die of any even number of sides for this, but why not employ that lonely, underutilized d4 for something for a change.)
The small eyelet is defined as a K2tog-YO2-SSK unit, with the YOs worked KP on the next row (a two-row double eyelet). Large ones are a bit more complex. They take three rows to complete – K3tog-YO3-SSSK as the base eyelet unit. On the next row I do another YO3 when I get to the hole. On the third row I work KPKP into the bottom YO3, encasing the horizontal strands left behind working both YO rows, and restoring stitch count to the original number. Yes, that’s a YO3, not a YO4, even though I’m working four stitches into the open space. I found by trial and error that YO3 made a less floppy, neater looking hole.
I haven’t seen this particular three-row mega-eyelet documented anywhere else, but as with all knitting – I refuse to believe that I’m the first to think it up. I’m sure there’s a reference book citation for it somewhere.
And using dice to introduce randomness isn’t an original idea either. There’s a whole school of aleatoric and indeterminate music that in addition to encouraging performers to take a major role in deciding how a piece is played, often employs mechanisms of chance (including dice) to add immediacy and uncertainty to its base compositions. Other knitters have used dice to determine stripe width or repeat, motif placement, or color choice.
So there you have it. Second Wingspan finished. Third, if luck holds out and this method produces something attractive, will be a bubbly, swirly Swiss-cheese of candy colored neon. If it does I’ll have to find a recipient whose idiom encompasses bubbly neon color scarves. And if it doesn’t I’ll rely on one of knitting’s prime virtues: The ability to reduce worked materials to their pre-project state, ready to begin something else.
* Another knitting-related use for polyhedral dice is as row counters. Put one next to you and advance it one number for each row (or stitch) that needs tracking.
TAKING FLIGHT
Playing with the Wingspan pattern here, I post progress. Wingspan #2 is almost finished.

Mine is narrower than the original pattern – 75 stitches instead of 90; and has one extra point. Oh, and Swiss cheese holes (double YOs, followed by Sl2-K1-PSSO center double decreases, although first and last one in the row is a single YO to maintain stitch count). I could probably have gotten away with knitting a tenth point, but I wanted to have a wider inside strip to finish. As you can see, I had a very wide red/blue ragg section, and I used it to do a row of decrease-framed diamonds across the whole top. I’ll finish out the ball flat, without additional eyelets. And if I don’t like that, I’ll rip back and do that last point. The next post will show my completed Swiss Cheese Variant Wingspan, mid-block.
For those who have asked, the Wingspan pattern is available as a free download on Ravelry.
More patterns posted
For those of you who may not have noticed, I’m continuing to post the accumulated free patterns previously published on wiseNeedle and here on String. All will be available as PDF downloads at the Knitting Patterns and Embroidery Patterns tabs, at the top of this page. Some incorporate additional advice on the pattern or technique harvested from the associated pattern discussion posts.
Highlights of the knitting pattern collection include:


![]()


Embroidery charts include but are not limited to:


Note that the block unit graphs presented as embroidery patterns are also suitable for knitting, mosaics, crochet, and other work that’s commonly done off a gridded design.
FLAPPING ONWARD
The quick side trip to knitting is being just as quick as I thought. Here’s Wingspan (Angel Variant), finished and blocking out on some rubber mats on my dining room table:

(Yet another traditional blurry String photo, taken at dawn.)
The colors are a bit red-shifted, but you get the idea. A prismatic bat wing. I do confess that I would have had a little bit left over at the end had I finished off where the pattern said to stop – after point #8. But the color change in it was among the nicest in the ball, so I kept going, using every bit of the precious Zauberball Crazy, and finishing off with some leftover red sock yarn from my stash. I’m pleased with it, and as soon as it’s dry and I can darn in the ends, I’ll be rocketing it off to Elder Daughter. Unless she declines because she wants the fun of knitting her own.
Wingspan #2 is now on the needles. Younger daughter requested the darker color ball. She also asked that her scarf be narrower, with lots more holes. So I’m playing with the concept. Instead of one row of eyelets to close out each point segment, I’m working eyelets every 6th row; and I’m making them larger by doing them as S2-K1-PSSO center double decreases, followed by double yarn overs.

Some fudging is going on, all on the fly, to make a garter border around the growing point ends, and to fit the eyelet progression into the short row edge shaping. Just enough (in combo with watching the colors change) to keep my interest.
<begin curmudgeonly rant>
In other news, we ran away for a bit of fun this weekend. Younger Daughter, her pal and I went to King Richards’ Fair in Carver, MA – the local renfaire. The kids dressed up and had a great time, being new to small stage jugglers, acrobats, and general comedic banter.
I will say that I was less impressed. For all of the staff’s efforts, the charm of the thing is largely gone when compared to my memories of eight or so years ago. There was only one artisan working in the compound – a fellow doing lamp work glass. I missed seeing more of that – the leatherworkers, the folk at the forge, and the like.
The mounted “jousts” were the only things there that were free.


Younger daughter was camera wrangler, so it’s no surprise that our pix are all of the horses. The show we saw started with tilts at target and rings, and ended with lance to lance on horseback. It was highly staged (which we didn’t mind, given the risk of injury if the combat were more real), and fun to watch.
From the start, I was mildly miffed. Although I brought cash with me, I was annoyed that in none of their ads or websites anywhere is the fact that the faire is cash-only listed. I heard more than one attendee retreat from the ticket window, to drive back to town to find a bank rather than use the exorbitant fee ATM machine at the gate.
Once you’ve paid your $27 per person, inside the faire you’ll find that everything costs money. Food is on a ticket system, sold in $5.00 blocks of tickets only. They’re 50 cents each, although (again) this isn’t posted anywhere. A bottle of water is seven tickets ($3.50), a child’s plate of chicken fingers and fries is 17 tickets ($8.50), a sausage on a roll is 19 ($9.50). And the prices of foodstuffs are arranged so that it’s difficult to not have a few tickets left over that you can’t redeem. I saw one guy hassled by staff when he tried to sell his leftover four tickets to another visitor.
All rides, attractions, or other events (again except for the horse-related arena stuff) come with an additional fee. $2.00 for the maze. $4.00 for archery, $3.00 for a kiddie ride, and so on. It would be easy to go with two kids and without eating a thing, spend $100 on top of admission just in an hour of walking around. It’s clear that even the small stage performers are largely paid by passing the hat. They did deliver amusing, well rehearsed performances that we did enjoy. I did feel sorry for them and pony up, but again – you’re opening your wallet for everything other than breathing.
I was also disappointed at the large number of adults who seemed to be there in order to drink while walking around. This was a holiday weekend, and the Faire’s opening weekend. I expected to see more renfest geek kids – herds of teens in costume; and families with children over stroller age (strollers are difficult to push on the uneven ground). But about three quarters of the crowd were adults in their late 20s through 30s, wandering around in advanced states of tipsy. Not what I expected.
On the merchants – based on the prices, I assume that the Faire charges steep rents for those kiosks and stalls. What I saw was very pricey. Lots of stuff catering to folk dressing for the next renfest, of course, which I did expect. $75. light cotton elastic waist skirts I could make out of a remnant for under $5.00. $300 wench bodices. $150 capes. $100 pewter cups. $75 leather notebook covers. There was some jewelry and toys in the $15-30 range, but you had to hunt for it.
Again, I will say that the kids had fun. I did too in spite of being annoyed, and for that I thank the individual small-stage performers. They made the day. But the Faire as a whole has gotten more expensive and cheesier than I remember.
We won’t be going again.
<end rant>
COMPULSION
Today I try to appease both my constituencies – stitchers and knitters.
First, for the knitters, I make confession that I’ve been seduced. I recently came into possession of a true one-skein wonder, two balls of Skacel’s Zauberball Crazy. One is an addled mix of red, turquoise, yellow and green (#1701), the other is chocolate, teal, cranberry and according to the official photo, on the inside somewhere – tan (#1507). It’s a lofty and soft fingering weight, 100g/459 yards per ball, enough to knit a pair of socks for me. Here are Skacel’s own photos of the two, at a color fidelity much better than I could achieve:


But looking at this stuff made me want to do something other than socks. Given the number of variables in play right now, I decided I didn’t want to take time to design my own pattern, so I began poking around the ‘net and found the Wingspan scarf. I’m working up this variant. It’s all garter stitch, with the demonstrative shaping formed by short rows. You can see the play of the extra long color repeat even in this traditional blurry String snap, taken at dawn:

A quick knit, totally on autopilot, with a clever system of traveling markers that make it impossible to make a mistake. More on this as the thing grows.
And on the Big Green Sampler, I’m inching along the fiddly bits at the bottom edge, filling in my voiding. The tightly drawn two-sided Italian cross stitch goes more quickly in an open field. Around these odd little bits – especially the Y-shaped extensions in the top and bottom borders (a detail done exactly this way in the museum original) – it’s a slow and exacting ride:

The little empty rectangles at the base of each Y are especially tricky to leave unworked. Still, I am making incremental progress none the less.
Now, why did I start the knitting project?
Compulsion. Plain and simple. I do 98% of my yarn acquisition at Wild & Woolly, my local yarn shop – a heaven on earth for knitters. But driving across the state to drop Elder Daughter off at college put me within striking distance of Webs, the Northampton, MA yarn hypermarket. My rule is not to buy stuff elsewhere that I can find locally, so Younger Daughter and I took a quick jaunt through the place looking for stand-outs – things I haven’t seen anywhere else.
That’s where I was attacked by the Zauberball. It fairly leapt of the shelf in a direct assault on my magpie color sense. It’s hard to describe this compulsion to a non-crafter. I HAD to get it, and I HAD to find something good to knit with it, and I HAD to cast on right away. That’s the way the best projects work – the absolute mandate to watch the piece take shape. Time flies on its own. Any encountered problems melt away. I look down and see more done than I realized was happening. Oddly enough, the final product while valued, is not the goal. It’s the process, the journey, the materials, and the sense of progress.
I’ll split my time between these two. Maybe I’ll figure out something myself to do with Zauberball #2. Or maybe not. But in any case, both balls have to be cooked, chewed and digested before I return to normal.
UPDATES CONTINUE
Added several more rescued patterns from wiseNeedle to the Knitting Pattern link above, including:
- Firefighters’ Socks
- Impossible Socks
- Pine Tree Toe Up Socks
- Jelly Bean Toe Up Socks
- Ch’ullu Hat
- Knot-a-Hat Earwarmer Band
- Spring Lightning Lacy Scarf
Will continue to plug away. Reminder – please, if you are thinking of linking to these, please link to the source page rather than the individual PDF. I can’t guarantee that the PDF links won’t change.
STEAMPUNK SATURDAY
…More like month-of-Saturdays, actually.
Here’s the outfit that accompanies the hat I showed off in my last post:

You can’t see the watch-type pendant and magnifying glass hanging from the chains at her waist.
The blouse and vest were flea market finds, along with the buttons and broken necklace chains that adorn it. We made the skirt and petticoat, the hat and the woven ribbon bag. The hat is a cut down New Year’s Eve party top hat, plus feathers and other adornments. The belt is an 80s-era retread from my closet, and the gear necklace and earrings were holiday presents this year past.
Here’s a close-up of the skirt trim. It’s a wide strip of brown ribbon, edged with black ribbon, folded and ironed into points:

I don’t remember where I first read about doing the points – possibly in an ancient Threads magazine, before they abandoned fine handwork, possibly in a Victorian era ladies magazine or millinery guide. The ribbon folding isn’t quite ruching, since no gathers are stitched, and it isn’t pleating, because the folds are not perpendicular to the ribbon. I used it once before, to make teeth on a dinosaur costume, when Elder Daughter was a toddler.
Wherever this trick came from was, it’s a very useful technique for producing custom, flexible trim that eases nicely around corners. I did mine in inexpensive double sided satin ribbon. A two-tone ribbon with different colors on each side would make points of alternating colors. Here’s how:


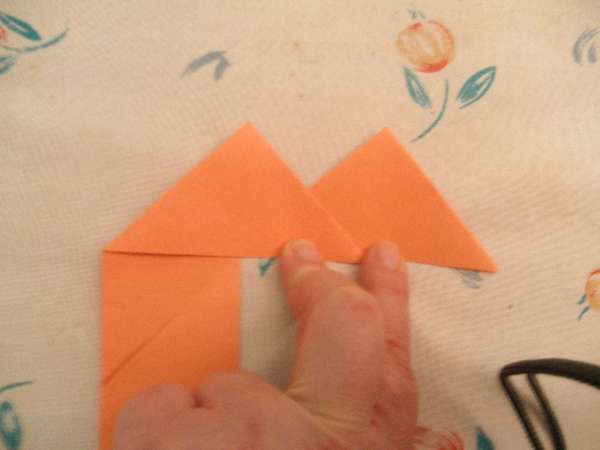
Fold a triangle, tucking the leading edge underneath. Then do an inverse triangle. Finally, flip the inverse triangle up so that it lies on top of the completed one.
You can see that if you wanted to make rick-rack instead of a row of upward pointing triangles, that second fold step would be done so that the “good side” landed on top, and the third step would be omitted.
Here’s the same process in actual ribbon, with firm steam pressing on the silk setting in between manipulations:

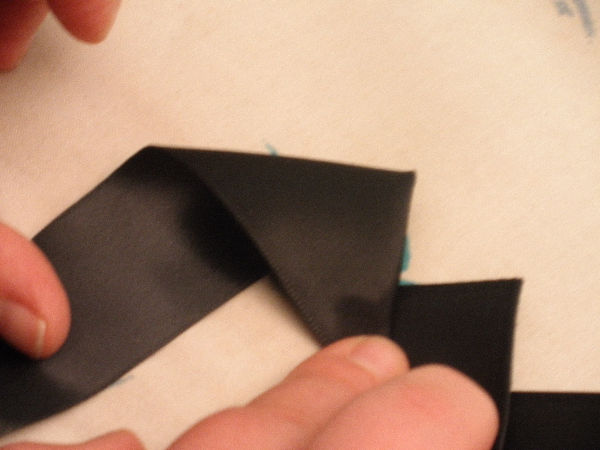

and the final product, ready to be pinned and sewn in place. Note the flexibility that can accommodate both inner and outer curves:

Younger daughter wore this to the Waltham Watch City Steampunk Festival, at the Charles River Museum of Industry and Innovation. After planning and accumulating the bits for the better part of the year, she was thrilled to do so, and had a great time.
PROGRESS
We’re quite busy these days at String Central. I continue to work on the long green sampler. Here’s the latest strip, photographed in early dawn light. This pattern is also in TNCM2, albeit without the gridded voiding. The little complementing border was stolen from a different TNCM2 pair.
TNCM2 as a whole also progresses. And to top it off, Younger Daughter and I are hard at work on an outfit for her to wear to the Waltham Watch City Festival steampunk gala.
Long time readers here may remember that last year at this time, Younger Daughter spent quite a bit of April and May in Children’s Hospital, in the throes of an argument with her burst appendix. She had wanted to attend the festival last year, and was very disappointed to have missed it. As a distraction, we planned out the outfit she would have liked to have worn. Being on the young side, what we designed for her was more steampunk than steamy-punk (no exterior corsets, hip high hemlines, or fishnet stockings). As incentive for cooperation with often uncomfortable hospital requests, I promised to make said outfit.
Now a year later, she’s totally better and my promise has been called in. We’re about halfway through the venture. A blouse/waist has been obtained (an antique barn bargain retread). We’re just finishing up a camel wool walking skirt, and will be trimming it next week with black and brown point folded ribbon. She’ll be decorating a brown suede bolero with copious brass buttons, plus a watch, a compass and a magnifying glass. The bolero and buttons were also flea market finds. Pix of all of these as they near completion. But I can present her hat:
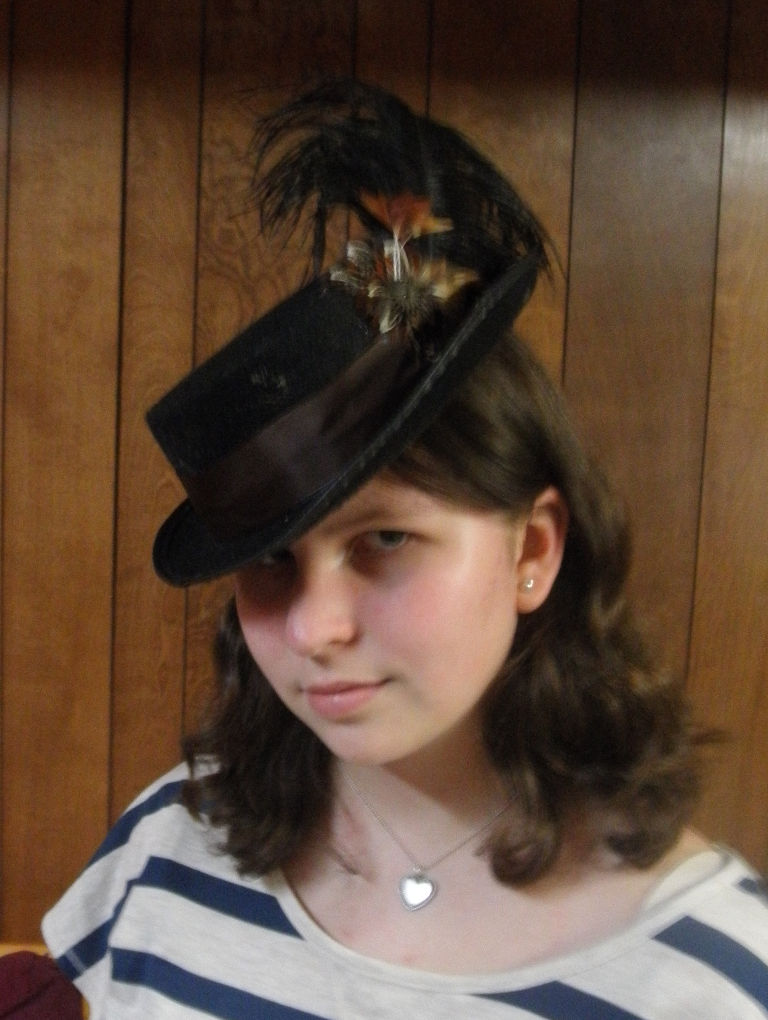
She started with an costume top hat, and excised about 2 inches of height. She covered the surgical scar with a brown ribbon, complete with a bow and streamers in the back; then added feathers and gears.
Cute, no?
GREENS BOTH DARK AND LIVID
Laying down the double running outlines for the latest strip, with the intent of going back and filling in the Montenegrin cross stitch spines along them in a second pass:

I’ll probably do the long straight runs first, while waiting for the Montenegrin stitch book to arrive. I don’t particularly like the way I handled the bent spines and am hoping that Autopsy of the Montenegrin Stitch will help.
In other news, I spent the weekend knitting a hat. An outrageous black earflap cap, encrusted with a lime green crest. Bespoken, of course:

I started with Interweave Knits Army Girl Earflap cap – unisex despite its name (available in the IKE 7 Free Knitted Hats booklet). I added a bit more height just above the forehead, before the crown decreases because the recipient is a tall guy with a slightly longer head than average. I’m using Brown Sheep Lambs’ Pride Bulky. If you want to make this hat as published, one skein of it is more than enough for the whole thing. My green crest adds about half of a second skein, in that screaming color.
I’ve got some more of the ruff to add, then I have to snip it back, barbering it from floppy/sloppy to a uniform and threatening length. But all is on schedule for a hat-ETA of later this week.
SQUEE!
Folk who know me either through String or in person know that I’m generally not prone to enthusiastic gushing. Passionate ranting, perhaps, but prancing around in delight is not part of my idiom.
Until today.
I’ve been pacing the floors since my last big embroidery project ended, keeping busy by knitting small things:
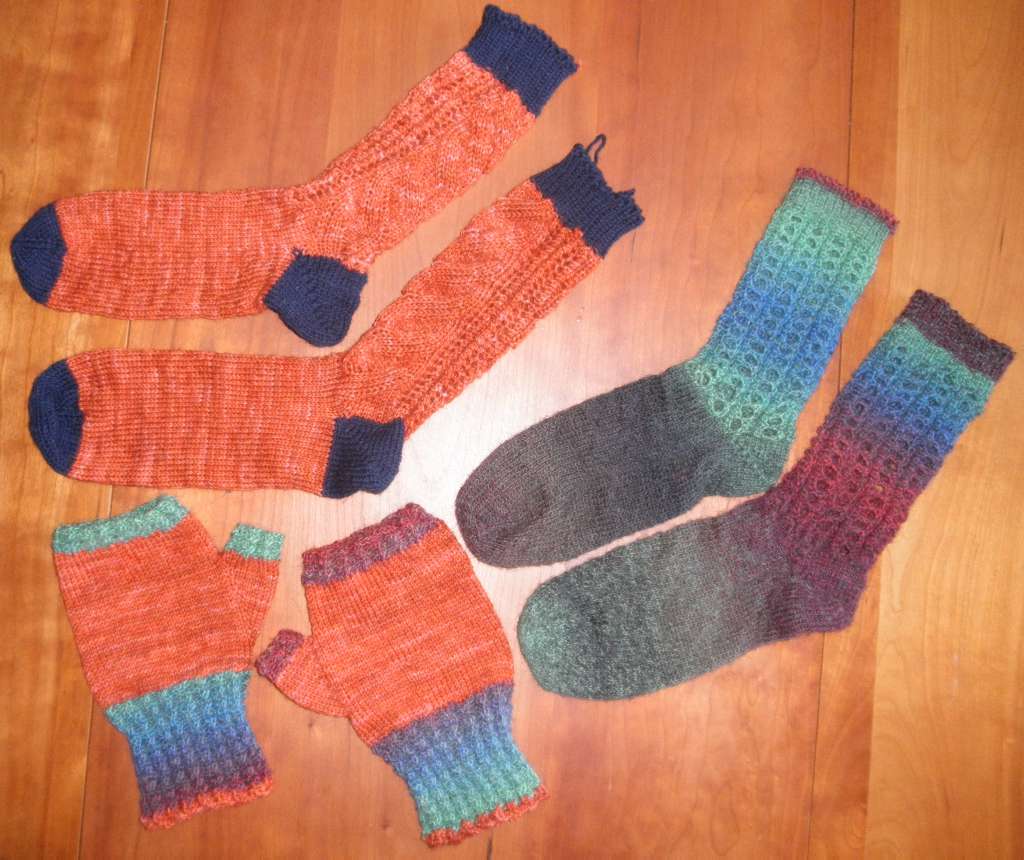
Two pairs of socks and a pair of Fingerless Whatevers. Socks are headed to Elder Daughter, whose pitiful pleas will now be gratified.
But finally, my Needle Needs Millennium Frame has arrived, all the way from the UK:
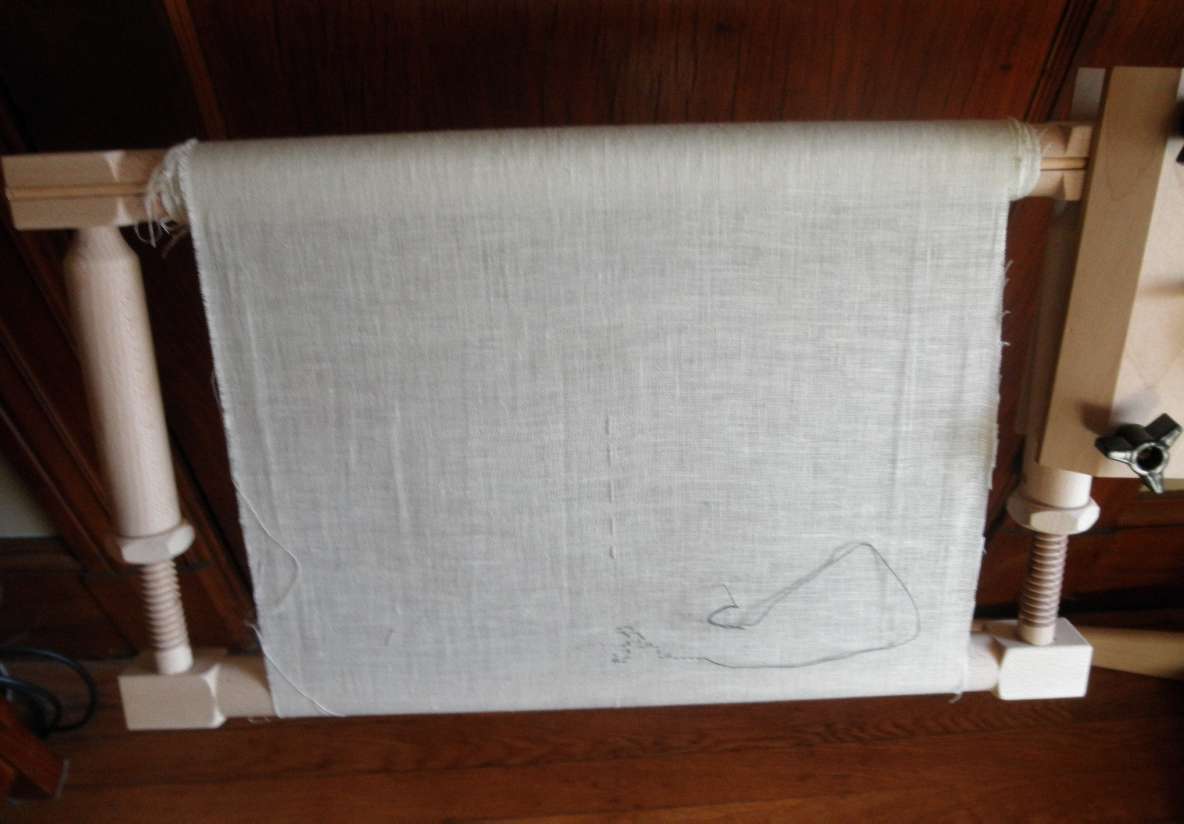
I’ve wanted to get a new flat frame for quite a while. My old one having been bought in the early ’70s, using babysitting money when I was still in high school. Frame technology has advanced. I was very impressed by the review of the thing over at Needle ‘n Thread. Her pix are better than I could manage, and I agree with her observations wholeheartedly. The frame is well made, and works exactly as presented. It’s easy to load with the work (minimal frame dressing), easy to adjust, and a delight to use. All in all a quantum leap over my old one.
The only problem is one faced by all round frame enthusiasts when they “move up” to a flat frame. It’s large. You need three or four hands to use it. One or two to hold the frame, and two to stitch. But I’ve faced this problem before. Behold my ancient Grip-It frame, bought about 20 years ago when I started working on my Forever Coif:

It holds my Millennium nicely in its omnivorous grasp. Just barely, though. I will take the three bolts that make up the fastening mechanism of the jaws to the hardware store this weekend, and look for some that are a bit longer.
And if having this miracle of modern needlework support infrastructure wasn’t enough to hyperventilate about, I have more to celebrate!
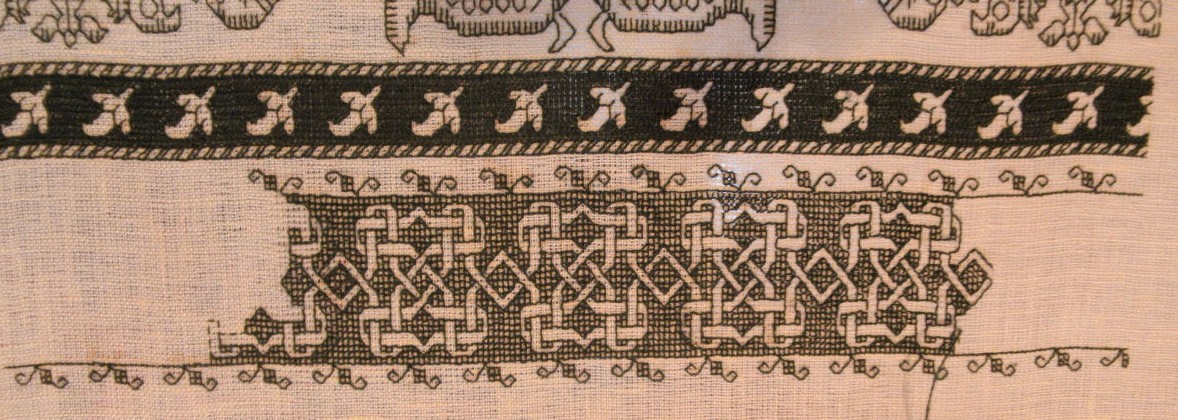
If you’re familiar with 16th and 17th century embroidery – the long red pattern strips that probably bordered domestic linens – you’ve seen that odd mesh background. Some museums call it “Punto di Milano”. Others call it “Point Lace” “Punto Quadro” or “Tela Tirata.”

This is the Metropolitan Museum of Art’s artifact “Strip.” Accession number 79.1.81.c
Stitch attributions range all over, in part because there are several ways that a mesh background can be achieved (withdrawn thread; withdrawn thread to make a grid, then darning; pulled thread, etc.) Some books specify that these patterns used Italian Two-Sided Cross Stitch, others say Four-Sided Stitch in addition (or instead) of using an Italian stitch/style name. At this point, I’ll agree with them all because all are feasible. But after long experimentation I’ve finally found a method that’s achievable.
I played with several pulled thread stitches before coming up with this:

It’s the same pattern as the museum piece. I’m working the mesh in two passes. The first is an easy to count pass of double sided cross stitch, worked double and pulled very tightly. The second is a pass in which the bars formed between the cross stitch are whipped four times (two times on edges butting up on un-mesh areas). It’s totally two-sided, identical front and back. While not exactly speedy, using the initial pass to establish the counted pattern is easy, and the fill-in whipping to create the mesh is far less think-intensive than working the same pattern in hard-to-see-the-count long-armed cross stitch. Is this Punto di Milano or Tela Tirata? I am not sure. But it’s darn close!
Requisites for production:
- Flat frame on a stand. You need two hands to do this.
- Relatively loosely woven ground cloth. Most modern even weaves are too dense. This nice, airy piece of linen was provided by StitchPal Pam (Hi, Pam!), who found it too gauzy for her needs. But it’s perfect for mine.
- High thread count ground. Although the weave density on this is good, it’s a bit coarse for this work. To achieve the compression that leaves nice big holes, stitches need to span 3-4 (or more) threads. I’m using 40 count here, stitching over 4 threads. 60 count would be MUCH better, although I’d have to find finer silk thread. I’ll have to investigate this on a future project.
- Silk thread. Cotton isn’t strong enough for all the pulling. Linen would have the strength, but it would be thicker, filling the holes more (and it was also done in linen historically, for white on white stitching).
- Slightly blunted slender needle with a small eye. This is only one strand of silk floss, and you need to spread rather than pierce the ground cloth threads. Still, a total tapestry blunt is too rounded for this delicate work.
Yaay!
