PATTERN – NORTH TRURO COUNTERPANE, PART 3
[Repost of material originally appearing on 2 August 2006]
As promised, here is the third unit needed to build my North Truro Counterpane. I won’t say the last, because I still intend on squaring out the sides and adding coordinated strip-knit coordinated trim. That will require some half-hexes, half-squares and the trim itself. But I’m not there yet.
Like the square, the triangle is knit flat and is quite straightforward. In addition to the patterned piece graphed below, I also make some plain triangles to fit in between the larger meta-motifs. In essence they are the triangle graph below, but without any patterning. To make them I cast on 31, then work entirely in stockinette, employing only the shaping directions shown at the ends of the right-side rows.

[Click on pix above for larger rendition]
I think that I might have done the patterned triangle a bit differently if I were to assay it again now. I might have eliminated the YOs and companion decreases down the center on rows 1-11. Or maybe not. I’d have to play with it to see if I liked the meta-unit (and how multiple metas fit together) after assembly without those radial spikes.
Tomorrow I’ll discuss again how these go together, and present some alternate arrangements.
PATTERN – NORTH TRURO COUNTERPANE, PART 2
[Repost of material originally appearing on 1 August 2006]
As promised, here is the square I use to build my North Truro Counterpane – the first of the companion units needed to build the thing along with yesterday’s hexes.
I could see someone making a blanket of only the squares, or only the triangles (tomorrow’s post), but I did design them to fit visually with the swirl counterpane to make up the larger star meta-motif. I like the contrast between the patterned, almost embossed central swirls and plain stockinette. The lines of the square extend and frame the swirl’s motion, spreading the design out beyond the borders of the hex itself.
The square is knit flat, back and forth on straights. I use two of my longer DPNs for all the smaller units. Since these are quick and almost never languish on the needles, don’t bother finding a pair of traditional straights with end buttons.

[Click on pix above for larger rendition]
Now, why did I go to all this trouble? For the classic reason. Why not?
I’m not a big fan of pieced quilting. I think it can be visually quite lovely, and value it as a medium for artistic expression, but I don’t enjoy manipulating all those little patches of cloth myself. I am however fascinated by simple geometry. Things like tessellations tickle my fancy. I can’t pass by a bit of interesting mosaic or brickwork without pausing to appreciate regular polyhedral tiling. Traditional Islamic non-figural ornamentation is a source of wonder to me. When I stumbled across Phillips Knitting Counterpanes I skidded to a halt and hung on every page.
Since then I’ve kept my eye open for more pieced counterpane style patterns of all levels of complexity. But I notice that very few are built on layouts beyond all squares, triangles, or hexes; or (at the most) on octagons plus small squares. I wanted to play with some of the more unusual layouts – to see if I could bend knitting around them. There are lots of ways to tile an area with simple regular polygons, and simple regular polygons are easy to knit. Why not mix squares and triangles? Or hexes, squares and triangles? Or (be still, my heart), dodecagons, hexes, and squares? North Truro is my first attempt.
I wonder what trouble i could get into if I departed the single plane, and ventured into the 3D world of polyhedra? Hmmm….
PATTERN – NORTH TRURO COUNTERPANE, PART 1
[Repost of material originally appearing on 31 July 2006]
O.K. Apparently I’m not the only crazed loon out there that’s interested in knitting something with ten thousand ends. So in response to requests, I share my North Truro Counterpane.
Please note that as a pattern, this is still in Beta stage. I have no yarn quantities, gauge estimates, or recommended needle sizes. There also may still be an error lurking in the upper right double moss area on rounds 35-43, after the centered leaf motif. I think I’ve corrected it on this version, but since I mostly work my motifs on autopilot at this point, I can’t swear that I’ve payed close enough attention to test-knitting this particular edition of my graph. If you run into oddness, remember that the double moss area on each side of the center leaf should mirror. If it looks like you’re developing a rib on row 37 or 39, invert the knits and purls after the center leaf and all will be well.
In terms of materials, I can say that I’m using a insanely inexpensive unnamed coned cotton flake yarn found in the back room at Webs. It’s soft, with some open and relaxed sections, rather than a tightly spun mercerized cotton. In terms of weight it’s probably closest to fingering, with occasional puffy bits making it hard to describe. I’m getting 16-17 wraps per inch.
For needles, I’m using 3mms. NOT US #2s, which tend to be 2.75 mm, but true European 3mm needles. I’ve got a mix of 10-inch and 8-inch long steel DPNs of that size, and am working my hexes on four, moving to seven when the number of stitches on the needles makes that more comfortable (one needle per side, plus one to knit with). Now not everyone is as DPN happy as I am, so if you prefer using one or two circs, try starting out with a set of 4 DPNs, (two hex sides per needle), and using them until the piece is large enough to make the transition practical – probably around round 23 or so.
Please remember to note the one-stitch transition on round 35. I shunt the beginning of the row one stitch to the left on that round. You should knit the first stitch of Round 35 onto the last needle of Round 34, then work around, doing that terminal K2tog on the last stitch of each repeat and the first stitch of the next one. If you’re using circs and markers, move the marker to after that K2tog. The final repeat of Round 35 will work out even – the last K2tog will combine the previous final stitch of that repeat plus that stitch you knitted and transferred at the beginning of the row.

[Click on pix above for larger rendition]
I will post the graphs for the companion square and the triangles tomorrow. The hex can be used alone or in combo with the other units. In fact, the geometry of the thing allows several possible assembly layouts I’ll write more about that later in the week.
Finally, there’s one more reason why this is just in Beta. I haven’t finished the total counterpane design yet. It is my intent to (eventually) draft out companion half hexes and half-squares, to finish the piece off as a rectangle, then trim the whole caboodle with a custom-designed edging that complements the design elements of the motifs.
Needless to say, I’m not there yet.
BIG SISTERS’ SWEATERS
As you can see, the first of the two sweaters I’m making for my friend’s kids is more than half-way done. I’ve got only a couple more rows of the body ribbing to go before doing the rolled lower edge, then I get to do the sleeves.
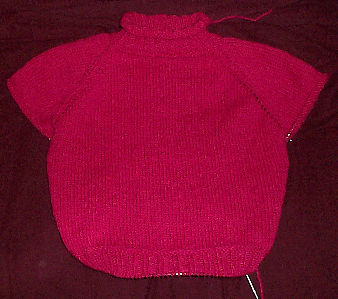
Of course, anything in a kids’ size 6 knitted at 5 stitches per inch goes quickly, especially when it’s just miles of stockinette. There’s just two more skills needed in this pattern – k2tog, and casting off. I’d rate this a solid beginner’s hit.
Now, about those sleeves…
My bugbear of the knit-in-the-round genre has always been making the sleeves even. I am a lazy knitter. I hate counting rows. Being the largest idiot in my universe, I try to idiot-proof my knitting whenever possible. I am not a big fan of two-circ technique for things like socks (I’m much faster on DPNs), but I think for these sleeves, I’ll give that method I try. I’ll use a pair of longish ones, and work both sleeves side by side, each from its own ball of yarn. I’ve discussed both alternate circular needle methods and side-by-side knitting of two items before. More on this tomorrow after I’ve gotten enough done to photograph.
In other blather, I’m annoyed with Knitters Magazine. This isn’t an unusual occurrence, but it does have other root causes. Most recently I’ve been annoyed because of their overall lackluster patterns – the sad, baggy, unflattering things; the unnecessarily tarted up,overembellished items; the ill fitting pieces in flash-in-the-pan novelty yarns that look stupid even on the svelte; and the parade of useless accessories that look more like hand-knitted fungus than anything else. Then there’s magazine format, use of ill considered yarn description standards, and the treasure hunt to determine the basic info needed to actually work the patterns. To be sure, the latest issue has its share of those, but it also has one item that looks to be worth knitting – the first one I’ve been tempted to make from Knitters in about five years. It’s the lace stole on the cover. I’d show you the thing, but as usual the Knitters site is throwing errors.
Why am I annoyed when the rag has finally presented something other than rags?
Because the issue appears to be in yarn shops and book stores, but not in my mailbox. My issue has either gone astray, or is lurking somewhere in the post office. I know several other subscribers here in Massachusetts. Their issues are also late. I suspect the magazine’s excellent standard of professionalism is to blame. The same one that is responsible for the buggy website, poor subscription management/customer service, lousy pattern choices, and severely flawed published instructions.
CATCHING UP
With great joy I announce the end of my most recent death-march deadline at work. The one that has eaten up nearly every day since Halloween (including weekends). I spent this past weekend catching up on a belated birthday celebration, exhuming some parts of my house from clutter, and returning at last to knitting.
One half of the birthday was a memorable dinner with The Resident Male at Blue Ginger restaurant in Wellsley, MA. Not being as eloquent on the subject as Chocolate and Zucchini (one of my favorite reads) I won’t bore you with a dissection of the meal beyond saying it was a leisurely evening of fine food and wine. The company wasn’t bad, either.
The other half of my celebration was a day of personal indulgence, including a visit to the local yarn shop to take advantage of their semi-annual clearance sale. I bought some Encore and a pattern (see below), a couple skeins of sock yarn, a kit to make Dovetail Design’s Rainbow Hat and Scarf (with a full spectrum of Frog Tree alpaca) and two full bags of Jaeger Matchmaker DK in an intense charcoal gray heather. The Matchmaker is destined to become the Sarah James Ribbed Leaf pullover.

On the knitting front, I’ve started winding the tie-dyed cotton. I made the mistake of washing and drying it in the machine. While in concept doing so wasn’t particularly wrong, I could have used more ties to secure the yarn. I ended up with quite a tangle which I am slowly deconstructing back into a ball. It’s not difficult or knotted, but it is tedious. I’m very pleased however with the result. Knitting it however will have to wait for another time, as I am wildly behind on other projects and need to finish them first.
On that Encore – I’ve got a pal at work who has two little girls, with a third on the way. Everyone always knits for the new baby, so I decided to do something different. I’m making two "Big Sister" sweaters in the girls’ two favorite colors for the older two. Since there will be ample laundry in that household, I’ve chosen an easy-care acrylic wool blend. The two sweaters will be identical except for color. One is kid’s size 6 in screaming pink, the other is a size 4 in eggplant purple.
As I mentioned before, I’m woefully behind in knitting so I am using the short-cut of a purchased pattern. A quick to knit, ultra-simple purchased pattern. I’m working Cabin Fever’s 1,2,3, Top Down (#609). It’s a unisex simple knitting pullover, worked top down. The pattern covers kids’ sizes 4-8, and is worked in standard worsted. As you can see, having started on Saturday, I’ve gotten about a quarter of the way through the larger size. I’m past the point where the sleeves split off, and am now well into the body tube. The pattern itself is quite simple and easy to follow. I’d recommend this as being a design that a newer knitter would enjoy. So far the skills needed to accomplish it have been casting on, knitting in the round, and yarn overs. A small bit of purling is introduced in the ribbing and (optional) welt at the base of the collar.

DYEING FOR ANSWERS
Some questions fell out of yesterday’s post:
Which dye kit did you buy?
This one. It’s by Jacquard (aka Rupert, Gibbon and Spider). It retails for around $19.00 and is widely available on the Web and in crafts stores. There are probably more cost effective ways to get the materials it contained, but I was paying for convenience and (being an idiot working with kids) idiot-proofed directions. Remember, I bought the thing primarily to dye shirts as a birthday party activity for 8-year olds. Dyeing my yarn was a lagniappe.

What kind of dyes did you use?
The kit comes stocked with pre-measured Procion MX dyes in squeeze bottles. They’re cold water dyes, and quite vivid. I know very little about dyes and dyeing, but it appears from a cursory web search that these are ideal for cotton.
Why did you use cotton and not wool?
See above. Also, I have to admit that the sacrificial aspect of experimentation played a key part. The cotton yarn I used was very inexpensive and has been stash-aging long enough to qualifty as being "almost free."
At present, my stash includes two sweater sized lots of undyed wool. One is a very special thing – hand-spun Churro wool, a gift from a friend in New Mexico. It’s waiting for the **perfect** thing to do with it, and is not to be wasted on an experiment that might go wrong. The other is a more modest yarn, but is a small producer local product, blooming with lanolin. I was unsure of whether or not the dyes would be as suitable for a protein fiber as they are for cellulose fiber, and I didn’t know how the presence of lanolin would affect the process. The kit was designed for cotton garments, so cotton yarn was my chosen target.
Did you measure out your skein diameter for optimal flashing?
No. I thought about doing that, but doing so would require that I knit up some swatches and do gauge calculations, then do some test-knitting to determine the final flash diameter. (Yes, I’m still progressing with my flash camo tee). Instead I decided to wing it. I extended my swift to its maximum diameter and just used that. My skein is about 1.5 yards in circumference. Give or take.
Have you rinsed the yarn yet?
No. Not yet. The kit specifies letting the dyes sit for a while, preferably overnight, to make sure they are firmly fixed. The picture I showed yesterday is of dye-damp unrinsed yarn.
What the heck is soda ash?
I didn’t know, so I looked it up. Google is my friend.
DYEING FOR A REST
Yes, I am still swamped at work, by the same project that has eaten my time and sanity since last November. The end though is in sight. Thank goodness. In the mean time everything else suffers. Especially blogging.
I was able to steal an evening this weekend past because Younger Daughter was celebrating her birthday. We had a house full of 8-year old girls, lots of cake, giggling, glow in the dark sticks, and other modest entertainments suitable to a sleep-over party. Along the way we did t-shirt tie dyeing. I got a bunch of inexpensive plain white t-shirts from Walgrens, and a tie dye kit from the local arts and crafts store (more chaotic but much more fun than those big box crafts palaces). The kit came with almost everything other than the shirts – instructions, three squeeze bottles pre-loaded with dye powder in screaming primary colors, one empty squeeze bottle with marks on it for using two of the other colors to make a fourth, soda ash, rubber gloves, and rubber bands. All I needed to add were the shirts and a bucket. The kids had lots of fun making their own creations, but when they were finished, I had about half of the dye left.
What to do with it? Well – what would you do?
What I did was experiment after the kids had wiggled themselves into their sleeping bags and (mostly) gone to sleep.
I had some old Southmaid Cotton 8 unmercerized white cotton left over from blankets past. It was very inexpensive, around $1.75 per skein, and it’s been kicking around my stash forever. Using my swift, I wound out about six skeins worth (2.5 oz each, no yardage provided), knotting them end to end as I went along. I secured my mega skein in three places with a loose figure 8 tie, just like all the countless skeins of yarn I’ve bought over the years. Then following the dye kit directions, I soaked the yarn in the soda ash bath. It sat there for a couple hours. Then I squeezed as much of the ash water out as I could and laid my yarn out on plastic. Then I took my squeeze bottles and had at it.

This is much harder than it seems. First, keeping the colors in neat segmets is a challenge that must get easier with practice. Second, making sure that the full depth of the skein is penetrated by color is also difficult. Again practice must be key. Perhaps I was overly ambitious with the amount of yarn I was trying to color, but you can see in the blue that I didn’t get the core of the skein as evenly colored as the outside.
Still, garish colors and imperfect execution as it is, it was a noble experiment. Without measuring, my guess is that I have enough yarn here to (eventually) make a sweater for Younger Daughter. At worst case, possibly a tee-shirt for her. Which would be congruent given the origin of my inspiration.
Will I try this again? Possibly. Messy is always fun.
MR BUNN GOES TO SCHOOL
This post comes under the heading of "Bragging Parent."
Elder Daughter’s school hosts a math fair every spring. Much as in a science fair, students are encouraged to create exhibits detailing concepts, or offering up research or practicum results. The only stipulation is that they have to involve math. One of the suggested topics this year was "Math in Everyday Life." Suggestions for this topic included documenting the math inherent in a cooking or hobby project. Elder Daughter chose to do hers on the math required to create a mini-sweater. Evil OverMom made sure she got lots of pencil time in doing so. [insert bwaa-haaa-haa sound effect here.]
She decided to take Mr Bunn (her first toy), and outfit him with a pirate motif sweater. She did some fashion sketches, and searched the web for a pirate motif. She found one on a wristband offered up by MagKnits.

To start, I gave her a tangled pile of yarn, of undetermined yardage and gauge. She rolled it up, weighed it and used a McMorran Balance to figure out her yards per pound. Lots of conversions between grams and pounds ensued.
I then had her measure Mr Bunn and draft out a proportionally designed pattern. There were percentage adjustments for ease, plus determining the length of the T-slit for the neck hole using Pythagorean geometry.
Then she did a gauge swatch, weighed it and figured out her yarn consumption per unit area, and based on that – whether or not she’d have enough yarn to do her project. (Obviously I made sure that she would, but let her figure it out on her own). More ounces, grams, pounds conversions!
After that she used that same swatch to determine row and stitch gauge. Averaging here, as she took several measurements at different spots on the swatch to get more accurate figures.
She used multiplication and ratios to translate her pattern and her gauges into actual stitch count directions. Then she drafted up a to-scale final pattern schematic. Finally, she mathematically determined placement for the motif.
And then she knitted the sweater and did up her poster, documenting all of the equations and methods she used. (The poster is still at school). On the day of the fair she manned her mini-booth and explained all of this to the judges.
I regret that in spite of effort and originality, Elder Daughter didn’t win one of the coveted few prizes. But that’s a mom talking. She did get an excellent grade on the project from her teacher. Also she learned quite a bit about design, data conversion, and drafting, had fun with applied math, and is now talking about designing up a person-sized sweater. All of which make her a winner in my book.
WHERE ARE THE SOCKS OF YESTERYEAR?
UPDATE: THE STITCH PATTERN BELOW IS NOW AVAILABLE IN AN EASY TO DOWNLOAD PDF FORMAT AT THE KNITTING PATTERNS LINK, ABOVE.
As you can tell from my absence from these pages, life again overtakes my leisure pursuits. Still, even though I haven’t had much time to write, I have been able to fit little scraps of knitting into my not-so-copious free time.
First, I knit a pair of replacement socks for Friend Alexx. They’re replacements because I had made a pair for him over the holidays that failed to fit. Since my socks come with an unlimited warranty, I was honor bound to replace them. Friend Alexx requested a pair of heavy hiking/slipper socks – preferably purple variegated. It took a bit of searching to find a purple mix in DK weight washable wool that didn’t trail off into prissy pink or boudoir lilac. But I did. Cleckheaton Tapestry 8 Ply, in Color #4. The pair is now done and waiting for me to darn in the ends and send them to the recipient. No pix – they’re pretty standard stockinette in screaming purple, but they’re dense and cushy.
In a coincidence, I stumbled across a briefcase I had been using three years ago. In it I found a pair of socks I had started for Alexx’s wife, Friend Kestrell. At that point, Kes was learning to knit and wanted to make socks. So I decided to make a pattern just for her. This presented a couple of challeges because Kes is blind. I wanted to use a simple knit/purl brocade that made a deeply embossed texture, and that would be relatively easy for a new sock knitter to memorize. Having worked with Friend Rosie (another non-sighted knitter) I also wanted to make a pattern in which one could use feel to determine one’s location.
My best intentions at that time led me to finish out one sock, and make my way through the heel of the second. Then for whatever reason something happened and I stopped working on the project. Around that time my job world changed, and the briefcase holding the socks was “retired.” The socks were forgotten in the ensuing turmoil.
In any case when the pair resurfaced, I had a finished sock but no pattern written down. I know I had drafted out the textured brocade, but I couldn’t find it on my archives. Another friend came to the rescue. My stitchpal Kathryn saves everyhing. I had shared the original chart with her way back when, and she was kind enough to send me a copy.
But there was a complication. The chart I sent Kathryn was for a 14-stitch repeat. My done-sock was worked on 72 stitches – an 18-stitch repeat. Yes, I had the finished sock, but it can be surprisingly difficult to graph up a piece from as-knitted, especially when the knitted object is done at tiny gauges with a variegated yarn. But between the sock and the logic of the pattern I was able to noodle it out and continue. I present both the 14 stitch and 18 stitch repeat. The 14 fits neatly on any sock worked on 56 stitches. If you are partial to working with a set of five rather than four needles, you will find that one full repeat will fit on each needle, and each needle will be worked in the same way. Also, being top-down symmetrical, this pattern wil look pretty much the same for toe up and cuff down socks.
Here’s a set of quick and dirty charts. Yes, I know that Kes and Rosie would have problems reading a *.jpg chart. See below for full prose instructions.

Kes’ Brocade – 14 stitch version, transcribed for knitting in the round only
Row 1: (Right Side) P2, K3, (P1, K1)3 times, K2, P1
Row 2: (Wrong Side) P3, K3, P1, K1, P1, K3, P2
Row 3: K1, P3, K3, P1, K3, P3
Row 4: K2, P3, K5, P3, K1
Row 5: K3, P3, K3, P3, K2
Row 6: P1, K3, P3, K1, P3, K3
Row 7: K1, P1, K3, P5, K3, P1
Row 8: (P1, K1)2 times, K2, P3, K3, P1, K1
Row 9: K1, P1, K3, P5, K3, P1
Row 10: P1, K3, P3, K1, P3, K3
Row 11: K3, P3, K3, P3, K2
Row 12: K2, P3, K5, P3, K1
Row 13: K1, P3, K3, P1, K3, P3
Row 14: P3, K3, P1, K1, P1, K3, P2
Kes’ Brocade – 18 stitch version, transcribed for knitting in the round only
Row 1: (Right Side) K3, P4, (K1, P1)2x, K3, P3, K1
Row 2: (Wrong Side) K1, P3, K4, P1, K4, P3, K2
Row 3: K2, P3, K7, P3, K3
Row 4: K3, P3, K5, P3, K4
Row 5: K4, P3, K3, P3, K4, P1
Row 6: P1, K4, P3, K1, P3, K4, P1, K1
Row 7: K1, P1, K4, P5, K4, P1, K1, P1
Row 8: P1, K4, P3, K1, P3, K4, P1, K1
Row 9: K4, P3, K3, P3, K4, P1
Row 10: K3, P3, K5, P3, K4
Row 11: K2, P3, K7, P3, K3
Row 12: K1, P3, K4, P1, K4, P3, K2
Row 13: P3, K4, P1, K1, P1, K4, P3, K1
Row 14: P2, K4, (P1, K1) 3 times, K3, P3
The astute will notice that the thing is symmetrical on two axes. The 14 stitch repeat mirrors around central stitch #8, and row #7. The 18 stitch repeat mirrors around stitch #9 and row #7.
And for good measure here’s a close-up showing the final texture. Or as good a photo as I could manage given my limited photography skills, the dark color and speckled nature of the yarn I used. Which yarn is it? I believe it’s Ancient Fortissima from the pre-merger days. The 100g ball (now long since separated from the ball band) is sort of ragg-style tweedy, with haphazard stripes being produced when one or more of the constituent plies shades off to a new tone. In real life it’s more deep burgundy/blood red than it is magenta/blue. The striping effect though isn’t uniform. Sock #1 has a far more demonstrative striping pattern than does on-the-needles sock #2.

I’m about half-way through the brocaded cuff of sock #2 right now (not shown). As soon as I’m done, I’ll pack up both pairs along with the finished pattern and send them to my friends.
A RAINBOW OF PROGRESS
Once again life overtakes blogging. But this time it didn’t intrude so completely that all knitting ceased. As a result I can report on progress and make some promises.
First, progress on my Trekking XL socks. With the exception of binding off, they’re done.

Yes, both of the socks are the same size. There’s a slight distortion because the photo was taken on a futon sofa with a canted seat area, then flipped 90 degrees. The sock on the left was further from the camera, and just looks smaller. As you can see though, just as I predicted, the tweedy type of striping is wildly unpredictable. Both were knit toe-up from the same ball of yarn. The sock on the left was done first. You can see the color match between the cuff cast-off row and the toe of the sock on the right. I did have a small quantity of yarn left over. Probably enough to have been more generous in my K2P2 rib (it’s only 20 rows deep).
Before anyone asks – there is no way to make a pair of identical socks knit from tweeds made up of several plies that cycle independently through a set of colors. If you’re dead set on identical rather than fraternal pairs, stick to printed yarns. Like the one in the next photo:

I still need to spell my camo tee knitting with something else, so I grabbed the next ball of yarn off the top of my sock yarn stash. This one is Lana Grossa Meilenweit Fantasy. The Fantasy color variant has the longest true repeat I’ve found in a fingering weight sock yarn. This one is in nice spring colors. Again, more autopilot knitting on my standard toe up, short row heel sock. I feel like using large needles this time, so I’m working this pair on #00s, about 9 spi and only 72 stitches around.
Lydia asks how I avoid little holes at the points of my short-rowed heels, at the spot where the heel ends and all the formerly dormant stitches have been re-activated, and the first post-heel full round starts. She also wants to know if I put my non-heel stitches on a holder when the heel itself is being worked.
I don’t bother off-loading my non-heel stitches. I just leave them on the two DPNs on which they ride for the entire sock and let them dangle. I never have a problem losing them off the ends (I prefer relatively long DPNs for other reasons, but not losing stitches off the end is another good reason not to switch to shrimpy needles.) On the gusset top hole problem – I pick up a stitch on each side during that first post-heel round. There’s a little trick to it, so I promise to take pix of that point when I get up to it on this pair.
On my camo tee – I’m still going…

I’m finding that the repeat becomes less and less stable the further I get into the piece, even though my stitch count remains the same. Better pix soon, I promise that too.
