WHERE ARE THE SOCKS OF YESTERYEAR?
UPDATE: THE STITCH PATTERN BELOW IS NOW AVAILABLE IN AN EASY TO DOWNLOAD PDF FORMAT AT THE KNITTING PATTERNS LINK, ABOVE.
As you can tell from my absence from these pages, life again overtakes my leisure pursuits. Still, even though I haven’t had much time to write, I have been able to fit little scraps of knitting into my not-so-copious free time.
First, I knit a pair of replacement socks for Friend Alexx. They’re replacements because I had made a pair for him over the holidays that failed to fit. Since my socks come with an unlimited warranty, I was honor bound to replace them. Friend Alexx requested a pair of heavy hiking/slipper socks – preferably purple variegated. It took a bit of searching to find a purple mix in DK weight washable wool that didn’t trail off into prissy pink or boudoir lilac. But I did. Cleckheaton Tapestry 8 Ply, in Color #4. The pair is now done and waiting for me to darn in the ends and send them to the recipient. No pix – they’re pretty standard stockinette in screaming purple, but they’re dense and cushy.
In a coincidence, I stumbled across a briefcase I had been using three years ago. In it I found a pair of socks I had started for Alexx’s wife, Friend Kestrell. At that point, Kes was learning to knit and wanted to make socks. So I decided to make a pattern just for her. This presented a couple of challeges because Kes is blind. I wanted to use a simple knit/purl brocade that made a deeply embossed texture, and that would be relatively easy for a new sock knitter to memorize. Having worked with Friend Rosie (another non-sighted knitter) I also wanted to make a pattern in which one could use feel to determine one’s location.
My best intentions at that time led me to finish out one sock, and make my way through the heel of the second. Then for whatever reason something happened and I stopped working on the project. Around that time my job world changed, and the briefcase holding the socks was “retired.” The socks were forgotten in the ensuing turmoil.
In any case when the pair resurfaced, I had a finished sock but no pattern written down. I know I had drafted out the textured brocade, but I couldn’t find it on my archives. Another friend came to the rescue. My stitchpal Kathryn saves everyhing. I had shared the original chart with her way back when, and she was kind enough to send me a copy.
But there was a complication. The chart I sent Kathryn was for a 14-stitch repeat. My done-sock was worked on 72 stitches – an 18-stitch repeat. Yes, I had the finished sock, but it can be surprisingly difficult to graph up a piece from as-knitted, especially when the knitted object is done at tiny gauges with a variegated yarn. But between the sock and the logic of the pattern I was able to noodle it out and continue. I present both the 14 stitch and 18 stitch repeat. The 14 fits neatly on any sock worked on 56 stitches. If you are partial to working with a set of five rather than four needles, you will find that one full repeat will fit on each needle, and each needle will be worked in the same way. Also, being top-down symmetrical, this pattern wil look pretty much the same for toe up and cuff down socks.
Here’s a set of quick and dirty charts. Yes, I know that Kes and Rosie would have problems reading a *.jpg chart. See below for full prose instructions.

Kes’ Brocade – 14 stitch version, transcribed for knitting in the round only
Row 1: (Right Side) P2, K3, (P1, K1)3 times, K2, P1
Row 2: (Wrong Side) P3, K3, P1, K1, P1, K3, P2
Row 3: K1, P3, K3, P1, K3, P3
Row 4: K2, P3, K5, P3, K1
Row 5: K3, P3, K3, P3, K2
Row 6: P1, K3, P3, K1, P3, K3
Row 7: K1, P1, K3, P5, K3, P1
Row 8: (P1, K1)2 times, K2, P3, K3, P1, K1
Row 9: K1, P1, K3, P5, K3, P1
Row 10: P1, K3, P3, K1, P3, K3
Row 11: K3, P3, K3, P3, K2
Row 12: K2, P3, K5, P3, K1
Row 13: K1, P3, K3, P1, K3, P3
Row 14: P3, K3, P1, K1, P1, K3, P2
Kes’ Brocade – 18 stitch version, transcribed for knitting in the round only
Row 1: (Right Side) K3, P4, (K1, P1)2x, K3, P3, K1
Row 2: (Wrong Side) K1, P3, K4, P1, K4, P3, K2
Row 3: K2, P3, K7, P3, K3
Row 4: K3, P3, K5, P3, K4
Row 5: K4, P3, K3, P3, K4, P1
Row 6: P1, K4, P3, K1, P3, K4, P1, K1
Row 7: K1, P1, K4, P5, K4, P1, K1, P1
Row 8: P1, K4, P3, K1, P3, K4, P1, K1
Row 9: K4, P3, K3, P3, K4, P1
Row 10: K3, P3, K5, P3, K4
Row 11: K2, P3, K7, P3, K3
Row 12: K1, P3, K4, P1, K4, P3, K2
Row 13: P3, K4, P1, K1, P1, K4, P3, K1
Row 14: P2, K4, (P1, K1) 3 times, K3, P3
The astute will notice that the thing is symmetrical on two axes. The 14 stitch repeat mirrors around central stitch #8, and row #7. The 18 stitch repeat mirrors around stitch #9 and row #7.
And for good measure here’s a close-up showing the final texture. Or as good a photo as I could manage given my limited photography skills, the dark color and speckled nature of the yarn I used. Which yarn is it? I believe it’s Ancient Fortissima from the pre-merger days. The 100g ball (now long since separated from the ball band) is sort of ragg-style tweedy, with haphazard stripes being produced when one or more of the constituent plies shades off to a new tone. In real life it’s more deep burgundy/blood red than it is magenta/blue. The striping effect though isn’t uniform. Sock #1 has a far more demonstrative striping pattern than does on-the-needles sock #2.

I’m about half-way through the brocaded cuff of sock #2 right now (not shown). As soon as I’m done, I’ll pack up both pairs along with the finished pattern and send them to my friends.
A RAINBOW OF PROGRESS
Once again life overtakes blogging. But this time it didn’t intrude so completely that all knitting ceased. As a result I can report on progress and make some promises.
First, progress on my Trekking XL socks. With the exception of binding off, they’re done.

Yes, both of the socks are the same size. There’s a slight distortion because the photo was taken on a futon sofa with a canted seat area, then flipped 90 degrees. The sock on the left was further from the camera, and just looks smaller. As you can see though, just as I predicted, the tweedy type of striping is wildly unpredictable. Both were knit toe-up from the same ball of yarn. The sock on the left was done first. You can see the color match between the cuff cast-off row and the toe of the sock on the right. I did have a small quantity of yarn left over. Probably enough to have been more generous in my K2P2 rib (it’s only 20 rows deep).
Before anyone asks – there is no way to make a pair of identical socks knit from tweeds made up of several plies that cycle independently through a set of colors. If you’re dead set on identical rather than fraternal pairs, stick to printed yarns. Like the one in the next photo:
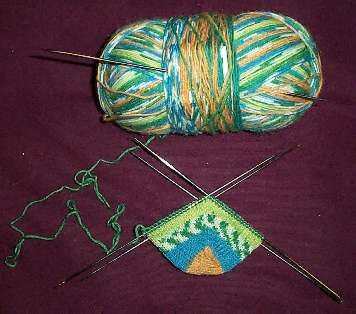
I still need to spell my camo tee knitting with something else, so I grabbed the next ball of yarn off the top of my sock yarn stash. This one is Lana Grossa Meilenweit Fantasy. The Fantasy color variant has the longest true repeat I’ve found in a fingering weight sock yarn. This one is in nice spring colors. Again, more autopilot knitting on my standard toe up, short row heel sock. I feel like using large needles this time, so I’m working this pair on #00s, about 9 spi and only 72 stitches around.
Lydia asks how I avoid little holes at the points of my short-rowed heels, at the spot where the heel ends and all the formerly dormant stitches have been re-activated, and the first post-heel full round starts. She also wants to know if I put my non-heel stitches on a holder when the heel itself is being worked.
I don’t bother off-loading my non-heel stitches. I just leave them on the two DPNs on which they ride for the entire sock and let them dangle. I never have a problem losing them off the ends (I prefer relatively long DPNs for other reasons, but not losing stitches off the end is another good reason not to switch to shrimpy needles.) On the gusset top hole problem – I pick up a stitch on each side during that first post-heel round. There’s a little trick to it, so I promise to take pix of that point when I get up to it on this pair.
On my camo tee – I’m still going…

I’m finding that the repeat becomes less and less stable the further I get into the piece, even though my stitch count remains the same. Better pix soon, I promise that too.
MORE CAMO, TREKKING SOCKS
Working away at the camo tee. The striping has settled down somewhat:

Unfortunately, the need to keep precise tension in unstretchy cotton is tiring on my hands, and when my hands get tired the gauge (and in this case the flash ratio) wanders. I find flash pieces and self-stripers to be easier in forgiving and somewhat self-correcting wool. So to ward off fatigue, I’ve been alternating projects, working a pair of socks at the same time.
Now the socks themselves are nothing special at all, being plain old stockinette with my standard figure-8 cast on toe and short rowed heel, but the colors of the sock yarn I’m using are particularly pleasing, and given the appearance of the skein – quite a surprise:

For the record this is Zitron’s Trekking XXL, color number 100. It’s marked as 75% superwash wool, 25% polyamide nylon, at 420m for 100g (2.5 oz, 459 yards). It’s very similar to the Skacel yarn of the same name, and to an older Socka yarn I remember using yearsandyears ago. The striping effect here is serendipity, caused by a confluence of color change among the yarn’s four constituent, individually shading plies.
I’ve used yarns that look like this before and had mixed results. The Socka pair was a minor disappointment. I bought two identical looking skiens of the same color number, in vivid fall reds, oranges, greens, and browns. One striped like the pair above. The other remained somewhat muddy, with no clear color sectioning because the tweedy bits never quite aligned. I note that since just before the heel this skein has calmed down somewhat. I’m hoping that it gets more demonstrative again on the ankle, and that the second sock (it’s a two-sock size ball) while not an identical match to the first, will display a similarly cheerful stripe effect. From the size of yellow-red blob that’s peeking out just over the "TR" on the label, I supect it will.
CAMO TEE REBORN
Friday’s post on twisted joins in circular knitting seems to have hit a chord. Go back and look at the comments because (beyond commiseration), there’s good advice there.
On another note – I ripped back yet again. I had about eight inches done when I decided that the tube I was forming – even with some augmentations I was planning, would not be wide enough for my purposes. It flashed nicely, being only two repeats of the original skein’s circumference, but to use it to fit me, I’d need to steek and cut both sides and introduce a large vertical strip of some other yarn. Kind of like this:

I thought about how that would look on me, and I decided that I’d probably look like a filleted iguana. So I’m going for a three-repeat tube. It will be roomier, but the flash effect isn’t as crisply defined.

Why is the flash muddier? Because of the short runs of color in this skein and the fact that stacking areas are now three repeats away from each other instead of two (further apart in the skein when dyed means less match up strand to strand). Two or three stitches off cycle is enough to skew the flash into a narrow diagonal because most color segments are five stitches or fewer. Still, there is pooling and massed effect striping instead of one-row tweedy short-repeat randomness going on.
So one step forward, two steps back. Again.
FLASH DANCE – PART IV
Finally! Success!
Yes, yesterday I had twisted the join again. Like I said, there’s no procedure so commonplace that can’t be taken for granted and screwed up royally, no matter how many times you’ve done it before. (I also blush to admit that no matter how many times I’ve sewed something and regardless of how many times I check what I’m doing, I’ve never succeeded in putting in the second sleeve right-side out.)
So I gave in and idiot-proofed my beginning rows. I had the waste yarn cast on chain from my provisional cast-on already done (I’ve re-used it for every attempt so far). Instead of picking up and knitting my camo yarn in the round directly from the chain, I grabbed the same waste yarn and knit four rows of stockinette in the flat. I knew the correct number to achieve flash, so I just went with that – picking up and working my waste section to the desired width. Once I had a narrow band of stockinette done it was much easier to assort the stitches around the needle to avoid the twist-at-join problem. I knit one last full round with my waste yarn, accomplishing the join, then started in with my hand-painted cotton. If you regularly have major problems with twisting joins you might try something similar – knitting a sacrificial section in the flat so you can control around the needle wiggle before making your join. You can always go back and zip off the waste yarn section, then finish the raw edge with ribbing, I-cord, an edging, or a simple bind-off row.
As you can see, my predictions are upheld – the teal stripes anchor interstices in which the other colors play. It’s interesting to note the movement of the striping. I started off more or less stable, then hit a section in which color migration skewed strongly to the right. So much so that I did a couple of evenly spaced decreases about 3 inches from the hem (about 60% of the way up from the cast on edge). That will end up being at the waist, and a very small nip in there will act as a design feature rather than a bug. As you can see, the colors continued to migrate to the right even after the nip in, and only in the last four rows have stablized somewhat.

You can also see why this is a difficult yarn to flash properly. Yarns with longer, more stable color blobs work MUCH better. If for no other reason than it is easier to spot the beginning and eding of each color segment. The short repeats and random drop-outs of my camo yarn made spotting the flash effect very difficult during the first several rows when I was straining to make it all work out. One look at the mottled area between the two teal stripes at roughly the center of the photo shows why.
I’m quite pleased with the way this is going (now that it’s finally going). I’ll finish out the body tube, then figure out what depth sleeves to make based on how much yarn I have left. It just goes to show, if an idiot is knitting, it pays to idiot-proof the work.
FLASH DANCE – PART III
Well, I wish I had had more time to knit last week. Swamped as I was with a special crisis assignment, many things fell (again) by the wayside. Knitting was one of them.
Still in what little time I had I did find out that I had comitted two of knitting’s cardinal sins:
- I didn’t take enough time to gauge properly, relying instead on the hubris of previous experience, and some inconsistent partial counts.
- When I cast on and then joined my piece together to knit in the round, I introduced a half twist.
So what I ended up with was a piece that was both way too big and being twisted – unusuable. So I ripped back. It just goes to show that no matter how many times you do something, and how well you think you know it, every new venture is another opportunity to make the same old misakes.
In the mean time, here’s a photo of the yet-again cast on and two rows knit new start.
Yes I know it’s blurry, but you can begin to see the colors build. As I suspected, the larger teal areas are lining up nicely, with the browns and greens somewhat less regimented between them. A better photo of a bigger slice tomorrow. Unless of course I’ve managed to twist the miserable thing again and will need to begin all over.
Traffic here
Looking over the logs for last week I was amazed to see the traffic here spike up to almost three times the expected number of visitors. There don’t appear to be many new referral entries, nor can I think of any ready explanation aside from a growing fascination with the Kureopatora Snake scarf pattern. A couple of scarf exchanges seem to have picked it up as an item of interest. My own experimentation and that of the other knitters suggest that there are lots of yarns that work well with the basic idea – the main difference among them being to vary the number of stitches across, depending on the chosen yarn’s gauge and repeat length. You can make the thing out of any yarn from fingering/sock self-stripers all the way up to bulky weights (superbulkies might be a bit too thick for comfortable wear as a scarf, but that’s a matter of personal preference – not a limitation of the pattern itself.) Of course, it’s obvious that yarns heavier than DK will require fewer stitches, and lighter ones will need more. For me in this pattern, I get the best results using an even number of stitches, but that’s a mnemonic, not a hard and fast rule. If you can keep the K1, P1 rib working off an odd number stitch base, go ahead and use it.
My snake is fun in any yarn, even a solid color, but it become ssomething special in a long-repeat varieggated. My hard-to-find, discontinued Kureopatora DK weight works for the pattern, as do other long-repeat Noro yarns like Silk Garden, and Kureyon. I’d recommend reducing the number of stitches across in both. I find that for them, the 30 stitches I used for Kureopatora is too many. For example, my Kureyon scarves, were done on 26 stitches across. I’ve also heard that Daikeito Diamusee also would be a good candidate, although there don’t seem to be any local distributors of the stuff and I haven’t seen it myself. Other possibilities include Regia 6 Ply Crazy Colors, Lana Grossa Dasolo Stripes, Katia Mexico, Euro Mexican Wave, some of the long repeat as opposed to tweedy colors of Encore Colorspun in any of its weights (an economical choice); or for those with bigger budgets than I – Classic Elite Embrace. I am sure there are more.
FLASH MOMENT
Yup. You guessed it. Twisted again and back to square one. That’s the bad news. The good news is that I’ve established my flash value. However I’m at the point where since I know my stitch count, I"m ready to knit several rows of waste yarn (twisting be damned), then start in on the good stuff.
My excuse? Too many stitches crammed onto too short a needle, and the fact that I usually take the lazy person’s way out. When I start a large circumference item on circs, I usually purl back the first round and join on the third (sometimes even the third or fifth for finer yarns). Having a larger bit done helps keep thnigs aligned when time comes to do the join, and cleverly done with the cast on-tail, the one or two row notch can be rendered invisible, or incorporated into the project as a design detail.
One final possible start again cue – I think the thing would look better knit on a US #6 (4.0mm) rather than a US #7 (4.5mm). Less leggy, more opaque. If so – it’s back to establishing a new flash value based on that new gauge.
Knitting is easy. It’s projects that are hard. But if it WERE easy, I woudn’t be tempted to keep at it.
FLASH DANCE – PART II
Yesterday I wrote about establishing the flash value. Today I write about what might go wrong while you’re doing so.
First, there’s the gauge problem. When I do it, the gauge of the row that I pick up off the provisional chain isn’t exactly the same as my plain old stockinette gauge. The waste yarn choice or tension of how I knit that first row can cause all sorts of oddities. This is especially true for me when I use larger size needles (anything over a US #3). As I knit the second row I might find my color alignment drifting because there are too many or too few stitches in the pick-up row. Not many, but enough to throw things off. For example, row two might hit a designated color change point several stitches before that same spot appeared on the cast-on row. If that happens I might cheat on the knit row immediately following my cast-on. If I see the color repeat drifting too much to the right, I might knit two stitches together. Conversely, if I "over-run" a color match point, I might rip back a couple of inches, then do a make-one to add a stitch, bringing the target sploches into better alignment.
I do however have to take care if I change the stitch count. If you look at my parrot-color sweater, you’ll see wide swings where the colors lurch from side to side. That’s normal. Two things make the zig-zags happen. First, one’s tension is not always uniform. Most of us have near imperceptible changes in gauge as we sit through a knitting session. We knit more tightly when we sit down, then loosen up a bit as our hands relax. Finally when we get tired, we tighten up again. Tighter knitting migrates the colors to the right. Looser knitting migrates the stripes to the left. I knit my parrot sweater’s body in two sessions. They’re easy to pick out.

Hand painted yarns also have a playful imprecision in color placement. They are never as regimented in their color placement as machine printed yarns (sock self-stripers). That’s the second factor, and what makes the edges of the stripe so step-like. Color segments seep into the hank at different rates at different places, yielding different saturations and slightly different lengths of the color segments from strand to strand. And some blobs may not go all the way through the hank and may seem to disappear after several repeats.

You can see clearly, above. Look at the 8:00 position on my skein. There’s a spot of brown. It encroaches on the teal and bleeds into the khaki, but doesn’t do it uniformly through the hank. It’s most evident on the top of the skein. Underneath it looks like the teal touches the khaki directly, with no intermediary fling into brown at all.
This brings me to the second thing that can go wrong. Not every hand-painted skein is ideal for this type of knitting. The longer the repeat and wider the individual color splotches, the better suited a yarn is for flashing. My new yarn is borderline. I expect some parts will align nicely. The big teal areas show special promise. I am expecting the brown and khaki bits to dance between the teal areas because they are so short and so haphazardly sized. I am not going to get the clear zig-zag stripe of my parrot sweater. Instead I’m expecting something with more of a softer forest floor/camoflauge look.
UPDATE: The third factor that limits flash is generated by how the skein is dyed, in conjunction with the total garment circumference. Strands that are adjacent in the original hank when it was dyed are more likely to be close or near-close matches than are strands that are further apart. If you have a garment that’s small enough to be traversed around by only two repeats, the color stacking you will see will be much more in alignment than will a garment knit from the same yarn that takes five full repeats to complete one round. That’s wny it’s not uncommon to see flash kits for toddler sweaters but less common to see them for adult sizes. If I were into dyeing and wanted to aim for flashing yarn in an adult circumference, I might try winding my yarn into hanks that are significantly wider around than the sizes most commonly used.
Now after several fits and starts of my own project – all the result of the pitfalls outlined abouve (you have to be willing to rip out several times if you’re going to start a flash sweater), I think I’ve got the stitch count thing down. I hope to have actual pix of it in the next post.
FLASH DANCE – PART I
First a cool thing: stud earrings in the shape of the end buttons from old Susan Bates US #1 straights (bottom of the page).
Flash Dance
I’m working with my latest yarn present – the hand-dyed cotton brought home from Arizona by the Resident Male:
My goal is to turn it into a t-shirt that flashes. By that I want to have the color segments line up one on top of each other so that the finished product looks like it was painted:

Based on new yarn’s look and circumference, I’m reasonably certain that I can do this, but two questions remain.
- Will the final dimensions dictated by having to use full multiples of the skein length for each round of knitting be useful sizes. In other words, my final sweater size will be dictated by how many stitches it takes to achieve flash. Will that size fit?
- How does one go about figuring out how many stitches to cast on to achieve this effect anyway?
The two questions are closely related. This skein is similar to a yarn I’ve used before. In that yarn (not the one above), it took about 60 stitches to consume an entire repeat (give or take). At five stitches per inch, that works out to about 12 stitches of linear knitting per repeat. A flashing garmet knit from that yarn could be roughly 24 inches, 36 inches or 48 inches around. 24 inches would be too small for Younger Daughter, but a 36-inch sweater will Older Daughter. 48 inches will fit me.
But will my new yarn hit that target. Not closely enough to be absolutely certain. This skein is a tad smaller in circumference than the old one. (To determine the skein diameter of the old one, I took my balled up leftovers and wound some around my swift, lining up the color slices. When the colors aligned, I knew I had "reconstructed" the original skein’s width.) The old skein was about a full yard in circumference. This one is about 30-31 inches so I’d expect that the color cycle would be smaller. For a rough approximation, I divided 36 inches by 60 stitches. I get about .6 inch of yarn consumed per stitch. That seems a bit high but not outside of reason. 30 inches "eaten" at the same rate would result in 50 stitches. I suspect that my flash value will be somewhere in the 50-stitch neighborhood. Five repeats of 50 stitches and a gauge of 5 stitches per inch would yield a garment circumference around 50 inches. A bit big, but not outside of wearability.
Now all the math theory in the world can’t substitute for actual experimentation. Having done the base noodle work, it’s time to try it out. I know that whatever I end up knitting, I will want to be as yarn-economical as possible. It might be necessary to eke out my limited amount of flash yarn with something else for ribbings or edgings, so I’ll start with a provisional cast-on.
I like the crochet chain provisional cast-on, preferably worked right onto the needles to avoid the fiddly bit of picking up stitches in the chain’s back bumps. I cast on far more stitches than I needed because with the crochet chain cast-on, you can slide any excess off the needles (or not pick up in the bumps) with no adverse effect on the project. So using a plain old bit of cotton string for ease of removal later, I cast on about 270 chain stitches and set it aside.
Another complication. In a screamingly bright color combo like the parrot sweater above, it’s easy to figure out where a color cycle begins. That yellow is killer and can’t be missed. My new yarn however contains colors that are much closer in value. There are three repeating segments per full cycle: teal, khaki, brown. How will I know when I’ve gotten back to the beginning point? Having wound my yarn into a big ball already it is no longer obvious where the cycles end. An artificial flag is necessary.
Just like I did to determine the skein length of my old yarn, I hauled out the swift again, and re-wound several turns of my new stuff, taking care to adjust the swift until I could align my color patches. I put a safety pin into the yarn at the end, and another into the yarn five turns (five full cycles) later, making sure that both pins marked matching spots in the cycle. I now had five repeats marked out. Starting with the point marked by my pin, I began to knit the loops off my provisional chain and continued until I cit the second safety pin. Counting up, I had about 260 or so stitches on my circ before joining. Or so? Why the imprecision? Am I ready to knit off happily watching the flash pattern grow?
Not exactly. Tune in tomorrow to find out why, and what I did next.
ANCIENT LEFTOVERS – WARMED OVER
It’s true I’ve had precious little time for much of anything lately. Including knitting. And the last thing I wanted was something challenging. Since small, soothing, quick to finish, and materials-on-hand were the orders of the day, I did several miniprojects. Most have already ended up as gifts – more booties, a baby hat, and several scarves.
The scarves were all done from my Kureopatora Snake pattern, some in various variegateds, and one in a solid color. I even bowed to the begging of Younger Daughter, and finished out the hideous short-repeat white, pink and grey Red Heart scarf for her to wear. (I may think it’s detestable, but she likes it).
I also went stash diving and came up with the remnant from this vest.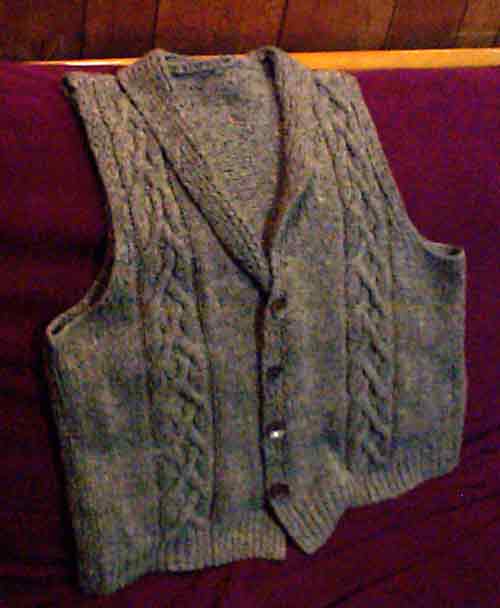
The vest was knit in 1987 or so, and at the time was a Major Investment for which I skimped on lunches, saving up for the purchase. The yarn is an old Silk City yarn I bought at Washington D.C.’s late, lamented Woolgatherer shop in Dupont Circle. It is worsted weight, mostly raw silk, with a touch of wool. The label departed company with the stashed remains years ago so I’m not quite sure which yarn it was. The stuff itself is soft and spongy, and over time becomes even nicer. Down sides include an abundance of very sharp chaff – almost thorns; plus the general non-stretchy nature of silk. The vest was adapted from a commercial pattern, now lost. I do know that I substituted yarns, messed with a new gauge, introduced the cables and removed some pockets.
Now for the hat.
I’ve had a haphazardly wound ball of leftover yarn sitting in my stash, too expensive to fritter away, but not enough with which to do something major. I grabbed it to work on in my small project frenzy.

Still riffing on the Snake scarf idea and no particular pattern, I started with a strip of bias-knit ribbing. I made it large enough to go around my head, earwarmer style and seamed it up. Then I picked up stitches along one side at a ratio of about three stitches picked up for every four rows of the strip. I ended up with 84 stitches, divided among four DPNs. Then I did a couple rows of purl welting and broke back into K1 P1 ribbing. When the hat was about 5 inches deep, measured from the bottom edge of the earwarmer band, I began my decreases. Since the thing was on four needles and I was lazy, I settled on four decrease points, and knit the last two stitches on each needle together, doing so every other row.
When I had onl y four stitches left on each needle, I decided to be silly. I worked about 16 rows of I-Cord using the four stitches on the first needle. Then I folded it in half, and without breaking the yarn, knit I-Cord from the four stitches on the second needle. I continued until I’d made four I-Cord loops, then did one row of plain knit to unite them, and one more decrease row. I drew my end through the remaining 12 stitches to end off the piece. I also did a little stealth fudging with the dangling end and a tapestry needle to snick up some looseness at the base of the I-Cord loops before darning the remainder in to finish the piece.
The result is a slightly goofy hat, with a finial on the top that looks like a Chuck Jones Instant Martian. I think I’ll take that tiny bit still left and add a row of knit-on I-Cord around the bottom edge. That will echo the look of the welts and the deely-bob at the top, plus it will give a nice, strong bit of definition around the bottom. As usual apologies for the lousy photos. The tweedy yarn is hard to capture well enough to see details,
One final note – The abalone shell buttons you see here are the third set that’s been on this vest. Previous sets included embossed black leather, and shiny black plastic. I’ve updated them several times over the years as styles have changed. Changing buttons can be an inexpensive way to freshen the look of classic knits, opportunity shop finds, or hand-me-downs.
 String-Or-Nothing